RSS
 

Posts Tagged ‘Good’

Step by Step How to Clean Camera Gear so it Stays in Good Shape

29 Sep

You may be very aware that photography equipment is not cheap. If you’re not, you’re in for a rude awakening! Camera bodies can cost thousands of dollars and it’s not uncommon for a lens to be even more expensive than a body! Sometimes it’s very tempting to baby your equipment; treat it with extra caution and wrap it up in cotton wool so as no harm will come to it. But with the right care and maintenance, your equipment will last and continue to perform for many years, no matter what, and without the babying!

DANS4206-2

Being a professional photographer myself, my equipment is often subject to some not-so-camera-friendly circumstances. Rain, snow, dust, and even champagne (!) are not uncommon encounters for my equipment. Even though I generally take the right precautions (for example, I use rain covers on for my cameras and lenses if it’s raining) there are times when the conditions are just unavoidable and my equipment gets a little dirty. It’s going to happen. But because I care for my equipment (even though it may look like I don’t!), it keeps on performing and hasn’t let me down. So I thought that I would share some of my tips to help you do care and maintenance on your gear, too.

Supplies needed

The good news about caring for your equipment is that it’s relatively cheap to buy what you need. With so few things in photography being cheap, this comes as a nice relief! Here is a list of what I use to care for my gear.

From a camera store (camera specific tools)

An overview of essential cleaning items.

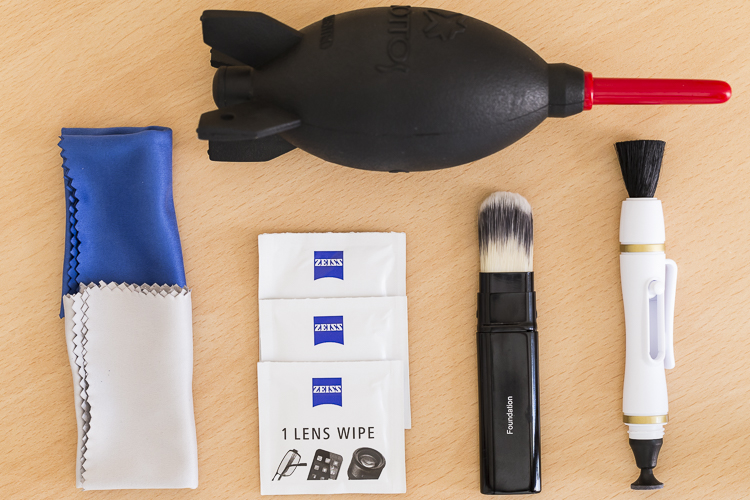
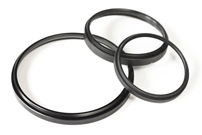
An overview of some essential cleaning items.

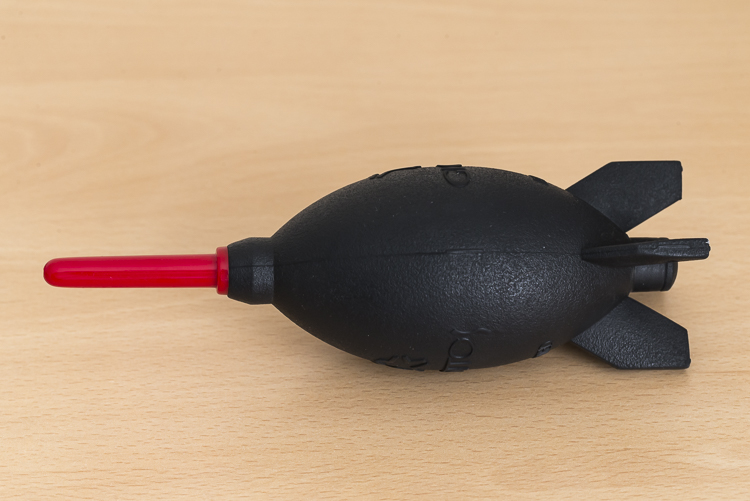
  • Rocket blower: I use this a lot! Squeezing it blasts out a puff of air to blow away any dust.

DANS4199

  • LensPen: I have just added one of these to my kit. At one end there’s a small soft, cleaning tip. At the other, is a retractable brush. I haven’t yet used it extensively but have been impressed with it so far. However, the cleaning tip is quite small so it’s not something I use on my larger lenses, such as a 400mm f/2.8; it would take forever.
  • Pre-moistened lens wipes: I love these things. These are almost like the refresher towelettes you can get at KFC, but for lenses. They’re pre-moistened with a lens cleaning solution that quickly evaporates from the lens. They’re also dirt cheap. I use the Zeiss brand ones (only ones I’m aware of) which for a pack of 200, cost about $ 13.90USD. (Note: also available by Hoodman especially for camera lenses)

DANS8686

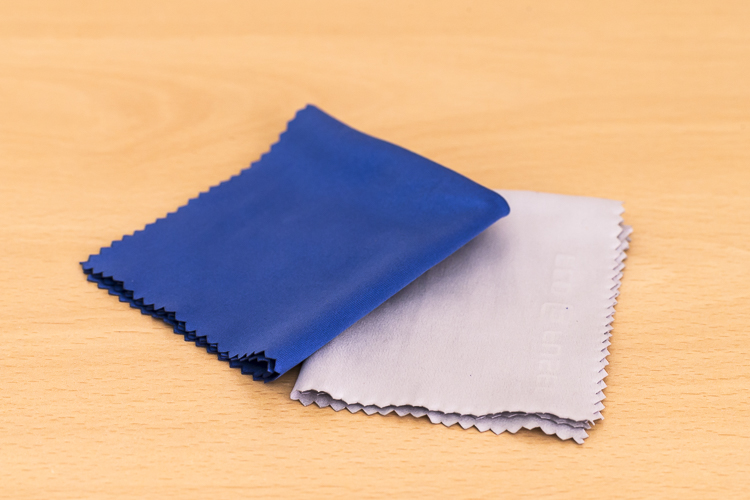
  • Microfibre cleaning cloths: Another cheap must have. I like to have several of these. I reserve one just to buff lenses after using the wipes, and another just for cleaning the lenses without any product at all. I avoid using the same one across many devices, for example, using the same clothing to clean my iPhone screen, then using it to clean my lenses.

DANS8688

From a regular store (non-camera tools):

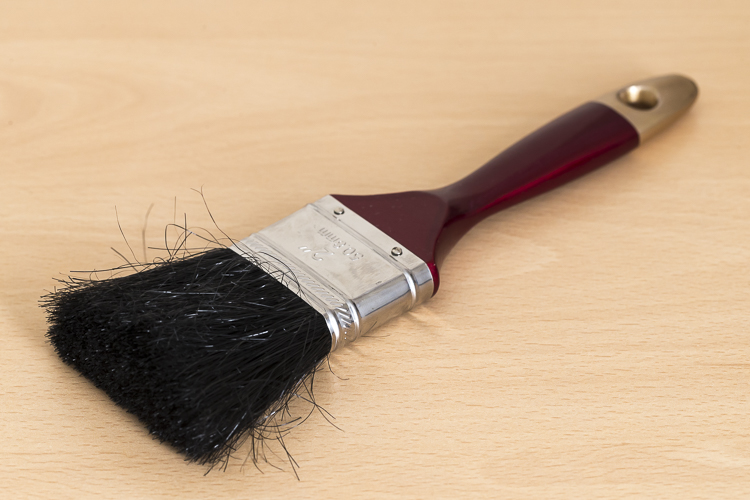
  • A paint brush: These are very handy at removing dust from the surface of camera bodies and lens barrels. Again, buy this brand new. You don’t want this to be super soft either, as it’s just being used on the outside of the cameras and lenses and not on anything that needs to be protected.

DANS4195

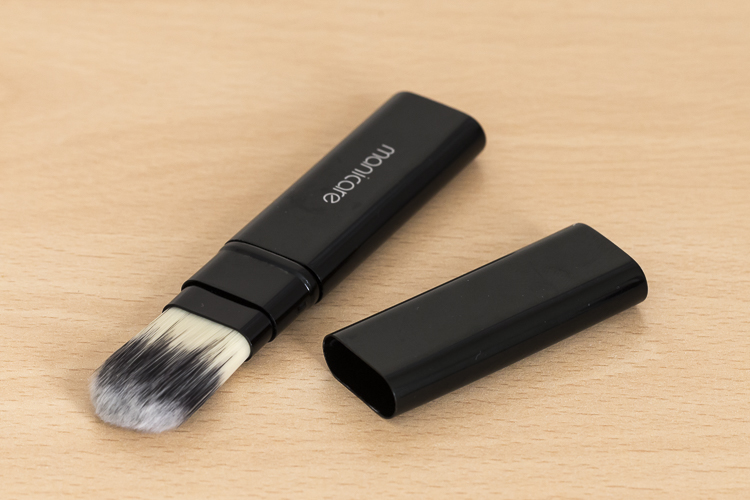
  • Make-up brush: this is something that people often have a laugh at when they see it in my bag. But then think, “Hey that’s a good idea”. If you want to add one to your kit, make sure you buy one brand new. You don’t want your partner’s blush going all over your lens. Generally, the more expensive brushes are better as their bristles are much softer. The one I have is also retractable, which is ideal as it protects the brush.

DANS4193

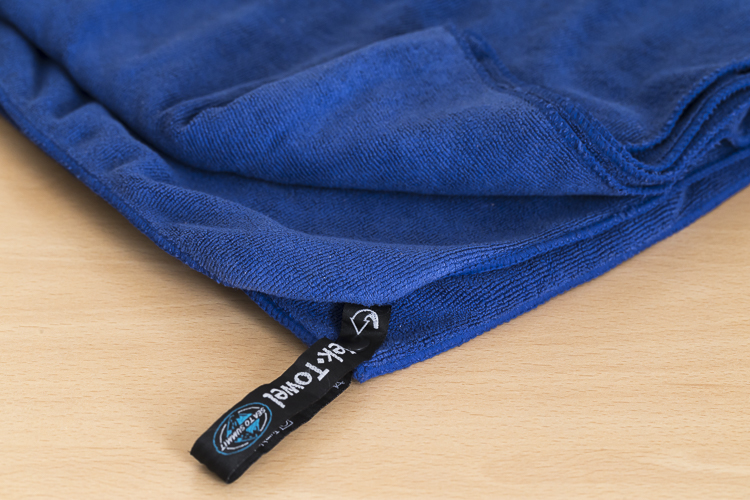
  • Teck Towel: I got a Tek Towel for my birthday years ago and decided to give it a go cleaning my gear. It works brilliantly, but a clean towel will work just as well.

DANS4197

  • Zip-Lock Bag: This is where I store my cleaning gear, to keep it clean and as dust free as possible!

With these items, I am able to keep my lenses and camera bodies looking (almost) like new. Here’s my workflow when it comes to cleaning time.

Lenses

Step 1. Use the Rocket Blower

The first step is to remove any larger bits of dust, etc., from the lens. For this, I use the rocket blower. Squeezing it blows air out of the tip and will blow away larger, loose bits of dust, etc. It’s important not to use a cloth for this step as this can drag dust over the lens and scratch it. This is why the Rocket Blower is very useful.

Step 2. Use the LensPen

DANS4194

Hopefully, the blower was able to remove all the dust. However, there are times when some little specs remain. To remove these, I use the brush on the end of the LensPen. Doing a quick flick of the brush around the lens should do the trick. There shouldn’t be a need to apply much if any pressure at all. This should remove all the dust from the surface of the lens. You may need to do a quick repeat with the blower, though. If you don’t have a LensPen, using a makeup brush works just as well.

If you don’t have a LensPen, using a makeup brush works just as well.

Step 3. Clean the glass

Your lens should now be free of dust and other debris. If there are some marks surface on the lens, this is when to give it a little clean. First off, use the cleaning end of the LensPen. It is very soft and doesn’t damage the glass at all so it is ideal for this. Using a circular motion, work your way around the lens until all the marks have been removed. This may take several passes to achieve. It’s important to not be tempted to push on the lens too hard. Just keep going around in a circular fashion until it’s satisfied. Give the blower another quick go over, too if necessary.If you don’t have a LensPen using a

If you don’t have a LensPen using a clean micro fibre cloth will also do the job. Just use the same circular motion and again, repeating the motion is preferred over applying more pressure.

Step 4. Get rid of stubborn marks

After Step 3, I am normally done cleaning the lens. Step four is completely optional, but sometimes, there is some muck on the lens that just will not budge; no matter how many times it’s gone over. This is when to use the pre-moistened lens tissues.

Using the same circular motion, I work my way around the lens until it’s been completely gone over (I normally go over it two or three times). Then I get a microfibre cloth (generally, a different one that I use just for this purpose) and give the lens a bit of a buff using the same circular motion. I’ll go over it a few times.

I favour these tissues over sprays because I don’t like the idea of having a bottle of liquid inside my camera bag. If it breaks, it can leak into my gear and cause major damage. I also quite like their single-use quality.

For me, using cleaning solutions is an absolute last resort and not something I do each and every time I clean my gear. I also don’t breathe on my lenses (you know, to fog them up to make it easier to wipe off grime) if I can avoid it. If you’re like me and quite a coffee drinker, your breath can be slightly acidic and with repeated use, it can wear down the coatings on your lens. At least that’s what Nikon mentioned a while back in an article I read (ps, I’m a Canon guy).

Step 5. Don’t forget the lens cap

The front element is now clean. But for me, the process is still not yet finished. Before placing the lens cap back on, I have a quick look at it – there could be grit and dust on it that is about to put back on my newly cleaned lens. Giving it a quick once over with the blower and a paint brush will keep it and the lens cleaner.

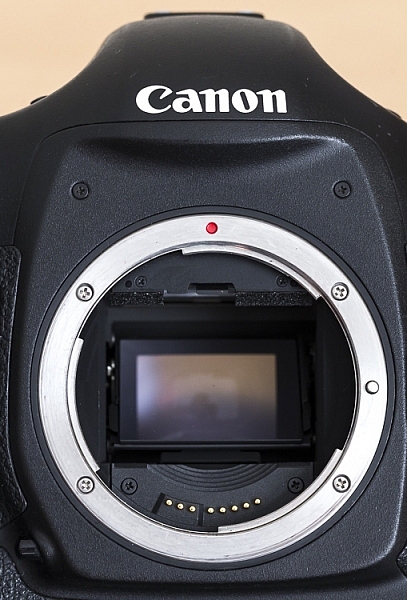
Step 6. Clean the rear element

Now it’s time to have a quick look at the rear element – the bit that goes inside your camera. This shouldn’t be too messy; after all, it stays inside the camera. But dust can fall on it, especially when changing lenses and this dust, while it may not show up in pictures, can definitely make its way on to the sensor. I give it a quick once over with the Rocket Blower making sure the bottom of the lens is facing down. Doing so will stop any dust from falling back on it.  Some rear elements are further recessed into the lens than others. With lenses that have the rear element much closer, I also may give it a quick wipe with a micro fibre cloth or LensPen to clean it up.

DANS4207

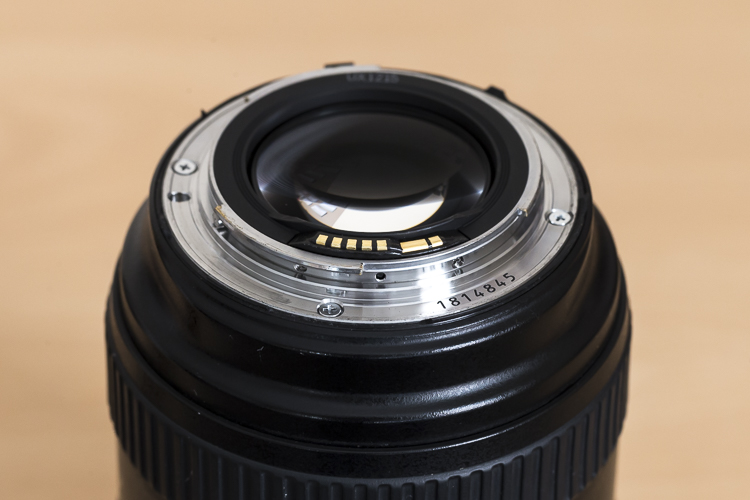
Notice with this lens, the rear element is very close to the surface. Also, those gold bars are the lens contacts.

Occasionally, I’ll also give the mount a clean up too, as well as the lens contacts. For this, I just use a Tek Towel, although any clean towel will do. Carefully wipe around the mount and go over it a couple of times. A small amount of alcohol on a cotton tip can be used to clean the contacts. Cleaning the contacts every now and then can help to prevent errors between the camera and lens caused by a build up of grime.

Now it’s time to give the rear cap a quick go over. Remove any dust with the blower and put it back on the lens.

With this lens the rear elements sits deeper in the lens barrel.

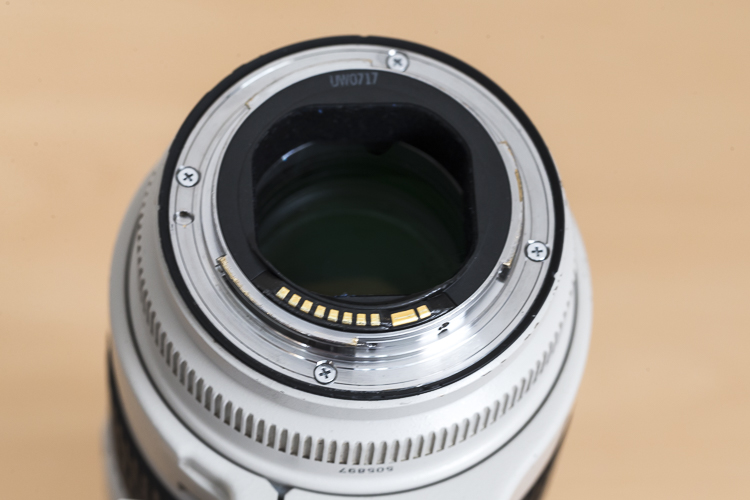
With this lens, the rear element is recessed deeper into the lens barrel.

Step 6. Clean the outside of the lens

Now that the elements (both front and rear) and the lens mount are clean, it’s time to give the outside a quick go over. For this, I whisk away any dust with the paint brush and wipe the whole surface area with the Tek Towel. If I’ve been at the beach (salt in the air), or my lens has had a shower, I’ll dampen the towel in fresh water to remove any salt or champagne, etc.

This step, while very quick and simple, has proven to be quite helpful in picking up some things that may need my attention. For example, a while back I was cleaning my 70-200mm lens and I noticed that the end of the barrel was a little loose. I took it into Canon it was fixed in 10 minutes and cost nothing. Prevention is the best remedy.

Camera

Here is a view of one of my camera bodies without its body cap. Care should be taken when cleaning around the lens mount so as to avoid dust/dirt etc from falling in. It's good practice to do this with the lens mount facing down.

Here is a view of one of my camera bodies without its body cap. Care should be taken when cleaning around the lens mount as to avoid dust, dirt, etc., from falling inside. It’s good practice to do this with the lens mount facing down.

Cleaning the camera is MUCH easier and quicker than the lenses. First off, I start by giving the outside a once over with the paint brush, followed by a thorough wipe down with the towel. I make sure the screens and the viewfinder are all nice and clean, too. As with lenses, I make sure that the mount and the contacts on the body are clean using the same steps and dampen the towel in fresh water if I’ve been at the beach.

While I have the body cap off, I’ll also blow out any dust that may be in the camera with the blower. With this step, I am much more cautious as I don’t want to blow into the body too much. Again, I also have the camera mount facing down to prevent dust from re-entering. This step can help reduce the amount of particles inside the camera which may eventually find their way onto the sensor.

Sensor

For me, this is where the cleaning process stops. I don’t do my own sensor cleaning as I much prefer it be done by the right people. Some people like to do their own sensor cleaning, and that’s completely fine. This is just something I like to give to professionals because if anything goes wrong, I can blame them.

Filters

Cheap-UV-Filters-202px.jpgYou may have noticed that I haven’t mentioned anything about UV filters. The reason for that is simply I don’t use them. I am yet to be convinced that they will actually save a lens from breaking if being dropped and have the view that if a lens is going to break from a fall, it will break; filter or no filter. I always use lens hoods which not only help to reduce lens flare but also provide some protection from objects falling on to the front element. However, if you’re in an extremely dusty environment, for example, then the use of a UV filter could be a smart investment.

Conclusion

So that’s it for my gear cleaning process. This isn’t something I do after each and every shoot, but I do try to get to it at least once a month or after shoots where my gear has been a little abused by the elements. It may seem that there are a lot of steps involved, but it really doesn’t take that long to do it. It’s even quite therapeutic when you get into it.

How do you clean your gear? Do you have any other tools you use? What’s your procedure and how often do you do it? Please share in the comments below.

googletag.cmd.push(function() {
tablet_slots.push( googletag.defineSlot( “/1005424/_dPSv4_tab-all-article-bottom_(300×250)”, [300, 250], “pb-ad-78623” ).addService( googletag.pubads() ) ); } );

googletag.cmd.push(function() {
mobile_slots.push( googletag.defineSlot( “/1005424/_dPSv4_mob-all-article-bottom_(300×250)”, [300, 250], “pb-ad-78158” ).addService( googletag.pubads() ) ); } );

The post Step by Step How to Clean Camera Gear so it Stays in Good Shape by Daniel Smith appeared first on Digital Photography School.


Digital Photography School

 
Comments Off on Step by Step How to Clean Camera Gear so it Stays in Good Shape

Posted in Photography


5 Good Reasons to Take Your Dog on Photography Walks

27 Sep

When I travel into the city (San Francisco) I take along my furry assistant and mini model, Mila, for the trip. She’s been working with me for awhile now. She trades in Pup-Peroni and DentaStix, and her daily rate is affordable, but I think she’d work for free too without complaint. I’d always rather bring my pup along on photography walks than go solo.

Take Your Dog on Photography Walks Header

There are a lot of great reasons to practice photography with your dog! I can already think of five good reasons to take your dog on photography walks.

1. Dogs pose for you

What better way to get test shots of a location than to photograph an assistant? But assistants cost money or at least a glass of wine, so if you’re running a tight ship your dog is a great option. My girl Mila has stood in for me on many location scouting trips. The best part about it is that I now have gazillions of photos of her from all of our adventures.

Take Your Dog on Photography Walks - dogs pose

Would this image have been as interesting without Mila posed in the middle?

2. Dogs break the ice

I find this especially useful for street and travel photography. People are less leery of me walking around taking pictures of their homes, businesses, etc., when I have Mila with me. In fact, they often stop to take pictures of her. Her presence encourages positive interaction and engagement, which is very helpful for me when I am trying to get the pulse of a place. Plus, it relaxes people, which makes for all-around better photography in my book.

Take Your Dog on Photography Walks - dogs break the ice

Mila always turns heads on the street. Who doesn’t love a dog that knows how to work the camera?

3. Dogs are like kids, they teach you patience

They need to be fed when they’re hungry. They need to drink when they’re hot. They fidget and don’t give you much time to get that winning shot. Oh, and they get tired and need to take naps in the middle of the street. If you thought child photography was difficult, try pet photography.

Mila is an exceptionally well-trained and mature dog, but she still reacts to her basic needs much as a toddler would. Practicing photography with her makes me very aware of my timing and helps me develop my patience, speed, accuracy, and client empathy. Dogs are great “personal trainers” for working with younger or more demanding subjects.

dogs are like kids they teach you patience

The hunched shoulders tell me all I need to know: it’s time to take a break. Even so, Mila was patient enough to let me snap this shot of her in front of the famous murals at the Mission District Women’s Center.

4. Dogs protect you

I will not lie, the thought of walking solo through San Francisco with the street value equivalent of a small sedan around my neck is somewhat unnerving. Couple that with a lack of situational awareness when I am focused on taking a shot, and I’ve got all the makings for a pretty nice mugging. I always feel better when Mila is with me because (a) thieves don’t like messing with chicks with dogs, and (b) she’s got really sharp teeth. (I learned the hard way not to hand-feed her bacon.) If you can’t take a human friend on your next photography walk, why not take man’s best friend?

Take Your Dog on Photography Walks - dogs protect you

Check out that sassy tongue! I challenge anyone to mess with me while my furry bodyguard is on the job.

5. Dogs encourage new perspectives

It’s true that all photographers get into ruts. We get used to taking certain kinds of photos because we’ve had past success with them and therefore know they will be well-received. We have to continually challenge ourselves to seek out new perspectives, and a great way to do this is to imagine seeing the world through someone else’s eyes.

Why not a dog’s? When I work with Mila, I always get inspired to look at things differently because I have to get down on her level or compose shots to complement her smaller size. Just be prepared for lots of dirty knees, soiled shirts, and the occasional funny look as you combat crawl through grass and gutters towards your furry subject.

Get low. Amazing how the scenery changes when you're 18 inches off the ground.

Get low. Amazing how the scenery changes when you’re 18 inches off the ground.

Conclusion

I love taking my dog with me on photography walks. Does it add some extra complexity? Absolutely. (I realized a little too late that I shouldn’t drink two glasses of water on the way to the city, it’s not easy to find dog-friendly bathrooms!) But I think about the rewards of having a pet companion with you on a photography walk, one that encourages you to interact with your environment and seek out new perspectives. It is well worth the extra effort.

If you don’t have a dog of your own to accompany you, perhaps you can borrow a friend’s.

Scroll below for more images from our San Francisco photography walk. Do you take your dogs on photo walks with you? Please share your photos and thoughts in the comments below:

Take Your Dog on Photography Walks 8

Black Magic Woman. I never knew Mila was a Santana fan. The things you learn about your dog on a photography walk.

Take Your Dog on Photography Walks 9

Funky fun style is a must in the Mission! Wear something colorful and bohemian and you are bound to blend in. Mila’s fashion sense led the way to this rack of hot threads.

Take Your Dog on Photography Walks 10

Dog Friendly. There are lots of lovely outdoor seating options at cafes, making them great places to grab a bite with your furry friend.

Take Your Dog on Photography Walks 11

I imagine this is what Mila sees when she looks up. The Mission District is renowned for its vibrant murals that celebrate the heritage and culture of the local Mexican community.>

Take Your Dog on Photography Walks 12

Driveways in San Francisco are often small and on an incline, making backup mirrors like this an important garage accessory. They’re also convenient when you want to take a grungey selfie with your Sheltie.


googletag.cmd.push(function() {
tablet_slots.push( googletag.defineSlot( “/1005424/_dPSv4_tab-all-article-bottom_(300×250)”, [300, 250], “pb-ad-78623” ).addService( googletag.pubads() ) ); } );

googletag.cmd.push(function() {
mobile_slots.push( googletag.defineSlot( “/1005424/_dPSv4_mob-all-article-bottom_(300×250)”, [300, 250], “pb-ad-78158” ).addService( googletag.pubads() ) ); } );

The post 5 Good Reasons to Take Your Dog on Photography Walks by Jessica Tallman appeared first on Digital Photography School.


Digital Photography School

 
Comments Off on 5 Good Reasons to Take Your Dog on Photography Walks

Posted in Photography


6 Reasons Why an iPad Makes a Good Photography Companion

08 Sep

I have an iPad Air 2 and I simply love it. It’s my portable digital workhouse. I can pop into most cafés where free wi-fi is the norm. I can enjoy a delicious cup of java, while checking my inbox, or pen a draft for my next article for dPS.

iPad Air 2

iPad Air 2

My main reason for purchasing the iPad was that I went back to college recently. I thought about buying a laptop. After a bit of research, I decided an iPad, paired with a keyboard case, essentially turned it into a mini laptop of sorts. Plus it was less expensive and more portable. I’ve completed the course, but the iPad has now become a great companion for my photography.

I was recently in a cafe waiting to meet a client, when an idea started to take shape about the advantages of having an iPad as a photographer. Following on from a previous article I wrote on “Can an iPad be used as a softbox or custom background?“, I realized that I am using my iPad more and more in my photography work than ever before.

ipad-paired-with-keyboard-open

iPad Air 2 paired with a Logitech keyboard

I could go on at length, extolling the many virtues of having an iPad/tablet as a photographer. Instead, I’ll limit my list for now to just six.

Here are my top six reasons an iPad makes a good photography companion

  1. Portability makes it handy to take anywhere
  2. Displaying your work or portfolio makes you look good
  3. Editing and sharing images is easy
  4. Reading and learning
  5. Spoiled for choice with so many Apps
  6. Google Drive

1. Portability of the iPad

The iPad Air 2 and other tablets are just so light, and even more portable than most laptops. The iPad Air for me is the ultimate Digital Briefcase! The dimensions are 9.4 x 6.6 x 0.24 inches (240 x 169.5 x 6.1 mm). It weighs just 0.96 pounds (436 grams). I feel like James Bond! (sorry Jane Bond)

portability

The iPad fits snugly into my camera bag.

2. To display your work

As a photographer, your work should speak for itself. As a commercial photographer, it’s what gets you your next gig. Now more than ever, there are so many ways to get your work online.

The first option is to have a personal website. But this does mean paying for a domain name and hosting. So what if you don’t want to invest in a website? If you are just starting out in your photography career or you’re a keen hobbyist? Again there are many ways to showcase your portfolio online and in most cases for free. For example there is Behance Display, Flickr, 500px and Morpholio to name just a few.

The retina display on the iPad allows maximum clarity of your photos, and makes it very easy for the viewer to look at the details by easily “zooming in” by pinching the screen. Also, flicking through your images or albums with a swipe of a finger, makes the experience much more tactile and hands-on. Similar to flipping pages of a book.

Recently, I met with a client and I needed to bring a digital portfolio with me. I don’t have my full range of work online. I also couldn’t rely on a solid wifi connection. So I put together a portfolio, saved it out as a PDF, and synced it to iBooks on the iPad. A typical page layout program, such as InDesign would be used to put a portfolio together. However, if you just have Photoshop, then here is a great way to create your own portfolio PDF for your iPad from multiple pages.

Creating a PDF portfolio from multiple pages in Photoshop

Open Photoshop and create all your pages the same size, 2048 X 1536 pixels. Place each image and text on a separate page. You can determine how many pages that you want in your portfolio. A general guide is 15-20 pages.

Go up to File>Automate>PDF Presentation. Check this box, “Add Open Files”, and click Save. Name your file and Save it to a location on your computer.

File-Automate-PDF-Presentation

This is handy tip in creating a pdf file from multiple pages or images in Adobe Photoshop.

Make sure to check the Add Open Files box.

When another dialog box appears, make sure Optimize for Fast Web Preview is checked.

Optimize-for-fast-webpreview

Make sure that the Optimize for Fast Web preview box is ticked.

Click on Compression under General (on the left side, see below screenshot). At the top, change the Adobe PDF Preset to High Quality Print, and next to Image Quality, change the setting from Maximum to Medium. Then click on the Save PDF button.

Compression-image-quality-medium

Choose the High Quality Print from the Adobe PDF Preset at the top. Then change Maximum beside Compression to Medium.

Tip: Try and keep the file size below 5mb so as you can email it to potential employers or clients. If you can’t optimize the file size to less than 5mb, then create another portfolio with less pages. PDF files can be viewed on a Mac or PC.

If you don’t have Photoshop, then read on to number six below, and I’ll show you how to create a PDF portfolio using Google Slides.

3. Editing and sharing images is easy

I haven’t done a lot of editing on the iPad. I prefer to do my post-processing at my desktop, where I have the big monitor and stylus. However, I think the iPad Pro could possibly change my mind.

I did try Snapseed. It’s impressive, so intuitive, and free. Other free editing apps are VSCO, Adobe Photoshop Express, and Instagram. What also makes these apps powerful is the ease with which you can share your images online to your social media accounts, or upload them to the cloud.

4. Reading and learning

I’m coming around to reading ebooks and PDFs on my iPad rather than a book. Although, you can’t beat a physical book in your hand. That said, from a practical point of view when travelling, carrying just one book takes up so much room!

I now have my Nikon D750 user manual downloaded on the iPad. This manual alone, although relatively compact in size, still has 507 pages and weighs 310g (11oz).

Tip: If you are using the Safari browser and open a PDF file, you can save it straight to iBooks.

5. Choice of Apps for the iPad

Given the array of apps already in the app store, it’s just not possible to run the gauntlet on them all. Here are a few that popped up on my radar.

  • LightTrac ($ 8.99): LightTrac calculates and plots the angle of Sun and Moon on top of a map, for any location.
  • The Photographer’s Ephemeris ($ 8.99):  TPE  shows you which direction the sun is shining at any given time during the day, no matter what location you choose.
  • Pocket Light Meter (FREE): A light meter that is always in your pocket. It is indispensable for film photography with a manual camera. Measures reflected light, and allows reciprocity calculations.
  • Simple DoF Calculator ($ 1.99): Simple DoF Calculator allows you to calculate the depth of field and hyperfocal distance for any given settings.
  • Take notes to a new level with Evernote (FREE), the productivity app that keeps your projects, ideas, and inspiration handy across all your digital devices.
  • Photography Releases – 500px has a free one. If you shoot Stock photography, a model/property release is a must have.
  • Snapwire also has a free model/property release. I downloaded this app and found it really useful, especially as it stores the photographer’s information. No need to keep filling in this info for every release. Plus it has the templates for all of the major stock sites.

6. Google Drive

What’s not to like about Google Drive? Google Drive is a complete office suite with Google Docs, Sheets, and Slides. Plus you get 15 GB free storage online. In Google Photos, images not exceeding 2048 x 2048 pixels, and videos shorter than 15 minutes ,also do not count towards this limit. It is hard to find fault with this setup when it’s all free!

It is really a Digital Photo Assistant. You can access email, write and publish blog posts, keep track of your schedule and contacts. Share out documents and collaborate with clients online. I also love that you can work with Google docs offline. This has proven as a great time saver if your internet connection is poor, or you simply don’t have access to an internet connection when you need it.

Google Slides is Microsoft’s version of Powerpoint. Here’s an animated gif to illustrate how easy it is to create your PDF portfolio. It’s well worth giving it a go.

animated-gif-slides-portfolio

An animated gif illustrating how easy it is to use Google Slides to create a PDF portfolio for the iPad.

To sum it all up

It was a challenge to keep this list to just six things. I know this could change over the next few months as I continue to use the iPad.

I didn’t mention uploading your photos from your camera directly onto the iPad. You can, but you need the Lightning to SD Card Camera Reader – $ 29.00 or the Lightning to USB Camera Adaptor – $ 29.00.
I only mentioned a mere smidgen of available apps, and most of those were free. This is only a tip of the app-iceberg-store. Some of the paid apps look interesting too.

It’s mind boggling just keeping up with trends. With the recent launch of the iPad Pro. It won’t be long before the iPad has morphed into a real contender, in place of a laptop, for the photographer out in the field.

Do you have an iPad or tablet? What apps do you use? Please share in the comments below.

googletag.cmd.push(function() {
tablet_slots.push( googletag.defineSlot( “/1005424/_dPSv4_tab-all-article-bottom_(300×250)”, [300, 250], “pb-ad-78623” ).addService( googletag.pubads() ) ); } );

googletag.cmd.push(function() {
mobile_slots.push( googletag.defineSlot( “/1005424/_dPSv4_mob-all-article-bottom_(300×250)”, [300, 250], “pb-ad-78158” ).addService( googletag.pubads() ) ); } );

The post 6 Reasons Why an iPad Makes a Good Photography Companion by Sarah Hipwell appeared first on Digital Photography School.


Digital Photography School

 
Comments Off on 6 Reasons Why an iPad Makes a Good Photography Companion

Posted in Photography


The good, the bad and the ugly of aerial photography – part 2: aircraft

19 Aug
My favorite image from the Holuhraun volcanic eruption, Iceland. Not only did I shoot multiple versions, I also asked the pilot to fly as slowly as possible and to return to this angle repeatedly so I could make sure I have the composition just right. This was easily done with the helicopter.

In the previous article I talked about some of the advantages of aerial photography. Now we’ll talk about some logistics, starting with the aircraft. There are two main options here: a light airplane or a helicopter. Yes, you can shoot from a hot air balloon but that’s not really an option in most places, plus it’s far less maneuverable, so I’ll gently disregard it. Also, while drones are taking the world of aerial photography by storm, the considerations discussed in this series don’t really relate to them, and so I won’t be talking about them at all.

It will probably come as no surprise when I say that a helicopter is the better way to go, by far. It might cost a bit (or a lot) more, but the advantages it offers make for a very different, vastly superior experience. 

Perhaps the greatest advantage is that some helicopters allow the doors to be opened or even completely removed for the flight

A helicopter is a flexible craft: it can fly slower than a plane or even hover in place, which gives you much more time to shoot a desired composition. But that’s not all: perhaps the greatest advantage is that some helicopters allow the doors to be opened or even completely removed for the flight. Once the door is off, you have a huge field of view, and wide-angle shooting is possible. You need to be careful not to have the rotor in the shot, but that can generally be avoided when pointing the camera downward.

The huge field of view also means that you have the option to try the same shot more than once should the first try fail, and you can shoot different angles of the same subject even after you’ve moved ahead. That’s a critical advantage which can make the difference between getting a shot and losing it.

Huge icebergs finally released from Kangia Fjord after floating there for years. Can you spot the (fairly large) boat?

Disko Bay, Greenland.

The most common helicopter for aerial photography is the Robinson R44. It’s a small helicopter fit for a pilot plus three passengers, and you can take both doors off in a minute, which is crucially important for getting crisp images without reflections or aberrations (if the pilot refuses to take the door off don’t even bother). Its small size also makes it relatively cheap to fly and maintain (emphasis on relatively).

What’s considered cheap? Well, one of my R44 flights cost me $ 850 (around €760) an hour, the other €1500 (around $ 1670) an hour. It really depends on where you fly, and costs worldwide can vary even more than that in both directions, but primarily upward. In places where a small, cheap helicopter isn’t available, costs can rise quite ludicrously. For example, I’ve recently gotten a quote of $ 4200 an hour for a larger heli in a place whose name I won’t mention. That’s $ 70 a minute. Yes, my reaction was similar to yours.

In the image below you can see a wide-angle shot of the dunes of Sossusvlei, Namibia, taken from an R44 helicopter with the doors taken off. It’s quite striking to see these intricate dunes from this angle, and the helicopter allowed me to take a very wide shot and include the entire dune, which is a huge advantage.

Shooting from a light plane is different. You usually shoot from an open window, and that’s in the best case scenario: about a year ago I did a photography flight in Greenland in which I had the dubious pleasure of shooting through a 15cm hatch in the front window. This means that shooting-angle selection was extremely limited (forget about ultra-wide lenses), and that once you pass a good shooting angle, the shot is gone unless you circle back. This disadvantage is emphasized by the faster movement speed, which frankly gives you a feeling of anxiety to be ready and shoot before it’s all gone.

To sum it up, though cheaper than a helicopter, a light plane with a small hatch (as opposed to a large window) is very limited in shooting angles, supplies less opportunities to get the right shot, and as a result yields much less keepers when the flight is done. I’d seriously reconsider before ever doing it again.

A Cessna with a large window you can open is a very different story. Shooting is much more comfortable and angle choice much less limiting. If you lean back (careful not to push against the poor pilot! I know I did that a few times…), no wind interferes with your lens and stability is quite good. I shot from such a Cessna in the Lofoten Islands and the experience was wonderful. 

Kjerkfjord, surrounded by mountains struck by beautiful pink light. Shot from a Cessna during sunset on my Lofoten Islands workshop this January.

In the next article I’ll discuss technicalities and parameter selection for aerial photography.


Erez Marom is a professional nature photographer, photography guide and traveler based in Israel. You can follow Erez’s work on Instagram, Facebook and 500px, and subscribe to his mailing list for updates.

If you’d like to experience and shoot some of the most fascinating landscapes on earth with Erez as your guide, you’re welcome to take a look at his unique photography workshops around the world:

Land of Ice – Southern Iceland
Winter Paradise – Northern Iceland
Northern Spirits – The Lofoten Islands
Giants of the Andes and Fitz Roy Hiking Annex – Patagonia
Tales of Arctic Nights – Greenland

More in This Series:

The good, the bad and the ugly of aerial photography – Part 1: Why shoot aerials?

Selected articles by Erez Marom:

  • Behind the Shot: Dark Matter
  • Mountain Magic: Shooting in the Lofoten Islands
  • Behind the Shot: Nautilus
  • Behind the Shot: Lost in Space
  • Behind the Shot: Spot the Shark
  • Quick Look: The Art of the Unforeground
  • Whatever it Doesn’t Take
  • Winds of Change: Shooting changing landscapes
  • On the Importance of Naming Images
  • Parallelism in Landscape Photography

Articles: Digital Photography Review (dpreview.com)

 
Comments Off on The good, the bad and the ugly of aerial photography – part 2: aircraft

Posted in Uncategorized


The good, the bad and the ugly of aerial photography – part 2: aircrafts

13 Aug
My favorite image from the Holuhraun volcanic eruption, Iceland. Not only did I shoot multiple versions, I also asked the pilot to fly as slowly as possible and to return to this angle repeatedly so I could make sure I have the composition just right. This was easily done with the helicopter.

In the previous article I talked about some of the advantages of aerial photography. Now we’ll talk about some logistics, starting with the aircraft. There are two main options here: a light airplane or a helicopter. Yes, you can shoot from a hot air balloon but that’s not really an option in most places, plus it’s far less maneuverable, so I’ll gently disregard it. Also, while drones are taking the world of aerial photography by storm, the considerations discussed in this series don’t really relate to them, and so I won’t be talking about them at all.

It will probably come as no surprise when I say that a helicopter is the better way to go, by far. It might cost a bit (or a lot) more, but the advantages it offers make for a very different, vastly superior experience. 

Perhaps the greatest advantage is that some helicopters allow the doors to be opened or even completely removed for the flight

A helicopter is a flexible craft: it can fly slower than a plane or even hover in place, which gives you much more time to shoot a desired composition. But that’s not all: perhaps the greatest advantage is that some helicopters allow the doors to be opened or even completely removed for the flight. Once the door is off, you have a huge field of view, and wide-angle shooting is possible. You need to be careful not to have the rotor in the shot, but that can generally be avoided when pointing the camera downward.

The huge field of view also means that you have the option to try the same shot more than once should the first try fail, and you can shoot different angles of the same subject even after you’ve moved ahead. That’s a critical advantage which can make the difference between getting a shot and losing it.

Huge icebergs finally released from Kangia Fjord after floating there for years. Can you spot the (fairly large) boat?

Disko Bay, Greenland.

The most common helicopter for aerial photography is the Robinson R44. It’s a small helicopter fit for a pilot plus three passengers, and you can take both doors off in a minute, which is crucially important for getting crisp images without reflections or aberrations (if the pilot refuses to take the door off don’t even bother). Its small size also makes it relatively cheap to fly and maintain (emphasis on relatively).

What’s considered cheap? Well, one of my R44 flights cost me $ 850 (around €760) an hour, the other €1500 (around $ 1670) an hour. It really depends on where you fly, and costs worldwide can vary even more than that in both directions, but primarily upward. In places where a small, cheap helicopter isn’t available, costs can rise quite ludicrously. For example, I’ve recently gotten a quote of $ 4200 an hour for a larger heli in a place whose name I won’t mention. That’s $ 70 a minute. Yes, my reaction was similar to yours.

In the image below you can see a wide-angle shot of the dunes of Sossusvlei, Namibia, taken from an R44 helicopter with the doors taken off. It’s quite striking to see these intricate dunes from this angle, and the helicopter allowed me to take a very wide shot and include the entire dune, which is a huge advantage.

Shooting from a light plane is different. You usually shoot from an open window, and that’s in the best case scenario: about a year ago I did a photography flight in Greenland in which I had the dubious pleasure of shooting through a 15cm hatch in the front window. This means that shooting-angle selection was extremely limited (forget about ultra-wide lenses), and that once you pass a good shooting angle, the shot is gone unless you circle back. This disadvantage is emphasized by the faster movement speed, which frankly gives you a feeling of anxiety to be ready and shoot before it’s all gone.

To sum it up, though cheaper than a helicopter, a light plane with a small hatch (as opposed to a large window) is very limited in shooting angles, supplies less opportunities to get the right shot, and as a result yields much less keepers when the flight is done. I’d seriously reconsider before ever doing it again.

A Cessna with a large window you can open is a very different story. Shooting is much more comfortable and angle choice much less limiting. If you lean back (careful not to push against the poor pilot! I know I did that a few times…), no wind interferes with your lens and stability is quite good. I shot from such a Cessna in the Lofoten Islands and the experience was wonderful. 

Kjerkfjord, surrounded by mountains struck by beautiful pink light. Shot from a Cessna during sunset on my Lofoten Islands workshop this January.

In the next article I’ll discuss technicalities and parameter selection for aerial photography.


Erez Marom is a professional nature photographer, photography guide and traveler based in Israel. You can follow Erez’s work on Instagram, Facebook and 500px, and subscribe to his mailing list for updates.

If you’d like to experience and shoot some of the most fascinating landscapes on earth with Erez as your guide, you’re welcome to take a look at his unique photography workshops around the world:

Land of Ice – Southern Iceland
Winter Paradise – Northern Iceland
Northern Spirits – The Lofoten Islands
Giants of the Andes and Fitz Roy Hiking Annex – Patagonia
Tales of Arctic Nights – Greenland

More in This Series:

The good, the bad and the ugly of aerial photography – Part 1: Why shoot aerials?

Selected articles by Erez Marom:

  • Behind the Shot: Dark Matter
  • Mountain Magic: Shooting in the Lofoten Islands
  • Behind the Shot: Nautilus
  • Behind the Shot: Lost in Space
  • Behind the Shot: Spot the Shark
  • Quick Look: The Art of the Unforeground
  • Whatever it Doesn’t Take
  • Winds of Change: Shooting changing landscapes
  • On the Importance of Naming Images
  • Parallelism in Landscape Photography

Articles: Digital Photography Review (dpreview.com)

 
Comments Off on The good, the bad and the ugly of aerial photography – part 2: aircrafts

Posted in Uncategorized


Why Engagement Photos are a Good Investment for You and Your Clients

22 Jun

Over the past several years, engagement photos (also known as e-sessions or pre-wedding photoshoots) have become quite the norm among couples who are engaged to be married. It is probably one the first things newly engaged couples discuss and plan out. There is a lot of debate about the need for engagement photos from a couple’s point of view – are engagement photos really required, and what purpose do they serve especially if the duration between the engagement and the wedding is very short?

As a wedding photographer, I believe having engagement photos prior to the wedding is almost as important as the wedding day photos. Here are some of the reasons why I recommend engagement photos to all my wedding clients.

Memorable Jaunts DPS Article on tips for engagement photos-5-2

To help them get comfortable in front of the camera

Most people are quite uncomfortable at the thought of having their picture taken by a professional photographer, especially if they have never had photos taken before, like ever! They feel uncomfortable and awkward and don’t quite know how to relax, how to pose, or how to display emotions. Limbs tend to get stiff, bodies becomes rigid, and forced smiles cause the jaw to lock up.

This awkward and uncomfortable feeling is usually reflected in the photos. An engagement shoot can help eliminate this discomfort. It is an opportunity for clients to practice being in front of the camera, and get used to the idea of being intimate with their significant other in the presence of another person.

03Memorable Jaunts DPS Article on tips for engagement photos-1

These clients came to me for wedding photos, and were very clear that they were not at all comfortable being in front of the camera. I suggested an engagement photo session as a way to get to know me and my style, as well as for me to get to know them. All through the shoot, my only direction was to be comfortable with each other, and spend time together. By the end of the session, they had a good sense of my style and my direction, as well as got pictures together in a more casual setting than the wedding.

To help them get to know you, the photographer

In addition to helping clients get comfortable in front of the camera, the engagement shoot is also a great time to get familiar with you, the photographer. Every photographer has a different style of directing and photographing people, and this is a great opportunity for them to get comfortable with your process. Most engagement shoots last an hour or two, sometimes longer depending on the couple and you, and this gives both parties plenty of time to interact, socialize, and chat with each other. This also works on the flip side, where you also get to know the couple. As photographers, we are often looking to understand and learn the relationship dynamics of our clients – how they interact as a couple and what is their comfort level in front of the camera. This way it will help you know how to get the best moments and interactions on the wedding day.

Documenting the relationship

Wedding photos capture one of the most important moments of a couple’s life together. But often, the stress and tension of planning the perfect wedding, and the perfect day, gets in the way of capturing authentic imagery of their relationship. The engagement shoot is a great opportunity to highlight the true personality of a couple in a more relaxed and natural environment. A good tip for both you and your clients is to choose a location that is comfortable, and is a meaningful reflection of the client’s personality. This add a personal touch to the photos, and showcases them in a relaxed environment, that is a true reflection of their personality as a couple.

02Memorable Jaunts DPS Article on tips for engagement photos-1

These clients choose a location that meant something special to them. They had also recently adopted a pet and wanted to include her in their photos, as they consider her as part of the family. I let my clients completely dictate the setup for this photoshoot, and simply documented their life as true to who they are as a couple.

Uses for the engagement photos

Most clients who choose engagement or pre-wedding photos tend to use the photos as save the date cards, guest sign-in books, wedding website setup, or even placing them around the wedding reception area as part of the reception decor. This gives their wedding guests a chance to get to know the couple more intimately.

01Memorable Jaunts DPS Article on tips for engagement photos-1

This couple already had a wedding photographer, but wanted engagement pictures as part of their wedding decor. Since they both love the outdoors and it was a fall evening, we decide to do a themed engagement photoshoot that showcased their personality.

Quality time together as a couple

This is probably one of the most important reason to have an engagement session. The wedding planning process can be very stressful and taxing, with a million different things to plan and coordinate. The engagement session is a time for couples to take a step back from the wedding planning process to be together, be playful, and just be themselves. A welcome break for most folks! As wedding and engagement photographers, it is our responsibility to ensure that our clients have a stress-free, relaxed time during their engagement session.

Are you a wedding photographer that recommends engagement photos for your clients? What are some of the reasons you like them? Feel free to share your experiences and images in the comments below.

googletag.cmd.push(function() {
tablet_slots.push( googletag.defineSlot( “/1005424/_dPSv4_tab-all-article-bottom_(300×250)”, [300, 250], “pb-ad-78623” ).addService( googletag.pubads() ) ); } );

googletag.cmd.push(function() {
mobile_slots.push( googletag.defineSlot( “/1005424/_dPSv4_mob-all-article-bottom_(300×250)”, [300, 250], “pb-ad-78158” ).addService( googletag.pubads() ) ); } );

The post Why Engagement Photos are a Good Investment for You and Your Clients by Karthika Gupta appeared first on Digital Photography School.


Digital Photography School

 
Comments Off on Why Engagement Photos are a Good Investment for You and Your Clients

Posted in Photography


The good, the bad and the ugly of aerial photography – Part 1: Why shoot aerials?

18 Jun

Man has always had the dream of flight – but so has the photographer. It’s a unique experience to shoot from the air, and it has some incredible benefits in many senses. But as one might discover, it often carries a number of problems and a hefty price tag. I personally started my romance with serious aerial photography about three years ago, and I’ve been hooked ever since. My experiences have mostly been amazing but admittedly not always so, and I’ve come to wonder what makes photography flights in different settings so… well, different.

In this series of articles I’ll try to survey my own experience with aerial shooting, including the different aircrafts to shoot from, what equipment to use, what technicalities to put an emphasis on and of course, the prices. I’ll talk about some of my aerial shoots, and explain what distinguished them and what I learned. Aerial photography can be wonderful and exhilarating, but it can also be disappointing if you don’t know what you’re getting yourself into. I hope the following articles help with this.

An aerial panorama of one of the most epic light shows I’ve ever seen. Wonderfully clear sun rays were peeking from between the thick cloud layer and the jagged mount Molhøgtinden and its surrounding peaks in the Lofoten Islands during my workshop there. I was stunned with excitement and couldn’t believe my eyes. After a few seconds I shook my head, picked my jaw up and went back to shooting. This image is the result.

So what makes aerial photography so darn good? A great many things. First of all, it allows for a new – and extremely different – angle of shooting. There’s a huge difference in the angle of view when shooting from the ground, or even from a mountaintop, and when shooting from hundreds of meters above the landscape. The same scenery gains another dimension, and the viewer gets a much better understanding of the surroundings. Perspective deformations are also less pronounced since there’s less of a difference in distance to the subject’s different parts.

An aerial shot of Deadvlei, Namibia. It’s incredible to realize that most of the clay pan is actually devoid of trees – which is hard to perceive when you’re down there.

It can be claimed that only from the air, one can see the landscape for what it really is. Unseen parts of the setting can be exposed, for example ones that are obscured by mountains, and with good visibility, one can see and shoot much farther than from the ground. In the image below, shot from a helicopter in Holuhraun, Iceland, several of these advantages are demonstrated: first of all, when shooting from the ground, it was impossible to get a shot of the lava which includes the caldera itself. Secondly, this angle allows for inclusion of the lava river in the background, which contributes a great deal to the composition.

In addition, some landscapes are hard to get to – not to mention shoot – from the ground, especially close enough to make them interesting. A good example of this is an erupting volcano. If the lava flow is strong, it can be impossible to go near the eruption point itself, but from the air, it can often be seen quite clearly.

But it’s really not limited to volcanoes. Instead of traversing miles and miles on foot, camping, climbing and struggling, one might take a short flight, shoot a location and fly back in time for dinner. Sounds enticing, and it truly is. Moreover, it’s quite addictive, so much so that when visiting a new location, I often feel like I have to shoot it from the air, even if there isn’t much sense in it. One mustn’t forget that aerial photography is an experience to cherish, not to be taken for granted. Do it when you must, when it offers real benefits, and not just as a means to shoot without making an effort.

The terminal of Ilulissat glacier, Greenland.

In the next article in the series I’ll talk about the two most popular aircrafts for aerial photography.


Erez Marom is a professional nature photographer, photography guide and traveler based in Israel. You can follow Erez’s work on Instagram, Facebook and 500px, and subscribe to his mailing list for updates.

If you’d like to experience and shoot some of the most fascinating landscapes on earth with Erez as your guide, you’re welcome to take a look at his unique photography workshops around the world:

White Wonderland – Lapland
Land of Ice – Southern Iceland
Winter Paradise – Northern Iceland
Northern Spirits – The Lofoten Islands
Giants of the Andes and Fitz Roy Hiking Annex – Patagonia
Tales of Arctic Nights – Greenland
Earth, Wind and Fire – Ethiopia

Selected articles by Erez Marom:

  • Behind the Shot: Dark Matter
  • Mountain Magic: Shooting in the Lofoten Islands
  • Behind the Shot: Nautilus
  • Behind the Shot: Lost in Space
  • Behind the Shot: Spot the Shark
  • Quick Look: The Art of the Unforeground
  • Behind the Shot: Watery Grave
  • Whatever it Doesn’t Take
  • Winds of Change: Shooting changing landscapes
  • On the Importance of Naming Images
  • Hell on Earth: Shooting in the Danakil Depression
  • Parallelism in Landscape Photography

Articles: Digital Photography Review (dpreview.com)

 
Comments Off on The good, the bad and the ugly of aerial photography – Part 1: Why shoot aerials?

Posted in Uncategorized


How to Clean Your Photography Gear and Keep it in Good Shape

23 May

A long time ago when I started my first steps into the photography world, a good friend of mine that worked many years as a photojournalist, told me:

“Treat your camera like a soldier treats his gun, keep it clean and ready to fire!”

I never forgot that advice from him, and I kept a Pentax K1000, my very first camera, in pristine condition to this day. Nowadays things are a bit different, and electronic digital equipment is not really built to last like in the good old days of mechanical equipment.

Modern cameras and lenses are built with a lot of sensitive electronic components, and are much more difficult to maintain. Most of the equipment I use is exposed to the elements, and to a lot of abuse during my shooting sessions, and to me it is fundamental to sometimes take a little bit of time off and make sure everything is clean, working properly, and ready to fire.

01

In this article I will guide you through the steps I usually take cleaning my photo equipment.

Like everything in life, everyone has their own method of doing things. The way I do this process might not be perfect, but it is the best method I have used so far, with all the tips and tricks I have been collecting along the years.

To start, I always try to be in a dust free environment, and have an anti-static microfiber cloth under the equipment I am cleaning. This is really important because your equipment is going to grab all the dust that is in the air like a magnet every time you try to clean it.

The way I do it is always to go from the outside to the inside, meaning I always clean the outer part of the lenses before I clean the glass, and I always clean the outside of the camera body before I clean the sensor. This way I gradually eliminate the dust that is stuck to the equipment.

Starting with the lenses, I used to just clean the outside of the lens with a microfiber cloth, and use a blower to keep the dust away. But a few years ago I was introduced to a new product from Japan that was the answer to all the germophobes that were really concerned with all the germs computer keyboards collect.

02

This cleaning compound is like a sticky jelly, with anti-bacterial properties that can be used on everything you want to keep clean and germ free.

I use it on the outside of my lenses and camera body, always with the caps on, because it is not supposed to be used on glass.

03

This product was expensive, and really hard to find when I first bought it, but nowadays it seems to be much cheaper and available in most stores online.

I find it really useful to clean the camera body in the buttons areas, where it collects a lot of dust that is difficult to clean.

04

Next it’s time to concentrate on the glass

Dust specs are really difficult to keep away from your lenses, and you should never try to wipe the glass off with a cloth like most people do. Wiping off dust might result in scratching your lens. The correct process should always be to blow it off first. You can use a blower or a compressed air can, and this way you remove the dust but don’t touch the glass.

05

Now the dust is gone it is time to clean eventual smudges or fingerprints you might have on the glass. My favorite tool for this process is the Lens Pen. It has a tip with a soft compound that is made to safely wipe the glass, without damaging it.

After cleaning with the soft tip, you may use the anti-static brush on the other side of the pen to get rid of any dust that is still around.

I usually don’t use any lens cleaning fluid unless it’s really needed. Those kinds of chemicals are never good for your lens coating, but if your lens has grease smudges, then cleaning fluid and a soft cloth might be the only solution.

06

Repeat that process on the glass on the other side of your lens, and while you’re at it it’s also a good idea to check the electrical contacts of your lens (metal parts on the back). Dirty or oxidized contacts are most often responsible for camera malfunctions or errors, so I always clean them off with a soft cloth.

In extreme situations I have heard of people cleaning these contacts with a rubber or really fine sand paper, but I’ve never had to do anything like that.

07

Dirty lens caps are also something to keep in mind to clean, as they always end up in your pocket or at the bottom of your camera bag while you’re photographing, so they collect a lot of dust. It doesn’t make sense to have your lens all cleaned up, then cover it with a dirty cap, the same applies to the body caps.

Replacing your caps with new ones from time to time might be a good idea, as they are not that expensive and give your equipment a newer look.

08

Now it is time to clean the camera body

After cleaning the outside with the anti-bacterial jelly compound, I usually clean the viewfinder. That is a difficult operation as it is a small, deep, and difficult to reach area. My trick for it is Q-Tips, but not the regular ones. I use some special ones made for babies that have a smaller pointy tip, and are made from a softer cotton, which allows a deeper and more efficient cleaning.

09

Next I clean the LCD screen glass with a little drop of glass cleaner and a paper tissue. This removes all the grease that the LCD screen gets from being stuck to my face all the time.

10

Cleaning the inside of the camera

As tempting as it might be I never try to clean the mirror of the camera. It usually seems to do more harm than good, and it usually sends more dust to the inside of the camera chamber, making it land on the sensor sooner or later.

We finish with the most complicated part of the whole process that is the sensor cleaning.

Camera makers always advise that this process should only be done in the brand’s technical assistance, by a trained technician, so if you are not comfortable with doing this yourself, please don’t try it.

I remember I was a bit scared the first time I tried to clean the sensor myself. But, the fact is that I have done it lots of times, with different cameras over the years, and it always worked out fine. You just have to be careful and do things slowly and steadily.

This is a totally optional step, but I usually use a sensor loupe to check the sensor before I clean it. It is a really nice device that illuminates and magnifies the inside of your camera, making it possible to see with good precision any dust that is on your sensor.

11

Now for the cleaning part itself, there are many different systems and brands out there for sensor cleaning. I have tried a few and my favorite is the Vswab by Visible Dust which consists of one time use soft-edge swabs, and a sensor cleaning fluid that you use to clean the sensor from any smudges or dust specs. There are specific swabs for different size sensors, so be sure to buy the correct one for your camera.

12

Just get the swab a little wet with the cleaning fluid (a drop or two is all you need) then activate the mirror lockup on your camera (or use the sensor clean setting – check your camera’s user manual if you aren’t sure how to lock it up for cleaning). Wipe your sensor from left to right, just one time, touching it but trying not to apply too much pressure.
Most of the times it works at first, but I always check it again with the sensor loupe after cleaning, and if needed I swab a second time.

Note: Keep it mind that these swabs can only be used one time, so if you go for a second clean use a new swab.

This allows the sensor to be clean all the time, avoiding spots on your images, caused by dust specs the get inside your camera every time you change your lenses.

13

These simple maintenance steps gives me confidence that my equipment is in top shape, and that I can be sure that it is going to work fine next time I pick it up.

Remember, keep it clean and ready to fire!

googletag.cmd.push(function() {
tablet_slots.push( googletag.defineSlot( “/1005424/_dPSv4_tab-all-article-bottom_(300×250)”, [300, 250], “pb-ad-78623” ).addService( googletag.pubads() ) ); } );

googletag.cmd.push(function() {
mobile_slots.push( googletag.defineSlot( “/1005424/_dPSv4_mob-all-article-bottom_(300×250)”, [300, 250], “pb-ad-78158” ).addService( googletag.pubads() ) ); } );

The post How to Clean Your Photography Gear and Keep it in Good Shape by Ivo Guimaraes appeared first on Digital Photography School.


Digital Photography School

 
Comments Off on How to Clean Your Photography Gear and Keep it in Good Shape

Posted in Photography


The Good, The Bad, and the Ugly of Watermarks and When and How to Use Them Effectively

20 May

When going out and photographing you put your heart and soul in to capturing that special moment, and later, you may pay great care and attention to finishing the image off in post-processing. You are so proud of the results you simply cannot wait to share it online, or add to your portfolio on your website!

One of the most popular practices amongst many photographers is the humble watermark; an opaque logo or text layered on top of an image. But is watermarking really necessary to protect your images – and is it really beneficial, or does it just get in the way?

Image 3

For the benefit, if are unfamiliar with what a watermark is, it is placing a logo or text  (or a combination of the two) with a reduced opacity over the main image. So why watermark in the first place?

Don’t know how to make a watermark? Check out: How to Watermarking Images With Photoshop and Lightroom.

What do watermarks do?

Watermarks prevent, or reduce the chance, of your images being stolen or used without your permission.

You’ve worked very hard – from capturing the image to editing it, and the last thing you want is for somebody to use your image without your permission; especially if it’s for the their financial gain. You would also like to have control over who uses your image. Many people believe that by adding a watermark to their images it will stop people, or at the very least deter them, from using their images without permission.

However, there is no real proof that a watermark does indeed reduce this from happening at all. It’s now all too easy to crop a watermark out of an image, or for the more savvy, clone it out altogether. Some thieves may not even bother with any of that; they may just simply take the image, with or without a watermark, and use it. The truth that is once your images are online, you cannot stop your images from being used without your permission – watermark or no watermark.

 A watermark on your work looks professional

This is a yes, and no answer. A good watermark can, in a very loose sense, look professional. However, the vast majority of watermarks – at least the ones I’ve seen – bring the level of professionalism right down. They are either simply too big, too distracting, have too much going on, or are poorly designed. They can even be a mix of all those things. A bad watermark can quickly degrade even the best image.

If you’ve decided that you still wish to watermark your work, here’s a quick example of bad, and good watermarks.

Watermarks

Example 1 (above left)

The watermark in the first example here has no reduced opacity, and is also straight across the middle of the image. By having it in that position, it is obstructing the view of the subject. In addition, it is also far too large. This would count as a bad example of a watermark.

Example 2 (above middle)

In this example, the opacity of the watermark has been reduced, which helps the image behind show through more than the first example. However, the watermark covers the entire image. The design is also quite generic which is okay for a stock website, where the images might be sold. But for a personal watermark, it looks too plain.

Example 3 (above right)

This is how a watermark should look; it’s small and discrete. It won’t stop people from stealing the image as it could easily be cloned out. However, if you wanted to try and prevent theft, this watermark could be placed closer to the main subject.

Generally, a watermark should:

  • Be small and monochromatic – or have very little color. Large, colored watermarks, detract from the image as they can compete with the subject too much.
  • Be placed in a descreet area of the image that does not interfere with the view of the image, but will make it more difficult to remove or clone out.
  • Have limited text
  • If the watermark is small, then having text will be all but near impossible to read

When and where to watermark

Watermarks can have their place on images. Although, they should not be on every image that you post online. Social media platforms, such as Facebook and Pinterest for example, could benefit with a subtle watermark on your images. In this case, if other users do share your photo, you can at least get a little exposure, provided they do not crop the watermark out.

Another instance where a watermark could be of benefit, is when you are showing images to someone as proofs or previews; perhaps after a wedding, or a model photoshoot for example. In those cases, the watermark could say SAMPLE or PROOF; something to make it known that those images are not the final product. In this scenario, the watermark is not intended to stop the unauthorized use of the images – rather it is there to make it known that, if these images are used, they are not the final product.

On the other hand, if you have a website that you use to show off your work, or even to potential clients as a portfolio, watermarking your images will not be of great benefit, as they generally do not look that professional.

Image 1

Conclusion

I am of the opinion that watermarks are used all too often nowadays, by photographers who want to get their name out there and prevent the theft or unauthorized use of their work, which is perfectly understandable. However, I believe that in most cases, a watermark does not add any significant purpose to your work. A watermark does not stop anyone from stealing your image, nor can it guarantee that your name will gain greater exposure if your images are shared. Rather, watermarks only degrade the quality of your work as they are most often not designed correctly, and are an obstruction to your image.

The only way that you can guarantee that your work will not be stolen, or used without your permission at all, is to never post or upload your images anywhere on the internet.

I enjoy sharing my work on the internet. But likewise, I like to share work that people can enjoy without the degrading distraction that a watermark provides. What are your thoughts? Do you use watermarks? Please share your thoughts and opinions in the comments below.

Image 2

googletag.cmd.push(function() {
tablet_slots.push( googletag.defineSlot( “/1005424/_dPSv4_tab-all-article-bottom_(300×250)”, [300, 250], “pb-ad-78623” ).addService( googletag.pubads() ) ); } );

googletag.cmd.push(function() {
mobile_slots.push( googletag.defineSlot( “/1005424/_dPSv4_mob-all-article-bottom_(300×250)”, [300, 250], “pb-ad-78158” ).addService( googletag.pubads() ) ); } );

The post The Good, The Bad, and the Ugly of Watermarks and When and How to Use Them Effectively by Daniel Smith appeared first on Digital Photography School.


Digital Photography School

 
Comments Off on The Good, The Bad, and the Ugly of Watermarks and When and How to Use Them Effectively

Posted in Photography


5 Good Reasons to Add People into Your Landscape Photography

25 Apr

Are you looking for a way to spice up your landscape photography? Many times when we think of making great landscapes image,s we try not to include people. Sometimes we even wait for long periods of time for other sightseers (or other photographers) to exit our view. There are many times this is the best technique for shooting a landscape photo, but adding the human element to a scene can be just the extra touch needed to create a great image. Let’s take a look at 5 reasons to add people to your landscape images.

Sometimes breaking the rules can work. Here the man walking out of the image seems to work with the image of the end of the day on the beach.

This surfer is done for the day. Normally it is preferable that a person faces into the photo, but exceptions may work too.

#1 Tell a Story

Adding a person to your landscape can help your image tell a story. People, or even a single individual, may add mystery and adventure to your landscape, causing your viewers to wonder who, what, and why about the person in your image. When your viewers ask these questions, their eyes will stay engaged with your image, adding entertainment value to the photo. An image of a person standing in front of a grand mountain range may cause the viewer to wonder what that individual is doing there. If the person has a backpack and a walking stick, the viewer may imagine a hike in the mountains is about to commence. Or maybe the person in your shot is carrying a rifle and wearing camouflage, leading the viewer to imagine a hunter heading into the woods in search of adventure. A person can be the subject of the image or interact with the landscape of the image; but either way, if the person fits into the image’s story, your landscape will draw the viewer in and the photo will tell a successful tale.

This image seems to tell the story of a man thinking about the yester-years working on a river boat.

This image tells the story of a man thinking about his former career working on a river boat.

#2 Composition

Placing a person or persons in an image in negative space can add balance to your landscape. A person in the foreground, or mid-way into your scene, will help create a sense of depth in the image. When you have the opportunity to position the person, take care to place them in the image in a way that draws the viewer into the image. Place your subject off to the side, preferably on a rule of thirds point, with them facing into the open space. It is almost never a good idea to have a person looking or facing out of your image, as this will cause a viewer’s eye to leave the image rather than explore the image fully. Nevertheless, with every rule of composition there are exceptions that will work. Knowing the rules of composition, when to use them, and when to break them, will help you when adding a person to your image.

The couple taking a selfie is placed in a rule of thirds position and fills a negative space on the beach.

This couple taking a selfie is placed in a rule of thirds position, and fills a negative space on the beach.

#3 Scale of Size

Adding a human to an image is a great way to reveal the size and scale of objects in your image. Without the person in many images, objects like trees and rocks may lack a scene of scale. The addition of a person immediately gives your viewer a point of reference and scale to the landscape.

In this image of Rock House in Hocking Hills State Park in Logan Ohio adding the Silhouetted figure at the end of the cave adds a sense of scale and also adds a focal point to the image.

Adding the silhouetted figure at the end of the cave gives a sense of scale and also adds a focal point to the image.

#4 Drama and Excitement

Silhouetting someone against a sunset or other backlit view, is a perfect example of how a person can help create a more dramatic image. Even the simplest of landscapes can become more interesting and exciting by adding people within the image. Photographing a couple holding hands as they interact with the landscape can add the drama of romance to your image.

This image tells a story of a Father and son playing in the surf at sunset. The sillouhetted figures add drama to an image that could just be another sunset at the beach.

A silhouetted father and son playing in the surf at sunset add drama to an image that would otherwise be just another sunset along the shore.

#5 Focal Point

A successful photo needs a focal point that gives the viewer’s eye a place to land to hold their attention, and adding people can achieve that. It is important to add a point of interest that will change a boring landscape into a striking one. Most landscapes have natural features or buildings as a point of focus, but adding a person can sometimes make for a much more interesting image. As mentioned earlier, at times you may have negative space in the foreground of your landscape, and by adding a person into your scene that negative space is filled, and your image will benefit from the balance. As a focal point, the person in your image can be the subject of the scene, or a complement to your landscape.

A couple sitting on a rock enjoying the Autumn view adds a romantic drama to the fall colors of the West Virginia Mountains

This couple sitting on a rock enjoying the fall color,s placed on the rule of thirds, creates romantic drama.

Tip: When adding a person or persons to your landscape, try to keep their face (s) obscure. This will allow the viewer to imagine themselves as the participant in the image.

Conclusion

Many times adding a person to your landscape image can be as serendipitous as people just wandering into your viewfinder, especially if you are visiting a park or popular scenic area. But if you are out alone in an interesting area, use yourself as the person in the scene. Place your camera on a tripod, set the timer, then add yourself into the image. Next time you are engaged in a landscape photo shoot, look for opportunities to add one or more persons to one of your images, and see if you like the results. You may be surprised at the difference you see.

Many landscape locations are powerful enough to stand on their own, but if your image needs a little spice, try adding a human. What other kinds of landscape scenarios do you think could benefit from adding a person to create a more interesting image? Leave your ideas in the comments below.

People photography week

This week on dPS we’re featuring articles all about different kinds of people photography including portrait, event and travel photography. See all the previous ones below, and watch for more people photography articles over the next few days.

  • How to Take Low Key Head-shots
  • How to Do a One Light Portrait Setup and Use it as Your Back-up Plan
  • Travel People Photography – Tips and Pitfalls
  • 8 Tips for Photographing Men
  • 24 Diverse Images That Showcase People Photography
  • Weekly Photography Challenge – People Photography
  • Tips for Getting Yourself to Relax as a Photographer and Have More Successful Portrait Sessions

googletag.cmd.push(function() {
tablet_slots.push( googletag.defineSlot( “/1005424/_dPSv4_tab-all-article-bottom_(300×250)”, [300, 250], “pb-ad-78623” ).addService( googletag.pubads() ) ); } );

googletag.cmd.push(function() {
mobile_slots.push( googletag.defineSlot( “/1005424/_dPSv4_mob-all-article-bottom_(300×250)”, [300, 250], “pb-ad-78158” ).addService( googletag.pubads() ) ); } );

The post 5 Good Reasons to Add People into Your Landscape Photography by Bruce Wunderlich appeared first on Digital Photography School.


Digital Photography School

 
Comments Off on 5 Good Reasons to Add People into Your Landscape Photography

Posted in Photography