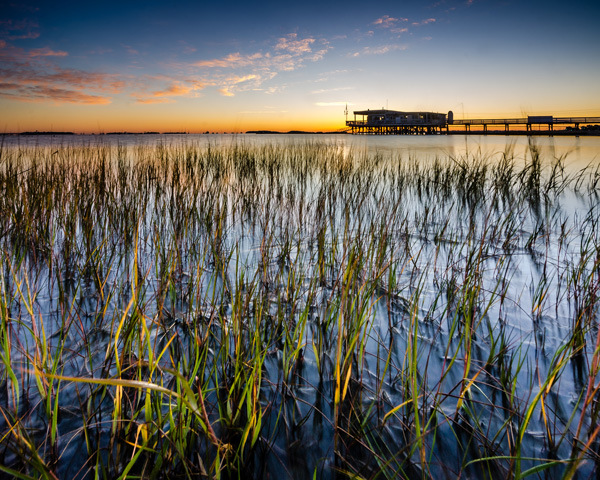
One of my favorite times of the day to photograph is sunrise. There’s just something about the peacefulness of being up before the sun, before most of the human world, that allows me to clear my head.
Sunrise photos have always been high on the list of fan favorites and I know that there are a great many DPS readers who love them as well, so I thought I’d share with you a little bit about how I made the shot above from finding the location to setting up the camera and then a step by step walk-through of my Lightroom workflow.
Determining a location
To begin a shoot you need a concept, and while photographing sunrise is always a great concept to start with, one of the most important things that you’ll need to do is find a location. This can be difficult to do sometimes, but if you’re struggling to find a new location, check out 5 Creative Ways to Find New Locations for Photography for some inspiration.
I can tell you that the inspiration for this photo came from my sister who saw this boat house while out on an afternoon jog. She sent me a text message demanding that I come spend a night so that I could photograph it at sunrise – and sure enough that’s exactly what I did. The key point to take away from this is, that inspiration can come from anyone and any where, so make sure that you are paying attention to your surroundings as well as what people are saying about their own.
As for getting to the location for a sunrise shoot you’re going to have to wake up early. Well before sunrise. For this reason I typically will either spend the night in a hotel or find a friend or family member who lives close enough to the location to allow me to crash for a few hours, otherwise there might not be any point of sleeping at all. Think of it like this… If you can still see stars – you’re doing it right!
Setting up the camera
Since camera settings will vary depending on your scene I thought I’d share a couple behind the scenes shots. The first is one that my sister took of me while I was setting up my camera and tripod along the shore – notice how close to the water I get. The second shot is a close up that I took of my camera setup during the shoot, notice that for this particularity shot the tripod was nearly flat against the ground to allow me to get a very low perspective, and allow for the foreground sea grass to take up a good portion of the frame.
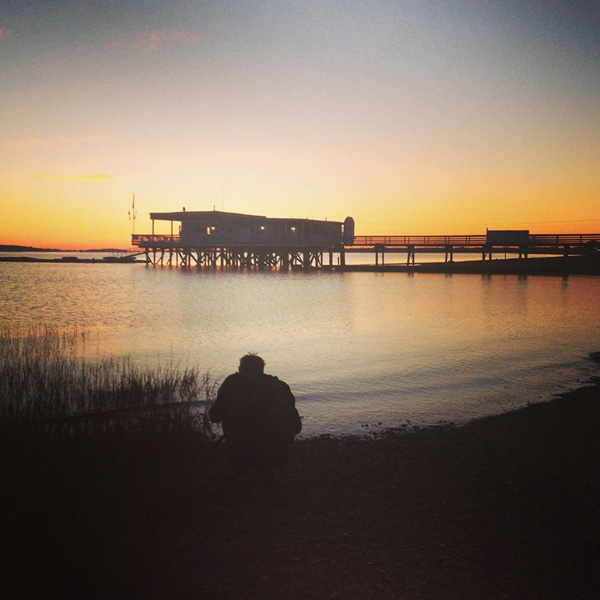
A behind the scenes shot of yours truly setting up the camera
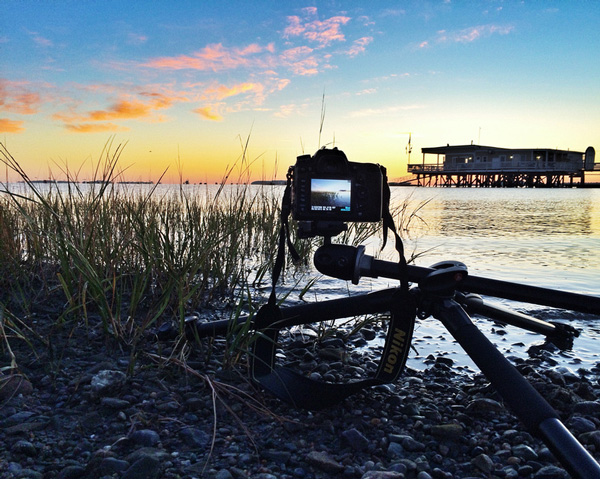
A photo of the camera set up – notice how close to the water and how low to the ground I put the camera for this shot
It’s important to note that each shoot is going to be different and you must realize that with every sunrise and every location there will be challenges that you will have to overcome. While I can show you examples of how I set up the camera and my thought process behind it, when you get out to your own location it’s up to you to determine the best ways to photograph the scene.
Back home – it’s time to process the photos
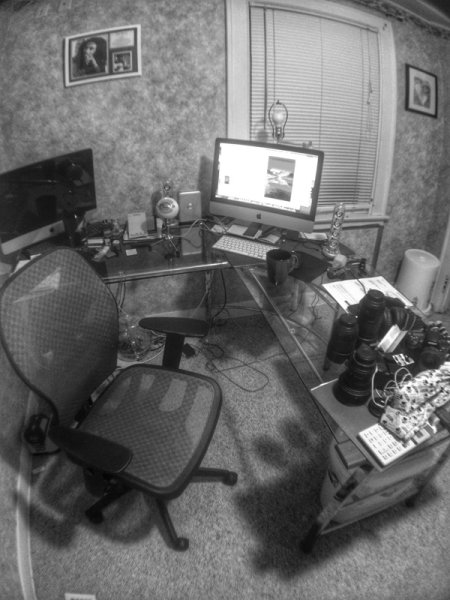
Just for fun I thought I’d throw in this snapshot of my office – What’s your desk look like?
Lightroom workflow – which frame to process?
Before you can start processing you must determine which of the frames you want to use. There’s no “one-size-fits-all” way of doing this, it really comes down to the person behind the computer. Some people like to simply process everything from the start of their shoot to the end. Other people like to meticulously rate everything, fill in all the meta data and stay super organized. My own workflow usually consists of a quick browse through all the photos that I’ve captured in a particular shoot, rating each of the ones I want to edit with a 5-star rating, and leaving everything else untouched for the time being. I’ll usually come back to shoots from time to time, to see if anything I may have missed on my first go through jumps out at me on a second glance.
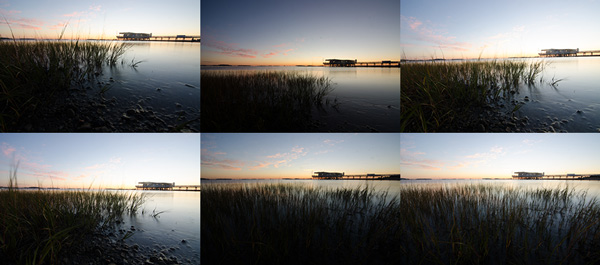
Six different frames from the shoot – I chose the bottom right frame for today’s photo
Lightroom workflow – making adjustments
Now that you’ve chosen a photograph to edit, it’s time to dive into the develop panel and get started with the post production workflow.

Enter the develop panel and select the photo to be edited.
Since this photograph is all about the sunrise, the first step is to make sure that you get your sky exposure as close to perfect as possible. By making a small adjustment here to the exposure slider in the basic tab you can have a great effect on the sky which will set the foundation for the rest of the photograph. It might look a bit under exposed at first, but we will be fixing this and fine tuning everything throughout the tutorial.

Adjust the exposure for the sky
To bring the foreground back into the image you will want to add a graduated filter into the frame (assuming you didn’t use one in the field of course). To do this simply press the ‘M’ key on your keyboard to open that panel in Lightroom. To apply the graduated filter drag in from the bottom of the frame and place the filter on the horizon line. Remember the filter’s effect is greatest starting from the direction you initially dragged in from so here the effect will be greatest towards the bottom of the frame.
Next to bring the exposure back into the foreground by increasing the exposure and shadows sliders (moving them to the right) of the graduated filter until you’re satisfied with the look. You will be able to fine tune the image by using the basic tab a bit later. You can always go back to this graduated filter if you need to make a minor adjustment later on, as well, simply by revisiting the graduated slider panel and clicking on the button (dot) of the graduated slider to activate it for editing.

Apply a graduated filter to adjust the exposure of the foreground without effecting the sky from the previous step
Now that you’ve exposed for the sky and brought back some foreground light, the next step is to add contrast, color, and clarity – all of which will help to make your image ‘pop’. This can be done by using the basic tab in Lightroom, which I’ve covered in Master These Five Lightroom Sliders and Your Photos Will Pop, if you’d like more information.

After achieving a general evenness in the previous steps use the basic tab to add contrast, color and clarity
At some point you’ll want to clean up the dust spots or remove distracting pieces of litter or other unwanted items from your image so now’s a good time to jump into the clone/heal tool and do just that – as you can see I need to get my sensor cleaned.

Here’s a good chance to clean up those pesky dust spots by using Lightroom’s clone/heal tool
Final adjustments can be made by using a combination of different adjustment brushes. Usually you’ll want to use this tool to control specific areas of the photograph, or specific parts of the exposure. To open the adjustment brush panel press ‘K’ on the keyboard and click on your image to place a brush. If you’d like to use more than one brush you can click on ‘New’ and again click on your image which will allow you to adjust two different parts of your scene separately from one another.
In the photo below I’ve added an adjustment brush to affect the highlights, and contrast of the water at varying levels of intensity. You can control these levels of intensity by adjusting the “flow” slider of the adjustment brush which will determine how much of the effect is applied at each pass of the brush – a lower flow has less effect per pass than a higher flow.

Fine tune the highlights on the water with an adjustment brush. The red overlay can be turned on and off with the check box below the photo (or ‘O’ on your keyboard)
Before you call it a day – the last step is to dive into the detail panel in Lightroom and apply some sharpening. For some more information on Lightroom’s sharpening options you can watch this Youtube video A Look at Sharpening in LR4, which is part of a weekly series I run on my channel.

Apply any sharpening you wish using Lightroom’s sharpen panel.
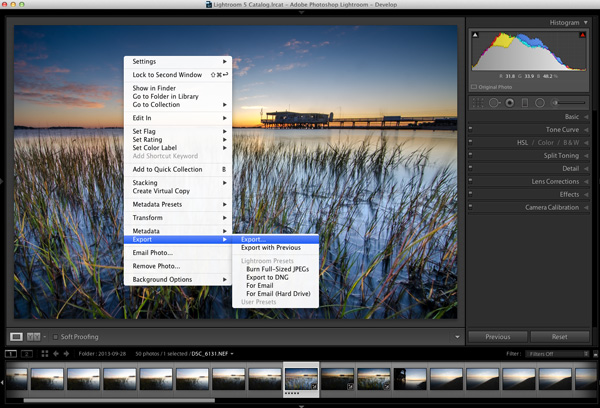
All that’s left to do now is export and share your work with the world.
Exporting and sharing
All that’s left now is to export the photo and share the results.
I hope this step by step Lightroom workflow helps you learn a bit about how to process your own photos. Share a before and after Lightroom edit in the comments below, and if you’ve got any behind the scenes shots, those are always fun to see as well. Don’t forget to let us know how you achieved the results.
Post originally from: Digital Photography Tips.
Check out our more Photography Tips at Photography Tips for Beginners, Portrait Photography Tips and Wedding Photography Tips.
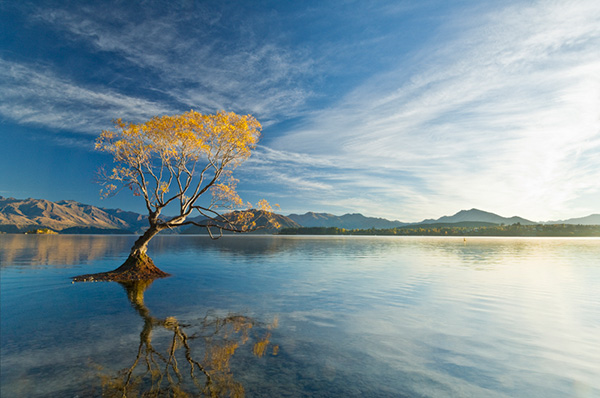
Lightroom Workflow – from Setup to Finished Sunrise Photo
The post Lightroom Workflow – from Setup to Finished Sunrise Photo by John Davenport appeared first on Digital Photography School.

Digital Photography School


You must be logged in to post a comment.