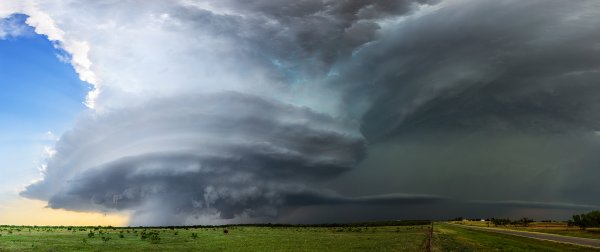
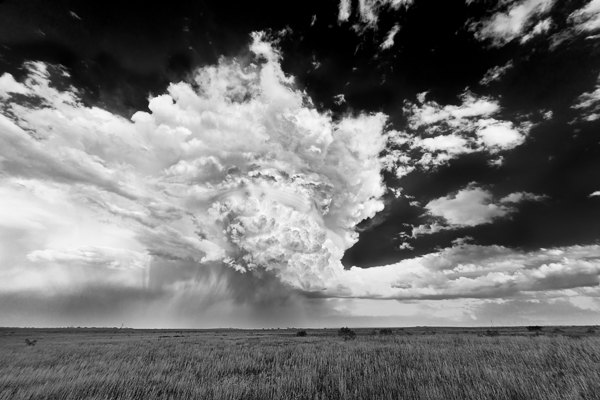
A massive supercell near Henrietta Texas in May, 2014. © James Brandon
I’ve been a professional photographer for around five years now. I’ve photographed a lot of different subjects throughout the years, but nothing in the world could have prepared me for photographing storms. When I stood in front of my first supercell on May 8th of 2013, I was hooked. A low hanging wall of cloud hovered over the field in front of me as its rotation increased by the second. The 40mph winds at my back were feeding moisture and warm air into the storm. The grass in the field was all bent down towards the monster looming in front of me. Yeah, that’s all I needed to become totally obsessed.
That was back in the spring of 2013. Since then I’ve become good friends with a few very seasoned storm chasers and have gotten a chance to ride along with them on several storms, both last season, and now this season. Mike Mezeul, for example, has become a great friend over the past couple of years and we even lead workshops together now. He’s an absolute wealth of knowledge when it comes to weather and I highly suggest you check out his work.
In these brief two seasons of chasing, I have already racked up countless hours chasing, God knows how many miles, and my bank account certainly knows how many tanks of gas. In spite of all that, I’m still very new to this world of storm chasing and storm photography, and to be honest, at this point, I’m more of a storm photographer than a storm chaser. I’ve already started getting a lot of questions about storm chasing so I thought I’d put together an article here on dPS going over some of the things I’ve learned thus far, with the preface that I am not an expert at this point. Whether you’re interested in dipping your toes into this genre of photography or just want to know more about it; read on.
1) Storm chasing and storm photography are two very different things
This is something that has become more apparent the more I go out. It’s tough to separate the two because when I go out in search of storms, even I say that I’m going storm chasing (but I’m really not at this point). The people up front in the car are the chasers. The driver is actually doing the chasing and the person riding shotgun is navigating and forecasting. Me? Well most of the time, at this point, I’m in the back; along for the ride. So you might say that I’m chasing with them and you might not. Who cares. I have been in the passenger seat a few times now (in charge of forecasting and navigating) and it is not easy. You can’t be focused on getting pictures in that seat. You’re responsible for navigating the road networks out on the chase — staying one step ahead at all times — while also keeping an eye on the storms using radar.
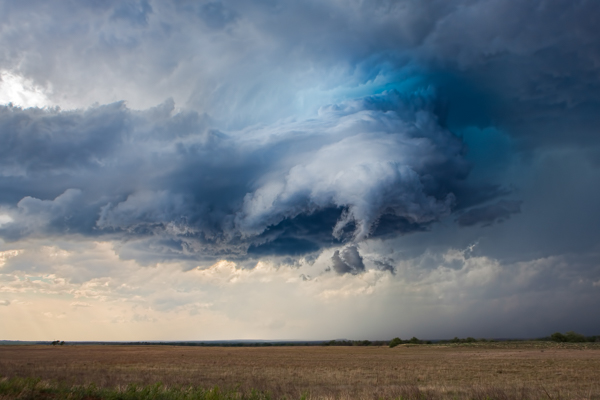
I haven’t photographed a tornado yet, but this is about as close as I’ve come. This wall cloud (the section of a storm where tornadoes DO come from) began lowering behind the tree line while rotating quite rapidly. © James Brandon
2) Becoming a good chaser takes time, dedication, mentoring and experience
Learning about weather has become a huge passion of mine ever since starting the process of getting my private pilot’s certificate (which I finally got back in late 2012). Weather has to be a passion to get into chasing. It just has to. You’ve got to have an intimate knowledge of weather patterns, frontal systems, pressure systems, lifting mechanisms, dry lines, triple points, dew points, troughs and so much more. You have to know when a scary looking cloud is just that; a scary looking cloud. Many rookie chasers (yes, I’ve done this) will see a scary, ominous looking cloud that is low to the ground and think it’s a tornado forming. They are looking in one direction — at the wrong part of the storm — while the actual danger is somewhere else. Lucky for me, I’ve always had experts with me to point out what I should be concerned with, and what I shouldn’t be.
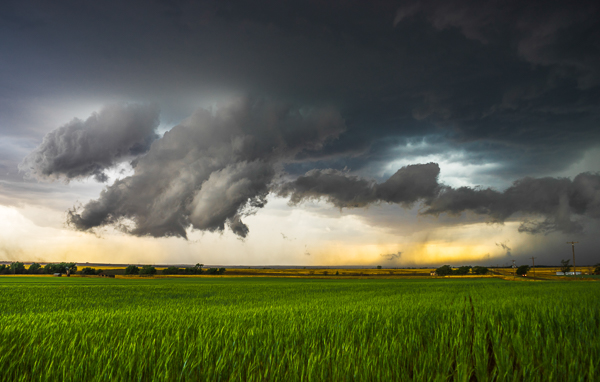
This image shows an area of outflow from the storm that was moving off to the right. At one point the cloud began to resemble a funnel that was almost touching the ground. However, it wasn’t rotating and it was on the wrong part of the storm. A few minutes later, tornado sirens began going off in the small town nearby, even though the storm wasn’t tornado warned yet. Someone had called in and said a tornado was on the ground.
3) Until you become a seasoned chaser, NEVER go alone
The best chasers out there have dedicated their lives to this stuff. It’s not a weekend hobby. Seriously: Don’t go out alone if you’re a rookie. Just don’t do it. You’ll be putting both your life and the lives of others at risk. Going out on your own means becoming driver, navigator, forecaster, and photographer all at the same time. Just earning a permanent spot up front in a chase vehicle is a coveted thing that takes years (and should) of experience to accomplish. It’s referred to as the “hot seat” for good reason. When you’re on your own, it’s impossible to be totally safe. You have to concentrate on driving, but you also have to pay attention to the storm. That means that you’ll likely be using some sort of radar app on your phone or laptop and will be checking that instead of paying attention to driving. This is a recipe for disaster that will catch up to you eventually.
4) Like any hobby/interest, there are a lot of egos and hot heads
I’m sure this one is going to piss some people off but it’s just the truth. It’s true with anything though. Go buy a Remote Control car and get into RC car racing. Go join your local camera club. Buy an RV and start spending time with fellow RV owners. Every group has them. In storm chasing you will see them driving on the wrong side of the road, passing people with their amber lights flashing while driving 90 in a 55 to get to a storm that’s still 20 miles away (risking lives just to get on a storm), parking their cars just off the side of the road and then leaving their doors open so that traffic has to swerve around them…the list goes on.
Most of them also cover their entire car in storm chasing decals, weather instruments, antennas, and amber lights. The point is: Pay attention to the stuff that these people do and don’t do it. Having amber lights on your car doesn’t make you any more important than the guy in front of, or behind you. Storm chasers are not law enforcement or emergency services. Being a chaser doesn’t give you any special powers or authority.
5) There are also a lot of amazing people
While there are a lot of egos out there, there are just as many incredible people who have more knowledge about weather than I could ever even dream of. These are the people who make storm chasing a noble pursuit. Some of them are self taught, some have masters and doctorates in meteorology or climatology. I’ve had the fortune of meeting some amazing people already just in two seasons. If you can befriend these people, and honor their knowledge and authority, you will have a good chance at advancing your own knowledge at an accelerated pace.
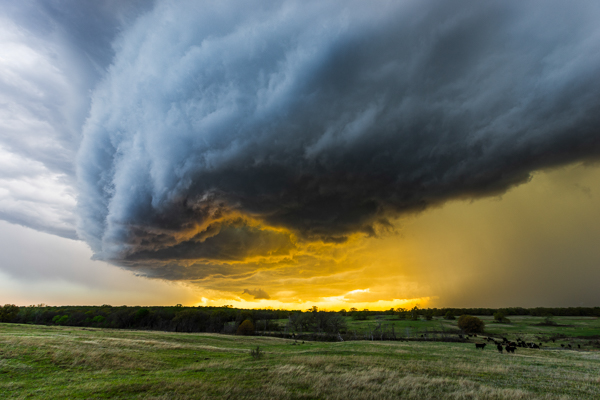
A beast of a supercell in Throckmorton, TX back in May of 2013. Around 10 minutes after I took this photo the storm fell apart and disappeared.
6) It’s not about tornadoes
Sure, easy to say for the guy who hasn’t photographed a tornado yet. In all seriousness though, tornadoes occur in somewhere around 1-2% of supercells. I don’t do this for a living and it’s still a very new passion, so I’m not going to drive 10,000-15,000 miles across the country ever year in search of tornadoes. Even if I did, I’d still see tornadoes so seldom that if that were my goal, I’d feel like a failure. On top of that, tornadoes are incredibly dangerous and destructive, and take lives every year. If I can one day photograph a beautiful tornado in the middle of nowhere, miles away from a town or residence, I’ll be happy. But if there’s a town nearby, or a neighbourhood, or even just a house, I’ll be praying against a tornado each and every time. I’m not after tornadoes. I’m after structure.
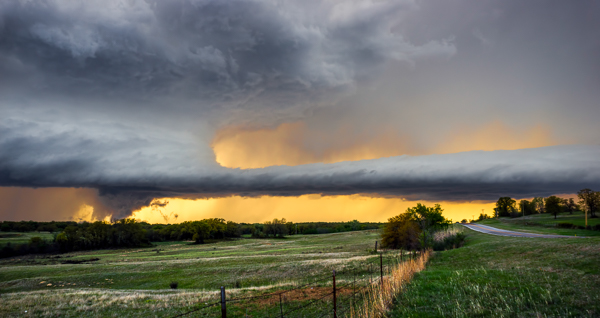
Standing in front of a supercell with 30-50mph winds at your back, watching as it rotates and grows, is one of the most awe-inspiring things you’ll ever witness. Seeing the raw power and fury of mother nature is just incredible. I’ve stood in a field with warm, moist 40mph winds at my back feeding the storm in front of me. Then, in an instant, the air turned dry and super cold. The storm had began ingesting the cold air from the evaporating rain it was dropping, and in essence it killed itself by doing so. Within 10 minutes, the entire storm was gone.
An image of a rotating wall cloud from the storm I described in the paragraph above. This was actually my first storm to ever photograph.
7) Chasing has become a circus in recent years – tread lightly
It’s something you can’t fully understand unless you see it. With shows like Storm Chasers, the constant media attention that chasers get during storm season, social media, etc., an innumerable number of people have come out of the woodworks to chase storms in the U.S. When the Storm Prediction Center posts a moderate or severe risk day, you can rest assured that the roads will be packed with chasers (especially if it’s during a weekend). This can, and does, present an added element of danger to chasing storms. I’ve heard stores of road networks being completely clogged up from just chasers while a tornado is on the ground nearby. Because of this, the people I chase with usually don’t go out chasing on days like this. Some of the best storms I’ve seen to this day were on slight risk days when most chasers stayed home.
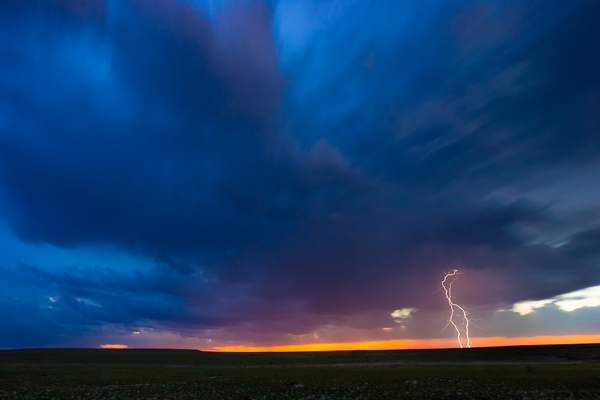
A CG (cloud to ground) lightning bolt strikes in a field somewhere in east Texas as a storm moves off into the distance.
In closing
Storm photography, storm chasing, whatever you want to call it, has become something I look forward to all year long now. The main months for chasing in Texas, and the surrounding area, is March through May – which means I have to dream about it from June through February. Sure, supercells can pop up in the surrounding months but not nearly as often. If you want to see what chasing is all about, please follow the advice that I set out above. These storms kill people every single year and should not be taken lightly. Don’t go unless you can secure a seat in the car of an experienced and knowledgeable chaser. For the record, someone who chases storms doesn’t necessarily qualify as an “experienced and knowledgeable chaser.” There are many people who chase solo year after year who shouldn’t be out there. Use caution and choose wisely.
If you have any questions, let me know in the comments below! To follow along with me during the upcoming storm season, be sure to follow me on Instagram. Thanks!
googletag.cmd.push(function() {
tablet_slots.push( googletag.defineSlot( “/1005424/_dPSv4_tab-all-article-bottom_(300×250)”, [300, 250], “pb-ad-78623” ).addService( googletag.pubads() ) ); } );
googletag.cmd.push(function() {
mobile_slots.push( googletag.defineSlot( “/1005424/_dPSv4_mob-all-article-bottom_(300×250)”, [300, 250], “pb-ad-78158” ).addService( googletag.pubads() ) ); } );
The post 7 Things I’ve Learned from Photographing Storms by James Brandon appeared first on Digital Photography School.

Digital Photography School


You must be logged in to post a comment.