RSS
 

Posts Tagged ‘from’

GoPro and Periscope partnership enables live broadcasting from Hero4 action cams

27 Jan

Live-streamed content is about to get a little more extreme as action cam maker GoPro and live-broadcasting video app Periscope have announced a partnership. Starting today, Periscope users can broadcast live from GoPro’s Hero4 Black and Silver models. With Periscope’s iOS app, users can switch between the camera on their mobile device and a GoPro, enabling a two-camera setup. An iPhone 5s, 6 or 6+ running iOS 8.2 is required. If you’ve got all the necessary equipment, download the latest version of the iOS app to start broadcasting from your GoPro.


Press release:

GOPRO GOES LIVE WITH PERISCOPE

Live story-telling just got more immersive! Beginning today, Periscope users can now broadcast live directly from their GoPro HERO4 Black or Silver camera. This innovative integration allows the 10+ million Periscope users to toggle between broadcasting from their iPhone’s camera to their GoPro directly from the phone screen with the simple touch of a button. 

Much like a production switchboard, you can use your Periscope interface to flip between the two different camera angles, so even if your broadcast is lacking that heart-pounding action only GoPro can capture, you can still set up a two-camera shot for more dynamic story telling in real time. And yes, your GoPro will still record locally on the micro SD card even while broadcasting through Periscope.

Periscope lets you see what’s happening in the world right now, unedited and unfiltered. Integrating GoPro offers Periscope broadcasters a new tool to help tell their stories more creatively, while GoPro content creators now have a new platform and audience with Periscope and Twitter to share their experiences, live!

Live broadcasts from GoPro can now be shared directly to Twitter’s home timeline, enabling GoPro users and Periscope broadcasters to expand their reach to their Twitter fan base. This helps broadcasters cultivate new fans and interact with their audience right from their broadcasts in their home timeline, even after the live broadcast is done.

Pablo Jablonski, Periscope iOS Engineer said, “As a skier myself, I’ve always loved extreme sports, and I love how GoPro can show us all of the crazy things these athletes can do. As an iOS engineer on Periscope, bringing these two technologies together has been a the fulfillment of a longtime personal wish. Starting with X Games and moving forward, Periscope and GoPro together will bring these LIVE moments to all the fans.”

*Broadcast functionality is currently only available on iOS, but users will be able to view GoPro broadcasts from any platform.

*Compatible with iPhone 5s, 6 and 6+ with iOS 8.2

*Integration for use with GoPro HERO4 Black and Silver models

Articles: Digital Photography Review (dpreview.com)

 
Comments Off on GoPro and Periscope partnership enables live broadcasting from Hero4 action cams

Posted in Uncategorized


13 Steps for Editing Street Photography in Lightroom from Start to Finish

20 Jan

Favorite editing tools for street photography

I admit it, I take too many photos. I know it, and I have too many images to deal with, and unless I am getting paid to finish them and send them out to a client, they may never get processed. Are you in the same boat? Do you too have some images that have just been sitting there in your digital desk drawer?

With digital photography, and especially because of how cheap memory is (don’t forget to include web hosting sights and the cloud), more and more photos are just there and never used.  The best solution is to be more decisive, and just take fewer photos. But we all get out of hand, and sometimes just come home with more images than we know what to do with.

image

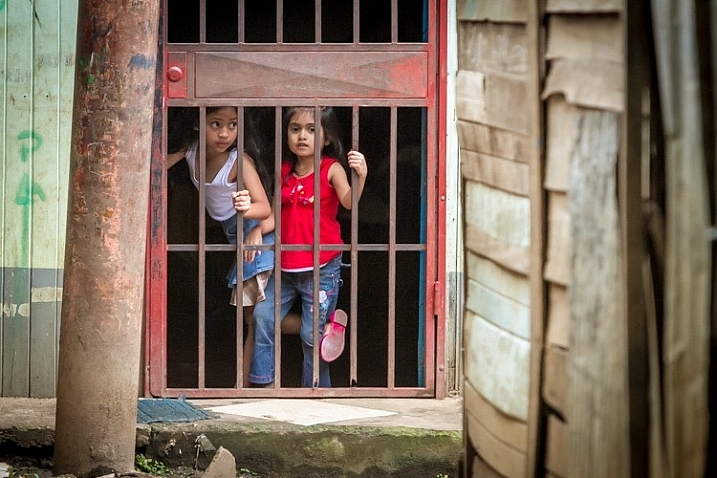
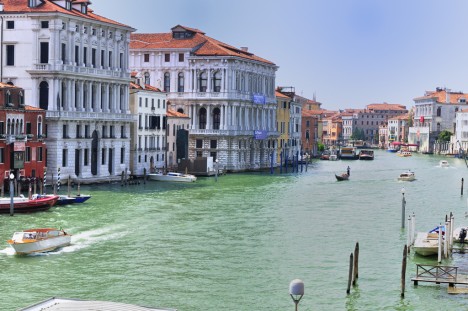
Final product after the simple steps followed below—a workflow that you can adjust to your own tastes too!

So the best thing to do is get to the grind and produce something. But it doesn’t need to be so much of a grindstone as you might think. I love taking photos more than processing and unless I am flying solo, I think I’ve got lots of people onboard with me. As you know, photography is not about broad strokes, and details are important. This set of instructions is specifically designed for street photography. But, are most of your photos from your travels? Well, streets (along with the convenient airplane) is maybe how you got there. Much of what we do as photographers crosses over into different genres of style and art. So have a go at the following tutorial, and you may find that with your own adjustments this is a recipe for more than just the street.

image

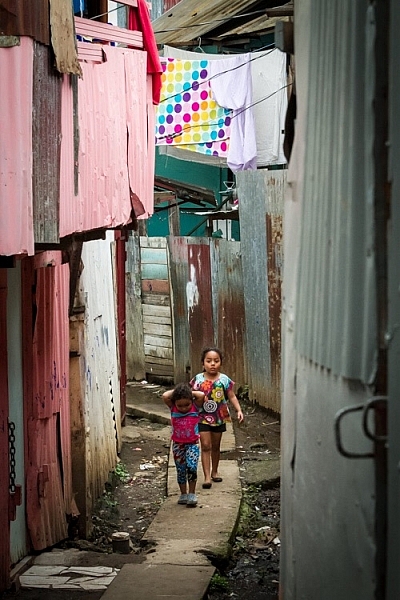
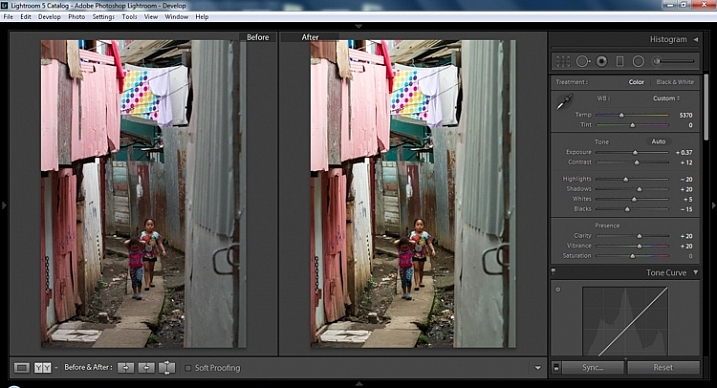
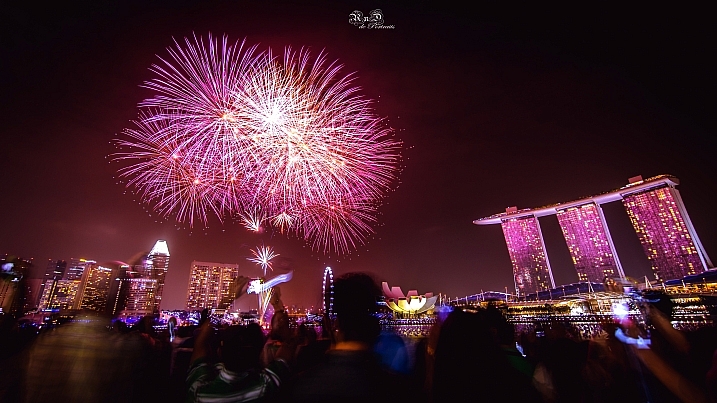
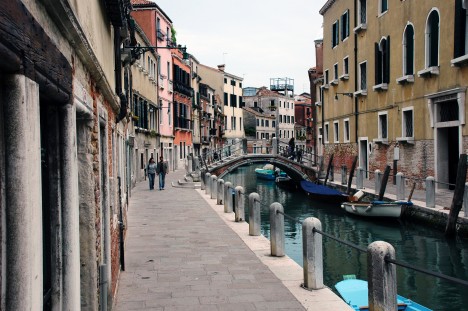
Final image of two young girls walking in the slums of San Jose Costa Rica, all editing was done following the steps below.

These instructions begin in the Library module of Lightroom, and then progress into the Develop module. There are countless modifications that can be made upon importing, categorizing them, giving them tags, etc. As the point of this tutorial is to streamline your workflow, the tips for editing will also be streamlined. So let’s get at it!

Library Module

Step 1 – Select images

Select a batch of images that are preferably in similar lighting conditions, and which have a similar theme. For example, choose a set of photos that were all shot outside over the course of a few hours, but not all night. Or a group of photos that were all shot in the rain. Lighting and theme conditions can vary, but greater variations will have potential greater variations in results.

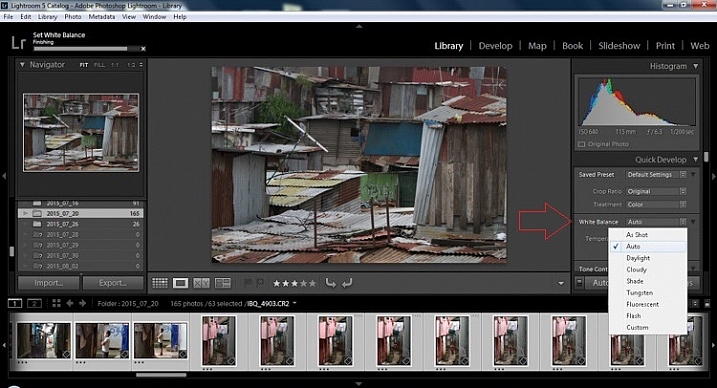
Step 2 – White Balance

In the Quick Develop Panel (at the top of the right panel in the Library Module) Select White Balance and choose Auto. Before you turn away, let me assure you that there have been more Ph.D.s awarded, and dissertations given, in creating the algorithms behind this button. If you compound the interest in dollars that has been invested in this Auto algorithm it would sustain many third and fourth quarter GDP figures for entire nations.

image

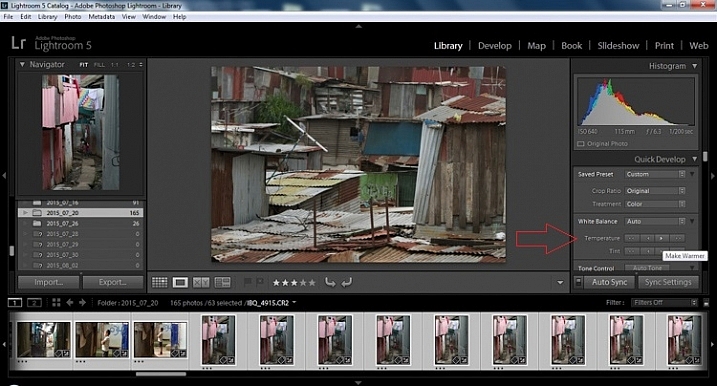
Step 3 – Warm images

Next, push the single arrow pointing right under the temperature heading indicated by the Make Warmer hint that appears if you hover over it. The single arrow will increase your warmth tone by +5. If you want plus +10 push it twice, using the double arrow will increase it in increments of +15.
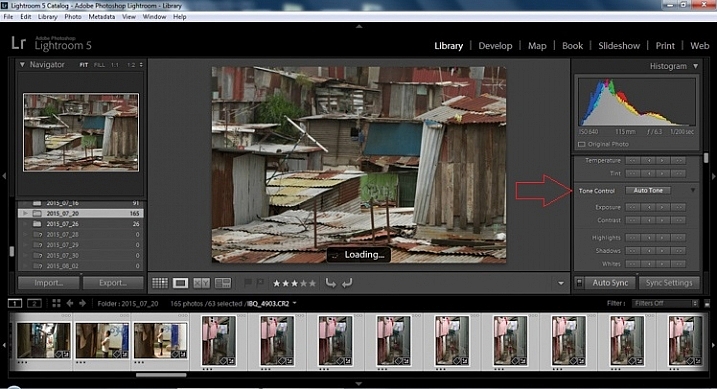
2015.09.25 Street Editing Tips Lightroom 002

Step 4 – Auto Tone

I know it is scary, and it does make me cringe sometimes too, but anything can be shifted, tweaked, and tuned later (and should be) to your liking. This will Auto Tone your exposure, highlights, shadows, whites, and blacks to each photo individually, so it is not the same as batch editing which will be covered later.

2015.09.25 Street Editing Tips Lightroom 003

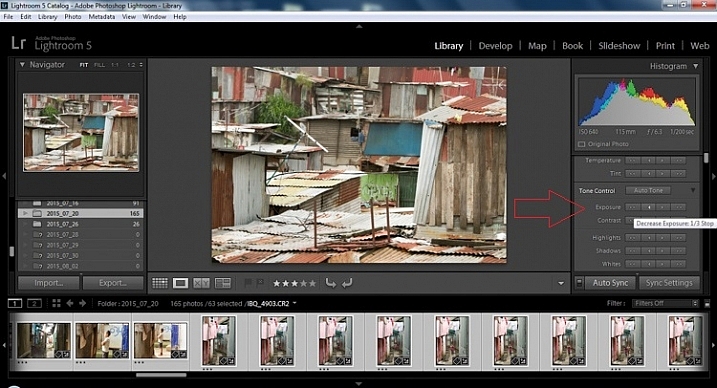
Step 5 – Decrease exposure

Select the single arrow to the left, decreasing the exposure by a 1/3 of a stop. It is minor, but keeps your darker tones (especially things like black asphalt) a little darker. Note: this is assuming you have a correct exposure to begin with – if it’s a bit out you can adjust later on a per image basis as needed.

2015.09.25 Street Editing Tips Lightroom 004

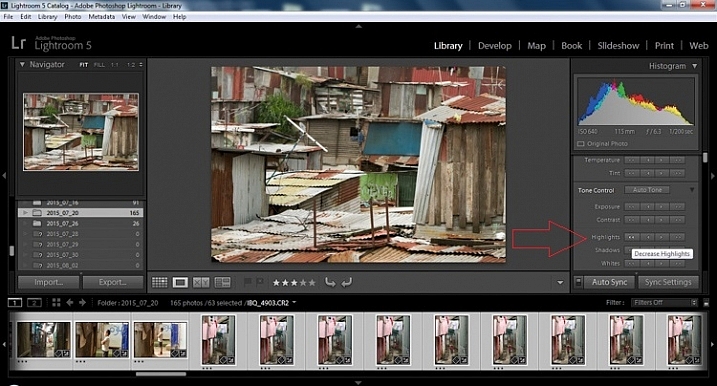
Step 6 – Decrease Highlights

For the Highlights, use the double arrow to the left, decreasing the highlights, and select it once. Be patient, as depending on how many pictures you select and your computer speed, it may take more than a few seconds. This can be monitored by looking in the top left of the screen above the Navigator window (progress bar).

2015.09.25 Street Editing Tips Lightroom 005

Step 7 – Shadows

For the shadows, use the double arrow on the right, decreasing the shadows, and click it once.

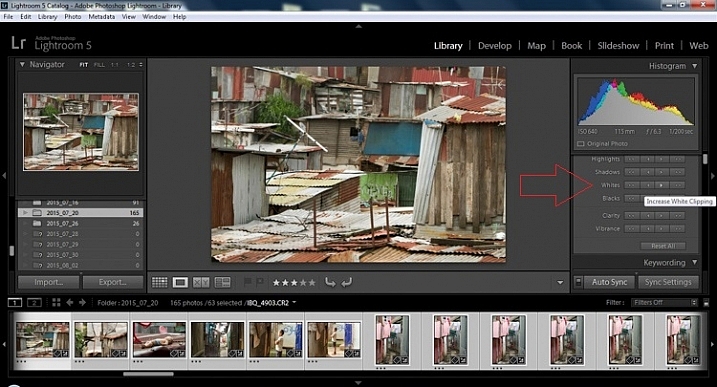
Step 8 – Whites and Blacks

Increase the white clipping by +5, by clicking the single right arrow once. Decrease the black clipping by -5 by clicking the single left arrow once.

2015.09.25 Street Editing Tips Lightroom 007

Step 9 – Clarity

Increase the clarity by +20, by pressing the double arrow to the right once (for more information about clarity please look near the end of the article which describes it in more detail).
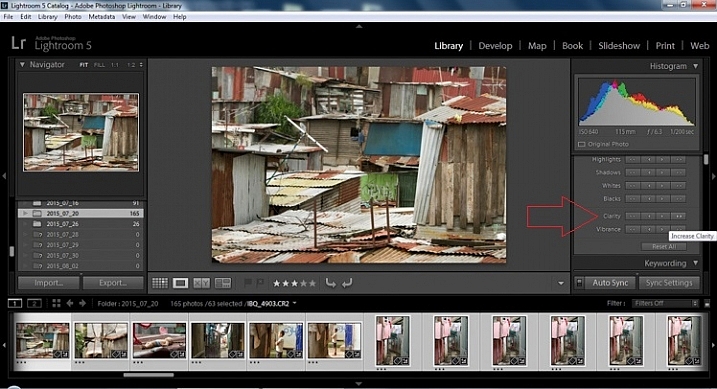
2015.09.25 Street Editing Tips Lightroom 009

Step 10 – Vibrance

The final step in the Library module is to increase the vibrance by pressing the double arrow to the right (for more detailed information about vibrance please see below).

Develop Module

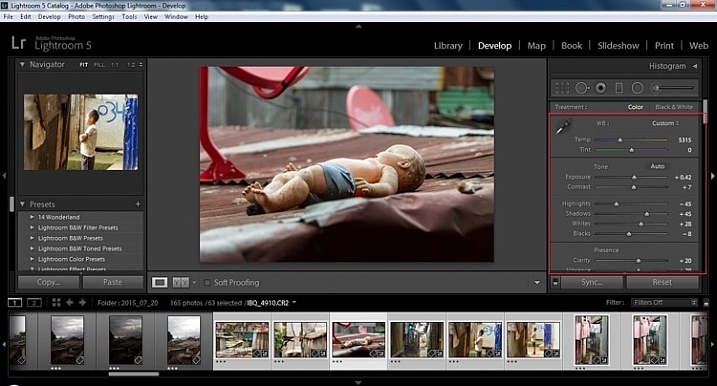
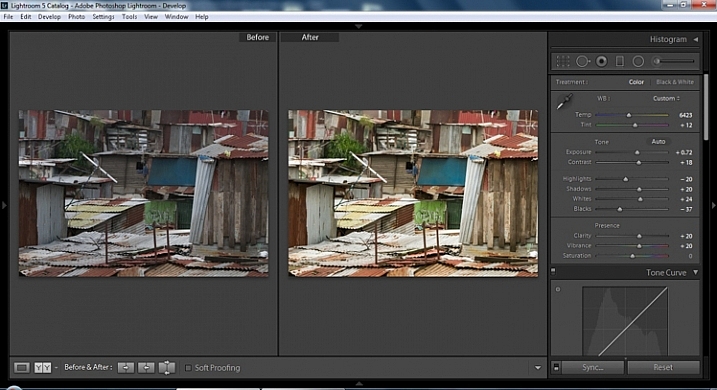
Now we will be moving into the Develop module. To this point, all the changes that you’ve made, have been applied to all the photos in the group, which you originally selected. Looking at the image below, you can see that despite the simple clicks made in the Library module, many delicate changes have been made. Again, all of these changes can be fine-tuned to your liking later. There are hundreds of modifications that can be made, but let’s keep those for later.

2015.09.25 Street Editing Tips Lightroom 011

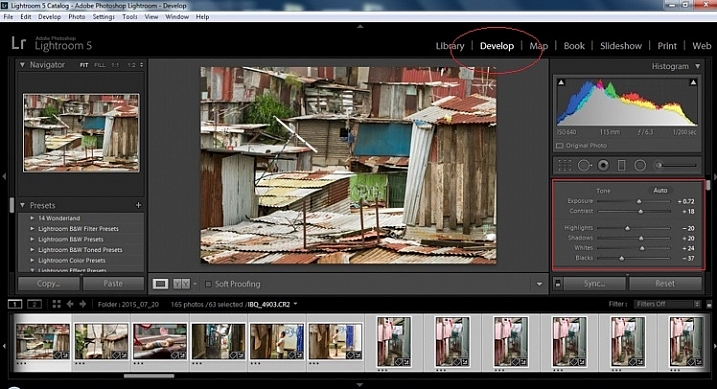
Notice the sliders have moved based on the changes you made in the Library Module Quick Develop panel.

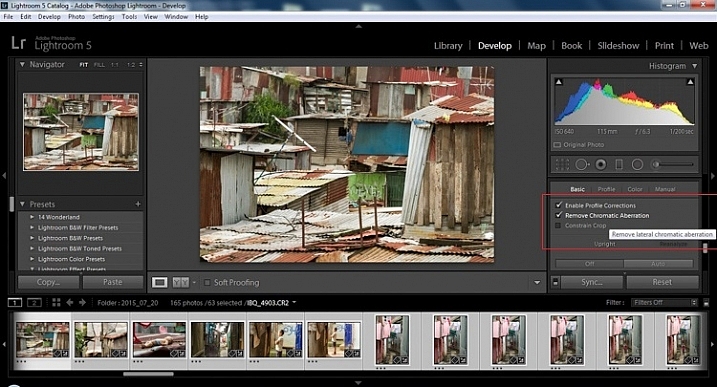
Step 11 – Lens Corrections

This step requires you to scroll down to the Lens Corrections Panel, and select two checkboxes. The first is Enable Profile Corrections, and the second is Remove Chromatic Aberrations. Both of these will allow Lightroom to make changes to the photo based on the lens used, and the inherent flaws that exist in that lens. A variety of corrections may or may not be included like, barrel distortion, vignetting, and as the second suggests, green and purple colors that result from diffraction in the lens.

2015.09.25 Street Editing Tips Lightroom 012

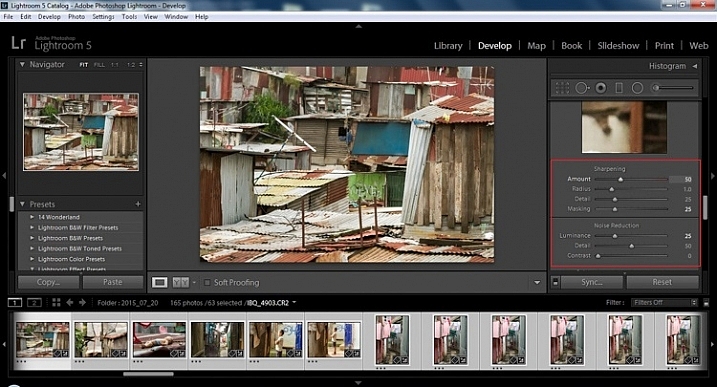
Step 12 – Detail Panel

Next is to scroll up and go to sharpening, increase it to +50,  then increase your masking to +25. Finally you may or may not need to reduce noise. For this example, because the ISO was 640 the noise reduction was increased to +25. To understand, sharpening and masking in more detail and their relationship to noise reduction please read below.

2015.09.25 Street Editing Tips Lightroom 013

Are you still with me? Here is where you will thank some of those computer science majors for creating the AUTO button. This is why they get the big bucks, and it saves us large amounts of time. We don’t need to apply these changes individually.

Step 13 – Sync settings

At the bottom of the Develop module there is a rectangular button that says Sync. PUSH IT! Make sure all your images are still selected before you sync (highlighted in the thumbnail strip at the bottom).

2015.09.25 Street Editing Tips Lightroom 014 sync

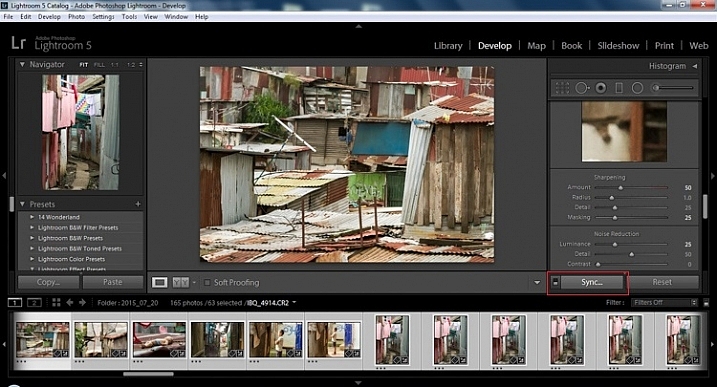
When the Synchronize Setting window pops up, select Check None. This will ensure that no unwanted changes will be made to your previous adjustments.

2015.09.25 Street Editing Tips Lightroom 015 sync check none

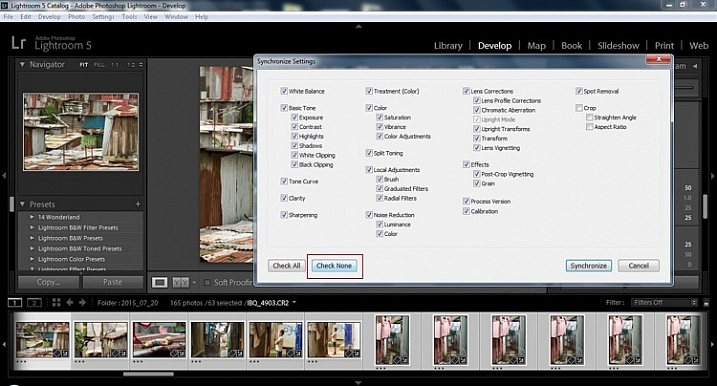
Now check the boxes labeled Sharpening, Noise reduction (which will subsequently select both boxes below it), Lens Profile Corrections, Chromatic Aberration, and finally Process Version. Notice these are the same adjustments that you had made in steps 12 and 13.

2015.09.25 Street Editing Tips Lightroom 016 sync check which apply

Finally, press the “Synchronize” button.

2015.09.25 Street Editing Tips Lightroom 017 verify sync

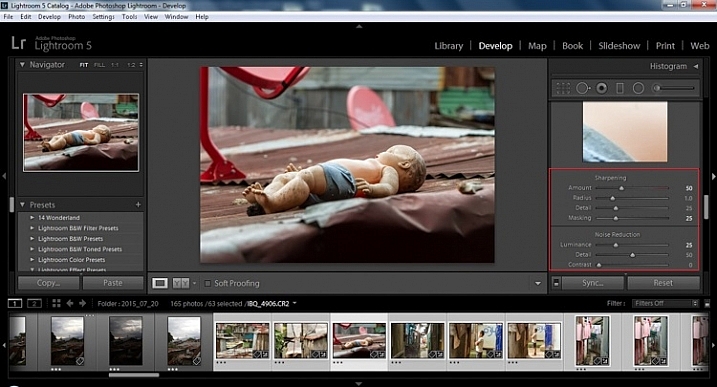
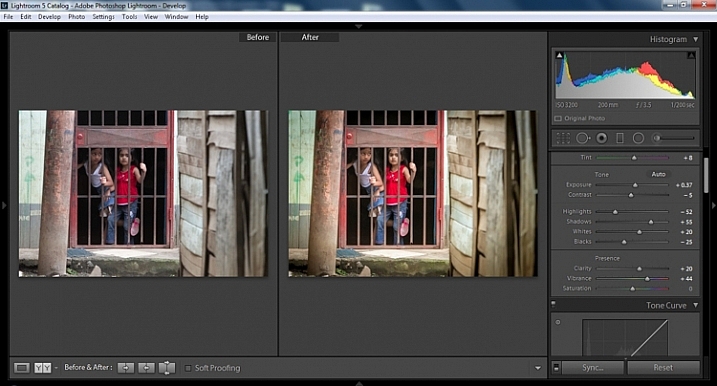
Looking at the screenshot above, you can see that the all of the selected photos have had the changes made to them.  If I were to go back and make all the individual changes to the potentially tens, hundreds, or even in bizarre cases thousands of photos, it would have taken me time that I don’t have, and neither do you. Looking at the image below you can see that the exposure, shadows, lights, whites and blacks have remained unique to the individual photo.

2015.09.25 Street Editing Tips Lightroom 018 verify sync basic settings

Below are simple side by side comparisons. In the last one I actually made a few additional small adjustments, and added a -10 vignette. Other than that, it is ready for export, along with almost all of the other photos that were just individually and batch adjusted. It is a bit of mix and match magic that keeps your photos natural, and true to the street.

2015.09.25 Street Editing Tips Lightroom 019 compare

2015.09.25 Street Editing Tips Lightroom 021 compare

2015.09.25 Street Editing Tips Lightroom 020 compare

Clarity

Clarity increases the contrast where two different tonal values meet. It is like contrast but on a micro scale, makes the image seem to be sharper. The lights will get lighter and the darks darker, but only where the different tone values meet, not broadly across the whole tonal range of the image.

Vibrance

Vibrance increases the tone of colors that are not already saturated. It is like a balancing scale for color. Saturation on the other hand, increases the intensity of all spectrums of light. Thus, vibrancy helps to bring out subtleties in the colors. For street photography, it brings out richness, without creating an over-saturated look. Sometimes I pull the vibrance up, and push the saturation down, to maintain an urban feel but doing so without making it look over-worked.

Sharpness

Just as I said, clarity is like contrast on the micro scale, sharpness is like clarity on a micro scale. Thus, it is like micro-micro scale. So we are still dealing with tonal values, but in even more detail. So be careful how much you increase your sharpness. Never try to rescue camera shake or blur in the photo using sharpness. “The devil is in the detail,” and this is no truer than in the sharpness slider. Because what you gain in sharpness you also increase the amount of noise (not desirable). If you have a high ISO, sharpness is more of an enemy than a friend.

EXTRA

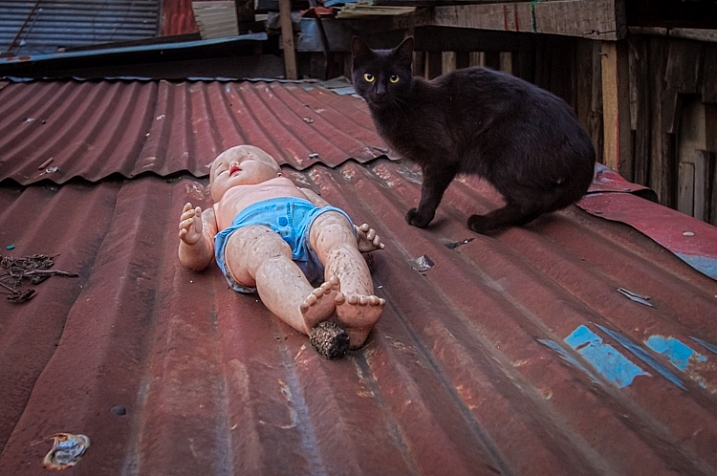
Final image all adjustments applied

Masking

Textures will become more enhanced, but smooth surfaces will not be affected, resulting in less excess noise being introduced. This will help the street photography mood, without giving it an overly grainy feeling, or your shadows having too much noise. So how much of this movement left and right on the Masking slider is helping or hurting all your hard work? Thanks to those “AUTO guys” the Alt key on windows (Opt on Mac) will give you a grayscale impression of exactly where, and how the sharpening is impacting your photo. White indicates the area on the photo where sharpening is being applied, and black shows where it is not. You will notice that the contrasts and textures deserve most of the sharpening, alleviating your smooth tones and surfaces from the ill effects of sharpness.

Summary

So hopefully that will give you some things to try out with your images to process your street photography faster and consistently. Do you have any other tricks and tips you use? Please share in the comments below.

googletag.cmd.push(function() {
tablet_slots.push( googletag.defineSlot( “/1005424/_dPSv4_tab-all-article-bottom_(300×250)”, [300, 250], “pb-ad-78623” ).addService( googletag.pubads() ) ); } );

googletag.cmd.push(function() {
mobile_slots.push( googletag.defineSlot( “/1005424/_dPSv4_mob-all-article-bottom_(300×250)”, [300, 250], “pb-ad-78158” ).addService( googletag.pubads() ) ); } );

The post 13 Steps for Editing Street Photography in Lightroom from Start to Finish by Branson Quenzer appeared first on Digital Photography School.


Digital Photography School

 
Comments Off on 13 Steps for Editing Street Photography in Lightroom from Start to Finish

Posted in Photography


Fujifilm XF 100-400mm F4.5-5.6 OIS WR lens moves from roadmap to reality

18 Jan

Fujifilm has officially announced its Fujinon XF 100-400mm F4.5-5.6 R LM OIS WR lens, which has been on the company’s roadmap since early 2015.

This weather-sealed lens, equivalent to 152-609mm (F6.8-8.4 equivalent) when mounted on an X-series body, has nine rounded aperture blades, 5 ED and 1 Super ED elements, and a fluorine coating. It also features a 5-stop image stabilization system and twin linear motors for fast, responsive focusing performance.

The lens is compatible with Fujifilm’s 1.4X teleconverter, giving users an equivalent focal length of 213-853mm.

You’ll be able to pick up the 100-400mm F4.5-5.6 lens in February for $ 1899.95.

FUJIFILM ANNOUNCES NEW ADDITIONS TO THE X-SERIES LINE OF CAMERAS AND LENSES

X-Pro2, X-E2S, X70 and XF100-400mmF4.5-5.6 R LM OIS WR join the X-Series; all-weather FinePix XP90 gets the shot from sand to slopes

Valhalla, N.Y., January 14, 2016 FUJIFILM North America Corporation, a leader in digital imaging, today announced new additions to the award-winning X-Series line of premium fixed and mirrorless cameras, and ultra-high quality lenses, including: the FUJIFILM X-Pro2, FUJIFILM X-E2S, FUJIFILM X70 and FUJINON XF100-400mmF4.5-5.6 R LM OIS WR.  Fujifilm also introduced the new rugged and waterproof FinePix XP90, perfect for capturing amazing images everywhere, from underwater to mountain tops.

FUJINON XF100-400mmF4.5-5.6 R LM OIS WR

The new FUJINON XF100-400mmF4.5-5.6 R LM OIS WR is a weather-sealed, superior telephoto lens that gives photographers exceptionally sharp images with a 152mm-609mm equivalent in 35mm format. The high-performance XF100-400mmF4.5-5.6 R LM OIS WR has an optical construction of 21 elements in 14 groups, and includes five ED lenses and one Super ED lens to help reduce chromatic aberration that often occurs in telephoto lenses. As a result, it delivers the highest image quality in its class.

The XF100-400mmF4.5-5.6 R LM OIS WR has been designed for handheld shooting with a 5.0-stop image stabilization system and twin linear motors for speedy autofocus that makes it perfect for shooting fast-moving subjects. The lens is also water and dust resistant and can operate in temperatures as low as 14°F, making it suitable for use in a wide range of outdoor shooting conditions. A fluorine coating has also been applied to the front lens element to repel water and dirt, further improving the toughness and functionality of the lens.

FUJINON XF100-400mmF4.5-5.6 R LM OIS WR key features:

  • Uses  21 elements in 14 groups, and 5 extra-low dispersion elements and 1 super extra low dispersion elements
    • Rounded 9 blade aperture
    • 1/3 EV (15 steps)
    • Water-repellent fluorine coating
  • Weather-sealed with 13 water and dust resistant seals at 12 points
  • Included lens hoods features a sliding window for accessing a polarizing filter and locking mechanism
  • Compatible the XF1.4X TC WR teleconverter (140-560mm F6.3-8 or 213-853mm in 35mm equivalent)
  •  Compatible with optional lens plate (MLP-75XF) and optional ARCA SWISS tripods


The FUJINON XF100-400mmF4.5-5.6 R LM OIS WR will be available in February 2016 for USD $ 1,899.95 and CAD $ 2,149.99.

FinePix XF 100-400mm F4.5-5.6 R LM OIS WR lens specifications

Principal specifications
Lens type Zoom lens
Max Format size APS-C / DX
Focal length 100–400 mm
Image stabilisation Yes (5 stops)
Lens mount Fujifilm X
Aperture
Maximum aperture F4.5 – F5.6
Aperture ring No
Number of diaphragm blades 9
Optics
Elements 21
Groups 14
Special elements / coatings Five ED and 1 Super ED element + fluorine coating
Focus
Minimum focus 1.75 m (68.9)
Maximum magnification 0.19×
Autofocus Yes
Motor type Linear Motor
Full time manual Yes
Focus method Extending front
Distance scale No
DoF scale No
Focus distance limiter Yes
Physical
Weight 1375 g (3.03 lb)
Diameter 95 mm (3.73)
Length 211 mm (8.29)
Sealing Yes
Zoom method Rotary (extending)
Power zoom No
Zoom lock Yes
Filter thread 82.0 mm
Hood supplied Yes
Tripod collar Yes

Articles: Digital Photography Review (dpreview.com)

 
Comments Off on Fujifilm XF 100-400mm F4.5-5.6 OIS WR lens moves from roadmap to reality

Posted in Uncategorized


Sample galleries from preproduction Fujifilm X-Pro2 and X70 posted

15 Jan

We’ve got our hands on preproduction versions of Fujifilm’s X-Pro2 and X70 and have put together a sample gallery for each. Keeping in mind that these are ‘beta’ cameras, have a look at some photos from both Seattle and Japan.

Articles: Digital Photography Review (dpreview.com)

 
Comments Off on Sample galleries from preproduction Fujifilm X-Pro2 and X70 posted

Posted in Uncategorized


CES 2016: Live from the Nikon press conference

07 Jan

Update: Thats a wrap! Thanks for following along. Keep an eye on our Twitter for more updates from the show this week and follow the links below for more on these launches from Nikon.


Aside from teasing its D5 professional DSLR last month, Nikon is keeping its latest products close to its vest. We’re in the audience at the company’s CES press event and you can follow along in real-time below. And don’t forget to leave your thoughts in the comments at the bottom of the page! 

Tweets by @dpreview

// Articles: Digital Photography Review (dpreview.com)

 
Comments Off on CES 2016: Live from the Nikon press conference

Posted in Uncategorized


Happy New Year 2016 from dPS

31 Dec
Randy Tan Travelogue

By Randy Tan Travelogue

Well it’s been a fantastic year here at dPS, we hope you’ve had a good one too.

The New Year is upon us and it’s a time to reflect on the past 12 months, and look forward to the next 12.

So I’m curious, do you make goals for the new year? I’m not into making resolutions myself, I think they’re often too shallow, and most people make rash ones, that they don’t keep more than a few days. The reason is they don’t have a plan to go with them.

Goal + A plan of Action = Success

So tell me, in the comments below:

  • What are your photography goals for 2016?
  • What will you do (action plan) to move yourself closer to achieving them?

My own personal goals this year are around balance and fitness/health. So I’ve already joined a gym and have started going three times a week or more. For my photography goals, my big one is (I’m putting this out there so I actually do it and you guys can hold me to it):

  • GOAL: Make a book of my Grandmother’s images (have had the photos for two years) to give to her and my family members (she’s 96 and want to do this while she’s still here and has eyesight, which is failing her).
  • ACTION PLAN: Take 30 minutes each week to work on this project (cull images, edit them in Lightroom, and design and order the Blurb book).

Okay, it’s your turn. What is your one big goal and your action plan?

William Cho

By William Cho

PS – a future goal is to spend New Year’s in Singapore (I’ve been there over Christmas but didn’t quite make it to the 31st). Sure looks like they have an amazing fireworks display based on the two images above!

googletag.cmd.push(function() {
tablet_slots.push( googletag.defineSlot( “/1005424/_dPSv4_tab-all-article-bottom_(300×250)”, [300, 250], “pb-ad-78623” ).addService( googletag.pubads() ) ); } );

googletag.cmd.push(function() {
mobile_slots.push( googletag.defineSlot( “/1005424/_dPSv4_mob-all-article-bottom_(300×250)”, [300, 250], “pb-ad-78158” ).addService( googletag.pubads() ) ); } );

The post Happy New Year 2016 from dPS by Darlene Hildebrandt appeared first on Digital Photography School.


Digital Photography School

 
Comments Off on Happy New Year 2016 from dPS

Posted in Photography


The Top Gear Related Articles from 2015

27 Dec

As much as we hate to admit it, we photographers love gear. We want the latest greatest lens, camera, bags, and gadgets. While we can’t always afford new things, nor do we need them, it’s nice to know what’s available when we are ready to upgrade.

popular dslrs

Let’s look at some of the top gear related articles from the last year, 2015.

Cameras and General

  • 6 of the Most Essential but Underused Camera Features
  • How to Clean Your Camera Sensor and Lenses
  • Gear Envy: Five Things to Consider Before Buying Your First Camera
  • 5 Lessons Learned Switching from DSLR to Mirrorless for Travel Photography
  • The 20 Most Popular DSLRs Among our Readers
  • The 19 Most Popular Compact System and Mirrorless Cameras with Our Readers
  • Mirrorless, DSLR or Point and Shoot: Which Camera is Best for Macro Photography?
  • Do You Really Need the Latest Greatest Gear?

Lenses

popular lenses

  • The 20 Most Popular DSLR Lenses Among our Readers
  • 7 Tips to Help When You’re Stuck with Only a Prime Lens
  • Writer’s Favorite Wildlife Lens – Tamron 150-600mm
  • Writer’s Favorites – 35mm Prime Lens
  • Writer’s Favorite Lens: 50mm f/1.8
  • Photographing Stars Using a Kit Lens
  • How to Use a Wide-Angle Lens for People Photography
  • Why Every Photographer Should Use a Manual Focus Lens
  • 5 Ways a Telephoto Lens Can Improve Your Landscape Photography
  • Comparing a 24mm Versus 50mm Lens for Photographing People

Other

  • How to Select the Right Camera Memory Card
  • 5 DIY Hacks to Have in Your Camera Bag
  • dPS Writer’s Favorite Photography Gadgets
  • How to Shoot in Low-Light Conditions Without Using Flash
  • Essential Accessories for Landscape Photography
  • A Beginners Guide to Light Modifiers

googletag.cmd.push(function() {
tablet_slots.push( googletag.defineSlot( “/1005424/_dPSv4_tab-all-article-bottom_(300×250)”, [300, 250], “pb-ad-78623” ).addService( googletag.pubads() ) ); } );

googletag.cmd.push(function() {
mobile_slots.push( googletag.defineSlot( “/1005424/_dPSv4_mob-all-article-bottom_(300×250)”, [300, 250], “pb-ad-78158” ).addService( googletag.pubads() ) ); } );

The post The Top Gear Related Articles from 2015 by Darlene Hildebrandt appeared first on Digital Photography School.


Digital Photography School

 
Comments Off on The Top Gear Related Articles from 2015

Posted in Photography


Happy Holidays from dpreview!

25 Dec

As we celebrate our seventeenth anniversary (the site officially launched December 25th, 1998, when some of our staff were still in elementary school) I’d like to wish each and every one of our visitors a very Merry Christmas/Happy Holidays/Season’s Greetings/Merry Festivus* (*delete as required). It’s been a busy year here at DPReview, with our first live event, PIX 2015, which brought an amazing collection of photographers together in Seattle for two days of inspiring talks and demos, whilst also giving us a new appreciation for the sheer amount of work that goes into putting on an expo. You watch all the videos from the show – onstage and off – at the PIX2015.com/videos.

I’m incredibly proud of the work the team did this year. 2015 was the year we went big on video content, sending Barney off on adventures that took him from the Arctic Circle to Mexico for our new field tests (which he assures me was nowhere near as glamorous as it sounds). If you’ve not had chance to watch them I’d definitely recommend you head over to our YouTube channel to check them out. It’s not like there’s much else to do over the next few days, right?

Behind the scenes we’ve been working hard to update the aging content management system that runs dpreview, something that will finally allow us to start work on the site redesign that’s been sort-of-planned now for about 5 years. We hope to be able to share some of the changes with you early in the year (and get your feedback), and to start rolling out the new design towards the end of 2016. And don’t worry – if you like your DPReview just the way it is, you’ll be able to keep it (right now the most common complaint from new users is the black background / white text, but we know there’s enough of you who like it fine the way it is that we’ll offer the option to switch back to the old style). We plan to overhaul user galleries and Challenges too, but that probably won’t happen until 2017. Or 2018. Certainly before we hit our 20th anniversary. 

Our other big priority for 2016 is to improve our reviewing processes so we can produce more camera, lens and accessory reviews. The camera market has seen significant changes over the last couple of years, with the death of the point and shoot market forcing manufacturers to concentrate on their high-end enthusiast products. This is great news for photographers, but has resulted in our in-depth reviews taking longer and longer as we devise new tests and dive even deeper to fully assess the performance of what can only be described as the most advanced and capable photographic tools ever developed for the enthusiast and professional.

I’m convinced we’re doing the best, most comprehensive, most photographically relevant camera reviews we’ve ever done, but we hear your feedback – you want more reviews, more quickly. And that means we need to fundamentally overhaul the process. We’ve already started, and I sincerely hope you’ll notice a significant increase in the volume of reviews we publish once we’ve implemented all our plans. Who knows, maybe we’ll beat 2015’s record three positive feedback messages (vs several thousand telling us exactly where we should stick our website/review/forum ban)…

And so, since my family is getting tired of waiting for me to stop working and drink some egg-nog I will leave you to enjoy the holidays, take some great pictures and maybe take a break between courses to visit our comments section and tell us how wrong we are about everything 🙂

Merry Christmas!

Simon

Articles: Digital Photography Review (dpreview.com)

 
Comments Off on Happy Holidays from dpreview!

Posted in Uncategorized


Happy Holidays 2015 from dPS

25 Dec

dps happy holidays 2015

It’s Christmas day in part of the world, where most of the dPS team is based. So Merry Christmas if you celebrate that – and Happy Holidays if you celebrate with another tradition.

Thank you for being a reader and fan of dPS, we appreciate you being here, and we wish you all the best, and the happiest times with your family this season.

THE COLOURS of CHRISTMAS... POINSETTIA by Magda Indigo on 500px.com


Christmas dinner by Michal Marek on 500px.com

googletag.cmd.push(function() {
tablet_slots.push( googletag.defineSlot( “/1005424/_dPSv4_tab-all-article-bottom_(300×250)”, [300, 250], “pb-ad-78623” ).addService( googletag.pubads() ) ); } );

googletag.cmd.push(function() {
mobile_slots.push( googletag.defineSlot( “/1005424/_dPSv4_mob-all-article-bottom_(300×250)”, [300, 250], “pb-ad-78158” ).addService( googletag.pubads() ) ); } );

The post Happy Holidays 2015 from dPS by Darlene Hildebrandt appeared first on Digital Photography School.


Digital Photography School

 
Comments Off on Happy Holidays 2015 from dPS

Posted in Photography


Car-Free Cities: 12 Pedestrian-Only Places from Venice to NYC

22 Dec

[ By Steph in Architecture & Cities & Urbanism. ]

car free 42 3

It’s funny how the idea of a purpose-built, car-free city where everything you need is easily accessible on foot seems so modern, yet it’s actually a return to our roots. To some, banning automobiles from densely populated urban centers is a radical concept, but European cities like Venice and Brussels are giving architects and urban planners fresh inspiration for contemporary equivalents. Here’s a mix of historic car-free places around the world, and pedestrian-only proposals for cities like New York, Los Angeles and Philadelphia.

NYC’s Broadway as a Pedestrian-Only Park
car free broadway

car free broadway 2

car free broadway 3

One of New York City’s best-known yet least-busy streets could transform into a pedestrian-only park, eliminating cars and trucks and providing green pathways to and from major public spaces like Times Square and Madison Square Park. The difference between converting a section of the city to a park and creating a car-free section is access to all of the businesses and public services residents need on a daily basis, so depending on how it’s handled, this could be a major, positive change to the way the city functions. The proposal, by Perkins Eastman, would also help Manhattan manage its drainage system, allowing water to be absorbed into the soil.

A Prime Pedestrian-Friendly Example: Venice, Italy
car free venice 1

car free venice 2

Quite simply the greatest pedestrian city in the world, Venice’s very walkable web of streets forbids almost all motor vehicle traffic, with dense buildings clustered around charming promenades and tranquil canals. Home to 70,000 residents and temporarily hosting many thousands more tourists year-round, Venice offers the same modes of transportation now as it did centuries ago, with its 118 small islands connected by over 400 bridges and accessible by boat.

Great City: China’s Car-Free Dream Oasis
car free china

car free china 2
Will China’s ‘Great City’ ever become a reality? There’s been no word on this project for a few years, but perhaps this entirely walkable city of 80,000 planned for a rural area outside Chengdu could still someday be built. The development bans motorized vehicles other than a mass transit system, and is organized around a series of high-rise towers surrounded by green public spaces. Walking from the center of the city to the parks takes just ten minutes.

Vision42: A New 42nd Street
car free 42

car free 42 2

car free 42 3

Citizens of Manhattan have come together to propose a reimagined and upgraded version of 42nd street in Midtown, adding a low-floor light rail system that travels through a landscaped pedestrian boulevard. Vision42 “welcomes pedestrians with space, greenery, and amenities, combined with speedy and efficient river-to-river travel, via a modern, at-grade, low-floor light rail line” adoptable within four years. The photos are downright utopian – imagine being able to navigate Manhattan on foot without the sound of honking horns and screaming cabbies.

Next Page – Click Below to Read More:
Car Free Cities 12 Pedestrian Only Places From Venice To Nyc

Share on Facebook


[ By Steph in Architecture & Cities & Urbanism. ]

[ WebUrbanist | Archives | Galleries | Privacy | TOS ]


WebUrbanist

 
Comments Off on Car-Free Cities: 12 Pedestrian-Only Places from Venice to NYC

Posted in Creativity