RSS
 

Posts Tagged ‘from’

5 Tips for Doing Photography from a Hot Air Balloon or Biplane

08 May

Do you do most of your shooting with your feet firmly planted on the ground? Camera shake is a basic concept that directs you to take a strong stance, brace your elbows, and keep that camera as still as possible. But what if you are not on the ground? What if you are up in the air? For myself, I would say that 95% of my photography happens on land, and while I get to do some underwater scuba photography sometimes, and that shooting from the sky is something I have only done a couple of times. But I hope that the lessons I have learned will help you, when and if you have that rare opportunity to get up off the ground and photograph the world from new heights.

001 Title

These tips are inspired by a balloon flight that I had in Bagan, Myanmar. Despite growing up with one of the world’s largest balloon festivals in my backyard (Albuquerque, New Mexico), I had never been in one. I have helped many land, but never been up in a balloon. So in Bagan, when an opportunity presented itself, I couldn’t think of a better way of seeing the over 2,000 temples of the area from the air. Also, I will show some photography examples from a single engine prop plane flight over the Bay Area, California.

So here are my five tips for doing photography from midair:

1. There’s limited space – so chose wisely

In anything defying gravity, whether it be a balloon or a plane, space is always limited. Before going up, there should be a safety briefing, and the pilot has the final say. So talk to the pilot and see if you can get a spot on the corner, or if he knows the best place from which to get a photos. It may not even be where you expect.

002 Limited space

2. The changing light conditions – be prepared

Most balloon flights start before sunrise, for both romantic notions, along with better flying conditions. But for a photographer that makes our job all the more difficult to capture the early morning darkness, turning into blue, then golden hour, and finally full daylight. So we have four different lighting conditions that need to be captured. If you bring a tripod leave it on the ground. It may be good for a sunrise picture, but getting the balloons or airplanes ready requires work. So there are lots of moving parts, and when you are in the air, you will definitely not need it.

The tip is really that there are many variables regarding light conditions.  I know it is a little obvious, but in a balloon (or airplane) you are not in a stable environment.  You will be dealing with multiple light conditions in a limited time and it is not so easy to just wake up the next day and fly again, so you need to be prepared for anything.

Bring a flash for fill. Use a gel on your flash to balance the blue or orange natural light. The fill flash is for the people in the balloon. During flight the balloon rotates, thus there are many times when the sun is at your back, being able to fill the shadows with some light is beneficial.

003 Changing light 2

003 Changing light

3. Camera – bring a second one along if possible

While I am not a gear junky, this is one place where it is nice to have another camera on hand. The confining space and the dynamic conditions (take off, spinning, turning, landing, etc., along with the changing light) make an extra camera really handy to have to be able get a range of shots in a limited space, in a limited amount of time. There are really not many options for doing that without having multiple cameras.

4. Lenses – take a long one

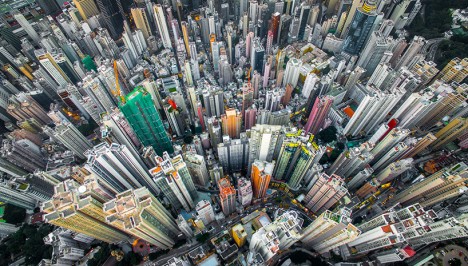
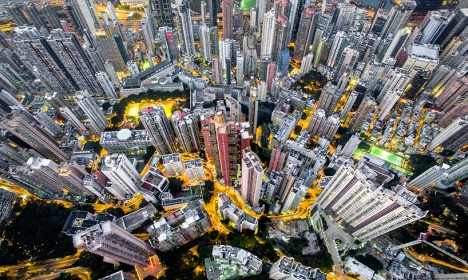
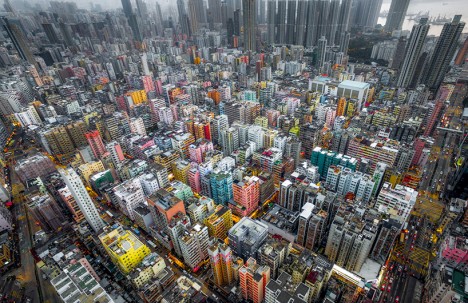
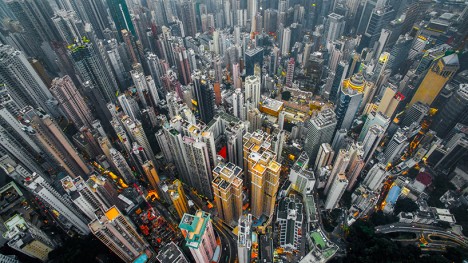
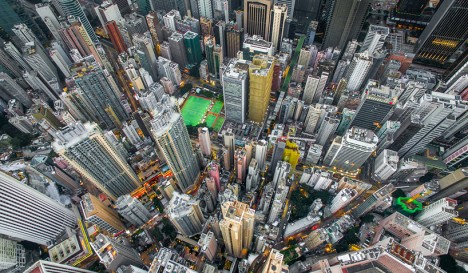
So what lenses to put on your cameras, is the next logical question. My first tip with lenses would be to bring a long telephoto. I have seen too many people with a 16-35mm lens try get the whole landscape, but when you are up high, you can get everything in frame with a longer lens. At 16mm the features of the landscape become minuscule from the air. It may seem strange to you to use a longer focal length lens for landscapes, but they are your good friend when floating or flying.

004 Lens 150mm

150mm lens

5. Don’t forget to just enjoy the trip

Balloons are to airplanes, as sailboats are to motorboats – they are quiet and hover calmly. It’s a bit surreal that it’s just a pocket of air that so delicately hoists you off the ground and drifts with the wind. It’s so smooth, so enjoy it!

Let me give you a breakdown of what I found worked for me, and if you have your own ideas please share them in the comments below.

004 Lens 200mm

My two cameras where a Canon 7D and a G-12. I brought two lenses with me, an equivalent 16-35mm lens, which stayed in my bag once we loaded up, and a 70-200mm. I brought a Canon 430ex II flash that was mounted on the hot shoe of my Canon G-12 (no need for it to be on the 70-200 when you are floating way up in the air). The flash was used primarily as fill light when the balloon would spin into the sunset with the sun behind. Thus, the basket, pilot and other passengers wouldn’t be black silhouettes or the background being totally blown out. I used a ¼ CTO gel to balance the orange morning sun.

Using my 70-200mm lens I was able to compress the background while still encompassing the landscape. In this case using a higher f-stop could help for clarity of both foreground and background. However, depending on when you actually get up in the air, you might want some more speed while keeping your ISO down. You also need to remember that you are moving. On the other hand, while directly over a subject a little less depth of field can be used, so a larger aperture. Takeoff and landing would be the best times to get some nice landscapes, but inside the balloon safety is first, and we were instructed to have our cameras secured. Thus, after takeoff get ready to start shooting before you are just way too high.

005 Zoom in

While having coffee and getting instructions from our pilot I asked a question, made a joke (that was not about safety), and hinted at a corner spot. The pilot, in my case, goes up every day during the winter months, and was no fool when it came to understanding my intention. So what do you know, he assigned me first, right in the corner. Whether he did it for a tip or for photography sake, I have no idea, but it worked in my favor. Instead of only a 180 degree view, I saw more like 270 degrees and that was 25% more options. I took it.

So go out there and get up in the air, land safely, and see the world from a new perspective. After all, photography is about perspectives and new horizons. Change your perspective of the world down here.

006 Salt Ponds of San Fransisco Bay Areal Photo from Single Engine Prop Plane

007 Sutro Tower San Fransisco 170mm from Single Engine Prop Plane

Seeing things in a new way can only make you understand your time on the ground that much better. As photographers a common goal we all share are the amazing visuals that we capture and create. So create from above, and share your thoughts in the comment section below.

googletag.cmd.push(function() {
tablet_slots.push( googletag.defineSlot( “/1005424/_dPSv4_tab-all-article-bottom_(300×250)”, [300, 250], “pb-ad-78623” ).addService( googletag.pubads() ) ); } );

googletag.cmd.push(function() {
mobile_slots.push( googletag.defineSlot( “/1005424/_dPSv4_mob-all-article-bottom_(300×250)”, [300, 250], “pb-ad-78158” ).addService( googletag.pubads() ) ); } );

The post 5 Tips for Doing Photography from a Hot Air Balloon or Biplane by Branson Quenzer appeared first on Digital Photography School.


Digital Photography School

 
Comments Off on 5 Tips for Doing Photography from a Hot Air Balloon or Biplane

Posted in Photography


4K from Space: ISS astronauts shoot 3D movie of planet Earth

07 May

Astronauts based on the International Space Station have been working as movie makers to help create a 3D film featuring the planet Earth as viewed from space. A Beautiful Planet was shot in 4K using Canon’s cinema camera system, and will be shown in IMAX theaters from the end of the month. The film includes dramatic views of the planet lit up at night as well as overhead perspectives on weather systems and the Northern Lights.

A Beautiful Planet IMAX® Trailer

Footage for the film was collected by six space station astronauts over the course of three missions from November 2014, after Canon EOS C500 and EOS-1D C cameras were delivered to the ISS via an unmanned supply ship with a collection of lenses. Made in association with NASA, the film aims to educate viewers about Earth, but also to highlight the effects humanity has on the planet.

For more information on the film and where you can see it visit the IMAX website.

Press release

IMAX® Film ‘A Beautiful Planet’ Features “Out Of This World” Canon 4K Imagery

Using Canon Cameras and Lenses, Teams Shooting from the International Space Station Capture Breathtaking Images of Our Planet from a Vantage Point Few Get to See

MELVILLE, N.Y., April 14, 2016 – The future of 4K filmmaking is looking up — in fact, all the way to space. A Beautiful Planet, the latest 3D space documentary from acclaimed filmmaker Toni Myers and IMAX Entertainment, made in cooperation with NASA, will premiere in IMAX in New York on April 16 and was shot primarily in space using Canon cameras and lenses.  The film will be shown to the public exclusively in IMAX® and IMAX® 3D theaters beginning April 29.

The Canon EOS C500 4K Digital Cinema Camera and EOS-1D C 4K cameras were transported from Earth to the International Space Station (ISS) in November 2014 via an unmanned supply ship, and were received by NASA astronaut Terry Virts, astronaut Samantha Cristoforetti from the European Space Agency and Cosmonaut Anton Shkaplerov. This was the first time that 4K cameras were brought aboard the space station for a commercial film project. During a six-month mission at the ISS, Virts, Cristoforetti and Shkaplerov worked closely with NASA astronauts Kjell Lindgren, Butch Wilmore, Scott Kelly, and Kimiya Yui of the Japan Aerospace Exploration Agency (JAXA) to take turns using Canon’s advanced digital cameras and lenses to film footage of lightning storms, the continents, volcanoes, coral reefs and bright city lights on Earth for the film. One of the film’s greatest and most dramatic highlights, the striking imagery of the Northern Lights–or the aurora borealis– was captured by NASA astronaut Kjell Lindgren. These awe-inspiring images were previously unattainable in such stunning resolution.

The Canon EOS C500 4K (4096 x 2160-pixel) Digital Cinema Camera is capable of originating uncompressed RAW output for external recording to meet the demands of premium cinematic productions and other top-quality production markets. It features a Super 35mm, 8.85-megapixel CMOS image sensor, DIGIC DV III Image Processor and an expansive range of recording and output options specifically for 4K and 2K image acquisition. The compact, lightweight Canon EOS-1D C Digital SLR camera delivers outstanding video performance and provides video recording at 4K (4096 x 2160-pixel) or Full HD (1920 x 1080-pixel) resolution to support high-end motion picture, television production and other advanced imaging applications.

‘A Beautiful Planet’ joins Canon at NAB
A gallery of still images taken on the ISS with the Canon EOS-1D C camera and Canon lenses during the shooting of the film will be shown at the Canon booth # C4325 at the National Association of Broadcasters (NAB) trade show, April 18-21, 2016 in Las Vegas, NV. During NAB, the film’s Director of Photography, James Neihouse, ASC, will speak at Canon’s stage on the challenges and benefits of shooting in space. Joining him will be Marsha Ivins, a consultant on the film, former NASA astronaut, and a veteran of five space shuttle missions. Neihouse has worked on more than 30 IMAX films including Space Station 3D and Hubble 3D and trained more than 25 shuttle and space-station crews on the intricacies of large-format filmmaking.

The documentary, A Beautiful Planet was produced, written, and directed by Toni Myers, and is narrated by Academy Award®-winning actress Jennifer Lawrence.

About A Beautiful Planet
A Beautiful Planet is a breathtaking portrait of Earth from space, providing a unique perspective and increased understanding of our planet and galaxy as never seen before. Made in cooperation with the National Aeronautics and Space Administration (NASA), the film features stunning footage of our magnificent blue planet — and the effects humanity has had on it over time — captured by the astronauts aboard the International Space Station (ISS). From space, Earth blazes at night with the electric intensity of human expansion — a direct visualization of our changing world. But it is within our power to protect the planet. As we continue to explore and gain knowledge of our galaxy, we also develop a deeper connection to the place we all call home. From IMAX Entertainment and Toni Myers — the acclaimed filmmaker behind celebrated IMAX® documentaries Hubble 3D, and Space Station 3D — A Beautiful Planet presents an awe-inspiring glimpse of Earth and a hopeful look into the future of humanity.

Articles: Digital Photography Review (dpreview.com)

 
Comments Off on 4K from Space: ISS astronauts shoot 3D movie of planet Earth

Posted in Uncategorized


A Landscape Photography Tutorial (from a Portrait Photographer Trying Something New)

06 May

landscape-photography-tutorial

Sometimes when you’re in a rut the best way to get out of it is to do something completely out of the box and try something new – something a little risky.

Portrait photographer Sean Tucker changed things up recently but setting out on a landscape photography road trip.

He videos the experience and I think the result is fascinating – both to see how he approached his landscape photography but also to hear his insights on stepping outside his comfort zone to approach a new type of photography for him.

I like what he wrote in his blog about the experiment:

“There was no guarantee the trip wouldn’t be a waste as I’m not a professional landscape photographer by any means, but I think the best creativity will always come out when you are taking risks.”

Grab a cup of your favourite beverage and settle down to journey with Sean. The end results are at the end of the video.

Have you ever stepped out of your normal type of photography to try something new like Sean did?

Further Reading for helping you to break out of a photography rut:

  • 10 Tips to Motivate You out of a Photography Rut
  • 5 Ways To Break Out of a Creative Photography Rut
  • Are You in a Photography Rut? 11 Tips to Get Out of It!

googletag.cmd.push(function() {
tablet_slots.push( googletag.defineSlot( “/1005424/_dPSv4_tab-all-article-bottom_(300×250)”, [300, 250], “pb-ad-78623” ).addService( googletag.pubads() ) ); } );

googletag.cmd.push(function() {
mobile_slots.push( googletag.defineSlot( “/1005424/_dPSv4_mob-all-article-bottom_(300×250)”, [300, 250], “pb-ad-78158” ).addService( googletag.pubads() ) ); } );

The post A Landscape Photography Tutorial (from a Portrait Photographer Trying Something New) by Darren Rowse appeared first on Digital Photography School.


Digital Photography School

 
Comments Off on A Landscape Photography Tutorial (from a Portrait Photographer Trying Something New)

Posted in Photography


Blog Project: Your Best Photos From 2015

27 Apr
Half Dome Sunset from Olmstead Point, Yosemite

It’s that time of year again and if you’re a regular JMG-Galleries reader that means one thing…
it is time to kick off the 9th annual best photos of the year blog project. This is by far my most popular blog project with over 200 participants taking part last year (see Best Photos of 2014, 2013,  2012, 2011, 2010, 2009, 2008 and 2007). Around this time of year people start to ask if I’d be running this project again. The answer clearly is always YES!
1. I love this project and I love that so many people get excited about it.
2. It’s a great way exercise to improve your photography (10 Ways to Top Your Best 20xx Photographs).
So with out any further delay here is how you take part to submit your best photos of 2015.

How to Participate (Read Carefully)

  1. Review & select your best photos from 2015.
    Note: Photo edit carefully narrowing down your results to your best 10 or 5 photos. Reference Pro Tips: Photo Editing with Gary Crabbe for pointers.
  2. Create a blog post on your web site or a Flickr/500px set containing your best photos from 2015.
  3. Complete the form below by Saturday JANUARY 2nd at 11:59PM PST to take part. The following Tuesday, or there about, I’ll post a link to all submitted sites and photos on my blog. Through out the week I’ll also share the results across all my social media accounts.

Spread the Word!
Feel free to spread the word of this project on Twitter, Facebook, Google+, photo forums you frequent and/or your blogs. All who are interested in taking part are invited.


Loading…

The post Blog Project: Your Best Photos From 2015 appeared first on JMG-Galleries – Landscape, Nature & Travel Photography.


JMG-Galleries – Landscape, Nature & Travel Photography

 
Comments Off on Blog Project: Your Best Photos From 2015

Posted in Equipment


Highlight reel: top video trends from NAB 2016

26 Apr

NAB 2016

Last week Las Vegas once again hosted the annual National Association of Broadcasters Show. Although many of the products and technologies seen at NAB won’t be of direct interest our audience (think satellite trucks and news studios), the explosion of high quality, affordable tools aimed at filmmakers and videographers make it a good place to watch industry trends and new product categories. Perhaps more importantly, NAB can provide insight into what technologies we might expect to filter down to prosumer and consumer products in a few years time.

Take a look at a few trends and products from NAB 2016 that caught our eye and got us excited.

Virtual Reality (VR)

VR was everywhere at NAB, with multiple sessions focused on VR technology, storytelling and distribution that were packed to standing room only. A top destination was the VR Showcase sponsored by Kaleidoscope VR, a VR studio, and Jaunt, a maker of VR cinema cameras. With dozens of stations featuring headsets from Samsung, Oculus and HTC, visitors could experience cinematic VR experiences in person.

These weren’t just your standard ‘park-a-camera-in-an-iconic-spot-and-look-around’ videos, but actual films created with a VR audience in mind. Imagine watching a film about the 7/7 London Tube bombings, except you’re sitting on the train while the story plays out. It creates an immersive, visceral experience that simply wouldn’t work with conventional filmmaking.

We’re very excited about the creative possibilities that VR can provide to photographers and filmmakers, so we’re planning a follow-up report to tell you more about VR and our experiences at NAB.

Nokia OZO: Impressive VR for a price

The Nokia OZO includes eight cameras and eight microphones to create immersive VR footage. You can pick one up for a cool $ 60,000.

If you still equate the name Nokia with mobile phones, it’s time to change your thinking. The company has made a big push into VR, making a big splash at NAB with its $ 60,000 OZO 360-degree spherical VR camera. The OZO features 8 cameras, each with 195-degree field of view and global shutter, as well as the ability to capture stereo video for 3D effect. To add additional realism, the OZO also features 8 microphones in order to provide 360 sound, something that’s important for creating immersive VR experiences.

Although the quality of the footage from the OZO still isn’t up to the resolution and dynamic range standards we’re accustomed to seeing in digital still cameras, the VR experiences created by the OZO were impressive and compelling. The directional sound had a huge impact on the realism of footage shot with the camera, and it captured some of the best VR footage we’ve seen. Count us in for a test unit!

GoPro Omni

Not to be left out the the VR extravaganza, GoPro showed off its new Omni camera, a cube-shaped cage that holds six GoPro Hero 4 cameras. Although rigs holding multiple GoPro cameras aren’t new in the VR world, GoPro has embedded useful features to improve the experience of a multi-GoPro setup. Primarily, all cameras in the rig are synchronized and act as a single camera. 

This may not seem like a big deal, but if you’ve ever tried to set up, sync, and use multiple cameras at one time you’ll appreciate the convenience. Making a mistake on just one camera ruins your entire shoot. The Omni solves this problem and syncs everything, right down to the rolling shutter, between all the cameras at once. 

GoPro is selling the Omni for $ 1,499 (rig only) or $ 4,999 for the full kit.

4K? No thanks, I think I’ll take 8K instead.

Although many consumers are still learning about 4K video technology, the broadcast industry is already beginning to think about 8K video, with companies such as NHK, Canon, Panasonic, Ikegami and Planar showing off 8K cameras and displays.

Let’s get the obvious out of the way right up front: 8K IS AMAZING! (Yes, we meant to scream that.)

OK, let’s put 8K this into some context. None of these companies really expect 8K technology to come to your living room any time soon, though that’s likely to occur in some form by the 2020 Summer Olympics in Tokyo, which seems to be a common target in the industry.

The real interest in 8K technology right now is for content acquisition, and it’s the same reason producers of HD content like to shoot in 4K: additional post-processing options and better quality footage when downsized. Display manufacturers are also excited about 8K for applications where size really does matter, such as cinema screens, displays at amusement parks, and giant stadium screens.

Trust us, though. Once you’ve seen 8K displays you’ll never look at a 4K screen the same again…

8K Displays

It’s almost impossible to see the pixels on Canon’s prototype 8K reference display – even with a magnifying glass.

Speaking of 8K displays, one of the most impressive examples was Canon’s prototype 8K reference display. To fully appreciate just how sharp this display is, consider that each frame of 8K video is just over 35MP of resolution – the rough equivalent of a full resolution Nikon D810 image. Pack that into a relatively small screen and for all practical purposes it looks like a backlit fine art print.

Quite simply, this redefines what a video screen is. Once you remove any noticeable pixelation, it’s essentially indistinguishable from a nicely backlit, printed image. We could easily imagine these being used for museum exhibits, but we suspect content creators will come up with interesting ways to use them that we haven’t even envisioned yet.

Almost as a tease, Canon tethered a magnifying glass to the display so you could look at the pixels up close. While it’s possible to see them you have to look really hard – certainly much closer than you ever would in real world conditions – and even then you have to convince yourself that you’re really seeing them.

8K Prints

Prints in Canon’s 8K print gallery were stunning and looked as good as what we would expect from even the best still cameras.

This is why still photographers should care about 8K video.

Each frame of 8K video is a 35MP image, meaning that as long as you use settings to avoid motion blur it’s possible to make some spectacular prints.

Canon illustrated this potential with an 8K print gallery, exhibiting prints made from individual frames of 8K video. The results were spectacular, with vivid colors and sharp edges. Really, if they had told us the photos were shot by a Canon 5DS or a Nikon D810 we would have believed them. If this is the future, bring it on.

Atomos Shogun Flame and Ninja Flame

The new Atomos Shogun Flame (top) and the original Shogun (bottom). The new Flame includes an HDR screen and AtomHDR technology, which allows videographers to see a live approximation of what graded footage will look like when shooting in Log.

Atomos has become a favorite of video shooters thanks to its excellent off-camera displays and recorders. At NAB the company showcased its newest line of ‘Flame’ products, which add significant new features to its Shogun and Ninja recorders.

The biggest improvement most users will notice are the displays: the screens are now 10-bit HDR displays that are up to four times brighter than previous models, meaning they can even be used outdoors without a hood.

Atomos also introduced a technology called AtomHDR to help videographers who shoot in Log format. Log video typically looks very flat until it’s color graded; AtomHDR allows you to record in Log while displaying accurate contrast and colors on-screen, giving a good approximation of what graded footage will look like. We use the original Shogun here in our studio and we were really impressed the AtomHDR technology. In the photo above you can see a comparison of the new Shogun Flame using AtomHDR (top) and the old Shogun without AtomHDR, but to be honest the photo doesn’t fully capture how much better the Shogun Flame looks.

The Shogun Flame lists for $ 1,695, and the Ninja Flame (which lacks some features such as SDI and XLR inputs) lists for $ 1,295.

Blackmagic Video Assist 4K

Videographers also flocked to the Blackmagicdesign booth to try out the Blackmagic Video Assist 4K, an updated version of its Video Assist monitor and recorder. The Video Assist 4K is built around a 7-inch display and includes HDMI and SDI plugs, dual SD card slots for continuous UHD recording, LANC connection for remote control, and XLR microphone inputs. Footage can be recorded in 10-bit 4:2:2 video in either ProRes or DNxHD for easy downstream editing. The Video Assist 4K looks to be a great option for people who need off-camera recording, especially those shooting events that may require long, continuous recording.

The Video Assist 4K lists for $ 895.

Sennheiser Microphones

The Sennheiser MKE 440.

Cameras tend to get a lot of attention, but videographers know that sound can be just as important as a good picture when capturing video.

Last year Sennheiser introduced the ClipMic digital and MKE 2 digital, lavalier microphones that plug directly into the Lighting port of an iOS device to record high quality sound, turning iPhones into great off-camera recorders. This year, the company followed up with additional Lightning-compatible microphones: The HandMic digital, a handheld microphone designed for mobile journalism, and the MK 4 digital, a studio microphone. We’ve actually been using one of the MKE 2 digital mics with an iPhone to record a lot of interviews over the past year and it works great, so we’re really excited to see Sennheiser expanding this line of products.

Sennheiser also introduced the MKE 440 stereo microphone for DSLRs (see photo). Designed to mount on a camera’s hot shoe, the MKE 400 provides high quality stereo recording as opposed to the mono recording provided by most DSLR microphones, and should prove useful when recording an immersive soundscape with an on-camera mic is important.

Lytro Cinema Camera

The Lytro Cinema camera promises to change the way films are made, though at the moment it’s about the length of a VW minibus.

Lytro was the clear winner of the ‘Well, that was bigger than we expected…’ award at NAB. 

The company, which recently announced its exit from the consumer photography business, literally pulled the cover off its new prototype Cinema camera to a standing room only crowd. Featuring a 755MP imaging sensor that appears to be about a foot wide, the Cinema camera has the potential to change the way some films are shot. 

Lytro’s Jon Karafin gave a live demo illustrating the camera’s unique ability to alter creative choices in post-processing, such as plane of focus, depth of field and depth-based keying. And because all of the computational work is done by thousands of CPUs in Google’s cloud, he was able to run the entire demo off a laptop computer.

The prototype camera is huge (about the same length as a VW minibus, to our eye), but company representatives told us that smaller versions will follow. We think this technology has a lot of potential and look forward to seeing how it evolves. You can read our analysis of the Lytro announcement here.

Articles: Digital Photography Review (dpreview.com)

 
Comments Off on Highlight reel: top video trends from NAB 2016

Posted in Uncategorized


Scaffolding Staircase: Huge Steps to Rise from Rotterdam Plaza

18 Apr

[ By WebUrbanist in Architecture & Public & Institutional. ]

urban staircase

A temporary installation to commemorate the rebuilding of the city after the second world war, this massive staircase made from scaffolding will lead visitors up onto a postwar structure in the heart of Rotterdam.

scaffolding staircase close up

Standing 60 feet high, the staircase of the 180 steps end on top of the Groot Handelsgebouw, an early building from the postwar construction effort that began 75 years ago. Dubbed simply The Stairs, this project by Dutch architecture firm MVRDV will also involve film screenings and events on the rooftop.

central station rotterdam

If the resulting temporary roof-topping venue is sufficiently popular, a more permanent means of access may replace the temporary stairs.

mvrdv market hall

Other temporary and permanent architectural and urban design projects are also being developed and opened as part of the 75th-year commemoration (above: Market Hall with digital mural by MVRDV)

Share on Facebook


[ By WebUrbanist in Architecture & Public & Institutional. ]

[ WebUrbanist | Archives | Galleries | Privacy | TOS ]


WebUrbanist

 
Comments Off on Scaffolding Staircase: Huge Steps to Rise from Rotterdam Plaza

Posted in Creativity


4 Things You Can Learn From Film and How to Apply Them to Your Digital Photography

15 Apr

Since the introduction of digital cameras, photography is becoming more and more popular amongst everyone. This is largely due to the fact digital has dramatically reduced the cost of taking photos, as they no longer required to be developed, and the recording media (SD or CF cards) can be reused. Another fantastic advantage of digital, is the instant replay it gives you of the photo just taken, giving you the option to correct any flaws in the image. This is something that could not be done with film, and each photo taken would cost money; regardless of how great it was, or was not.

Digital Film

Digital technology has come so far in the last several years that it is out-performing film on almost every level; for example, camera’s can now go up to ISO 3.2 million – an ASA (film equivalent to ISO) level that was never even considered during the films days.

But does this mean that film is useless, and has nothing to offer? Absolutely not. Regardless of whether film is making some sort of a resurgence or not, there are still many things that film can teach you about photography, that digital simply cannot. Here are some thing that shooting with film can teach you better than what digital capture can do:

1. SELF CONFIDENCE

With the immediacy of the feedback that digital cameras provide you, it is all too easy and tempting to continually check your camera’s LCD to see how your photo has turned out. This tendency to keep looking at the LCD is often referred to as chimping. You may chimp for various reasons, ranging from ensuring your photo is correctly exposed (the most common reason), in focus, or seeking self-gratification that you’ve done a good job.

Now, imagine you were photographing with film. You would not be able to see your photos straight away; you’d have to wait a week or even two! You would not be able to see if the photo was correctly exposed, or pat yourself on the back about getting a great frame – at least not right away!

Film taught photographers to read the light and tones within their environment, and to learn how to use their tools correctly. This built confidence within photographers to trust in their own abilities and decisions. It meant that photographers would worry less about receiving positive reassurance on the photo they’d just taken; they knew that they had exposed and focussed correctly and kept going. There was no ,”Hold on, I’ll just check to make sure your wedding dress is correctly exposed”, or “I missed that shot because I was checking my exposure.”

Fredrik Holmberg

By Fredrik Holmberg

So why is chimping a bad habit? Because it says that you are not that confident in your own abilities and judgement, and you need the constant reassurance that you are doing a good job. It results in you potentially missing a great opportunity for a photograph, as your attention has now shifted from your subject to your camera. Wedding, sport, and action photographers may miss a critical moment, a defining moment, if they are always looking at their screen. If you’re looking at your screen, you’re not ready for the moment and you most certainly are not taking photos.

For portrait photographers, taking your camera way from your eye breaks that connection between yourself and your subject. It also says that you’re more interested in the result than you are them.

Apply this to your digital photography

To increase your confidence in your own abilities, I challenge you to only look at your LCD once or twice the next time you’re out photographing. These times should really only be to help you achieve the exposure you wish. If the lighting conditions are consistent, there is no reason you should need to look at your LCD again.

2. PUSH YOURSELF MORE

All too often you may see an outstanding result on the back of your camera. You stop taking photos because you are convinced that it cannot be bettered; only to see your friend take a better image right next to you. The instant replay of your work on the back of your camera can often prevent you from pushing yourself just that little bit further, and getting that great shot. That instant replay didn’t exist on film cameras, so photographers didn’t know if they had “the shot” or not; they had to keep pushing themselves to ensure that they did get it.

Calvinnivlac

By calvinnivlac

If you’re tempted to keep looking at your screen, I’d encourage you to turn preview or replay to off in your camera menu. If you are still tempted to press play and have a sneaky peek, tape a little piece of paper or card over the screen so you cannot see the image.

Apply this to your digital photography

Do not be tempted to keep looking at your screen, and being satisfied with what you see after the first one or two frames. Keep going. Perhaps you could try different angles, settings, lighting etc., but you should always keep pushing a little further to get a better shot. Even if it is just three or four additional frames.

3. YOU THINK MORE

Taking a photo with digital cameras costs nothing; just the minuscule amount of electricity the camera needs to operate and a little bit of storage. Memory cards can hold thousands of photos – far more than the 36-exposure roll of film. But that limitation of 36 exposures can teach you something that digital cannot – discipline.

John Goode

By John Goode

Think about the last time you went out taking photos. How many did you come back with? I would bet that you might have hundreds of photos to go through, maybe even thousands. Now, divide that number by 36. That’s how many rolls of film you went through. When you have such a limited number of exposures until you have to change your roll (which takes a lot more time than switching memory cards, by the way), you don’t just take photos every time you see something you like. You look at the subject or scene and consider it more carefully. In doing this, you evaluate if it is indeed worth taking a photo of or not.

Apply this to your digital photography

Try shooting with a smaller memory card like 1gb, or even smaller if you can find some old cards. Limit yourself to 36 shots per day or per outing. Do not delete images as you go, only fill the card or your limit of shots and no more. It will help you be more intentional with your shooting. If you are always deleting images, that defeats the purpose of having a smaller card!

4. GREATER VARIETY IN YOUR WORK

Have you ever gone through photos that you’ve taken and realized that you took so many images of the same thing, with little or no difference between many of them? Do you find it boring going through your photos sometimes because there is such little variation in so many images? With film, each frame cost more money than digital, so photographers made each frame count.

Phil

By Phil

Apply this to your digital photography

Do you really need 10 photos of the same object, from the same angle? No, you don’t – those 10 frames are all the same, so therefore are really just one photo taken ten times. You can still have 10 photos of the same subject, but vary them; try different angles, focal length, exposures. Even try photographing it with a different lens (wide angle versus telephoto). Make each frame different to the next, and make each frame count. Not all the images will work out, but you will have much more variety in your work from the same number of subjects. It will also help you greatly in the future when deciding on what approach to take for your next subject.

Summary

So there you have it, some simple and practical things that shooting with film can teach you better than digital. If you have a film camera laying about collecting dust, why not pick it up, put a fresh roll of film in (extra points if you shoot on slide film) and start using it? It will be quite a strange sensation using a film camera and the the images you take may not be that fantastic to start. Should you stick with it, it will help you on your journey to improving you photography and in my experience, nothing is more satisfying that nailing a photo on film over digital.

googletag.cmd.push(function() {
tablet_slots.push( googletag.defineSlot( “/1005424/_dPSv4_tab-all-article-bottom_(300×250)”, [300, 250], “pb-ad-78623” ).addService( googletag.pubads() ) ); } );

googletag.cmd.push(function() {
mobile_slots.push( googletag.defineSlot( “/1005424/_dPSv4_mob-all-article-bottom_(300×250)”, [300, 250], “pb-ad-78158” ).addService( googletag.pubads() ) ); } );

The post 4 Things You Can Learn From Film and How to Apply Them to Your Digital Photography by Daniel Smith appeared first on Digital Photography School.


Digital Photography School

 
Comments Off on 4 Things You Can Learn From Film and How to Apply Them to Your Digital Photography

Posted in Photography


Beastgrip expands into UK and Japanese markets, announces plans for high quality lenses from Kenko Tokina

13 Apr

$ (document).ready(function() { SampleGalleryV2({“containerId”:”embeddedSampleGallery_4199009759″,”galleryId”:”4199009759″,”isEmbeddedWidget”:true,”standalone”:false,”selectedImageIndex”:0,”startInCommentsView”:false,”isMobile”:false}) });

US mobile phone rig and lens mount manufacturer Beastgrip has started distribution of its Beastgrip Pro smartphone grip in the UK and Japan, and announced it is working on new ‘high quality’ lenses with Kenko Tokina. The Beastgrip Pro is an adaptable smartphone housing that uses adjustable clamps and a sliding lens mount assembly to fit conversion lenses over the camera of any model – Beastgrip claims.

The system uses a 37mm threaded lens mount that accepts conversion lenses from Beastgrip’s own collection as well as those from independent manufacturers. The company also offers what is calls a DOF (depth-of-field) adapter that allows Canon EF-mount lenses to be used on the rig in front of the smartphone lens to achieve a shallow depth of field.

The rig also features a cold shoe and tripod thread for attaching accessories such as microphones and lights, as well as a number of mounting threads.

While the company offers its own wide, ultra-wide and fisheye conversion lenses the partnership with Kenko Tokina promises some extra interesting lenses. Kenko’s own line of smartphone conversion lenses includes a 7x telephoto lens that would convert most smartphone focal lengths to 196mm – but that’s not to say it would be also produced to fit the Beastgrip Pro.

The system will be distributed by Kenko Tokina in Japan and Intro2020 in the UK. The price of the rig on its own is $ 139.99/£139.99, and kits are available that include wide and fisheye conversion lenses. For more information visit the Beastgrip website.


Press release:

Beastgrip Pro – the world’s first universal lens adapter and camera rig for smartphones

With immediate effect, Intro 2020 has been appointed sole UK distributor of BEASTGRIP PRO.

Beastgrip Pro is the world’s first universal lens adapter and camera rig system for smartphones. It is the ultimate tool for photographers, videographers and the rapidly growing live streaming market.

The Beastgrip Rig features an adjustable lens mount with spring loaded clamps to ensure a secure grip and perfect fit with virtually any smartphone on the market. It is a modular rig system with a removable lens mount assembly and handle that allows the user to modify the Beastgrip Pro to their own personal preference. It comes with industry-standard photography mounts and an ergonomic grip, allowing you to attach all kinds of photography gear and take a better shot.

There are 3 kits in the product range, including 2 with lenses, as follows:

Beastgrip Pro Rig
Universal/adjustable and works with virtually any camera phone on the market. It is simple and convenient to use and works with or without a protective phone case. It features a standard 37mm threaded lens/filter mount and is compatible with wide variety of conversion lenses and filters. It also features a cold shoe mount for attaching LED lights, microphones, and other accessories plus comes with five standard ¼”-20 threaded mounts for attaching to supportive photo/video gear such as tripods, stabilizers, sliders and other accessories.

Beastgrip Pro Rig plus Wide Angle Lens
This set includes a 37mm 0.43x Extreme Wide-Angle lens, which nearly doubles the field-of-view in your photo/video, letting the user see much more in the frame than a standard phone camera. It’s perfect for shooting large scenes like landscapes, concerts, sports, family photos etc.

Beastgrip Pro rig plus Wide Angle and Fish-eye lenses
Includes the Beastgrip 37mm 0.43x Extreme Wide-Angle lens and an ultra wide-angle lens that produces strong visual distortion, i.e. the classic “fisheye” circle, and an immersive 180° field-of-view. It’s perfect for action sports like skateboarding, biking, snowboarding/skis, etc.

SUGGESTED RETAIL PRICES:
•    Beastgrip Pro Rig £139.99 including VAT
•    Beastgrip Pro Rig plus Wide Angle Lens £169.99 including VAT
•    Beastgrip Pro Rig plus Wide Angle & Fisheye Lenses £199.99 including VAT

All units are available immediately.

Articles: Digital Photography Review (dpreview.com)

 
Comments Off on Beastgrip expands into UK and Japanese markets, announces plans for high quality lenses from Kenko Tokina

Posted in Uncategorized


How to Cut Out the Subject From the Background in Photoshop

10 Apr

This video by Chris from Spoon Graphics does a good job of going over many of the options available inside Photoshop for cutting things out. The most common use is to cut out the subject from the background, to place it on a different image or background – as in when making composite images.

Watch as he goes over the options for cutting things out:

Quick and dirty selection tools and methods:

  • Eraser tool (not the best choice, this is shown in the video)
  • The Magic Wand tool
  • Quick Selection tool

Pro techniques tools include:

  • Manually drawing the selection
  • Lasso tool (can be frustrating and tricky to use)
  • Pen tool (also using Paths)
  • Tonal selection
  • Channels (plus Curves or Levels)
  • Color range (quick selections based on tones in an image)
  • Layer masks
  • Refine edge tool
  • Defringe to remove halos and outlines
  • Paint hair back in manually
  • Buy a Photoshop plugin like Topaz Remask

Here’s a second video from Glyn Dewis that puts some of those techniques to use to cut out a tree from the background.

Do you know any other methods for doing cut outs? What’s your favorite? Please share in the comments below.

googletag.cmd.push(function() {
tablet_slots.push( googletag.defineSlot( “/1005424/_dPSv4_tab-all-article-bottom_(300×250)”, [300, 250], “pb-ad-78623” ).addService( googletag.pubads() ) ); } );

googletag.cmd.push(function() {
mobile_slots.push( googletag.defineSlot( “/1005424/_dPSv4_mob-all-article-bottom_(300×250)”, [300, 250], “pb-ad-78158” ).addService( googletag.pubads() ) ); } );

The post How to Cut Out the Subject From the Background in Photoshop by Darlene Hildebrandt appeared first on Digital Photography School.


Digital Photography School

 
Comments Off on How to Cut Out the Subject From the Background in Photoshop

Posted in Photography


Urban Jungle: Dizzying Drone Photos of Hong Kong from Above

08 Apr

[ By WebUrbanist in Architecture & Cities & Urbanism. ]

drone photo hong kong

Hong Kong has inspired so many iconic images of urban density shot from the ground or horizontally across buildings, but seeing it from above via drone footage gives the city an entirely fresh dimension.

drone density china

drone repeating buildings

In this series of vertigo-inducing snapshots, photographer and unmanned aerial vehicle pilot Andy Yeung captures both the chaos and order, colorfulness and monotony, of one of the world’s most stunning urban centers.

drone aerial city

drone view above

Shot from hundreds of feet in the sky, the resulting views exceed even the relatively awesome ones attainable by tripping up to the top of the adjacent hillsides. An onlooker starts to get a sense of the combination of  rigorous order and organic evolution of the city.

Share on Facebook


[ By WebUrbanist in Architecture & Cities & Urbanism. ]

[ WebUrbanist | Archives | Galleries | Privacy | TOS ]


WebUrbanist

 
Comments Off on Urban Jungle: Dizzying Drone Photos of Hong Kong from Above

Posted in Creativity