Abstract: You can alter your camera's white balance and gel your flash to "correct" nearly any ambient light color shift. But should you?Read more »
Strobist
Abstract: You can alter your camera's white balance and gel your flash to "correct" nearly any ambient light color shift. But should you?Read more »
Strobist
 |
TCL-sub-brand Alcatel might not be the best-known smartphone manufacturer out there but some of its models definitely deserve some attention from mobile photographers. The Flash, which was announced today, is such a device. Its main imaging module uses a dual-camera setup that applies a similar concept as the cameras used in recent models from Huawei, combining a monochrome sensor with an RGB chip for improved image detail, noise levels and dynamic range.
The camera module houses two 13MP image sensors. One is a monochrome variant, the other a 1/3.06″ Sony IMX258 RGB sensor. Both 6-element lenses come with F2.0 apertures and Alcatel claims on-sensor phase-detection allows for focus speeds as fast as 0.15 sec. 4K video is supported as well. As if that weren’t enough, the Flash also offers a dual-cam at the front, albeit a much simpler setup. An 8MP main sensor is supported by a 5MP chip for shallow DoF-effects. As on the back, both front lenses come with an F2.0 aperture and you also get a dual-LED flash at the front as well.
The rest of the specification looks very solid, too. Images can be viewed on a a 5.5″ FullHD IPS display and processing power is provided by a Mediatek Helio X20 deca-core CPU. There are 3GB of RAM, 32GB of expandable internal storage, a 3100mAh battery and a rear-mounted fingerprint reader. Unfortunately, Alcatel has not released any information on pricing and availability yet.
 |
Articles: Digital Photography Review (dpreview.com)
 |
Lexar has launched its new JumpDrive Tough, an ultra-durable version of its USB 3.1 flash drive product lineup. This model is designed to ‘withstand life’s challenges,’ according to Lexar, and to likewise protect data stored on the dongle via included EncryptStick security software with 256-bit AES encryption.
The Lexar JumpDrive Tough is resistant to temperatures ranging from -13°F to 300°F / -25°C to 149°C, water down to depths of 98 ft, and pressure/impacts up to 750psi. This durability is complemented with read speeds up to 150MB/s and write speeds up to 60MB/s. With those speeds, a 3GB video can be transferred in less than 1 minute. JumpDrive Tough is compatible with both Mac and PC, and is backward compatible with USB 2.0 and 3.0.
The new flash drive is available to purchase from Lexar now in three capacities: 32GB ($ 19.99), 64GB ($ 34.99), and 128GB ($ 59.99).
Via: GlobalNewswire
Articles: Digital Photography Review (dpreview.com)
 |
Cactus has announced a series of brand-specific firmware updates for its V6 II and V6 IIs triggers that will add TTL functions alongside their cross-brand HSS support.
The triggers are already capable of high speed sync across systems, as well as remote control over flash power and zoom. The upcoming firmware updates will add the ability to support automatic TTL exposure across brands as well. The first firmware releases will support Sigma, Fujifilm and Sony, with support for Nikon, Canon, Olympus, Panasonic and Pentax following one-by-one.
For more information on the Cactus V6 II triggers and compatible flashes check out the company’s website, and for more information on the upcoming firmware releases, see the press release below.
Press Release:
Hong Kong, March 24, 24, 2017 – Just nine months since the release of the Cactus V6 II and Cactus V6 IIs, Cactus is now launching a series of brand-specific firmware upgrades to transform the cross-brand HSS flash triggers to one that also supports crosscross-brand wireless TTL. The new X-TTL firmware versions, apart from supporting cross-brand high-speed sync (HSS/FP), remote power and zoom control of Canon, Fujifilm, Nikon, Olympus, Panasonic, Pentax and Sigma flashes all at the same time1, NOW support automatic TTL exposure in the same cross-brand environment, both on-camera and off-camera.2
The first wave of firmware releases will be for Sigma Sony and Fujifilm. Other camera systems, Canon, Nikon, Olympus, Panasonic and Pentax, will follow one by one as we complete system integration on the V6 II. All these X-TTL firmware versions are free of charge for V6 II / V6 IIs users. The new firmware is system-specific so users simply choose the corresponding system when updating with the Cactus Firmware Updater. Once installed, the V6 II / V6 IIs is transformed into a cross-brand wireless TTL flash trigger.
This unique function gives photographers an unprecedented flexibility. The need for matching flashes with the same camera system for on and off-camera TTL flash photography is over – TTL without boundaries.
Cross-brand TTL
The X-TTL firmware allows users to have wireless TTL automatic exposure with camera and flash that runs on the same system, such as a Canon camera triggering a Canon flash, and one that runs on different systems, such as a Sigma camera triggering a Nikon system flash.
Similar to the cross-brand HSS firmware on the V6 II, the supported flash systems for wireless cross-brand TTL include Canon, Nikon, Olympus, Panasonic, and flash that runs on the same camera system.
Two unique Exposure Locks
Cactus is unveiling a brand new approach in using TTL metering. Over the past, professionals who love the convenience from TTL metering often have to suffer inconsistency in lighting outputs, making post processing a pain. In view of this Cactus devised two types of Exposure Locks.
1. Flash Compensate: Store a desired flash exposure that will automatically adjust according to changes in camera settings. Gone is the ever-changing flash exposures between each TTL metering.
2. Flash Power Lock: Lock flash power output after a desired TTL exposure is achieved. Perfect for consistency in repeat shooting. Wireless TTL functions
The X-TTL firmware will also support advanced TTL functions on the Cactus V6 II and V6 IIs, such as first and second (rear) curtain sync, on-camera TTL, group TTL metering and TTL lighting ratios3.
New support for Sigma
We are delighted to offer firmware support for Sigma cameras and flashes. This includes remote power control, remote zoom control, wireless High-speed Sync, and wireless TTL with Sigma’s SA-TTL flashes. The same cross-brand support is also available on the Sigma X-TTL firmware. Cactus expresses appreciation to SIGMA CORPORATION for their immense support in our development for Sigma system firmware.
Fujifilm TTL and HSS
With the introduction of Fujifilm new flash system launched on the EF-X500, Highspeed Sync (HSS/FP) is finally available. Besides adopting the new HSS platform, the upcoming Fujifilm X-TTL firmware also extends support for wireless TTL to Fujifilm flashes as well as Canon, Nikon, Olympus, and Panasonic flashes. Fujifilm X-TTL Firmware release date will be announced on our website.
V6 IIs with Sony TTL
Existing Sony V6 IIs users already has a system-specific transceiver unit, and the upcoming Sony X-TTL firmware adds wireless TTL support for Sony flashes and other system flashes when paired with the Cactus V6 II. Sony X-TTL Firmware release date will be announced on our website.
Features at a glance
1. Cross-brand wireless manual power and zoom control with HSS/FP support of Canon, Fujifilm, Nikon, Olympus, Panasonic, Pentax and Sony flashes;2
2. Cross-brand wireless TTL of Canon, Fujifilm, Nikon, Olympus, Panasonic, Pentax, Sigma and Sony flashes;2
3. Cross-brand group TTL metering is extended to use in a cross-brand setup;3
4. TTL Ratios output adjustments can be done directly on the V6 II (TX);3
5. Two Exposure Locks offer consistency with the convenience of wireless TTL.
6. Works seamlessly with Cactus RF60X to support HSS, TTL, remote power and zoom control.
Price and Availability
System-specific X-TTL firmware versions are free of charge. Download the Cactus Firmware Updater4 and select the corresponding system firmware to install the X-TTL firmware on the Cactus V6 II and V6 IIs.
After launching the initial three systems, i.e., Sigma, Fujifilm and Sony, Cactus will continue to launch X-TTL firmware for the remaining camera systems. Stay up to date for the latest releases on X-TTL’s microsite: https://www.cactusimage.com/special/X-TTL/
1 With the exception of Pentax and Sony system flashes due to special timing requirements so they must be paired with a Pentax and Sony camera respectively in order to support HSS.
2 Only Canon, Nikon, Olympus and Panasonic system flashes support cross-brand TTL.
3 This function may not be supported on all the camera systems.
4 Cactus Firmware Updater version 3.01 or later will better facilitate firmware selection. To be released soon!
Articles: Digital Photography Review (dpreview.com)
In this article, I will introduce you to creating a rim light using a single flash. While not so common, it is extremely easy to put in place and will allow you to get very interesting and powerful images. To do this kind of photography you just need a flash with the ability to place it off camera. A welcome accessory, the only one you may need, is a light stand or tripod to easily keep the flash in place.

If you are just getting started in portraiture, chances are you have been faced with the “flash versus natural light” dilemma, and you probably went with natural light. I find many amateur and beginning photographers are intimidated by lighting equipment because they think that in order to get something good, they have to use complicated setups where many pieces of equipment are required.
In my opinion, the problem with learning to use flash is that the easiest possible setup, i.e., a single flash used off-camera, is often presented only as a way to create a basic image that needs to be improved by adding more gear and by creating more complicated lighting setups. As if nobody would seriously use just one light. So, I can see why flash photography is intimidating.
If you are a beginner, you probably want to know how to use your single, entry level, flash and how to create images that will stand out from the gazillion of portraits out there.
googletag.cmd.push(function() {var gpt_slot = googletag.defineSlot( “/1005424/_dPSv5in-post-mobile(300×250)”, [300, 250], “pb-ruleset-mobile-ad-0” ).addService( googletag.pubads() );ruleset_mobile_slots.push( gpt_slot );});
googletag.cmd.push(function() {var gpt_slot = googletag.defineSlot( “/1005424/_dPSv5in-post-mobile(300×250)”, [300, 250], “pb-ruleset-desktop-ad-4” ).addService( googletag.pubads() );ruleset_desktop_slots.push( gpt_slot );});
My solution was to forget about the magazine and fashion style portraits. I wanted to take advantage of the limitations of my single light setup to create strong and moody portraits by combining the hard light from the bare flash with a low-key style. Note; this style will better suit male models.

Self-portrait using a single flash on my right, without any light modifiers.
By changing the output power and the zoom setting of the flash, you can get a more gentle and intimate portrait, like the one below.

A single light setup can produce less punchy and contrasty images by changing the flash output power and the zoom settings.
This is all nice and good, but you can get a very different look by using a rim light. This kind of light highlights only the contours of the subject, and I love it.

Rim light and low-key style; a powerful combination.
The setup is extremely simple. Just hide the flash right behind the model or the object, and point it back directly at the subject.
In practice, we could see the rim light as the opposite of a silhouette, where the subject is seen as a black shape against a brighter, often white, background. In the studio, the light setup for a silhouette is, in fact, the same of as that used to create a rim light, except that the flash is pointing at the background instead of at the subject.

Self-portrait in silhouette.
Ideally, you want to have only the rim light in the scene and not record any ambient light. But this does not mean you have to work in a dark room. The only thing you need to be careful about with rim light setup is to ensure that the flash output power is such that the light does not spill over and around the subject edges. You want to have only the light running along the subject contour.
googletag.cmd.push(function() {var gpt_slot = googletag.defineSlot( “/1005424/_dPSv5in-post-mobile(300×250)”, [300, 250], “pb-ruleset-mobile-ad-1” ).addService( googletag.pubads() );ruleset_mobile_slots.push( gpt_slot );});
googletag.cmd.push(function() {var gpt_slot = googletag.defineSlot( “/1005424/_dPSv5in-post-mobile(300×250)”, [300, 250], “pb-ruleset-desktop-ad-5” ).addService( googletag.pubads() );ruleset_desktop_slots.push( gpt_slot );});

It is all about that thin light running along the subject’s edges.
If possible, the editing is even easier. Make sure that the blacks in your image are deep and the highlights are bright. Do this and you have pretty much done with the editing.
What I like about this technique is that the resulting photo has a mysterious look that captures the viewer’s imagination. I guess it has all to do with the “see/not see”.
If you like props, you can also use them with a rim light to better convey a message, like in the photo below.

Addiction. Here I have allowed the light to spill a bit more, so as to light my hands and the mobile screen.
We all live, most of the time, with our noses inside a smartphone screen, somewhat unaware of the reality around us. That and a feeling of addiction is the message I tried to attach to the photo.
Emotions can also be easily conveyed in an interesting way by using rim light. We had a new baby girl a few months ago, and a few weeks before the due date, I experimented with a rim light in the living room when my pregnant partner passed by. I decided to take the usual very cliché photo of the father kissing the belly of the mother. While kissing her baby bump, I had the vision of the sun rising from behind the Earth, seen from space and thought, “Use a rim light!”. This is the result:

Rim light can change a cliché image into a very moody and interesting one.
googletag.cmd.push(function() {var gpt_slot = googletag.defineSlot( “/1005424/_dPSv5in-post-mobile(300×250)”, [300, 250], “pb-ruleset-mobile-ad-2” ).addService( googletag.pubads() );ruleset_mobile_slots.push( gpt_slot );});
googletag.cmd.push(function() {var gpt_slot = googletag.defineSlot( “/1005424/_dPSv5in-post-mobile(300×250)”, [300, 250], “pb-ruleset-desktop-ad-6” ).addService( googletag.pubads() );ruleset_desktop_slots.push( gpt_slot );});
I think this simple light setup transformed the same old same old photographic cliché into a much more powerful and interesting image.
Finally, because the scene is backlit, an easy way to add interest is to include in the shot smoke or aerosols. Both will capture and scatter the light around, creating some interesting effects.
 Since I do not smoke, I sprayed water around to make this self-portrait shot more interesting.
Finally, try to turn the model towards the light and allow the flash to light them a bit more for some interesting variations.
 Turning the model to face the light can be an interesting variation on the theme.
To conclude, I hope I have given you some ideas to start playing with a single off-camera flash in a simple and non-intimidating way using a rim light. The bonus is creating some particular and interesting photos in the process.
googletag.cmd.push(function() {var gpt_slot = googletag.defineSlot( “/1005424/_dPSv5in-post-mobile(300×250)”, [300, 250], “pb-ruleset-mobile-ad-3” ).addService( googletag.pubads() );ruleset_mobile_slots.push( gpt_slot );});
googletag.cmd.push(function() {var gpt_slot = googletag.defineSlot( “/1005424/_dPSv5in-post-mobile(300×250)”, [300, 250], “pb-ruleset-desktop-ad-7” ).addService( googletag.pubads() );ruleset_desktop_slots.push( gpt_slot );});
The post Rim Light – A Simple Way to Create Powerful Images with a Single Flash by Andrea Minoia appeared first on Digital Photography School.
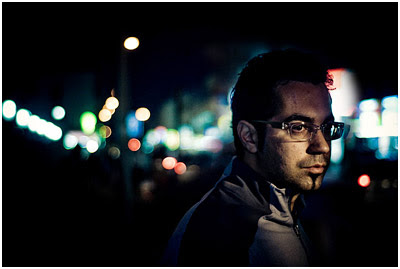
Abstract: Don't bother gelling a scene that is completely lit by a single flash. But if a second light is involved—even ambient light—it's always better to control color at the source.

PIctured above is Midwest Camera President Moishe Appelbaum. He wandered into a lighting class I was teaching at Midwest last fall, so we pulled him aside and shot him. He's lit by a single LP180 speedlight, fired through a white bed sheet.
(Pro tip: A speedlight fired through a bed sheet will rival the light of the most expensive octabanks in the world—in quality if not in quantity. It all comes down to square inches in the light source. And a bed sheet has a crap ton of square inches.)
After our previous lesson, you might think that this photo is an ideal candidate for a warming gel: caucasian skin, warm background, warm-colored clothing. Why not unify this with a little added warmth?Read more »
Strobist
$ (document).ready(function() { SampleGalleryV2({“containerId”:”embeddedSampleGallery_2255968885″,”galleryId”:”2255968885″,”isEmbeddedWidget”:true,”standalone”:false,”selectedImageIndex”:0,”startInCommentsView”:false,”isMobile”:false}) });
Independent flash and accessories manufacturer Phottix has announced the next generation of its Ares remote flash triggering system that brings with it additional channels and improved security. The Ares ll transmitter and receiver have also both been given a facelift to include a new clearer control layout and LCDs to display functional information.
The new system offers a total of 16 radio channels, twice the number of the previous model, and can now deal with 4 groups of flashes. The units also include digital ID so that users can be sure other photographers in the area won’t interfere with their signal.
Using the first four channels the Ares ll can trigger Phottix Strato-compatible flash units, such as the Mitros+ hotshoe gun and the Indra studio heads, while all channels will trigger hotshoe flash units attached to an Ares ll receiver. The system allows a maximum flash sync speed of 1/250 sec, and both trigger and receiver are powered by two AA batteries each.
While the new units have a much more user-friendly design they have lost 50m of range compared to the original Ares, and can only operate at up to 150m – which is still enough for most uses. The units are compatible with the hotshoe and flash foot of cameras and flash units from ‘most major camera and flash systems (including Sony)’ according to Phottix.
The new Ares ll transmitter costs $ 54.95, as does the receiver. For more information visit the Phottix website.
Press Release:
Welcome to the family
Introducing Phottix’s newest budget-friendly flash trigger system – the Phottix Ares II. The transmitter and receiver system boasts the latest technology and is perfect for manual shooting with studio lights or hot shoe flashes. Better yet: The popular original Phottix Ares system was a standalone product within the Phottix ecosystem – not so for the Ares II. The Phottix Ares II will join the Phottix ecosystem and be compatible” with other Phottix products.
Features:
• Transmitter and Receiver with LCD display
• 16 Channels (Strato II compatibility on channels 1-4)
• 4 Groups, A-D
• Digital ID Codes (0000 – 9999)
• 150m Range
• Compatible with other Phottix products*
The Ares Wireless Trigger took the world by storm when it was released in 2012 the Ares was a simple and affordable way to use off-camera flash. The Ares transmitter and receiver units were popular and lauded by some of the biggest names in the industry for its design and reliability.
More Channels and Digital ID:
Pick from 16 channels. The first four channels offer compatible with the Phottix Strato II Receiver – and can be used to trigger Phottix products such as the Mitros+ and Indra series of studio lights with built-in Strato II receivers. Use the Digital ID function for the ultimate in secure triggering – no one can trigger your flashes unless using your four-digit Digital ID code.
Universal Hot Shoe
The Ares II Transmitters and Receivers have been design to be compatible with most major camera and flash systems (including Sony). The Ares II is at home on Canon, Nikon, Sony (MIS), Pentax, Panasonic, Fuji and Olympus cameras and compatible with most hot shoe flashes (triggering from the X-Sync pin)
Articles: Digital Photography Review (dpreview.com)
$ (document).ready(function() { SampleGalleryV2({“containerId”:”embeddedSampleGallery_9219200983″,”galleryId”:”9219200983″,”isEmbeddedWidget”:true,”standalone”:false,”selectedImageIndex”:0,”startInCommentsView”:false,”isMobile”:false}) });
Elinchrom has introduced its new ELB 1200 portable lighting system for photographers, a model that builds upon the company’s existing ELB 400 system introduced in 2015. The new system features three new flash heads, the Action, Hi-Sync, and Pro, as well as a TSA-approved ‘Air’ lithium-ion battery capable of powering 215 full-power flashes and 80 minutes of continuous LED use.
In addition to the TSA-approved ‘Air’ version of the battery, Elinchrom also has an ‘HD’ version with a higher capacity that can power 400 full-power flashes and 120 minutes of continuous light. The batteries are also capable of powering accessories via a 5v USB outlet, and they can both be switched into a ‘shipping mode’ for long distance travel.
The three aforementioned flash heads feature a daylight-balanced and dimmable LED CRI 92 lamp, which Elinchrom says is equivalent to a 250w Halogen lamp. The Hi-Sync flash head supports shutter speeds as fast as 1/8000s. The company expects the ELB 1200 to be available in the ‘middle of 2017,’ with pricing information being provided at a later date.
Check out Elinchrom’s product video below to see the kit in action.
Articles: Digital Photography Review (dpreview.com)
$ (document).ready(function() { SampleGalleryV2({“containerId”:”embeddedSampleGallery_8916282099″,”galleryId”:”8916282099″,”isEmbeddedWidget”:true,”standalone”:false,”selectedImageIndex”:0,”startInCommentsView”:false,”isMobile”:false}) });
Small but mighty, Godox’s Wistro AD200 speedlight offers wireless support with Godox’s 2.4G X system and 200Ws / GN 52 output. That’s pretty incredible – for comparison, many speedlights struggle to put out just 100Ws.
The unit is powered by a rechargeable lithium-ion battery pack rated for 500 full power flashes, and provides TTL support with Canon, Nikon and Sony systems when used via wireless control. Output can be adjusted in eight steps, and the AD200 can be used with a number of accessories and diffusers.
The AD200 looks to be available for pre-order from Adorama under the FlashPoint brand for $ 330.
Articles: Digital Photography Review (dpreview.com)
 Popping open the generic black carrying case of the Polaroid PL-190 TTL flash is an unimpressive endeavor. Not that these things ever are of course. The flash which slid smoothly out into my hand looked unremarkable as well; an LCD screen and a series of buttons below. The lens had the typical integrated bounce card and diffuser. But when I slid the sizeable flash onto the hot shoe of DSLR, the un-remarkability ended. In use, the PL-190 TTL was far more impressive.
Equipped with an 18-180mm zoom, swivel/bounce head, TTL, and wireless remote capability, and it started to look pretty comparable to the high-end flashes available from Canon and Nikon (though much, much less expensive).
Note: the Polaroid PL-190 TTL flash is available for both Nikon (PL-190N) and Canon (PL-190C).

As a largely Canon shooter, I’ve always been a bit disappointed by my brand’s flashes. Designed to be so closely integrated into the operating system of the camera, they can produce great results. But making swift changes to settings, power, and TTL exposures can be a slow, button-pushing, menu-searching process. Then, of course, there is the cost of the Canon flashes. The higher end can run close to $ 500, which is almost five times the cost of the Polaroid PL-190 TTL flash, which I held in my hand.

On-camera, the PL-190 TTL is as large as Canon or Nikon’s high-end flashes. And it’s just about as powerful.
In part due to the fiddly nature of Canon flashes, I’ve often defaulted to using basic, inexpensive, manual control lights. Plus I can buy two, three, or even four for the price of a Canon 600EX. So I was excited about this new offering. The specs of the Polaroid PL-190 TTL flash are similar to that of Canon’s high-end ones (the Speedlite 600EX II-RT), though perhaps not quite as capable, and as a third party offering, the integration with my standard operating system is not quite as smooth. This flash is capable of TTL, but also easily adjustable through manual power settings. Basically, the flash seemed like a great compromise, and much more affordable.
In using the flash, that pleasure continued. Frankly, I love this thing and didn’t want to return the demo I’d received on loan from Polaroid.
The controls on the back are simple, a pleasant change from the various wheels and menus required to Canon’s 580ex. It’s powerful too, lighting up distant objects even under fairly bright conditions. The zoom capability, which was automated, to correspond with the focal length of the camera’s lens reached to nearly 200mm, throwing a light cone that worked nicely with my 70-200mm (one of my favorite lenses).

Straight flash, is typically direct and bright, mostly lacking shadows and textures. (True of any camera when used on-camera.)

Using the built-in diffuser, you lose about two stops of light (this is the same flash power and camera settings as the previous, straight-flash shot). The light does soften somewhat but is still direct and harsh.

This image shows the same camera setting and flash power as the previous two images but is using just the bounce card with the flash aimed straight up. It creates a softer, top-light look, though you lose about three or four stops of light.

Here, I increased the flash power three stops and used the bounce card with the flash aiming up. The result is brighter but retains the softness and directionality of a top light.
Since the TTL functionality worked well with my camera, I could take advantage of that one shot then quickly switch over to full manual functionality the next. I could zoom manually as well, allowing me to focus the beam narrowly while shooting with a wide angle lens on the camera, highlighting a single portion of a much larger frame.

Off-camera the Polaroid PL-190 TTL flash was easy to use. Manual settings are easy to control, providing a great deal flexibility when creating the proper exposure.

Another off-camera image. When used with the bounce card and placed close the subject, the light was surprisingly soft.
Now I want to note, that since I was primarily interested in the basic functionality and usability of this flash, I tried it only briefly off-camera, making a few images of flowers. Off-camera, I used the manual settings. As I noted earlier, the simple adjustment of power makes this a breeze. With a simple radio trigger on board, I was set to go. The Polaroid PL-190 TTL flash does have wireless slave capability and although I did not test this, given the smooth operation of the flash in general, I’m sure this too would work well.

With a 1/200th sec flash sync speed the PL-190 TTL is easily capable of images like this. Fast moving subjects like flying birds retain sharpness, with little motion blur.
In short, I think the Polaroid PL-190 TTL flash is a great lighting tool. It worked flawlessly in the brutal cold of an Alaska winter day when I played with it outdoors, and it has easy to use controls with some helpful camera integration. In fact, I liked its simplicity and ease of use so much that as my Canon 580ex ages, this Polaroid flash may be the replacement. With a $ 109 price tag (at major online retailers) I can buy four with change for the price of one Canon 600ex. Guess that means I can quadruple my creative lighting options…now, where did I leave my credit card?
Shop for the Polaroid PL-190 TTL flash on Amazon.com (Nikon PL-190N or Canon PL-190C ) or B&H Photo (Nikon PL-190N or Canon PL-190C ) .
googletag.cmd.push(function() {
tablet_slots.push( googletag.defineSlot( “/1005424/_dPSv4_tab-all-article-bottom_(300×250)”, [300, 250], “pb-ad-78623” ).addService( googletag.pubads() ) ); } );
googletag.cmd.push(function() {
mobile_slots.push( googletag.defineSlot( “/1005424/_dPSv4_mob-all-article-bottom_(300×250)”, [300, 250], “pb-ad-78158” ).addService( googletag.pubads() ) ); } );
The post Review of the Polaroid PL-190 TTL Flash by David Shaw appeared first on Digital Photography School.
You must be logged in to post a comment.