RSS
 

Posts Tagged ‘Five’

DxO Optics Pro 8.3.1 adds support for five recent cameras

04 Sep

opticspro8logo_large.png

DxO Labs has released version 8.3.1 of its Optics Pro RAW conversion and image correction software, adding support for the Panasonic Lumix GF6 and G6, the Olympus PEN E-P5, the Sony Cyber-shot DSC-RX100 II, and the Pentax K-50. It also adds 490 extra camera/lens combinations to the library of optics correction modules. Click through for the full press release, including download links.

News: Digital Photography Review (dpreview.com)

 
Comments Off on DxO Optics Pro 8.3.1 adds support for five recent cameras

Posted in Uncategorized


31 August, 2013 – Vision and Creativity – Part Five

31 Aug

Today Alain Briot continues his current series of essays with Vision and Creativity, Part Five.


"Having been to Antarctica with Michael and Kevin, I would say after having traveled the world and shot nearly my entire life as an exhibiting photographer,  it was one of my highlights in my life and I talk about it, all the time.  The images and experience of seeing something visionary and nearly extinct from the world, to see and experience the wildlife and scenery that does not fear humans is amazing.  The images I shot there won me two Smithsonian awards and nearly 18 other international awards". – Tim Wolcott

 Find Out More Now
These Expeditions Will Sell Out Quickly. They Always Do


The Luminous Landscape – What’s New

 
Comments Off on 31 August, 2013 – Vision and Creativity – Part Five

Posted in News


Five Self Assignments That Teach You To See

15 Aug

In my 20 years in photography, I’ve seen a lot of different assignments teachers have given their students.  Most I have heard, or been given myself from time to time, have centered around learning to use the camera.  Things like “Use Only One Exposure Mode”, “Use Only One Lens”, or “Use One Aperture Setting”.  The most interesting to me, from a photographic standpoint, involved learning to see.  The reason I say this is that simple camera use can be easily learned. It’s basic math when you boil it down.  But learning to see creatively, learning to compose a shot, takes much more than learning buttons, dials, and controls.  These self assignments force you to look around you, to really see what you’re shooting and try to make interesting images.

1. Pick A Color

Pick up your camera and choose a color for the day. Go out and make images with that color as a dominant element in the image. Find as many different ways as possible to do this.

This image I went in search of things red. 1/320, f/7.1, ISO 1000. EOS 5D Mark II, EF 100mm f/2.8L IS Macro.

This image I went in search of things red. 1/320, f/7.1, ISO 1000. EOS 5D Mark II, EF 100mm f/2.8L IS Macro.


2. Pick A Shape

Choose a shape and create images which use that shape in an interesting way. It could be features in architecture, artwork, or juxtaposition of multiple structures. Squares are relatively easy. Start there, and then search out triangles, circles, or combinations of shape.  Again, look for the most interesting composition you can to highlight that shape in your image.

I ventured into Central Park in New York City without a real game plan in mind. I found a sundial and started shooting that, and then went in search of more circles. Found this ironwork and used it to frame a pair of lovers in a rowboat. 1/160. f/2.8, ISO 100. EOS 5D Mark III, EF 24-70 f/2.8L II at 24mm.

I ventured into Central Park in New York City without a real game plan in mind. I found a sundial and started shooting that, and then went in search of more circles. Found this ironwork and used it to frame a pair of lovers in a rowboat. 1/160. f/2.8, ISO 100. EOS 5D Mark III, EF 24-70 f/2.8L II at 24mm.

3. Shoot Something Different

If you’re like me, you probably have one type of subject you gravitate to more than any other.  But it’s easy to get too comfortable, and miss opportunities to make great images, when you’re only looking for one thing.  Once in a while it’s a good idea to change things up and shoot something different.  If you’re a sports shooter, try shooting a still life.  If you’re a landscape artist, try shooting macro.  These types of exercises forces you out of your comfort zone and helps you learn to see in a new way.

Normally I'm a landscape guy first. But I decided I wanted to try a still life of one of the tools of my trade.  I used some black plexi as the table, and black matte board for the background. I used a single speedlite in a softbox above and behind the subject. EOS 5D Mark II with EF 24-70 f/2.8L II. 1/200, f/8, ISO 100.

Normally I’m a landscape guy first. But I decided I wanted to try a still life of one of the tools of my trade. I used some black plexi as the table, and black matte board for the background. I used a single speedlite in a softbox above and behind the subject. EOS 5D Mark II with EF 24-70 f/2.8L II. 1/200, f/8, ISO 100.

4. Shoot Reflections

Reflections are a powerful element in photography, but I’m almost embarrassed to admit how long it took me to actually start SEEING them.  I had a “lightbulb moment” one day when shooting with a friend of mine, and since then, I am constantly looking for reflections as an element in my work, whether it be portraits, landscapes, or still lifes.

This is probably the most photographed puddle in New England, but it's great for producing a reflection of Pemaquid Point Lighthouse. Reflections add interest to images so always be on the lookout. EOS-1D Mark IV, EF 16-35mm f/2.8L II. ISO 100, 1/20, f/16.

This is probably the most photographed puddle in New England, but it’s great for producing a reflection of Pemaquid Point Lighthouse. Reflections add interest to images so always be on the lookout. EOS-1D Mark IV, EF 16-35mm f/2.8L II. ISO 100, 1/20, f/16.

5. The 15 Foot Circle

Stand in the center of a room, or wherever you happen to be.  Make photographs only of subjects that happen to be within 15 feet (or 10, or 5) of where you’re standing.  Give yourself a time limit. Exhaust all possibilities. Get as many images as you can using only that area before moving on.  This kind of exercise forces you to really look at things and work to compose interesting images.

I was standing in a dining room at the holidays last year and decided to try the 15 foot circle. This was a line of candles on a fireplace mantle. EOS-1D X with EF 70-200 f/2.8L IS II. ISO 400, 1/250, f/2.8.

I was standing in a dining room at the holidays last year and decided to try the 15 foot circle. This was a line of candles on a fireplace mantle. EOS-1D X with EF 70-200 f/2.8L IS II. ISO 400, 1/250, f/2.8.

For beginners, these assignments are great for learning to see. For more experienced photographers, these are great ways to stay fresh, to restart the creative eye when you’re feeling blocked, or to just do something different.  What other self assignments have you tried to refresh your photographic vision?

Post originally from: Digital Photography Tips.

Check out our more Photography Tips at Photography Tips for Beginners, Portrait Photography Tips and Wedding Photography Tips.

Five Self Assignments That Teach You To See


Digital Photography School

 
Comments Off on Five Self Assignments That Teach You To See

Posted in Photography


Five Ways to Get In with the Photo Community

21 Jun

[Today’s guide comes from rad photographer and Photojojo buddy, Helena Price!]

If you’re a photographer or aspiring photographer-to-be, building community with other photogs is an essential part of getting your work noticed and building your name in the photo world.

Before being a full-time freelance photographer, I built communities for companies and products for a living, and I’ve been an active part of communities ranging from tech to food to photography.

I’ve distilled down everything I’ve learned over the years into the five fundamental ways to start building and connecting with a photo community.

What is the “photo community,” you ask? It’s however you define it. It’s a big social web of photographers, both online and offline, who know each other, inspire each other, and help each other make the best work they possibly can.

You should most definitely be a part of it, and here’s how.

How to Connect with the Photo Community

p.s. Wanna boost your creativity? Our pals at Maine Media are offering some way cool photography and filmmaking workshops designed for just that.

1) Do some research.

before There are many kinds of photo communities out there, big and small. It’s up to you to decide what part of the photo community you’d like to surround yourself with and why. Is it pro photogs with big fancy cameras? Is it Instagrammers? Is it people in your own town? People who love photographing food, or skateboarding, or music? Go after whatever interests you the most, and see where it takes you.

2) Find your inspiration.

beforeThe easiest way to do this is on the interwebs. Follow folks who create work that inspires you. How to find them, you ask? There are many ways, ranging from googling “awesome food photographers,” to browsing Tumblr’s photographer spotlight or Instagram’s suggested user list. Subscribe to their feeds, watch the way they create and post their work, and take good notes.

3) Go make some stuff.

before For every moment you spend networking, you need to spend double the moments making things. Your photo inspirations are who they are because of the work they’ve created, so go take that inspiration and make some work of your own. By constantly improving and sharing your craft, you’re constantly increasing the likelihood that other people will find and like your work too.

4) Support others.

beforePhoto karma is real. In all communities, what you put in will often dictate what you receive down the line. Go like people’s work. Leave genuine, attentive, supportive comments. Don’t post asking for likes or follows, because that’s not what this is all about (and if you haven’t realized by now, people really hate that). Help people spread the word about their projects and exhibitions. If you’re a supportive member of the community and making great work of your own, people will notice you and you’ll soon find support coming back your way.

5) Reach out and say hi.

beforeThe easiest way to connect with people in the photo community is to simply send them a note. Find three (or more!) people whose work you love, send them an email/message/comment, and tell them you dig their work. But not in a “I love you FOLLOW ME CHECK OUT MY GALLERY” kind of way. In a genuine, I’m-not-asking-anything-in-return kind of way. You will not only make the recipient’s day, but that person will likely remember your name for a long time to come.

Have any other tips to add? Tweet them at us at @photojojo!

Related posts:

  1. 10+ Awesome Ways to Upcycle Vintage Photo Gear Extra photos for bloggers: 1, 2 They say one man’s…
  2. Two Great Ways to Publish Your Own Magazine June’s Photojojo made possible by… ~Have a cool photo product…
  3. Ten Ways To Look Fabulous in Pictures Photojojo is hiring! We’re hiring!Photojojo is looking for a creative,…


Photojojo

 
Comments Off on Five Ways to Get In with the Photo Community

Posted in Equipment


Master These Five Lightroom Sliders and Your Photos Will Pop

19 Jun

a Guest Contribution by John Davenport from Phogropathy

Have you ever opened up Lightroom (or any other professional level editing program) and said, “Oh my – where do I start?” If so then this post is probably right up your alley.

Today I’m going to show you how to take the process out of processing photos and how you can get some great results simply by learning how a handful of sliders work. After you learn these basics you can start to dig deeper into the program and learn how to bring out even more of the hidden details in your photographs.

before&after1.jpg

The Seven Lightroom Sliders to Master First

Lightroom is filled with all sorts of options from drop down menus to sliders and all this can make get started for the first time overwhelming, especially if you’ve had no editing experience in the past, so today we are going to look at the very basics of Lightroom.

When you break it down there are five key parts of almost every photo that you’re going to want to adjust and those are as follows: mid-tones, shadows, highlights, sharpness and white balance. We will tackle all of these areas by using just a handful of sliders in the basic tab of Lightroom. To get here simply click on “Develop” and then if it isn’t opened already click on the “Basic” tab.

Now let’s get started!

Exposure

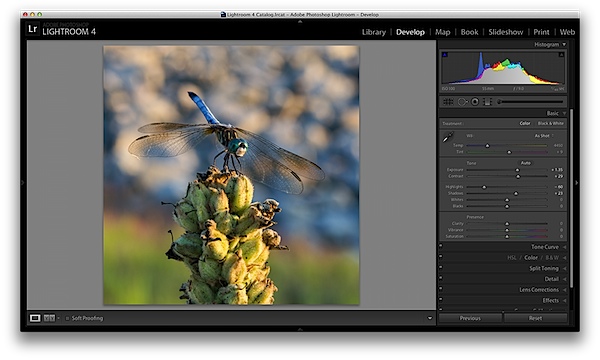
When I process photos I like to start with the exposure slider, as it’s a good overall adjustment to get started. It is designed to adjust the mid-tones of the photo and therefore will help to add or reduce to the overall brightness of the scene. To lighten an underexposed photo simply slide the exposure slider to the right – if you’d like to reduce the brightness then slide it to the left.

Watch your histogram and you’ll start to see the data shift from side to side as you make the changes. In the photo below I added just a small bit to the exposure to brighten it up slightly.

exposure.png

Contrast

Next up is the contrast slider, which will help to define the areas of lightness and darkness. In the vast majority of my photographs I’ll end up increasing the contrast slightly as it tends to help bring out details and make the photo “pop” a bit more.

As you watch the histogram you’ll notice that the data will either get stretched out or be pushed together depending on which way you go. The more contrast you apply the more defined the difference between lights and darks will get which can be observed in the stretching of the histogram.

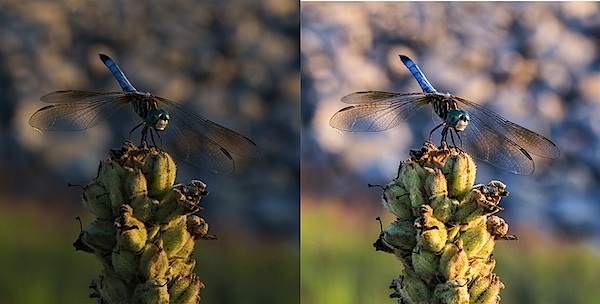
In my dragonfly photo I pushed the contrast up slightly which helps to get the subject separated from the background a bit more and adds a bit more crispness to the photo.

contrast.png

Shadows/Highlights

One of the best features in Lightroom 4 are the Shadows and Highlights sliders. (Note: if you’re using an older version of Lightroom you’ll do something similar with the Fill Light and Recovery sliders, but they’re not nearly as powerful).

These two sliders work in opposite directions. The more detail you want in your highlights the lower you’ll drop the slider, for more detail in the shadows you’ll increase the slider. Make sure you’re aware that these do come at costs and you’re not going to be able to get detail out of blown out or completely black areas of your photo – there must be data there to recover for these to work.

Again as you watch the histogram when you make the changes you’ll notice that the shadows slider has an effect on the data towards the left side of the mid-tones and the highlights slider will work on an area to the right. The black and white sliders (which we aren’t talking about today) will have an effect on the very edges of the histogram in much the same manor.

HighlightsShadows.png

Clarity

There is an entire area of Lightroom dedicated to sharpening your images, but the clarity slider is a good place to start with if you’re trying to keep things simple. You won’t have as fine of control over the process, but you will be able to help crisp up your images a bit by using one simple slider.

As you’ll notice when you start moving this slider around it works in much the same way as the contrast slider, just on a finer detailed level. Again, in the vast majority of my photos I’ll be adding a bit of clarity to give the photo the punch it needs, but often times in portraits you might end up toning down the clarity to give that soft look to your subject’s face.

clarity.png

White Balance

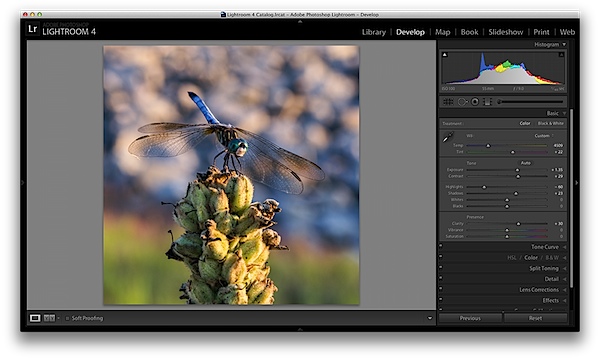
Finally the temperature and tint sliders control the white balance of your photo. For the time being I’d suggest just using the Lightroom presets as they do a decent job of getting into the ballpark and make it a lot easier to deal with than trying to figure out the right amount of warmth and tint to add or subtract.

However, if you want that little extra control in your hand then use the “Temp” slider to adjust the color temperature of your photo. Moves to the right will produce a warmer scene and to left will cool your scene off.

The “Tint” slider is used more for minor adjustments to remove or add unwanted green or magenta colors from the scene and will often be used to get skin tones correct. However, there are people who use this slider for more artistic purposes (play with it and you’ll see what I mean).

whitebalance.png

One Small Note

If you’re photographing in RAW you’ll see more options available to you and have more control over the final outcome of your image, if you’re a JPEG shooter some options I talked about today will be limited as a result of the smaller file sizes and the compression that has already taken place in your camera. You can read more about RAW photography here.

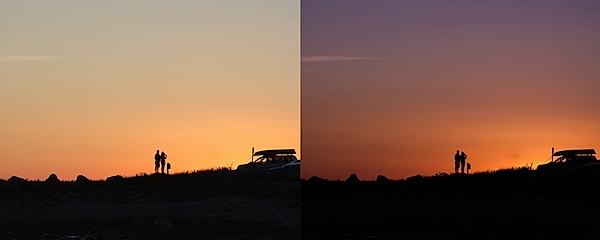
A Few More Before and Afters

Here are a few more before and after images that I processed in a similar manner using only the techniques talked about in this post. It’s truly amazing how much just a few minor tweaks can change your photo and just imagine what can be done once you dig a bit deeper. If you’d like more tips on Lightroom editing feel free to subscribe to my YouTube channel.

before&after2.jpg

before&after3.jpg

before&after4.jpg

John Davenport is an avid photographer and blogger who shares his photography on his Facebook page and runs a weekly video series on how to edit photos in Lightroom.

Post originally from: Digital Photography Tips.

Check out our more Photography Tips at Photography Tips for Beginners, Portrait Photography Tips and Wedding Photography Tips.

Master These Five Lightroom Sliders and Your Photos Will Pop


Digital Photography School

 
Comments Off on Master These Five Lightroom Sliders and Your Photos Will Pop

Posted in Photography


Gear Bag: Five Great Tips for Dealing with Cables

30 May

If your lighting gear includes sync cords, power cables and/or extension cords, this could happen to you. Don't laugh, pictured is my actual Ancient Sync Cord Burial Ground from the past 20+ years.

But over that time I have also gotten a lot better at dealing with cords, and picked up a few cool tips along the way. Keep reading for my favorite five.

Read more »
Strobist

 
Comments Off on Gear Bag: Five Great Tips for Dealing with Cables

Posted in Photography


Naked Man – Episode Five

25 Jan

Naked Man Episode Five: Naked Strikes Back (or) What Luck Another Naked Guy. The Naked Man Comedy Series. In a world full of danger a hero arrives, but why is he naked? Produced by Christian Monzon. Written, Produced and Directed by Adam Fike. Director Of Photography, Mark Ryan: www.flow-films.com Wyndotte Street Presents original comedy series, sketch, improv, stand up and live music. Find Out More At: www.yndotstreet.com Get an unlisted Youtube bonus video, just Like, Follow, Friend or Subscribe. Our Links: Twitter @WyndotteStreet (www.twitter.com/wyndottestreet) Youtube: www.youtube.com/yndotstreet Our Blog: yndotstreet.wordpress.com Thanks for watching!
Video Rating: 4 / 5


Sony launches five Cyber-shot compacts including Wi-Fi and waterproof models

08 Jan

DSC-WX80.png

Sony has announced five Cyber-Shot compacts, including the Wi-Fi-capable, 16MP CMOS-based DSC-WX80 with its 25-200mm equivalent zoom lens. There are also two CCD-based W-series cameras – the DSC-W730 which shares its lens with the WX80, and the DSC-W710 that has a 5x 28-140mm equiv. zoom. Beyond these are the 16MP CCD-based 5x rugged, waterproof DSC-TF1 and the 26x DSC-H200 superzoom.

News: Digital Photography Review (dpreview.com)

 
Comments Off on Sony launches five Cyber-shot compacts including Wi-Fi and waterproof models

Posted in Uncategorized


Five Reasons to Go to Dubai for Gulf Photo Plus 2013

04 Jan

Five Reasons to Go to Dubai for Gulf Photo Plus 2013

March quickly approaches, and GPP has announced their instructors and courses.

I happen to think this is the best photo week of its kind on the planet. If you are anywhere near that part of the world, GPPis a no-brainer. But even if you are far away, it's worth the trip.

Here's why. Read more »
Strobist

 
Comments Off on Five Reasons to Go to Dubai for Gulf Photo Plus 2013

Posted in Photography


Top Five Tips to Help you Buy a Digital Camera

19 Dec

live.pirillo.com – You’re buying a camera, but you have absolutely no idea what is best suited to your needs. Even for a seasoned photographer, it can be tough. Try to keep these tips in mind next time you’re shopping for a new camera.

SmokingStrobes.com – I connected the dots between the DSLR hd video features and the growing market for microstock video. In the process I found a cool way to overcome my challenges with recording high quality hd video – and the awesome photographer Drew Gardner played a majore role in that. In this video I am going to tell you how I go about to take this chance as a photographer. The DSLR video capabilities make it possible for us to produce video in absolutely brilliant cinematic quality on a shoestring budget. This has never been possible before. I guess those of us who take this chance and develop this discipline will seriously clean up. And even if it is not about the commercial intent, I found that shooting video is actually a lot of fun, once I knew certain tricks.
Video Rating: 4 / 5