RSS
 

Posts Tagged ‘Find’

How to Find Your Best Images With Lightroom 5’s Compare View

15 Nov

Using Lightroom 5's Compare View

For decades photographers have faced the question of how to determine which of their images are the best. I’ve been through it all, from squinting at 35mm slides through a loupe on a lightbox, to creating contact sheets from negatives and marking the best with a red marker, to scanning negatives and slides through to the modern version of looking at Raw files on the camera’s LCD screen or in the various programs I have used over the last few years. Of those, there’s no doubt that Lightroom is one of the best for the task of comparing images and selecting the best ones.

Compare View

The tool I use for comparing images in Lightroom is the aptly named Compare View (I also use Survey View, to be covered in a future article).

To get the most out of Compare View, you should use Collections to organise your images, and Grid View to view thumbnails. Click the links to learn more about both.

Using Lightroom 5's Compare View

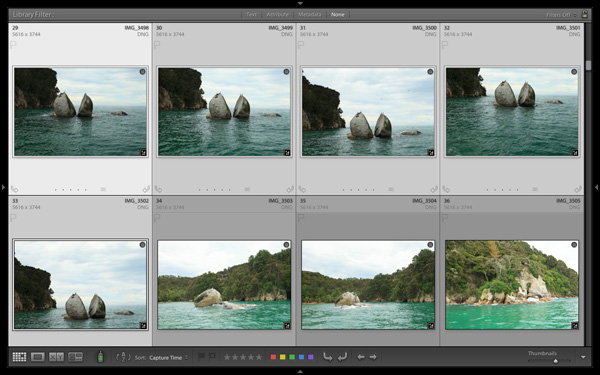
Grid View is the starting point for using Compare View. Select the images that you want to compare. It may be just two, or you may want to compare more. In this example (above) I selected five images.

Using Lightroom 5's Compare View

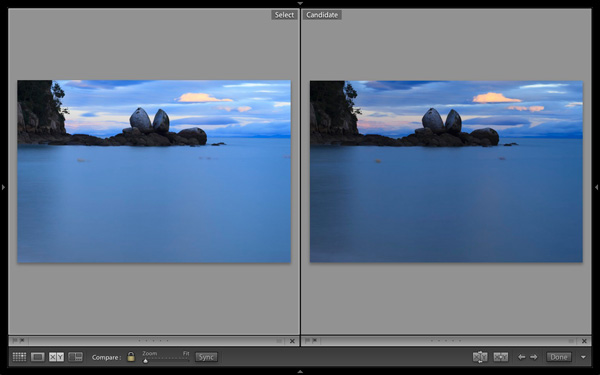
The first image that you select is, in Lightroom terminology, the most selected image. It is surrounded by a lighter frame than the other selected photos. In the screenshot above the photo on the left is the most selected.

Using Lightroom 5's Compare View

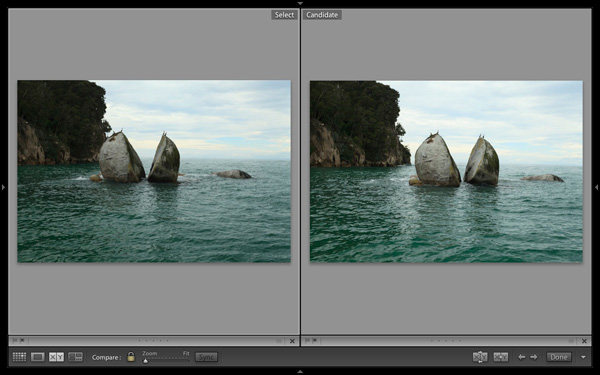
Images selected, press ‘C’ on your keyboard to go to Compare View. The most selected image is displayed on the left. Lightroom calls this photo the Select. The next image in the selection is displayed on the right. This one is called the Candidate.

The idea is to compare the Select with the rest of the images in the selection. Test it out by using the left- and right-arrow keys on your keyboard. If your selection contains more than two images, Lightroom cycles through the remainder of the selection, displaying each image as a Candidate.

Compare View icons

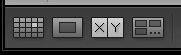
The icons along the bottom of the window in Compare View help you tell Lightroom what to do with either the Select or Candidate images. The first set is located underneath each photo:

Using Lightroom 5's Compare View

1. Click on these icons to flag the photo as a Pick (left) or a Reject (right).

2. Click on these dots to give the photo a Star rating.

3. Click on the faint grey square to apply a Colour label.

4. Click on the X to deselect the photo. Lightroom removes it from Compare View when you do this.

The icons change to indicate the updated status of the image.

If the photo changes when you click any of these options, it is because you have the Auto Advance option ticked. Turn Auto Advance off by going to Photo > Auto Advance. I find it easiest to use Compare View with Auto Advance disabled.

The Toolbar icons

The rest of the icons are displayed in the Toolbar at the bottom of the Compare View window (press ‘T’ on your keyboard to reveal the Toolbar if you don’t see it).

Using Lightroom 5's Compare View

This indicates that you are in Compare View. From left to right, these icons show Grid View (G), Loupe View (E), Compare View (C) and Survey View (N). You can switch between these modes by clicking on the icon or using the keyboard shortcuts (indicated in brackets).

Using Lightroom 5's Compare View

With the padlock icon in the locked position (above) you can zoom into both the Select and Candidate image simultaneously by clicking once on either one. The magnification is set by the Zoom slider and both images move in tandem with the hand tool. This is useful for comparing two near identical images for fine detail such as accurate focusing or noise.

Using Lightroom 5's Compare View

With the padlock icon in the unlocked position you can zoom into either image without affecting the other. Press the Sync button at any time to bring the second image into sync with the first.

Using Lightroom 5's Compare View

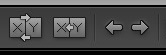
These icons are perhaps the most important in Compare View, as they help you navigate around the images in the selection.

The two arrows on the right are straightforward. Click on them to navigate through the selection, just like you did with the arrow keys earlier.

The Swap button (X|Y with two arrows) tells Lightroom to swap the Candidate and Select images. Use it when you decide that the Candidate is the strongest image in the selection, and you want to compare it to the others.

The Make Select button (X|Y with one arrow) tells Lightroom to turn the Candidate image into the Select. The Select is removed from the display, and the next image in the selection becomes the new Candidate.

Using Lightroom 5's Compare View

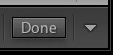
If you press the Done button Lightroom takes you to the Loupe View and displays the Select image. Alternatively, you can use the ‘G’ shortcut to return to Grid View.

Click the White arrow icon to add or remove icons from the Toolbar.

Putting it together

The main purpose of Compare view is to let you compare similar image so that you can decide which ones you want to process in the Develop module (you can also use it to compare photos that you have processed, or partly processed in the Develop module – but that’s another topic). Use the arrow keys to cycle through the images in your selection, and the Swap and Make Select buttons to compare different images. If this is new to you, it won’t take much practice before you settle into a rhythm. You’ll be pleasantly surprised at how quickly you can work you way through even hundreds of images using Compare View.

While some photographers use Star ratings and Colour labels to help organise their images, by far the simplest method is to use Flags. If you decide to process an image, click the grey flag icon underneath the photo (it’s on the left) to flag it as a Pick. If decide not to process it, leave it unpicked. Then, when you have finished, all you have to do is return to Grid View and choose the Flagged option in the Filter bar to remove the unwanted images from view. Then go to Edit > Select all to select all the flagged images and send them to a new Collection containing only the images that you want to process in the Develop module (using Collections to organise your images is covered in this article).

Mastering Lightroom Book One: The Library Module

Using Lightroom 5's Compare View

My latest ebook Mastering Lightroom Book One: The Library Module is a complete guide to using Lightroom’s Library module to import, organise and search your photo files. You’ll learn how to tame your growing photo collection using Collections and Collection Sets, and how to save time so you can spend more time in the Develop module processing your photos.

Post originally from: Digital Photography Tips.

Check out our more Photography Tips at Photography Tips for Beginners, Portrait Photography Tips and Wedding Photography Tips.

How to Find Your Best Images With Lightroom 5’s Compare View

The post How to Find Your Best Images With Lightroom 5’s Compare View by Andrew Gibson appeared first on Digital Photography School.


Digital Photography School

 
Comments Off on How to Find Your Best Images With Lightroom 5’s Compare View

Posted in Photography


5 Creative Ways to Find New Locations to Photograph

05 Oct

There’s truly nothing like visiting a location for the first time – I absolutely love it and I strive to always photograph at least one new location a month.

When I started on my photography journey this wasn’t a hard challenge to meet as even my own backyard was new to me and my camera, but as time went on things got a bit more difficult. New locations became ‘go-to’ spots and there came a point where I was only photographing at places that I had previously visited.

While I’d love to travel the world on a whim I just don’t have the means or time to do so which severely limits the range of my ‘new locations’ to places within driving distance from my house. As a result I’ve developed this list of useful techniques for getting the most out of my local area and I hope that it will help you do the same!

Creative Ways to Find New Photography Locations

#1 – Stuck on Earth

While Google Maps, Google Earth and Google’s Street View tools are great for getting location data, one of the best tools that I’ve used to find locations to photograph is the amazing app created by the people at Stuck in Customs called Stuck on Earth.

It works by fusing Flickr location data with a beautiful map to give you an amazing resource of not only useful locations, but the photographs other photographers have taken at those locations.

On top of searching random locations for photographs that have been tagged in various locations around the world, they have top location lists that have been curated by actual photographers to showcase the best photographs in cities around the world. There’s a bunch of other cool features as well and I highly recommend it as a resource (after all it is free).

You can find out more about it here.

#2 – Join a Photo Club

I’d have to say that one of the best ways to get out and find new locations is by meeting new people local to your area. Even if you’ve lived there your entire life odds are someone else has found interesting locations you haven’t – or better yet – has been able to find a new perspective on a location you thought you’ve picked clean.

Photography clubs often will also hold photo walks which will help you get out to different locations many of which might become your new ‘go-to’ spot when you’re in a pinch to get on location before sunset. It’s a great experience and I highly recommend trying it if you haven’t done so yet.

Have you ever gone on a photowalk? Tell us about the experience in the comments!

#3 – Make an Old Place New By Going At Night

One trick that I’ve done is not necessarily to find a new location, but instead to photograph the same location in the middle of the night.

A-lot-of-Stars

Night changes the way we perceive the world and will more than likely change the way you see a familiar location. It opens up a whole new set of challenges and pushes your camera to its limits of low light image capture, but in my opinion it’s one of the most fun types of photography there is.

Read more about photographing at night here.

#4 – Buy a Guide Book to Your Local State

Guide books might seem dated these days with instant access to so many great tools online, but there’s something to be said about a good guide book that has a friendly voice guiding you to the spots, telling you what to expect, where to park and when the best time to visit is.

Trap Falls 2013

I never would have found out about Trap Falls (pictured above) if I hadn’t gotten a guide book detailing the hundreds of waterfalls and cascades that New England has to offer. It’s amazing the detail that the book goes into about not only where the waterfalls are, but how difficult the hikes are, and how picturesque the fall is.

There are tons of great guide books on Amazon and other bookstores and many of them can be downloaded as eBooks right to your phone or eReader so you can take it with you on your trip!

#5 – Fill up your tank and just drive

Finally, if all else fails, just fill up you tank and drive. One of my favorite things to do is pick a highway and a direction and tell myself, “I’m driving for 50 miles and taking the first exit I see after that”. What I end up doing is putting myself into an unknown town with all sorts of new things to see. I like to bring a friend along for the ride to keep me company as well as a second pair of eyes so that I can be sure to see potential photography opportunities.

Double Yellow

Of course it’s not a fool proof plan and driving around aimlessly can be a bit tricky. While it’s certainly possible that you’ll find a location you might otherwise have overlooked – it’s nearly just as likely that you’ll spend your day driving around with nothing to show for the effort, time and gas you burned.

How Do You Find New Locations to Photograph?

Okay now it’s your turn to help build upon this list – I’d love to hear what techniques you use to continue to discover new locations – leave a comment below and let us know!

Post originally from: Digital Photography Tips.

Check out our more Photography Tips at Photography Tips for Beginners, Portrait Photography Tips and Wedding Photography Tips.

5 Creative Ways to Find New Locations to Photograph

The post 5 Creative Ways to Find New Locations to Photograph appeared first on Digital Photography School.


Digital Photography School

 
Comments Off on 5 Creative Ways to Find New Locations to Photograph

Posted in Photography


Find the Perfect Parking Spot Before You Even Leave Home

18 May

[ By Delana in Conceptual & Futuristic & Technology. ]

parkme app

There are countless maps and other direction-finding methods for your smartphone that can help you get to where you want to go – but once you get there, you still have to worry about parking. This, of course, is one of the most frustrating aspects of going anywhere in a mid-to-large-size city. In fact, some 30 to 50 percent of urban congestion is caused just by people driving around looking for parking spots. But never fear – an app called ParkMe is here to provide real-time parking availability information in cities and countries all around the world.

parking facility availability

The smartphone app works by utilizing data from a number of sources. Parking facility operators can update the app with their capacity and availability. Businesses can use a widget to provide real-time availability near their establishments, which is a win-win for them and their customers. Payment options are listed so you’ll know ahead of time if you need to have cash available.

parkme app locations

Not all of the 1800 cities featured on ParkMe have real-time data available; only a handful of cities in the US offer that level of seamless parking integration. But the app does tell you where you’re most likely to find parking near your destination and how much you’ll have to pay for the privilege of leaving your car there. If you enter the amount of time you’ll need to park, the app will even tell you what your total cost will be.

parkme mobile and computer

Overall, the app will reduce traffic congestion in cities by helping people find a place to park in advance. If  you could figure out your exact route, down to the entrance to the lot you’ll leave your car in, before you even leave your house – imagine how much easier it would be to get to your destination and get your fun outing started.

Share on Facebook


[ By Delana in Conceptual & Futuristic & Technology. ]

[ WebUrbanist | Archives | Galleries | Privacy | TOS ]


WebUrbanist

 
Comments Off on Find the Perfect Parking Spot Before You Even Leave Home

Posted in Creativity


Ok Glass, Find Dogfood!

17 May

Ok Glass, Get Dogfood


Thomas Hawk Digital Connection

 
Comments Off on Ok Glass, Find Dogfood!

Posted in Photography


Find the Light: Ep 233: Digital Photography 1 on 1: Adorama Photography TV

14 Jan

AdoramaTV Presents Digital Photography One on One. In this episode Mark demonstrates some techniques for shooting portraits (and a few other things) in natural light. Mark uses nothing but his camera, no reflectors or fill flash, to get terrific results. Mark also talks about open shade and how you can use it to get different lighting results. Sekonic L-358 Flash Master: www.adorama.com Go here for more articles and videos about outdoor portrait photography and to learn more about the gear Mark used in this video: www.adorama.com Visit www.adorama.com for more photography videos! Send your questions to: AskMark@Adorama.com


[FRAMED] Episode 5: Chris Orwig Find Your Passion

04 Nov

Many photographers are self-taught, and others learn from the best. And this photographer, is one of the best. Why? Because he has found his voice and followed his passion. Because of that, he was a large piece of what many of us use today…Adobe Photoshop. He is sought after by celebrities to spread his wisdom, was featured on TEDx, he teaches on the great resource of Lynda.com, and is currently changing lives one student at a time. Chris Orwig brings passion to all that he does. He has an insatiable knack for creativity and discovery. Chris is a celebrated photographer, author, speaker, interactive designer and on the faculty of Brooks Institute of Photography is Santa Barbara, CA. His work is widely sought after and enjoys a diverse client base including professional surfers, musicians, artists, etc. In fact, many of our [FRAMED] artists have attended Brooks Institute and have told us the incredible influence that Orwig has had on their work, their art, their vision, and most importantly, their lives. Join him today as he gives us a tour of Brooks, shoot some film, speaks inspiration and even gives a sneak into his skills on Lightroom and Photoshop. Photographer: Chris Orwig Chris’s latest book: Visual Poet Chris’s forthcoming book: Click here Enjoy more detailed training and tutorials on lynda.com here Model: Jeff Johnson and www.180south.com – the movie he played the lead role in Brooks Student Assistant: Shaun Walton www.shaunwaltonphotography.com – portfolio site

HDR Processing Techniques with Rob Hanson, Part 1 of 5. Includes Introduction, Analysis, Tonemapping in Photomatix Pro. Originally posted on my blog site at robhanson.wordpress.com 08/07/12: Favor please… If you’re going to give this a Dislike, please leave a comment regarding why you did. Thank you. It’ll help with future tutorials.
Video Rating: 4 / 5

 
Comments Off on [FRAMED] Episode 5: Chris Orwig Find Your Passion

Posted in Photography Videos


“when you find me”

01 Nov

Project Imagin8ion, a collaboration between Canon and Ron Howard, is the first ever user-generated photo contest that invited consumers to inspire a Hollywood production. Ron Howard chose the winning 8 photographs, setting the stage for his latest production “when you find me.” Directed by Bryce Dallas Howard. www.YouTube.com/Imagination
Video Rating: 4 / 5

 
Comments Off on “when you find me”

Posted in Photography Videos


Windows 7 – Find Recently Created or Modified Files

16 Oct

Don’t remember what you named a recent file or what folder / location you placed it in? Use a date modified search.

It has happened to all of us. You recently created or modified a file in some application in Windows 7, but don’t remember its name or what folder in which you placed it. You can try going back to the original application and hope the filename is in the recently used file list by selecting the “File” menu, but what if the file is not there? All hope is not lost!

1. Click the Folder button in the taskbar….

Read more at MalekTips.
New Computer and Technology Help and Tips – MalekTips.Com

 
Comments Off on Windows 7 – Find Recently Created or Modified Files

Posted in Technology


Google – Find Google Blogs, Plus Google on Twitter, FaceBook, Elsewhere

16 Oct

Display listings of Google’s presence on blogs and social networks.

Google maintains a wide variety of blogs on various subject such as the Google Chrome web browser, Gmail, YouTube, and other subjects. Their social network presence includes Twitter accounts containing Google puzzles, information on accessing Google for those with disabilities, and updates from Google office locations around the globe. They maintain Facebook accounts regarding their products for nonprofits, using Google Maps, and information about the daily life at Google.

With all of these ways to see what is going on at Google, as well as via Google+ accounts and YouTube videos, how can one see it all or find what they are most interested in? The “News from Google” page offers all the above information, as well as updates from the official Google blog. Instead of hunting through links from one Google-related Twitter account or Facebook page to the other, find the lists of all Google accounts in one easy-to-access place….

Read more at MalekTips.
New Computer and Technology Help and Tips – MalekTips.Com

 
Comments Off on Google – Find Google Blogs, Plus Google on Twitter, FaceBook, Elsewhere

Posted in Technology


[MODIFIED] Yahoo Search – Find Cheap Gas Prices On Your Computer or Mobile Device

08 Aug

Save money pumping gas into your car. Use Yahoo! Search to find cheap gas prices around your city or neighborhood.

Trying to save money filling up your automobile? Looking to find cheaper gas prices in your city? Instead of trying to remember the URLs of websites offering cheap gas price information in the USA, just use Yahoo! Search.

Type in a search query in one of the following formats:…

Read more at MalekTips.
New Computer and Technology Help and Tips – MalekTips.Com

 
Comments Off on [MODIFIED] Yahoo Search – Find Cheap Gas Prices On Your Computer or Mobile Device

Posted in Technology