RSS
 

Posts Tagged ‘Find’

iFixit tears down Sony’s new a7R II to find its secrets

19 Aug

Earlier this week we took you ‘under the hood’ of the Sony a7R II, metaphorically. Now, thanks to our friends at iFixit, it’s possible to take a literal look inside the a7R II. Ifixit took delivery of a production sample a7R II at around the same time as we did, but while we were out testing its AF system and checking to see how its sensor measures up, the hard-working crew at iFixit were busy taking it to pieces. Click through to see what they found  

Articles: Digital Photography Review (dpreview.com)

 
Comments Off on iFixit tears down Sony’s new a7R II to find its secrets

Posted in Uncategorized


6 Tips to Find Undiscovered Photography Locations in Your City

02 Jul
This location was discovered by walking BEYOND the main public area and exploring nearby dirt paths.

This location was discovered by walking BEYOND the main public area and exploring nearby dirt paths.

There’s nothing quite like the rush of finding a nook, a cranny, a wall, a corner, or a building that looks amazing in photos but has not been fully discovered by others just yet. Ask any photographer about unique locations, and most likely they will cringe a bit at the thought of giving up their secret spots. How, then, do you find new locations for yourself? It’s not always necessary to go outside of your city (or even your neighborhood!) to find a great photography location.

Here are several tips for how to find those hidden gems you crave:

1. Break routine

Do you have a usual way to drive home from work? How about that super fast shortcut that you love to take when meeting friends for dinner? Set some time aside to go a different route, and really look at your surroundings as you drive by. Take note of things like texture, if there is a lot of shadow or direct sun on a wall, if there are bright colors, and if certain areas have easy access from the road. Are there any buildings that stand out to you? How about the landscaping – any beautiful trees that provide a dramatic canopy or a large flowering bush that has bright colors?

Use this designated time to explore, stop spontaneously when something speaks to you, and take some quick sample photos (even if with your phone!) to keep on file for future reference.

Cell phone shot while exploring is on the left.  Finished photo for a family portrait is on the right.

Cell phone shot while exploring is on the left. Finished photo for a family portrait is on the right.

2. Leave the car at home

This may sound extremely basic, but if you are like most people, you’re used to driving everywhere. While this is a huge time-saver, it also causes you to not SEE your surroundings in as much detail. When you walk, you see the cracks in the sidewalk, the nooks full of graffiti in the small alley behind the shops, or the vantage points that can be seen at eye level. Changing your perspective is an instant way to re-evaluate your surroundings. If you’re not able to walk, consider riding your bike. It’s still a more leisurely way to explore the details than by car would be, and it’s much easier than a car to stop repeatedly and explore.

Not visible from the street, this pedestrian bridge gets overlooked from a car.

Not visible from the street, this pedestrian bridge gets overlooked from a car.

3. Ask

Sounds simple, right? Yet, how many of us actually do this? Most of us will search online, scan the forums and Facebook groups, and explore on our own. All this, we do instead of simply asking those around us. Next time you go into a small local store, ask the clerk if they have any favorite spots for photos, or ones that offer a fantastic view. Reach out to other local photographers you know; ask them if they have any locations they love going back to time and time again, and if they would be willing to take you there sometime. Ask your friend or relatives if they have any spots in town that they’ve always thought would be great for photos. Their answers may surprise you. Oftentimes, all you need to do is ask.

Many locals recommend this property, but few use the old carports as backdrops. Cell phone shot on left, final portrait on right.

Many locals recommend this property, but few use the old carports as backdrops. Cell phone shot on left, final portrait on right.

4. Create an assignment

It can be overwhelming to just get in your car and drive without knowing what you’re seeking. To make things easier, give yourself a specific type of location that you’re looking for that day. Perhaps you want to find a beautiful skyline view of your city, or you want to find a wall that has colorful graffiti for a backdrop. Maybe just give yourself a theme – industrial buildings, or lush bright flowering landscapes, or open pastures, or patterns.

Having a goal in mind can give you some direction as to where to start looking. Looking for rustic and open? Head out of the city and into wide open spaces. Looking for urban and gritty? Go straight for urban neighborhoods and industrial areas of town.

On a search for great texture and patterns, this wall was discovered. It is part of a research facility at a local university.

On a search for great texture and patterns, this wall was discovered. It is part of a research facility at a local university.

5. Yes, asking Google can help, too

Let’s face it, we go to Google for all our questions these days, and that’s okay. Do a bit of online research, keeping in mind some parameters for what you’re seeking. If you’re looking for old industrial buildings, be sure to enter that into your search. Be as specific as you can be, then get more general as needed to widen the net. There are also a good number of websites and books about “weird places” or “abandoned places”, all of which would have loads of appeal to photographers. If you do seek out abandoned or off-the-beaten-track locations, be sure to take all safety precautions possible to ensure a safe return.

Researching abandoned locations in the desert resulted in this location near a major attraction.

Researching abandoned locations in the desert resulted in this location near a major attraction.

6. Keep records of your discovered gems

This is a tip about finding locations, but more about making sure to remember them. Find a system that works for you to keep track of locations you like, what type of work they may be suited for, any outstanding characteristics, and any sample photos you snapped while exploring. While everyone will have a slightly different way of organizing this information, Google Maps is highly recommended for marking locations on a map and adding notes.

If you have a Gmail account, you can go to Maps and create your own. After each outing, you can add pins to locations you want to remember, name them whatever you’d like, and even add a few notes. In addition to this, I would recommend keeping a folder on your computer that is specifically for sample photos of locations. This comes in handy, not only for remembering a location yourself, but also for showing a potential subject and convincing them of your vision for their photos.

An ongoing project - the personalized Google Map.

An ongoing project – the personalized Google Map.

Have you found tucked away locations that you are proud of? What tactics did you use for stumbling upon these spots? Please share in the comments below.

googletag.cmd.push(function() {
tablet_slots.push( googletag.defineSlot( “/1005424/_dPSv4_tab-all-article-bottom_(300×250)”, [300, 250], “pb-ad-78623” ).addService( googletag.pubads() ) ); } );

googletag.cmd.push(function() {
mobile_slots.push( googletag.defineSlot( “/1005424/_dPSv4_mob-all-article-bottom_(300×250)”, [300, 250], “pb-ad-78158” ).addService( googletag.pubads() ) ); } );

The post 6 Tips to Find Undiscovered Photography Locations in Your City by Natalia Robert appeared first on Digital Photography School.


Digital Photography School

 
Comments Off on 6 Tips to Find Undiscovered Photography Locations in Your City

Posted in Photography


How to Find Great Backgrounds for Portraits

17 Nov
Portraits and backgrounds

I used a short telephoto lens at a wide aperture to throw the cliff in the background out of focus in this photo. With this technique, the background itself isn’t so important as no-one can tell what it is, but it must still complement the subject.

Finding great backgrounds that complement the subject is an essential part of the process of creating beautiful portraits. My article How to Plan the Perfect Portrait Shoot will help you with the other aspects of putting together a portrait shoot, but today I thought it would be interesting to delve deeper into the subject of backgrounds for portraits. Here are some things to think about in your search for the perfect background for your portraits.

Do you want your background to be sharp or blurred?

This is an important question because the answer dictates your entire approach to the portrait shoot.

If you want the background to be in focus, then this suggests that the background is in some way relevant to your subject. For instance, if you are taking a portrait of a performing musician, then perhaps it would be nice to take a photo in a venue where they perform, including the background to show the environment.

On the other hand, if your aim is simply to take a pretty portrait of somebody, then the background may not be so relevant, but it must be complementary. A good example of this is taking a portrait of somebody on a beach, where the environment becomes an important part of the composition.

The easiest way to take a portrait with the background in focus is to use a wide-angle lens with a smallish aperture (f/8 is ideal). You should be careful not to get too close to the subject (avoiding distortion) and to include lots of background.

Portraits and backgrounds

I used a 24mm lens at f/4 for this portrait. With such a wide-angle lens f/4 was sufficient to ensure the entire background was relatively sharp.

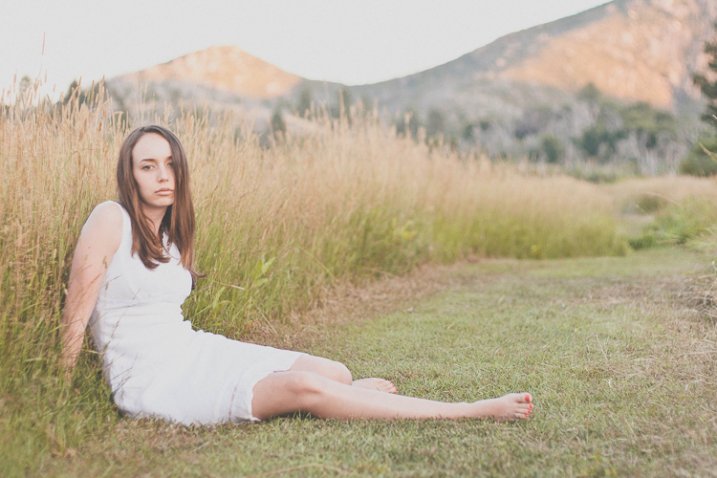
If you want to take photos with a completely blurred background, then the background itself isn’t so important. It will be out of focus, so nobody will be able to tell what it is. The important thing is that you need to be able to position your model some distance from the background. Then all you need to do is to use a short telephoto lens with a wide aperture, and if the model is far enough from the background it will go out of focus.

This technique works best with prime lenses because of their wider maximum apertures. But you can still make it work, even with an 18-55mm kit lens (which typically have maximum aperture settings of f/5.6). You’ll just need to move your model further away from the background, and get as close to her as you can (try taking a simple head and shoulders shot) to make it work.

Don’t forget there’s a middle ground between these two extremes. You may want to render the background slightly out of focus, so it is still recognizable but not so sharp it competes with the model for attention.

Portraits and backgrounds

The background of this portrait is out of focus, but still sharp enough for the viewer to tell what it is.

Are you going to take your photos indoors or outside?

The answer to this question is important because it leads to the question of how you are going to light your photo.

For example, indoor locations can be great for shoots that take place in the winter time, or even at night, when you can’t rely on the weather to be good enough to take photos outdoors. While you may be able to use your house as a location, another idea is to keep an eye out for interesting indoor locations in your local area that you may be able to use. Examples are cafes, bars and hotels. Once you’ve found a photogenic location, it’s a simple matter of finding the right person to ask for permission to use that location for a shoot.

Once you’ve found the location, you need to decide how to light the portrait. You might be fine with natural light, especially if there are large windows or your camera works well at high ISOs. You’ll probably need an assistant with a reflector to help out.

If you decide to use flash to light your portrait, things may be a little more complex. You’ll need room for lighting stands, and you may need to run power cords across the floor. If you intend to use flash, make sure you mention this when you ask permission to use the location.

Portraits and backgrounds

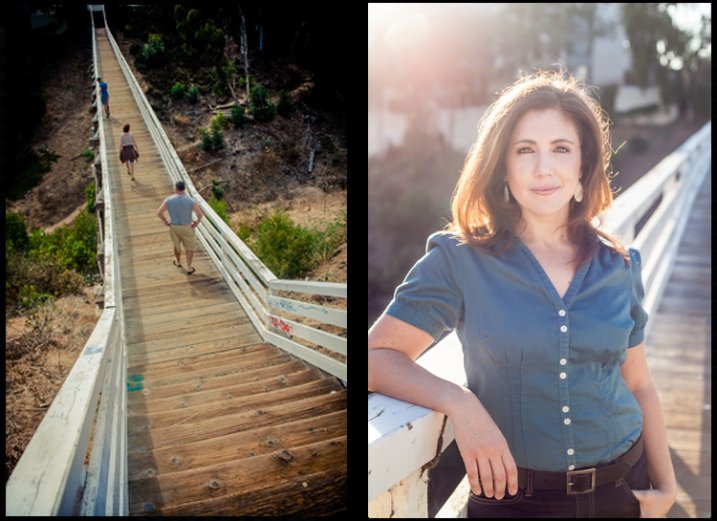
I took this portrait in a cafe, using natural light from the windows.

If you are going to take your photos outside then the question of lighting still applies. Do you intend to use natural light? Again, an assistant with a reflector may be useful. If you intend to use flash to supplement or even overpower the natural light, then you need to consider if you have enough room in your chosen location to set them up? Will you need someone to help you? Thinking through the practicalities will help your shoot run smoothly.

Background ideas

Finally, here are some of my favourite locations for taking portraits. You may find these suggestions useful in your search for great backgrounds.

Beaches: I especially like rocky beaches as rocks make great backgrounds. The key to getting the best from a beach location is to take the portraits close to the sunset and utilize the beautiful quality of light during the golden hour.

Gardens or parks: Public gardens can be a great place to take portraits. They are normally quite beautiful and may contain a variety of plants and trees that you can’t find elsewhere in your area.

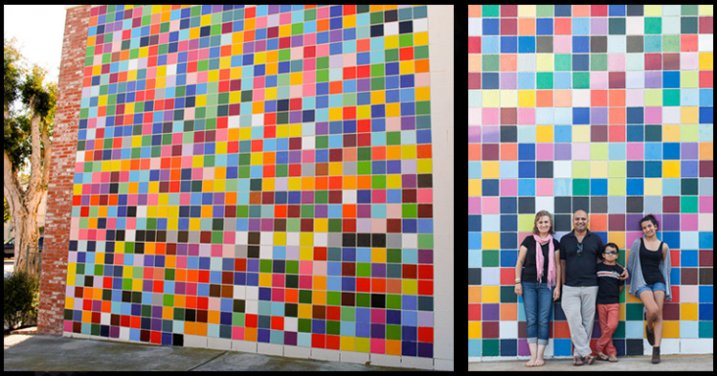
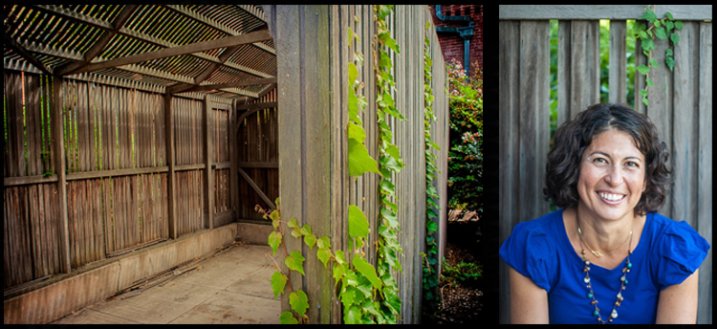
Urban or suburban areas: I like to wander around interesting parts of the city I live in with my model looking for good backgrounds. It’s amazing how many times a wall or doorway can make a simple yet effective background for a portrait.

Portraits and backgrounds

This portrait was taken using an ivy covered wall (that I found on a street near my house) as a background.

Woodlands: These can be tricky as the light tends to come from above, between the trees, almost like a spotlight. The result is harsh shadows under your model’s eyes and nose, even on an overcast day. The solution is to use a reflector or flash to fill in the shadows. While the lighting isn’t always easy in woodlands, the results can be worth the effort.

Children’s playgrounds: Use a playground at a quiet time and your model can have lots of fun on the rides, adding a sense of movement and vitality to your portraits.

Portraits and backgrounds

We went to a children’s playground in the late afternoon (no kids to disturb) to take this portrait. My model enjoyed playing around on the rides.

Your turn

These are my suggestions, now it’s your turn. Can you suggest any locations or types of background that are suitable for portraits? Please let us know in the comments.


The Natural Portrait photography ebookThe Natural Portrait

My ebook The Natural Portrait teaches you how to take beautiful portraits in natural light. This 240 page ebook, published by Craft & Vision, takes you through the entire process of natural light portrait photography through from finding a model, deciding where to shoot, working with natural light and post-processing your images. Click the link to learn more or buy.

The post How to Find Great Backgrounds for Portraits by Andrew S. Gibson appeared first on Digital Photography School.


Digital Photography School

 
Comments Off on How to Find Great Backgrounds for Portraits

Posted in Photography


Follow our New Facebook Page & Find the Best Photography Tips from Around the Web

10 Sep

I started Digital Photography School as a simple blog in April 2006. My goal was to share the things I knew about photography with those just starting out in their journey – in a time where digital photography was really gaining momentum.

Since that time dPS has changed in many ways.

One of the changes since starting dPS in 2006 is the rise in social media. We’ve embraced this early on by creating an active dPS Facebook page and Twitter account.

These accounts are largely about highlighting new tutorials that we publish each day as well as highlighting some of the 4700+ posts in our archives that readers might have missed.

Many of our readers appreciate these accounts but we’ve always been really aware that there’s a lot of great photography content on the web beyond what we produce at dPS.

In response to this we started a dPS Pinterest page to curate the best content that we’re seeing around the web. This has been well received so we want to extend the idea further and just a few days ago started a new Facebook page which will largely about sharing content we like on other sites.

Do you like photography

The new Facebook page is at Do You Like Photography?

Each day on this page we’ll post a variety of tutorials, inspirational images and ideas to help you in different types of photography. We’ll also occasionally share a post or two from our archives that we think might be relevant but it’ll largely be content from other photography blogs and sites.

So if you’d like more photography tips and tutorials in your Facebook stream (in addition to the dPS page where we will continue to publish the same amount of posts each day as we’ve always done) follow our new page here and you’ll hopefully start seeing them in your feed shortly after.

PS: it’s only been five days since we started our new page but we’ve already had over 43,000 people like it – thanks everyone for your support!

The post Follow our New Facebook Page & Find the Best Photography Tips from Around the Web by Darren Rowse appeared first on Digital Photography School.


Digital Photography School

 
Comments Off on Follow our New Facebook Page & Find the Best Photography Tips from Around the Web

Posted in Photography


Floating on Dry Land: 17 Derelict Houseboats Find New Home

05 Aug

[ By WebUrbanist in Architecture & Public & Institutional. ]

ceuvel project lifting place

Located in the north of Amsterdam, the recently-opened De Ceuval (conceptualized by Space&Matter) is a radical redevelopment project featuring homes, offices, restaurants and gardens, all accessed via elevated winding platforms that connect renovated houseboats.

houseboat space matter diagram

houseboats on dry land

A former shipping wharf, this brownfield site is being transformed from a polluted wasteland into a temporary ten-year creative haven, all designed to revitalize and rehabilitate the land it occupies and leave it cleaner at the end of its lease.

houseboat winding wood pathways

houseboat brick wall exterior

The complex is made up of an array of formerly-floating homes that are no longer seaworthy but can still be fixed up and find a second life on land. As PopUpCity reports, “The imaginatively retro-fitted houseboats that make up the creative quarter are all placed around a winding bamboo walkway and the surrounding landscape consists of plants that clean the soil.”

houseboat brownfield site renovation

houseboat axon diagram

An incredible array of sustainable strategies are being employed in the development, both for the benefit of the site and to educate the public,  showing off “new technologies that can transform how we produce and consume resources and public services in cities. Throughout the site, solar technologies will convert energy from the sun into heat and electricity. Green roofs and water collection systems are designed to collect, purify, and store rainwater for when it’s needed. Sanitation systems will extract energy, nutrients, and water from the waste produced for on-site food production. A network of sensors provide information on performance and user behavior.”

houseboat renovated interior design

houseboat gathering people party

One of the central features of the program is the Ceuvel Café, designed as a gathering and eating space for tenants and visitors alike, featuring “lectures, workshops and tastings. In the future, it will also be possible to buy locally produced vegetables [and attend] guided tours and events. Ceuvel Café will also act as a stage for artists, musicians, theat[rical performers] and filmmakers.”

houseboat finished pedestrian diagram

aerial view micro town

The entire complex is meant to serve not only the designer and architects who occupy it, but the environment around it, using green tactics of all kinds including  “high-tech systems like sensors, monitoring devices, solar panels, and high-efficiency electric boilers. Low-tech systems also play an important role, including biological waste processing, water filtration, smart insulation methods, vegetation, and solar tubes that provide more natural light to indoor spaces.”

Share on Facebook


[ By WebUrbanist in Architecture & Public & Institutional. ]

[ WebUrbanist | Archives | Galleries | Privacy | TOS ]


WebUrbanist

 
Comments Off on Floating on Dry Land: 17 Derelict Houseboats Find New Home

Posted in Creativity


Find the Perfect Photography Location Using Google Maps

25 May

No matter if you’re planning your next photo road trip or you’re scouring the city streets looking for the perfect viewpoint, Google Maps and Google Earth are the most valuable tools to add to your arsenal for finding the perfect photography location.

Planning to Shoot

I usually travel for work, or with family, so I don’t have the luxury of as much time as I might want to search for the perfect vantage point in person. Nor to scout an area to compare locations that I want to dedicate to the one sunset that I’ll have time to shoot. Google Maps to the rescue!

While planning a trip from home, you have much more time to explore the area in a virtual capacity instead of being out there with boots on the ground. Nothing can compare with actually being there, but the tools available to you are getting better every day and the ability to nearly frame your shot is a realistic time saver. Time to turn the volume on your pre-visualization up to 11.

If I’m planning a trip or have an idea for a shot, I’ll start with Google Maps and zero in on the area that I want to shoot. You probably already do this, too, but let’s just take it a step further. Click the icon in the lower left corner labeled “Earth” to start the Google Earth browser plugin. This has replaced the satellite or aerial view for much of the world’s map, but instead of only offering a flat, two dimensional view of the map directly overhead, you can now tilt the map and see an approximation of topography, texture, and elevation.

Default Earth View

Normal mouse controls on the map let you pan in all directions, and zoom in or out with the mouse wheel. In order to adjust to a view that will help you get a better idea of the terrain, hold down the shift key, click and drag upward. That will rotate your point of view (POV) so that you now have an aerial view looking toward the horizon instead of straight down. Dragging left or right while holding shift will rotate your point of view instead of panning.

Rotated Earth View

But, you don’t have to be tied down to your desk to do this. Just two weeks ago, I was out with a friend exploring San Francisco and searching for a specific vantage point of the 101/280 freeway interchange. We knew the general area that we wanted to shoot from, but with so many streets winding around, using Google Earth on my mobile phone helped to eliminate some of the trial and error of driving around without a clue how to find what we wanted.

101 280 Framing the Shot Mobile

101 280 Framing the Shot

Desktop interface Google Earth view looking south

Joe Ercoli Land of Confusion 600

Finished image from location scouted using Google Maps/Earth

The example images from this article show the area that we shot in, including a screenshot taken from the mobile interface, and the completed image. Of course the view that you can get from the map interface is never as good as what you’ll see in person, but it’s an excellent way to help you hit the ground running when you get on-site with your camera in hand.

NOTE: The camera is facing South in the final composition, not North as in the initial Google Earth Point of View.

Have you used Google Maps to find any cool locations? What other tips or tricks have you tried? Please share in the comments below.

The post Find the Perfect Photography Location Using Google Maps by Joe Ercoli appeared first on Digital Photography School.


Digital Photography School

 
Comments Off on Find the Perfect Photography Location Using Google Maps

Posted in Photography


Lenstag helps photographers find stolen lenses and images

21 May

Screen_Shot_2014-05-20_at_2.47.12_PM.png

The website Lenstag bills itself as a tool for helping photographers find lost or stolen gear, but now it’s branching out to help people find images used without permission, too. Lenstag maintains a database of a user’s lens, camera body and accessory serial numbers and then trolls the web looking for photos posted with those registration numbers in the EXIF data of a photo. Learn more

News: Digital Photography Review (dpreview.com)

 
Comments Off on Lenstag helps photographers find stolen lenses and images

Posted in Uncategorized


Oppo launches Find 7 with QHD display and 50MP image option

21 Mar

oppo3.jpg

Several manufacturers were rumored to launch a smartphone with a QHD-display (2560×1440 pixels) at Mobile World Congress in Barcelona but none of the models introduced at the show featured one of the high-resolution screens. Now the wait is over. The Chinese smartphone manufacturer Oppo has introduced the Find 7, the first smartphone to feature a QHD screen. Learn more

News: Digital Photography Review (dpreview.com)

 
Comments Off on Oppo launches Find 7 with QHD display and 50MP image option

Posted in Uncategorized


Top Photo Spots – a New Way to Find Locations for Photography

20 Mar

Top Photo Spots is a hugely ambitious project headed up by James Brandon (a regular  dPS writer) that aims to take the guesswork out of travel photography. James has asked me to introduce TPS here on Digital Photography School in hopes of bringing attention to the project and helping bring his vision to life. It’s a great idea and one, that if it can be accomplished, could become a go-to resource for photographers looking to find locations for photography around the world – however it’s a long way from that point right now.

So what is Top Photo Spots?

topphotospots1

The best way to introduce TPS is to take a quote from the man who created it – from James himself.

You can Google something like “best places to photograph in Big Sur” and while you might get some helpful information, it will mostly be from random one-off websites and it won’t always be geared towards photographers.

In essence TPS aims to solve the problem of searching the web, which is filled with tourists photos of various locations, inaccurate or confusing information on where and how the photographs were taken, and replace that with something that’s geared specifically towards photographers.

The concept, layout and design are there

Overall TPS has a unique concept that will fill a huge need in this industry, the layout and design are modern, easy to navigate and complement the concept well, but – oh yes there’s a but – the big hurdle that TPS needs to conquer is content (which I’ll touch on in a bit). So, let’s focus on the good first.

As I said, the design is great and well thought out. Each location that’s been added to TPS has a sample photograph, Google map with location pins for points of interest, and a description of what to expect.

topphotospots2

After the brief introduction to the overarching location, in this case Santa Cruz, California, there are sub-posts that describe various photographic opportunities within the location in more detail.

topphotospots3

Moving into one of these sub-locations will provide you with a sample photograph from that specific location as well as another Google map giving you exact coordinates to get you there and of course more information on the location itself. It’s a really well thought out concept and I can see these guides being very helpful to people visiting locations and looking for not only ideas of things to photograph, but exactly how and where to take photographs.

Now – about the content problem

Currently James has TPS listed in a beta status while he builds content and brings in contributors. As I’ve said from the start of this article – this is an ambitious project – it’s going to take a lot of time and effort to get it to the point where it needs to be in order to truly be meaningful to the majority of people searching for locations to photograph.

Currently there are only a few dozen locations, most of which are within the United States, so the location you are traveling to probably isn’t yet listed – which means there’s a lot of room to grow. But this is where you can help!

TPS is openly looking for contributors to help fill out the site with locations around the world. If you’ve got an interesting location and know a bit about writing for the web I’d suggest that you check out the write for TPS page and help James get the site rolling – it could be the next big thing in travel photography.

Final Thoughts and Suggestions

Top Photo Spots is a great concept that is too ambitious for the vast majority of people to even attempt – which is why it’s such a good idea. If James can succeed in his vision I think that TPS will become an extremely valuable resource for photographers looking for spots to photograph on their next trip.

That said, I do have a few suggestions for James, and I’m sure he’ll entertain more in the comments – here are the three big things that I’d like to see integrated into the site at some point in the future.

  • A visually appealing way to browse through all the currently available locations – sometimes people don’t know where they want to travel, but rather are looking for something to inspire them.
  • The ability to print and download guides, or save them to a mobile device. Ideally I’d want to have quick and easy access to the guide when I’m on location without having to refer back to TPS – especially if the location is in a remote location where access to the internet might be limited.
  • Integrate TPS with other photographers around the world who are willing to set up photo walks and guides of locations that are featured on TPS. This could take some time – but I think that a site like TPS is set up perfectly for this and would be a huge benefit to people traveling to the new locations. Not only that, but it would set it even further apart from the ‘Google search’ method that we are currently using to find places to photograph.

So go have a look at Top Photo Spots and check out what James has put together so far. Then come back here and tell us what you would add to the TPS wish-list above.

For more on travel photography:

  • Tips for Photographing Popular Tourist Destinations
  • 10 Ways to Improve your Vacation Photos
  • 6 Tips for Photographing People When Travelling

The post Top Photo Spots – a New Way to Find Locations for Photography by John Davenport appeared first on Digital Photography School.


Digital Photography School

 
Comments Off on Top Photo Spots – a New Way to Find Locations for Photography

Posted in Photography


Find Out What It Takes To BeA Profesh Photographer

06 Mar

This is Margo. ->

She takes all the photos for the Photojojo Shop, like these. ->

She gets money (& snacks) for doing that, so that makes her a professional photographer!

We snuck a video camera into the photo studio at Photojojo HQ so you can watch her work … LIVE.

See just what a pro photog does all day.

How does she set up her lights? Where does she position the camera? What kind of snacks are those?

Watch Margo LIVE Today from 12-3pm PST

p.s. She’ll even stop working for a Q&A at 2:30 PST. Leave your questions for her on Facebook, Twitter or Instagram.


© laurel for Photojojo, 2014. |
Permalink |
No comment |
Add to
A Profesh Photographer”>del.icio.us

Post tags:


Photojojo

 
Comments Off on Find Out What It Takes To BeA Profesh Photographer

Posted in Equipment