RSS
 

Posts Tagged ‘film’

Secret Cities: Capturing Hidden Abandoned Places on Film

12 Nov

[ By Steph in Abandoned Places & Architecture. ]

Secret Cities Abandoned Places 1
Just beyond all of the noise and activity of daily urban life is a secret world of forgotten spaces which are nearly always dank and dusty, but often surprisingly beautiful. Photographer Andrew Brooks seeks out these spots in Manchester, UK and Sittard-Geleen, The Netherlands, capturing them on film so the less adventurous can experience a small fraction of their crumbling glory.

Secret Cities Abandoned Places 2

Brooks gains entry into grand disused buildings that seem frozen in time, like the Hulme Hippodrome and Manchester’s Albert Hall, as well as subterranean tunnels and decommissioned water towers. At his website, the photographer provides detailed information about each location he shoots, describing what it felt like to experience them firsthand, as well as offering his stunning images.

Secret Cities Abandoned Places 3

Secret Cities Abandoned Places 6

The forgotten spaces just out of view of the average person in virtually any major city around the world start to occupy ‘imaginary spaces,’ says Brooks. It’s easy to envision them as settings for all sorts of fictional intrigue, to let our imaginations run wild with the possibilities of these often complex spaces, yet most of us are too wrapped up in our immediate surroundings to give them much thought.

Secret Cities Abandoned Places 4

Secret Cities Abandoned Places 5

“The familiar space we occupy gradually take on the character of wallpaper in our lives as we hurry from meeting to meeting, commitment to commitment, never stopping to appreciate the places where we live. In our rush we miss both the fantasy and reality of our pace in the world, habitually ignoring even the points where the opportunities for simple adventure encourage us to indulge.”

Share on Facebook


[ By Steph in Abandoned Places & Architecture. ]

[ WebUrbanist | Archives | Galleries | Privacy | TOS ]


WebUrbanist

 
Comments Off on Secret Cities: Capturing Hidden Abandoned Places on Film

Posted in Creativity


Get Started with the Beautiful World of Film Photography in 7 Easy Steps

27 Sep

Ahh, film photography.  The cool kid on the block.  The “old” thing that’s suddenly the “new” thing.  In recent years, it’s been popular opinion that it was an identifying trademark of hipsters, and only then for an artistic flair that digital photography has failed to capture for them.  The reason Instagram has been such an enormous success recently is our Continue Reading

The post Get Started with the Beautiful World of Film Photography in 7 Easy Steps appeared first on Photodoto.


Photodoto

 
Comments Off on Get Started with the Beautiful World of Film Photography in 7 Easy Steps

Posted in Photography


Ilford opens US lab to meet demand for black and white film development

02 Sep

Ilford-Photo-Lab-BWsq.jpg

While digital has truly swamped film for most common purposes, demand for black and white film development and printing is sufficient that ILFORD has expanded its processing and printing service to include a mail-order lab in San Clemente, California. Unlike most local labs, ILFORD’s service offers black and white printing on silver gelatin photo paper.

News: Digital Photography Review (dpreview.com)

 
Comments Off on Ilford opens US lab to meet demand for black and white film development

Posted in Uncategorized


Kodak bankruptcy plan approved, former film giant exits consumer business

22 Aug

shared:kodakextColor.jpg

The Kodak planning to exit from bankruptcy on September 3rd looks very different from the familiar imaging company that filed for Chapter 11 last year. The U.S. Bankruptcy court has approved Kodak’s plan for reorganization, a step that means the company can resume independent operation soon. CEO Antonio M. Perez issued a statement emphasizing Kodak’s move into commercial imaging for a profitable future, including “packaging, functional printing and professional services.” Click through to read more about where Kodak now stands.

News: Digital Photography Review (dpreview.com)

 
Comments Off on Kodak bankruptcy plan approved, former film giant exits consumer business

Posted in Uncategorized


Faded dream: blogger looks back at the failure of the Silicon Film project

20 Aug

SiliconFilm.png

In the early days of digital photography a small American company, Imagek, started developing a digital sensor module that could be installed in film SLRs. The idea still generates excitement today, more than ten years after the company (by then named Silicon Film) failed. Photographer and blogger Olivier Duong has taken a look back at the promise and disappointment of the Silicon Film dream.

News: Digital Photography Review (dpreview.com)

 
Comments Off on Faded dream: blogger looks back at the failure of the Silicon Film project

Posted in Uncategorized


‘Film was never this sharp’: Breaking Bad photographer interviewed

14 Aug

fo3_bb_main.jpg

Commercial photographer Frank Ockenfels III has worked on several high-profile blockbusters like Harry Potter and Men in Black 3, as well as a number of TV shows, and his most recent work is currently being used to promote the season five finale of Breaking Bad on AMC. PopPhoto has published an interview with him, in which he explains how he got started in the TV and movie business, the equipment he uses, and why he bases his career around the concept of ‘never having just one idea’. Click through for a link to the full article. 

News: Digital Photography Review (dpreview.com)

 
Comments Off on ‘Film was never this sharp’: Breaking Bad photographer interviewed

Posted in Uncategorized


Bursting the Burst Mode Myth: [What I Learned from Shooting with Film]

29 Jul

Over the next week we’ll be featuring a mini-series of posts from Rachel Devine (author of our kids photography eBook) in which she’ll be talking about five reasons learning photography on film cameras made her the digital photographer that she is today.

Here’s today’s on Busting the Burst Mode Myth.

no burst mode here

There are a few things I hear as top advice for budding children’s photographers and parents who want to take better photos of their children. I think that setting the camera to burst mode and holding the shutter down while taking photos is the one I hear most often and makes me cringe hardest. Called the “spray and pray” method, lots of digital photographers rely on taking hundreds of images (I have actually heard of thousands of frames shot for one portrait session) at a sitting to get a handful of good shots.

When keen new photographers ask for advice on how to get better photos of kids (their own or for a client) and are told, “It is digital, it will not cost you anything, just put the camera in burst mode and take as many as you can and you are bound to get a good one in there” they are being fed bad advice…or rather non-advice.

I started my photography career on film 16 years ago and when I did, those who swear by the spray and pray method may be shocked to learn that there were lots of other kid and family photographers who had to get the entire session worth of images for their clients on just a few rolls of film. And they did…every time.

Here is why shooting in burst mode not best for everyone and what I think is better advice for those really wanting to get better at taking photos of kids.

Burst Mode does actually cost something

Time:: It takes time on your end to weed through those hundreds of resulting shots. Culling images is a time sucking and soul zapping process where you will be tied to your computer for hours sorting, comparing and slitting hairs. It may be fun the first few times you go through your images, but it will wear on you over time and if you get into the habit of having to shoot this way, you will also have to allow time for sorting and editing all of those images.

Not learning to see:: If you do have to resort to shooting in burst mode, then things really are on auto. Burst mode does not allow for the photographer to make changes to the image and exposure settings while they are taking the shots. With single images taken thoughtfully, the photographer can fine tune the exposure settings and compose carefully. Learn to recognize what makes a great image and then set out to purposefully shoot that.

no burst mode here

Missing Details:: When the camera is set to burst mode, the focus is on quantity and quality tends to take a back seat. People tend to forget to scan the shot for details and end up with an entire series of cute expressions on a child who seemingly has a tree growing out of the top of their head. That photographer can now tack extra time onto their post processing routine to edit that sucker out. I have seen tags left on clothes, dirty faces, cars parked prominently in the background. Things get missed easily in the rapid fire fury.

Connection with the subject:: Finally, I have heard an argument in favor of burst mode that it helps avoid missing any special moments. Really, the wham-bam-thank you ma’am approach to photography may seem like a good idea for kids because they are fast and have short attention spans, but getting them involved in the whole experience is so much more enriching for both photographer and subject. These are not wild animals on safari, but tiny human beings who can and should bring personality to the table when they are active participants in your sessions, not just being shot at. This is especially true for people who enjoy documenting their own children over and over again. Slow down, take a moment to breathe, observe and photograph and then breathe again…it is then when you will not only be photographing the special moments, but also participating in them.

If that all does not speak to you, let’s talk cash…

Shutter actuations:: Your camera does have a shelf life and it really is not determined by when the latest and greatest new model is released, but more by how many times the shutter has actually clicked. While the total end number can vary by camera model and may seem really quite high, it will be reached faster if you are taking hundreds of images each time you go to use your camera.

Where burst mode does come in handy

no burst mode here

Shooting big group portraits :: Great for getting extra shots of the same scene (especially when mounted on a tripod) where you may need to do a head swap because someone closed their eyes.

Sports :: That is pretty much why it is called Sports Mode

Portraits with a point and shoot camera :: The shutter lag present in point and shoot cameras (the time it takes the camera to actually capture the shot from when you press the shutter button is called shutter lag and is very apparent in point and shoot cameras) can cause you to miss the moment even when you are shooting carefully and are ready for it. Setting the little compact cameras to sports mode can help overcome this technical hurdle.

Back in the days of film, we were limited by budget as we had to pay cash money for the film and processing. That made it necessary to shoot mindfully. We ended up with more images that we loved and fewer wasted frames. Today with digital, the costs are hidden, but there are still costs. Take the time to set up the sessions, meter the light, compose and be present while you are photographing your little subjects. Practice shooting digital with the discipline of film. You just may find that you enjoy the act of photographing kids even more than you thought possible.

For more on the topic of Kids Photogrpahy – Check out Rachel’s eBook Click! How to Take Gorgeous Photos of Your Kids.

kids photography tips

Post originally from: Digital Photography Tips.

Check out our more Photography Tips at Photography Tips for Beginners, Portrait Photography Tips and Wedding Photography Tips.

Bursting the Burst Mode Myth: [What I Learned from Shooting with Film]


Digital Photography School

 
Comments Off on Bursting the Burst Mode Myth: [What I Learned from Shooting with Film]

Posted in Photography


Time-Lapse Tagging: Short Film Reveals Secrets of Graffiti

29 Jul

[ By WebUrbanist in Art & Street Art & Graffiti. ]

time graffiti artist ladder

You see the finished pieces all over – ornate, curved and layered – but rarely get such a vivid and complete all-angle, real-time view of how their tags come together. If you are even remotely interested in graffiti, this behind-the-scenes video with its shifting point of view is well worth a few minutes of your time.

time lapse graffiti mural

Featuring Melbourne street artist Sofles and directed, filmed and edited by Celina Mills of Unity Sound & Visual, this video provides a whirlwind four-minute window into the creative process behind tagging. Instead of a static shot of a single tag, though, the camera follows the artist from wall to wall, into an abandoned building and more.

time lapse tagging video

What makes it really remarkable, though, is that it gives you a tour of different scenarios and contexts for various styles and types of graffiti creation. It features interior and exterior settings as well as canvasses ranging from blank to brick to already-painted – so you can see what happens from start to finish in all kinds of urban situations.

Share on Facebook


[ By WebUrbanist in Art & Street Art & Graffiti. ]

[ WebUrbanist | Archives | Galleries | Privacy | TOS ]


WebUrbanist

 
Comments Off on Time-Lapse Tagging: Short Film Reveals Secrets of Graffiti

Posted in Creativity


How to Use Film Simulator Presets in Lightroom

26 Jun

20130620 dPS 000  tri x
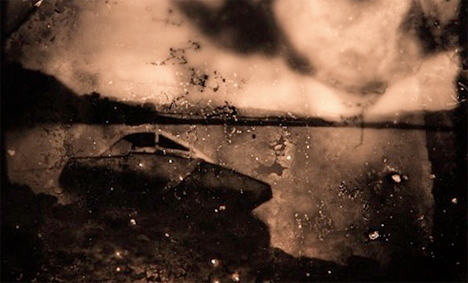
processed using VSCO’s Kodak TRI-X film preset

Those of you who think Instagram and its ilk are pushing us towards the end of “real photography” can quit reading right now.  For everyone else, the following paragraphs will show you how to get that ever-so-trendy, faded, slightly desaturated, vintage, “look” that is so prevalent from both professionals and hobbyists.  I’m going to let you in on a secret that professionals have been utilizing for awhile (many use it secretly!) to give their photos that added edge. 

Specifically, I am going to cover the use of film simulation presets to develop your RAW files in Lightroom.  Why use film simulation at all?  As evidenced by the popularity of mobile apps like Instagram, emulating the look of traditional film stocks has become a rather trendy and prevalent practice in photography and can be a useful tool in your post-processing arsenal.  Your clients may not specifically request a certain film, but they may ask you to give them a specific look & feel that is a result of simulating film, i.e. “Can you give my engagement photos that faded, vintage-y feeling?”, or “Make my photos look like they were taken with Instagram”.  I’ve had several clients ask for that style of processing without realizing it was the result of emulating a 50-year old film stock.  Film simulators answer the question: “What would this digital image look like if I took it with Kodak TRI-X film?”.
 
In short, film simulation presets are designed to process your camera’s specific RAW files into images that emulate the look provided by some classic film types.  Before I discovered these plugins, I foolishly spent countless hours playing with various Lightroom sliders attempting (and failing) to get that look I wanted to emulate.  After trying a number of these, my favorite by far is VSCO Film, created by a company called Visual Supply Co (VSCO for short).  They create a number of plug-ins for Lightroom, Adobe Camera Raw, and Aperture, that all do the same thing; make your digital image look like it was taken with an old-school film camera. We’ll be covering how to use these in Lightroom though they should have the same effect in ACR or Aperture.  It should be mentioned that I do NOT work for VSCO and / or receive payment in any way from them.

VSCO Logo

VSCO’s film packs come as downloads from their website and installation is as easy as running the downloaded installer and booting up Lightroom afterwards. You will then find several new groups of presets once you’re in Lightroom’s Develop module. 

VSCO Presets

Once you’ve installed the presets, applying them is as easy as selecting the image(s) you want to process, and clicking on the desired preset on the left.  If you mouse-over the list of presets, you’ll notice that the Develop module’s Navigator window will show you a preview of the preset’s effects on your image.  You’ll find that each different film type will give you varying effects on color, contrast, brightness, and will alter the tone curve of the image.  Some film presets will introduce subtle changes, while others do dramatic things, and covert your image to B&W, add grain, and reduce the dynamic range of the image by resetting the tone curve. 

Frankly, I am unsure if there is anything a VSCO filter can do that you can’t do manually, however, it is an incredible time saver if you don’t want to spend hours re-creating the look of specific film stocks.  VSCO’s team has already done the research into the settings to emulate popular film types, and all you need to do choose which ones you like.  You’ll also notice that each preset has  “-”, “+”, “++” versions of each film, representing the degree to which you’d like the particular film’s effects applied.  Film presets work like any other preset and the develop settings can be copied and pasted from image to image or applied to a large batch of images at once.

However, the beauty of VSCO (and similar presets), is that once you’ve selected a film stock that you like, you can then tweak it to your heart’s content.  For example, you can start off with a baseline Kodak Portra 400+, and decide that you’d want to bring up the shadows, add some grain, and saturate the blues.  Save those settings as a new preset, and boom, you’ve developed your own, unique look.  VSCO’s film pack also comes with “Toolkit” presets that will help you fine-tune your image.  With a click of a button you can add grain, bring up the shadows, save your highlights, or fix Chromatic Aberration.  Again, these are all things that you can do manually, but the presets will save you quite a bit of time.
VSCO Toolkit

VSCO has now released three different film packs, each with its own set of films, with the latest film pack focusing on a variety of instant (Polaroid!) films.  The film packs are not cheap, at $ 119 / pack, but existing customers will receive a discount on subsequent film pack purchases.  I’d suggest buying VSCO 01 and only adding the others if you really like the first pack.  Don’t feel like ponying up the dough or only use your iPhone to take pictures?  VSCO actually has an iOS app called VSCO Cam. 

So that’s all there is to it! I will leave you with some quick before & after examples that may help demonstrate how powerful these presets can be.  Each of these following images will be presented in two forms, the “before”, sans preset and without any major Lightroom modifications, and the “after”, with a specific preset applied. For the sake of this demonstration, I have picked films with a relatively dramatic effect on the original image.

Before:
20130620 dPS 001??After, with a “Polaroid 690 cold” preset applied:

20130620 dPS 001  polaroid 690 cold

Before:

20130620 dPS 002

After, with a Polaroid 669 preset applied:

20130620 dPS 002  polaroid 669

Before:

20130620 dPS 003

After, with a “Polaroid 690 cold” preset applied:

20130620 dPS 003  polaroid 690 cold

Before:

20130620 dPS 000

After, with a Kodak TRI-X filter applied:

20130620 dPS 000  tri x

Frank Wang is a NYC photographer specializing in portrait and architectural photography. You can find him online at www.frankwangphotography.com and www.framephotographics.com. Connect with him via witter / Instagram: @frankwangphoto

Post originally from: Digital Photography Tips.

Check out our more Photography Tips at Photography Tips for Beginners, Portrait Photography Tips and Wedding Photography Tips.

How to Use Film Simulator Presets in Lightroom


Digital Photography School

 
Comments Off on How to Use Film Simulator Presets in Lightroom

Posted in Photography


15 of the World’s Weirdest Low-Tech Film Cameras

19 Jun

[ By Steph in Technology & Vintage & Retro. ]

Unusual Cameras Main

A pistol that shoots photos instead of bullets, a harness for pigeons, a cane and a human skull are among the unexpected objects that have been turned into film cameras since the dawn of photography in the 19th century. Here are 15 strange and unusual cameras, including historic collector’s items and new experiments in low-tech techniques like pinhole photography.

Miniature Pigeon Camera

Unusual Cameras Pigeon Surveillance

Inventor Julius Neubronner’s tiny harnesses fitted with cameras were received with understandable skepticism when he first unveiled the idea in the early 20th century, but once he put the photos taken by pigeons on display, his idea took off, and even the military took interest. But it wasn’t long before the invention of the airplane made the need for pigeon photographers null and void for reconnaissance purposes. Each pigeon was trained to wear the harness and fly to a specific location, and a timer in the camera took care of the rest.

Skull Camera

Unusual Cameras Skull 1

Unusual Cameras Skull 2

Photographs taken from inside a human skull are suitably eerie and nightmarish. The Third Eye Camera by Wayne Martin Belger is made from the 150-year-old skull of a 13-year-old girl. It’s a pinhole camera, with a hole drilled between the eyes letting light hit a piece of photo paper placed inside.

900-Pound Camera from 1900

Unusual Cameras Mammoth Oversized

The world’s largest camera at the time, this monster made by Chicago camera builder J.A. Anderson weighed 900 pounds and required 15 men to load it onto a horse-drawn van for transport. And it’s all because the Chicago & Alton Railway company wanted to show off their new train to the world. The camera had a 8-by-4.5-foot glass plate to take the largest possible photo of the train, which was displayed at the Paris Exposition in the year 1900.

Turtle Shell Camera

Unusual Cameras Turtle Shell

Virtually any hollow object can be turned into a pinhole camera, as demonstrated by Taiyo Onorato and Nico Krebs in their two-volume series of books, “As Long as It Photographs” and “It Must Be a Camera.” The pair found their turtle shells, taxidermy animals and other objects at flea markets.

Cane Handle Camera, 1903

Unusual Cameras Cane Handle

Made in 1903, the Ben Akiba cane handle camera features a shutter released by pulling a knob below the handle. When a roll of film is exposed, you just remove the side face of the handle to pull it out, and a new roll pops up from a storage area inside the cane. Both originals and replicas of this odd camera are in demand these days, with one selling for $ 27,000 in 2002.

Next Page:
15 Of The Worlds Weirdest Low Tech Film Cameras

Share on Facebook


[ By Steph in Technology & Vintage & Retro. ]

[ WebUrbanist | Archives | Galleries | Privacy | TOS ]


WebUrbanist

 
Comments Off on 15 of the World’s Weirdest Low-Tech Film Cameras

Posted in Creativity