RSS
 

Posts Tagged ‘Field’

Overview and Field Test of HoldFast Gear’s Money Maker Leather Camera Strap

02 Nov

The camera strap is one accessory that has definitely evolved along with the photography industry. While the default strap that comes with every camera might suit your basic shooting needs, there are plenty of options available with enhanced features (and style). Some help you shoot more ergonomically by better balancing heavy gear across your body, and some just give you the appearance of looking like a more polished professional. This product review is a camera strap that meets both ergonomic and stylistic needs of today’s photographers: the Money Maker leather camera strap by HoldFast Gear.

best leather camera strap Holdfast Moneymaker Review

About the MoneyMaker strap

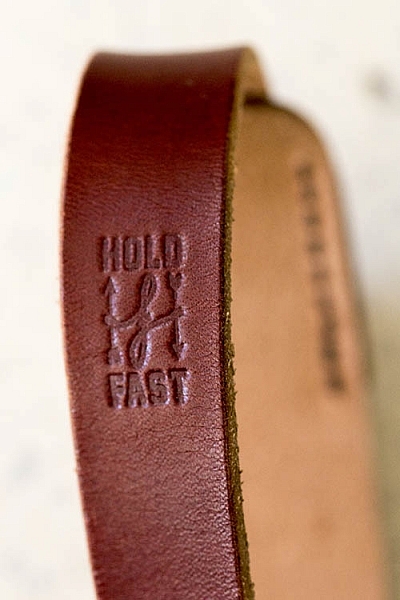
The MoneyMaker is one of several camera strap products created by HoldFast Gear founder Matthew Swaggart. As a photographer himself, Swaggart created his line of camera straps to efficiently carry his own camera gear and pocket items, while also maintaining a nice aesthetic. Beginning with his very first product, the RuckStrap, Swaggart’s brand is perhaps best known for the MoneyMaker leather dual camera strap. Based in Tulsa, Oklahoma, every single HoldFast product is made in the USA, and Swaggart has been known to openly collaborate with customers to design custom straps.

best leather camera strap Holdfast Moneymaker Review

Benefits of Dual (or Double) Camera Straps

While dual (or double) camera straps are already very popular among photographers who carry multiple camera bodies, many of them such as the popular Black Rapid Double have designs that resemble tactical SWAT team gear. As a petite female photographer using these dual camera straps, I’m frequently met with raised eyebrows and asked if I’m getting ready for battle.

This is where the HoldFast MoneyMaker comes into play. Once I switched from Black Rapid to the MoneyMaker, I noticed even more raised eyebrows, but this time with the question, “Where did you get that beautiful camera strap?”

best leather camera strap Holdfast Moneymaker Review

MoneyMaker Basics

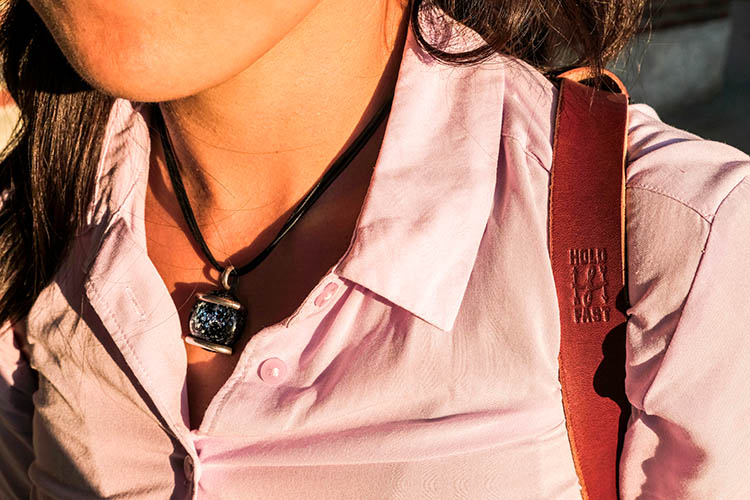
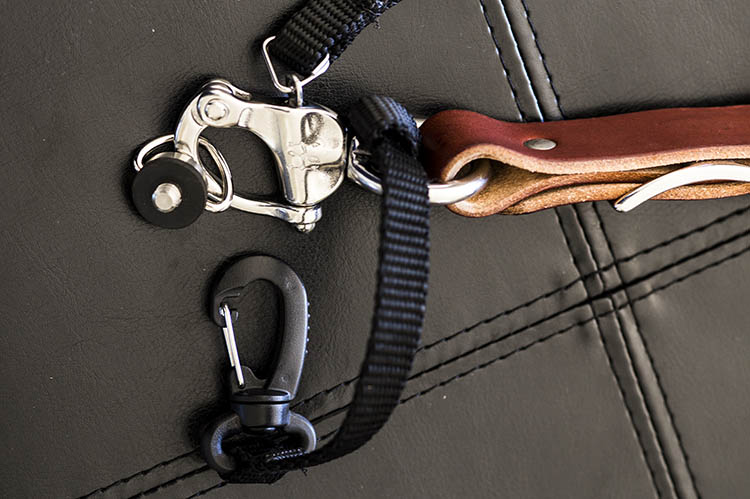
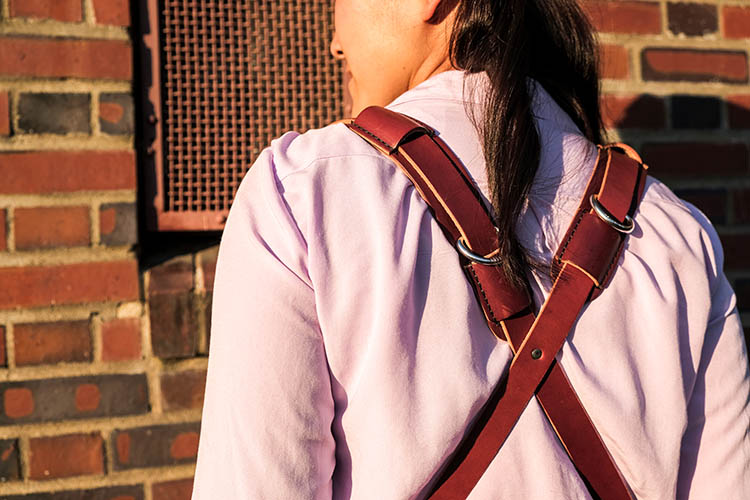
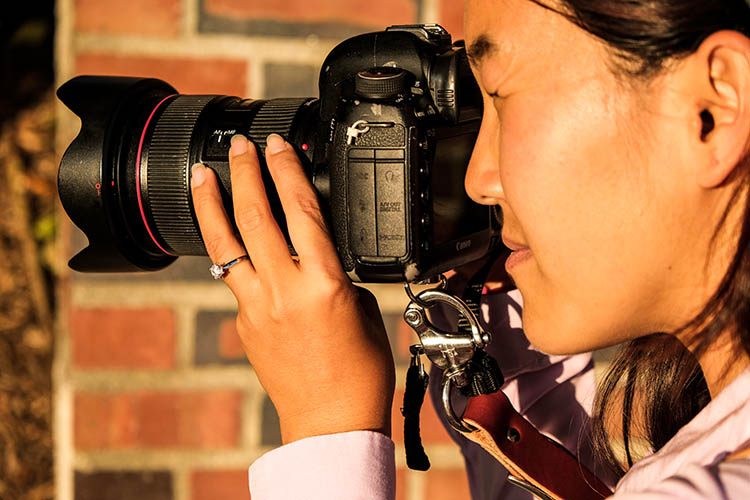
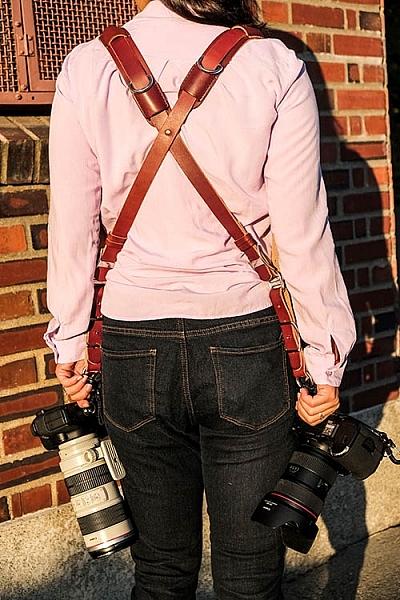
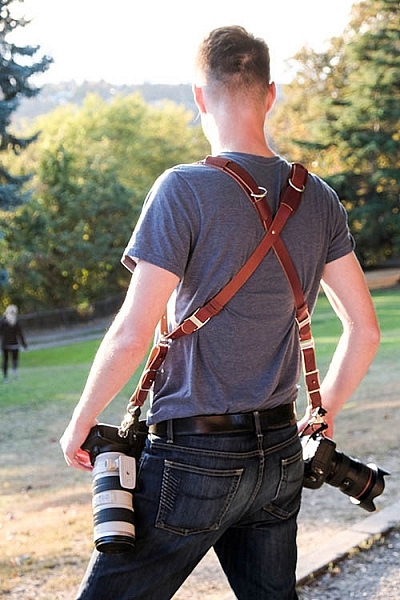
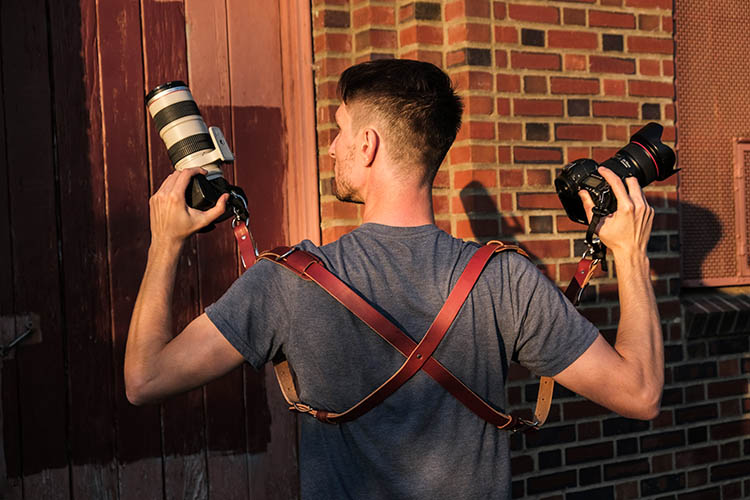
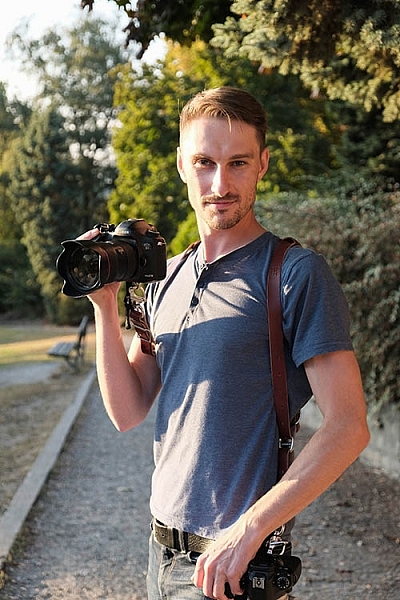
Crafted from high-grade leather and metal fasteners and buckles, the MoneyMaker is worn like suspenders, with a camera suspended from each end. The design balances the weight of the cameras so they both hang down by your hips, and you can even attach a third camera to the front by using an optional attachment leash. One of the best features, that is lacking from competitors such as BlackRapid, is the MoneyMaker’s inclusion of a Safety Catch clip that adds an extra layer of security to your camera.

best leather camera strap Holdfast Moneymaker Review

If you’ve ever used a Black Rapid camera strap, the mechanics of the MoneyMaker will be very similar.

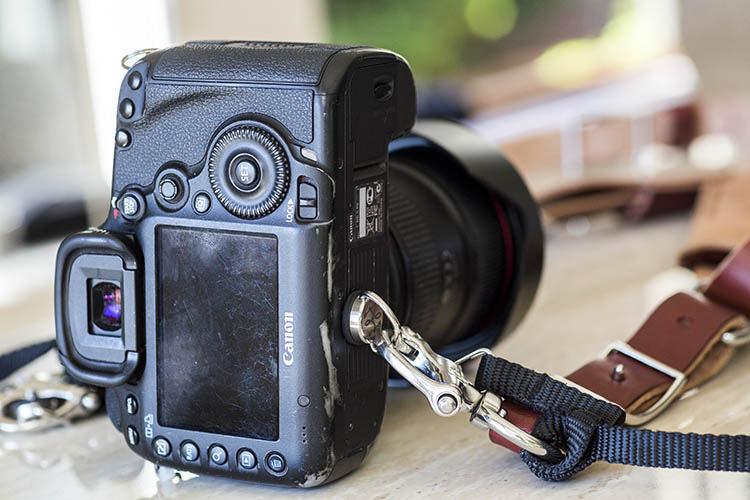
  1. Start by first putting on the MoneyMaker Straps, then fasten the HoldFast screws to the tripod mount of your camera.
  2. Next, attach the circular split ring from the Safety Catch to your camera. This can be a bit tricky for Canon DSLRs.

best leather camera strap Holdfast Moneymaker Review

MoneyMaker Options and Variations

Textures

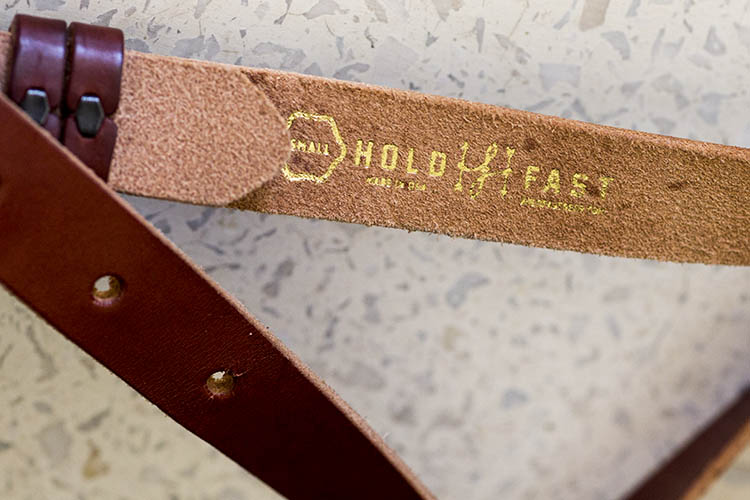
There are several standard variations you can choose from with the MoneyMaker to make it more comfortable and stylish. First, the MoneyMaker comes in several different materials including English Bridle, Water Buffalo, Great American Bison, and even Genuine Python. Prices and color options vary according to the material you choose, with Bridle Leather being the lowest priced, and Genuine Python costing the most.

best leather camera strap Holdfast Moneymaker Review

For those preferring camera straps not made of leather, HoldFast offers the Camera Swagg collection featuring the same MoneyMaker design crafted from high-grade nylon. Slightly lighter in weight and more affordable in price compared to leather options, this ultra-light option also comes in a wider array of colors including copper, navy, red, and black.

pratt_holdfast-gear-camera-strap_16

If you want a truly unique, one-of-a-kind camera strap, you can even opt for the hand tooled, hand painted leather MoneyMaker. Each is custom made to order and results in a beautiful, functional piece of art that embodies the art of leather craftsmanship.

Sizes

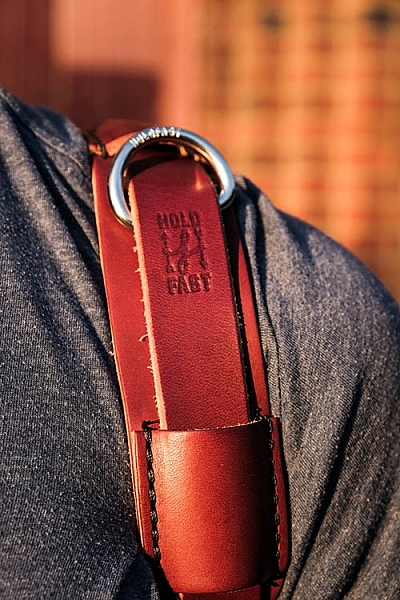
All of the leather straps can be ordered in the Original (1 1/2″ wide) or Skinny (1″ wide with 1 1/2 inch removable shoulder pads) version. They also come in Small, Medium, or Large, depending mainly on your height and build, with optional D-ring metal loops that can add extra attachment options. As a 5’2″ petite female, I opted for the Bridle Leather MoneyMaker in Chestnut color, size Small, and the Skinny version with no D-rings (they are’t recommended if you have long hair). It was a perfect fit!

best leather camera strap Holdfast Moneymaker Review

My Experience Shooting with the MoneyMaker

While the MoneyMaker is very popular among wedding photographers, I found it to be perfect for shooting concerts and corporate events as well. At concerts and music festivals, in particular, where leather camera straps aren’t yet prevalent, the MoneyMaker proved to be an excellent conversation starter among other photographers and concert-goers.

best leather camera strap Holdfast Moneymaker Review

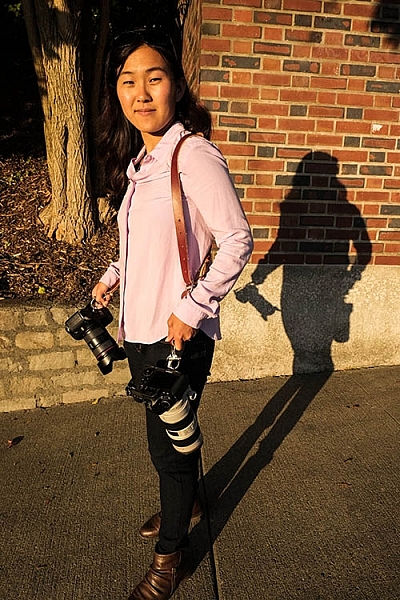
When I shoot big concerts and events, I typically have the following camera setup:

  • (1) Canon 5D Mark III (B&H or Amazon pricing) with a 70-200mm f/2.8 attached  (B&H or Amazon pricing)
  • (1) Canon 6D (B&H or Amazon pricing) with a 24-70mm f/2.8 attached (B&H or Amazon pricing)
  • (1) 580 EXII Flash (B&H or Amazon pricing)
  • (1) Wallet with extra memory cards, batteries, and business cards

Using the MoneyMaker to carry my two camera bodies, I also used a lightweight ThinkTank belt pack to carry my flash and wallet. This combination helps balance the weight in my upper body and allows me to emerge with zero back and shoulder pain after shooting a multi-day music festival and two corporate conferences.

best leather camera strap Holdfast Moneymaker Review

best leather camera strap Holdfast Moneymaker Review

Things to Note

While my experience with the MoneyMaker was highly positive, there are a couple things about this camera strap system to note.

First, the use of all authentic leather makes the MoneyMaker heavy compared to the all-nylon systems of Black Rapid and other competitors. This isn’t a problem when you’re wearing and using the camera straps, but it can feel and appear somewhat intimidating right out of the box.

best leather camera strap Holdfast Moneymaker Review

Second, leather takes some time to break in, so the straps aren’t the softest and most supple at first. That doesn’t mean the straps aren’t comfortable, but you’ll need to use them frequently over time to get them to loosen up. Also, you’ll want to take extra care of the material if you go with a genuine leather camera strap option so it retains high quality.

Over to you

Do you have a certain camera strap that you prefer to use other than the default strap you automatically receive when you buy a camera? Is style as important as function when it comes to your ideal camera strap? What do you look for in a strap?

Please share in the comments below.

best leather camera strap Holdfast Moneymaker Review

googletag.cmd.push(function() {
tablet_slots.push( googletag.defineSlot( “/1005424/_dPSv4_tab-all-article-bottom_(300×250)”, [300, 250], “pb-ad-78623” ).addService( googletag.pubads() ) ); } );

googletag.cmd.push(function() {
mobile_slots.push( googletag.defineSlot( “/1005424/_dPSv4_mob-all-article-bottom_(300×250)”, [300, 250], “pb-ad-78158” ).addService( googletag.pubads() ) ); } );

The post Overview and Field Test of HoldFast Gear’s Money Maker Leather Camera Strap by Suzi Pratt appeared first on Digital Photography School.


Digital Photography School

 
Comments Off on Overview and Field Test of HoldFast Gear’s Money Maker Leather Camera Strap

Posted in Photography


Field Test: Birds in flight with the Nikon D500

18 Oct

Nikon’s D500 is a professional APS-C format DSLR, designed for shooting fast-moving subjects in tough conditions. For this week’s Field Test, we brought the D500 to a wildlife reserve in Montana, to meet with National Geographic photographer Ronan Donovan.

Over two days, DPReview Editor Barney Britton joined Ronan to shoot the various bird and animal species that make the reserve their home. Watch the video to see how the D500 performed. 


This is sponsored content, created with the support of Nikon. What does this mean?

Articles: Digital Photography Review (dpreview.com)

 
Comments Off on Field Test: Birds in flight with the Nikon D500

Posted in Uncategorized


Field Test: Shooting action with the Nikon D5

06 Sep

Nikon’s D5 is a full-frame professional DSLR designed for shooting fast action in tough environments. To test the D5’s market-leading autofocus system, we took the camera out to Santa Fe, and put one in the hands of professional photographer Michael Clark.

In this field test, DPReview’s technical editor Rishi Sanyal joined Michael to shoot a range of activities, including dirt bikes and white-water kayaking. Watch the video to see how the D5 performed. 


This is sponsored content, created with the support of Nikon. What does this mean?

Articles: Digital Photography Review (dpreview.com)

 
Comments Off on Field Test: Shooting action with the Nikon D5

Posted in Uncategorized


Canon EOS-1D X Mark II Field Test: DPReview goes to the rodeo

01 Aug

The Canon EOS-1D X Mark II is a professional full-frame DSLR, and Canon’s fastest, toughest and most capable camera ever. To test out its blazingly fast shooting speeds and advanced autofocus we needed a shooting situation that would really stretch the camera’s abilities.

So saddle up, ya’ll – DPReview is headed to the rodeo…


This is sponsored content, created with the support of Canon. What does this mean?

Articles: Digital Photography Review (dpreview.com)

 
Comments Off on Canon EOS-1D X Mark II Field Test: DPReview goes to the rodeo

Posted in Uncategorized


Sony a6300 Mirrorless Camera – Thoughts and Field Test

29 Jun

Sony has spent recent years charging full steam ahead into the full-frame mirrorless camera market. But they have also managed to satisfy the desires of APS-C shooters, mainly through their widely-popular a6000 mid-range mirrorless camera. In March 2016, just two years after the debut of the a6000, Sony released the a6300 with improved features, that still retain many of the characteristics of the older model.

To be clear, Sony doesn’t intend for the a6300 to be a replacement for the a6000, meaning the older camera is still in production and can be purchased at a very attractive price point (around $ 549.00 for the body only).

Sony a6300 Mirrorless Camera

My Camera Background

Before diving into this review, I want to clarify my digital camera experiences to make my perspective more apparent. The Sony a6300 is the very first mirrorless camera I’ve owned, besides my very brief experiment with the a6000 for comparison purposes. Until recently, I’ve shot almost exclusively with Canon DSLRs, namely the 5D Mark III and 6D. As a result, many of the a6300’s features such as its pop-out LCD screen and electronic viewfinder might seem like standard features to other mirrorless shooters, but for a Canon DSLR user like myself, these are newfound novelties that turned my world upside down. With that being said, let’s move on to the a6300’s specs.

Key Features of the Sony a6300

Sony a6300 Mirrorless Camera

The main improvement with the Sony a6300 is a newly developed sensor with a pixel count of 24MP (same as the a6000) that is packed with a whopping 425 phase-detection AF points, which is significantly higher than the a6000’s 179 AF points. According to Sony, the a6300 has the greatest number of phase-detection points to date, on an interchangeable-lens camera ,and makes the a6300 the camera with the world’s fastest autofocus.

Video is another aspect that Sony upgraded on the a6300, with the inclusion of 4k video recording capabilities, the addition of a mic socket, and the ability to record time code. Besides the autofocus and video systems, the a6300 sees an OLED 2.36M-dot viewfinder, an improvement from the a6000’s OLED 1.44M-dot viewfinder. Battery life is also slightly improved at 400 shots versus 360 shots.

Physically, the a6300 is only 2 ounces heavier than its predecessor, although it feels much more solid with its weather-sealed magnesium alloy build, that was lacking on the a6000. An AEL button with an AF/MF switch has also been conveniently added to the back of the camera, which sports and action shooters should find handy. Other than these few additions, the Sony a6300 doesn’t look or feel much different than the a6000.

Overall, these added features of the a6300 clearly appeal to shooters looking to focus on action, sports, and video.

Sony a6300 Mirrorless Camera

Sample action shot with a Sony 16-50mm f/3.5-5.6 kit lens.

Pros of the a6300

While discussing the pros and cons of the a6300, it should be noted that many of the same features are also available on the a6000.

Extremely compact

As a DSLR shooter, the a6300’s compact size was particularly appealing. While testing the Sony a6300, I used both the kit 16-50mm f/3.5-5.6 retractable zoom lens, and the Sony 20mm f/2.0 pancake lens, and was amazed that both were incredibly lightweight and basically the same size. There is of course, the trade-off of both lenses being made of plastic and not feeling as robust as say a Fujifilm lens, but they both perform very well and weigh close to nothing. Pairing either lens with the a6300 makes for a very compact, low-profile camera system that is perfect for travel.

Sony a6300 Mirrorless Camera

An informal food photo taken at a restaurant table moments before consumption. Shot with a Sony 20mm f/2.8.

Silent Shutter

While many DSLRs offer a Silent Shutter that is still quite noisy, the a6300’s silent shutter feature makes the camera so quiet you wouldn’t even know a photo was being taken. It’s a great feature for undercover or candid photography moments when you truly want no sound associated with taking a photo. With that said, non-silent shooting on the a63000 produces a very crisp shutter snap, especially when firing away at the camera’s highest shutter speed of 11 frames per second.

Panoramic shooting feature that actually works (most of the time)

After consistently trying, and failing, to take advantage of panoramic shooting on a variety of devices from point and shoots to cell phone cameras, I was beginning to think that on-the-go panoramic shooting was a myth, until I tried it with the a6300. Unlike other devices, the a6300 will shoot and stitch together a near-perfect horizontal or vertical panorama even when your manual panning isn’t spot on. There were a few times when the camera insisted that I wasn’t panning straight enough to make a clear pano shot, but most of the time even my wobbly panning techniques were good enough for the a6300 to make sense of.

Sony a6300 Mirrorless Camera

Sample panorama shot with a Sony 16-50mm f/3.5-5.6 kit lens.

Focus Modes + Face Recognition

Easily two of the best features of the a6300 are the Face Registration and Eye AF (autofocus) features, which do pretty much what their names imply. Activating Face Registration allows you to program the a6300 to recognize and prioritize up to eight faces. This feature is incredibly handy when shooting a crowd of people, and the a6300’s accuracy of picking out the correct face is astounding. Eye AF works very similarly, but without the need to register (program them in) the eyes. Simply enable Eye AF on the a6300 and the camera will automatically search for your subject’s eyes and track them using continuous autofocus. This feature is so spot-on that the a6300 will even lock onto artistic renderings of eyes, such as a painted portrait.

Sony a6300 Mirrorless Camera

Sample portrait shot with a Sony 20mm f/2.8 lens.

Quick Wi-Fi connection

Like most newer digital cameras today, the a6300 has Wi-Fi and NFC, to connect with smartphones and tablets for remote camera shooting, and wireless image transfer via Sony’s PlayMemories Mobile app. Setting up Wi-Fi on the camera is very quick and intuitive, and Sony’s accompanying app also includes an array of other options that can further enhance your shooting experience, such as time-lapse and multiple exposure apps, among many others.

Built-in flexible flash

Sony a6300 flash

Thankfully, Sony kept one of the a6000’s best features on the a6300: a built-in pop-up flash. Extremely compact and flexible, the little flash can bend 45 degrees to tilt upwards, allowing for bouncing the flash off the ceiling.  Next to the pop-up flash is a hot shoe mount that can fire Canon or Nikon Speedlight flashes when used with an adapter.

One accessory that can help fully utilize the pop-up flash are plastic bounce cards which attach to the a6300 via the hot-shoe mount, and hold the flash in an upright position.

Sony a6300 Mirrorless Camera

Sample night shot with a Sony 20mm f/2.8 lens.

Sony Lens Options

Currently, there are over 70 Sony lenses that you can purchase to go along with your new a6300 body. Options range from compact, low-priced primes and larger, higher-priced zoom lenses. Cheaper prime options include the 16mm f/2.8, 20mm f/2.8, 28mm f/2, 30mm f/3.5 macro, 35mm f/1.8, and 50mm f/1.8, all ranging in price from $ 249.99-$ 449.99. Wide-range zoom lenses, without a fixed f-stop, are also somewhat affordable, such as the 18-200mm f/3.5-6.3 ($ 749.99) or the 24-240mm f/3.5-6.3 ($ 998.99)

Sony 18-200mm f/3.5-6.3 ($ 749.99)

However, Sony’s higher-quality lenses are much higher in price, which may be difficult to swallow if you’re converting from a DSLR kit. Larger, high-quality Sony primes such as the 24mm f/2 and 35mm f/1.4, prices are upwards of $ 1,200.00 and more. The same is true for Sony’s versions of traditional DSLR lenses such as the 16-35mm f/2.8 ($ 2,248.99), 24-70mm f/2.8 ($ 2,098.00), and 70-200mm f/2.8 ($ 2,999.99). If you’re a DSLR shooter with an array of lenses, you can always invest in a converter to use your DSLR lenses with your Sony camera body, but at the expense of slower autofocus.

When you purchase either the Sony a6000 or a6300, you have the option of buying it body-only, or with a 16-55mm f/3.5-5.6 E-mount retractable zoom kit lens, which is valued at approximately $ 260.99 if purchased separately. For its size, range, and overall performance, the kit lens, plus a Sony prime lens, aren’t a bad starter combination, especially if you’re looking to keep your gear compact and lightweight, and aren’t quite ready to invest in higher-priced Sony E-mount lenses yet.

ISO Performance

Sony opted to improve the a6300’s high-ISO performance by including a native ISO range of 100-25,600 with the possibility of extending that ISO to 51,200. While the ability to shoot at higher ISO is great in theory, I found that ISO 6400 was the highest I could comfortably push the a6300 in darker environments, without sacrificing too much image quality. Even my RAW photos shot at ISO 6400 were a little too grainy for my taste, no matter how much noise-reduction I did in post-processing.

Sony a6300 high ISO2

Cons of the a6300

Sony’s bloated camera menu

A common complaint among Sony shooters, that I have to agree with, is that the camera menu is very difficult to navigate. It truly seems like Sony outfitted the a6300 with so many features, and tried to stuff them all into a menu, that it can take weeks for new Sony shooters to get used to using the camera.

This could be easily solved if Sony allowed users to customize the menu a bit more, so that frequently-used features can be quickly accessed. As it stands, Sony only allows assigning custom functions to the camera’s physical buttons, and there aren’t nearly enough of those.

With that being said, the trick to making sense of Sony’s menus is to customize as much of the camera’s settings as possible. Presently, I’ve customized the buttons and settings on the a6300 set to shoot almost identically to the way I shoot with my Canon 5D Mark III, making it easier to switch from one system to another.

Sony a6300 Mirrorless Camera

Sample action shot with a Sony 16-50mm f/3.5-5.6 kit lens.

LCD screen sometimes blanks out

When it comes to the a6300’s LCD screen, I was grateful for its pop-out rotating feature, something that has been sorely lacking on Canon DSLRs. Some other reviewers complained about the a6300 lacking a touch screen LCD, but again, this is something I’ve never had on a camera, so the fact that it’s missing doesn’t bother me.

One feature of the a6300’s LCD that was troublesome, was its occasional blackouts, which usually occurred right after rotating the screen. Oftentimes, the only way to get the LCD working again was to turn the camera off and on. With that said, using the electronic viewfinder (EVF) always worked without fail, even when the LCD blanked out.

Over to you

Do you already shoot with the Sony a6300, or are you considering making the move? What do you love about it, or what hesitations remain? Let me know your thoughts in the comments below.

googletag.cmd.push(function() {
tablet_slots.push( googletag.defineSlot( “/1005424/_dPSv4_tab-all-article-bottom_(300×250)”, [300, 250], “pb-ad-78623” ).addService( googletag.pubads() ) ); } );

googletag.cmd.push(function() {
mobile_slots.push( googletag.defineSlot( “/1005424/_dPSv4_mob-all-article-bottom_(300×250)”, [300, 250], “pb-ad-78158” ).addService( googletag.pubads() ) ); } );

The post Sony a6300 Mirrorless Camera – Thoughts and Field Test by Suzi Pratt appeared first on Digital Photography School.


Digital Photography School

 
Comments Off on Sony a6300 Mirrorless Camera – Thoughts and Field Test

Posted in Photography


Pentax K-1 Pixel Shift Resolution: Updated Field Test

05 Jun

Metlako Falls in the Columbia River Gorge of Oregon State offered a unique setting to push the limits of the K-1’s pixel shift technology. This is a conventional single exposure utilizing no Pixel Shift. Pentax K-1, HD Pentax D FA 24-70mm F2.8 ED SDM WR 70mm, F20, 0.3 sec, ISO 100.

A note from the editor:

Earlier this week we published an article examining the performance of the Pentax K-1’s Pixel Shift mode when shooting waterfalls – a common landscape photography subject. We found various issues, including movement artifacts and false colors in Raw files shot using this function.

It has since become clear that some of these issues are unique to the current build of Adobe Camera Raw. We’ve spoken to Adobe, and the ACR team has confirmed that support for the K-1 in ACR 9.5.1 is ‘final’. Certainly, Pixel Shift shots of our (non-moving) studio test scene look absolutely fantastic when converted in ACR. However, in scenes that contain movement, it’s a different story altogether. The K-1’s bundled software, SilkyPix, on the other hand, while crash-prone and a little awkward to use, does a much better job. SilkyPix also supports the K-1’s Motion Correction feature in Pixel Shift files, which Adobe has now confirmed is not supported by ACR.

Once all this started to become apparent, we pulled our original article and started a more detailed look at the K-1’s performance when Raw files are run through the bundled software, SilkyPix. You can read it below.

Thanks to all of the K-1 users that contributed helpful comments and suggestions as we worked on these additional tests.

Barney

Introduction

It’s clear that the Pixel Shift Resolution shooting modes make a huge difference to image quality from our studio tests, but how does that translate to real world shooting situations?

In previous iterations of this feature (in the K3 II) we found that movement within a scene could cause major issues during Pixel Shift Capture. So if leaves rustled in the wind or your subject moved in any way the camera compensated poorly for the movement, which then resulted in pixel blur and artifacts in the regions where the movement occurred.

Like the K-3 II, Pixel Shift on the K-1 takes four separate exposures at single pixel increments; however, the K-1 now offers a ‘Motion Correction’ option. If movement is detected in subsequent images, the camera is supposedly able to differentiate pixels that have changed from the first frame and clone in pixels to cover that area from the first frame of the 4-shot capture. In theory, this should produce a much better final product then was possible in the Pentax K3 II.

To determine just how much the technology has improved in the K-1 over the previous iteration, I took the camera out into the field to really push the limits of the Pixel Shift Resolution shooting modes. I converted the resulting files in both Adobe Lightroom (my Raw converter of choice) (using ACR 9.5.1, which Adobe has confirmed represents final support for Pixel Shift) and also SilkyPix, which is bundled with the K-1.

The Gorge

The Columbia River Gorge, located along the Columbia River that borders Washington and Oregon state offers a variety of amazing scenic locations in addition to a number of challenging shooting environments. In order to test the capabilities and limitations of the Pixel Shift resolution mode in the K-1, I decided to focus on the seemingly endless amount of waterfalls that parallel the Columbia River about an hour or so outside of Portland, OR.

In an effort to get the most bang for my buck I decided to hike along the Eagle Creek trail, heading toward Punch Bowl Falls. There are a number of beautiful spots to take in the views and two waterfalls (Punch Bowl and Metlako falls) to make the trip more than worthwhile. The weather conditions were, well, pretty miserable. My fiancé and I experienced moderate rain throughout most of the day which definitely put a damper (literally) on the trip.

Most of the Eagle Creek trail is carved into some fairly steep cliffs and snakes its way back along the deep river valley that lies several hundred feet below the trail.

Pentax K-1, HD PENTAX-D FA 28-105mm F3.5-5.6 ED DC WR, 28mm, F6.3, 1/50, ISO 100

Pushing the Limits of Pixel Shift Resolution

Our first stop was Metlako Falls located about a mile from the trail head. The access trail to Metlako is poorly marked, so it’s definitely easy to miss if you aren’t careful. I chose this waterfall because it offers an excellent opportunity to examine not only how the Pixel Shift deals with movement but also detail resolution, since the waterfall is surrounded by dense and lush foliage. The following widget contains files that were shot at 70mm and an aperture of F/10 to limit the effects of diffraction and to really give you a sense of the detail resolution that is possible with the Pixel Shift mode turned on.

Using the widget below you can examine files converted using Adobe Lightroom, Silkypix, and out of camera JPEGs. We’re showing files taken with Pixel Shift turned off, and with Pixel Shift turned on with Motion Correction enabled.

$ (document).ready(function() { ImageComparisonWidget({“containerId”:”reviewImageComparisonWidget-55670867″,”widgetId”:363,”initialStateId”:null}) })

As you see there can be significant benefits$ (document).ready(function() { $ (“#imageComparisonLink2569”).click(function() { ImageComparisonWidgetLink(2569); }); }) to shooting with the Pixel Shift Resolution mode turned on (note that SilkyPix applies significant sharpening by default, which we chose to not turn off). The detail in the foliage$ (document).ready(function() { $ (“#imageComparisonLink2570”).click(function() { ImageComparisonWidgetLink(2570); }); }) is much better with Pixel Shift, and a nearly 2EV theoretical increase in dynamic range means greater latitude for Raw processing of contrasty scenes (in reality, the advantage appears to be somewhere in between 1EV and 2EV).

While files from our movement-free studio scene look great when run through ACR, our waterfall images (converted in the same way, using the same software) show very unpleasant color artifacts$ (document).ready(function() { $ (“#imageComparisonLink2571”).click(function() { ImageComparisonWidgetLink(2571); }); }). SilkyPix does a much better job, and there’s no sign of any false colors in the same areas in files converted through the K-1’s bundled software.

However, while there’s no crazy false color, even in the out of camera JPEGs and Raw images processed using SilkyPix you can still see some issues with pixel blur$ (document).ready(function() { $ (“#imageComparisonLink2525”).click(function() { ImageComparisonWidgetLink(2525); }); }) where movement took place (mostly in the foliage surrounding the waterfall) as the four frames were captured. This can lead to some strange cross-hatch artifacting$ (document).ready(function() { $ (“#imageComparisonLink2572”).click(function() { ImageComparisonWidgetLink(2572); }); }). And when it comes to landscapes, finding truly static shooting environments can be difficult, if not impossible.

With that said, if you process your Pixel Shift files through SilkyPix, the end result might be good enough (depending on the amount of movement you’re dealing with) that cloning or masking in rough-looking areas via your favorite post processing software becomes an option. Interestingly, sometimes SilkyPix does an even better job of motion correction$ (document).ready(function() { $ (“#imageComparisonLink2573”).click(function() { ImageComparisonWidgetLink(2573); }); }) than the camera JPEG engine itself. In fact, much of the image is quite usable in the SilkyPix conversion, but if you’re the kind of person that desires the detail Pixel Shift brings, you’ll still find yourself cloning out motion artifacts$ (document).ready(function() { $ (“#imageComparisonLink2574”).click(function() { ImageComparisonWidgetLink(2574); }); }) in many regions for a scene like this one.

Out of Camera JPEG Options

If you don’t mind JPEG output, you can also retroactively add motion correction in-camera to an image shot with Pixel Shift.

After applying the Pixel Shift to the file, you can export it as an out of camera JPEG. With that said, I don’t know too many landscape photographers that shoot in JPEG or want to produce out of camera JPEGs, since they’re mostly un-editable from a post processing standpoint. You’re probably better off using SilkyPix, with all the caveats that brings (more on that later).

Out of Camera JPEG Pixel Shift (scaled 50%)

No Motion Correction

HD Pentax D FA 24-70mm F2.8 ED SDM WR, 70mm, F16, 1/4, ISO 100

Out of Camera JPEG Pixel Shift (scaled 50%)

Motion Correction

HD Pentax D FA 24-70mm F2.8 ED SDM WR, 70mm, F16, 1/4, ISO 100

Dynamic Range Benefits

There’s another benefit to Pixel Shift we briefly alluded to: since information from four Raw files are essentially combined, noise is decreased. It’s not that frames are averaged, but that 4x as much total light is collected and used in generating the final image, which decreases relative shot noise. This suggests a nearly 2 EV theoretical increase in dynamic range (ignoring read noise), and indeed a significant improvement is evident in the +4 EV pushed shots below. The non-pixel shift file still shows respectable noise performance in the shadows thanks to the very high dynamic range sensor, and the Pixel Shift file is even cleaner. While it’s not quite a 2EV advantage, the Pixel Shift files in our studio dynamic range tests look better than the standard shots despite a 1EV relative underexposure. Hence, we’d estimate a benefit of somewhere between 1 and 2 EV.

$ (document).ready(function() { ImageComparisonWidget({“containerId”:”reviewImageComparisonWidget-19122861″,”widgetId”:364,”initialStateId”:null}) })

So what does this mean?

When it comes to Pixel Shift Raws, ACR is unable to cope with any sort of movement that may have occurred in the short time that the K-1 takes to capture the four separate files. Color artifacts and cross-hatching result in areas of motion, although the rest of the image experiences a significant detail increase. ACR doesn’t support Motion Correction at all. So (for now, at least) Pixel Shift and ACR simply don’t mix.

SilkyPix, on the other hand, handles Pixel Shift Raws in a different manner from ACR, which alleviates the color artifacts that we see in the files processed through ACR. It can also interpret the Raws shot with Motion Correction activated and produce a final image with far fewer motion artifacts – sometimes doing an even better job than the K-1’s in-camera JPEG engine.

Digging a little deeper, we’ve found that only the first of the four exposures taken during the Pixel Shift process is used to mask in problem areas when the Motion Correction setting has been enabled (in in-camera JPEGs or SilkyPix conversions). This makes sense – comparing the four files to find the sharpest one would be too computationally intensive to be practical – but it does mean that if the first exposure should happen to contain the most blur, results might not be optimal.

Conclusion

The amount of detail in the Pixel Shift files is markedly better than those taken with the mode turned off, but for landscape work (assuming anything short of totally still conditions) artifacts caused by movement in the scene can still cause issues. I’m glad that things aren’t quite as bad as we feared from looking solely at the output from Adobe Lightroom, but even the K-1’s bundled SilkyPix software shows some movement artifacts in Pixel Shift files. And, at least for Mac users, SilkyPix is not the most stable or easy to use software out there. 9 out of 10 times we tried to use it, we got an unusable image preview even at 100% – making editing cumbersome, if not impossible. Capture One and DxO Optics Pro don’t currently support the K-1 or Pixel Shift (e.g. on the older K-3 II) at all.

The reality, then, is that Raw shooters wanting to take advantage of Pixel Shift for scenes with motion will have to resort to (the buggy and cumbersome) SilkyPix. That’s a real limitation, but not an insurmountable one – you can perform rudimentary processing in SilkyPix and then output a 16-bit TIFF to continue processing in Lightroom or Photoshop.  

In absolutely perfect shooting conditions though (macro, portrait, and some telephoto work), the K-1’s Pixel Shift shooting modes can offer outstanding results. The OOC JPEG and SilkyPix Raw images below depict a (mostly) static cityscape, and the real-world detail resolution is very impressive when movement isn’t a factor. 

$ (document).ready(function() { ImageComparisonWidget({“containerId”:”reviewImageComparisonWidget-16261297″,”widgetId”:371,”initialStateId”:null}) })

It is worth noting, however, that if there is a chance of any movement occurring in the frame I would definitely recommend backing your files up with non-Pixel Shift exposures so you can choose to mask areas in using post processing tools or choose to use the non Pixel Shift files. We’ll be posting more sample images from my trip to the Gorge soon, and be on the look out for our forthcoming full review of the K-1 as well!

Articles: Digital Photography Review (dpreview.com)

 
Comments Off on Pentax K-1 Pixel Shift Resolution: Updated Field Test

Posted in Uncategorized


Canon EOS 80D Field Test: Barney builds a boat

25 May

The Canon EOS 80D is a 24MP APS-C format enthusiast DSLR, with a strong stills and video feature set. When the opportunity presented itself to build a traditional Greenland-style skin-on-frame kayak with craftsman and friend of DPR Kiliii Yuyan, DPReview editor Barnaby Britton used the EOS 80D to document the process.


This is sponsored content, created with the support of Canon. What does this mean?

Articles: Digital Photography Review (dpreview.com)

 
Comments Off on Canon EOS 80D Field Test: Barney builds a boat

Posted in Uncategorized


COOPH Field Jacket is 100% waterproof, designed for photographers

14 May

$ (document).ready(function() { SampleGalleryV2({“containerId”:”embeddedSampleGallery_5573536821″,”galleryId”:”5573536821″,”isEmbeddedWidget”:true,”standalone”:false,”selectedImageIndex”:0,”startInCommentsView”:false,”isMobile”:false}) });

Cooperative of Photography (COOPH) has introduced the Field Jacket, designed for photographers and made from a fully waterproof Swiss cotton fabric called EtaProof. The jacket features both inner and outer pockets for carrying photography gear, a quick-access smartphone pocket, and a small loop near the collar to fix a cable (from headphones or a microphone) in place.

The jacket’s material was first used to make overalls for WWII British Hurricane pilots, according to COOPH, offering a mixture of comfort and protection against hypothermia by blocking out water. Used to make COOPH’s Field Jacket, the fabric helps keep both photographers and their stowed gear dry without constricting movement or getting too warm. 

The Field Jacket is available in Black and sizes ‘small’ to ‘xx-large’ for €398. COOPH currently ships only within Europe, though some US distribution is becoming available.

Via: PhotographyBLOG

Articles: Digital Photography Review (dpreview.com)

 
Comments Off on COOPH Field Jacket is 100% waterproof, designed for photographers

Posted in Uncategorized


Heavenly bodies: Nikon D810 & D810A field test

12 May

José Francisco Salgado is an Emmy-nominated astronomer, photographer and educator. Driven by a passion to show and explain our universe, José Fransisco’s work has taken him all over the world, even as his camera lens is aimed far beyond our atmosphere. José Fransisco joined us when we took Nikon’s D810 and D810A down to southern California recently, to capture the stunning desert vistas – and night skies – of the landscapes near Death Valley. 

The D810 is Nikon’s highest-resolution DSLR, and the D810A is a specialized version specifically designed for astrophotography. As well as a higher base ISO sensitivity, the D810A’s sensor is modified to capture the specific wavelengths of the light transmitted by distant nebulae. Watch our video to see how José – and the D810A – performed.

Waiting for the D810 full review? We’re pleased to tell you that it’s being readied for publication! For now we hope you enjoy watching this field test, with José Francisco Salgado.

If you want to learn more about astrophotography make sure to visit our Astrophotography Talk forum.


This is sponsored content, created with the support of Nikon. What does this mean?

Articles: Digital Photography Review (dpreview.com)

 
Comments Off on Heavenly bodies: Nikon D810 & D810A field test

Posted in Uncategorized


First Look and Field Test of the Canon 80D

01 May

Recently Canon released their latest upgrade in the EOS line, the 80D. It’s a direct update of its predecessor the 70D but it competes well in many areas when compared to the older 5D Mark III, and the 7D Mark II bodies.

See what Chris and Jordan from The Camera Store think as they put the Canon 80D through various tests.

It has some great dynamic range, focus pull features while doing video, and a rotating tilting screen. The guys feel that the 80D is the best DSLR in the Canon range right now, and that it’s a step in the right direction for Canon.

What are your thoughts? Have you tried it out?

googletag.cmd.push(function() {
tablet_slots.push( googletag.defineSlot( “/1005424/_dPSv4_tab-all-article-bottom_(300×250)”, [300, 250], “pb-ad-78623” ).addService( googletag.pubads() ) ); } );

googletag.cmd.push(function() {
mobile_slots.push( googletag.defineSlot( “/1005424/_dPSv4_mob-all-article-bottom_(300×250)”, [300, 250], “pb-ad-78158” ).addService( googletag.pubads() ) ); } );

The post First Look and Field Test of the Canon 80D by Darlene Hildebrandt appeared first on Digital Photography School.


Digital Photography School

 
Comments Off on First Look and Field Test of the Canon 80D

Posted in Photography