RSS
 

Posts Tagged ‘Features’

ZTE Axon 7 features 20MP Samsung ISOCELL sensor

26 May

Chinese smartphone maker ZTE has announced its latest high-end device, the Axon 7. It comes with an impressive camera specification that includes a 20MP Samsung ISOCELL sensor, fast F1.8 aperture, a sapphire glass lens front element, optical image stabilization and on-sensor phase detection autofocus. A dual-LED flash helps with illumination in dim conditions, and in video mode the camera is capable of recording footage with 4K resolution. The front camera comes with an 8MP sensor. 

The other components of the device match the camera’s high-end specifications. The Axon’s aluminum unibody houses a 5.5-inch AMOLED panel with 2560 x 1440 Quad-HD resolution that is covered by 2.5D curved Gorilla Glass 4 and the Android OS is powered by a Qualcomm Snapdragon 820 chipset. In terms of memory consumers get to choose between a version with 4GB RAM and 64GB storage or a 6GB/128GB premium model. There is also a microSD-slot for expansion. A hearty 3140 mAh battery supports the Quick-charge 3.0 standard. There are also a dedicated audio chip, dual speakers, a fingerprint reader and a USB Type-C connector.

The Axon 7 will be launched in China first in July and make its way to international markets at a later stage. Official pricing will be revealed closer to launch, but is expected to be below $ 500 which sounds like an interesting offer for such a well-specified device.

Articles: Digital Photography Review (dpreview.com)

 
Comments Off on ZTE Axon 7 features 20MP Samsung ISOCELL sensor

Posted in Uncategorized


The Top 10 Camera Features Wish List of dPS Readers and Writers

17 Apr
Brooklyn Bridge picture taken using a remote shutter release and a neutral density filter, which could be eliminated with camera improvements.

Brooklyn Bridge picture taken using a remote shutter release and a neutral density filter, which could be eliminated with camera improvements.

It is becoming almost cliche, but there has never been a better time to be a photographer. What we can do now with modern digital cameras, without spending that much money, is incredible. Without breaking the bank, you can now get an extremely high resolution digital camera, with low light performance and a dynamic range unheard of just a few years ago, that shoots at speeds measured in multiple frames per second. If that isn’t enough, it will also double as a video camera with HD quality as a bare minimum. It will even send the pictures wirelessly to your phone. It seems ungrateful to ask for more. Still, everything can be improved, can’t it?

And just to be clear – when I say improved, I don’t mean adding more megapixels. Or demanding even better low light performance and dynamic range. Or achieving even faster focus and shooting speeds. The manufacturers know everybody wants that stuff, and they seem to be putting all their energy into those areas.

But doesn’t it seem like there are features that could be added to cameras that wouldn’t require a technological breakthrough? Or that wouldn’t make your camera cost a fortune? It always seemed that way to me. So I started asking around to other photographers, then I started asking readers, and finally I asked my fellow dPS writers.

How would you improve digital cameras?

I got some good answers, and have combined them with my own to create a list of 10 new features (a wish list) that could be added to digital cameras to make them better. Here they are, in no particular order:

1. A Small LCD for the Histogram

The first improvement is a separate, smaller LCD on the back of the camera. Why? Let me explain.

We all know that the best way to evaluate exposure when you are shooting is to look at the histogram. Looking at just the picture on the LCD doesn’t work as well when you are trying to evaluate exposure. But look what happens to the picture on the screen when you add the histogram:

LCD-graphic

On the left, where you have the full picture, you can clearly see it. But once you add the histogram, the picture on the right becomes tiny. It is unusable and tells you nothing. We are essentially forced into a position of having to choose between a picture we can see, or just viewing the histogram (but not both). I’d like to do both.

To fix that, you could just put another very small LCD on the back of the screen. It would show only the histogram, so that you could still have a full sized version of your picture.

2. Three Dials

When you set the exposure level of your pictures, there are three controls: shutter speed, aperture, and ISO.

At the same time, how many dials do we have to set those three controls? Two – and that’s if we’re lucky. Entry level cameras often only have one. To change all three exposure controls with only two dials, means you have to press buttons while turning dials. It’s a rather cumbersome process, for the most important and commonly used functions of the camera. If we have three exposure settings, shouldn’t we have three dials to set them?

The odd man out is always ISO, and I personally think this is a hold-over from the days of film. Back then, you couldn’t change the ISO except by changing your film. When digital came along, everyone was pretty happy to be able to change the ISO at all, so having to press a button didn’t seem like a big deal. In addition, at that time, available ISO ranges were extremely limited and if you raised the ISO much then digital noise quickly became a problem.

But now? ISO ranges are huge! Even entry level cameras have ISO ranges up to 25,000. ISO is now truly a equal partner in the exposure triangle. It should be treated as such. That means it should have its own dial. You shouldn’t have to press buttons to adjust it.

ISO-controls-graphic

Stop ISO discrimination! Let’s make it an equal member of the exposure triangle by giving ISO its own dial!

Where would you put the extra dial? There are many places you could choose from, but one thought is to get rid of the mode dial. Having a dedicated dial to quickly change the mode is another hold-over from a time when there were fewer camera controls (and no menus). Who changes their modes so frequently that the most valuable real estate on the camera needs to be taken up with a dial for it? Don’t most people just pick a mode and use it most, or all of the time? Even those that change modes don’t do so often enough that it needs its own dial.

Note: It actually appears that this change might be on the way. There are three dials on most Fujifilm mirrorless cameras and one of them is dedicated to ISO. Perhaps others will follow suit.

Supplied by Fujifilm

Supplied by Fujifilm

3. Lower ISOs

Speaking of ISO, in the rush to expand ISO values on the high side, the lower side of the ISO scale has been completely neglected. The camera manufacturers have worked very hard to make digital sensors more sensitive to light. It would seem like a simple thing to make the sensor less sensitive to light. Why couldn’t cameras have ISO levels of 50, 25, 12, and so on?

Why would that matter? It would put us in more control over shutter speed, and avoid the necessity of carrying around neutral density filters. Why do landscape photographers need to carry around a bunch of neutral density filters to slow down their shutter speeds? If we could lower the ISO, that would require a longer shutter speed for a proper exposure. It seems like that could just be built in, and would make it much simpler. Instead of adding a 3-stop neutral density filter to your lens, you could then just reduce the ISO from 100 down to 12 (3 stops).

Why stop at ISO 100? We should see ISO 50, 25, 12, 6, 3, and so on.

Why stop at ISO 100? We should see ISO 50, 25, 12, 6, 3, and so on.

Of course, we might need to talk about the numbering system for these low ISOs. Moving down 10 stops from ISO 100 would result in ISO .09 which may not work.

4. Retractable Remote Shutter Release

Speaking of landscape photographers, something every one of them needs is a remote shutter release, or an intervalometer. It seems like the shutter release could detach from the camera with a retractable cable. That way you could pop it out and trip the shutter, without moving the camera or risking vibration.

TripodAtGoldenGate

Note the remote shutter release hanging down. Wouldn’t it be nice to have a retractable unit?

It would mean that we wouldn’t have to carry around remote shutter releases.

5. Allowing Longer Shutter Speeds

Another improvement would be to allow longer shutter speeds without the need to switch over to Bulb mode. At present, most cameras limit the length of shutter speeds to 30 seconds. If you want to use a longer shutter speed than that you can, but you have to switch over to Bulb mode. It would be nice to be able to take exposures of a minute or longer without having to switch modes.

Why is this important? Largely because of bracketing (or Auto Exposure Bracketing, or just AEB for short). When you bracket, you are taking three (or more) exposures: one at normal exposure, one underexposed, and one overexposed. If you are starting with a long shutter speed, then the longer shutter speed required for the overexposed picture will often need to be longer than 30 seconds.

For example, if you are taking a bracket of three photos, with your starting shutter speed at 15 seconds, and you set the exposures 2 stops apart, the bracket won’t work as you hope. In this example, the overexposed picture of the bracket would need a shutter speed of one minute (starting at 15 seconds, adding one stop doubles your shutter speed to 30 seconds, and the second stop doubles it again to one minute). But your camera will only allow a shutter speed of 30 seconds, so that won’t work. Your camera will take the normal and underexposed photos, but the overexposed one will be limited to 30 seconds.

Here is a pretty common bracket for those who use them (5-shots, with each shot separated by 1 stop). If the original shutter speed is longer than 6 seconds, the camera will not capture the entire bracket because the most overexposed picture would need longer than 30 seconds.

Here is a pretty common bracket: 5-shots, with each shot separated by 1 stop. If the original shutter speed is longer than 6 seconds, the camera will not capture the entire bracket because the most overexposed picture would need longer than 30 seconds to expose.

How often does this happen? A lot more than you might think. Landscape photographers are known for being out before the sun is up, and they all want to use a combination of a small aperture to maximize depth of field and a low ISO to minimize noise. The only way to get a proper exposure in these conditions is to use very long shutter speeds. These are the same people who have very little control over their lighting and often face dynamic range problems, so they are the most likely to bracket their photos.

6. Self-Timers

Why are self-timers on cameras limited to two and 10 seconds? A reader named Jeff Johnson wondered about this (as well as raising some of the other improvements mentioned in this article). Every $ 10 digital watch in the discount store will allow you to set timers of different ranges, why not our digital cameras?

This is another one that seems to be a hold-over from a prior era. Timers were mechanical devices at one time, and it may have made a lot of sense to limit the options. Now, it doesn’t make sense. It seems like we ought to be able to set whatever length of timer we want, or at least have a few more options.

7. Improved Wifi

One exciting recent development in cameras has been the introduction of Wifi. It allows you to transfer your pictures to your phone or other device wirelessly. But it is usually clunky. You have to turn off your phone’s data connection to connect with your camera. Some have raised the idea of using bluetooth for connection to phones, tablets, and laptops (in addition to wifi). dPS writer John McIntire echoed that, and pointed out the smartphone and tablet control for things like timelapse and long exposures.

 8. Hyperfocal Distance Calculator

Despite its name, the concept of hyperfocal distance is not that complicated. It is just the closest point at which you can focus, and still keep your entire background acceptably sharp. It depends on only three factors:

  1. The sensor size of your camera
  2. The focal length you are using
  3. Your aperture setting.

There are charts and apps that will help you calculate the hyperfocal distance for your shot.

Hyperfocal Distance Charts

Hyperfocal Distance Charts

But why should you be forced to calculate it at all? The aforementioned Jeff Johnson had another great idea of having the camera calculate it for you. After all, the camera is a computer. It already knows all three of the variables involved. Why couldn’t the camera just tell you the hyperfocal distance? It could be part of the camera’s display.

Note: Once again the Fuji cameras lead the way, as the X-T1 and possibly others, do indeed have a hyperfocal distance display inside the viewfinder.

9. Internal storage

Storage has changed remarkably fast in a short period of time. Just a few years ago, you might have been carrying around a bunch of 4 GB memory cards with you. After a couple hundred pictures, you’d swap it out for another. But now, the sizes of memory cards are huge. 128 GB is commonplace, and not all that outrageously expensive. There are even 256 GB cards or even 512 GB cards available as well. As a result, most of us just buy a large card and leave it in the camera. We download the pictures periodically, and resume shooting with the same card.

That’s already a better situation than what we had a few years ago, but doesn’t it seem weird that there is no storage at all in digital cameras (at least not in the mirrorless cameras and DSLRs we tend to use)? It did to Leanne Cole, who wondered why we are fooling around with memory cards at all at this point. Given how much storage can fit in a small place, haven’t we reached the point where storage should be built-in to the camera? Why not have a 500 GB drive already added?

10. Your Changes

These are some items we’d like to see. I think some of these are good ideas, but I suspect there are better ideas out there. So what would you change? Are there things you would add? Are there features you’d like to see put on the digital camera wish list?

Please let us know in the comments below.

googletag.cmd.push(function() {
tablet_slots.push( googletag.defineSlot( “/1005424/_dPSv4_tab-all-article-bottom_(300×250)”, [300, 250], “pb-ad-78623” ).addService( googletag.pubads() ) ); } );

googletag.cmd.push(function() {
mobile_slots.push( googletag.defineSlot( “/1005424/_dPSv4_mob-all-article-bottom_(300×250)”, [300, 250], “pb-ad-78158” ).addService( googletag.pubads() ) ); } );

The post The Top 10 Camera Features Wish List of dPS Readers and Writers by Jim Hamel appeared first on Digital Photography School.


Digital Photography School

 
Comments Off on The Top 10 Camera Features Wish List of dPS Readers and Writers

Posted in Photography


CP+ 2016: Features you need to know about on the Nikon D5/D500

03 Mar

CP+ 2016: Features you need to know about on the D5/D500

Nikon is starting off the year strong with the announcement of the D5 and D500, the KeyMission 360, and the DL compacts announced for CP+ 2016. We got our hands on the D5 and D500 and have been very impressed by our initial, informal testing. AF is much improved, as are ergonomics. We’re working on a video to demonstrate what we consider to be ground-breaking AF performance, but in the meantime we thought we’d also put together a slideshow highlighting some new things we found while digging through the D5 and D500 menus, and give you an idea of the extensive customization options available.

CP+ 2016: Features you need to know about on the D5/D500

First off is the autofocus menu, where you’ll note a couple of new features. You can now turn face detection on and off during viewfinder AF-C shooting, with the ‘3D-tracking face-detection’ option. Helpfully, Nikon’s new 180k-pixel RGB metering sensor is more than capable of discerning a face – even the eye of a face.

3D-tracking gains a ‘3D-tracking watch area’ customization, with options for a ‘Normal’ or ‘Wide’ watch area. We believe this affects how wide of a search region the camera should look over when tracking a subject around the frame. Frankly, the default setting has always worked so remarkably well that we’re not sure what switching it from its default (‘Normal’) will do, but we’re curious to put it to the test soon.

CP+ 2016: Features you need to know about on the D5/D500

‘Focus tracking with lock-on’ gains some new customization. Previously, this option just had a setting of 1 to 5, with higher numbers biasing toward ‘sticking’ to a subject rather than being distracted by a different object that passes in front of it. Nikon has now broken this setting down to allow you to separately customize how long the camera should wait before refocusing to a subject that passes in front of your initially acquired subject, and how erratic the movement of your subject is. 

It’s unclear if ‘Subject motion’ refers to how erratic an object switches between approaching and receding motion, vs. how erratic the subject is in terms of X-Y movement around the frame. We’ll investigate this once we have one in for testing, but the tailoring should help the user adapt the camera to a wider range of shooting scenarios.

CP+ 2016: Features you need to know about on the D5/D500

While this isn’t new, we though it worth pointing out that Nikon tends to offer four different settings for release vs. focus priority in AF-C (continuous).

Release prioritizes ‘taking the shot’ over focus, while ‘focus’ prioritizes acquiring focus before releasing the shutter. Focus+release prioritizes focus for the 1st shot, prioritizing release for later frames, while release+focus prioritizes firing the shutter for the 1st shot, but requiring focus before release for subsequent shots.

CP+ 2016: Features you need to know about on the D5/D500

The D500 can illuminate the focus screen red, but you can turn this off if you so desire. Unfortunately, the camera can only flash the point(s) red when either selecting them, activating an AF point, or when focus is acquired. It cannot keep focus points lit red as you track a subject or fire a burst. That’s reserved for Nikon’s flagship…

CP+ 2016: Features you need to know about on the D5/D500

… the D5 (and its recent predecessors). Unlike the D500, the D5 can continuously keep AF points lit red, which helps you see the active point as the camera follows a subject around the frame in, say, 3D-tracking mode.

You can even adjust the level of bright red they glow, in 4 steps. Seeing one red AF point stick to your subject like glue even as it moves around in your composition is, frankly, somewhat magical. Stay tuned for a video of it in action.

CP+ 2016: Features you need to know about on the D5/D500

With all the complex AF modes and customizable buttons on the D5, it’s helpful that Nikon has finally adopted a visual way to assign button function. And the number of customizable functions per button is impressive. The D5 allows you to customize the Pv, Fn1, and Fn2 buttons on the front of the camera where your right hand fingers rest, an additional vertical Fn button right behind the shutter button on the vertical grip, and finally a Fn3 button to the left of the LCD screen.

The Pv, Fn1, Fn2, and Fn3 buttons are highly customizable in that they can be assigned to any one of 24 or so different functions, or any of a number of functions (6, if we counted correctly) that have different levels of granularity that you can adjust by holding the custom button while turning a dial. The Fn3 button is a bit more limited, and the AF-ON button is reserved for AF and AE functions. We’ll spell out all the assignable options for these buttons in the D500 slides to follow, as they’re largely the same (save for features unique to the D5, like LAN, or 14 fps lockup). One significant difference, though, is that the joystick on the D5 is not customizable, while on the D500 you can assign exactly what pressing this joystick (called the ‘sub-selector’) down does.

Helpfully, you can change the behavior of these buttons during movie recording by customizing their functions specifically for movie shooting.

CP+ 2016: Features you need to know about on the D5/D500

The D500’s custom control assignment is a bit less complex than the D5’s, because it has fewer customizable buttons. On the other hand, unlike the D5, its ‘sub-selector’ AF joystick is customizable (we’ve set it to change image area in conjunction with a dial, as you see highlighted in yellow above), so it’s no slouch when it comes to customizability.

The Pv and Fn1 buttons are on the front of the camera, for easy access with your right hand as it grips the camera. The Pv button is up top and can generally be activated easily by your middle finger, with the Fn1 button accessible by your ring or pinky finger. Given their ease of access, and ability to be used in conjunction with the rear thumb dial, these two buttons are highly customizable. The new sub-selector retains all customization options of the Pv and Fn1 buttons as well, while adding two more. The Fn2 button, to the left of the LCD screen, is less customizable, likely because it’s less used during shooting. The AF-ON button is reserved for AF/AE functions.

Before we dive deep into all the customization options available for these buttons, for those prone to accidentally or inadvertently changing settings, you always have the option to assign a button to ‘None’, essentially deactivating it.

CP+ 2016: Features you need to know about on the D5/D500

With all this button customization, you’re probably wondering what you can or cannot assign to various buttons. Let’s start off with the AF-ON button, because it has a particular feature that might just be game-changing if you love Nikon’s ‘3D tracking’ as much as we do.

AF-ON can be assigned to any of the options shown above, as well as ‘AE lock (Hold)’ and ‘AF lock only’ (on the 2nd page of this menu, not shown). But here’s what we’re most excited about: the ability to assign the AF-ON button to ‘AF-area mode’ or ‘AF-area mode + AF-ON’. It’s a quick way to instantaneously switch between your selected AF-area mode (Single, d25, d72, d153, Group-area, Auto-area, 3D) by momentarily holding down the AF-ON button. 

The option to couple the AF-area switch with AF-ON means the following: a half-depress of the shutter engages AF with your typical AF-area mode, say 3D-tracking. But let’s say you’re now faced with a situation where things are happening so fast that you don’t even have the time to place your selected AF point over your intended subject to start tracking it. Instead, you just want the camera to find, say, the nearest bird or human face by itself and track it. What do you do? Click next…

CP+ 2016: Features you need to know about on the D5/D500

Assign the AF-ON button to ‘AF-area mode + AF-ON’ and select ‘Auto-area AF’ within this sub-menu. That way, when you hold down the AF-ON button, the camera will switch to ‘Auto-area’ as long as you have it held down, focusing on the nearest object or detected face and tracking it. This makes for versatile switching between your two most-used AF-area modes.

I actually found it most useful to assign AF-ON to ‘AF-area mode + AF-ON’ with Single-point AF, highlighted above. That way, I keep 3D-tracking engaged as the default AF mode (in AF-C), always defining my subject by initiating AF on it. The camera then tracks it as it moves or as I recompose, but if I ever want the camera to stop moving AF points automatically to track, and instead just freeze the AF point while still continuously focusing on the subject if it approaches or recedes, I just hold down the AF-ON button (while keeping the shutter button half-depressed). Want the camera to continue tracking the subject exactly where it left off? Just let go of the AF-ON button while keeping the shutter half-depressed, and the camera starts tracking the subject around the frame again. 

CP+ 2016: Features you need to know about on the D5/D500

The camera remembers your subject, such as this gentleman’s eye at the Nikon booth at CP+ (please excuse the low, through-the-viewfinder, iPhone video screenshot). The camera tracked his eye until I wanted it to stop moving the AF point – but only momentarily – re-engaging the tracking of his eye when I laid off the AF-ON button.

Previously, 3D-tracking – though class-leading in terms of subject tracking – was somewhat limited by the following: when I got the composition I wanted, and there was no more subject movement, I’d often want the camera to stop tracking in the X-Y plane, but continue tracking in depth (refocusing if the subject or photographer approaches or recedes). I couldn’t do that – if I wanted the AF point to momentarily stop moving while in 3D tracking, I’d have to engage AF-Lock, which’d mean the camera would stop focusing entirely. Now, though, I can use the AF-ON button to momentarily stop only the X-Y tracking. There isn’t a camera in the world, save for the D5 and D500, that can provide this robust functionality.

There is still no way to assign a button to instantly switch between AF-S and AF-C, but with the reliability of Nikon’s 3D tracking, I would leave this cameras in AF-C pretty much permanently, assigning one of the customizable buttons to ‘AF lock’ in the rare instances I don’t want the camera to focus (for example, recomposing such that the subject is outside of the AF area).

CP+ 2016: Features you need to know about on the D5/D500

You’re probably tired of hearing about AF by now. Let’s look at the other customizations possible with the Fn1, Pv, and sub-selector buttons. This and the next 3 slides show all the available customizations on the D500 for these three buttons, with the sub-selector also assignable to ‘select center focus point’ (a quick way to reset to center) and ‘highlight active focus point’ (red). For reasons that are obvious, Nikon is expecting you to assign the sub-selector to AF point-related functionality.

Oops, I thought I was going to stop talking about AF… As Barney often says, I’m absolutely irrepressible.

CP+ 2016: Features you need to know about on the D5/D500

This is the 2nd page of assignable options to the Fn1, Pv, and sub-selector buttons.

CP+ 2016: Features you need to know about on the D5/D500

This is the 3rd page of assignable options to the Fn1, Pv, and sub-selector buttons.

We think it’s very cool that you can momentarily trip the camera into a different metering mode – though this is nothing new for Nikon. It’s helpful that Nikon’s spot-metering is linked to the selected AF point on nearly every one of their cameras, and highlight-weighted metering allows one to expose for the highlights and recover shadows in post-processing (given the extensive latitude most Nikon cameras have). And on a related note – remember that you can permanently bias any of the metering modes +/- 1 EV, in 1/6 EV increments on most Nikon DSLRs (it’s an option under the metering menu).

CP+ 2016: Features you need to know about on the D5/D500

… and the final and fourth page of assignable options to the Fn1, Pv, and sub-selector buttons. Well, not exactly, since the 5th page has a ‘None’ option, and all of these options are a bit shifted for the sub-selector button because it has two additional functions listed on the 1st page. But now I’m just being pedantic.

A very useful assignment is ‘Access top item in MY MENU’. It’s a quick way to access one of your most used menu items after you assign to the top of MY MENU. Again, available on previous Nikons, but worth reiterating. This is how I, for example, quickly bias the minimum shutter speed the camera will use in Auto ISO mode.

CP+ 2016: Features you need to know about on the D5/D500

Here is a list of 6 out of 7 functions you can assign to the Fn1 button if you desire to operate it in conjunction with a dial (the 7th, on the next menu page, being ‘Photo shooting menu bank’. The same list of options is available if you with to operate the Pv button with a dial. Note that if you do this, you can’t assign any of the previous actions in the past 4 slides. You either use the Fn1 and Pv (and sub-selector) buttons as single button press actions, or as actions triggered in combination with a dial. The latter is more limited, for obvious reasons.

The sub-selector button has three fewer options when used in conjunction with the dial…

CP+ 2016: Features you need to know about on the D5/D500

… when using the sub-selector (pressing it downward centrally) in combination with a dial, you don’t get ‘1 step spd/aperture’ (which adjust shutter speed and aperture in 1 EV increments, instead of 1/3 EV) or ‘Active D-Lighting’ or ‘Exposure delay mode’.

CP+ 2016: Features you need to know about on the D5/D500

As we’d mentioned earlier, the Fn2 button to the left of the LCD screen is less customizable, probably because it’s less ergonomically useful during shooting. The Fn3 button in a similar position on the D5 has a few more features because of things like LAN connectivity on the D5.

CP+ 2016: Features you need to know about on the D5/D500

Now that you have a good idea of the extensive customization available on the D5 and D500, as well as some of the new features that enhance AF ergonomics and functionality, we turn to one last feature that shooters may find useful: an electronic front-curtain shutter (EFCS). This was first introduced on the Nikon D810, and we’re happy to see it continue in Nikon’s lineup.

EFCS initiates exposure electronically, foregoing the mechanical shutter, which ensures no camera-induced shake during an exposure. The exposure is ended mechanically, ensuring that rolling shutter is not an issue.

EFCS is limited though: above certain shutter speeds (we’d guess around 1/1000 or 1/2000 or so), EFCS becomes unreliable, if not outright unavailable. Furthermore, Nikon continues to offer this as a mirror-up only mode, which is a shame. It means you have to switch the camera’s drive mode to mirror-up, press the shutter button once to lock up the mirror and shutter, and press the button again to initiate the exposure electronically. That means you can’t really use it in typical shooting scenarios. Especially when you consider that the 2nd button press can induce motion, which means you may wish to introduce an exposure delay…

CP+ 2016: Features you need to know about on the D5/D500

… and unfortunately, the same exposure delay options are available as before. We would’ve loved to see the introduction of 1/2s, 1/4s, and 1/8s which, when coupled with EFCS, would automatically trigger the electronic shutter after the pre-specified delay.

In other words, EFCS should’ve been implemented like this: press the shutter button to lift up the mirror and shutter, then after the pre-specified delay time – say 1/2s – the camera would automatically start the exposure electronically. As it is, just like on the D810, you’ll have to press the shutter button once, then press it again to initiate the delay, after which the exposure is started. With a long lens, your entire composition will have shifted by now. And this method is often required in conjunction with certain VR lenses to ensure no mirror/shutter-induced shake is present in a certain range of shutter speeds (typically 1/60s – 1/125s).

That said, these roughly ~21MP cameras are unlikely to be as sensitive to mirror induced shake as the higher resolution D810, so users probably don’t have to worry much about these issues at all. Still, best practices are best practices, and we hope Nikon is listening.

CP+ 2016: Features you need to know about on the D5/D500

Introduced on the D810, but now with its own menu option, is ‘Monitor color balance’. This allows you to tune the color of the LCD on your camera’s screen. Some pros might find this useful in their workflow, to ensure the screen is a better judge of output color. But as long we’re seeing this sort of tailoring for color – might we expect true ICC color management in future camera displays? We certainly hope so.

We hope you’ve learned a few things about the new features available on the D5 and D500. The extensive feature-set and customization will prove invaluable for working pros and enthusiasts alike. We weren’t able to get a look at automated AF Fine Tune, unfortunately, but it’ll be the first thing we look at when we get our hands back on these cameras. Suffice it to say we’ve walked away incredibly impressed by these cameras, particularly by what they offer both in terms of AF capability and ergonomics. These cameras are likely to be second to none in their ability to track moving subjects and focus on them, even during 10-12 fps bursts. But don’t take our word for it – we’ve tried it, and will be releasing a video soon showing it in action.

Stay tuned.

Articles: Digital Photography Review (dpreview.com)

 
Comments Off on CP+ 2016: Features you need to know about on the Nikon D5/D500

Posted in Uncategorized


Oil-Painted Van Gogh Film Features 12 Paintings Per Second

02 Mar

[ By WebUrbanist in Art & Drawing & Digital. ]

loving1

It took over 100 artists to paint this full-length movie, the first of its kind: a work where every frame was hand-painted, then combined into an epic animation about, in the style and using the techniques of Van Gogh (oil and canvas).

This first trailer of Loving Vincent shows the brushstroke style anyone familiar with the artist’s world will immediately recognize. The movie is about Vincent’s life, death and works, an honest look at what was anything but a carefree existence. His own work also shows up throughout, 120 of his masterpieces in total, smoothly transitioned into the frames as the narrative unfolds around them.

loving2

loving3

A great deal of care went not only into the planning process, but also the execution so that each frame is both original and unique but transfers seamlessly to the next, despite the number of painters involved.

filmmaking loving vincent

Produced by Oscar-winning studios BreakThru Films and Trademark Films, production is still in progress in Gdansk, Poland, but this sneak peaks suggest it will be well worth the prices of admission (h/t Colossal).

loving vincent painters

loving vincent frame

More from the filmmakers: “Loving Vincent is an investigation delving into the life and controversial death of Vincent Van Gogh, one of the world’s most beloved painters, told by his paintings and by the characters that inhabit them. The intrigue unfolds through interviews with the characters closest to Vincent and through dramatic reconstructions of the events leading up to his death. Every frame in the Loving Vincent movie is an oil painting on canvas, using the very same technique in which Vincent himself painted.”

Share on Facebook


[ By WebUrbanist in Art & Drawing & Digital. ]

[ WebUrbanist | Archives | Galleries | Privacy | TOS ]


WebUrbanist

 
Comments Off on Oil-Painted Van Gogh Film Features 12 Paintings Per Second

Posted in Creativity


In a nutshell: a video rundown of the Canon EOS 80D’s features

19 Feb

Don’t have time to read through our rather tech-y hands-on overview of the Canon EOS 80D? We’ve put together a quick primer video on the camera’s features and changes to bring you up to speed. Lend us your ears for a mere 106 seconds and we’ll tell you what you need to know…

Articles: Digital Photography Review (dpreview.com)

 
Comments Off on In a nutshell: a video rundown of the Canon EOS 80D’s features

Posted in Uncategorized


Designing the Perfect Camera – What Features are on Your Wish List?

18 Feb

The perfect camera doesn’t exist, but if I were a camera designer, I know exactly what sort of camera I would make for myself, and how I’d improve on the one that I’ve already got. I’m not asking for the impossible either – all these ideas could be implemented using current technology. Really, what I would do is take the camera I already own – the Fujifilm X-T1 – and add the best bits from other cameras, to make a kind of super-camera, or at least one that is better tailored to my own needs.

1 – Sensor size

Let’s start with the sensor. The X-T1’s sensor uses the same 3:2 aspect ratio as other APS-C and medium format cameras. This often works well when taking photos in the landscape orientation. But it doesn’t work nearly so well when taking photos in the portrait orientation (with the camera turned on its side).

Aspect ratio

The portrait on the left has an aspect ratio of 2:3 (width always comes first), the same as the sensor on the X-T1. The portrait on the right shows how it would look if the sensor had a 4:5 aspect ratio. The area is the same, but the width and height are different.

It’s surprisingly hard to create a good composition that utilizes all the space in the frame well, especially for landscapes and portraits. It’s much easier with a shorter rectangle, such as those found in large format cameras (aspect ratio 5:4), some medium format film cameras (7:6) and Micro four-thirds cameras (4:3).

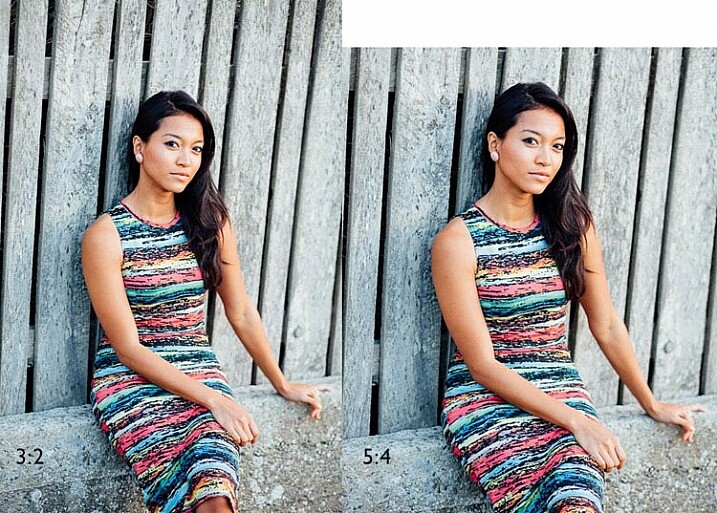
For example, check out the landscapes of Joe Cornish. He uses a large format camera for a lot of his work, and he uses the portrait orientation a lot. It works really well with the short rectangle.
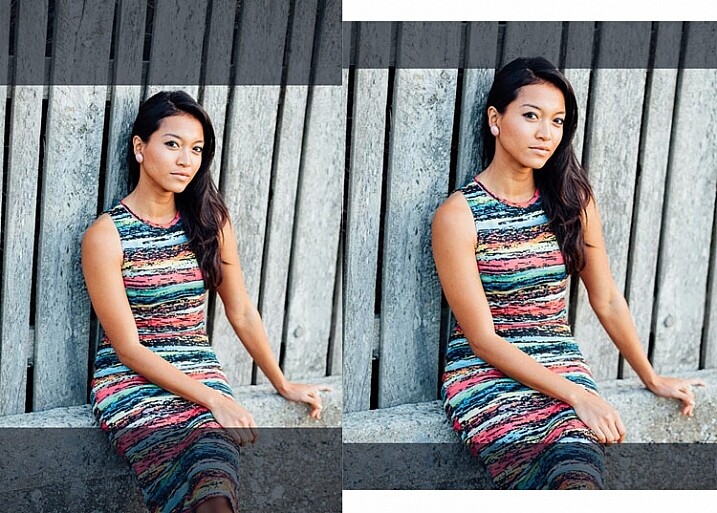
 

My proposal is this. Ditch the 3:2 aspect ratio sensor and place it with one that uses the 5:4 aspect ratio. But keep the area of the sensor – don’t make it bigger or smaller. This would give you several benefits:

  • It’s easy to compose images within the 5:4 aspect ratio.
  • If you crop to a square (as I often do because I love the square format) you use more of the sensor than when you crop the current APS-C sensor.
  • You get a slight improvement in image quality, especially at wide apertures, because you are using the centre part of the lens to create the image.
Aspect ratio

The above two photos, cropped to a square. The dark grey area shows the unused part of the sensor. You lose less information captured from the 5:4 sensor than you do from the 3:2 one.

What I don’t want to see, is a full-frame camera introduced into the Fujifilm range. The problem with having two sensor sizes in the same range, is that it greatly complicates the process of making, and buying lenses. It’s far better, as Fujifilm has done so far, to use a single sensor size throughout the range (in my opinion).

2 – In-Camera Image Stabilization

I think this is a fantastic idea, and I’d like to see it in Fujifilm cameras. The advantage of having Image Stabilization in the camera is that you can use it with any lens. That includes wide-angles, which you can then potentially hand-hold at shutter speeds like 1/4 or 1/8 second, giving all sorts of interesting creative possibilities when it comes to recording movement. Sony and Olympus have got this one right.

Fast shutter speed

I took this photo with a 35mm lens at 1/180 second to freeze movement. This lens doesn’t have Image Stabilization, but if it were built into my camera, I could try taking the photo at a shutter speed as slow as 1/15 or 1/8 second. The man would be a blur, creating a different image entirely. Image Stabilization lets you try this with a hand-held camera, so you don’t have to use a tripod.

3 – Quick control dial

Mid-range and high-end Canon cameras have a quick control dial – a thumbwheel on the back of the camera, that you can move while looking through the viewfinder. The big advantage of the quick control dial is that you can adjust exposure compensation without removing your eye from the viewfinder.

Quick control dial

The quick control dial on the EOS 5D Mark II. Its position means that it’s easy to move with your thumb, while looking through the viewfinder.

The X-T1 can already display a histogram in the viewfinder. With a quick control dial you can adjust exposure compensation (when in an automatic mode like aperture priority, shutter priority or program) as you go, to get the histogram where you want it. All guesswork regarding exposure is gone. The current exposure compensation dial is too hard to move while looking through the viewfinder, and reduces the usability of the camera.

The joystick added to the X-Pro 2 for quick movement through the autofocus points would also be a welcome addition.

4 – Dual card slots

Probably coming in the XT-2, but essential for backing up photos. Good quality memory cards are virtually indestructible. If your camera saves a copy of each photo on two different cards this makes backing up photos much easier, especially while travelling.

So Fujifilm, if you’re listening, I know I’m only one user among many, but I’d love it if you could give some consideration to these ideas. Especially the one about sensor size, which I think could revolutionize the way we use cameras.

Your turn

If I could add just one feature to my X-T1 it would be the 5:4 aspect ratio sensor. So here’s a question for you – if you could add just one feature to your camera, which would it be and why? I’m looking forward to reading your answers, this should be interesting.


Mastering Lenses photography ebookMastering Lenses

My new ebook Mastering Lenses: A Photographer’s Guide to Creating Beautiful Photos With Any Lens shows you how to get the best from the lenses you own already. A comprehensive guide to exploring the creative potential potential of wide-angle, normal and telephoto lenses, it’s also the ultimate buying guide for readers thinking about purchasing a new lens for their camera. Please click the link to learn more or buy.


googletag.cmd.push(function() {
tablet_slots.push( googletag.defineSlot( “/1005424/_dPSv4_tab-all-article-bottom_(300×250)”, [300, 250], “pb-ad-78623” ).addService( googletag.pubads() ) ); } );

googletag.cmd.push(function() {
mobile_slots.push( googletag.defineSlot( “/1005424/_dPSv4_mob-all-article-bottom_(300×250)”, [300, 250], “pb-ad-78158” ).addService( googletag.pubads() ) ); } );

The post Designing the Perfect Camera – What Features are on Your Wish List? by Andrew S. Gibson appeared first on Digital Photography School.


Digital Photography School

 
Comments Off on Designing the Perfect Camera – What Features are on Your Wish List?

Posted in Photography


Fujifilm X-E2 firmware 4.00 brings Classic Chrome and other X-E2S features

09 Feb
It may be over two years old, but that doesn’t mean Fujifilm has given up on the X-E2.

Fujifilm has released its promised firmware update for its X-E2 mid-range mirrorless camera. The firmware update adds a host of feature and operational improvements, including the Classic Chrome film simulation and AF upgrades from the recent X-T models, as well as a revised user interface and multiple Auto ISO settings.

The firmware update for the over two-year-old model continues Fujifilm’s habit of supporting existing users and brings the camera into line with most of the latest X-series models.

The changes are so significant that, rather than publishing an addendum, Fujifilm has released a new version of the camera’s owner’s manual.


Press Release:

Substantial firmware updates for the X-E2, delivering a new AF system for better capture of moving subjects among other improvements and function enhancements

[ Improvements and function enhancements with this firmware update ]

  1. New AF System

    (1) New AF system with Zone and Wide/Tracking modes for effortless capture of moving subjects
    (2) Improvement of AF accuracy
    (3) Eye Detection AF
    (4) Auto Macro mode
    (5) AF improvement in the Movie mode

  2. Function enhancements

    (6) High-speed electronic shutter with a maximum speed of 1/32000sec.*
    (7) White Balance Bracketing
    (8) Enhanced ISO Auto Setting to AUTO1/AUTO2/AUTO3
    (9) Exposure Compensation control in Manual.
    (10) Natural Live View function is just like the naked eye.
    (11) Finer lines on the framing grid enhances visibility
    (12) New Video Frame rates (50P / 25P / 24P)
    (13) Manual Shooting in Video mode
    (14) Phase detection AF support for Instant AF
    (15) Expansion of shutter speed in Program Shift mode

  3. Operability improvements

    (16) The new user interface
    (17) Improved Shutter Speed Dial operation
    (18) Name of Silent mode changed to avoid confusion
    (19) Direct selection of AF area
    (20) Unlocked AE-L / AF-L Buttons
    (21) Variable Focus Area during MF
    (22) Q. Menu customization
    (23) Interlocking of Metering and Focus areas
    (24) Movie Recording

  4. Other changes with the update

    (25) Supports focus limiter function for XF100-400mmF4.5-5.6 R LM OIS WR
    (26) “BACKGROUND COLOR” menu
    (27) The maximum number of images taken in the continuous shooting mode

Articles: Digital Photography Review (dpreview.com)

 
Comments Off on Fujifilm X-E2 firmware 4.00 brings Classic Chrome and other X-E2S features

Posted in Uncategorized


Leica updates wide-angle M lenses with new optical and design features

15 Jan
Left to right, and not to scale, Leica Elmarit-M 28mm F2.8 ASPH, Leica Summicron-M 28mm F2 ASPH and Leica Summicron-M 35mm F2 ASPH

German camera brand Leica has introduced upgraded versions of three of its wide-angle M lenses that offer improvements to both build and performance, according to the company. The trio of reportage favorites are the Leica Summicron-M 35mm F2 ASPH, the Leica Summicron-M 28mm F2 ASPH and the Leica Elmarit-M 28mm F2.8 ASPH. Each is a direct replacement for the current equivalent model. 

All three of the lenses will be fitted with metal lens hoods and a ring to cover the hood mount when the hoods aren’t in use, and metal lens caps will replace the current plastic units.

The company hasn’t been absolutely clear about the optical changes that it has made, making general statements about sharpness improving across the frame. The 35mm Summicron though now has 11 aperture blades, while the previous versions of the lens had only seven, eight or ten blades. 

The company also comments that both 28mm lenses have significantly improved curvilinear distortion controls that provide better drawing, as well as flatter field projection for increased resolution in the corners of the frame.

The new Leica M lenses are scheduled to be available as follows:

  • Leica Elmarit-M 28mm F2.8 ASPH. (black) – end January 2016, price £1,650
  • Leica Summicron-M 28mm F2 ASPH. (black) – end January 2016, price £2,975
  • Leica Summicron-M 35mm F2 ASPH. – beginning of February 2016, black version price £2,250, silver anodised version price £2,350

For more information see the Leica website. 


Press release: 

Leica introduces new generation of classic Leica M lenses with improved performance

  • Leica Summicron-M 35mm F2 ASPH.
  • Leica Summicron-M 28mm F2 ASPH.
  • Leica Elmarit-M 28mm F2.8 ASPH.

Leica Camera has introduced next-generation models of three of its classic M lenses: the Leica M Summicron-M 35 mm F2 ASPH., Leica Summicron-M 28 mm F2 ASPH. and Leica Elmarit-M 28 mm F2.8 ASPH., each delivering enhanced image performance and quality, thanks to their new optical design.

Additional improvements to the lenses include a more robust construction, now featuring a full metal rectangular lens hood with thread mount, and a threaded protection ring for the front of the lens when the hood is not attached. The lens cap is now also made of metal.

As with all Leica products, this classic trio of reportage lenses offers both optical and technical excellence. Made in Germany, the combination of state-of-the-art technology, the highest quality materials and meticulous manual construction ensures consistent quality, resulting in reliable products with outstanding durability.

The new generation Summicron-M 28 mm F2 ASPH. and Elmarit-M 28 mm F2.8 ASPH. lenses are scheduled to be available from the end of January. The Summicron-M 35 mm F2 ASPH. is scheduled to be available from February in black and, for the first time, also in a silver anodised finish.

The impressive Summicron-M 35 mm F2 ASPH. fast, classic prime lens delivers superior image performance and a unique bokeh. Despite its high speed and exceptional image quality, its dimensions are astoundingly compact. Furthermore, with its eleven blade iris, this new generation lens creates a circular aperture, lending out of focus areas an extremely smooth look and feel. Images are pin-sharp with rich contrast, and almost completely free from distortion with superb bokeh at all apertures and distances – and even when shooting wide open.

High performance and speed are also distinct characteristics of the Summicron-M 28 mm F2 ASPH. wide-angle lens. Its outstanding speed makes it particularly versatile and produces brilliant imaging results, even in difficult lighting conditions. At its maximum aperture, the Summicron-M 28 mm F2 ASPH. delivers rich contrast, differentiated reproduction of even the finest structures, a soft and smooth bokeh, and extremely high resolution. Improvements within the optical design in this new generation lens have made it possible to achieve superior image performance across the entire image field. The significant reduction of image field curvature guarantees better resolution of details from corner to corner within every picture.

The Elmarit-M 28 mm F2.8 ASPH. is the most compact lens in the entire portfolio of Leica M lenses. Thanks to its small size and light weight, this lens is a particular favourite with street and reportage photographers. Compared to the previous model, this new generation lens offers significantly reduced image field curvature, which brings considerably improved image performance with high resolution and brilliant resolution of details. The Elmarit-M 28 mm F2.8 ASPH. is practically distortion-free from infinity to its closest focusing distance of 0.7 metres, and provides an exceptionally clear view through the Leica M viewfinder.

Articles: Digital Photography Review (dpreview.com)

 
Comments Off on Leica updates wide-angle M lenses with new optical and design features

Posted in Uncategorized


BOOMR camera strap features unique bungee design

05 Nov

StatGear, a Brooklyn-based manufacturer of first aid and EMS products, is venturing into photography accessories with BOOMR, a unique camera strap featuring internal bungee cords for shock absorption and increased comfort. The design is inspired by bungee cord rifle slings, and the company is seeking funding for the product on Kickstarter. Read more

Articles: Digital Photography Review (dpreview.com)

 
Comments Off on BOOMR camera strap features unique bungee design

Posted in Uncategorized


Polarr releases Photo Editor 3 with new features, interface improvements

17 Oct

Polarr has released Photo Editor 3, the third version of its lightweight photo editing software. The new version brings with it support for using a mouse and a touchscreen, as well as a new user interface, adjustment sliders, photo editing guides, and other features. Read more

Articles: Digital Photography Review (dpreview.com)

 
Comments Off on Polarr releases Photo Editor 3 with new features, interface improvements

Posted in Uncategorized