RSS
 

Posts Tagged ‘Feature’

Revamped camera and lens feature search now live!

12 Mar

shared:DPRlogo.png

We’ve revamped two of our most popular site tools – our camera and lens feature search pages. We didn’t want to completely reinvent the wheel, and changes mostly relate to design and user experience. The tools now look friendlier (we think), search options should be a little more logical and the process of narrowing down searches should be less confusing. We’ve also added a few new fields here and there while removing some outdated ones. Click through for links.

News: Digital Photography Review (dpreview.com)

 
Comments Off on Revamped camera and lens feature search now live!

Posted in Uncategorized


Animating Van Gogh: World’s First Fully-Painted Feature Film

24 Feb

[ By WebUrbanist in Art & Photography & Video. ]

animated-film-comes-alive

It is a fantastic endeavor and nearly finished – a movie made up of 56,800 stop-motion paintings, all presented in the style and told by the characters of the tale’s protagonist: Vincent van Gogh.

animated-van-gogh-film

The first full-length feature of its kind, Loving Vincent uses van Gogh’s own techniques to explore the life and death of the artist, “through his paintings and by the characters that inhabit them.”

van gosh painting studio

As its creators explain, “the intrigue unfolds through interviews with the characters closest to Vincent and through dramatic reconstructions of the events leading up to his death.”

van gogh character still

This production by Breakthru Films features 120 of the artist’s paintings and draws its plot from 800 letters, using them to flesh out a deeper picture of this often-misunderstood painter whose work goes well beyond his most famous Starry Night and Mona Lisa.

van gogh movie trailer

In van Gogh’s own words: “Well, the truth is, we cannot speak other than by our paintings” – these industrious filmmakers are taking him at his word, and animating his images and subjects to tell his story.

van gogh loving vincent

Breakthru was founded by Oscar award-winning animator Hugh Welchman. Unfortunately, the project did not raise sufficient funds on Kickstarter, but given how far they have come one can only hope the work does not end in tragedy.

Share on Facebook


[ By WebUrbanist in Art & Photography & Video. ]

[ WebUrbanist | Archives | Galleries | Privacy | TOS ]


WebUrbanist

 
Comments Off on Animating Van Gogh: World’s First Fully-Painted Feature Film

Posted in Creativity


MEGA iOS app adds PhotoSync feature

11 Feb

mega.jpg

There are many major cloud storage providers out there, but one in particular aims to improve privacy and security options: MEGA. Founded by the man behind the controversial and now defunct Megaupload.com, MEGA has just announced that its latest iOS app adds a feature to automatically sync your photographs, much like Google Drive and Dropbox do now. Click through for more.

News: Digital Photography Review (dpreview.com)

 
Comments Off on MEGA iOS app adds PhotoSync feature

Posted in Uncategorized


Infographic Feature: Capturing Perfect Wedding Photos

06 Jan

There are many wedding photographers (or people who merely think they can shoot weddings), but there are also many who could brush up on their skills. That’s putting it lightly. We believe that wedding photography is basically a category onto itself because of the high degree of skill and specificity required to pull off shooting any wedding successfully. We’ve covered Continue Reading

The post Infographic Feature: Capturing Perfect Wedding Photos appeared first on Photodoto.


Photodoto

 
Comments Off on Infographic Feature: Capturing Perfect Wedding Photos

Posted in Photography


Testing New Flickr Web Embeds Feature

19 Dec

New Flickr format for blogged photos

Flickr Web Embeds

To The Open Arms of the Sea
Old Flickr format for blogged photos

I like the old format a lot better. The new format forces a title and Flickr logo watermark on your photo. I do love Flickr but I don’t want a Flickr watermark on every single photo I blog. I don’t want *ANY* watermark on the photos that I blog.

Also, look how bad the watermark looks on a white background. White text on a white photo becomes unreadable. Also, why is the r in Flickr cut off on the right on the flickr logo with the new iframe crap code?

As it stands right now, users on Flickr have an option to use the new embed feature or they can also still get the old html code. On the new Flickr beta photo page though users are only given the option of the new iframe code. I hope when the new beta photo page becomes default, we still have an option to choose between the old, clean and simple code instead of the new forced watermark code.

More conversation on today’s change in the Flickr help forum here.

Update: More from TechCrunch here:

“But perhaps a logo with more transparency would be nice, or one that faded away with navigation controls, appearing on interaction or mouse-over. It’s a fairly minor complaint for me, though some photogs might have an issue with it.”

Yep, I’m one of those photogs that probably has an “issue” with a forced Flickr watermark on every single photo on blog on my paid Flickr Pro account that is supposed to exempt me from advertising on my photos.


Thomas Hawk Digital Connection

 
Comments Off on Testing New Flickr Web Embeds Feature

Posted in Photography


Photoshop Tips – Using the Blend If Feature

12 Dec

blendif_opener_alt

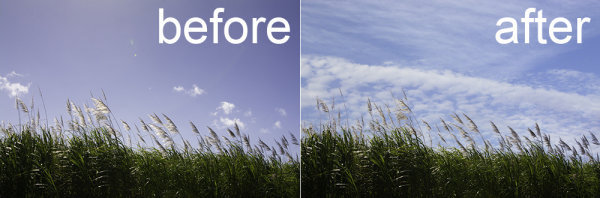
The Blend If feature in Photoshop blends one layer into another based on the content of either of the two layers. It can be used, for example, to replace a sky by making it easy for you to knock out the blue sky without having to make a complex selection.

In this article, you’ll learn some Photoshop tips on how to use Blend If to replace a sky.

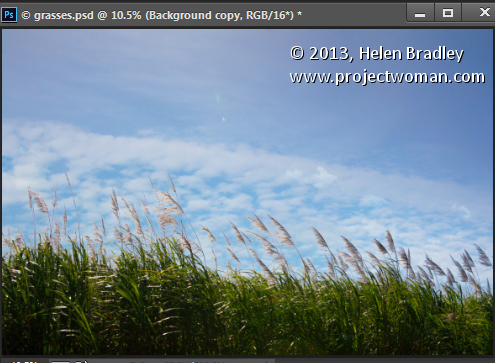
Start by opening an image such as the one shown here. Right click on the background layer and choose Duplicate Layer to make a second copy (keyboard shortcut is “command/control + J”). You now have two layers with the same content.

using the "blend if" feature in Photoshop

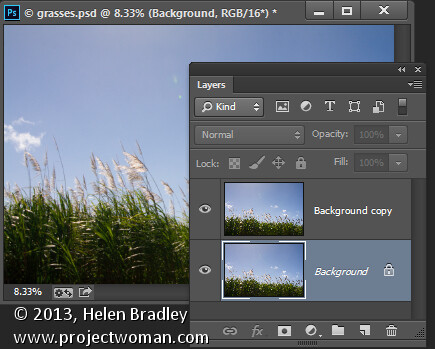
Make a duplicate layer

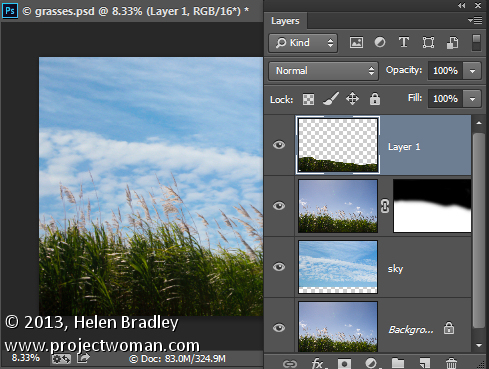
Open an image with good sky. Choose Select > All and then Edit >Copy. Click on the main image and choose Edit > Paste. Drag the sky layer between the two image layers. Size the sky layer, if necessary, so it is big enough to replace the unwanted sky in the original image. Alternately you can use File>Place to choose the new image, and Photoshop will automatically add it as a layer and make it a Smart Object (so it can be resized without any quality loss).

blendif_2

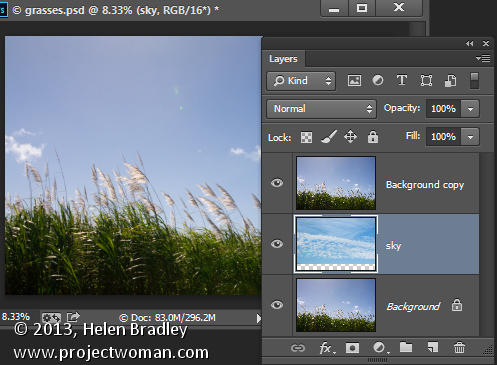
Put the layer of the new sky in between the other two

Target the top layer, click the Add Layer Style icon (fx)at the foot of the Layers palette and click Blending Options to open the Layer Style dialog box (see below).

blendif_3

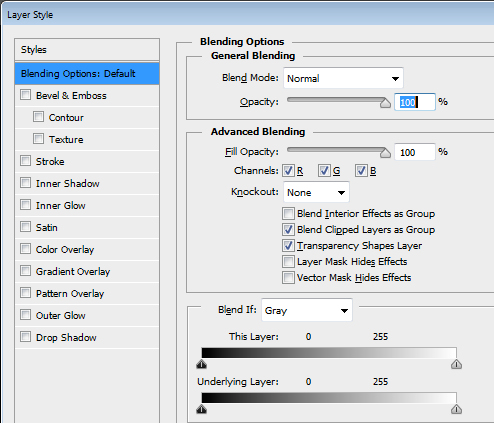
The Blend If sliders and channel selector are at the foot of this dialog. To start, you will choose the channel to use. The Gray channel is the luminance channel so it lets you make your adjustment based on the lightness/darkness of either the image layer or the layer below. If you choose Red, Green or Blue you’ll be using that channel as the basis for your blending.

blendif_4

The layer underneath the current layer contains the sky that we want to use. So you will use the sliders called This Layer to remove the existing sky, to be able see through to the sky underneath. If we were to select the Gray channel we won’t be able to make the selection very easily because both the sky and the grasses have similar luminosity or lightness values.

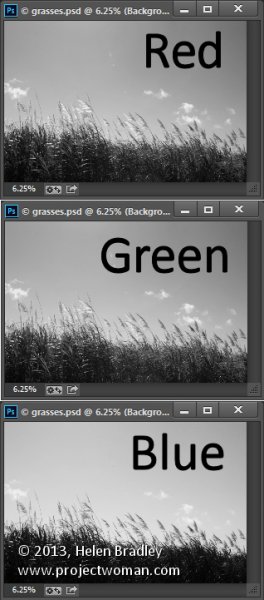
However if you exit this dialog for a minute and take a look at the individual channels in the image, you may find one where there is plenty of contrast between the area you are seeking to hide (the blue sky) and the areas you want to keep (the grasses).

To do this close the dialog box temporarily, choose Window > Channels and click on the Red, Blue, and Green channels in turn to view them.

In this case the Blue channel displays the sky as a lighter tone than the grasses, which are darker. This channel has the most contrast in the area we are interested in so it will be a good one to use.

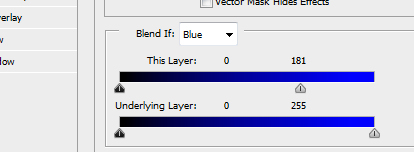
Select the RGB channel again before you leave the Channels palette. Return to the Layers palette and target the top most layer again. Display the Blending Options dialog again and choose the Blue channel in the Blend If pull down.

Drag the right most slider in the This Layer area to the left. As you do so, the lighter blue areas will disappear and you will see through to the sky layer underneath.

Blendif_5a

Pull the right slider for “This Layer” to the left

Blendif_5b

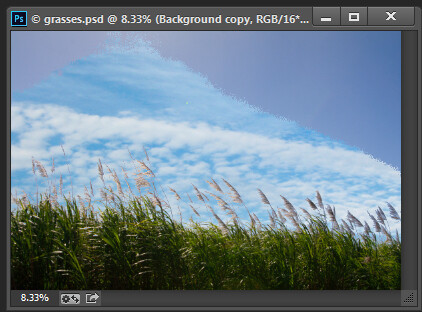
The result is the the layer below will start to appear, but the transition is not smooth

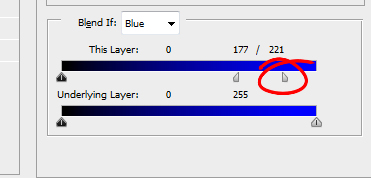
To smooth out the transition between the area being removed and the area which remains, break the slider in two. You do this by holding the Alt key (Option on a Mac) and drag half of the slider away from the other half.

The rightmost half of the slider indicates the point at which the blending effect is fully impacting the image. So pixels which have a value greater than the value indicated by this slider will be fully transparent. The left half of this slider controls the point at which the blending ceases. Any values in the blue channel that are smaller than the value indicated by this slider will be fully opaque. Pixels which have values in the blue channel that match the values between the two sliders are partially transparent.

blendif_6

For some images you may get better results by combining multiple channels. So you might use the blue and the red channels but use the rightmost slider on the blue channel and the leftmost slider on the red channel. You’ll need to experiment to see what works for your image. When you have a good result click Ok.

In a perfect world you’ll be able to fully remove the unwanted sky with just this adjustment. Chances are your results will be less than perfect! Mine certainly are, see below.

blendif_7

If this is the case, make sure that the Blend If adjustment gives you the best results in the area that would require you to make a complex selection. For me that is where the grass meets the sky. Selecting around the grass would be a big job so I want the Blend If results to be good in this area. That it doesn’t get rid of the rest of the sky is just fine – that it is easy to get rid of manually.

Target the top layer and click the Add Layer Mask icon at the foot of the Layers palette. Target the mask by clicking on it. Choose a soft round brush and paint using black over the mask to hide the remainder of the sky. Using a soft brush (0% Hardness) will ensure you get a seamless transition between the original image and the new sky.

blendif_8

Problems elsewhere

Occasionally you will find that using the Blend If sliders to remove the sky also results in some unwanted transparency appearing elsewhere in the image. If this occurs you can use content from the background layer to fill the transparent areas.

Make a selection over the area to fix, click on the Background layer to target it and choose Layer > New > Layer via Copy. Drag this layer to the top of the image and it will cover the areas that were made transparent.

Although this wasn’t a problem with this image, this is what the layer stack might look like if you do need to fix some transparency appearing elsewhere in the image.

blendif_9

The Blend If sliders are a useful way to blend layers without needing to make complex selections. You can make even better use of these sliders when you use the channel data as a guide to determine which channels to use for your blending.

Post originally from: Digital Photography Tips.

Check out our more Photography Tips at Photography Tips for Beginners, Portrait Photography Tips and Wedding Photography Tips.

Photoshop Tips – Using the Blend If Feature

The post Photoshop Tips – Using the Blend If Feature by Helen Bradley appeared first on Digital Photography School.


Digital Photography School

 
Comments Off on Photoshop Tips – Using the Blend If Feature

Posted in Photography


Non-destructive photo editing feature coming in Android 4.4 KitKat

06 Nov

kitkat.png

Google is giving a sweet treat to photographers in its new KitKat operating system. Android 4.4 will be shipping with a non-destructive photo editing feature in the native Gallery app. From what we’ve seen of the software so far, it appears to offer a huge collection of some of the most advanced editing tools available on any mobile photography app. Learn more on connect.dpreview.com.

News: Digital Photography Review (dpreview.com)

 
Comments Off on Non-destructive photo editing feature coming in Android 4.4 KitKat

Posted in Uncategorized


Apple’s iPad Air and iPad mini feature Retina display

23 Oct

features_hero.jpg

At its hotly anticipated press event today in San Francisco, Apple announced two new iPads. The iPad Air is Apple’s thinnest yet, while the iPad mini with Retina display offers faster computing and a better display in Apple’s tiny tablet. See what else Apple had to share today on connect.dpreview.com.

News: Digital Photography Review (dpreview.com)

 
Comments Off on Apple’s iPad Air and iPad mini feature Retina display

Posted in Uncategorized


Flickr announces auto-upload feature for iOS app

10 Oct

TS250x0~cms_posts-0200950401-flickr_ios72.png

Good news for iPhone photographers. Flickr has released an update to its iOS application that allows users to automatically upload their photos to Flickr’s free terabyte of cloud storage. In addition to the automatic uploading feature, users now have access to an easy auto-straightening tool. Read more on connect.dpreview.com.

News: Digital Photography Review (dpreview.com)

 
Comments Off on Flickr announces auto-upload feature for iOS app

Posted in Uncategorized


Trouble Feature: 10 Abandoned Drive-In Movie Theaters

25 Aug

[ By Steve in Abandoned Places & Architecture. ]

abandoned drive-in movie theaters
Drive-in movie theaters stand for the great American auto-centric suburban dream, though as time goes by fewer and fewer of the outdoor screens remain standing.

Driven Out

abandoned drive-in theater Washington(image via: WebUrbanist)

On June 6th, 1933, as many as 400 New Jersey motorists looking to escape the harsh realities of the Great Depression for a while enjoyed Wives Beware, starring Adolphe Menjou, from the comfort of their automobiles. Though the 40 by 50 ft screen at Park-In Theaters in Camden is long gone (it operated for only three years), other relics of the Drive-In Theater Age still stand, if just barely.

The Drive-In Project

abandoned drive-in movie theater(images via: Gadling and Ego-TV)

According to travel photographer Craig Deman, “approximately 90 percent of drive-ins are closed from their peak in the late 1950s.” Deman is somewhat of an expert on the topic, having authored the hauntingly illustrated The Drive-In Project which documents the current state of abandoned drive-in movie theaters from coast to coast.

After The Last Picture Show

abandoned Midway drive-in theatre Sweetwater Texas(images via: Debra Jane Seltzer, robert e weston jr and Paul A. Valentine)

They say “Life Is Sweet In Texas” but since the Midway Drive-In Theatre in Sweetwater, Texas closed things just haven’t been the same. The 230-car capacity drive-in was opened in the 1950s and like many drive-ins of the era, provided a large playground for kids and an outdoor seating area for families in front of the screen.

abandoned Midway drive-in theatre Sweetwater Texas(image via: Nicholas Henderson)

The jagged faux mountain range painted in bold Indian red & forest green on the back of the Midway Drive-In Theatre‘s screen make it an easily identified landmark, even from far across the windswept plains of north-central Texas. Flickr user Nicholas Henderson captured the screen-back backdrop’s eerie essence above, looking little the worse for wear, on a bright summer’s day in 2011.

Lake Woe Begone

abandoned Lake drive-in Mt. Orab Ohio (images via: Darren Snow and Lowand77)

There’s not much left of Mt. Orab, Ohio’s Lake Drive-In besides its inimitable Fabulous Fifties main sign and the moldering wooden ticket shack. Indeed, the theater’s Happy Days indeed have long since faded though Richie, Potsie, Ralph and the Fonz still likely have fond memories of many a moonlit night… hey Arthur, don’t you think it’s about time you let those guys out of the trunk?

Next Page:
Trouble Feature 10 Abandoned Drive In Movie Theaters

Share on Facebook


[ By Steve in Abandoned Places & Architecture. ]

[ WebUrbanist | Archives | Galleries | Privacy | TOS ]


WebUrbanist

 
Comments Off on Trouble Feature: 10 Abandoned Drive-In Movie Theaters

Posted in Creativity