RSS
 

Posts Tagged ‘fast’

Fast telezoom: Sigma 50-100mm F1.8 sample images

10 Jun

The Sigma 50-100mm F1.8 DC HSM Art is a fast telezoom lens designed for APS-C format cameras, on which it provides an equivalant focal length range of approximately 75-150mm. Its fast F1.8 maximum aperture makes it the brightest lens of its type on the market. But is it any good? Take a look at our sample images to find out.

Articles: Digital Photography Review (dpreview.com)

 
Comments Off on Fast telezoom: Sigma 50-100mm F1.8 sample images

Posted in Uncategorized


How to Straighten Crooked Images Fast Using Lightroom

06 Jun

If you’re like me, it’s so easy to get focused on trying to take great shots that you forgot to make sure your images are straight, and not crooked. Not some crazy tilt, mind you – just a slight tilt. So slight that when you notice it in your images, it just looks weird. A more dramatic tilt and we’ll just call it art. But this slight tilt is just enough to drive you crazy and cost us a lot of extra time editing your images.

Well I am here to report that I have found a quick and easy way to fix this tilt fast using Lightroom. So easy, that you can even automate it so that Lightroom fixes it for you.

So if this tip interests you, keep reading to find out how:

Image01

Take a look at the image above. Good shot, right? Photographically I think I did well with the image, but it’s crooked! I can’t give this image to my client like this, it needs to be straightened first.

Lens Corrections Panel

Beginning with Lightroom version 5 the Basic tab was introduced inside of the Lens Corrections panel. This tab gives you the easy to use Upright Mode buttons, which are powerful tools used to fix perspective issues with your images. The perspective issue that I always seem to be dealing with is crooked images.

Image02

There are several Upright Mode buttons, but the one I want to show you in this article is the Level button. When clicked, this button works to straighten your images based on the lines present inside them. Obviously if there are no strong vertical or horizontal lines in the image, this button won’t work. But if there aren’t strong lines, who’s to say it’s crooked in the first place, right?

Images appear crooked to our eyes because of the strong lines within an image, therefore the Level button works great at straightening those images quickly, without much difficulty. Instead of going into the crop tool and manually rotating the image slightly to straighten it, I can go to the Lens Corrections Panel instead and click the level button to straighten this image very quickly.

I also like to have the Enable Profile Corrections check box checked as well as the Constrain Crop check box. These make sure Lightroom is straightening with as much information as possible.

Image03

Automating Your Upright Adjustments

Now here is the trick. When done properly, you can create a Lightroom preset, or sync your Level adjustment across any number of images, and have Lightroom analyze and adjust each image independently based on each image’s needs and requirements.

What this means is you can have Lightroom straighten all of your crooked images with the click of a couple of buttons!

Syncing

In the Sync dialog box under Lens Corrections check box, there are three check boxes you want to be concerned with: Upright Mode, Upright Transforms and Transform.

Image04

These three boxes determine how Lightroom is going to handle your straightening – whether to analyze each image independently or simply copy the same settings from one image to the next.

If all three are checked, Lightroom will simply apply the same setting to all of the images, something you do not want because each image requires specific straightening based on its own lines. You’ll notice that Upright Mode is grayed out, telling you that it isn’t active.

Image05

To do what you want, which is to have Lightroom analyze each image independently and straighten it based in its own needs, you want to ONLY have a check mark in the Upright Mode box. The other two are left blank (see below).

Image06

By doing it this way, Lightroom will fix your crooked images, according to the amount of straightening that each image specifically needs.

How cool is that?

Take a look at the images below. I took many shots in a sequence of the couple walking, and I want to straighten each one individually. Before learning this technique, I had to straighten each image individually – but not anymore.

Image07

Once I fix the first image using the Level button in the Lens Corrections panel, I can then sync the Upright Mode across all of the other crooked images, and each will be analyzed and fixed according to what it needs (even if they are all different amounts).

Image08

Look at that. All of my images were fixed with a few clicks. I don’t want to belabor the point here, but I constantly shoot crooked and this little trick saves me hours of tedious straightening over the course of a year.

Making a LR Preset

You can also automate this process by creating preset. You do this by first straightening an image with the Level button found in the Lens Corrections panel of the Develop Module.

Then, at the top of Presets panel clicking the (+) plus button to create a new LR preset.

Image09

This will bring up the New Develop Preset dialog box where you choose which settings you want in your preset, the folder you want to store it in, and what name you want to give it. Name your preset something that you will remember, put checkmarks in the Upright Mode checkbox and the Lens Profile Corrections checkbox and hit Create.

Image10

Now, when you have crooked images you can hit this preset and almost magically, your images will be straightened compared to the strong lines in the image.

Image11

Give it a shot, I think you will find yourself using this technique quite often to straighten your images quickly.

Image012

Image013

googletag.cmd.push(function() {
tablet_slots.push( googletag.defineSlot( “/1005424/_dPSv4_tab-all-article-bottom_(300×250)”, [300, 250], “pb-ad-78623” ).addService( googletag.pubads() ) ); } );

googletag.cmd.push(function() {
mobile_slots.push( googletag.defineSlot( “/1005424/_dPSv4_mob-all-article-bottom_(300×250)”, [300, 250], “pb-ad-78158” ).addService( googletag.pubads() ) ); } );

The post How to Straighten Crooked Images Fast Using Lightroom by Kelly David Sansom appeared first on Digital Photography School.


Digital Photography School

 
Comments Off on How to Straighten Crooked Images Fast Using Lightroom

Posted in Photography


Fast Glass: Tips for Working With Wide Aperture Lenses

29 May

As photographers, many of us become infatuated with new gear, such as a new flash, tripod, or lens. We scrimp and save our money, and go off to the camera store to purchase that new lens we’ve had our eye on, most times satisfied with whatever new piece of kit has found its way into our bag. Sometimes, though, it happens that for some reason that new gear we’ve spent our hard-earned money on doesn’t live up to our expectations.

Shallow depth of field

Fast lenses enable the photographer to use shallow depth of field creatively. A 24mm f/1.4 lens, shot at f/1.4 was used for this image.

It may be that it was overhyped, or it doesn’t suit your workflow. There are occasions, however, when a piece of gear has a learning curve attached to it that needs to be solved before you can fully enjoy it. One such item that seems to have that learning curve attached, is a fast lens (one with large maximum aperture).

At some point, we all begin dreaming of fast (large aperture) lenses. For the purpose of this article, I’m going to define fast lenses as ones with maximum apertures wider than f/4.

Fast lenses are great for a lot of things, shooting in low light being one of the major advantages, because the wider aperture allows more light into the imaging sensor, which in turn allows you to use a faster shutter speed. This is why lenses like the 70-200mm f/2.8 are such a workhorse in a photojournalist’s camera bag. Another advantage to the wider aperture is the ability to create shallow depth of field in your image, which can make your subject really stand out from the background. The 85mm f/1.4 is one of my go-to lenses for almost any portrait situation for just that ability.

Focus on the eye

When photographing portraits, focusing on the closest eye is ideal when using shallow depth of field.

That all sounds great, right? But it’s that last point regarding shallow depth of field which seems to create the biggest problems for most photographers, who are new to using a fast lens. I often hear of photographers complaining about a lack of sharpness in their lenses, and more often than not, the issue crops up when the photographer is using a fast lens.

It may be a portrait photographer trying to use an 85mm f/1.8 wide open, or someone doing street photography with a 35mm f/1.4, and for some reason there’s a lack of sharpness to the image that will invariably be blamed on the lens. In my 20 years in photography, I’ve owned and worked with a lot of gear – 0ver a dozen different camera bodies, and several dozen lenses I’ve used at one point or another. I can honestly say that I have never once had one come straight out of the box brand new, and not be in perfect working order, so treat that option (that the lens is faulty) as a last resort for now.

Understanding Depth of Field

In addition to their low light capabilities, many photographers purchase fast lenses simply because of the ability to shoot with a shallow depth of field. When used creatively, a lens with a large aperture used wide open, allows you to be very selective in what you show the viewer, and what you hide in soft out of focus areas, known as bokeh.

However, it’s very important to understand that depth of field works differently dependent on the lens you are using. For instance, a lens such as the Nikon 85mm f/1.4 will have paper thin depth of field when used at f/1.4, at close distances to the subject. As the subject moves further away from the camera, that depth of field becomes a little greater. But at the minimum focusing distance, you could focus on an eyelash on your subject, and still have the eyeball be out of focus, despite the fact it’s only half an inch behind the eyelash. Assuming you don’t want to back up and change the framing on your subject, the best way to ensure sharp focus on the eye, is to choose a focus point on the eye and be careful it does not accidentally focus on an eyelash.

If you are willing to sacrifice a bit of that shallow depth of field, simply stop down a bit to give yourself some leeway on where you focus. While at f/1.4 or f/1.8 you may not be able to get both the eyelash and the eye in focus, but at f/2.2 or f/2.8, you’ll likely have enough depth of field to achieve sharp focus on both.

hyperfocal distance

Using a 24mm f/1.4 lens wide open, setting the focus distance to the hyperfocal distance, allows you to get greater depth of field even when photographing wide open.

Even on wide angle lenses, such as a 24mm f/1.4 or 35mm f/1.4, which have inherently (seemingly) greater depth of field due to the nature of wide angle lenses, you’ll still notice some issues arising due to the use of a wide open aperture. If you can step back from the subject, you can increase the perceived depth of field since you’ll be focusing further away. You can calculate how far away you need to be by using a hyperfocal distance calculator.

The hyperfocal distance is the closest distance at which a lens can be focused, while still keeping objects at infinity acceptably sharp. In the shot of the upended bus at night, knowing the bus was about 30 feet away, I calculated the near limit of focus for the lens I was using at about 18 feet and the far limit was 91 feet, meaning anything past that distance would still be out of focus at f/1.4. By focusing at the hyperfocal distance of 44 feet, I knew the bus would fall into the area of sharp focus, while still keeping the stars in sharp focus. This is true because the hyperfocal distance is where everything from that distance to infinity falls within your depth of field, and everything from the hyperfocal distance to the point halfway between the camera and that distance, also falls within your depth of field.

Unfortunately, it’s not always possible to focus at the hyperfocal distance. For instance, photographing at a party in a dimly lit room, you may notice some areas out of focus due to the shallow depth of field. The fix here is to  stop down a bit if you can. If you need more light, consider using a flash if appropriate, and stopping down the lens to give greater depth of field. Another option is to raise the ISO a bit to allow you to stop down the aperture more.

You may find yourself saying, “I didn’t purchase a fast lens to use it at a smaller aperture!” While that may be true, if you find yourself unable to capture sharp images due to the shallow depth of field, stopping down is the best solution. Please keep in mind, I’m not talking about a lens that just isn’t sharp. I’m talking about a lens that, due to its fast aperture, isn’t capable of capturing the depth of field needed to keep everything that you want sharp in focus.

Choosing Your Focus Point

choose a focus point

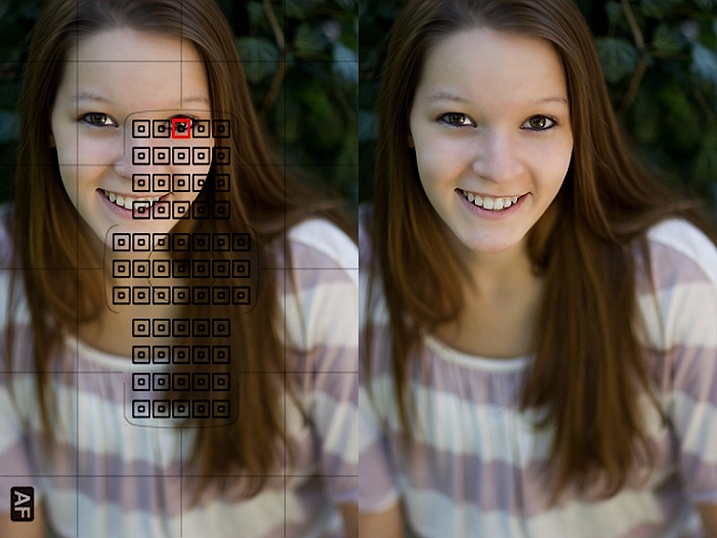
When it is critical to focus on a specific area in the image, choosing the correct focus point will ensure sharp focus where you want it, even when using a wide aperture with shallow depth of field.

One of the best things you can do when using a fast lens, is to ensure you’re focusing precisely where you think you are focusing. You want to be sure your camera is set to allow you to manually choose a focus point. By manually selecting a focus point, you can ensure the camera focuses on what you think it should. Most cameras default focus point selection method is automatic. In this mode, the camera will generally try to focus on the nearest object with detail that is covered by one of the focus points. Allowing the camera to choose can be a recipe for disaster, since quite often, the nearest object with detail is not what you want to focus on.

One of the best things you can do as a photographer is take control of where your camera is focusing by selecting the focus point that you want, and ensuring that the focus point you choose is on the subject you want to be sharp. Cameras today have multiple focus points, with some having as many as 61 AF points. While it’s true that generally speaking the center point will be the most accurate of those points, technological advances have made the points along the outer edge much more accurate than in the past. This means that you can choose those outer focus points with confidence when composing your image.

Focus on the eyes

Using shallow depth of field on a portrait allows the photographer to focus on the eyes, and lets the rest of the body fall out of focus. An 85mm f/1.2 lens was used here.

Another related problem to the camera choosing the wrong AF point, is photographers employing a technique known as focus and recompose. This technique came about back when cameras only had a few AF points bunched around the center of the viewfinder. In many situations, it’s not a problem, as long as you are using an aperture that will provide adequate depth of field to maintain focus on the object or person you’ve focused on.

However, when using a fast lens, at a wide open aperture, focusing and then recomposing your shot becomes a real problem. This is because when using a fast lens at a wide aperture, the depth of field is so thin, that recomposing the shot will actually shift the plane of sharp focus away from the subject you initially focused on. So while you may have focused on the correct subject, using the center AF point, in adjusting your composition you knocked your subject right out of focus again. The solution for this issue is the same as above: manually select an AF point that you can place right on top of your subject, without recomposing your shot.

Embrace the Bokeh

shallow depth of field

Shallow depth of field can be used to create interesting effects and force your viewers to look where you want them. This image was made with a 70-200mm lens at f/2.8.

Lastly, in answer to those who bought fast glass to shoot it wide open, I say – embrace the bokeh! Bokeh is defined as the visual quality of the out of focus areas of an image, and each lens renders these areas a bit differently. Fast lenses typically have beautifully smooth bokeh.

Compose your shots so that the shallow depth of field is used creatively. To do this, you’ll need to understand what you can and can’t do when shooting wide open. Knowing that you will have a shallow depth of field, you’ll want to avoid stacking subjects at different distances. Create compositions that contrast sharp areas, with out of focus areas. Use that contrast to highlight certain objects within your frame, and by the same token, hide other objects by causing them to be drastically out of focus.

Highlight an object using shallow depth of field

Using shallow depth of field allows you to highlight one object in sharp focus against a blurry background. This image was made with an 85mm f/1.2 lens.

Images created using shallow depth of field force your viewers to look where you want them to, because the eye is naturally drawn to areas of sharp focus. By using proper focusing techniques, you can ensure the image you see in your mind is the one you capture, and by understanding how the lens will handle depth of field, you can ensure that you’ll know to stop down when you need to for added depth of field, avoiding the mistake of having an important part of your image out of focus.

What’s your favorite fast lens to work with and why?

googletag.cmd.push(function() {
tablet_slots.push( googletag.defineSlot( “/1005424/_dPSv4_tab-all-article-bottom_(300×250)”, [300, 250], “pb-ad-78623” ).addService( googletag.pubads() ) ); } );

googletag.cmd.push(function() {
mobile_slots.push( googletag.defineSlot( “/1005424/_dPSv4_mob-all-article-bottom_(300×250)”, [300, 250], “pb-ad-78158” ).addService( googletag.pubads() ) ); } );

The post Fast Glass: Tips for Working With Wide Aperture Lenses by Rick Berk appeared first on Digital Photography School.


Digital Photography School

 
Comments Off on Fast Glass: Tips for Working With Wide Aperture Lenses

Posted in Photography


Fast and steady: Tamron 85mm F1.8 Di VC USD real-world samples

19 May

The Tamron 85mm F1.8 claims the title of the world’s first fast-aperture 85mm lens with stabilization. The focal length will certainly appeal to portrait photographers, and the combination of Tamron’s vibration compensation with an F1.8 aperture might just give it an edge in low light situations. We’ve been shooting with it over the past couple of weeks, both on full-frame and crop sensor bodies, to get an idea of its performance.

Articles: Digital Photography Review (dpreview.com)

 
Comments Off on Fast and steady: Tamron 85mm F1.8 Di VC USD real-world samples

Posted in Uncategorized


Fast machines: Shooting motocross with the Nikon D5 and Canon 1D X II

18 May

Introduction

Big cameras. Big performance.

The Nikon D5 and Canon EOS-1D X Mark II are purpose-built machines. Firing at 12 and 14 frames per second respectively, they are designed for speed and durability to help you make sure you get the shot no matter what conditions you find yourself in. Conditions like those at the Evergreen Speedway in Monroe, Washington recently, where DPR staffers Dan Bracaglia and Carey Rose went to get some preliminary findings on the cameras’ AF systems.

Bear in mind we’re camera reviewers, and not pro sports photographers – we’re actively working to get the Nikon and Canon cameras into the hands of working pros to get some real-world opinions on them. But for now, we thought there was some value in sending Dan out to get some early findings from the 1D X Mark II, which had arrived only recently into our offices, and Carey out with the D5, the review of which is fully under way. Since these cameras are likely to be shot alongside each other at many a major sporting event, we figured we’d try our best to do the same and compare our results.

The Nikon D5

by Carey Rose

Flyin’ high. Photographed in Auto Area AF. Nikon 24-70 F2.8E VR @ 38mm | F11 | 1/250 sec | ISO 100

For someone as interested in motorcycles as I am, it’s almost embarrassing to admit that this was my first time watching motocross in person, much less photographing it. And even though we were shooting a Sunday ‘practice’ session, it proved a good test for Nikon’s flagship sports shooting machine. As riders brapped and blipped their engines, rocketing around the track at over 40 mph, I snapped and clacked the D5 away at 12 fps nearly the whole time. You just don’t realize how nice all those frames per second are until you really – truly – need them.

But before we get to the burst rate and the photos, let’s dig into the D5’s autofocus system a bit. The continuous autofocus modes I chose to try out were 3D Tracking, single-point, Group Area AF and Auto Area AF. Here’s what all those modes mean, how they behave and some common use cases.

  • 3D Tracking utilizes the D5’s phase-detection autofocus module for distance information and combines that with color readings from the RGB metering sensor to effectively track subjects around the frame with a single point. Put another way, place your chosen AF point over your subject, initiate autofocus, and the point should stick to that subject whether you or your subject move. Frankly, it’s worked so well in my experience that I default to this mode almost all the time for general shooting.
  • Single-point AF utilizes depth tracking from the phase-detection module to effectively track an object that is moving towards or away from the camera, so long as you keep the point over that subject. Despite how good 3D Tracking performs, it can still sometimes be fooled. If you know your subject’s trajectory and can comfortably follow that subject with the AF point over it, this mode also comes with a high degree of precision.
  • Group Area AF works very similarly to the single-point method, but uses a tight group of 5 AF points instead of one. With a larger ‘zone’ of focus coverage, it should be easier to follow unpredictable subjects in this mode, and it’s commonly used for photographing birds in flight.
  • Auto Area AF works basically by letting the camera take over entirely. Like 3D Tracking, this mode uses the camera’s PDAF module and metering sensor in tandem to intelligently discern what it should be focusing on. It will usually bias to objects closer to the camera, so watch your foregrounds, but it should also intelligently be able to read colors, and in Nikon’s newest models, faces and eyes. This is a good mode for photographing people at events, or if you don’t have time to react and just need to get a photograph, there’s a chance Auto Area AF will get you what you need.

It goes without saying that all of these modes, despite how computationally intensive they may be for the D5, work perfectly well at its full burst rate (not mirror lock-up mode).  And as someone who is used to 5fps bodies, the higher frame rate is something to behold. 

12 fps

After some quick and informal testing, I soon started to take 12 fps for granted. Slowing down the D5 in ‘Continuous Low’ mode to 6 fps to simulate a less sports-oriented body was torturous. Predictably, instead of getting a solid six-to-eight shots of a rider flying past me with wide-ish framing, I’d get maybe two or three. I was often left wanting an additional shot in-between the few that I managed to get, and because of this, I ended up trying to get just a single shot at the right moment and hoping that my timing worked out. It often didn’t. Back to 12 fps mode for me.

A high frame rate gives you more compositional options in situations such as this, where two riders are constantly changing their positions relative to each other. Nikon 70-200 F2.8G VR II @ 200mm | F5.6 | 1/1250 sec | ISO 400

Following and focusing with single-point AF

But of course, 12 fps is useless if you can’t see what you’re shooting. The good news is that the viewfinder blackout is so short on the D5 even at 12 fps that I was able to pan and follow a fast-moving rider at a very close distance with ease. Nikon’s 3D Tracking worked well (more on that later), but because I could see so clearly in ‘real time’, using single-point continuous autofocus and just keeping a point over my subject was a completely viable option when panning and this approach netted a high number of ‘keepers.’ What’s more, the frame coverage of the D5’s autofocus array is so generous that I rarely felt compositionally constrained by picking a single point to keep over my subject.

Of course, for the sake of some variety, sometimes it’s best not to follow the action and just let it pass you by. Nikon 300m F4 PF | F5.6 | 1/500 sec | ISO 100

Group AF

Group AF on the D5 works similarly to single-point, but with the idea that a tight group of points will give you greater precision than just one point alone. The idea is great in principle and it usually worked well, but there were a handful of times where I let a part of the group stray off the rider, and the camera quickly readjusted to focus on the background. Part of this is probably due to to the fact that I had the AF system set up for ‘erratic’ subjects since 3D tracking and single-point worked so well in this mode, but in any case I tended to avoid Group AF for the rest of this shoot. 

Motorcycles in flight. Nikon AF-S 300mm F4 PF | F4 | 1/1600 sec | ISO 100

3D Tracking

One of the most exciting autofocus developments for DSLRs in recent years, Nikon’s 3D Tracking, worked as well as I have come to expect with only a single exception. When at wider focal lengths and attempting to initiate tracking on a rider at a distance, the D5 would usually just not be able to find my subject. The user manual reflects this though, saying that the camera collects color information from focus points surrounding the one you’ve chosen, storing that information and using it to initiate tracking.

So with a distant rider, the D5 was seeing mostly the dirt color, despite the bright colored clothing of my intended subject. In any case, if I let the subject get a little closer, or if I used longer lenses that produce inherently shallower depth-of-field, 3D Tracking proved itself to be pretty magical, constantly re-focusing and re-positioning the autofocus point in the viewfinder even when I was shooting at 12fps.  

Nikon’s 3D Tracking did a great job of tracking this rider with a single AF point pegged to his riding suit. Nikon AF-S 300mm F4 PF | F4 | 1/1000 sec | ISO 100

Auto Area AF

The last mode I experimented with was Auto Area AF, which is usually a mode that I tell people to avoid using. The D5 might just change my mind on that one. The camera was able to find a moving subject and hit it with anywhere from one to nine AF points almost every single time.

1 2 3 4 5

In the above series of (unedited) images, Auto Area actually directed the camera to focus on the background first. But then in the middle of that 12 fps burst, focus snapped to the rider flying through the air in front of me within two frames. I generally prefer a higher degree of control than Auto offers, but I can see this mode being genuinely helpful if you have milliseconds to get a shot and you don’t have time to place an autofocus point manually.

All those buttons

One of the best parts of the new D5 (and its sister model, the D500) is the level of button customization regarding autofocus modes. I am a back-button AF shooter, as I do sometimes like to pre-focus and wait for a subject to enter the frame without having to switch into manual focus. But even with the shutter button decoupled from any autofocus functionality whatsoever, I can assign AF-ON to be 3D Tracking, then assign the FN1 button on the front of the camera (under my ring finger) to switch to single-point continuous autofocus, and then also assign a full press of the AF joystick to switch into Auto Area mode.

So without even shifting my grip, I’ve got three different autofocus modes at my fingertips. This is incredibly handy as I often found myself changing AF modes depending on my lens, my position and the riders’ movement.

Having watched this rider come around this corner a number of times, I wanted to focus on just how much dirt he kicked up as he plowed through the scene. Having de-coupled autofocus and my shutter button, I pre-focused just behind where his rear tire is, shot a burst as he entered and exited the viewfinder with the tight framing I wanted and I didn’t have to worry about the focus shifting or missing (an admittedly minor concern with the D5). Nikon 300mm F4 PF | F4 | 1/2000 sec | ISO 200

So, now that we’ve seen how the Nikon D5 performed, let’s move on to Canon’s EOS-1D X Mark II.

Articles: Digital Photography Review (dpreview.com)

 
Comments Off on Fast machines: Shooting motocross with the Nikon D5 and Canon 1D X II

Posted in Uncategorized


Fast Flash for Portrait Perfection: 25% Off our New Flash Photography eBook

27 Jan

NewImageWho said flash portraits had to be complicated?

With our brand new ebook, Fast FLASH for Portrait Perfection by Gina Milicia, they don’t have to be!

A five-time dPS ebook author, Gina has been using flash lighting in her portraits for over 25 years – photographing a-list celebrities, heads of state… even royalty.

Now in this practical how-to guide, she’s sharing all her best flash secrets, tips and techniques.

She’s really held nothing back!

Created specifically to take away the guesswork when it comes to flash photography, this practical ebook will give you the skills and confidence you need to create AMAZING portrait images.

Learn more about Fast FLASH here.

Is this flash photography ebook for you?

Yes! If you:

  • Want to learn all there is to know about flash, from one of the world’s best portrait photographers
  • Don’t want to get bogged down with technical explanations
  • Are looking to develop your own unique portrait lighting style
  • Want to understand what gear to use (and what not to use), no matter your budget
  • Want to greatly improve the quality of your portrait images, whether you’re a beginner, enthusiast or pro

There are loads of examples included, too. All shot by Gina using mostly budget lighting kits (but with studio-quality results that you can achieve as well!).

Grab a Copy and Save 25% Today

To celebrate the launch of this brand new Flash Photography eBook you can pick it up today for a limited time 25% off discount. Normally $ 19.99 USD today it is yours for just $ 14.99 USD.

Pick up your copy of Fast FLASH here.

googletag.cmd.push(function() {
tablet_slots.push( googletag.defineSlot( “/1005424/_dPSv4_tab-all-article-bottom_(300×250)”, [300, 250], “pb-ad-78623” ).addService( googletag.pubads() ) ); } );

googletag.cmd.push(function() {
mobile_slots.push( googletag.defineSlot( “/1005424/_dPSv4_mob-all-article-bottom_(300×250)”, [300, 250], “pb-ad-78158” ).addService( googletag.pubads() ) ); } );

The post Fast Flash for Portrait Perfection: 25% Off our New Flash Photography eBook by Darren Rowse appeared first on Digital Photography School.


Digital Photography School

 
Comments Off on Fast Flash for Portrait Perfection: 25% Off our New Flash Photography eBook

Posted in Photography


Eyes on the Skies: Ambarella brings fast 4K to drones with H2 and H12 processors

07 Jan

Processor maker Ambarella has announced its two newest and most powerful chips. The H2 and H12 are 4K (UHD) capable processors, with the more powerful H2 able to compress 10-bit 4K/60p video using H.265 HEVC compression or 4K/120p with the less efficient H.264 AVC system. The company says it’s the drone market that’s now pushing the capabilities it needs to offer – way beyond what compact cameras tend to need.

With the drone market in mind, the H2 also includes a 1.2Ghz quad core processor that allows it to handle the data required to keep a drone in the air. It can also output a low-delay Full HD video stream at the same time as compressing a 4K stream, allowing a near-immediate high res view to be sent to a remote operator.

What we found interesting is not just that applications such as drones are so demanding (that makes sense), but that the expectations of the drone and sports camera markets are so far beyond what is being offered in the still camera market. One big difference between the two markets is that, with the continued decline of small-sensor compacts, most of the sensors used in stills photography are much larger than those used in action cams or drones, which makes heat management and data readout more challenging. Even with this difference, it’s interesting to know that 60p and 120p 4K processing is already ready for consumer devices.

Ambarella vice president of marketing and business development Chris Day says that sales of processors for drone/flying cameras now makes up 10% of the company’s revenues, highlighting how fast-moving the sector is. ‘These things need Ultra HD video, high frame rates, great imaging, electronic stabilization and lots of CPU power. And, of course, this all needs to be with low power consumption: it’s pretty demanding but it’s a great fit for us.’ he says. Asked about the impact these technologies are likely to have on the conventional stills camera market, he points out the narrowing of boundaries between sectors: ‘companies such as DJI are starting to make their own cameras, rather than mounting conventional Sony or Micro Four Thirds cameras on there.’

With fast, high quality, high bit-depth video likely to become more common on action cameras and flying cameras, it’ll be interesting to see how many of these capabilities start to appear on more conventional cameras in the coming months and years.


Press Release:

Ambarella Introduces Low Power 4K Ultra HD SoCs for Sports and Flying Cameras

SANTA CLARA, Calif.–(UNDER EMBARGO – until Jan. 6, 2016 at 8:00 AM Eastern)–Ambarella, Inc. (NASDAQ: AMBA), a leading developer of low-power, HD and Ultra HD video processing semiconductors, today introduced the H2 and H12 camera System-on-Chips (SoCs) for a new generation of sports and flying cameras. H2 targets high-end camera models with 4K Ultra HD H.265/HEVC video at 60 frames per second and 4K AVC video at 120 frames per second. These high frame rates deliver smooth video during fast action shots and slow motion playback. H2 also includes 10-bit High Dynamic Range (HDR) video processing to handle high contrast scenes and supports DSLR quality photography. H12 targets mainstream cameras and offers 4K Ultra HD HEVC video at 30 frames per second. Both SoCs have extremely low power consumption allowing for the design of small form factor cameras, and feature advanced 3D electronic image stabilization, potentially eliminating the need for mechanical gimbals.

“With the introduction of H2 and H12 we now provide a complete portfolio of 4K Ultra HD HEVC solutions for sports and flying cameras,” said Fermi Wang, President and CEO of Ambarella. “H2, our first 14nm chip, delivers 4Kp60 Ultra HD HEVC video with 10-bit HDR processing, as supported by the latest generation of 4K HDR televisions. H12 delivers 4Kp30 Ultra HD HEVC video for outstanding video quality at mainstream camera price points.”

H2 features a new generation image processing pipeline which includes 10-bit HDR video processing and excellent imaging, even in challenging low-light conditions. The integration of a 1.2 GHz quad-core ARM® Cortex®-A53 CPU with floating point and NEONTM provides significant processing power for customer applications including flying camera flight control, video analytics and wireless networking. Its hardware de-warp engine supports wide-angle panoramic camera designs, while USB 3.0 connectivity provides fast upload of high resolution video. H2 supports live streaming of a second, low-delay, Full HD video stream for wireless monitoring and camera control.

H12 supports both 4Kp30 Ultra HD HEVC and AVC video encoding. It integrates a 1GHz single-core ARM® Cortex®-A9 CPU with floating point and NEONTM to provide the processing power required for customer applications including flying camera flight control and wireless networking. Its de-warp capability allows the use of wide-angle lenses with minimal image distortion. H12 also supports the live video streaming of a second, low-delay Full HD video stream.

Ambarella will demonstrate both H2 and H12 at a private event during the Consumer Electronics Show in Las Vegas, January 6 – 9, 2016.

Pricing and Availability

For pricing and availability please contact Ambarella at www.ambarella.com/about/contact/inquiries
The URL for this news release is: www.ambarella.com/about/news-events.html
The URL for the related image is: www.ambarella.com/about/news-events/press-images/H2-H12-press-images.html

Articles: Digital Photography Review (dpreview.com)

 
Comments Off on Eyes on the Skies: Ambarella brings fast 4K to drones with H2 and H12 processors

Posted in Uncategorized


Fast Track: New High-Speed Pedestrian Lanes Live in Liverpool

18 Nov

[ By WebUrbanist in Architecture & Cities & Urbanism. ]

pedestrian walking lane

An experimental pedestrian fast lane system deployed in England allows speedy walkers to circumvent gawking tourists and window shoppers.

Implemented by retailer Argos adjacent to a shopping complex in Liverpool, the Fast Track is a trial run (or: really fast walk) for separating dawdlers from power walkers.

PIC BY ARGOS/MERCURY PRESS (PICTURED: THE FAST LANE IN LIVERPOOL CITY CENTRE) Speedy shoppers will no longer get stuck behind people who dawdle or stop to check their phones ñ thanks to the UKís first ever pedestrian fast lane. Argos has painted new markings on the pavement outside its Liverpool store after research revealed almost half the nation found the slow pace of high streets to be their biggest shopping bugbear. The new lane, being trialled this week in the Liverpool One shopping complex, hopes to help pick up the pace for those who are hurrying by bypassing the crowds. SEE MERCURY COPY

pedestrian fast speed lane

If it seems like a marketing stunt, consider this: close to 30,000,000 Brits favor fast lanes for busy pedestrian thoroughfares. Close to a third surveyed in a recent study responded that they would approve of some consistent solution to slow-moving foot traffic.

fast lane shopping market

As in similar attempts elsewhere, like NYC’s half-joking painted pavement markings dividing New Yorkers from Tourists, the aim is to provide clear paths for different paces, segregated by speed, cellphone use or other factors, indoors or outside.

This latest variant may only be temporary, but a store spokesperson says it is there by popular demand and if successful the same idea could continue to spread to other private and public spaces.

Share on Facebook


[ By WebUrbanist in Architecture & Cities & Urbanism. ]

[ WebUrbanist | Archives | Galleries | Privacy | TOS ]


WebUrbanist

 
Comments Off on Fast Track: New High-Speed Pedestrian Lanes Live in Liverpool

Posted in Creativity


Big and fast: Hands-on with Zhongyi 135mm F1.4 Speedmaster

24 Oct

Chinese manufacturer Zhongyi optics has announced a new lens, the stupendously large Zhongyi 135mm F1.4 Speedmaster. The company is aiming to make less than 100 units, and expects the lens to appeal to specialized stills photographers and filmmakers. We got up close and personal with a prototype this week at the Photo Plus Expo show in New York. Read more

Articles: Digital Photography Review (dpreview.com)

 
Comments Off on Big and fast: Hands-on with Zhongyi 135mm F1.4 Speedmaster

Posted in Uncategorized


One One-Thousandth of a Second: Shooting Sports and Fast Action

05 Aug

Whether you’re a sports fan or not, if you’re a photographer, you’ll probably find yourself taking photos of some fast-paced competitive action at some point. If you’re used to shooting in a nice, controlled environment, like a studio, or if you’re used to street photography, where your subjects are probably walking at a normal, relatively slow pace, shooting a sporting Continue Reading

The post One One-Thousandth of a Second: Shooting Sports and Fast Action appeared first on Photodoto.


Photodoto

 
Comments Off on One One-Thousandth of a Second: Shooting Sports and Fast Action

Posted in Photography