RSS
 

Posts Tagged ‘Elements’

Adobe announces Photoshop Elements 13 and Premiere Elements 13

24 Sep

Adobe has announced new versions of its basic photo and video editing software, Photoshop Elements 13 and Premiere Elements 13. Photoshop Elements updates include a new Photomerge Compose tool for copying people or objects from one photo into another, and Premiere Elements gets an enhanced Shake Stabilizer mode designed to smooth out shaky video footage. Learn more

Articles: Digital Photography Review (dpreview.com)

 
Comments Off on Adobe announces Photoshop Elements 13 and Premiere Elements 13

Posted in Uncategorized


Crash Course: 24 Elements of Design Animated in 48 Seconds

28 Jul

[ By WebUrbanist in Design & Graphics & Branding. ]

animation design elements video

Arguing that design is more art than science, this stunning short video provides a rapid-fire visual tour of principles all aspiring designers should keep in mind.

Matt Greenwood ties each example into the next, speeding through basics like lines and planes before covering balance, scale, texture, symmetry, then contrasting rules with randomness and much more.

animated example of designers

It might not teach you to be a designer in less than a minute, but it does provide a dazzling introduction to basic concepts, showing and not just telling with useful and compelling (if quick) examples.

animated principles of design

About the creator: Matt is a “freelance art director & motion designer based in Toronto with over 10 years professional experience. Working with After Effects, Photoshop, illustrator and Cinema 4D, [he] create[s] styleframes, storyboards, hand drawn illustration, 3D animation, matte painting and compositing for both broadcast and film work.”

animation example design principles

If you are into speed-learning new things (and have a few more minutes to spare), you may also want to check out this 15-minute Animated History of Western Architecture as well as this short 100-second animation of 26 famous buildings.

Share on Facebook


[ By WebUrbanist in Design & Graphics & Branding. ]

[ WebUrbanist | Archives | Galleries | Privacy | TOS ]


WebUrbanist

 
Comments Off on Crash Course: 24 Elements of Design Animated in 48 Seconds

Posted in Creativity


Create a Cast of Light in Your Image using Photoshop or Elements

06 Feb

Light sources add depth and interest to your images immediately. By simply adding some window light to this image we added depth and warmth. If you have an image that you love, but it’s falling a little flat, consider adding some light! With just a few simple steps you can add beautiful light to your images.

Follow these steps to create a cast of light – works in Photoshop and Elements
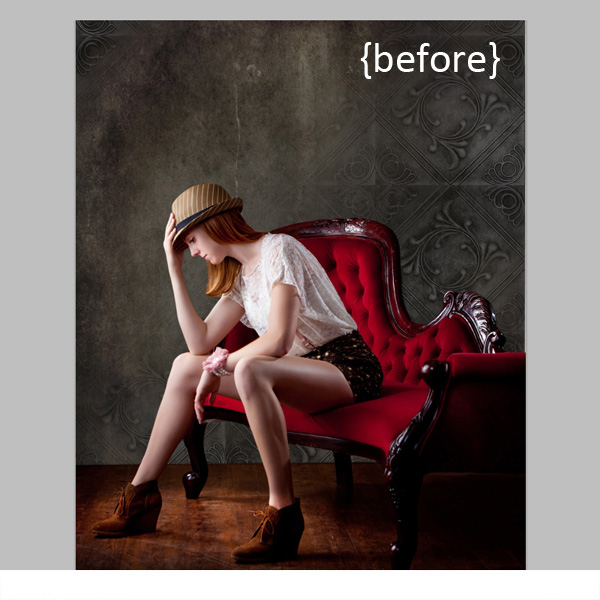
Window Light Cast Before

Window Light Cast After

One thing you’ll want to pay special attention to is pre-existing lighting in your image. Make sure the light source you add works with and compliments your image. You can adjust the angles and direction of your added lights to make them work together so your image is both believable and beautiful.

Let’s get started. Follow these simple steps to make your compositions shine!

Step 1: Start with a light source

This can be an image you’ve taken, something you’ve designed or something you’ve purchased. We are using a light element from our Window Cast Light Set. Choose a light source and shape that you want to bring into your composition.

NOTE: if you want to follow along and try this on one of your images we’re happy to provide our set of Light Casts to you for free. Go here to download them – use the code: FREEBIE when you checkout to get them at no charge.

Step 2: Add the light source to your image

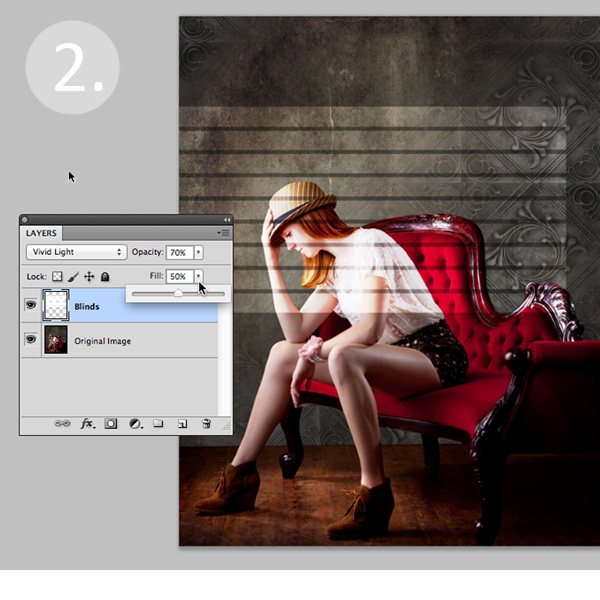
If you have your image and the light source both open in Photoshop, you can use your selection tool to drag the light source to your image. Alternatively, you can also copy (Control + C) the window shape layer in Photoshop (or PSE). Open your image and paste (Control + V) the window shape layer into your image.

In this case, we placed the light source over our image. Next we adjusted our Layer Blending Mode by setting it to “vivid light” and then adjusted our opacity and fill on the light source until we achieved the desired look. You’ll want to play around with these settings to get the right look for your image.
Window Light Cast La ED2363

Step 3: Adjust the shape of your light

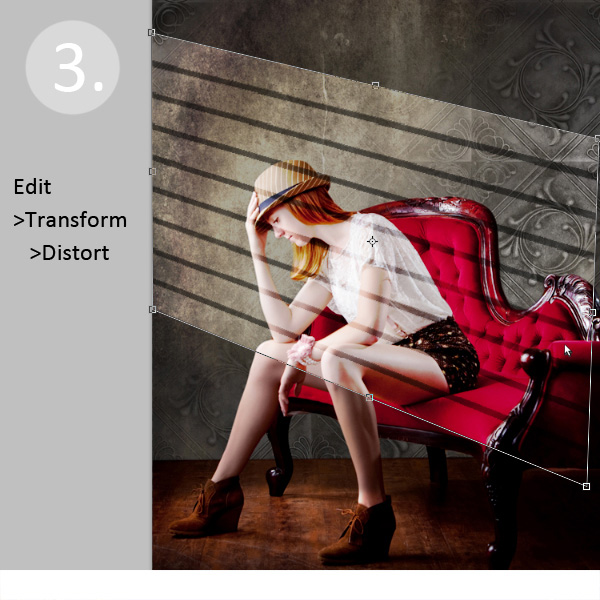
Next, you’ll transform the window shape to your liking. Go to Edit>Transform>Distort and then move the corners to create the
shape that works best with your image.
Window Light Cast Transform

Step 4: Soften your light

Now you want to soften the edges of your light so that it is not so harsh. Use the Gaussian Blur filter (Edit>Blur>Gaussian Blur) to soften the edges to your taste. In this case, we set the blur amount to 5. Adjust the amount of blur up and down to see how it softens the light in your image.
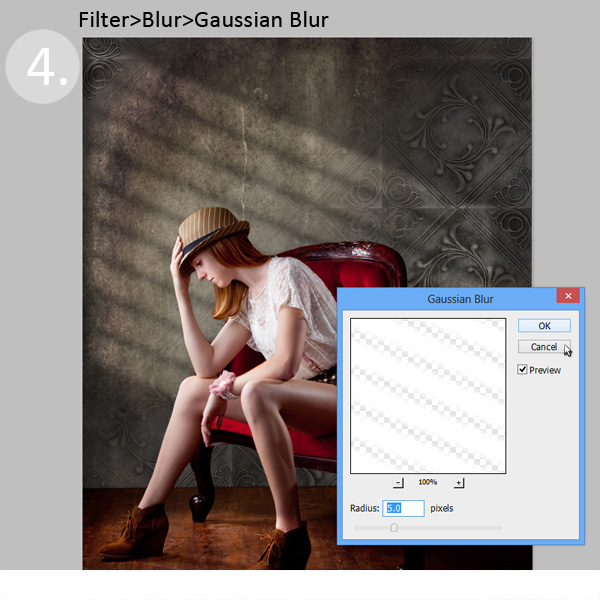
Window Light Cast Blur

Step 5: Fade your light source for a more natural look

Now you’ll add a Layer Mask to your window shape layer. First, select your layer, and then click the Add Layer Mask Button at the bottom of your Layers Palette. Click on the new Layer Mask in the layer to make sure it’s selected. (VERY IMPORTANT STEP!)
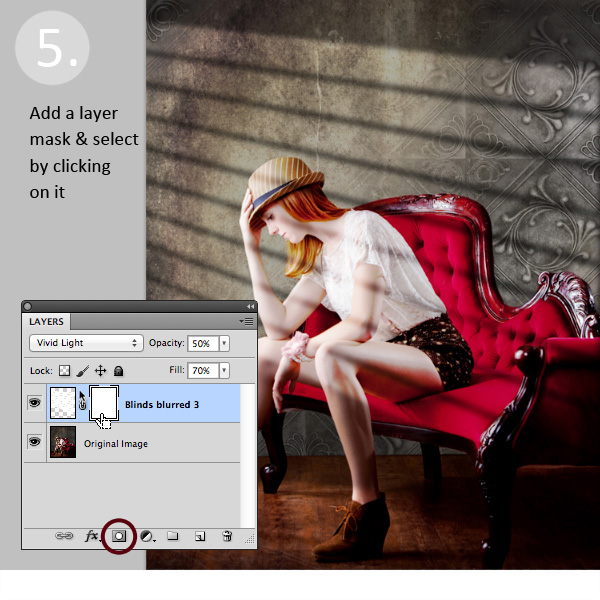
Window Light Cast La ED283A

After adding a layer mask to the light cast layer, set your color palette to black and white, with black in the foreground color. Then use the gradient tool set to “foreground to transparent” to fade the light off.
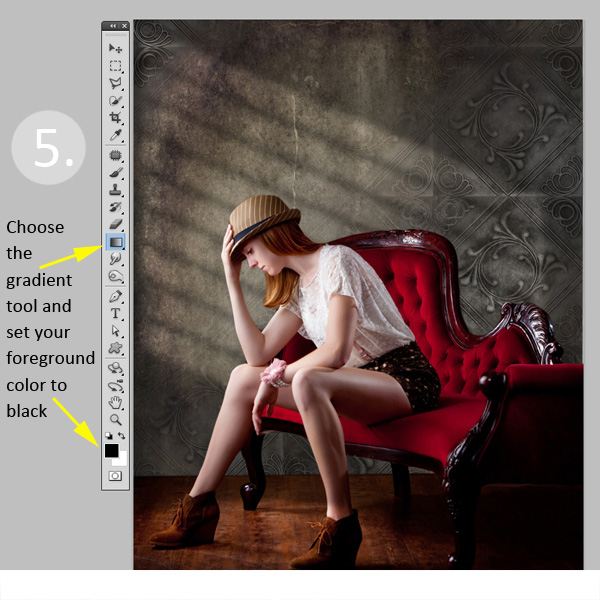
Window Light Cast Gradient

Simply click into your layer mask and drag your cursor from one end (this will be 0% opacity) to where you’d like to see the light at 100% opacity. If you don’t like your results, fill the mask with white and start over.
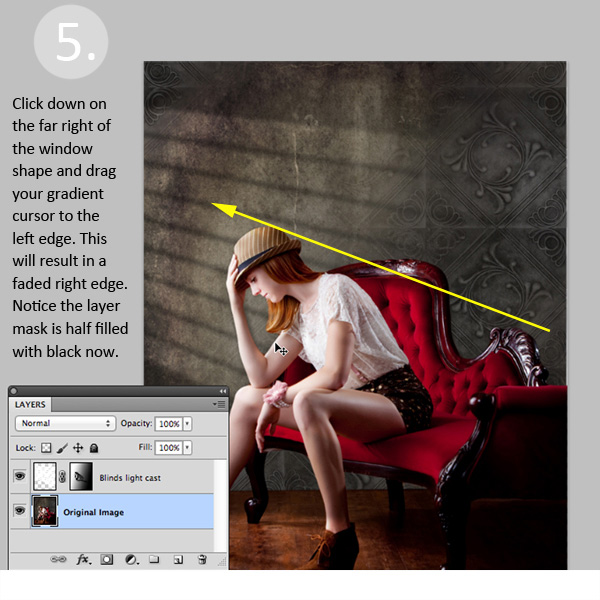
Window Light Cast Gr ED2331

Step 6: Position the window shape to your liking.

Use your Selection Tool to adjust the position of your light layer to the desired location in your image. You can also use a soft black brush set to 30% opacity to subtly brush away the window light in the layer mask. We did this to remove extra light from her face.

Congratulations! You’ve successfully added a beautiful, warm light effect to your image to create more depth and interest in your image.

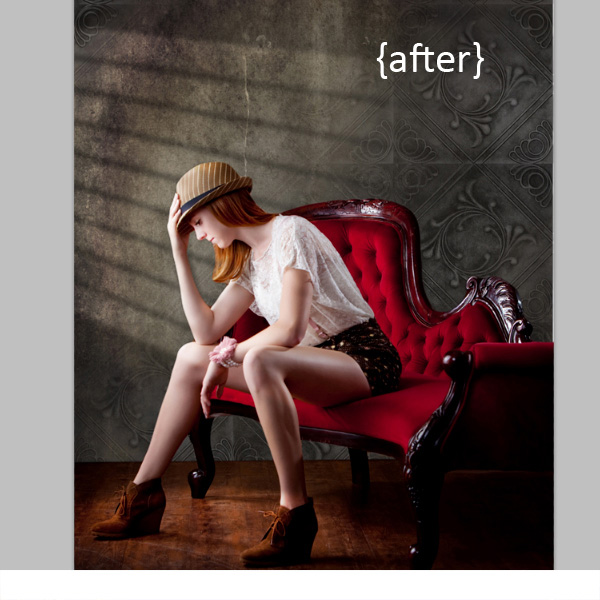
Window Light Cast Before

Window Light Cast After

Your turn!

If you’ve tried out this technique please share your images in the comments below, and please ask if you have questions!

The post Create a Cast of Light in Your Image using Photoshop or Elements by Christina Roth appeared first on Digital Photography School.


Digital Photography School

 
Comments Off on Create a Cast of Light in Your Image using Photoshop or Elements

Posted in Photography


Photoshop Elements 12 adds useful editing tools, without the subscription

25 Sep

PSE12_3in_boxshot_front.png

Adobe has released version 12 of its Photoshop Elements software for Mac and Windows. One of the highlights of the latest version of this consumer-friendly photo editor is ‘Mobile Access’, which uses Adobe’s Revel cloud service to let users view and retouch photos on their mobile devices, keeping everything in sync. Other new features include ‘Content-Aware Move’, guided editors, and 64-bit support for Macs. Best of all, there’s no monthly subscription fee. Read on to learn more about Elements 12, and if it may be a good substitute for its big brother.

News: Digital Photography Review (dpreview.com)

 
Comments Off on Photoshop Elements 12 adds useful editing tools, without the subscription

Posted in Uncategorized


MetaRaw plugin offers Photoshop and Elements users broader Raw support

18 Jun

metaraw.png

The Plugin Site has created the MetaRaw plugin for Photoshop and Photoshop Elements that allows the conversion of Raw files not supported by the associated version of Adobe Camera Raw. The MetaRaw plugin offers access to three Raw conversion methods – ACR, DNG Converter or its own, dcraw-based converter. It also allows Elements 10 and 11 users to access ACR’s lens correction and chromatic aberration tools.

News: Digital Photography Review (dpreview.com)

 
Comments Off on MetaRaw plugin offers Photoshop and Elements users broader Raw support

Posted in Uncategorized


Elemental Elegance: 14 Amazing Photographs of Elements

16 Mar

[ By Delana in Gadgets & Geekery & Technology. ]

elemental photography

We all learned about the periodic table of elements in high school, but for most of us that’s where our knowledge of the elements ends. Japanese chemist and photographer R. Tanaka is showing the world just how beautiful the elements are with his fascinating set of elemental photographs.

elemental scientific photography

photographs of elements

The extreme close-ups of the elements show a seldom-seen world full of incredible shapes and unexpected colors. The crystalline structure of certain elements resembles trees, leaves, and other parts of the natural world at large.

gorgeous elemental photography

scientific photographs of elements

Other elements resemble alien shapes or objects from a long-lost civilization. From sulfur to phosphorus to colorful bismuth, the elements are all amazingly detailed and surprisingly photogenic. These are the building blocks of our world, and they are far more complex and lovely than most of us realize.

scientific elemental photography

Taken together, the series seems like a catalog of the most beautiful parts of our natural world. The gorgeous organic shapes are like the most intricate sculptures ever, captured in photographs to showcase their most delicate and ethereal qualities.

Share on Facebook


[ By Delana in Gadgets & Geekery & Technology. ]

[ WebUrbanist | Archives | Galleries | Privacy | TOS ]


WebUrbanist

 
Comments Off on Elemental Elegance: 14 Amazing Photographs of Elements

Posted in Creativity


DxO Labs FilmPack 3.2.3 now compatible with Photoshop Elements 11

24 Jan

logo.png

DxO Labs has updated its FilmPack film simulation software to v3.2.3, adding Windows 8 support and Adobe Photoshop Elements 11 compatibility. Both Mac and PC versions are available, with a free 30-day trail downloadable from the company’s website. The company has also announced v1.1.1 of its ViewPoint distortion correction software that fixes minor bugs.

News: Digital Photography Review (dpreview.com)

 
Comments Off on DxO Labs FilmPack 3.2.3 now compatible with Photoshop Elements 11

Posted in Uncategorized


7 Elements of Photography We Can Learn From The Hobbit

01 Jan

THE-HOBBIT-AN-UNEXPECTED-JOURNEY-a-560x241.jpg

1. Dramatic Lighting

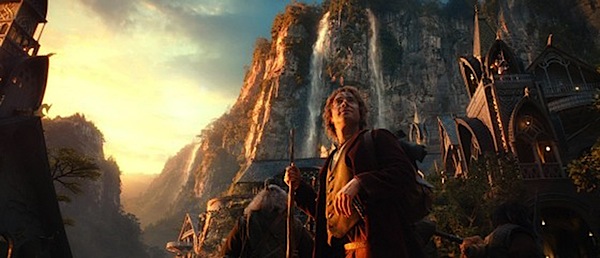
You will notice that in the majority of good portraiture, dramatic lighting is often a key element. It’s not too often you’ll find ‘flat’ lighting in a great picture (not to say it can’t be done however). It will either result in the lighting that appears directly on the person or dramatic lighting between the subject and the foreground or background. For example, in the images of Bilbo and Thorin Oakenshield, there is dramatic, directional lighting on their faces. There are many ways that dramatic lighting can manifest itself or be achieved.

2. Deep Blacks and Good Highlights

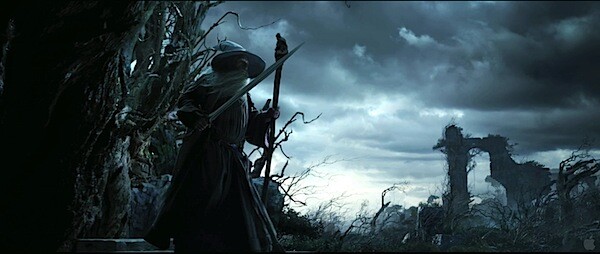
You may also notice in images created by someone who knows how to process their images, they’ll have excellent tonal range. The images from The Hobbit capitalize on this. Proper images have some deep blacks and some highlights as well. This is also another way to avoid having your image appear ‘flat.’ It doesn’t necessarily have to be a great deal of each, just so long as you’re touching on both ends of the spectrum. Some photographers like to use filters or they have a style of slightly muting everything which minimizes tonal range. This is fine. There are times when the photographer can make a decision not to have a high contrast image. They still produce a great image, however this style is to be intentional and purposeful.

11glamdring.jpg

3. Interesting Foregrounds and Backgrounds

Another element that can really enhance an image is including interesting foregrounds or backgrounds. These are two things that always need to be considered one way or the other. It’s very easy, especially if you’re new to photography, to forget about these and end up with distracting backgrounds or foregrounds. However, do not simply avoid them; they are useful tools to achieve a stronger image. Look at every example image from the movie. Don’t the backgrounds give interest, setting, and help tell a story? That’s what we’re wanting.

4. Find Unique Angles

Don’t be afraid to try new angles. It’s easy to get stuck in a rut of taking pictures from the same angle or height. Try spicing it up some; you may be shocked. Get high. Get low. Back away. Get close. This can add some variety to your shots and help you find a real keeper.

5. Be Color Smart

Be very aware of how your colors and image temperatures are telling a story. Are your colors too bright and vibrant or too muted? How does this affect the mood? Is the image temperature cold and moody or warm and cheerful? These are things that can be fined-tuned to help narrate your image. If you’re wanting a dramatic image like Gandalf’s photo, then a warm temperature would not be desired. Chances are you could put more thought into these details to improve your images. So often we take the picture concerned only with composition, lighting direction, and subject when the color can be considered more thoroughly.

The_Hobbit__An_Unexpected_Journey_70.jpg

6. Mind the Sky

If shooting outdoors, instead of allowing the sky to be a blown-out nuisance, view it as a resource, and use it to your advantage. Now, this may not always be possible due to equipment, desired effect, or setting. But there are ways that you can properly capture the clouds or the blue of the sky. You could either expose for the sky and light the subject with additional lighting, use HDR, or find a proper exposure with natural light that works for both your subject and the sky. But don’t always avoid the sky; learn to tame it. Notice the drama it adds to Gandalf and Bilbo’s images.

7. Don’t Use Shallow Depth of Field Every Time

Using a very large aperture and creating a shallow depth of field can be a great affect for portraiture and many other types of photography. This doesn’t mean, however, that it is the only effective use of DOF. Use a large DOF every so often, especially if your background could amplify the effect of the image. Make the image sharp throughout the entire image. Play around with both and learn in what situations it works best.

David Wahlman is a wedding and portrait photographer from Redding, CA. He works all around California and is aiming to get into destination photography. You can see his best work at www.wahlmanphotography.com and follow his updates on his facebook page.

Post originally from: Digital Photography Tips.

Check out our more Photography Tips at Photography Tips for Beginners, Portrait Photography Tips and Wedding Photography Tips.

7 Elements of Photography We Can Learn From The Hobbit


Digital Photography School

 
Comments Off on 7 Elements of Photography We Can Learn From The Hobbit

Posted in Photography


Photoshop Elements 7 on Ubuntu GNU/Linux 9.04 x64

11 Dec

I’m a GIMP user. Period. Couple of days ago I’ve got Nikon D60 dslr camera (you can find unboxing clip in my videos) and UFRaw and GIMP could not do what I wanted them to. Instead of using Google to solve this issue, I tried Adobe Photoshop Elements 7 and it worked! Bad news is that I did not manage to do the same with Nikon Capture NX2, which fails to start after installation. Good news is, that even if you do not want to change Photoshop (Elements) you are currently using for (let us say) GIMP, you can still have dedicated photo processing machine which runs Ubuntu 🙂 Since I never used Elements before, I was little bit lost at first as you can see in the video. I had some expirience with older Photoshop versions, so I’ve managed to find my way around in the end. After some thinking about video size and youtube restrictions I’ve decided to record only RAW importing, a little bit of most basic postprocessing, resizing for web and of course, exporting to JPEG file. Remember that I am no professional photographer or Photoshop user in any way, so this was just a demonstration of how well Adobe Photoshop Elements can work under GNU/Linux operating system, NOT a tutorial for photo editing of any kind! Person depicted on a photograph is my neighbor. Photo is taken with his permission, and some version of it can be found on my Flickr account. Do not use it in any way, all rights are reserved. PSE7 trial version for Windows was downloaded from Softpedia. Ubuntu version is 9.04

 
Comments Off on Photoshop Elements 7 on Ubuntu GNU/Linux 9.04 x64

Posted in Nikon Videos


Correcting Perspective in Photoshop and Photoshop Elements

18 Nov

Photoshop perspective correction opener

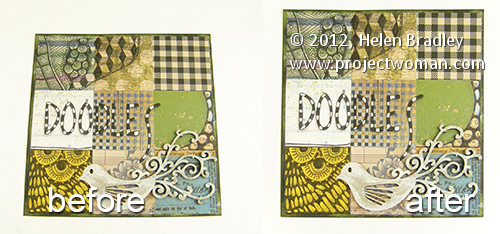
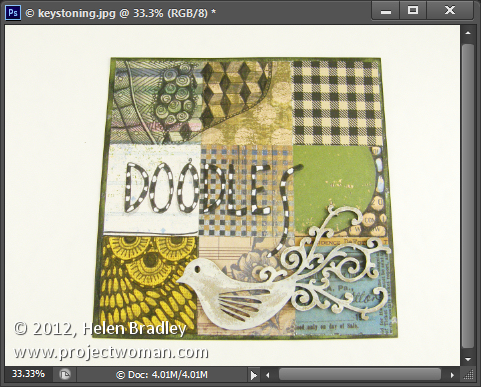
Sometimes you’ll capture an image that should be rectangular but is anything but. In this example I shot an image of a 6 x 6 inch sheet of paper for a project. The aim at the time was to have a reference image before the project was shipped.

Photoshop perspective correction step1

Later I found I need to do more with the image and because it had been shot so casually the proportions were all wrong and the image does not look like a square sheet of paper. I also no longer have the project so reshooting is out of the question.

Luckily Photoshop and Photoshop Elements both share a similar tool for adjusting perspective which will go a long way towards fixing an image like this.

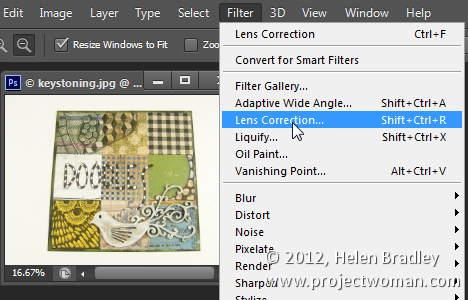
To do this choose Filter > Lens Correction in Photoshop and then click the Custom tab to access the custom tools. In Photoshop Elements choose Filter > Correct Camera Distortion.

Photoshop perspective correction step2

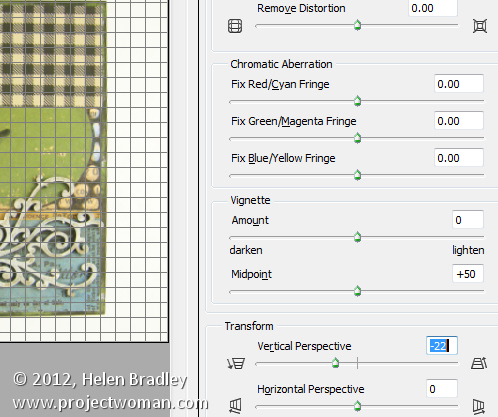
Make sure the Show Grid option is checked and you may want to adjust the grid size so it is useful for determining the straightness of the edges in the image.

The Vertical Perspective adjustment will fix this image’s perspective problems so drag it to the left to increase the width at the top of the image to adjust for the incorrect perspective.

Photoshop perspective correction step3

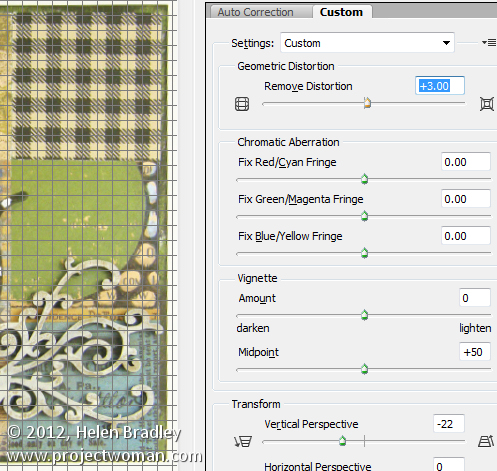
When you do this you may notice that the image has some geometric distortion. In this case it’s barrel distortion and the edges of the subject are billowed out.

To remove this adjust the Remove Distortion slider to counteract the distortion. It won’t be possible to get it perfect but it will be possible to reduce it to acceptable levels.

Photoshop perspective correction step4

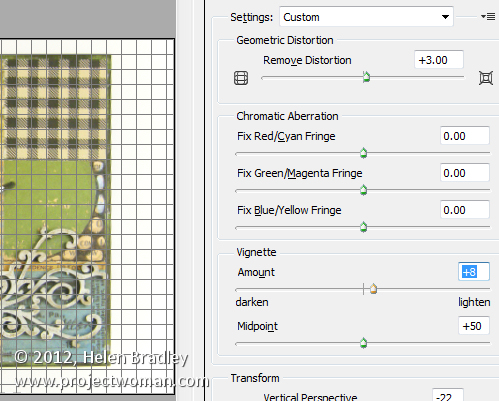
In this same dialog you may occasionally want to adjust the Vignetting slider if your lens causes dark vignettes in the corners of the image. In most cases you will drag to the right to slightly lighten the edges of the image.

Photoshop perspective correction step5

Once you’re done click Ok to return to Photoshop.

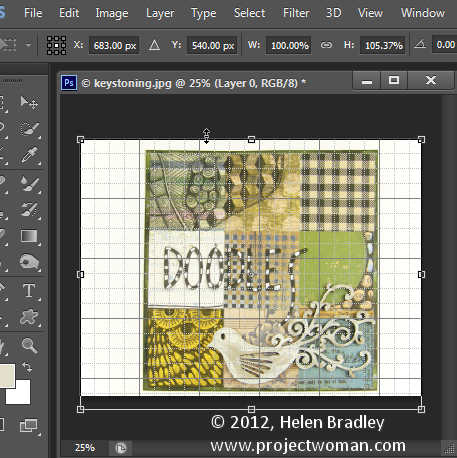
The only problem that cannot be fixed in the lens correction filter is the one that would stretch the image so the subject looks closer to its original proportions which are of a 6 x 6 inch page.

For this you’ll need to click the Move tool and drag up or down on the image to stretch it.

If you need to stretch the image beyond the current image canvas dimensions, do so and confirm the change. Then choose Image > Reveal All to reveal the area of the image off the side of the canvas. While the final image isn’t perfect it looks a lot better than the original.

Photoshop perspective correction step6

This same tool can be used to adjust perspective on buildings which show a keystoning effect where the building appears to be narrower at the top than at its base.

Post originally from: Digital Photography Tips.

Check out our more Photography Tips at Photography Tips for Beginners, Portrait Photography Tips and Wedding Photography Tips.

Correcting Perspective in Photoshop and Photoshop Elements


Digital Photography School

 
Comments Off on Correcting Perspective in Photoshop and Photoshop Elements

Posted in Photography