RSS
 

Posts Tagged ‘Elements’

How to Use Scene Elements to Create Impactful Panoramas

13 May

The post How to Use Scene Elements to Create Impactful Panoramas appeared first on Digital Photography School. It was authored by Ian Johnson.

Close your eyes and let me take you to a scene that you have experienced before. You are standing in front of a wonderful vista. It is huge – a sunset, a mountain range, a canyon, a cityscape – and you are blown away by the grandeur of it. After admiring it for a bit you pull out your cell phone or camera to take an image. But alas, your phone cannot capture the image because it extends far out of your field of view. “Not to worry,” you think to yourself as you flip your device into panorama mode to create impactful panoramas.

A few seconds later and your newly stitched image captures the whole scene with one problem: all the things you loved about the scene have been reduced to tiny pixels making it hard to appreciate how beautiful it was out there. In my opinion, you’ve fallen victim to the “panorama trap.”

Paradoxically, wider is not always better for capturing a large vista!

Panorama, How-to, Foreground, Photography, Lessons, Northern Lights, Mountains, Cannery

This panoramic image illustrates the “Panorama Trap.” I wanted to photograph the mountains, but there is nothing compelling to draw me into the image or tell the story of that place (it happens to be the Denali Highway).

You can up your panorama photography game by carefully thinking about elements of the shot before making it. For instance, integrating close foreground elements using hyperfocal distance or switching to a longer lens can give you a more interesting shot. We’ll go through that and more in this article!

Why panoramas?

In order to capture a more interesting shot, it is useful to think about why you are using a particular technique. For instance, you might think of black and white photography for shadows and contrast, macro techniques for tiny things (although that’s a rule to be broken), and side-lighting for portrait photography. Each of these techniques or photography genres is meant to maximize the benefit and impact of the elements in the image.

So, why panoramic? Because you want to maximize and impress the viewer with grand-scale elements in the image which you cannot capture in one image alone. Using the mantra of “making a shot” and not “taking a shot” is good to keep in mind for panoramas. To make a more compelling panorama, envision what you want to accomplish and how you want the image to feel or influence your viewer before pressing the shutter button.

Panorama, How-to, Foreground, Photography, Lessons, Northern Lights, Mountains, Cannery

Some scenes are just too big for one image! This snow-covered landscape caught my attention during an afternoon of skiing. I like the framing of the trees on the left, but to my eye, this image still gets caught firmly in the panorama trap because it lacks compelling elements in the foreground.

Techniques

Integrate Close Foreground Elements using Hyperfocal Distance

Foreground elements are critical pieces to incorporate into your image to grab the viewer. Foreground elements help tell a story, give the image context, and make it more interesting to look at. Since many panoramas get taken with a mid-length (e.g., 50 mm) to ultra-wide lenses (e.g., 12mm), you must walk close enough to foreground elements to give them a presence in the image.  You can maximize the impact of a foreground element by using a photography technique called hyperfocal distance.

Panorama, How-to, Foreground, Photography, Lessons, Northern Lights, Mountains, Cannery

This image was made during a recent trip to Hawaii and shot on a Nikon D810 with a 24mm Sigma Art f/1.4. The Mamane Tree in the foreground was a compelling silhouette.  I am only about 10 feet from it, but HFD enabled me to keep the foreground and Milky Way sharp.

Hyperfocal distance (HFD) is not a “hyper-difficult” subject. By definition, it is the closest thing your lens can focus on while keeping the horizon at infinity. HFD is influenced by your lens focal length, by your camera’s sensor size, and by your aperture. As a rule of thumb, wider lenses have a shorter HFD than longer lenses, and the larger your sensor is, the shorter the HFD is. Creating a smaller aperture (e.g., f/16 instead of f/2.8) will also decrease the HFD.

Depending on your system and camera settings you may be able to have foreground elements 2.0 feet (0.6m) away and have all elements beyond that in focus! There are many resources to learn HFD from and to calculate it for your camera system. I recommend starting with this article to learn more. As you use HFD more, you will begin to have an intuitive sense of how far objects have to be from your camera to be in focus.

Panorama, How-to, Foreground, Photography, Lessons, Northern Lights, Mountains, Cannery

This image incorporates HFD to frame the image. The closest spruce is about 8 feet in front of me. I made the image with a Nikon D810 and a 12mm, ultra-wide lens

Hopefully, you have made the connection of why HFD will help you integrate interesting foreground elements into your panoramic image. Here’s how you can achieve intriguing panoramas in three generic steps:

  1. find a compelling scene,
  2. locate an interesting foreground element, and
  3. walk to the HFD in front of the foreground element and begin shooting.

I recommend stopping your lens down to f/8, so it is at its sharpest and shooting with a panning tripod head to keep your horizon straight and level. It will make the stitch and final image cleaner. However, don’t be overwhelmed – these techniques take time and patience.

Panorama, How-to, Foreground, Photography, Lessons, Northern Lights, Mountains, Cannery

This image was made on an Olympus OMD Em5 with a 12mm lens adapted with a Metabones speed booster. The foreground silhouette tree was about 8 feet away. I got as close as HFD would allow to make it impactful in the image.


Panorama, How-to, Foreground, Photography, Lessons, Northern Lights, Mountains, Cannery

This image is not utilizing HFD, but I had to consciously know how close to stand to these spruces to give them impact in the image. I intentionally balanced their silhouette against the glow of the Northern Lights.

Now that you have learned briefly about HFD, I’m going to tell you to keep in mind that rules are made to be broken! The foreground of your image may be far more important to the telling of that story than the horizon. Having an in-focus foreground element and out-of-focus background is okay too.

The image below has many compelling elements. However, my goal was to bring you into the winter scene by ensuring the hoar-frost-covered Black Spruce in the foreground was tack-sharp.

Panorama, How-to, Foreground, Photography, Lessons, Northern Lights, Mountains, Cannery

Rules are made to be broken! In this image, I knew my background and stars were going to be out of focus. That did not matter to me because they were only accents to the foreground trees and their beauty.

Use long lenses to bring the scene to you

You may be thinking to yourself “I can’t always get closer to my subject, so what then?” Not to worry – you can make compelling panoramic images by using long lenses to bring the landscape closer to you. When using a long lens of 150mm or more, it is critical that you use a tripod with a panning head. Use a cable release to remove shake in the lens and shoot at a large aperture (e.g., f/20) to get sharp elements.

Panorama, How-to, Foreground, Photography, Lessons, Northern Lights, Mountains, Cannery

This image of Denali was made with an Olympus OMD Em5ii at 100mm. I isolated the mountain and its foothills to create a panorama full of layers, colors, and textures.

You can use a telephoto lens to isolate and photograph your favorite part of a scene. Above, I used one to isolate Denali, and below, I used it to isolate a cannery against the large mountains of the Juneau Range.

The steps for making a panoramic image with a telephoto lens are similar to using HFD. You need to:

  1. Identify a scene,
  2.  identify which part of the scene to isolate with the telephoto, and
  3. shoot the scene with the telephoto and cable release.
Panorama, How-to, Foreground, Photography, Lessons, Northern Lights, Mountains, Cannery

I made this image from a boat and shot it at 330mm to isolate the cannery. The effect of “compression” from the telephoto lens made the mountains feel very close to the cannery. In reality, they are over 18 miles (350km) away!

Practice makes perfect

Experimenting with HFD and long lenses is going to result in some images that you “could have done better on.” Expect to learn from your mistakes!

I’ll share an image that illustrates when my HFD distance estimating was off. I did not achieve a sharp foreground and background. However, I like how the sharp part of the image draws your eyes through the snow-covered trees. So, this image is not a total flop.

As I always say, “pixels are cheap.”

I hope you make tons of pixels while experimenting with panoramic images!

Panorama, How-to, Foreground, Photography, Lessons, Northern Lights, Mountains, Cannery

Even images that are not perfect can have qualities you like! The air glow on this night was spectacular and I like how the distant spruces are in focus drawing your eye through the tunnel of snow-covered trees.

The post How to Use Scene Elements to Create Impactful Panoramas appeared first on Digital Photography School. It was authored by Ian Johnson.


Digital Photography School

 
Comments Off on How to Use Scene Elements to Create Impactful Panoramas

Posted in Photography


How to Break the World Down into Elements to Create Better Photos

12 Sep

sunset photo - How to Break the World Down into Elements to Create Better Photos

I have a really cool idea for you. One that is so simple, and yet so amazingly impactful, that if you start utilizing this concept now you will immediately see the benefits in your photography and you will create better photos.

I come across some very common issues in my workshops. One huge problem is that the photos people take are often too busy. The subject doesn’t stand out and there isn’t a clear relationship between the subject and the elements around it.

Or, in reverse, the photos are so focused on the subject, that nothing else is in the frame, so the photo ends up being relatively flat.

How to Break the World Down into Elements to Create Better Photos - forest stream and mossy rocks

Everything within your frame is an element: the expanse and color of the sky, the child playing in the background, the rush of cars behind your subject, etc.

Each element that is within your frame must have a function, a purpose and must contribute to the overall image. If it doesn’t, it shouldn’t be there.

Your job as a photographer is to break down the scene you want to photograph into its elements. Then arrange the elements into an interesting and complementary combination.

rolling hills Tuscany - How to Break the World Down into Elements to Create Better Photos

Nature photography by a street photographer

For this article, I have used photos from a project I did in Tuscany. For seven weeks, I stayed in a castle over the winter with my family and a bunch of other traveling families. I spent my time wandering in the quiet hills, photographing. It is an intensely beautiful place.

I am using these photos as examples because I am not a nature photographer. I usually photograph cities, often at dawn, when the light is beautiful and the streets are empty.

So I wanted to show you how I approached a subject I love, but am not super experienced at shooting, and how by using this technique I got some pretty awesome photos.

cemetery in Tuscany - How to Break the World Down into Elements to Create Better Photos

I like to always be developing as a photographer, to push myself beyond what I am already doing. So being out in the silent forests and undulating hills of Tuscany on a winter’s morning was incredibly inspiring.

Nature can be notoriously tricky to photograph. Wandering out into a forest with thousands of trees and millions of other elements that all look the same or similar, can be a case of where do I start?

You are not just waiting for the perfect moment to happen and then to photograph it. You are creating the photograph with the elements around you.

castle silhouette - How to Break the World Down into Elements to Create Better Photos

I am going to use examples of how I approached organizing the elements in the world around me into compelling photos. So let’s get started!

Shapes and Lines

The first example is the photograph below, made almost totally of interesting shapes and lines. Can you see them? These lines and shapes were the elements I used to create the image.

One day, I was walking along this path and the first thing that piqued my interest was the lines that the path created.

rural path and stone wall - How to Break the World Down into Elements to Create Better Photos

They are really strong, so I started to play around with them. From further away the lines were pretty straight and not very interesting, just heading off into the distance. However, as I started to get closer to the curve of the path, the lines of the path started to turn. Then the fence started to come into play and echo the twist of the path. I thought that was interesting.

Now another element I worked into the shot (and I took a lot of shots of the path, going from left to right, and moving further away) was the wall. What a cool wall! The relationship between the chaotic, curved fence, the smooth curve of the path, the strong lines of color, worked really well with the element of the heavy stone wall made up of oblong or square shapes.

So, from an elements perspective, this photo is almost entirely made up of lines and shapes, placed together to form an interesting composition.

My final flourish (and I like to do this in my images because I don’t always want the photo to be too clean) is waiting for the rise of mist. This creates a pleasing contrast to the organized shapes, a little bit of nature and wildness.

Silhouettes

How to Break the World Down into Elements to Create Better Photos - trees in silhouette

Onto my next image. What do you think are the strong elements in this photo above?

Most obvious are the silhouettes of the trees. I was very inspired by the beauty of the sky. The soft pinks and blues, the sun and the little stretch of clouds. But photos of skies, of really simple things, can be pretty boring. So I was trying to move beyond just pretty.

What I love about photographing silhouettes of bare trees is how they add such strong and intriguing shapes to photos. The branches can look wild and chaotic, but they are also contained and ordered by their structure.

I could have taken the photo of the trees against the sky as it was – two very strong elements of sky and trees. But I wanted to add a more grounding element, something that didn’t really look like an important element, but somehow brought it all together.

For that, I have used the view of the forest running along the bottom of the image. And of course, the brilliant sunburst is important.

Detail

How to Break the World Down into Elements to Create Better Photos - signs in the forest

In the photo above is a detail shot, where I honed in on an interesting, simple element. Detail shots are a gift in nature photography, as there is so much you can focus on up close.

But I didn’t want it to be too simple, I didn’t want to just have the sign as to me it wasn’t that interesting. So I used a shallow depth of field to create an attractive, out of focus background of color and indistinct shapes.

I think that this adds a nice bit of depth to the photo. Plus, I have a couple of pine cones sticking out in the front. Again this helps my image from being too clean and organized, but reflect a bit of that wild nature feeling.

Build with the Elements

How to Break the World Down into Elements to Create Better Photos

The photo above is an excellent way to illustrate this idea of building your photo with the elements around you. I saw the tree and I liked the shape of it. But to photograph a tree against a pretty flat blue sky – with not even any interesting cloud formations behind it – would have made a dull photo.

I looked around to see what else I could bring into the shot to make it a more appealing scene. What other element was in my surroundings that could be used to add depth and complexity to the image?

I saw a bush with small, pretty little leaves, and decided that this would make a nice framing element for the tree. Using a shallow depth of field ensured the bush was an interesting frame, but not in focus, and thereby it created a feeling of depth to the image.

road in the trees - How to Break the World Down into Elements to Create Better PhotosA road to…

Put it all together

The key is – you don’t just go shooting. When you find something interesting that you want to shoot, don’t just raise the camera and snap. No! You need to stop and look around.

What elements are jumping out at you? What shapes are being made by the light? Look at the different parts of the scene. Ask yourself – what happens to these shapes when I move over here?

Pause, look around, organize your position, and then start shooting.

Now – look at the photo below and tell me what is the subject, and what are the supporting elements?

house in a field - How to Break the World Down into Elements to Create Better Photos

If you picked the houses as the subject, you guessed correctly! Can you tell me what the next most significant element is?

Of course, it’s the mist! I’ll tell you why. If the mist wasn’t covering much of the rest of the photo, the landscape would be in equal focus and therefore very confusing to the eye. The house would just blend into the landscape and it would be a flat, undynamic shot.

So part of understanding about elements is knowing when to shoot, where to shoot and how to shoot your subject.

How to Break the World Down into Elements to Create Better Photos

So there you go! Those were my ideas on how to break the world down into elements. I would love to know what you think. Was it useful?

Please let me know in the comments below what you think.

The post How to Break the World Down into Elements to Create Better Photos appeared first on Digital Photography School.


Digital Photography School

 
Comments Off on How to Break the World Down into Elements to Create Better Photos

Posted in Photography


Video: How Nikon tests its D850 DSLR against the elements

16 Aug

If you’re sensitive to gore, you might want to turn your head. Nikon Asia has published a video on its YouTube channel that dives into the brutal depths the company goes to in order to test the ruggedness of its DSLR cameras — specifically the Nikon D850.

In the two-minute video, Nikon ambassadors and workers detail the amount of thought, research and methods that go into practically testing how its cameras will handle tough environments. Although there are plenty of automated tests going on, this particular video, titled ‘True Reliability’ takes a look at the more hands-on testing.

Specifically, the video shows how Nikon tests its cameras in dusty conditions, wet environments and extreme temperatures, all well beyond what you could reasonably expect from even the most challenging shoots. There’s even a few drop tests in there for good measure.

It’s not as long or in-depth a look as we would like, but it goes to show how few stones are left unturned when checking for resiliency in Nikon cameras.

Articles: Digital Photography Review (dpreview.com)

 
Comments Off on Video: How Nikon tests its D850 DSLR against the elements

Posted in Uncategorized


3 Elements of Getting Shallow Depth of Field Images

01 Jun

Depth of field is one of the things that beginners often struggle with understanding. So I found a couple of videos on YouTube to help you out.

Depth of Field Basics

In this first video from B&H Photo, Kelly Mena explains the three elements that affect depth of field and how they work. The three elements are:

  1. The aperture
  2. Focal length of your lens
  3. The subject to camera distance

Okay, that explains things really well. Let’s look at another video example showing the same three elements.

Depth of Field the Easy Way

Next up, is this video by photographer Ray Scott. He gives some great image examples showing both ends of the spectrum from shallow to wide depth of field and how to combine the three elements to best control your background and foreground focus.

If you have had trouble understanding how to get a shallow depth of field, I hope this has helped you get a better handle on it.

The post 3 Elements of Getting Shallow Depth of Field Images appeared first on Digital Photography School.


Digital Photography School

 
Comments Off on 3 Elements of Getting Shallow Depth of Field Images

Posted in Photography


Adobe unveils Photoshop Elements 2018: Can open closed eyes, find your best photos and more

04 Oct

A before and after of Photoshop Elements’ new Open Closed Eyes featured at work.

While the professional photography market waits with bated breath to see what Adobe has in store for us at AdobeMAX, the company behind Lightroom and Photoshop unveiled something that appeals to a bit broader of an audience today: Photoshop Elements 2018 and Premiere Elements 2018.

The new, user-friendly versions of Adobe’s photo and video editors come with some really creative and easy-to-use features that the company says are aimed at “memory keepers.” The idea was to create two programs that make finding, enhancing and sharing the precious memories hidden away inside random memory cards, hard drives and (most likely) smartphones almost totally automatic.

Photoshop Elements 2018

Photoshop Elements 2018 tackles the same problem that everyone—Google’s Photos App, Apple Photos, etc.—is trying to tackle: how do you help the typical shutterbug find their best images out of the thousands they take every week on their smartphone, and enhance those images so they look ‘professional’ and worth sharing on social media?

As with everybody else, Adobe is leaning heavily on machine learning and computer vision (different types of ‘AI’) for this trick.

It starts with an easy-to-use Organizer view and something called Auto Curation, which uses computer vision and some nifty algorithms to guess (because it can’t REALLY know, can it?) which of your images are the best. So if you have a group of 200 images, you can ask Photoshop Elements to cull those down automatically to just 15.

Once you’ve selected your shots, you can use the program’s new Guided Edits and a new feature called Automatic Selection to do things like drop in a new background, create a double exposure effect using two of your images, or add ‘artistic’ overlays.

The coolest feature, though, has to be Open Closed Eyes, which allows you to select two frames, and replace the closed eyes in one with the open eyes from another. The results are incredibly lifelike given that whole thing can be done in a matter of seconds.

Premiere Elements 2018

Like Photoshop Elements, Premiere Elements 2018 also leans heavily on AI-powered features to make video editing as automatic and pain-free as possible.

Smart Trim does for videos what Auto Curate does for photos, namely: it asks you what ‘style’ of video you want to create, tries to intelligently find the best clips that match this style, and tosses out the rest to create a coherent clip.

Another interesting addition is a feature called Candid Moments, which tries to find the best candid ‘photo’ hidden within a video clip and pull it out for you. With new smartphones like the iPhone 8 Plus shooting gorgeous 4K 60p, we could see this feature being a huge hit with those ‘memory keepers’ Adobe is all trying to target.

Admittedly, neither Photoshop Elements 2018 nor Premiere Elements 2018 are really targetted at more professional photographers out there (read: many of the people who enjoy reading DPReview). But as these beginner-focused programs get more and more powerful, amateur photographers who are allergic to the subscription model and don’t like to do much post-processing anyhow might actually enjoy using Photoshop and Premiere Elements 2018.

Of course, that’s not to say we won’t be keeping a very close eye on AdobeMAX this year.

To learn more about Photoshop Elements 2018 and Premiere Elements 2018, head over to the Adobe blog by clicking here, or visit their dedicated landing pages by clicking on the program names above. Both programs are available now for $ 100 new or $ 80 as an upgrade. You can also buy them together for $ 150 new or upgrade both programs at once for $ 120.

Articles: Digital Photography Review (dpreview.com)

 
Comments Off on Adobe unveils Photoshop Elements 2018: Can open closed eyes, find your best photos and more

Posted in Uncategorized


4 Key Elements to Help You Create Stronger Landscape Photography

08 Aug

If you’re like me and love great landscape photography, then you’ve probably wondered how the same photographers seem to be able to pull off beautiful shots of sweeping mountain vistas or incredible black and white images of rolling hills and valleys. It’s as if they have some secret formula for “getting lucky” time and time again. Have you ever thought about what goes into making a strong landscape photograph? The techniques, the composition, the timing, the tools?

4 Key Elements to Help You Create Stronger Landscape Photography

The fact is, there is no secret formula for making better photos of landscapes. There’s almost always much more that goes into the task than simply snapping a picture of a pretty place. Most great landscape photos are made in beautiful places but that doesn’t mean that every picture of beautiful scenery is a great landscape. While there are no concrete “rules” for doing solid landscape photography there are a few ways to strengthen your landscape work and make those “awesome shots” happen more frequently.

#1 – Construct Interesting Elements

I once had a professor of photography tell me that any photograph could be judged by how much information it contained. It’s easy to say that a successful landscape photo shows the beauty and majesty of a place, but the truth is there is so much more. When setting up for your photo, pay attention to everything that falls within the frame. Look for interesting foreground elements such as trees or rocks, water, even people or animals.

4 Key Elements to Help You Create Stronger Landscape Photography

Look for ways to add more information to the photograph. Generally, the more you fill the frame with interesting elements the more interesting and appealing the overall photograph will be. But there is also a flip side to this concept as sometimes less is more. There are times when you must know what to NOT include in order to give a better feel to the photo. Look at this photo from a blustery winter morning.

4 Key Elements to Help You Create Stronger Landscape Photography

The feelings of solitude and isolation are brought about by the use of empty space. More on composing your landscape photos a little later.

#2 – Lighting

Yes, yes…I’m sure you’ve heard the phrase “chasing the light” when it comes to making good photos. This is especially true when it comes to landscape photography. There’s a reason why photographers love to shoot in the early morning hours (ugh) or in the waning light of the afternoon or late evening.

4 Key Elements to Help You Create Stronger Landscape Photography

It comes down to the quality of light which again, adds more interest to a landscape. When you have beautiful light, the entire landscape is transformed into something different. It becomes less ordinary and more extraordinary.

4 Key Elements to Help You Create Stronger Landscape Photography

As much as it pains me, getting up early and staying out late is virtually a necessity for landscape photographers. The reason being is that some of the most gorgeous golden light comes in the late afternoon as the sun gives way to night. Just as true, the early morning “Blue Hour” as the first glimpses light begin to appear, is another prime time for shooting landscapes.

Even locations that seem somewhat lackluster at midday can take on an entirely new feel in the late or early hours of the day. So be sure to try out different spots at daybreak and sundown. There’s a good reason why we landscape junkies really do chase the light.

#3 – Composition

The very word “composition” describes the nature of how something’s parts are constructed or arranged together. Having all the best ingredients doesn’t help you much if you don’t know how to put them all together into an awesome cake, a beautiful symphony, or in your case…a strong landscape photograph. The way you compose the elements in your landscapes can often make or break the photograph. Again, there are no actual rules to composing your photo but there are some tried and true practices.

4 Key Elements to Help You Create Stronger Landscape Photography

Adjust the horizon so that it isn’t exactly in the middle of the frame and place foreground or background elements off-center to add interest and make stronger images.

4 Key Elements to Help You Create Stronger Landscape Photography

It helps to use imaginary lines such as the Rule of Thirds (again, not exactly a rule) to help compose your image.

4 Key Elements to Help You Create Stronger Landscape Photography

Just as importantly, always remember to shoot your landscapes in accordance with how they “feel”. Composition in landscape photography is about conveying a feeling, not just how the scene looks. Shoot different compositions of the same location until you find one that works best for that particular landscape.

#4 – Gear and Technical Considerations

While a successful landscape photo doesn’t rely on having the latest or greatest gear, there are a few gear and technical aspects that make for better photos. Here are a few tips.

Use a wider lens

Even though many solid landscape photos can be shot at long focal lengths using zoom lenses, generally short focal length (wider angle) lenses work best. Wide angle lenses allow you to include more into the frame of your photo.

4 Key Elements to Help You Create Stronger Landscape Photography

Use smaller apertures

Continuing on from lenses, using a smaller aperture increases the depth of field and brings more elements into focus. Remember, the larger the F-Number the smaller the physical aperture of the lens becomes.

….and wait for it…..

Use a tripod

If you’ve read any of my other articles, you’ll know that when it comes to landscape photography I believe a sturdy tripod is worth its weight in gold. Reducing motion as much as possible is key for obtaining sharper landscape photographs. Using a tripod helps to eliminate as much camera shake as possible. This becomes important because generally the smaller apertures used in landscape photography call for longer shutter speeds which make hand holding the camera less desirable.

Final Thoughts

A successful landscape photo is a careful construction of multiple ingredients. Knowing what to include (or exclude from your photo) and understanding when the best light happens, go a long way to making a better image.

4 Key Elements to Help You Create Stronger Landscape Photography

Just as importantly, knowledge of how to compose the elements in the frame and what techniques or gear will be needed are both essential to “getting lucky” time and time again. Producing stronger landscapes takes patience and a little planning but it is well worth the effort.

The post 4 Key Elements to Help You Create Stronger Landscape Photography by Adam Welch appeared first on Digital Photography School.


Digital Photography School

 
Comments Off on 4 Key Elements to Help You Create Stronger Landscape Photography

Posted in Photography


How to Compose Photos with Impact Using Elements of Design

27 Jul

All visual artists have a common goal of creating an image with impact. But unlike painters who start with a blank canvas and add to it, photographers start with a sometimes chaotic scene and must decide what to remove from it. Which parts of the scene should be included and which excluded to create the greatest impact?

Mobius Arch by Anne McKinnell - How to Compose Photos with Impact Using Elements of Design

This rock arch, known as Mobius Arch, frames the mountains in the background.

Part of your job as the photographer job is to bring order to the chaos by deciding how to arrange the elements in the scene in your camera’s frame. You cannot just hold up your camera and expect to make an impactful image. You have to evaluate the scene and discover what elements of design are there to work with and how you are going to use them to create your composition.

There are visual clues to good composition all around you. Clues that will help you see with your photographer’s eye if you take the time to slow down and take notice of them. The elements of design are there, but sometimes you don’t notice them until you go looking specifically. That’s the key – you have to go looking for them. Once you start looking for a particular element of design, you will be surprised how often you will discover it in the world around you.

Valella Valella by Anne McKinnell - How to Compose Photos with Impact Using Elements of Design

These creatures are called Valella Valella. As they wash up on shore, they create a leading line that guides the viewer’s eye into the frame.

1. Lines

Lines are one of the fundamental building blocks of composition. They direct the eye around an image and give the viewer a path to follow. Understanding the power that lines have in graphic design, and how different lines have different effects on the viewer, will help you add more impact to your images.

  • Horizontal lines exist in almost every scene. They tend to be calming and give a sense of peace and tranquility.
  • Vertical lines tend to be associated with strength and power. Think of skyscrapers, trees in a forest, or waterfalls — all features of strength and grandeur.
  • Diagonal lines add energy to an image and give a sense of movement.
  • Curves create a graphic design that makes an image easy to look at by leading the viewer’s eye through the frame. They can be c-curves, s-curves, arches, circles or spirals.
  • Leading lines can be any type of line that leads the viewer’s eye toward the main subject.
North Algodones Sand Dunes, California by Anne McKinnell - How to Compose Photos with Impact Using Elements of Design

The lines in these California sand dunes lead the viewer’s eye into the frame toward the main subject.

2. Color

Colors determine the viewer’s emotional response to an image. They set the mood and determine what part of an image gets the most attention.

One of the most impactful ways to use color in your composition is to look for complementary colors. Complementary colors are opposites on the color wheel such as blue and orange, red and green, purple and yellow.

Sea Nettle by Anne McKinnell - How to Compose Photos with Impact Using Elements of Design

Blue and orange are complementary colors.

3. Patterns

The human eye is drawn to patterns in the same way that our ears are drawn to the beat of music or the chorus of a song. The visual rhythm that the pattern creates makes order out of the chaos. It can give an image a sense of movement as our eyes travel from the first element to the next.

Filling the frame with a pattern is a sure way of turning a snapshot into a compelling photograph.

A pattern is simply a repetition of a graphic element such as a line, shape or color. Usually, a pattern is made up of at least three repetitions, but the more the better!

Jing'an Temple, Shanghai, China by Anne McKinnell

These prayer ribbons create a repeating pattern in the frame.

4. Symmetry

Despite everything we have been taught in photography about the rule of thirds and keeping things off balance and out of the middle, symmetry has always been associated with beauty. In a symmetrical composition, your main subject is placed at center stage and the eye is encouraged to travel in a circular center around the frame. This will make a scene feel harmonious and calm. But it’s a lot more difficult than it sounds!

The difference is in the details. It’s in the absolute perfection of the symmetry. A composition that is almost symmetrical will seem off and boring, one that is perfect will seem awe inspiring.

To make a photograph that is symmetrical, you will have to hone your eye to find items in the scene that are symmetrical and leave everything out of the frame that does not fit. The composition should have symmetry from corner to corner, which means that the background if there is one, must be symmetrical too.

Legislature in Victoria, British Columbia by Anne McKinnell - How to Compose Photos with Impact Using Elements of Design

This photo uses both symmetry and frame-in-frame as design elements.

5. Frame-in-Frame

One way to quickly add a new dimension to your subject is to give it a frame inside the boundaries of the image. The edges of your photograph are the first frame. Then, you want to add another frame around your subject, which is internal to the photograph.

The idea is to add interest to your photograph by framing your main subject inside another frame. This isn’t always possible, of course, but if you keep your eyes open for opportunities you will start to notice them more often.

Windows and doors are one of the most accessible frames for this technique because you find them everywhere. If you have a wonderful view from your window, try including the window in your image. Remember you can look from the inside out or from outside looking in.

Hatley Castle by Anne McKinnell - How to Compose Photos with Impact Using Elements of Design

This gazebo provides an arch that frames the garden and castle outside.

Conclusion

The next time you are out photographing, keep one of the above elements of design in mind and go looking for it. Being purposeful about your composition is how you will progress from taking snapshots to making great images.


If you’re ready to dive deeper into composition and the elements of image design, be sure to check out Anne’s eBook The Compelling Photograph – Techniques for Creating Better Images.

The post How to Compose Photos with Impact Using Elements of Design by Anne McKinnell appeared first on Digital Photography School.


Digital Photography School

 
Comments Off on How to Compose Photos with Impact Using Elements of Design

Posted in Photography


3 Photoshop Elements Tutorials to Help You Correct and Enhance Your Images

14 Dec

We’ve noticed on our current reader survey (if you haven’t filled it out already, please do so here) that many of you are using Photoshop Elements. So I rounded up some video tutorials to help you use Elements (15 or any older version) to help you make corrections and enhancements to your images.

#1 How to brighten and improve a dull photo

George Peirson from How To Gurus walks you through several steps you can apply to make a dull photo more exciting. He covers things like working with adjustment layers so you can work non-destructively, adding more color in certain areas, layer blending modes, and more.

#2 How to remove people using the clone stamp tool

Sometimes you can get unwanted people in your shots. In this video you can learn how to remove them using just the clone stamp tool in Photoshop Elements.

#3 How to create a motion blur effect using Elements

In this final video learn the steps to add motion to an image using different blur effects in Photoshop Elements. The example used is a race car that was frozen with a fast shutter speed.

If you use Photoshop Elements I hope these videos have helped you out, and you have learned a couple new things. Many things that you can do in Photoshop, can also be done in Elements. Some of the tools and menus are a bit different but many of the features are similar. Elements also offers a “guided” user experience to help you walk through doing some common things.

If you want to learn more try the Adobe website where they have more tutorials and articles on Elements.

For more Photoshop help try these dPS articles:

  • How to Add a Sun Flare to Your Images Using Photoshop
  • How to do Non-Destructive Editing in Photoshop
  • An Introduction to Photoshop Layers Possibilities and Properties
  • Tips for Using the Blur Filters in Photoshop
  • 2 Simple Methods for Adding Color to Your Images Using Photoshop
  • A Guide to Black and White Conversion in Photoshop

googletag.cmd.push(function() {
tablet_slots.push( googletag.defineSlot( “/1005424/_dPSv4_tab-all-article-bottom_(300×250)”, [300, 250], “pb-ad-78623” ).addService( googletag.pubads() ) ); } );

googletag.cmd.push(function() {
mobile_slots.push( googletag.defineSlot( “/1005424/_dPSv4_mob-all-article-bottom_(300×250)”, [300, 250], “pb-ad-78158” ).addService( googletag.pubads() ) ); } );

The post 3 Photoshop Elements Tutorials to Help You Correct and Enhance Your Images by Darlene Hildebrandt appeared first on Digital Photography School.


Digital Photography School

 
Comments Off on 3 Photoshop Elements Tutorials to Help You Correct and Enhance Your Images

Posted in Photography


4 of the Most Important Elements of the Lightroom Library Module

11 Oct

When I read through photography forums or talk to other photographers the topic of image editors often comes up. People give various opinions and thoughts about which one they prefer. Photoshop, Lightroom, Apple Photos, Capture One, GIMP, and a host of other options from companies like ON1 and MacPhun are all capable of doing various types of small and large edits to your images.

However, one advantage Lightroom has over some other programs is that it not only lets you edit your pictures but categorize them, sort them, tag them, even compare different pictures to see which one you prefer. All this happens in the Library module which is a key part of Lightroom’s workflow. It is essential to understand the Lightroom Library module if you want to get the most out of this program.

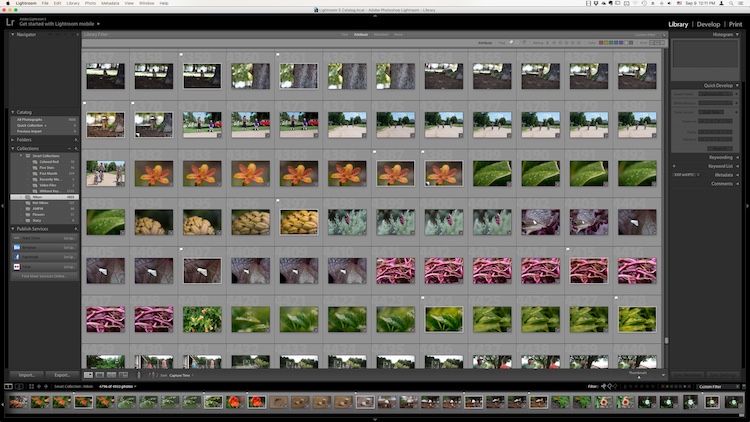
The Library module. No late fees here, just lots of ways to manage your images.

The Library module. No late fees here (library pun), just lots of ways to manage your images.

While the Library module does many different things, to get an understanding of the basics it’s good to narrow your focus down a bit. There are a few key areas of the photographer’s workflow that are served by this part of Lightroom; organizing, sorting and viewing…with a dash of editing thrown in just for fun. Let’s look at each one by one.

Organization of images in Lightroom

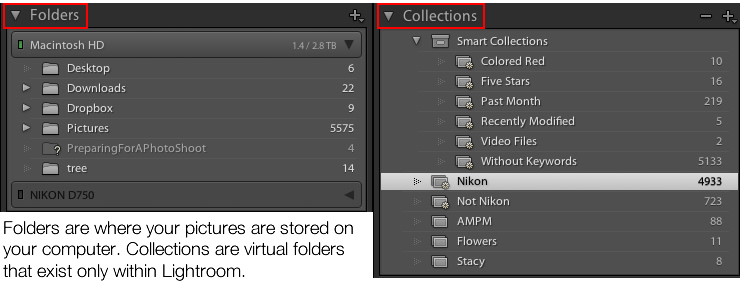
One aspect of Lightroom that is often misunderstood is how it handles your actual picture files, whether JPG, RAW, DNG, or any other format. Contrary to what some people think, it doesn’t actually do anything with your files whether you are categorizing them, sorting them, or editing them. Wherever your pictures are stored on your computer, that is precisely where they will remain when you import them into Lightroom. What you can do, however, is use the Library module to organize and manage your pictures within the program itself. The best way to do this is to put your pictures into what’s known as Collections, or virtual folders that contain sets of images.

Collections are a powerful and efficient method of sorting and organizing your pictures in Lightroom, while leaving them fully intact and untouched on your hard drive.

Collections are a powerful and efficient method of sorting and organizing your pictures in Lightroom while leaving them fully intact and untouched on your hard drive.

How Lightroom sees your pictures

When you import your pictures into Lightroom you are essentially just telling Lightroom where to look for the images that are sitting on your hard drive. Remember back in the days of using the card catalog in a public library? The books weren’t stored in the massive grids of tiny filing cabinet drawers. But those thousands of little cards did tell you where to locate each book as well as a bit of information about each one. That’s sort of how the Collections feature works in the Library module. You can use it to create virtual filing cabinets to organize the images on your hard drive without actually moving, renaming, or otherwise altering your original images.

For example, let’s say you shoot a wedding for your friends Jim and Pam Halpert and come back to your computer with over a thousand images to edit. You can copy all their images to your computer into one folder, and then use Collections in Lightroom to organize them in a way that makes sense to you. Then you can create a Collection Set called “Halpert Wedding” and then within that create additional collections such as “Ceremony,” “Reception,” and “Candids.” Because you are not actually moving the images into different folders on your computer or duplicating the actual picture files, you can put the same picture into multiple collections. You could have the same shot of Jim’s buddy Dwight in both the Reception and Candids folder.

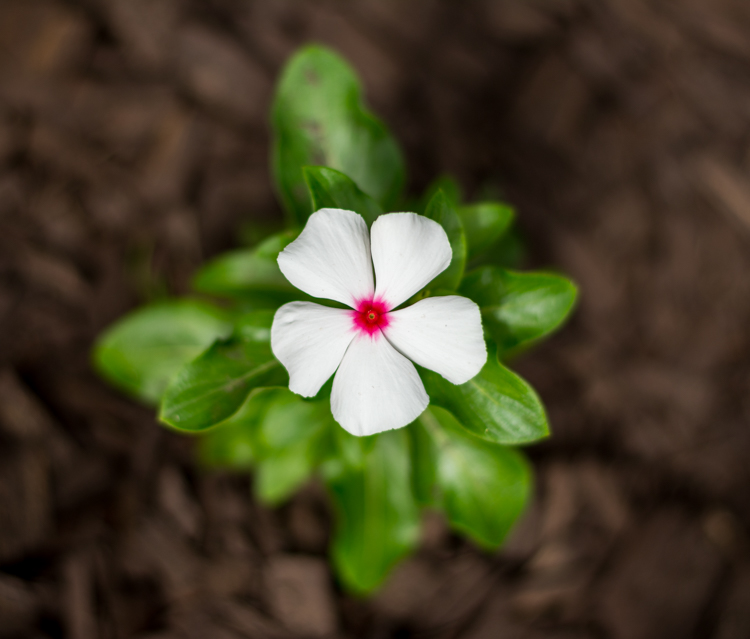
This picture of a periwinkle flower could go into a collection called "Flowers," another one called "Nature," and another one with only pictures of periwinkles. All at the same time.

This picture of a periwinkle flower could go into a collection called “Flowers,” another one called “Nature,” and another one with only pictures of periwinkles. All at the same time.

Smart Collections

While Collections themselves are quite flexible, you can go a step further by utilizing Smart Collections which is a way of automatically putting pictures in various collections based on criteria that you specify. There are a staggering number of criteria at your disposal, and you can choose whether the Smart Collection should meet any, all, or none of them. These collections are updated dynamically so as soon as a picture in your Library meets the specifications for a given Smart Collection it is automatically inserted into that Collection.

lightroom-library-module-smart-collection


Collections remain one of the hallmark features of the Library module and serve to make Lightroom far more versatile than other programs that simply let you edit your pictures. They work hand-in-hand with the many sorting options as well to give you even greater control over your images.

Sorting images in Lightroom

Have you ever gone through your closet and wished that you could snap your fingers and instantly see all your red shirts, tan pants, or gym shorts that still fit? Better yet, what about immediately seeing only the red shirts you actually like? The Library module allows you to do just that. With the click of a button or press of a keystroke, you can hone and filter your images to see precisely the ones you want, then easily reset everything back the way it was. Pressing the “\” key (while in the Library module), or going to “View > Show Filter Bar” brings up a bar at the top of your screen that allows you to dynamically sort your images based on criteria you specify at will.

lightroom-library-module-filter-bar

Using the filter bar tools

The Filter Bar lets you sort by criteria such as whether photos are marked as Picks or Rejects, have a color or star rating, or are associated with specific keywords. Click any of the icons in the Filter Bar to see the results in real-time, and your images will be immediately pared down to reflect the criteria you want.

To remove any of the filtering criteria just click the button again and Lightroom turns it off. You can also change the type of filtering by clicking the “Text/Attribute/Metadata” options in the middle of the top of your screen which will give you additional parameters. If you don’t want to constantly turn the Filter Bar on and off there is also a persistent mini Filter Bar at the bottom of your screen with many of the options as the full-featured one. I use these filters constantly to sort through my images and find the ones I need for any given project.

Using Keywords to sort your images

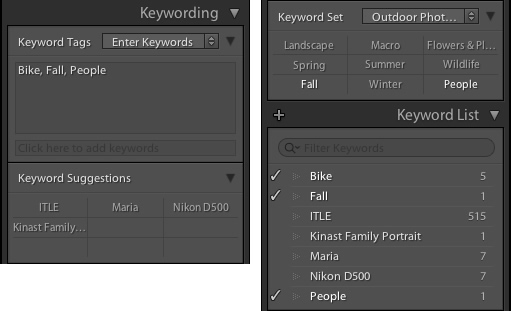
lightroom-library-module-keywords

Keywords are a handy way to add sorting criteria to your photos.

The Keywords feature is another aspect of Lightroom that allows you to sort through your images. On the right side of the Library module is a panel that you can use to assign keywords to images such as “Birthday,” “Nature”, “Summer”, “Uncle Mike”, or any other words you want. To assign a keyword, or multiple keywords, to a picture, just start typing them in the Keyword box or select them from the Keyword Suggestions or Keyword Bank frames. To assign keywords to multiple images at the same time, select them first and then enter your keywords in the box.

Whether you have dozens, hundreds, or thousands of pictures to sort, the options in the Library module can help.

Whether you have dozens, hundreds, or thousands of pictures to sort, the options in the Library module can help.

Viewing images in the Library module

As your photo collection grows larger it’s essential that you have a way to actually view and manage all of the images. Thankfully Lightroom has a robust system in place to let you do exactly that. Of course, you can use collections and sorting criteria, but you also have some useful tools at your disposal to actually view the pictures too. The icons at the bottom-left of your screen let you change between four different views; Grid, Loupe, Compare, and Survey.

View modes

Click Grid to see a bird’s-eye view of all the pictures in the Collection you are currently viewing. Use the Thumbnail slider in the bottom-right (if it’s not visible tap the T key to hide/show the tools bar) to change the size of the thumbnails depending on your preference.

Grid, Loupe, Compare, and Survey let you view your pictures in useful and creative ways.

Grid, Loupe, Compare, and Survey let you view your pictures in useful and creative ways.

Loupe is a term borrowed from the days of developing pictures in a darkroom. It refers to the small glass viewer, sort of like a magnifying glass without a handle, that a technician would use to see a given image in greater detail. Click the Loupe view to see one image at a time and then click anywhere on the image with your cursor (which has now turned into a magnifying glass with a + inside) to zoom in closer. Hold [alt] or [option] on a Mac to click and zoom out, and use the zoom level options in the top-left corner of your screen to change the magnification level. This is particularly useful if you want to check if a given picture is sharp and in focus.

Compare and Survey view modes are related in that they let you see two or more pictures at a time in order to choose the one you prefer. These modes are especially handy if you have multiple similar images, such as after a portrait session, and are trying to pick the best one out of a bunch.

I had about two dozen nearly identical shots, but Lightroom's view and sorting options helped me find just the photographic needle in the memory card haystack.

I had about two dozen nearly identical shots, but Lightroom’s view and sorting options helped me find just the photographic needle in the memory card haystack.

Quick Develop in the Library module

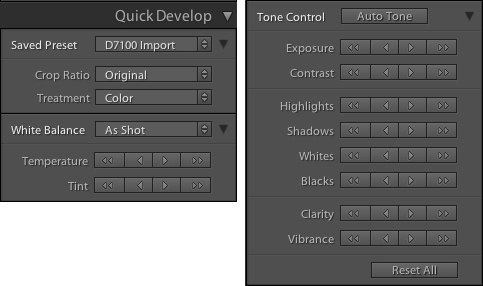
I like to think of the Library’s Quick Develop options as extra credit for a class assignment. They are an added touch that lets you do a bit of editing with your pictures without going to the full-fledged Develop module, and will often give you just the right amount of editing that a picture needs. Nestled on the right-hand side of the Library module is a little toolbar called Quick Develop which does exactly what you might think. It allows you to quickly and easily adjust a few essential parameters such as White Balance, Exposure, Highlights, Shadows, and a few other settings.

lightroom-library-module-quick-develop

Clicking on the single arrow for any given parameter adjusts things just a little bit. While clicking the double arrow adjusts things a lot. For example, the single right-facing arrow for Exposure will increase the value by 1/3 stop, whereas the double arrows will increase the value by a full stop. You don’t get anywhere near the fine-grain control that you do in the actual Develop module, but if you need to quickly make some basic edits to an image you might find Quick Develop to be quite handy.

lightroom-library-module-rainbow

Conclusion

These four elements aren’t all that the Library module has to offer, but learning them will give you plenty to work with as you begin to expand your knowledge of this powerful program. Do you have any favorite tips you’d like to share? Are there features you think I missed that others should know about? Please leave your thoughts in the comments below.

googletag.cmd.push(function() {
tablet_slots.push( googletag.defineSlot( “/1005424/_dPSv4_tab-all-article-bottom_(300×250)”, [300, 250], “pb-ad-78623” ).addService( googletag.pubads() ) ); } );

googletag.cmd.push(function() {
mobile_slots.push( googletag.defineSlot( “/1005424/_dPSv4_mob-all-article-bottom_(300×250)”, [300, 250], “pb-ad-78158” ).addService( googletag.pubads() ) ); } );

The post 4 of the Most Important Elements of the Lightroom Library Module by Simon Ringsmuth appeared first on Digital Photography School.


Digital Photography School

 
Comments Off on 4 of the Most Important Elements of the Lightroom Library Module

Posted in Photography


Photoshop Elements 15 and Premiere Elements 15 released

04 Oct

Adobe has updated its beginner-friendly Photoshop Elements and Premiere editing software. Elements 15 adds touchscreen editing, batch adjustments, enhanced search function and a tool to edit facial features.

New Smart Tags help identify key features in images and are applied automatically – search for ‘dog’ or ‘birthday’ and Adobe claims its enhanced search will identify these photos in your collection. Borrowing from Photoshop CC’s face-aware liquify technology, Elements also gets a tool to help turn frowns into smiles and fix squinting eyes. Quick Edit and Organizer modes gain touch compatibility, and it’s now possible to apply ‘instant fix’ edits to a batch of photos.

Premiere Elements 15, Adobe’s entry-level video editing software, offers the de-haze tool already offered by Photoshop CC and Elements and also gains touch functionality. A few other feature updates are also included, like the ability to create photo/video collages and a Remix feature to help match music and video clip length.

Visit Adobe’s website to learn more about Photoshop Elements and Premiere Elements 15.

Articles: Digital Photography Review (dpreview.com)

 
Comments Off on Photoshop Elements 15 and Premiere Elements 15 released

Posted in Uncategorized