This is a guest post by: John Davenport
Selective color photography has been around for ages. It’s something that has been used in the movies – Schindler’s List and Sin City come to mind – and more recently Chase Freedom and Budweiser have used it in their ad campaigns to highlight their products. So even if you dislike selective color, or if haven’t given it much thought, you have to admit it’s a great technique to use when you’re trying to draw attention to a certain subject and is something useful to have in your tool belt.
Today I’m going to show you how to create simple selective color images using only Lightroom as your processing software.
What Makes a Good Selective Color Image?
First we need to make sure we know what to look for when we’re out photographing our subjects because selective color photography is not something suited for every situation. Whether you’re a landscape photographer, a portrait photographer, or someone shooting on the city streets it’s important to keep the idea in the back of your head that selective color shouldn’t be forced.
Typically you’ll want to pull a vibrant color out of a rather drab scene so fall foliage can work really well, blue eyes in portraits are a very common theme, bright dresses and clothing work well too.
One final point is that you should make sure that whatever you’re keeping in color adds value to the photograph and isn’t something that will detract from the overall scene.
How to Create Selective Color in Lightroom
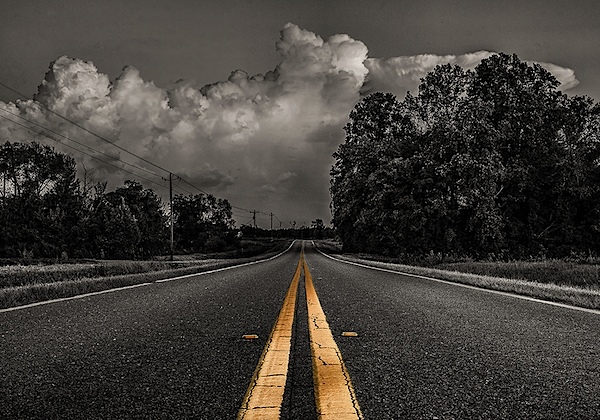
One of the limitations of Lightroom is that it does not have the ability to do true layers like Photoshop does. We can get around this for selective color processing by working with the HSL tab and working with the Adjustment Brush tool. In short, what we’re going to be doing today is turning the saturation down on all the colors and areas of the photograph that we don’t want color in. The following is a step by step guide on how I created the image at the top of this post.
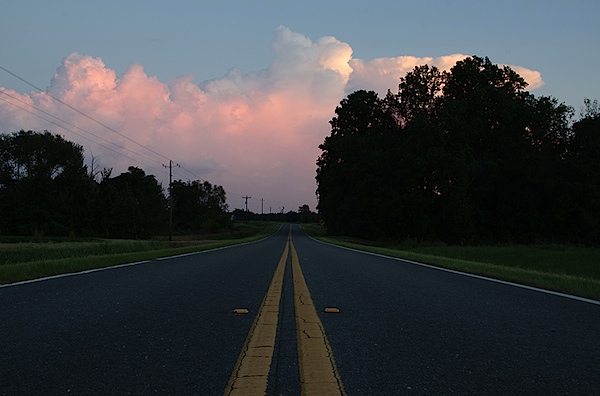
Here’s the original image for your reference.
The first step would be to go into the HSL tab in Lightroom and remove the saturation from all the colors you don’t want in your photograph. In my case I wanted to keep yellow so all the other sliders have been pulled to the far left.

Next step would be to tune the image to your liking – this is a rough tuning just something to get you close to where the final image will be. Simply go into the Basic editing tab of Lightroom and get the overall image set up how you like. You might notice as you do this, some colors start creeping back into the photograph, that’s okay we’ll fix this in the next step.
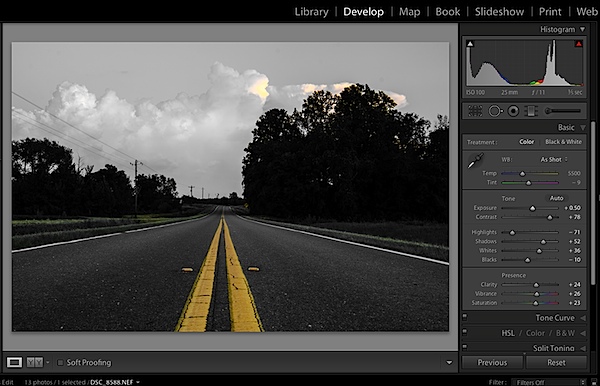
Cleaning up any colors that have reappeared after your tuning process can be done easily with the Adjustment Brush. Simply create a new adjustment brush layer and turn the saturation to the far left. Paint anywhere you don’t want color. If you accidentally paint over something you want to keep switch to the erase mode and go back over that area until you get it right.

After you get to this point it’s up to you to finalize the photograph for your own unique look with final touches and cropping.
I find that this workflow does a good job at creating selective color images without the confusion and time consuming nature that dealing with layers in Photoshop has. Of course it should be noted that with a program like Photoshop you’ll have a lot more control over your selective color processing, but for many of us this Lightroom trick is a great alternative.
Let’s Hear From You
Now that we’ve learned how to perform selective color edits I’d love to hear what your opinions are of this kind of processing do you use it? Do you hate it? Have you ever done this kind of thing in Lightroom before?
John Davenport is an avid amateur photographer who shares daily photos on Facebook. For more tips on Lightroom editing check out John’s weekly series which focuses on how to edit photos in Lightroom.
Post originally from: Digital Photography Tips.
Check out our more Photography Tips at Photography Tips for Beginners, Portrait Photography Tips and Wedding Photography Tips.
How to Easily Create Selective Color Using Lightroom
