RSS
 

Posts Tagged ‘easily’

How to Easily Add a New Element to Your Image Using Photoshop

09 Aug

This is an article for beginners in Photoshop. You will learn how to simply add an element to your photo and transform a daylight image into a nighttime one.

Open your selected images in Photoshop

First thing you want to do is select a photo of a mountain (in raw format). For that, open Photoshop then go to File > Open, it will open a window where you can select the photo that you want. Here we select raw file of the mountain:

Add element using photoshop 01

Raw adjustments first

Because we opened a raw file it is going to pop up in Adobe Camera Raw and we are going to retouch it to make it look like night first. Let’s set the White Balance towards the blue, so move the Temp slider to 4150. Then you want your Exposure to be very low so it looks dark, try -1,90, lower your Highlights to -84, add some Contrast to +39, boost the Blacks to +28, and lower the Whites to -46. Basically bring down the bright parts and boost the darker parts to give the image a night mood.

Add element moon photoshop 02

Now click on the sentence under your photo: ProPhoto.. and select Open in Photoshop as a Smart Object.

Add element photoshop 03

Open the element you want to add

Once you have done that you can come back and open an image or element to add to the first image. We are going to select a moon that we want to add to this mountain. Go to File > Open and select one photo of a moon in jpg.

Add moon photoshop 04

Arrange your workspace

You should have the photo of the moon and the mountain in tabs on the top of your Photoshop interface. If you don’t see that, you can go to Window > Arrange > Consolidate all tabs:

Add moon photoshop 05

For this tutorial we need a workspace with two windows on the right, one is to show Layers and one is for Properties. For that you need to select “3D” from the pull-down menu for Workspace in the upper right corner.

Add moon photoshop 06

Move the moon or element onto the mountain image

Go to your moon photo and grab the Move tool, it is the first icon on your left side (tools palette), the keyboard shortcut is V.

Add moon photoshop 07

Using the Move tool you need to click on the moon, hold your mouse button, drag it over to the tab of the mountain and let go of the mouse to drop it.

Add moon photoshop 08

Blending the images together

You can see that we have black around the moon still, so we are going to blend that out. In the layer window there are different options for Blending Modes, For this one we are going to use Screen. Pull it down and select Screen from the options.

Add moon photoshop 09

That took most of the black out.

Resize and place the element

To make the moon even bigger, go to Edit > Free Transform.

Add moon photoshop 10

Using the shift key to maintain its proportions, you can extend the moon by grabbing the corner and pulling it down.

Add moon photoshop 11

You can also move the moon or your element around, and see where you want to put it. It looks pretty cool already but now we are going to get into masking. For this you will need to click on the Eye icon next to the moon layer number (to turn it off) and click on the layer of the mountain to select it.

Add moon photoshop 12

You should see this now.

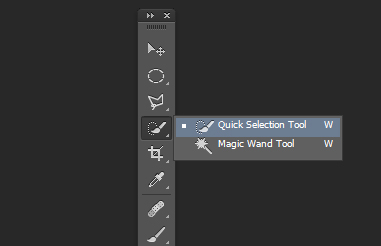
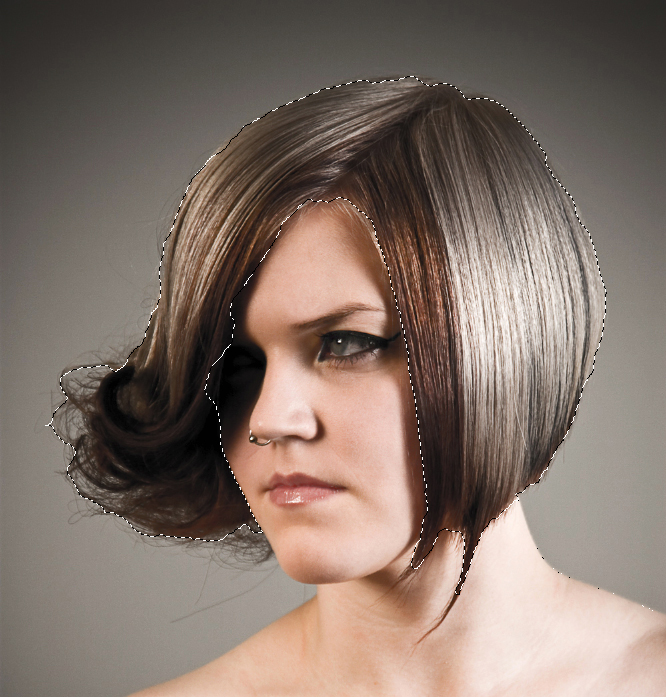
Select the Quick Select Tool (W on your keyboard) and drag your mouse over the sky to select it.

Add moon photoshop 13

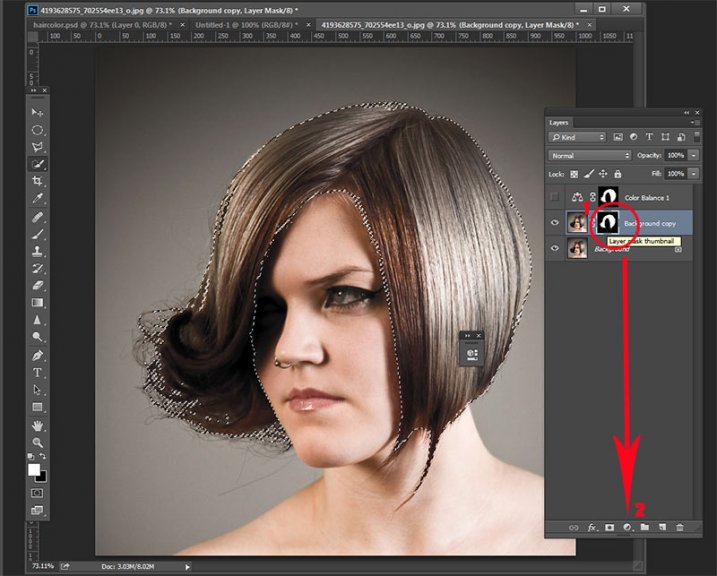
Turn the moon layer back on and click on the little square icon at the bottom to create a layer mask (shown in red below).

Add moon photoshop 14

This is going to create a mask and because we have an active selection, a part of the moon is now hidden.

Add moon photoshop 15

If you want to reposition the moon you just have to select the moon layer and click on the little chain on the side to unlink the image of the moon from the mask.

Side note: if you make a mistake you can select Cmd/Ctrl+Z to go back or undo the last step.

PHOTO 16

Fine adjustments

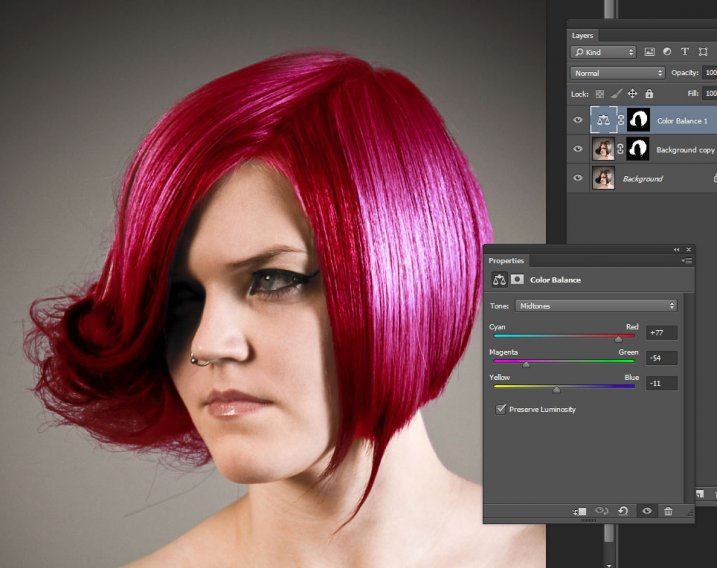
You can see that there is a difference of color around the moon because of the layer, so to fix grab the Brush tool. (hit B for brush on the keyboard) or the select the Brush on the tool palette).

PHOTO 17

Make sure that the opacity is at 100% and that black is your foreground color. Right-click and set the hardness to zero. This makes your brush very soft and you can brush over the white to remove it.

Side note: Click on the Control and Alt keys to make your brush or any tool in Photoshop smaller or bigger.

Add moon photoshop 18

Add moon photoshop 20

Here you can see where I painted on the mask.

Finished!

Add moon photoshop 19

There you go! You have added a moon to your landscape!

I hope you liked this article and you feel more comfortable using Photoshop so you can add the moon or another element into your landscapes and create this cool effect.


If you enjoyed this tutorial and want to learn more about how to use Photoshop, check out Serge’s course Photoshop for Photographers 2017. Use the special promotional code – DPS65 – to get 65% off as a dPS reader!

The post How to Easily Add a New Element to Your Image Using Photoshop by Serge Ramelli appeared first on Digital Photography School.


Digital Photography School

 
Comments Off on How to Easily Add a New Element to Your Image Using Photoshop

Posted in Photography


How to Use a Synology DS216 NAS to Get your Photos Online Quickly and Easily

27 Jul

If you’ve read my articles here on dPS about storage and backup, you’ll know that they’ve mostly been about slightly larger systems with lots of space for people who have lots of data in the form of photographs. It’s been a while, so I thought it might be time to write about the smaller system I’ve been using for a couple of months, not only from a backup and storage point of view but from a delivery and sharing your work angle, too. Enter, the Synology DS216.

How to Use a Synology DS214 NAS to Get your Photos Online Easily

Get the Synology DS216 on Amazon

Hard drives

The crew at Seagate have some specific NAS (network attached storage) drives, like the Seagate IronWolf (such a sexy name for a hard disk!) which I have put in this Synology DS216 for this test. The drives are running well, have not over-heated despite lots of large file transfers, and appear to be handling things quite nicely. I’ve gone with two 4tb disks and after using the Synology Hybrid Raid, I have about 3.6TB of usable space.

The two Seagate Ironwolf NAS specific disks I’m using in my setup, 4tb each giving you about 3.6tb of useable space.

I also have a “1 disk fault tolerance” which means that one disk can die, and I still have one copy of my data remaining! I can then swap out the dead one and copy it back across both (called rebuilding) and I’m good to go.

Here you can see the individual disks are 3.6TB each

How to Use a Synology DS214 NAS to Get your Photos Online Easily

And below you can see the capacity is 3.57TB

How to Use a Synology DS214 NAS to Get your Photos Online Easily

SHR is kinda like a normal raid, but a little different… And for those of you that have no idea what RAID stands for, it’s “Redundant Array of Independent Disks” or “Redundant Array of Inexpensive Disks” depending on your age. Basically, it means that you have more than one disk that the info (in our case photos) is being copied onto. (NOTE: Raid on its own isn’t really a backup, while it will give your NAS / Storage unit some redundancy, it’s not considered a backup)

How to Use a Synology DS214 NAS to Get your Photos Online Easily

Rather than get all geeky and talk figures and facts about backing up and how to set everything up, I wanted to give you a scenario you might encounter as a photographer, professional or not. I’ll show you how you can really benefit from a little setup like this one, so keep reading.

Real-World NAS use for your workflow

Imagine you’re on a shoot. You’ve set up your kit and are doing some portraits, headshots, or food photographs and you can shoot tethered. Alternatively, you’ve gone on a holiday and you take a load of great photographs that you copy onto your external drive via your laptop while you’re sitting on your balcony sipping a tasty orange juice (the little Lacie in my example). Then after your shoot or your holiday, you get home and you want to do one of a few things…

  1. You want to share your holiday photos with friends and family.
  2. You want to send an album of images for your client to select from.
  3. You want to put either set of photos into your NAS as a means of backup.

Now, there’s absolutely nothing stopping you from sticking your drive into your computer and importing your images as you would normally. Then you would import them (we’ll presume RAW) into Lightroom, export some jpgs and then uploading those to your website.

But what I’ve found with the Synology DS216 setup, is that all you need to do is plug your external disk in the front of the Synology and wait a little while (the little NAS has to generate thumbnails etc., and it’s not the fastest processor in the world but it does just fine). Your images, even raw ones, will then show up on your default web site. Naturally, there is some setup required. But for the import process I’ve mentioned above, you only need to setup your rules once. Then when you plug in a certain USB device the NAS will see you’ve plugged it in, and run the rule that you’ve setup for that particular drive.

One example is that I’ve come back from a weekend away with my little Lacie external drive. I had copied all of my jpgs from my GoPro timelapse and the RAW files from my Sony a7ii into a folder on the Lacie while I was sitting around one night over the weekend (having a tasty espresso, since you asked). I arrived home and plugged my drive into the NAS, headed off and get the kids into bed, unpacked my case and then came back to my computer later. All the images were copied across, thumbnails generated and the photos are now available online for anyone that I’ve given the album link to.

But what about my privacy?

You can control exactly who gets to see your photographs through passwords. So you can have an album online for a set amount of time, take albums offline at any point, and allow comments. All of these things are in a really easy to understand menu, and you don’t need a degree in computer science to get it set up exactly as you’d like.

You can pop across and look at the demo album I’ve uploaded for you,  or you get an idea via the screenshot below. It shows a shared album (yes, that’s an out of focus photo of my friend Glynn, great example Simon!) and to Glynn’s left you can see an album called Petey (who is an admin in our Facebook group, thanks for your help Petey!) that shows how the password protection works (type in password13 to see it)

How to Use a Synology DS214 NAS to Get your Photos Online Easily

Conclusion

In conclusion, if you’re after a simple to use network storage system that allows you to quickly and easily share your photographs online (be it for a client or for your family and friends) the Synology DS216 is a great solution that is among the easiest and most flexible I’ve tried. As a side note, you can also share your images to your TV in a slideshow. Great for family holiday photo nights!(depends on your tv, it works on my few year old Sony).

If this was a pure gear review, I’d give the combined gear five out of five stars. I considered giving the NAS four stars because while it’s simple to use, I do have a background in IT and I thought “maybe it’s only simple for me”. But it really is simple, robust and mostly forgiving if you screw things up. I hope this helps some of you and please feel free to ask me any of your storage questions about this gear in the comments below.

The post How to Use a Synology DS216 NAS to Get your Photos Online Quickly and Easily by Sime appeared first on Digital Photography School.


Digital Photography School

 
Comments Off on How to Use a Synology DS216 NAS to Get your Photos Online Quickly and Easily

Posted in Photography


LG V20 owners report fragile, easily cracked camera glass

26 Oct

Numerous reports have surfaced from LG V20 owners claiming that the glass covering the smartphone’s rear camera is easily shattered. In some cases, the glass reportedly breaks without any direct impacts, leading some to speculate that the LEDs may be the cause. Some users report receiving a new phone with glass that’s already cracked, while others indicate it cracks after only several hours or days of use.

In addition to user reports on Reddit, smartphone durability tester ‘JerryRigEverything’ experienced the same issue. The glass camera covering is shown shattering in the video below a few moments after he rubs it with a pick to test its durability against scratches. LG has not issued a comment on the reported issue. For now, users are advised to keep the protective film covering on the camera glass in an effort to avoid cracks.

Via: TechTimes

Articles: Digital Photography Review (dpreview.com)

 
Comments Off on LG V20 owners report fragile, easily cracked camera glass

Posted in Uncategorized


24 Hour Deal: Become a Lightroom Expert Quickly and Easily

15 Dec

Today we have an amazing deal for you as deal 2 in our 12 Deals of Christmas.

It’s 85% off Cole Joseph’s Lightroom Training Workshop.

NewImage

Cole Joseph has processed over half a million photos in his career and so certainly knows a thing or two about Lightroom.

In this workshop he’ll share his best tips and tricks with you to help you prices the highest quality final edits to your images in no time at all.

Walking you through Lightroom step by step, Cole will demonstrate exactly how to use Lightroom to its full potential. You’ll not only learn how to edit more quickly, but see how to get the same results he does.

Buy today at a crazy 85% off, and by this time tomorrow, you’ll be a Lightroom master!

PS: Cole is offering this training with a no risk 30 day money back guarantee. If you buy it and don’t find it meets your expectations – simply ask for your money back. What could be better than that!

googletag.cmd.push(function() {
tablet_slots.push( googletag.defineSlot( “/1005424/_dPSv4_tab-all-article-bottom_(300×250)”, [300, 250], “pb-ad-78623” ).addService( googletag.pubads() ) ); } );

googletag.cmd.push(function() {
mobile_slots.push( googletag.defineSlot( “/1005424/_dPSv4_mob-all-article-bottom_(300×250)”, [300, 250], “pb-ad-78158” ).addService( googletag.pubads() ) ); } );

The post 24 Hour Deal: Become a Lightroom Expert Quickly and Easily by Darren Rowse appeared first on Digital Photography School.


Digital Photography School

 
Comments Off on 24 Hour Deal: Become a Lightroom Expert Quickly and Easily

Posted in Photography


Create Your Own Movie Easily

06 Sep

The high quality home movie creator software such as Movavi, is a great help for you who want to be creative and creating your own movie. The software will help you to join the audio and video files. All you need to do is to install and run the movie creator software, and then prepare […]
Digital Photography Information Center

 
Comments Off on Create Your Own Movie Easily

Posted in Equipment


How To Shoot Fashion Shows Easily With These 6 Simple Tips

21 Jul

How To Shoot Fashion Shows

Hi there FashionPhotographyBlog.com readers, today we have a special guest joining us. Based in the Netherlands, Sander Van Leeuwen, has worked in fashion and commercial photography as well as film. He’s also been a loyal follower of FPBlog for many years now and had taken the time to write to us in a response to an article we had previously posted on how to shoot fashion shows.


We thought what he wrote was so insightful and it listed factors that the original post oversaw, that we decided that it would benefit a lot of you who may be trying to shoot fashion shows for the first time and not quite sure what to expect of the experience. We have invited Sander Van Leeuwen to share with us his 6 simple tips that can make shooting through the commotion of a fashion show just a little bit easier by being prepared for the experience.


We do want to want to make a disclaimer though before we start, and remind everyone that fashion shows are live events, and can be, by nature, a stressful affair. Like in wedding photography, if you miss the moment, you miss the moment. There is no going back!  The buzzing environment of fashion shows may not be everyone’s cup of tea, (perhaps not even for Sander) though some people thrive in these kind of situations. We just want you to be prepared, so you can be on your game and not miss those moments photographing powerful shots of the models on the runway. Take it away, Sander!


Hi folks, actually it’s kind of stupid that a lot of camera people (were) shooting the same show… the craziness during a show I did (the Amsterdam International Fashion Week 2009)… It was my first big show. I actually liked some of the parts (the parties and being with a lot of famous people (and) designers), but I hated the actual shooting, since it was kind of stressful. My experience:


1. Professional shows have good light: especially with the good high ISO performance, nowadays this is not an issue.


2. 70-200 mm is a good range. The only thing is most of the time you can’t shoot full body on the turn. But with 200 mm you can shoot nice full body shots during the whole runway and you can make some nice close ups of accessories.


3. DON’T USE FLASH! With a lot of photographers the chance is big you’re ruining someone else s picture with your flash, or someone else is ruining yours. Good organizations even officially forbid to use flash (if not other photographers will look at you (like) they are going to kill you).


4. A monopod is a must have. It happens that there is very little space and you can stand steady between all other photographers.


5. Take a bottle of water with you since waiting can be really make you tired and thirsty.


6. If it’s a multiple show even, try to make friends with some of the photographers so you can help each other when this is needed (save good spots for example) and you can have a nice chat while waiting… Did I mentioned waiting already? 😉


I hope this helps some photographers a little!


Kind Regards, Sander

Savale.nl


Did you find these tips useful? Please share this post on social media if you did 🙂


Also, if you have your own tips not covered in this list, please write them in the comments box. We will love to hear what tips you have.


Lastly, if you would like to be featured as a guest writer like Sander Van Leeuwen did, do send us a message and get in touch with us. We would like to hear from you. For more details on how to contribute to FashionPhotographyBlog.com click here –> CONTRIBUTE TO FPBLOG HERE


Fashion Photography Blog

 
Comments Off on How To Shoot Fashion Shows Easily With These 6 Simple Tips

Posted in Uncategorized


3 Steps to Easily and Realistically Change Hair Color in Photoshop

18 Jul

For those who follow trends you’ll know there is a move to “metallic” hair colors for both men and women, and this is especially evident in fashion photography.

From this, to this in 4 steps.

From this, to this in 3 steps using Photoshop

Whether you want to add extra pizzazz to a fashion shot, jazz up a promotional photo without having your models spend hours (and probably big bucks) at the salon, or to simply see what you’d look like with a different or metallic hair color –  this simple process will help you change the color of a subject’s hair color in a realistic way, with no frustration. You can even use this technique to create fantasy animals for your artistic digital manipulations, by changing the color of their fur with the same steps.

Editing hair has often been a challenging process. Even with the most meticulous editing, the results were often unrealistic, and obvious as manipulations. This workflow changes all that.

Step 1: Masking the Hair

Thankfully Photoshop’s Quick Select tool makes masking hair a breeze. Open the image you want to edit. Select the Quick Selection Tool from the tool palette.

quickselect

Change the size of the brush by using the square brackets keys on the keyboard, you’ll find these next to the “P” on  most keyboards. Now select the hair using the selection brush – you’ll see the famous marching ants as you make your selection. If your selection extends too far use the CTRL key to subtract the selection.

selection

When you have the hair selected, click on the Refine Selection button in the top context menu. This will allow you to soften the edges and add some transparency to the selection to make it very realistic. You’ll see a new palette pop up with some edge options to choose. First, select On White from the View Mode dropdown. This will enable you to see only the hair selection. Next select the Brush from the left hand side, and make the radius between 1.5 and 2.5, this will vary with your image. Now you can brush to bring back some of the transparency around the edges, especially where there are fine hairs such as the bottom left in this image.

selection-tools

Once you’ve refined the edges, go to the Output section and select New Layer with Layer Mask. This will output your refined edge selection on a new layer, which you’ll use in the next step.

Step 2: Create your Color

Here’s your opportunity to bring our your inner stylist. First, go over to the Layers Palette. Here, you’ll make a special Adjustment Layer using Color Balance adjustment. To do this first make sure that the layer mask thumbnail on your recently created layer is active. Don’t click on the thumbnail of the photo. What you’re doing here is telling the Adjustment Layer you’re creating, to ONLY affect the hair selection.

Now CTR+click in the layer mask thumbnail to get the marching ants selection on your image. Next, at the bottom of your layers palette, click on the Adjustment Layers icon to create your new adjustment layer. From the pop-up  menu, choose Color Balance. You’ll now see your new adjustment layer called Color Balance, at the top of your stack.

create-color-balance-layer-mask

Now make the Color Balance layer active by clicking on the scales icon thumbnail. This will bring up the color balance sliders where you can now create the color for your hair. Remember to also use the top drop-down in the slider pop-up to also adjust the highlight and shadow tones.

color-balance

You’re now ready to apply your color. Depending in whether you’re going for a bold and artistic look, or fashionable and metallic, your color choice will be made here in the color balance adjustment layer. Play around with changing all the colors, and note the results. In the final step you’ll be adjusting the intensity and the opacity of the color to make it look realistic, no matter what style you want to show.

Step 3: Blend Modes and Opacity

At this point, you’re ready for the fine detail adjustments to ensure your new hair color looks realistic, and not Photoshopped. All you need to do now is adjust the opacity and the blend modes of your color balance layer. T0 achieve the metallic look try blending mode HUE with an opacity of 75%.

For bolder looks try SATURATION or SOFT LIGHT. Depending on what colors you’re using you can also achieve great looks with DARKEN and SCREEN.

Stylistic Color

Here we have four totally different looks. They are all from the same file and one adjustment layer, just by changing colors with color balance; and varying the intensity using opacity and blending modes.

haircolor3 haircolor4 haircolor6 version

Here’s the PSD file for you to practice with (zip format). Download it to your computer. Unzip and open the PSD in Photoshop.

The original image is used under the Creative Commons license and is attributed to Looking Glass.

googletag.cmd.push(function() {
tablet_slots.push( googletag.defineSlot( “/1005424/_dPSv4_tab-all-article-bottom_(300×250)”, [300, 250], “pb-ad-78623” ).addService( googletag.pubads() ) ); } );

googletag.cmd.push(function() {
mobile_slots.push( googletag.defineSlot( “/1005424/_dPSv4_mob-all-article-bottom_(300×250)”, [300, 250], “pb-ad-78158” ).addService( googletag.pubads() ) ); } );

The post 3 Steps to Easily and Realistically Change Hair Color in Photoshop by Alex Morrison appeared first on Digital Photography School.


Digital Photography School

 
Comments Off on 3 Steps to Easily and Realistically Change Hair Color in Photoshop

Posted in Photography


Master Easily Taking Candid Photos of Your Friends

21 May

Taking photos of your friends is an accessible way to improve your picture-taking skills. But it can be difficult to do this well and get good photographs, improve your skills, and not offend your friends. It seems simple, of course… you and every person with a smartphone these days are taking photos of your lunches like it’s the top of Continue Reading

The post Master Easily Taking Candid Photos of Your Friends appeared first on Photodoto.


Photodoto

 
Comments Off on Master Easily Taking Candid Photos of Your Friends

Posted in Photography


Google Chrome – Easily Share Content on Facebook, Pinterest, Twitter, More

24 Apr

The “AddThis” extension for Google Chrome lets you easily share content on a variety of services.

Do you frequently share content on a variety of blogs, bookmarking services, and social networks, as well as via web-based e-mail, using sites such as Facebook, Gmail, Pinterest, Reddit, StumbleUpon, and Twitter? Tired of installing extensions for each individual service to share content or relying on website share buttons?

The “AddThis – Share & Bookmark” extension for Google Chrome adds a button to the Toolbar that lets you share content via, according to the author, over 300 services. These include the aforementioned as well as AOL Mail, Blogmarks, Digg, Evernote, LinkedIn, Plurk, Xing, and many, many more….

Read more at MalekTips.
New Computer and Technology Help and Tips – MalekTips.Com

 
Comments Off on Google Chrome – Easily Share Content on Facebook, Pinterest, Twitter, More

Posted in Technology


Eye-Fi Mobi SD card easily connects cameras and smartphones

04 Jun

eyefi-mobi.png

If you own a digital camera without Wi-Fi and want to quickly transfer photos to your smartphone or tablet, then the new Eye-Fi Mobi SDHC card might be for you. Setup is simple: just download the app for iOS or Android, enter a 10 digit code, and you’re ready to roll. After that, photos you take on your camera will automatically be sent to your mobile device. For more on the Eye-Fi Mobi, read the full story on Connect.

News: Digital Photography Review (dpreview.com)

 
Comments Off on Eye-Fi Mobi SD card easily connects cameras and smartphones

Posted in Uncategorized