RSS
 

Posts Tagged ‘Easier’

4 Steps to Less Stressful and Easier Photo Editing

31 Jul

Have you ever returned to your computer with a memory card full of photos and become overwhelmed at the idea of going through all of them?

Tree starburst

The thought of sorting and analyzing so many pictures can seem so daunting it’s sometimes hard to even know where to start! Often we find ourselves copying the contents of our cameras to our computers and letting our precious memories collect digital dust, though we promise ourselves we will get around to organizing them – someday. Modern technology has made this task easier, with various software and cloud-based services even promising to find your best photos for you. And while these digital assistants certainly have merit, I like to take a different approach to dealing with all the images I capture.

The following tips will help you streamline your photography workflow and make the task of sifting through your images not only easier, but a lot more enjoyable too. While I work mostly in Adobe Lightroom, these general practices will apply no matter which photo editing software you use.

Step 1: Get rid of bad photos

This is the first thing I do when sorting through pictures, and it’s a tough hurdle to overcome because I have a tendency to want to save everything. But this step will make all the difference in managing your growing photo library, especially if you have never done it before.

Let’s say you went on a summer family trip to a national park, and you returned home with thousands of pictures to deal with. It might be tough, but as you look through them, try to think about what images will matter the most to you a year from now. You might have had a wonderful time at the Grand Canyon during your vacation, but will you really want 50 pictures of your child looking down at the great abyss? What about the ones where he is blinking, out of focus, or looking the other way? It is likely that two or three good pictures are all you need. In this first step, it’s up to you to find the ones that best encapsulate your experience as a whole, and ditch the rest.

Unicycling

I captured close to 100 photos on my brother’s recent visit, but this is one of just a handful I really need to remember the day, and all the things we did.

This approach might seem coldhearted and cruel, but it’s a necessary step in taming the photo-management beast. When you revisit the pictures from your summer trip a couple years from now, you won’t need a thousand of them to help you remember the experience. A tenth of that will probably be perfectly appropriate. If you hang on to every last one you might find that they become an albatross around your neck, weighing you down so much that you don’t even want to look back at your pictures because there are just so many of them.

To put things in another perspective, think about a time when one of your friends wanted to show you photos from his or her family trip. How long did it take you to grow tired of looking at the same types of images over and over? You could have easily gotten the point with just a few pictures, and then spent time visiting with your friends about the events surrounding the photos.

Moth

Of all the photos I took during this nature walk, this was one of only a few that I decided to keep. And in the years since, I haven’t missed the others at all.

One nice advantage of using a photo management program is that you can remove unwanted photos without actually deleting them from your hard drive. In Lightroom, pressing the “X” key on a photo will mark it as rejected, so it will no longer show up in your photo library but will still exist on your computer. This helps soften the initial blow, and then you can go back later and actually delete the rejected photos if you so desire. Alternatively, you can press the “P” key to flag a photo as one of your favorites, or assign star ratings to the images you like best. Then you can instantly sort out your best shots later down the line, and delete the rest when you are ready.

Step 2: Basic Editing

After culling your pictures to find the ones you like most, the next step is to perform basic edits and save the real heavy lifting for later. After removing the duds from my most recent camera import, I typically go through each of the remaining images and apply the simplest of edits such as crop, straighten, and exposure. Not much else is needed at this stage, as you are essentially preparing your photos for any real edits that might need to be done later. These basic adjustments are very quick, and you can churn through your recent batch of vacation, birthday, or hiking photos in a manner of minutes or hours instead of days or weeks.

You can also copy and paste adjustments, so if you have a dozen similar photos you can edit one and then apply those adjustments to the rest with a simple keystroke. This is also a good time to do apply some rudimentary organization to your photos as well, using tools like keywords, flags, categories, or star ratings. Be careful not to get caught up in editing any single photo in depth at this stage. The goal of Step 2 is to dig a little deeper into the photos you like, which will help you decide where to concentrate your efforts if you do need to do more intensive edits afterwards.

Husky

I had to crop this photo in order to draw the viewer’s attention to the dog’s eyes.

Step 3: Advanced Editing

By this point you should now have a curated set of photos that you really like, with some mild corrections applied to help them look a little more pleasing. Now it’s time to perform the types of more detailed edits that will help your images truly shine. Advanced adjustments to a photo’s white balance, color saturation, contrast, and other parameters, while also applying localized improvements like dodging and burning can take a long time, but the results are well worth it.

It’s important to do this step last, or else you can easily wind up spending a great deal of time editing a single picture early in the process only to realize there are plenty of better ones that should have had your attention instead.

Family

This family photo turned out fine, but I had to do some color corrections and other enhancements to get it to look how I really wanted. By doing this step last I was able to devote more time to the editing process and not worry about processing hundreds of additional images.

Step 4: Walk Away

This might sound silly, but often the most useful activity you can do when editing your photos is nothing at all. Take a break, get a coffee, head out for a walk, or just go to bed and come back to your pictures the next day with a fresh set of eyes. I’m amazed at how often I stare at a photo performing detailed adjustments trying to get things just right, only to leave my computer and return after a short hiatus and realize the solution was much easier than I realized at first.

As a case study in how all this works, let me share the following example. My brother and I recently I spent an afternoon at the beach trying to get pictures of a rock hitting the water. When I got back to my computer I found that we had over 50 of images to go through, and following the aforementioned workflow strategies helped make things much easier. After importing the images into Lightroom I went through and rejected about 35 right off the bat. That left me with a much more manageable set, so I cropped and applied some basic adjustments to the remainder. This helped me realize that I needed to reject more of them, now that I was looking at the cream of the crop in greater detail, and I ended up with three photos to edit more extensively. When I was finished, I ended up with exactly one photo from the afternoon that I really liked.

Water splash

Not only is this the best photo out of the many I shot that day, but looking at it allows me to remember many other things about the afternoon as well. I don’t need a hundred poorly-composed, out-of-focus pictures to remember a fun afternoon at the beach. Instead I have this one and just a couple others that all serve to bring back some amazing memories.

Following this simple process, and adjusting it to suit your individual needs, can transform photo sorting from a tedious chore into an activity that is enjoyable, relaxing, and fun.

The post 4 Steps to Less Stressful and Easier Photo Editing by Simon Ringsmuth appeared first on Digital Photography School.


Digital Photography School

 
Comments Off on 4 Steps to Less Stressful and Easier Photo Editing

Posted in Photography


Finding New Photography Locations Just Got Easier With ShotHotspot

26 Jul

There are many ways to go about finding photography locations, but if you’re struggling to find new locations I’d suggest giving ShotHotspot a try.

shothotshop

Five Reasons to check out ShotHotspot?

#1 Great search functionality

shothotspot

Search locations, keywords, and type of photography

The standout feature of ShotHotspot has got to be the search functionality that they have built into the site. Much like Stuck on Earth the photographs they are using come from Flickr and Panoramio, but unlike Stuck on Earth and other outlets ShotHotspot allows you to search based on keywords, style of photography, location distance, and gives you full control over how strong the matching system should be.

shothotspot4

Search within a drawn box

As if that wasn’t enough, it gets even better!. Say you’re not exactly sure what the location that you want to search is called, but you have a general idea of where it is located on a map, you can simply draw a box and search only within that box for photographs taken there and still have access to the various filtering options.

By far they have one of the best search engines I’ve come across for finding locations to photograph, and with time it will only get better.

#2 Crowdsourced corrections from all visitors

One of the problems with pulling data from sites like Flickr and Panoramio is that you rely on the accuracy of the photographer’s location data and key wording. ShotHotspot occasionally will ask for your help in order to help make the location data better. It does this through a simple “Help us Out” box that asks for various information about the location that you are currently browsing.

shothotspot5

ShotHotspot asks for help from a human brain when it needs it

#3 User generated hotspots and information

On top of crowdsourcing for location corrections, ShotHotspot also allows its users to add hotspot locations to their database and edit information about current hotspots that they currently store. This allows for a massive worldwide approach to finding spots to photograph, and determining which ones are better than others. As a user you can add things like type of suitable photography, best time to visit, equipment required, cost of entry or even a general description of the location.

shothotspot6

Add information to locations to help make the database stronger

#4 Integrated with The Photographer’s Ephemeris

While the search functionality is probably the best feature of the site there are a couple of other cool additions that only add to the experience. The first of which is that HotShotspot is directly hooked into The Photographer’s Ephemeris. This allows you to get information on sunrise, sunset, anything else you’d like to know about the location with the click of a button.

shothotspot7

Clicking on the sun/moon calculator will open The Photographer’s Ephemeris

shothotspot2

Get all the details you need to plan for your shoot

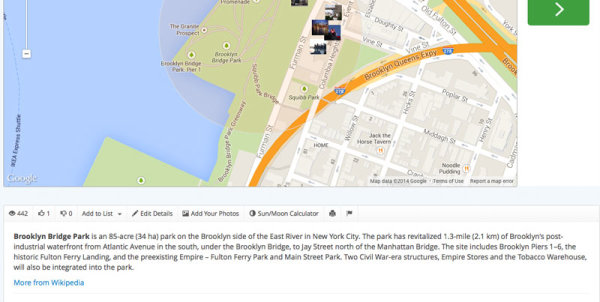
#5 Integrated with Wikipedia

Finally ShotHotspot has also tapped into the gigantic database of Wikipedia for information about the locations it has in the database. Not every location has a wiki page so you’ll find some that are empty, but more popular locations will have a vast amount of information for you to browse through.

shothotspot3

Information from Wikipedia with a link to the Wiki page of the location makes it easy to find out more about where you’re going.

It’s still early, but I think ShotHotspot is a winner

In just a few minutes I found two locations I didn’t even know existed less than 20 miles from my house. I’m not saying that this will happen for everyone, but it’s a great sign for a site that’s only just getting started. Check out ShotHotspot and then come back here and let me know what you think.

The post Finding New Photography Locations Just Got Easier With ShotHotspot by John Davenport appeared first on Digital Photography School.


Digital Photography School

 
Comments Off on Finding New Photography Locations Just Got Easier With ShotHotspot

Posted in Photography


Windows 8 – Make it Easier to Differentiate Explorer Windows by Showing Full Paths

24 Apr

Add the full paths to Explorer folders in Windows 8.1 to make it easier for you to navigate your system.

Let’s say you are copying files between different folders on your Windows 8.1 system or networked drives, or perhaps you are performing basic file maintenance. The need comes to work with two different folders that end with the same name in the path. Another task distracts you, and now you need to get back to work on a particular folder. If you hover your mouse pointer over “File Explorer” in the Taskbar, only the ending parts of the paths are readable. You’ll have to manually click on each window to find out what path each thumbnail represents.

What if you could make the folder windows contain the full paths, such as “C:\Windows.old\Windows\Cursors”, instead of just “Cursors”? This is an easy tweak….

Read more at MalekTips.
New Computer and Technology Help and Tips – MalekTips.Com

 
Comments Off on Windows 8 – Make it Easier to Differentiate Explorer Windows by Showing Full Paths

Posted in Technology


Quick Tip: Importing to Lightroom Made Easier

07 Mar

Introduction

This tutorial is from the Lightroom 4 Workshop Collection. Including 27 hours of A to Z Lightroom 4 education and the industry standard Lightroom 4 Preset System. DPS users can get 10% off by using the DPS10 coupon code upon checkout. Click the link above to learn more/purchase.

Overview

In this tutorial, we will give you a quick tip when importing image into Lightroom that will eliminate the need to search around for import and destination folders.

Step 1. Create Your Catalog

If you don’t already have a Lightroom catalog created, then let’s go ahead and create one now. Simply open Lightroom and go to File -> New Catalog.

file-new-catalog

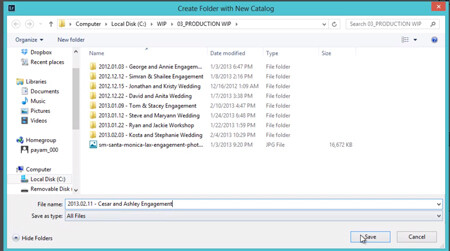
Give your Catalog a descriptive name and a destination folder of your choice. Remember to keep your naming conventions consistent to have an efficient and organized workflow. Our naming convention is as follows:

YEAR.MONTH.DAY – NAMES PHOTOGRAPHY TYPE

So, for this example we have the following:

2013.02.11 – Cesar and Ashley Engagement which is typed into the File name location shown in the image below.

name-catalog

After you hit “Save”, Lightroom will close and re-open with the New Catalog which is ready for images to be imported.

Step 2. Creating the “Folders”

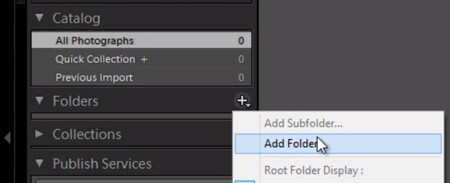
We will be directly importing the images into a folder on the left-side Panels called “Folders.” But, first we have to create a folder for the images to be imported into. On the Folders Panel, simply click the “+” icon to create a new folder as shown below.

add-folder

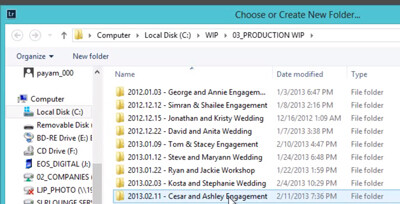
Now, select the same folder where we saved our catalog to create the folder where we want to place the original images. We do this to ensure that the images always move with the catalog if the catalog is ever transferred.

select-folder-engagement

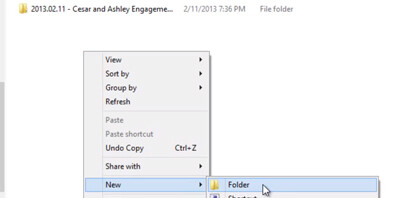
To create new Folder for your original images, right-click within the Folder content area and select “New Folder”. Remember, we are doing this all from the “Add Folder” dialogue in Lightroom, not in the Operating System.

new-folder-engagement

Type in “00_Originals” or the name of your choice for the Folder to contain your original images. Again, keep your naming conventions consistent for better organization. Then click “Select Folder”.

create-00-originals

Step 3. Importing Directly to Folders

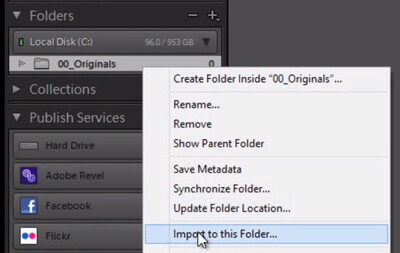
Now that we have our folder created. We have two options to import. Option number 1 is to Right-click on the Folder that shows up under the Folders Panel and select “Import to this Folder” as shown below.

right-click-import

This will pull up our Import Dialogue and automatically set the destination to the “00_Originals” Folder without having to manually select our destination as we normally would.

Workflow Tip: Apply a Workflow Preset on Import

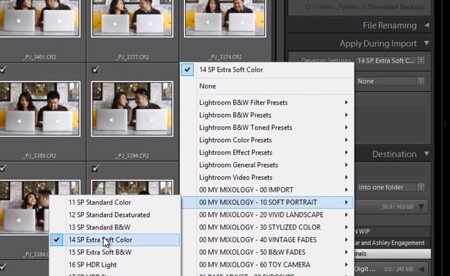
Before you begin the Import process, we always select an import preset that is most applicable to the type of images being imported. In our studio, we generally use the “Extra Soft Color” Preset for portrait sessions from the Lightroom 4 Preset System by SLR Lounge as shown below.

import-with-preset

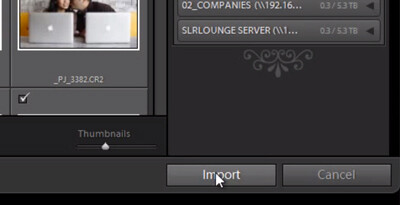
When you are finished, select “Import” located on the bottom-right in Lightroom.

FINAL-select-import

And that’s it! Hopefully this little quick tip on importing will help you to import images just a bit more efficiently.

Learn More with the Lightroom 4 Workshop Collection!

This was a sample tutorial from the Lightroom 4 Workshop Collection. A collection of nearly 30 hours of video education teaching everything from Lightroom basics to advanced raw processing techniques.

The LR4 Workshop Collection also includes the critically acclaimed Lightroom 4 Preset System which is designed to enable users to achieve virtually any look and effect within 3-5 simple clicks. From basic color correction, vintage fades, black & white effects, tilt-shift effects, faux HDR, retouching, detail enhancing, and so much more. Click the links above to learn more.

Post originally from: Digital Photography Tips.

Check out our more Photography Tips at Photography Tips for Beginners, Portrait Photography Tips and Wedding Photography Tips.

Quick Tip: Importing to Lightroom Made Easier


Digital Photography School

 
Comments Off on Quick Tip: Importing to Lightroom Made Easier

Posted in Photography


Microsoft Visio 2010 – Make It Easier to Select Multiple Shapes

08 Feb

When using a selection rectangle in Visio 2010, select objects even if the rectangle does not completely surround them.

When trying to select multiple shapes in a Microsoft Visio 2010 diagram by creating a selection rectangle, you might find the process tricky as Visio requires you to completely surround each shape for it to be added to the selection. This can especially be true if you are editing a diagram on a laptop and using a touchpad / trackpad or other non-mouse pointing device.

By making a simple tweak, you can add objects to the selection by surrounding only part of them with a selection rectangle. While this may cause inadvertent selections in some cases, you might find the ease in selecting a large group of objects to more than make up for that in the long run….

Read more at MalekTips.
New Computer and Technology Help and Tips – MalekTips.Com

 
Comments Off on Microsoft Visio 2010 – Make It Easier to Select Multiple Shapes

Posted in Technology