RSS
 

Posts Tagged ‘Dramatic’

Bold Bamboo: 8 Dramatic Organic Structures by Chiangmai Life Architects

14 Aug

[ By SA Rogers in Architecture & Public & Institutional. ]

With the completion of their latest project, a spectacular sports hall made of prefabricated bamboo trusses, Thai firm Chiangmai Life Construction (CLC) shows off the stunning architectural possibilities of this natural, inexpensive and sustainable material. But it’s far from the only incredible bamboo structure they’ve designed and built, and they’re here to prove that bamboo blends beautifully with modern technology and lifestyles. Each of their projects centers on the concept of ‘life construction,’ in which the design of a building is carefully customized to its environment, including weather, to control how bamboo interacts with the elements.

Bamboo Sports Hall for Panyaden International School

Each of the prefabricated bamboo trusses used to build this sports hall for a school in Thailand spans more than 55 feet without steel reinforcements or connectors, lifted into position on-site with help from a crane. The structure is designed to withstand earthquakes, torrential rain and high velocity winds, and to host basketball, futsal (a variation of football played on a small hard court), volleyball and badminton. The building shape is based on that of a lotus flower, and like all of CLC’s projects, this one is open to the air to encourage ventilation for cooling in Thailand’s temperate climate, where cold weather is not a problem. The space can host 300 students at a time and includes a storage area behind the stage.

Erber Research Center

At Kasetsart University, Thailand’s largest agricultural learning institution, CLC created a facility that allows students and visitors to study chicken rearing through the windows of an adjacent pre-existing broiler hall (where the chickens are raised) as well as offering space for lectures. Based on the layout of a traditional farmhouse with a square courtyard, the facility includes a covered observation platform with windows spray-painted to look like the eyes of a chicken, with a meeting room, office, lecture hall, kitchen and bathrooms nearby. Says CLC, “This design brings traditional architecture to today’s students who grow up in concrete bunkers.”

Trika Villa

Trika Villa is a residence aiming to illustrate CLC’s core goal of bringing natural materials into the 21st century, maintaining a balance of beauty, affordability and quality. The luxury residence includes 5 bedrooms, 5 bathrooms and a spacious living and dining room arranged around a swimming pool in the courtyard. The adobe walls don’t quite meet the curving, overhanging roof, allowing heat to escape and breezes to penetrate the structure.

Bamboo Reception Hall

Welcoming parents and visitors at the entrance of Panyaprateep School in Thailand is this bamboo reception hall with a rolling bamboo roof inspired by snakeskin. Half open and half closed, the structure offers earthen and stone benches for sitting together in small groups as well as an area full of shelves for the display of items made by the students.

Next Page – Click Below to Read More:
Bold Bamboo 8 Dramatic Organic Structures By Chiangmai Life Architects

Share on Facebook


[ By SA Rogers in Architecture & Public & Institutional. ]

[ WebUrbanist | Archives | Galleries | Privacy | TOS ]


WebUrbanist

 
Comments Off on Bold Bamboo: 8 Dramatic Organic Structures by Chiangmai Life Architects

Posted in Creativity


How to Use a Cell Phone for Dramatic Night Photography

15 Jun

Night has fallen. All of the beautiful golden light that flooded across the landscape during sunset has slowly slipped away over the horizon – replaced by inky darkness and twinkling stars. But that doesn’t mean that you need to put away your camera until tomorrow! In fact, you most likely have an excellent source of light in your pocket or purse right now – your cell phone flashlight!

A man photographed using a phone flashlight as the key light -How to Use a Cell Phone for Dramatic Night Photography

A man photographed using a cell phone flashlight as the key light.

Whether you’ve packed your camera bag light or are simply looking for a creative way to make a picture work in extremely dark conditions, your mobile phone flashlight is a surprisingly capable and adaptable lighting tool.

Creating dramatic off-camera lighting

You might be wondering; “Why bother with this at all? My camera has a pop-up flash. If it’s dark outside, my flash can provide all the light I need.”

It’s true that you can use your on-camera flash to light a picture even in near-complete darkness. However, the light that comes from a pop-up flash is direct. This isn’t how we experience light on a daily basis; we experience light coming down on us from the sun or light fixtures in the ceiling.

Directional light is that which comes from an angle, and creates pleasing shadows and depth, whereas on-camera flash erases shadows and textures, resulting in a flat look.

A photo of a man lit by one camera flashlight as the key light - How to Use a Cell Phone for Dramatic Night Photography

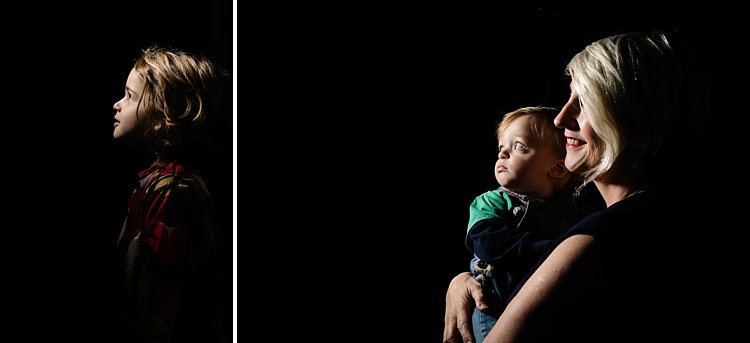
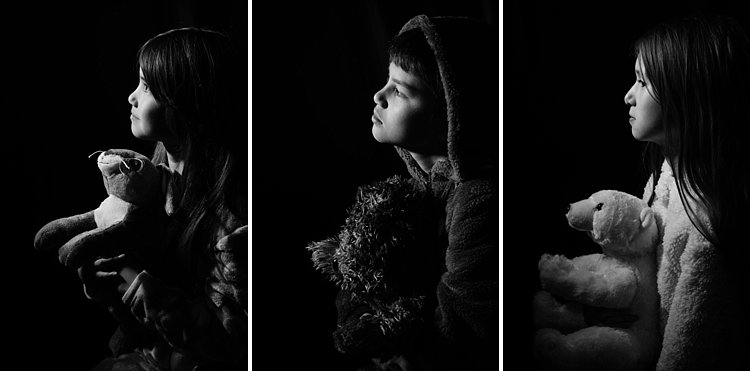
Even using light from one phone flashlight can create dramatic shadows and interesting directional light.

Another problem with on-camera flash is that it often kills the ambient or existing light of a scene. If you want to save the soft glow of city lights in the background of your shot, you’ll often find that your on-camera flash is too overpowering and unnatural looking.

A photo of a man taken using on-camera flash to illustrate the lack of depth and shadow that occurs with this technique - How to Use a Cell Phone for Dramatic Night Photography

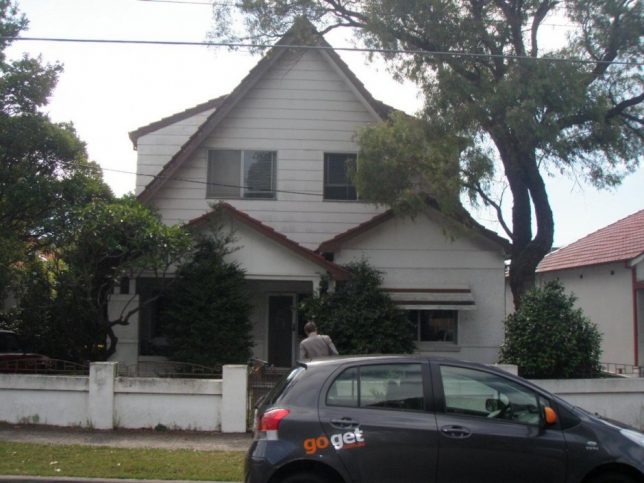
This picture is taken in Automatic Mode, which used the on-camera flash. The light on the subject is flat, the background is dark and all drama or depth in the picture is lost.

Directional light is often what makes or breaks a photo. This isn’t just for photographers using flash. Natural light photographers can spend years learning how to properly position their models in relation to the sun and natural reflectors in order to create pleasing lighting on the subject.

Using a cell phone flashlight allows you to bring the light on your model in from an angle, which can be used to add dimension, enhance textures and create a sense of drama.

Taking the picture

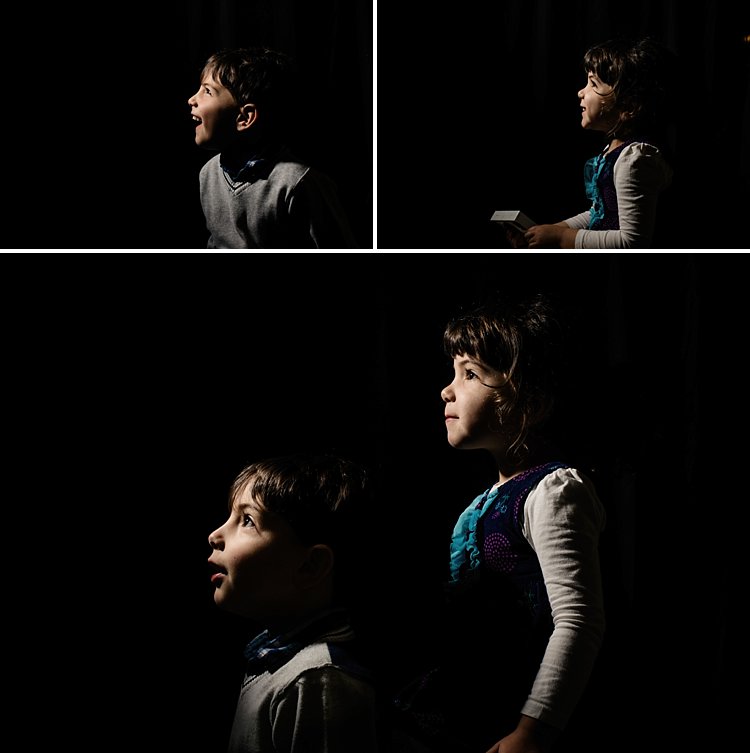
The main advantage of using a cell phone flashlight is accessibility. Most people carry their phone wherever they go, so it shouldn’t be hard to quickly get two or even more light sources that you can use for your picture.

Behind the scenes of lighting a model with light from a cell phone flashlight

Using a cell phone flashlight gives you a mobile lighting kit that is ready for use within five seconds.

A portrait of a man lit by two cell phone flashlights he is holding in his hand

Looking to add more light into your scene? Simply add a second cell phone flashlight!

Things to watch out for

Of course, there are also some drawbacks that you need to be aware of when taking pictures with this technique. First off, most mobile phone flashlights aren’t very powerful. Fortunately, there are three ways to make the light more effective.

    1. Open your aperture wider. With a wider aperture, the camera will collect more light – including the light from your flashlight. Bear in mind that this will also make the whole scene brighter, background and all, so there needs to be a balance.
    2. Turn up your ISO. A higher ISO means your camera’s sensor picks up more light. Again, this effectively makes your cell phone flashlight stronger. Just like with the previous point, this will also make the background brighter.
    3. Move the flashlight closer. Saving the most practical method for last – if you aren’t getting enough light on your subject, try moving the light closer. Sure, you may not want to have a hand holding a cell phone in your image, but getting as close as you can, will add as much light as possible.

The second drawback with using mobile phone flashlights is that the color of the light may not be consistent or carefully balanced like you would find in a typical camera flash. This means that using more than one camera flashlight in a shot could result in slight differences of color.

The last drawback is that a phone flashlight is a small light source and, consequently, produces hard light. If you want an exceptionally soft light that leaves very faint shadows, you would need to use a large softbox or umbrella. But we’re aren’t expecting studio light when we pull out our phone – this is a quick and dirty solution to light.

Examples and comparison

But even with these drawbacks, using a phone flashlight allows you to create directional light that results in more interesting images. Consider the following two examples:

A man photographed in the city, lit by on-camera flash - How to Use a Cell Phone for Dramatic Night Photography

This picture is taken on Automatic Mode. In the darkness, Auto decided to use the on-camera flash. Once again, all shadows and textures are gone from the subject’s face and the pleasant night-time ambience of the city in the background is lost.

A man photographed in the city, lit by a flashlight on a cell phone as the key light

By using a cell phone flashlight just to camera left to light the side of the subject’s face, I was able to add depth and drama for a shadowy, film-noir style image.

Post-processing

A picture lit with a cell phone flashlight will always benefit from some work in the editing room. It’s a good idea to shoot in RAW rather than JPG in order to have as much flexibility as possible with your edits.

The good news is that if you took the time to properly position your lights during the picture, you should have a pretty decent image right out of the camera.

How to Use a Cell Phone for Dramatic Night Photography

This is the unedited, straight-out-of-camera image. It’s already pretty close to the final product.

The first step is to make some corrections to the color of the lighting. You may need to play with the White Balance, or even selectively reduce the saturation on a specific color in order to get natural skin tones.

For example, some cell phone flashlights might produce an overly green light. Pulling saturation back on the greens in your editing program will help to fix that.

You might also need to tackle some hot spots in the post-processing phase. A hot spot is when the center of the light is significantly brighter than the edges. This can be corrected with by using a brush to “paint” the hot spot a bit darker.

How to Use a Cell Phone for Dramatic Night Photography - processing

This is the final edit of the photo shown above. Converting to black and white was a way to add mood while also helping remove some color issues that came with using a cell phone as a key light. This image was shot at 1/100, f/1.4, ISO 1000.

Play, experiment and have fun!

Practice, practice, practice. Taking the time to experiment will help you to better understand the benefits and drawbacks of this style of lighting.

Of course, if you need high-quality lighting for a shot, don’t expect your cell phone flashlight to produce the same results as a softbox. But if you’re in a pinch and need to improvise some lighting in a hurry, remember that you’ve got a ready-made light source right in your pocket.

The post How to Use a Cell Phone for Dramatic Night Photography by Frank Myrland appeared first on Digital Photography School.


Digital Photography School

 
Comments Off on How to Use a Cell Phone for Dramatic Night Photography

Posted in Photography


Extremely dramatic video touts Canon’s CMOS technology

16 Feb

No doubt, Canon’s CMOS sensors are capable of capturing some amazing low light video footage. And it’s true that Canon cameras can create usable footage in literal darkness. But this new video from Canon… maybe takes it all a bit too seriously. Here’s a glance at what the script (probably) looks like:

[Title: Moonbow / a rainbow born of moonlight]

[Scene opens with a dramatic time-lapse sunset over a mountain. Cue the strings.]

[Narrator, in very Movie Trailer Guy voice]: Have you ever seen a rainbow… in the light of the moon?

That’s just the first ten seconds. Do yourself a favor and watch the full 4+ minutes to enjoy the full effect of the soaring music, dramatic CGI models and lines like ‘By uncovering an unseen world, Canon CMOS sensors contribute to the creation of a prosperous society.’

In all seriousness, the CMOS technology Canon references does push the envelop for extreme low light shooters. Take a look at how one filmmaker uses the ME20F-SH to record video of a meteor shower.

Articles: Digital Photography Review (dpreview.com)

 
Comments Off on Extremely dramatic video touts Canon’s CMOS technology

Posted in Uncategorized


4 Beginner Tips for Creating Dramatic Portraits with One Flash

02 Feb

In this article, I will explain how you can use a transmitter/receiver, or transceiver system to achieve simple dramatic portraits using only one flash. Below is a step-by-step guide on how to get you started.

Background

I used to fear using anything other than natural light. One of the reasons was that I had a notion that using artificial lights such as off-camera flash and strobes is too difficult and requires deep technical knowledge. Well, yes and no. To master it, you have to understand lighting ratios and learn to make mental calculations of light from various sources and suchlike. But to start using it, not really.

My first experience of off-camera flash was using the Creative Lighting System (Nikon) capability between my speedlight and my camera. Most of my early attempts were unsuccessful especially with the limitations of the line of sight infrared system. It was unreliable too, especially when shooting under pressure or caught on the hoof. I also used overexposed my light with my very untrained and inexperienced eye when I was just starting out.

4 Beginner Tips for Creating Dramatic Portraits with One Flash

Wireless triggers

Enter wireless radio transmitters and receivers (or transceivers) such as the Pocket Wizard, CyberSyncs, brand’s own (Nikon and Canon) and the super affordable Yongnous. A transmitter which is connected to your camera sends the message to the receiver which is attached to the flash unit. Transceiver units, on the other hand, can act as both receiver and transmitter so that you can use them on either the camera or the speedlight but you would still need one unit to attach to each piece of equipment.

These wireless transceivers are a game changer without a doubt. They are simple to use and are reliable most of the time as well. I use Cybersyncs for my studio strobes and Yongnous for my speedlights and find the Yongnous are incredibly reliable and user-friendly with hardly any misses. However, the Yongnous cannot be used for strobes.

#1 Choose the look and mood for your portrait

Do you want super dramatic low key portraits or the other end of the spectrum – high key, bright and airy? The mood of your picture will dictate your background and of course the camera and flash settings. I have chosen a black background for these portraits to achieve a high contrast between the brightest parts of the image and the shadows. This will keep the overall mood dramatic and the lighting low key with plenty of black areas.

#2 Set up your equipment

If you have transmitter and receiver units, attach the transmitter to the hotshoe of your camera while the receiver needs to be attached to the flash (speedlight or strobe). If you have a transceiver, this can go on either camera or flash but you still need two units, one on each piece of equipment.

It’s also a good idea to put your flash unit on a light stand. I used a studio strobe mounted on a light stand but attached it to a boom arm for more flexibility in angling the light. Note: A boom arm is not necessary at all for a simple beginner setup. Without a light stand, you can always mount your flash on a cabinet or steady surface, making sure it doesn’t topple over. Most speedlights come with little plastic feet that are handy for this purpose.

4 Beginner Tips for Creating Dramatic Portraits with One Flash

#3 Modify your light

One of my rules is to always modify the light. The only time I shoot with a bare flash is when I use it as a kicker light at wedding receptions or to light a backdrop. At all other times, I will always modify it somehow or bounce it to maximize the softness of the light or to minimize the harshness depending on the situation.

For this look, I wanted the flash to point directly at the subject, in a narrow beam and not have any spill onto the background. A gridded snoot would do the job controlling the light direction, but I didn’t have one. Plus I probably would have found that the light was still a bit harsh without further modification. I ended up McGyvering my own modified snoot using a black card and the diffuser panel of a 5-in-1 reflector. I twisted the reflector (like you would when putting it away) so that it was only a fraction of its size and I then had a 3-layer diffusion panel. This was taped to the strobe and with black card wrapped around it to direct the light onto my subject like a beam.

There are two factors that are crucial for getting soft light; the distance between your subject and the light and the size of the light. The closer the light is to the subject, the softer it is. The larger your light source is, the softer it will be. My light source was not very big at all, so to leverage maximum softness I decreased the distance to the subject. The light was positioned about an arm’s length away from the subject, quite high up at a 45-degree angle. This was to mimic natural light coming from a high window.

#4 Try various settings

I wanted to shoot at f/8 so I metered the flash. You don’t require a handheld light meter to do this, by the way, you can just start with a few trial and error test shots to find the correct setting. I started off with the lowest power on my strobe but ended up cranking it up as the 3-layer diffusion cut out quite a lot of the light. My settings for these were: f/8, 1/60th,  ISO 400 and my strobe power high at 7. The strobe settings will vary depending on the brand you are using.

4 Beginner Tips for Creating Dramatic Portraits with One Flash

This is just one of the many ways you can create portraits with one flash. Try it and experiment with other angles, moods, and light settings and you may be amazed at what one light can do!

Share your portraits here too in the comments below.

googletag.cmd.push(function() {
tablet_slots.push( googletag.defineSlot( “/1005424/_dPSv4_tab-all-article-bottom_(300×250)”, [300, 250], “pb-ad-78623” ).addService( googletag.pubads() ) ); } );

googletag.cmd.push(function() {
mobile_slots.push( googletag.defineSlot( “/1005424/_dPSv4_mob-all-article-bottom_(300×250)”, [300, 250], “pb-ad-78158” ).addService( googletag.pubads() ) ); } );

The post 4 Beginner Tips for Creating Dramatic Portraits with One Flash by Lily Sawyer appeared first on Digital Photography School.


Digital Photography School

 
Comments Off on 4 Beginner Tips for Creating Dramatic Portraits with One Flash

Posted in Photography


Modern Home Makeovers: 15 Dramatic Before & After Transformations

08 Nov

[ By SA Rogers in Architecture & Houses & Residential. ]

main

Not every radical home makeover turns an ugly duckling into a beautiful swan, but they sure can render the original structures completely unrecognizable, for better or worse. Sometimes no more than the bones of the home stay in place as an entirely new sort of residence rises in its place, while other renovations maintain a starkly visible division between the old and the new. These transformations certainly prove the value of looking past a building’s flaws to its potential, as no matter what a house may look like when it’s purchased, it can ultimately be anything the homeowners want it to be.

Kensington Residence, Sydney, Australia

kensington-before

kensington-after

There was nothing particularly special about this two-story 1920s bungalow residence in Sydney, Australia, before CplusC Architects got ahold of it and transformed it into a sustainable home. An existing extension to the first floor is vastly improved by a timber screen that improves natural ventilation and gives it loads more curb appeal.

Brooklyn Row House by Office of Architecture

screen-shot-2016-11-06-at-6-48-28-pm

screen-shot-2016-11-06-at-6-48-38-pm

A 110-year-old Brooklyn row house looked very 1980s with its vinyl siding, boring sash windows and afterthought of an awning, not to mention missed opportunities for vertical expansion and a visual connection to the private outdoor space. Office of Architecture renovated the space inside and out, integrating a second-floor extension, lots of glass and a wooden facade.

Commercial Building to Modern Residence in Thailand

thailand-before-and-after

thailand-after-2

A gutted five-story commercial building becomes a spacious, luxurious home for an extended family of siblings, their spouses and children in this stunning Bangkok renovation project by IDIN Architects. The first level accommodates the family’s jewelry store, while the rest serves as their private home, full of atriums planted with live trees.

Texas Ranch House Transformation by MF Architecture

pugh-residence-before

pugh-residence-after

Who would ever think that a ranch house had so much potential? This residence east of Austin, Texas had already been expanded several times and was full of dark, disconnected interior spaces. MF Architecture conserved most of the exterior envelope while knocking out lots of the interior walls, but gave the facade a fresh look with white brick, timber cladding and a high row of narrow windows that bring light inside.

Modest Home in Salmon Arm, Canada

salmon-arm-before

salmon-arm-after

The couple who bought this property in Canada called it a “run-down, boring sausage-box cookie-cutter house built in ’73 on a large lot with ramshackle garbage-filled sheds.” But they knew it could be more, and took on the project of renovating it themselves, adding a third-floor volume that extends to the ground in the front and back, transforming the facades and tacking on two carports.

Next Page – Click Below to Read More:
Modern Home Makeovers 15 Dramatic Before After Transformations

Share on Facebook


[ By SA Rogers in Architecture & Houses & Residential. ]

[ WebUrbanist | Archives | Galleries | Privacy | TOS ]


WebUrbanist

 
Comments Off on Modern Home Makeovers: 15 Dramatic Before & After Transformations

Posted in Creativity


Dramatic ‘Elastica’ Residence: The House of the Future is Here

18 Aug

[ By SA Rogers in Architecture & Houses & Residential. ]

elastica house 1

Looking like the set of a sci-fi film, the ultramodern ‘Elastica’ residence in Bangalore, India is pretty much what we all imagined our houses would look like by the time we became adults. It’s a little bit Jetsons, a little bit rock n’ roll, and a whole lot different from the decidedly unfuturistic houses most of us still occupy in the year 2016. Inside, there are virtually no straight walls, with undulating white surfaces stretching around the space, and what looks like a translucent cylindrical elevator reminiscent of the ‘Orgasmatron’ machine in the 1973 film Sleeper standing at its center.

elastica house 2

elastica house 3

elastica house 11

Cadence Architects conceived the house as a continuous loop rising from the ground, with large open spaces providing sight lines from the upper floors to the living space on the lowest level. Made of acrylic and ferroconcrete, the walls and floors flow like liquid in sculptural curves, occasionally stretching out to become built-in furniture like a cantilevered kitchen island. In the bedroom, a black acrylic base cradles a circular mattress like a gigantic soap dish, matching the marbled floor.

elastica house 4

elastica house 10

elastica house 7

elastica house 8

A minimalist black and white palette keeps all the attention on those curves and gives the interiors the air of a spaceship, accented with strips of LED lighting and furniture that appears to have been custom-made to match the scheme. A pod-like children’s bed looks like something you might wake up in after traveling for light years on an intergalactic journey, and a home cinema amplifies the outer space effect with starry lighting and a molded, carpeted floor shaped like a landscape with comfy hills and planes to lay on.

elastica house 6

elastica house 5

elastica house 9

The facade of the home is glazed on every level except the middle one, which is sheltered by a modern interpretation of the traditional brise-soleil, a perforated screen that filters direct sunlight. The ground and top floors feature Astroturfed terraces, the highest of which looks out onto the more conventional architecture of the neighborhood. Some of the design touches throughout are strange in an otherworldly sort of way, and certainly not everyone’s cup of tea, but it’s a cool example of architects getting creative with residential designs.

Share on Facebook


[ By SA Rogers in Architecture & Houses & Residential. ]

[ WebUrbanist | Archives | Galleries | Privacy | TOS ]


WebUrbanist

 
Comments Off on Dramatic ‘Elastica’ Residence: The House of the Future is Here

Posted in Creativity


How to Create a Dramatic Cinematic Style Portrait Using Photoshop Color Grading

30 Jun

Cinematic style portraits are personally one of my favourites. What I like the most about them are the desaturated colours and the dramatic ambience.

Before we start the tutorial on colour grading, I will give you some of my best tips to achieve this cinematic look:

  • Use a large aperture, something between f/1.4 and f/2.0. If you have a long lens then you can also use that. The idea is to have a nice background bokeh (when things in the background are blurred). You also want to have nice separation between the model and the background.

IMAGE 1

  • If you’re shooting indoors with strobes, then try to add ambience by adding shadows to the model’s face. You do not want flat lighting, it is boring.
  • If somehow you can’t get the dramatic lighting, don’t hesitate to enhance the contrast with some dodging and burning in Photoshop.

IMAGE 2

  • If you’re shooting outside, the I recommend shooting right after sunset. You will get nice soft light on the model’s face, and you will also have city lights behind them, to really get a cinematic feel. This only works with a large aperture, and it adds another point of interest.

IMAGE 3

  • Your model should have a strong expression on their face, especially if it’s a male. Cute smiling images do not really work that well with this style.
  • Leave some space in the frame. You do not want your model to take up the whole frame, so leave some space around them, to add context to your image. You can get better results if the viewer is able to locate the spatiotemporal context of your image.

IMAGE 4

  • Your model should not wear something too flashy (something like pink or yellow), limit their clothes to sombre, subdued colours.
  • Try to use complementary colours as much as possible, it creates nice depth to your images. Usually in movies, the actor is either in blue and the background in yellow/orange, or vice versa. Try to keep your actor in a range of cold colours and your background in warm colours, it works the best. The opposite also gives you good results.

IMAGE 5

  • The most important thing is that your model should look like a character. Try to add accessories, clothes, or poses that make the character look credible. You can discuss with the model or stylist before the session, the look you want to give to your images, and have a look together at the wardrobe.
    IMAGE 6

Color Grading in Photoshop

For the colour grading tutorial I am going to work on this image:

IMAGE 7

This image was taken on a Canon 6D, with an aperture of f/1.8, on a 50mm lens. This was taken during a short film where I was the photographer. There was a lighting behind the window aiming at the model, we added some fog to create this 1945 look.

What we’re going to do with this image is bring it back to life, by enhancing the contrast between the yellows in the highlights, and the greens in the shadows. We’re going to have a colour scheme based on analogous colours, going from green to yellow.

Let’s start with some basic exposure correction on Lightroom, this will depend on your image, so adjust accordingly.

IMAGE 8

Do basic adjustments in Lightroom, or your program of choice, first.

After the basics are done let’s move the image over to Photoshop to start our colour grading. If you are using Lightroom just right click and choose Edit in Photoshop.

First, duplicate the layer in Photoshop so that you won’t do any destructive editing. You can always go back to the original layer if you don’t like the results.

IMAGE 9

IMAGE 10

Make a duplicate layer.

The first thing we’re going to do is to create a new layer adjustment, go to: Layer > New Adjustment Layer > Color Lookup…

Screen Shot 2016 06 23 at 2 08 13 PM

Pick filmstock_50.3dl and reduce the opacity of the layer to around 20%. You need to reduce the opacity otherwise the effect is going to be too strong.

IMAGE 12

IMAGE 13

Next thing we’re going to do is create a curves layer and redo the contrast. This will really depend on your image, so adjust according to your taste.

IMAGE 14

Adjustment layer Curves to add contrast.

Then create another curves layer, go to the blue curve and lower the top right extreme of the layer. This will add yellow to your shadows.

IMAGE 15

Add yellow to the shadow areas using this curve adjustment

Next step is to play around with the colour balance (make another new adjustment layer) to enhance to greens in the midtones and the yellows in the highlights. Once again just the sliders to add green and yellow to both the highlights and the midtowns.

IMAGE 16

Select Midtones from the pull-down menu and add green and yellow.

IMAGE 17

Select Highlights from the pull-down menu and add green and yellow.

Right now, we are basically done with colour grading. Lastly is to quickly dodge and burn, to enhance the light coming from the window, and to darken the image and the background. We are basically doing a manual vignette.

To lighten up the image, create a curves layer, make it brighter, and add a black layer mask (CMD/CNTRL+I to invert the layer mask). Call the layer Dodge, and paint with a white brush (because the mask is black) in the spots where you want to brighten up the image. Pick a brush with an opacity around 40% with and edge hardest of 0%

To create a dark layer, we will basically do the same thing but darken up the curves layer and paint over the spots in the image we want darker.

IMAGE 18

This Curves adjustment layer is for dodging or lightening areas of the image.

IMAGE 19

This Curves adjustment layer is for burning or darkening areas of the image.

IMAGE 20

Rename your layers to identify them easier.

IMAGE 22

This is the final result:

IMAGE 23

Conclusion

Cinematic portraits rely heavily on great colour grading – but the lighting, model, camera settings and ambience should not be neglected. It all starts with a great image and ends with Photoshop to enhance your vision.

Enjoy the art !

googletag.cmd.push(function() {
tablet_slots.push( googletag.defineSlot( “/1005424/_dPSv4_tab-all-article-bottom_(300×250)”, [300, 250], “pb-ad-78623” ).addService( googletag.pubads() ) ); } );

googletag.cmd.push(function() {
mobile_slots.push( googletag.defineSlot( “/1005424/_dPSv4_mob-all-article-bottom_(300×250)”, [300, 250], “pb-ad-78158” ).addService( googletag.pubads() ) ); } );

The post How to Create a Dramatic Cinematic Style Portrait Using Photoshop Color Grading by Yacine Bessekhouad appeared first on Digital Photography School.


Digital Photography School

 
Comments Off on How to Create a Dramatic Cinematic Style Portrait Using Photoshop Color Grading

Posted in Photography


LandscapePro software promises simple steps to dramatic changes

21 May

Anthropics Technology, the makers of the PortraitPro software application, has announced a program that it claims ‘radically simplifies and speeds up’ dramatic reworking of landscape images. LandscapePro offers tools for replacing skies, enhancing water and altering the direction of the light using automatic selection techniques and ‘one-click’ pre-sets. The company says that users will need ‘no prior knowledge or technical skills’ to use the program.

LandscapePro invites users to drag labels, such as ‘grass’, ‘sky’ and ‘water’ on to the relevant areas of an image and the software automatically makes an adjustable selection of that area. A collection of sliders and filters then makes it possible to adjust or replace each type of element. A depth of field simulator can create blur at certain distances while further controls allow photographers to emphasize distance through coloration.

Color temperatures can be adjusted using pre-sets with atmospheric labels to simulate sunset or stormy conditions, and ‘common objects’ such as grass and sand have their own pre-sets as well. There is also a tool that helps to select areas of sky through the branches of a tree.

There are two versions of LandscapePro: Standard and Studio. The Studio version works with Raw files and has options to operate as a plug-in for Photoshop, Lightroom and Elements among other differences.

The Standard version costs $ 79.90/£59.90 while the Studio version costs $ 119.90/£99.90, though both are offered at 50% off at the moment.

For more information, and a free trial, visit the LandscapePro website.


Press release:

LandscapePro Launched

New, easy way to enhance landscape photos

Anthropics Technology today announced the launch of LandscapePro, the industry’s first intelligent landscape photo editing software, available in standalone and Adobe Photoshop, Lightroom and Elements plug-in editions. The new software radically simplifies and speeds up outdoor and nature photo retouching. It includes landscape relighting, sky replacement, 3D depth estimation, a depth of field simulator, distance controls, intelligent selection tools, and photo-adaptive controls among other powerful features. With one-click presets and targeted editing available, users can create beautiful landscapes in seconds.

LandscapePro is a new way to enhance pictures that rises to the challenges and nuances of landscape photography. It assumes no prior knowledge or technical skills, and photographers can create unique, dramatic effects quickly. The new product comes from the makers of the award-winning retouching software PortraitPro and PortraitPro Studio with a plug-in mode for Adobe Photoshop, Lightroom, and Apple Aperture.

“Inspired by the success of Anthropics’s PortraitPro software, we are delighted to introduce a new product to help photographers expand their creativity and take landscape retouching to the next level,” said Andrew Berend, CEO, Anthropics. “LandscapePro offers an innovative and easy way to create stunning landscape photography, and can be used by novices or experienced photographers alike. As its intelligent controls uniquely adapt to the features of each photo, it enables photographers to do incredible things with their outdoor photos simply by using sliders.”

Key Features

Easily enhance landscape photos. LandscapePro contains a host of unique tools to enable anyone to create beautiful scenic photographs.

  • Intelligent selection tools.
  • Unique editing controls that adapt to the photo.
  • Easy-to-use slider interface.
  • No technical skills required.
  • LandscapePro Studio handles RAW files and can be run as a Photoshop, Lightroom and Elements plug-in.

Expand your creativity. Create unique, breathtaking scenes. LandscapePro effects are specifically tailored to landscape photography.

  • Landscape relighting. Lighting adjustment to fit any creative goals: change light source, temperature, time of day, or go from dawn to sunset. Note how the side lighting brings out the texture on the ground.
  • Instant sky replacement with presets. The unique sky controls enable photographers to replace sky, change clouds, or cast cloud shadows. Note how the change in sky has automatically relit the ground.
  • Cloud and atmosphere adjustment. Tools to manipulate skies by separately adjusting the clouds and the atmosphere behind them.
  • 3D depth estimation. A unique, easy-to-use depth of field simulator respects 3D objects in the scene. As easy as using a single slider.
  • Distance controls. Change colors in the image depending on the distance to the camera – make distant objects bluer, highlight the middle distance, or add fog.
  • Landscape-specific tools for dealing with common issues such as selecting small patches of sky behind trees.
  • Color adjustment tools targeted at common objects in landscapes, e.g. tools to make grass look lush, change the color of the sea, or to make sand golden.
  • One-click presets such as wet sand, stormy water, red sunset, lush trees.
  • Automatic area selection. Tag areas as sky, trees, buildings, grass, sand, rock, water and the selection will be applied instantly.
  • Targeted editing. Specially designed controls for different areas, e.g. change clouds to stormy or add thunder clouds, adjust waves, or add sunrise reflection to the sea.
  • Whole picture and individual object enhancements. Transform the whole photo instantly or use a new workflow where you select several objects in your scene first, before editing.

Editions

LandscapePro Standard – dedicated landscape photo editing.
LandscapePro Studio – handles RAW files, 48 bit per color TIFFs, supports different color spaces, and can be run as a plug-in for Photoshop, Lightroom and Elements.

Compare the different editions: www.landscapepro.pics/editions.
Availability, Free Trial and Pricing

LandscapePro is available to purchase or for a free trial from http://www.landscapepro.pics/.

Articles: Digital Photography Review (dpreview.com)

 
Comments Off on LandscapePro software promises simple steps to dramatic changes

Posted in Uncategorized


14 Essential Rain Photography Tips for Creating Dramatic Images

16 Apr

Wherever you travel, you are always free to take that perfect shot from the best angle. Not when it’s pouring down heavily, though. Winter is not always the best climate for comfortable outdoor photography. But guess what, if you are a clever photographer, you can take even better photos in the rain than on sunny days. Cold and stormy weather Continue Reading

The post 14 Essential Rain Photography Tips for Creating Dramatic Images appeared first on Photodoto.


Photodoto

 
Comments Off on 14 Essential Rain Photography Tips for Creating Dramatic Images

Posted in Photography


Time Travel in China: Photos Reveal A Century of Dramatic Growth

15 Apr

[ By Steph in Culture & History & Travel. ]

time travel china 1

Few nations have experienced quite the explosive rate of growth over the last century as China, and a new photo series shows us just how dramatic those changes actually look on the ground. Photographer, computer scientist and MIT alum Dheera Venkatraman pored through books and archives to find images taken in the 20th century and then went out and re-took them, shot by shot, attempting to frame them exactly as they were originally photographed. All of the new imagery has been converted to black and white to highlight what’s different and what has managed to survive after decades of frantic industrialization.

time travel china 11

time travel china 5

The result is a series called Time Travel in China, creating pairs of images that Venkatraman likens to a ‘spot-the-difference’ game. Agricultural fields become towns, skyscrapers shoot up into the air, bridges stretch across waterways, dirt roads are paved, infrastructure becomes more complex.

time travel china 6

time travel china 7

time travel china 2

Yet not only do the contours of the land and the silhouettes of the mountains remain the same, a surprising number of buildings do, too, especially temples and historical structures. In some cases, the only notable shifts in a forty- or even eighty-year period are the vehicles, some lights and a handful of modern towers.

time travel china 12

time travel china 14

time travel china 3

time travel china 10

“When most people travel, they think of traveling in space,” she says. “Whether it’s hiking through a national park or learning about a distant culture, it’s usually about the destination. This time, I decided to travel in time.”

time travel china 8

time travel china 9

time travel china 4

“It wasn’t always easy to get that perfect angle match,” she continues in a post on PetaPixel. “In some places, the vantage point ended up being in a private location, and in some cases there was a large obstruction or building preventing me from getting the same view. But nonetheless, I managed to capture several shocking contrasts over the past century of Chinese history.”

Share on Facebook


[ By Steph in Culture & History & Travel. ]

[ WebUrbanist | Archives | Galleries | Privacy | TOS ]


WebUrbanist

 
Comments Off on Time Travel in China: Photos Reveal A Century of Dramatic Growth

Posted in Creativity