RSS
 

Posts Tagged ‘density’

How to Use Neutral Density Filters to Make Better Landscape Photos

20 Feb

In an earlier article, I wrote that neutral density filters are the secret weapon of the landscape photographer. I couldn’t work without mine and I suspect most landscape photographers would say the same.

But why are they so useful? There are two reasons. One is that neutral density filters give you control over exposure, and the other is that they give you creative control over shutter speed.

Neutral density filters

Let’s take a closer look at these concepts.

What is a neutral density filter?

First, some definitions. A neutral density filter is one that blocks light. The result is that less light passes through the lens and reaches the camera’s sensor (or film).

There are several ways of measuring the strength of neutral density filters, but they are basically all different ways of stating how many stops of light the filter blocks. Typical strengths are one stop (0.3 or ND2), two stops (0.6 or ND4), three stops (0.9 or ND8), six stops (1.8 or ND64 )and ten stops (3.0 or ND1024). Some manufacturers even make neutral density filters that block 16 stops or more light, although these are more of a specialty item.

This photo shows a ten stop neutral density filter mounted on a lens. As you can see the filter is nearly opaque and you can’t see through it well.

Neutral density filters

Different kinds of ND filters

Neutral density filters block light evenly across the frame. Graduated neutral density filters, on the other hand, block light across just part of the frame. Half the filter is clear, and half is opaque, with a graduated area in-between (hence the name).

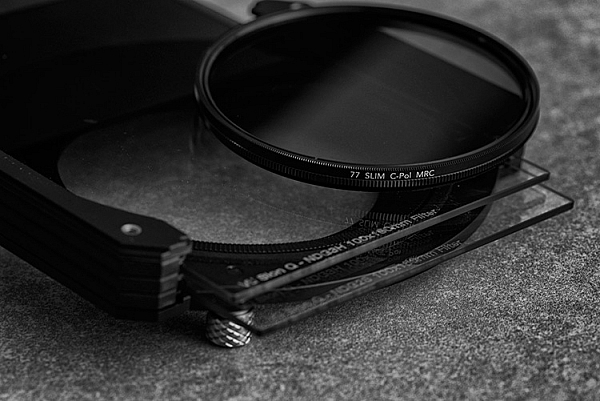
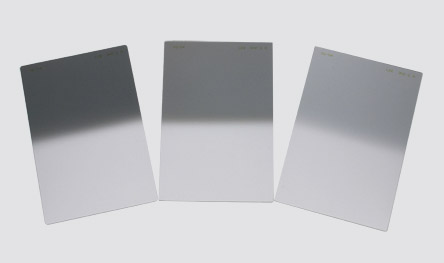
This photo shows a two stop Lee graduated neutral density filter in a square filter holder. The top half of the filter is dark (to block light) and the bottom is clear.

Neutral density filters

Graduated neutral density filters and the landscape

Graduated neutral density filters (often just called grads or GND filters) are used by landscape photographers to control exposure.

Imagine you are taking a landscape photo that includes the sky and the setting sun. In this scenario, the sky is much brighter than the foreground. If you expose correctly for the sky, the foreground goes dark. If expose correctly for the foreground, the sky is burnt out.

A graduated neutral density filter blocks light from the sky without affecting the foreground. If for example, the sky is three stops darker than the foreground then a three-stop graduated neutral density filter will help even out the difference between the two, allowing you to capture the scene in a single frame.
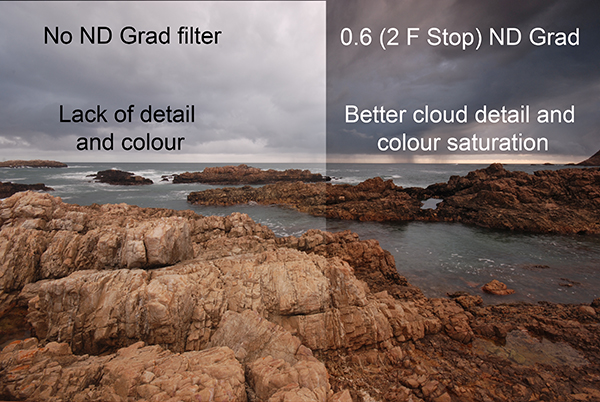
Here’s an example

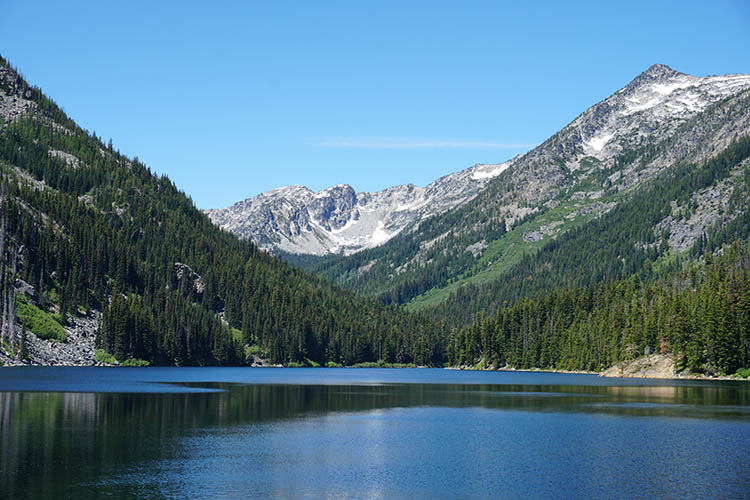
For this first photo below I set the exposure by exposing to the right (on the histogram) so that there were no clipped highlights. The problem is that the bottom half of the photo is too dark. You can make it lighter  in Lightroom, but not without introducing noise.

Neutral density filters

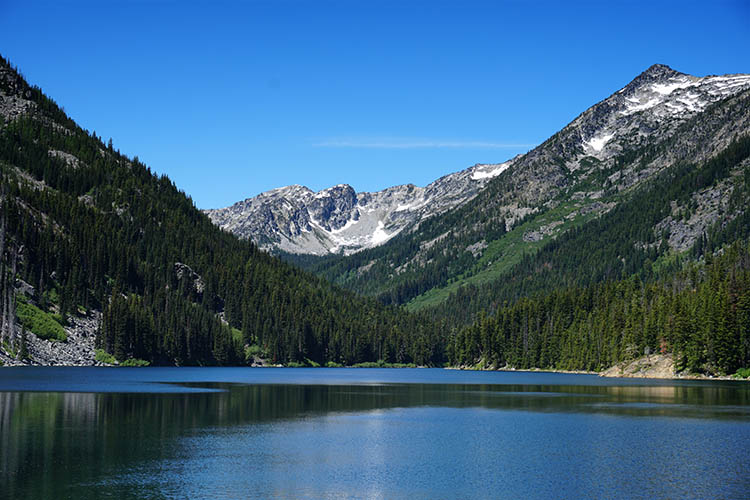
I made another photo (below) and increased the exposure by two stops. The foreground is exposed properly but now the sky is burnt out. There is no way to bring back the lost highlight detail in Lightroom.

Neutral density filters

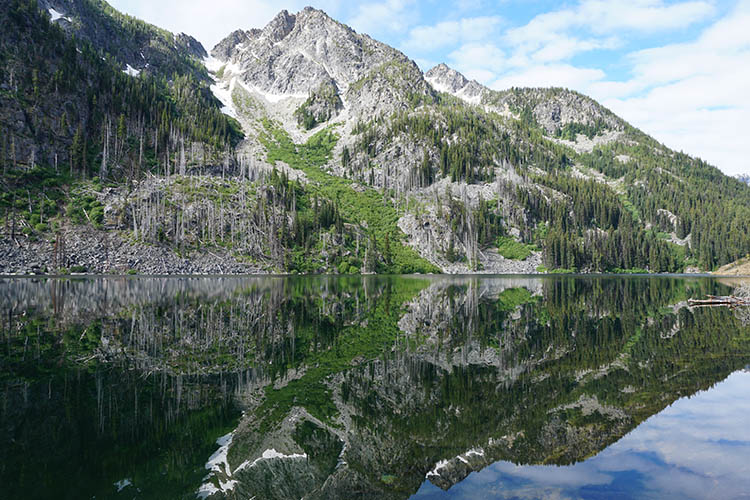
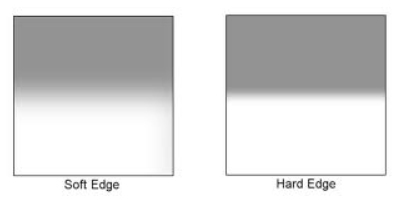
I made this last photo using a three-stop soft graduated neutral density filter. The filter allowed me to capture detail in both foreground and sky.

Neutral density filters

The advantage of using the filter is that it let me continue working as the light faded, taking longer exposures without having to bracket. The last photo of the evening had an exposure time of six minutes.

It also saves time in post-processing compared to using techniques like exposure blending or HDR in Lightroom. Before digital cameras (and processing), graduated neutral density filters were the only way that photographers had to balance out exposure between foreground and sky.

Disadvantages of graduated neutral density filters

Graduated neutral density filters do have some disadvantages.

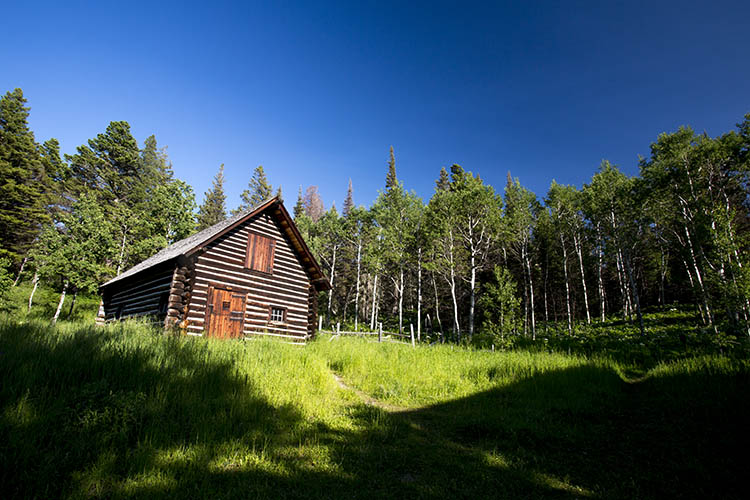
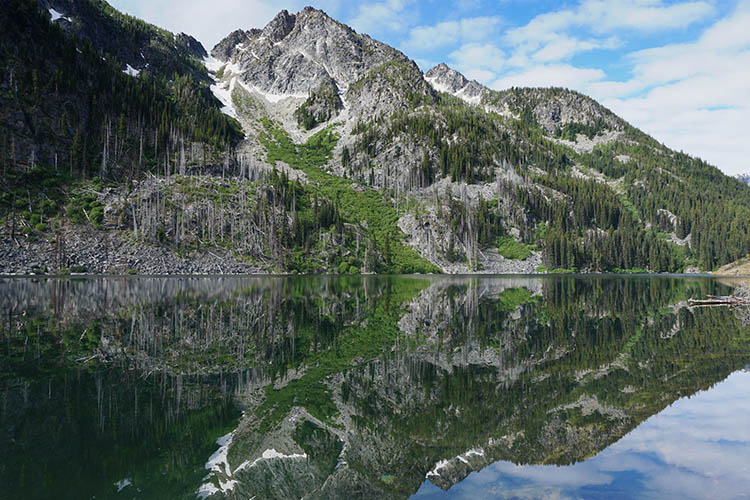
The first is that they don’t work well with scenes broken by something that sticks up above the horizon (like a tree or mountain).

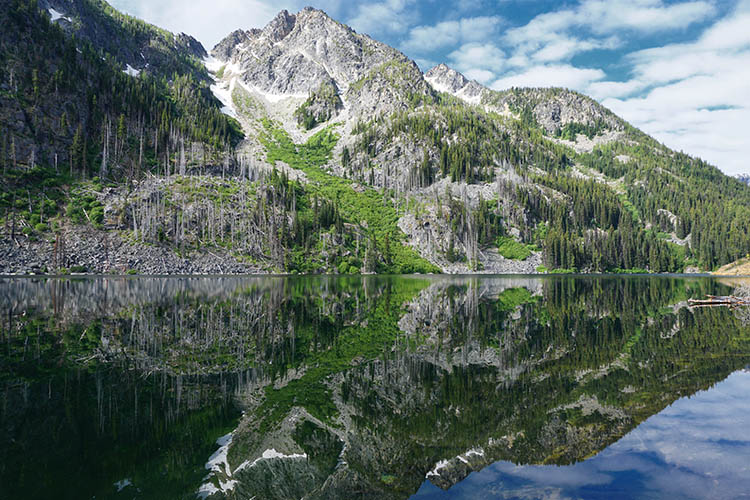
The photo below is a good example. The sky is a small part of the frame and it’s impossible to cover it with a graduated neutral density filter without making the rocks darker as well. The only solution was to take two different exposures, one for the foreground, the other for the sky, and blend them in post-processing.

Neutral density filters

Another disadvantage is that good quality graduated filters are expensive.

Despite this, some landscape photographers like to use them as it gives them choice. With graduated neutral density filters you can decide which technique is best suited for the scene you are photographing.

Neutral density filters and the landscape

Landscape photographers use neutral density filters for creative control over shutter speed.

Think about the exposure settings landscape photographers tend to use. You normally set ISO to the lowest setting and aperture to f/11 or f/16. This gives you maximum image quality (low ISO) and good depth-of-field (narrow aperture).

The shutter speed required to give the correct exposure will depend on the ambient light leves. In bright light, it might be around 1/125th of a second. In the fading light at the end of the day, it might be around 1/2 second.

But what if you want a longer shutter speed? This is where neutral density filters come in. They block light so that you can get longer shutter speeds. Longer exposures allow moving parts of the landscape (like clouds or water) to blur, which in turn creates mood and atmosphere.

The ultimate example of this is long exposure photography, where exposures of several minutes are used to blur the motion of the sea and clouds. Here’s an example. This photo was taken at ISO 200, at f/11 for 1/125th of a second.

Neutral density filters

With a neutral density filter, I was able to turn that into a shutter speed (exposure time) of 210 seconds. The photo is transformed.

Neutral density filters

The neutral density filters I use

One of the problems with neutral density filters is that there are so many to choose from. How do you know which ones to buy? Ultimately you have to decide how much you want to spend and then look at the options. But I can start by telling you which filters I own, why I bought them, and give you some tips for choosing filters.

Take note – filter size is a factor

But before I do that, I’d like to make the point that filters are very closely related to lens size. The bigger your lens, the bigger the filter required to cover the front element, and the more expensive it will be to buy. The difference can soon add up to hundreds of dollars. You have to bear in mind the filters you may want to buy later when you buy the lens itself.

My Neutral Density Filter Kit

My neutral density filter kit is the circular Formatt Hitech 72mm Firecrest Joel Tjintjelaar Signature Edition Long Exposure Kit #1. It contains three neutral density filters with strengths of three, six and ten stops respectively. You can also use two filters together to block nine, 13 or 16 stops of light. I bought the circular filters because they are less expensive than the square ones. (NOTE: if you plan to use your filters on multiple lenses, buy the size you need for the largest one, and get step-down rings to adapt the filters to fit the smaller ones – OR get the square drop-in kind instead.)

My Graduated Neutral Density Filter Kit

My graduated neutral density filter kit is the Lee Seven5 system, which I bought in a set that includes the filter holder, an adapter ring, and four graduated neutral density filters. The Lee Seven5 system is smaller (and less expensive) than Lee’s full size filters and is designed for mirrorless camera systems. This comes back to the point I made earlier about lens size.

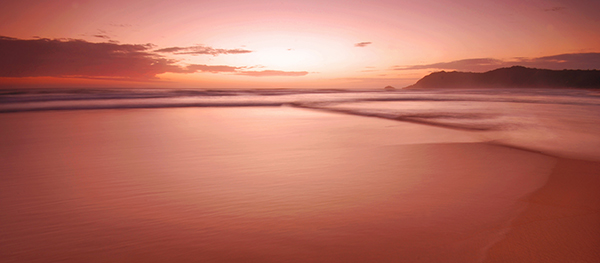
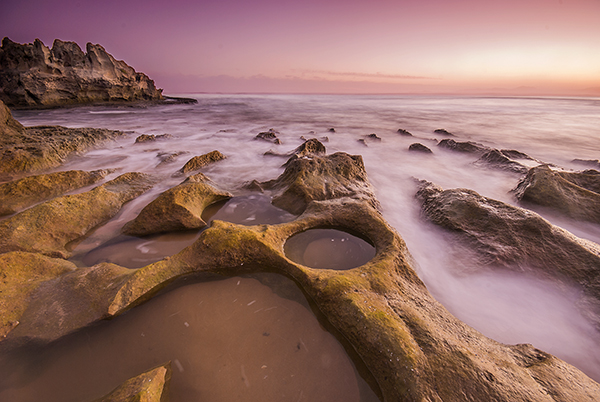
I love these filters because they help me take photos like this.

Neutral density filters

I would love to hear from you what neutral density filters you use. Which ones did you choose and why did you buy them? What brands would you recommend to other photographers? Please let us know in the comments below.


If you enjoyed this article and would like to learn more about landscape photography then please check out my ebook The Black & White Landscape.

googletag.cmd.push(function() {
tablet_slots.push( googletag.defineSlot( “/1005424/_dPSv4_tab-all-article-bottom_(300×250)”, [300, 250], “pb-ad-78623” ).addService( googletag.pubads() ) ); } );

googletag.cmd.push(function() {
mobile_slots.push( googletag.defineSlot( “/1005424/_dPSv4_mob-all-article-bottom_(300×250)”, [300, 250], “pb-ad-78158” ).addService( googletag.pubads() ) ); } );

The post How to Use Neutral Density Filters to Make Better Landscape Photos by Andrew S. Gibson appeared first on Digital Photography School.


Digital Photography School

 
Comments Off on How to Use Neutral Density Filters to Make Better Landscape Photos

Posted in Photography


How to Use Graduated Neutral Density Filters for Landscape Photography

01 Feb

Since the camera was invented, we have tried to copy one of the greatest wonders of our body; the human eye. Unfortunately, despite being over 100 years since the first time that we captured light, we are still far from overcoming Mother Nature.

Why? Because in the visible spectrum your eye sees much better than your camera.

How to Use Graduated Neutral Density Filters for Landscape Photography

Dynamic Range

The parameter that describes this behavior is called Dynamic Range. This basically defines the difference between the minimum and maximum value of brightness that a device (like your eye or the sensor of your camera) is able to record. In the real world, Dynamic Range defines the ability of your camera to see details in very dark areas and very clear (bright) areas of the scene.

If you’re wondering how much more your eye sees, the answer is staggering. Your eyes have about twice as much range that they can see and capture.

How to Use Graduated Neutral Density Filters for Landscape Photography

The problem

That’s why when you look at a marvelous sunset with your eyes you’re able to see all the details in the scene (in both the sky and the land). But as soon as you try to capture it with your camera, you’ll get an overexposed sky or a underexposed foreground. The Dynamic Range of your camera is only able to capture detail in one of those areas so you have to choose.

But if even the best cameras have a Dynamic Range which is only half that of the human eye. So how can we hope to shoot a beautiful sunset or a wonderful sunrise and capture all the marvelous details?

There are different methods to overcome this problem, but my favorite is the use of Graduated Neutral Density filters (GND).

graduated neutral density filters

What is a Graduated Neutral Density Filter?

A Graduated Neutral Density Filter is one made of two distinct parts; a completely transparent area, and a darker section. By setting the darkest part of the filter to correspond with the brightest portion of the scene, you can reduce the exposure difference (dynamic range) in the frame.

To reduce the exposure difference is to reduce the dynamic range of the scene, and thus allow your camera to simultaneously capture detail in both bright and dark areas of the scene. Basically, to make an analogy, GND filters are like a kind of sunglasses for your camera.

Types of GND filters

Graduated Neutral Density Filters are typically distinguished by the type of transition that exists between the transparent and dark areas of the filter. For this reason, we can identify three families of GNDs:

  1. Hard-edge filters, which are characterized by a clear boundary (it’s obvious where one begins and the other ends) between the transparent and dark areas. They are therefore used when the separation between the bright and dark areas of your scene is very defined, such as the horizon at sea.
  2. Soft-edge filters are characterized by a soft transition (they change from light to dark more gradually) and are therefore used when the transition between light and dark areas is not so clear. A classic example is a shot in a mountainous area.
  3. Reverse filters, which are nothing more than hard-edge GNDs with the dark area that fades away the more you move from the line of separation to the upper border of the filter (meaning it’s darker in the middle than on the edge). Basically, they were invented to better manage sunrises and sunsets, where the light is more intense on the horizon line (middle). If you love seascapes like me, this filter will be one of your best friends forever!

How to Use Graduated Neutral Density Filters for Landscape Photography

Which to buy?

Another distinction is between filters is the construction material. Higher quality filters are made of optical glass. Putting an inexpensive resin filter in front of a lens worth hundreds (or thousands) of dollars is not a great idea.

Finally, GND filters are distinguished by graduation, or their ability to block light through the darkest area. Essentially how dark they are at the extreme. Normally in landscape photography, this difference is between one and four stops during sunset and sunrise, depending on weather conditions. This is the reason why you will find these gradations almost exclusively on the market.

Shop for Graduated Neutral Density filters on Amazon.com or on B&H Photo Video’s site (they ship worldwide).

How to use a GND filter in the field

The use of GND filters in the field is very simple; try to take exposure readings in the darkest and in the brightest areas of the scene (usually the sky). The exposure difference will indicate the intensity of the filter to be used. Let’s assume that the light meter reading for the sky is 1/250th, and the one for the rocks in the foreground is 1/30th. The difference between those readings is three stops (250th > 125th > 60th > 30th), so to balance the exposure you must use a 0.9 (3-stop) GND.

At this point, just mount the filter with its dark side over the brightest part of the scene. This is why a GND screw-in filter does not make sense. You would not have the possibility to align the dark area in accordance with the scene as well as a drop-in style filter.

How to Use Graduated Neutral Density Filters for Landscape Photography

To avoid having to hold the filter with your hands (that could be a problem if you are going to use them together with other filters) you can buy a holder, that once mounted in front of your lens will do the job for you. There are many valid solutions on the market, but the best one (in my opinion) is the V5 Pro Holder by NiSi filters. This is the only one that lets you simultaneously install three different filters and a polarizer without any vignetting issues (as wide as 16mm on full frame cameras).

At this point, the limited Dynamic Range of your image will be just a bad memory!

How to Use Graduated Neutral Density Filters for Landscape Photography

googletag.cmd.push(function() {
tablet_slots.push( googletag.defineSlot( “/1005424/_dPSv4_tab-all-article-bottom_(300×250)”, [300, 250], “pb-ad-78623” ).addService( googletag.pubads() ) ); } );

googletag.cmd.push(function() {
mobile_slots.push( googletag.defineSlot( “/1005424/_dPSv4_mob-all-article-bottom_(300×250)”, [300, 250], “pb-ad-78158” ).addService( googletag.pubads() ) ); } );

The post How to Use Graduated Neutral Density Filters for Landscape Photography by Francesco Gola appeared first on Digital Photography School.


Digital Photography School

 
Comments Off on How to Use Graduated Neutral Density Filters for Landscape Photography

Posted in Photography


Hoya Solas infrared neutral density filters launch in USA

05 Oct

Hoya has launched new USA-exclusive Solas infrared neutral density filters. The company says its new IRND filters offer a consistent color balance across the density range while also suppressing infrared, the end result being a balanced image with reduced ‘IR contamination’ like excessive digital artifacts and color shifts.

Hoya has launched the new Solar IRND filters in the following sizes and densities:

0.3 (1-stop) – 49mm ~ 82mm
0.6 (2-stop) – 49mm ~ 82mm
0.9 (3-stop) – 46mm ~ 82mm
1.2 (4-stop) – 49mm ~ 82mm
1.5 (5-stop) – 49mm ~ 82mm
1.8 (6-stop) – 46mm ~ 82mm
2.7 (9-stop) – 49mm ~ 82mm
3.0 (10-stop) – 46mm ~ 82mm

B&H Photo currently lists the filters with the following prices: 46mm ($ 48.90), 49mm ($ 48.90), 52mm ($ 53.90), 55mm ($ 61.90), 58mm ($ 69.90), 62mm ($ 85.90), 67mm ($ 93.90), 72mm ($ 100.90), 77mm ($ 120.90), and 82mm ($ 151.90).

Via: Kenko Tokina USA

Articles: Digital Photography Review (dpreview.com)

 
Comments Off on Hoya Solas infrared neutral density filters launch in USA

Posted in Uncategorized


Circular Polarizers Versus Graduated Neutral Density Filters for Landscape Photography

22 Aug

Whether you’re a professional or hobby photographer, odds are you’ve come across a beautiful, scenic landscape, that you absolutely had to photograph. Unless you’re an experienced landscape photographer, there’s a good chance the color in that photo wasn’t as saturated, or balanced as you were expecting. That’s because there’s generally a wide disparity in the dynamic range between the foreground and background of landscapes, as well as between the upper (sky) and lower (earth) halves of the frame. Thanks to a couple of lens filters, this hurdle can easily be overcome without having to spend hours of post-processing in Photoshop.

Drop-in and screw-in filters

What are lens filters?

Lens filters are lightweight pieces of glass that screw onto the front of most camera lenses (or drop-in using a holder system) in order to offer additional protection of your lens while also improving image quality. There are a variety of filter sizes that must match up to the size of the thread on your camera lens, so it is very important to make sure you get the correct size for the lens you plan to use it on (tip look on the back of your lens cap).

In addition to varying sizes, lens filters can also serve several different purposes. Most basic lens filters are ultra-violet (UV) reducing filters (also known as haze filters) that come with an anti-reflective coating to cut through the effects of atmospheric haze, thereby improving overall image quality. Besides UV/haze filters, there are two others that are particularly useful for landscape and outdoor photography – polarizers and graduated neutral density filters.

From left to right: A clear UV filter, a polarizing filter, and a Graduated Neutral Density filter.

From left to right: A clear UV filter, a polarizing filter, and a Graduated Neutral Density filter.

What is a polarizing filter?

The next filter we’ll discuss is the polarizing (usually circular) filter, which attaches to the front of a lens and can be spun around to produce varying degrees of saturation throughout an image. This quality of the polarizing filter is important to pay attention to, because it’s easy to produce uneven shades of saturation if the polarizer is even slightly off, such as in the example below.

Circular polarizer versus ND grad filter

Landscape photo with uneven polarization. Notice how the sky is very uneven in color.

Sony a6300 camera with bare kit lens - no filter applied. UV and Polarizing filters on the table.

Sony a6300 camera with bare kit lens – no filter applied. UV and Polarizing filters on the table.

Polarizing filters do two things: first, they help reduce glare or reflections cast by non-metallic reflective surfaces such as glass or water. Second, they saturates colors and enhances image clarity by reducing the overall exposure of an image. The benefits of the polarizing filters are best seen when you are shooting at a 90-degree angle to the sun.

Take a look at the landscape photo below that was taken with no filter, the colors are muted and not very exciting. However, once the polarizing filter is added, you can see a huge boost in overall color saturation. It’s a pretty dramatic difference without even post-processing the photo.

Circular polarizer versus ND grad filter

Landscape photo with no filter.

Circular polarizer versus ND grad filter

Landscape photo with a circular polarizing filter. Notice how overall the colors are intensified.

What is a neutral density filter?

Another effective filter for landscape photography is a neutral density (ND) filter, which reduces the overall exposure of an image. ND filters are uniformly dark in color and they come in different strengths depending on density.

The best use of ND filters is in situations where you wish to use a long exposure or wide aperture to capture an image, without risking overexposure. Some example scenarios when a ND filter would be effective include:

  • Producing a smooth, blurred movement of water in a waterfall, lake, or the sea.
  • Blurring moving subjects to convey movement or motion (such as panning).
  • Reducing diffraction by using a large aperture.
  • Shooting with a shallow depth of field in bright lighting.

What is a graduated neutral density filter?

ND filters also come in a graduated form, also known as a split ND filter. The top half of the filter appears dark, while the bottom half is clear. Similar to the circular polarizer, the graduated ND filter can also be spun around to produce varying degrees of saturation, so it’s important to be careful when using it to avoid unevenly saturating your image.

The best scenarios for a graduated ND filter to shine are when you wish to reduce light, or darken just part of your image. Think landscape photos where the earth is balanced, but the sky is blown out. This would be an ideal time to use a graduated ND filter to darken the sky.

Circular polarizer versus ND grad filter

The above landscape photo with a soft edge ND grad filter. Notice how the sky is darker and more saturated, while the water hasn’t changed.

There are two types of ND grad filters: hard edge, and soft edge. You’ll want to use a hard edge filter when the light and dark sections are very clearly separated, while a soft edge filter is best used when the light and dark sections are not distinctly separated.

Circular polarizer versus ND grad filter

Landscape photo with no filter.

Circular polarizer versus ND grad filter

Landscape photo with a circular polarizer.

Circular polarizer versus ND grad filter

Landscape photo with a graduated ND filter.

Over to you

Do you use polarizers or neutral density filters with frequency in your photography? Please share your thoughts and images in the comments below.

googletag.cmd.push(function() {
tablet_slots.push( googletag.defineSlot( “/1005424/_dPSv4_tab-all-article-bottom_(300×250)”, [300, 250], “pb-ad-78623” ).addService( googletag.pubads() ) ); } );

googletag.cmd.push(function() {
mobile_slots.push( googletag.defineSlot( “/1005424/_dPSv4_mob-all-article-bottom_(300×250)”, [300, 250], “pb-ad-78158” ).addService( googletag.pubads() ) ); } );

The post Circular Polarizers Versus Graduated Neutral Density Filters for Landscape Photography by Suzi Pratt appeared first on Digital Photography School.


Digital Photography School

 
Comments Off on Circular Polarizers Versus Graduated Neutral Density Filters for Landscape Photography

Posted in Photography


Lee announces very hard neutral density grads for seascapes

08 Apr
Before and after with the Lee Filters Very Hard ND graduated filter

Lee Filters has announced a new range of neutral density graduated filters that have an extra hard transition from dark to clear, making them suitable for shooting seascapes and scenes in which the horizon is very flat. Along with these new ‘very hard’ graduates, the company has launched another range that has a ‘medium’ strength transition that sits between the traditional ‘hard’ and ‘soft’ grades.

Both of the new grades are available in half-stop incremental strengths from one to four stops, and in sizes compatible with the Seven5, 100mm and SW150 systems.
For more information visit the Lee Filters website.

Pricing

Seven5 medium grad (single filter 0.3ND to 0.9ND) RRP £51.88 (excl VAT)
Seven5 medium grad (single filter 1.2 ND) RRP £77.82 (excl VAT)
Seven5 medium grad set (0.3ND, 0.6ND & 0.9ND) RRP £138.35 (excl VAT)
100mm very hard & medium grad (single filter 0.3ND to 0.9ND) RRP £71.86 (excl VAT)
100mm very hard & medium grad (single filter 1.2 ND) RRP £108.86 (excl VAT)
100mm very hard and medium grad sets (0.3ND, 0.6ND & 0.9ND) RRP £179.66 (excl VAT)
SW150 very hard & medium grad (single filter 0.3ND to 0.9ND) RRP £79.70 (excl VAT)
SW150 very hard & medium grad (single filter 1.2 ND) RRP £119.55 (excl VAT)
SW150 very hard & medium grad sets (0.3ND, 0.6ND & 0.9ND) RRP £215.00 (excl VAT)


Press release:

LEE Filters introduces very hard and medium neutral-density graduated filters to its systems

Traditionally, neutral-density graduated filters have been available exclusively in hard and soft versions. However, because all neutral-density grads in the LEE Filters range are made by hand, it is possible to be extremely precise with the depth of the transition between the coated and clear sections of the filter. As a result, LEE Filters has the capabilities to manufacture ND grads in medium and very hard versions. In the past, these were available exclusively as custom-made filters for professional photographers. Now, however, they have been made available to all those who use the Seven5, 100mm and SW150 systems.

The medium and very hard grads not only expand a photographer’s creative options, they also allow for even more exact control when balancing lighter and darker areas of the frame. The very hard grad (available for the 100mm & SW150 systems) is perfect for seascapes that feature a completely flat horizon line, while the medium grad (available for the Seven5, 100mm and SW150 systems) is that perfect ‘in-between’ strength that is ideal for any scene in which an element of the composition – a mountain or a building, for example – protrudes into the sky.

Both ND grads are available in 0.3ND (1 stop), 0.45ND (1½ stops), 0.6ND (2 stops), 0.75ND (2½ stops), 0.9ND (3 stops) and 1.2ND (4 stops) strengths.

For further information, contact LEE Filters on 01264 366245; sales@leefilters.com; www.leefilters.com

Articles: Digital Photography Review (dpreview.com)

 
Comments Off on Lee announces very hard neutral density grads for seascapes

Posted in Uncategorized


Lee introduces 15-stop Super Stopper neutral density filter

05 Mar

Lee Filters has announced it is to offer a neutral density filter that converts what would normally be a two-second exposure into one that lasts 17 hours and 4 minutes. The new Super Stopper reduces the amount of light entering the lens by a massive 15 stops, to enable especially long shutter speeds in normal daylight conditions.

Available for the 100mm, SW150 and Sev5n ranges, the filter is made from what Lee describes as ‘high-quality optical glass’. It comes packaged in a protective tin case and has a lifetime warranty. The company says the filter induces only a slight color cast that it claims is easy to remove in post-production. It joins the 10-stop Big Stopper and the 6-stop Little Stopper in the company’s range of ND filters.

The filter factor of the Super Stopper is 3200 and it has a density of 4.5. It will be available soon, and the version for the SW150 series will cost $ 175. For more information on the company see the Lee Filters website – though the company hasn’t posted any details of the Super Stopper yet. There is more information though on the website of UK distributor, Linhof Studio.


Press release:

LEE Filters NEW Super Stopper Available for 100mm, SW150 and Sev5n.

With its 15 stops of light-reducing power, the Super Stopper sits at the top of the Stopper family, joining the Big and Little Stoppers in the long-exposure photography revolution.

The Super Stopper is designed for use in bright conditions, during the middle of the day – a time that’s traditionally considered unsuitable for photography because of the harsh, contrasty nature of the light.
However, with the Super Stopper filter fitted, the softness that arises from any movement contrasts pleasingly with any areas of bright light, creating an effect rarely seen in photography before now.

Like all the filters in the Stopper family, the Super Stopper is constructed from the high-quality optical glass and is supplied in a metal case for protection. It has only a minimal colour cast that is easily corrected in postproduction.

The exposure guide chart below allows you to find out the extremes to which photographers can now take their long exposures.

Articles: Digital Photography Review (dpreview.com)

 
Comments Off on Lee introduces 15-stop Super Stopper neutral density filter

Posted in Uncategorized


Density Sensor: Real-Time Data Shows Which Places are Packed

10 Aug

[ By WebUrbanist in Gadgets & Geekery & Technology. ]

density location sensor

Online reviews indicate how popular your favorite place is in general, but cannot tell you whether now is a good time to drop by or if you may be stuck in a crowd or waiting in line – this is where the Density Sensor comes into play.

density sensor tracking

No need to resort to complex spatial mapping or real-time video sensors with this gadget, a people-counting device that simply tracks passages through doors (attached to the frame). Some more obvious applications include specific bars, restaurants, coffee shops and other businesses that have time-of-day and day-of-week cycles to contend with, but the same data can also help you pick the DMV or grocery store with the shortest line.

density incoming outgoing people

In turn, businesses can choose what data to share with customers and what to keep for optimization purposes, offering discounts during less busy times or adjusting when to open and close. Compared to non-networked break-beam technology or real-time surveillance cameras, there is no need to wait for data or face privacy concerns.

density sensor box

Of course, up-to-the-minute incoming and outgoing traffic are just a starting point – architecture firms, for instance, could use extended datasets to anonymously track customer or employee flows through a building and use that data to optimize going forward, shaping extensions or remodels. Ultimately, one could imagine this system being replaced by more detailed heat-mapped trackers keeping tabs on entire spaces, but for now this is a cheap solution to a long-standing problem.

Share on Facebook


[ By WebUrbanist in Gadgets & Geekery & Technology. ]

[ WebUrbanist | Archives | Galleries | Privacy | TOS ]


WebUrbanist

 
Comments Off on Density Sensor: Real-Time Data Shows Which Places are Packed

Posted in Creativity


Vertical Cities: 12 Towers Take Urban Density to the Skies

18 Jun

[ By Steph in Architecture & Cities & Urbanism. ]

vertical cities singapore futuristic

Taking advantage of virtually endless vertical space within urban centers, entire cities-within-cities could spring up into the skies, packing in thousands of new housing units as well as parks, recreational space, offices, shops and everything else you’d expect to find on a typical block. These 12 residential skyscraper designs build up instead of out, often using staggered or stepped arrangements of stacked modules to maintain air circulation, access to daylight, and views. Rather than creating closed class-based communities, most make their communal spaces open to the public, and reserve the ground level for greenery.

High-Rise High-Density Tropical Living in Singapore
vertical cities singapore futuristic 2

How do you pack 100,000 people into a square kilometer without sacrificing quality of life? WOHA’s entry into a competition to design a vertical city for Singapore devised a greenery-laden ‘lattice city’ made of staggered modules. This porous arrangement ensures that all levels get plenty of fresh air and daylight, free up the ground level for nature reserves and heavy industry, and weave social spaces throughout. The plan was created to be walkable, but large elevators and people movers can zip inhabitants vertically and horizontally as needed.

Stacked Modules in Vancouver

vertical cities geometric extruded 1

vertical cities geometric extruded

vertical cities geometric extruded 3

Conceived for Vancouver, this design by Ole Scheeren is made up of stacked rectilinear modules that poke out of the main tower at various angles, projecting the living spaces outward to mimic the spacious feel of living on the ground and create cantilevered terraces. The aim is to reconnect architecture with the natural and civic environment, encouraging social interaction between inhabitants.

Vertical Village in Singapore by OMA

vertical cities singapore village

vertical cities singapore village 2

Condo units that would take up a lot of space if there were all placed on the ground are instead stacked in hexagonal arrangements for The Interlace, a residential project by Ole Scheeren/OMA. 31 individual six-story blocks come together to create a network of both private living spaces and communal areas, with eight large courtyards and various terraced gardens.

Vertical City in Jakarta

vertical cities jakarta

vertical cities jakarta 2

vertical cities jakarta 3

The city of Jakarta in Indonesia is in need of both higher density housing and green space – but designs like these prove that you don’t have to choose. MVRDV has designed a 400-meter-tall tower called Peruri 88 that integrates housing, offices, retail, a luxury hotel, parking, a mosque, an imax theater and more into what is essentially its own city within the city.

Next Page – Click Below to Read More:
Vertical Cities 12 Towers Take Urban Density To The Skies

Share on Facebook


[ By Steph in Architecture & Cities & Urbanism. ]

[ WebUrbanist | Archives | Galleries | Privacy | TOS ]


WebUrbanist

 
Comments Off on Vertical Cities: 12 Towers Take Urban Density to the Skies

Posted in Creativity


Marumi introduces fixed and variable neutral density filters, including ND100,000 for solar shooting

19 Feb

Japanese filter brand Marumi has introduced a collection of neutral density filters for its DHG (Digital High Grade) range including fixed density strengths of ND 8, 16, 32 and 64 as well as a variable ND filter with a range of ND 2.5-500. The company has also announced a ND filter for shooting solar eclipses. Read more

Articles: Digital Photography Review (dpreview.com)

 
Comments Off on Marumi introduces fixed and variable neutral density filters, including ND100,000 for solar shooting

Posted in Uncategorized


Using Graduated Neutral Density filters for Landscape Photography

23 Dec
You can see the effect an ND Grad has on the scene

You can see the effect a graduated neutral density filter has on the scene

One of the biggest challenges in photography is managing the light in your scene. It is for this reason that many landscape photographers love to be out shooting during the golden hours or blue hour when the light is beautiful and the contrast is manageable. Contrast is tough to manage on bright days and in certain scenes, but there are a few ways to work around this. In this article we are going to look at the usefulness of using neutral density gradient filters (aka ND grads). These filters have been around for a long time, most landscape photographers will have a set of them in their camera bag.

Filters or Photoshop?

In recent years, there has been an ongoing debate around whether it is better to use filters or to bracket the images and blend them in Photoshop afterwards or even use HDR to capture all the different tonality and light in a scene. In many cases this is a personal preference, and I switch between the two depending on the scene or the vision I have of the image I want to make.

If I am shooting during golden hour I will most often use an ND grad filter. If I am doing a starscape, I will take two images and blend them, one for the sky and one for the foreground. The reason is this. At golden hour, I can expose for the ambient light and use a filter to keep the detail in the sky. If I want a starscape (not a star trail) I need to push my ISO up really high and if there is something in the foreground of the scene that is a little too bright, it will overexpose. My first shot will be an image that will expose the the scene properly. For my second shot, I will expose the sky to capture a starscape shot. Afterwards, I will blend them in Photoshop, which really works well.

In some cases, there is no substitute for an ND grad. If you want the waves in a seascape scene to become silky smooth or a river to look soft and white, then you will need to use ND grads. This effect cannot be made in Photoshop (not yet anyway). The best part about using ND grads is the surprise you get when you see the image on the screen. You will be amazed at the effect of capturing the blurred movement of different elements in your image.

What is a graduated neutral density filter (ND Grad)?

Essentially it is a rectangular, optically correct piece of resin or glass with a gradient from dark to light. It is called “neutral” because the dark part of the filter should not make any colour differences, or add a colour cast to the scene. This is not always true of cheaper filters, but the well established filter brands (Lee, Singh-Ray) leave very little colour cast on the final image. The reason behind using an ND filter is to hold light back so that the part of the scene that is brightest (usually the sky) does not overexpose. This effect creates a pleasing image. The sky is well exposed and the foreground is correctly exposed as well.

If you were to expose the scene without using an ND grad filter, very often, the foreground would be well exposed while the sky may simply be overexposed or, if you were to expose for the sky, the foreground would be very dark. As I said earlier, you can do blending in Photoshop, but sometimes, you may not capture all the detail in the sky and using a filter to capture the scene may be useful. Also, you will be able to spend more time shooting and less time editing afterwards!

A set of ND grads in varius strengths

A set of ND grads in varius strengths

When should you use an ND grad filter?

Most landscape photographers will use them at sunrise or sunset, during the golden hour. You can also use them during the day to slow the shutter speed to make water smooth and silky. Blurring moving objects such as people, cars, buses or even trees blowing in the wind is also an option. What you will get is a well exposed, daylight scene with some blurred movement. This can look really interesting and dynamic in your image.

The reason you will want to use an ND grad filter is that there can be a substantial difference, light wise, between the sky and your foreground. If you have more than a two stop difference, you will probably need an ND grad filter to correct that and get a good, well balanced exposure. This not a rule, but if you try and average the exposure and you are finding that your foreground looks too dark and your sky is too bright, maybe it is time to use the filter.

An ND Grad was used in this image to expose the sky and clouds correctly

An ND grad was used in this image to expose the sky and clouds correctly

Types of ND grad filters

ND grad filters have a few variables. The first is whether the filter has a hard or soft edge. There is a reason for this and both types are useful. The hard edge filter has a very definite transition between the dark gradient part of the filter and the part that is clear. The soft edge filter gently blends the gradient across the filter, so the line is less obvious. Each one of these filters are used on different scenes. For example, the hard edge filter is really useful if you have a very definite horizon line (i.e. a seascape or a landscape scene where the horizon is pretty flat and straight). The soft edge filter is used for scenes where there is no clear horizon (i.e. a forest or street scene). Learning when to use which type of filter takes some practice, but once you can visualise what the result will look like, it is pretty easy.

Hard Edge and Soft Edge ND Grads

Hard Edge and Soft Edge ND Grads

ND grads come in different strengths

The filters are made in different strengths to compensate for different lighting conditions. Depending on the dynamic range (the difference between highlights and shadows) in your scene you can choose an ND grad filter that will be darker or lighter. Darker filters hold back more light and lighter filters, hold back less light. ND Grads are made in the following strengths 0.3 or one f-stop of light, 0.45 or 1.5 f-stops, 0.6 or two f-stops, 0.75 or 2.5 f-stops, 0.9 or three f-stops. The important calculation to remember is to try and keep your sky and your foreground within one stop of one another. Also, ND grads can be stacked if the light is really bright, so you can make the sky even darker, depending on the effect you want.

How do I use an ND grad filter?

It is easier than you might think. There are some technical details to think of, but once you have used grads a few times, it is really quite simple. Here is a process that works pretty well in most lighting conditions:

  1. Set up your camera on a tripod and take a light meter reading of the foreground. Making sure that your camera is on Manual, point it down and fill the viewfinder with the foreground to take the reading.
  2. Take a light meter reading in the same way as above, of the sky.
  3. Work out the difference between the two exposures and use an ND Grad to get your scene to within one stop of light difference. As an example, if the sky is three stops brighter than the foreground, you can use an ND Grad that blocks two f-stops of light or a 0.6 ND Grad.
  4. Slide the ND grad filter into place in front of the lens and determine the best position for the gradient to be in your image. If it is a hard horizon (i.e. a seascape scene) use a hard edge grad, if it is a forest scene, use a soft edge grad.
  5. Expose for your foreground and make the shot.
  6. Check the result on your LCD screen, zoom in on the image to make sure everything is properly exposed. Make any adjustments and shoot another image if necessary.

That’s it, simple really. Of course, as I said earlier, it takes a fair amount of practice to become adept at using these filters, but the results are worth it.

In this scene, the ND grad allowed the sky to be exposed properly and slowed the shutter speed won enough to blur the water

In this scene, the ND grad allowed the sky to be exposed properly and slowed the shutter speed down enough to blur the water.

Image editing

Once you have captured your well exposed scene, you will want to take it into Lightroom or Photoshop to put the finishing touches to the image. There are many different ways to enhance the image and make it really pop. I am not going to go into all the different adjustments you could make to the image except for one piece of advice. I will generally select the sky and the foreground separately and make a layer for each of them, then make separate adjustments to each. You may want to make the sky even more foreboding if it was a cloudy day, or perhaps brighten up the foreground a little more to show the detail. By doing this you will get the most out of the the light in the scene. Many photographers will convert their ND grad images into black and white because the movement and softness of the water in the scene can look very compelling in monochrome. The choice is yours.

What’s next?

To do this kind of photography, you will need to buy an ND grad or two. Some of the cheaper ND grads are a good place to start, brands like Cokin are good, and they are not especially pricey. The more expensive brands offer top quality, and in some cases the filters are hand made. If you find that you really love the effect these filters give, then you may want to invest in some Lee filters or Singh-Ray. These are top filter brands and the results from these products are amazing.

The most important thing to remember is to invest the time in getting the technique right and knowing how to use the equipment. Photography is all about practice and getting the technique right. Yes, good equipment helps, but the most important thing is practice. Once you have mastered the technique with a cheaper filter, then consider making the investment in the more expensive ones.

A final image after being processed in Photoshop

A final image after being processed in Photoshop

googletag.cmd.push(function() {
tablet_slots.push( googletag.defineSlot( “/1005424/_dPSv4_tab-all-article-bottom_(300×250)”, [300, 250], “pb-ad-78623” ).addService( googletag.pubads() ) ); } );

googletag.cmd.push(function() {
mobile_slots.push( googletag.defineSlot( “/1005424/_dPSv4_mob-all-article-bottom_(300×250)”, [300, 250], “pb-ad-78158” ).addService( googletag.pubads() ) ); } );

The post Using Graduated Neutral Density filters for Landscape Photography by Barry J Brady appeared first on Digital Photography School.


Digital Photography School

 
Comments Off on Using Graduated Neutral Density filters for Landscape Photography

Posted in Photography