RSS
 

Posts Tagged ‘Custom’

Custom SLR Dual Camera Strap – Product Review

25 Aug

CustomSLR-Dual-Strap-DPS-PWC2015-0805-1314To be honest, I thought the Custom SLR Dual Camera Strap looked like a dorky idea when I was first asked to review it. The idea is simple: sometimes you need to carry two cameras (especially heavy cameras) and the logistics of such a feat have always been cumbersome. One strap over this way and the other maybe off of the other shoulder? Double criss-cross?

Custom SLR, a company that got its start thanks to a number of successful Kickstarter campaigns, crafted a solution using one of their best selling camera straps, times two. They sent me a copy of the Dual Camera Strap to test during a small boat cruise with UnCruise Adventures in Alaska last month. I was excited for the trip as it would mean I could take both my cameras and long lenses (28-300mm and a rented 150-600mm) for both close and distant images of marine wildlife. Having that range from 28mm-600mm (on crop factor cameras) always available was important to me so I was willing to try the Dual Camera Strap, with hopes I wouldn’t always be fumbling for the right camera.

What is it?

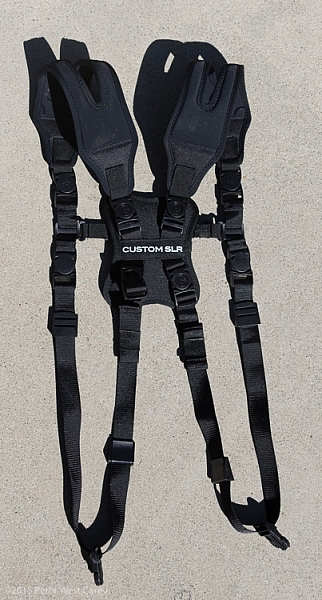
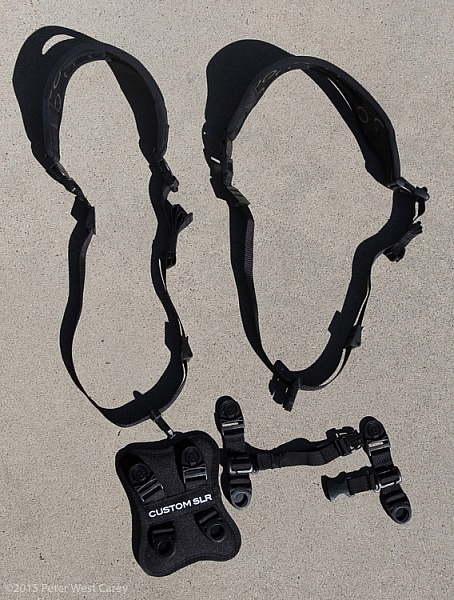
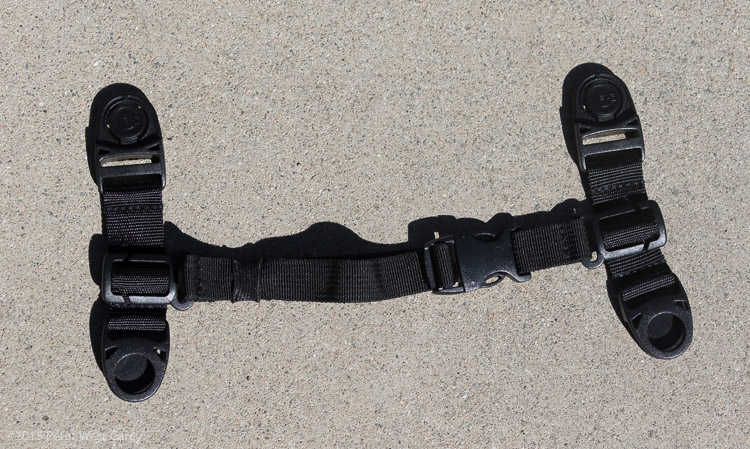
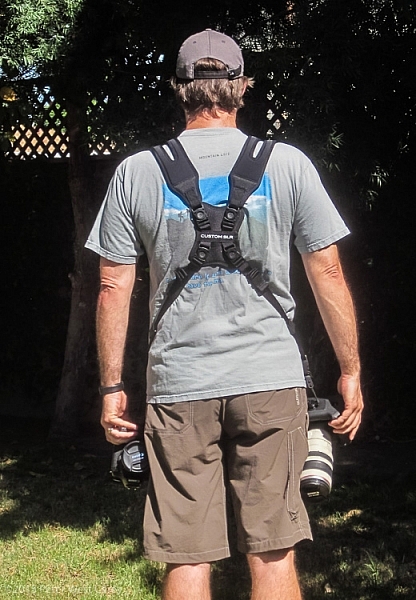
The unit is really five parts in one. Two of those parts are copies of the traditional Glide One Strap System by Custom SLR, meant to hold one camera, over one shoulder. Then they introduced a unique buckle connector that fits in the middle of your back. Lastly, there are two small pieces of webbing that add a sternum connector.

CustomSLR-Dual-Strap-DPS-PWC2015-0805-5547

The great thing about this setup is it uses two straps that can work alone. You’re not stuck with always using the dual setup when you only want to use one camera.

Let’s take a look at how it all fits together then I’ll tell you about my experience with the setup.

Anatomy of a Dual Camera Strap

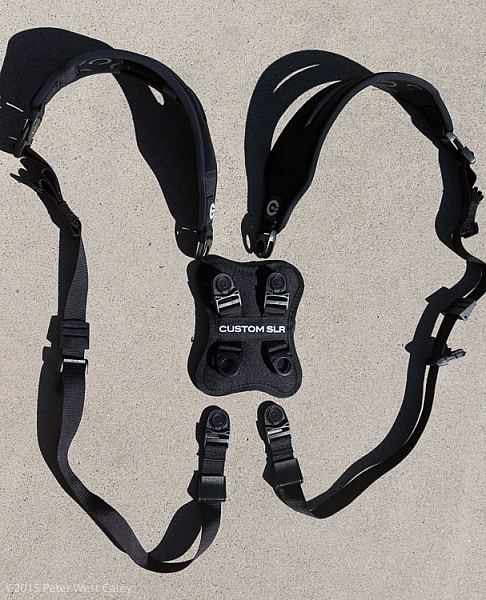
The setup starts with the individual straps. Each has a piece of split neoprene to help evenly distribute weight on your shoulder. On the underside of the the split strap is a silicone print to provide traction, ensuring the strap doesn’t move around your shoulder.

CustomSLR-Dual-Strap-DPS-PWC2015-0805-5550

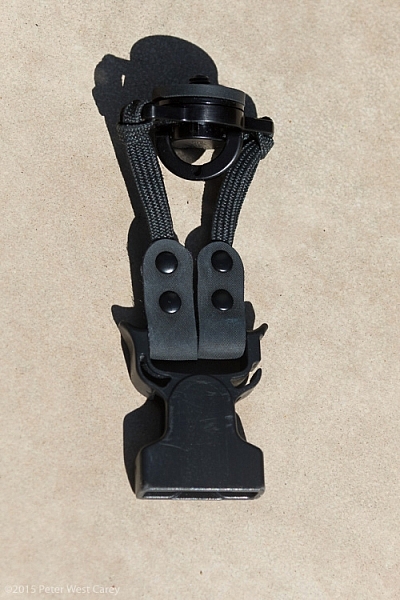
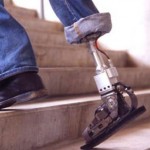
Cameras are connected to a strap via a beefy quick-release clip attached to a tripod screw, with a loop to make hand-tightening possible (no need for tools). I have used one of these single straps in my daily photography and travels to over a dozen countries for the past three years. It’s now getting a little frayed but never once has the screw mount or quick-release failed.

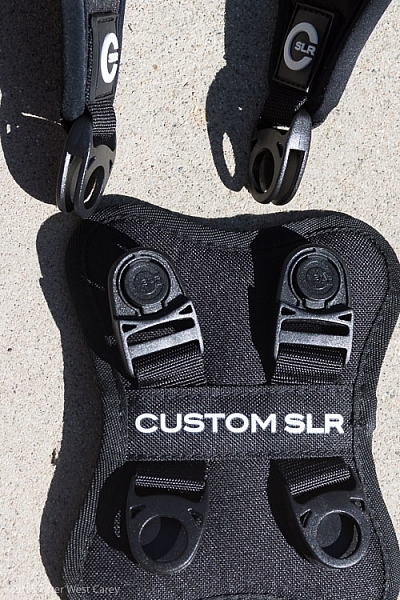
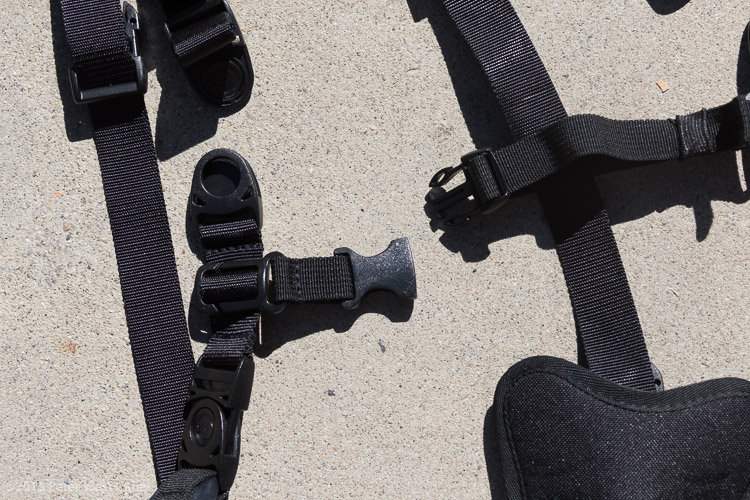
Next there is a connector that attaches the two straps in the middle of your back. Simply disconnect each single strap and clip them into the connector. The clips are one-way, making the process fairly idiot-proof.

CustomSLR-Dual-Strap-DPS-PWC2015-0805-5555

Lastly, to keep the system stable, you need to insert a sternum strap that clips the two single straps together in the front.

CustomSLR-Dual-Strap-DPS-PWC2015-0805-5551

Having received my unit already setup, I took it apart, jumbled up the pieces, and tried to put it all together at a leisurely pace. It took me one minute and 50 seconds to go from two single straps to the Dual setup, and that included making a small error and correcting it. It’s pretty easy.

CustomSLR-Dual-Strap-DPS-PWC2015-0805-5554

CustomSLR-Dual-Strap-DPS-PWC2015-0805-5556

Attach Your Cameras

When changing from single straps to dual, the straps first need to be shortened. This is because each strap is simply looping around one shoulder and not across your body.

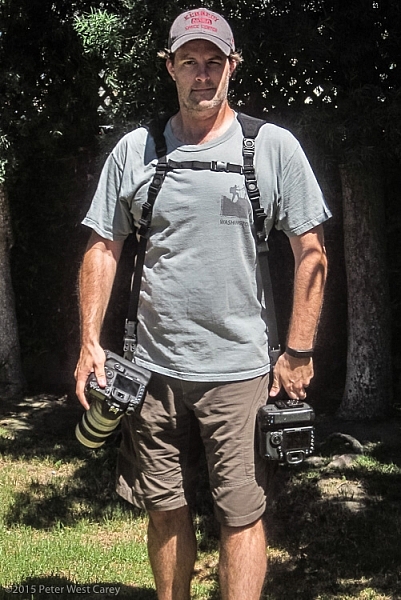
Next, screw in the tripod mount, called a C-Loop, to each camera. As Custom SLR likes to create a whole inter-functioning ecosystem, the C-Loop also works with their M-Plate tripod quick release system. This additional plate gives better stability when using long lenses, but is sold separately (shown in second photo).

CustomSLR-Dual-Strap-DPS-PWC2015-0805-5553

CustomSLR-Dual-Strap-DPS-PWC2015-0805-5552

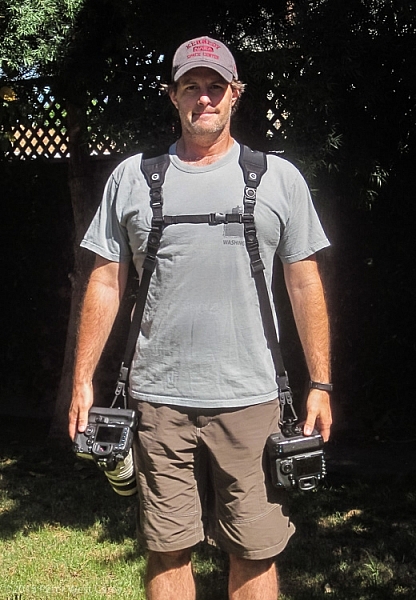
Suiting-Up – Harness First, Then Cameras

Now to put it all together! It’s best to put on the harness first before attaching cameras. It can be done the other way around, but it is quite clunky and will bang up your cameras. Then, clip each camera into your preferred side.

CustomSLR-Dual-Strap-DPS-PWC2015-0805-1314

CustomSLR-Dual-Strap-DPS-PWC2015-0805-1317

How Does it Feel?

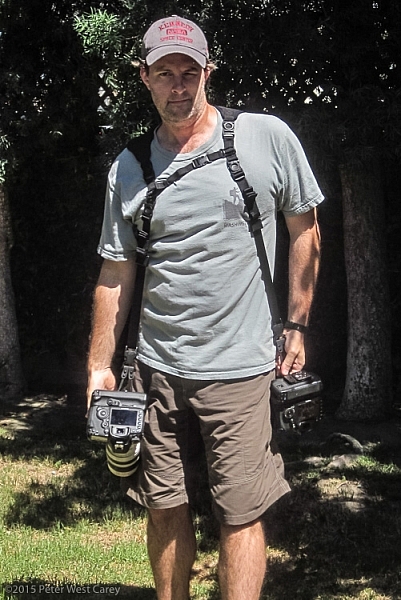
What I enjoyed about the Dual Strap was how comfortable it was with the weight. I was wearing about 16lbs (7.2kg) of gear and it was no different than using a solid backpack with cameras stowed inside. In fact, short of a waist belt, this setup is just like a backpack with two comfortable stretchy neoprene shoulder straps.

How Does it Work?

In practice the unit takes some getting used to during initial setup. Having two cameras dangling from your hips also takes a different sense of awareness when maneuvering in crowds, or around hard surfaces. Keeping your hands on your cameras helps with stability.

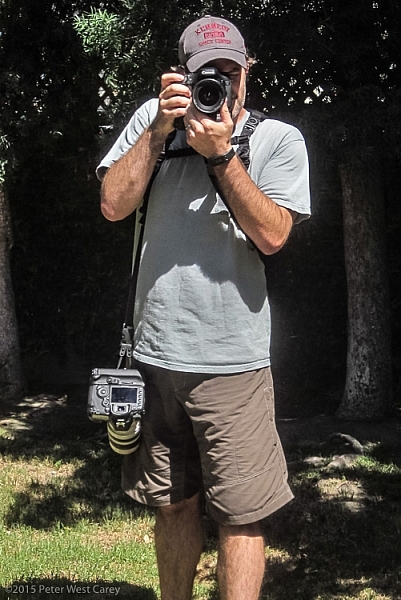
Each camera is free to glide up and down its own strap, yet is kept ready at your fingertips. When one camera is held up and the weight on that strap lessened, the second camera stays in place, without swinging to the side or sliding off your shoulder, as has been my case before using this strap.

CustomSLR-Dual-Strap-DPS-PWC2015-0805-1348  CustomSLR-Dual-Strap-DPS-PWC2015-0805-1349

CustomSLR-Dual-Strap-DPS-PWC2015-0805-1351 CustomSLR-Dual-Strap-DPS-PWC2015-0805-1352

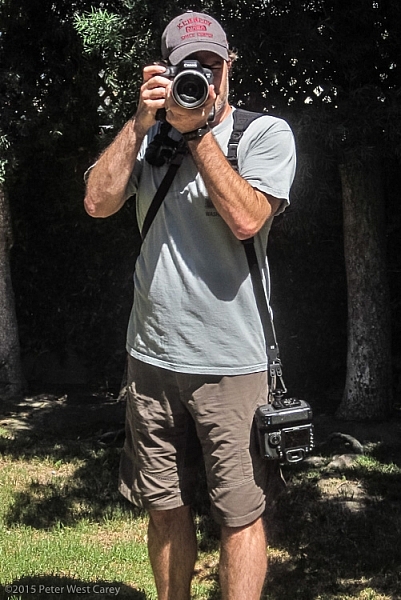
I realize I look a little odd with this setup on my body. But the comfort and ease of use, quickly quieted my ego from worrying too much about what others think.

In short, the Dual Camera Strap now goes with me wherever I take both my camera bodies. I can break it down quickly for single camera use (I typically leave the sternum strap section attached to make setup quicker) and when I know I want both cameras at hand, there is simply no replacing this unit.

Additionally, I could still wear my F-Stop Lotus backpack over this setup, although range of motion was slightly lessened, but not enough to stop me from using the two together.

Conclusion

Dorkiness be damned, this thing works, and it works well. I wore the strap for more than 40 hours in a month, and after I figured out the best way to put it on (straps first, then attach cameras), it was a piece of cake.

There is something empowering having two cameras at the ready, and no longer worrying about one of them slipping off your shoulder. The Custom SLR Dual Camera Strap performs as advertised, and is a great solution if you have a two camera carrying problem.

Disclaimer: This product was provided to the author by the manufacturer for the purposes of doing a review. All reviews on dPS are 100% unbiased and based on the author’s opinions only. 

googletag.cmd.push(function() {
tablet_slots.push( googletag.defineSlot( “/1005424/_dPSv4_tab-all-article-bottom_(300×250)”, [300, 250], “pb-ad-78623” ).addService( googletag.pubads() ) ); } );

googletag.cmd.push(function() {
mobile_slots.push( googletag.defineSlot( “/1005424/_dPSv4_mob-all-article-bottom_(300×250)”, [300, 250], “pb-ad-78158” ).addService( googletag.pubads() ) ); } );

The post Custom SLR Dual Camera Strap – Product Review by Peter West Carey appeared first on Digital Photography School.


Digital Photography School

 
Comments Off on Custom SLR Dual Camera Strap – Product Review

Posted in Photography


Two Useful Lightroom Print Module Custom Layouts

14 Aug

On sale now at Snapndeals: August 11-25th get 20% OFF Andrew’s ebooks – Mastering Lightroom Complete Collection: Lightroom 6 & CC Update. 

With a little imagination and know-how you can use the Lightroom Print module to create amazing layouts, which in turn you can use to create prints, postcards or even business cards. I’m going to give you a couple of examples, which you can copy or adapt to your own requirements. Let them inspire you to come up with your own creative designs!

Custom Layout #1: Single Image / Contact Sheet

This is the first custom layout we are going to create. It uses the Single Image / Contact Sheet Layout Style. With this Layout Style, each selected photo in the Collection is added to the layout just once, in the order that they appear.

Lightroom Print module

1. Maximize template

Go to the Template Browser panel in the Lightroom Print module and select the Maximize Size template. This simple template is an ideal starting point for creating your own layouts.

Note: I started with paper size set to A4 (click the Page Setup button to set paper size and orientation). If your paper size is different, you will require different measurements to those used here. The same applies if your page bleed area, which depends on the printer model, is different.

Lightroom Print module

2. Save Print

Before you go any further, click the Create Saved Print button. The Create Print window appears. Give the print a name, and make sure the Include only used photos box is unticked. Click Create, and Lightroom creates a new Collection called a Print Collection (marked by a printer icon in the Collections panel) containing the photos in the original Collection. Now it’s impossible for you to lose your work – you can leave and come back to the Print Collection at any time.

Lightroom Print module

3. Set up the page layout

Go to the Layout panel and under Page Grid; set Rows to 2 and Columns to 3. Only selected photos appear in the layout, so in the Filmstrip, select the photos that you want to appear, clicking and dragging to rearrange the order if necessary. Note: If you select more than six images, Lightroom creates a second page to automatically fit them onto.

Adjust the Margins, Cell Spacing and Cell Size settings to add space between the photos and create the style you see below. The layout is shown both with the guides on and off (tick/untick the Show Guides box in the Guides panel) for clarity. Remember to centre the photos between the grey border representing the page bleed area, not the page itself.

Lightroom Print module

This screenshot shows the layout with Guides enabled. Note the page bleed area around the edge (shown in grey) and the black lines showing the dimensions of the Photo Cells.

Lightroom Print module

The layout is much easier to see with the Guides turned off.

The idea is to keep the spaces between the photos as even as possible (or as close as you can get according to the restrictions of your selected paper size). The settings I used are shown below, but yours may differ if you are using a different paper size, or if your photos have a different aspect ratio.

Lightroom Print module

4. Set up the Identity Plate

Go to the Page panel and tick the Identity Plate box. Click the white arrow icon (down facing one) and choose a Styled Text Identity Plate to go at the bottom of the layout – if you don’t have a suitable one already, you can create a new one by selecting Edit from the menu. Tick the Override Color box and click the rectangle to the right of it to select a colour for the Identity Plate text.

Lightroom Print module

5. Set size of identity plate to match two columns

If possible, resize the Identity Plate so it is the same width as the last two columns. As long as the text doesn’t look too large or too small (you’ll have to exercise your own judgement), aligning it with the photos this way adds a professional touch to the design.

Lightroom Print module

Custom Layout #2: Custom Package

The Print module contains nine templates that work with the Custom Package Layout Style. This Layout Style is like the Single Image / Contact Sheet Layout Style, except that it lets you add the same image to a page more than once, and also overlap photos.

Another difference between the Custom Package Layout Style and the others, is that Lightroom doesn’t add photos automatically to the layout. Instead, you add them yourself by clicking and dragging them from the Filmstrip. This makes it easy to move photos around without having to rearrange them in the Filmstrip, and to add the same photo to a page more than once.

1. Select the Custom Overlap x3 template

Go to the Template Browser panel and select the Custom Overlap x 3 template. Don’t forget to click the Save Print button to create a new Print Collection.

Lightroom Print module

2. Add the photos by dragging and dropping them

Unlike the previous example the template doesn’t automatically populate with selected images. Instead, you have to click and drag photos from the Filmstrip. Here’s how it looks with photos added.

Lightroom Print module

3. Resize images to suit

The overlapping images are less than ideal, but unlike the Single Image / Contact Sheet Layout Style used in the first example, you can drag and resize the Photo Cells to something that suits you. You can adjust the size of the Photo Cells precisely in the Cells panel (and add new ones), and keep them aligned by going to the Rulers, Grids & Guides panel and setting Grid Snap to Grid.

Right-click on a Photo Cell and select Send to Front to bring it on top of the others.

You can also add a Styled Text Identity Plate the same way as in the first example. A little tweaking enabled me to come up with the following design.

Lightroom Print module

Hopefully these examples will show you just how flexible the layouts in the Print module are when you take the time to explore the possibilities. But did you know that you can also create triptychs and calendars quite easily in the Print module? The following articles show you how to do it.

  • How to Create a 2015 Calendar in the Lightroom Print Module
  • How to Make a Triptych in Lightroom

The Mastering Lightroom CollectionMastering Lightroom ebooks

On sale now at Snapndeals: August 11-25th get 20% OFF Andrew’s ebooks – Mastering Lightroom Complete Collection: Lightroom 6 & CC Update. 

googletag.cmd.push(function() {
tablet_slots.push( googletag.defineSlot( “/1005424/_dPSv4_tab-all-article-bottom_(300×250)”, [300, 250], “pb-ad-78623” ).addService( googletag.pubads() ) ); } );

googletag.cmd.push(function() {
mobile_slots.push( googletag.defineSlot( “/1005424/_dPSv4_mob-all-article-bottom_(300×250)”, [300, 250], “pb-ad-78158” ).addService( googletag.pubads() ) ); } );

The post Two Useful Lightroom Print Module Custom Layouts by Andrew S. Gibson appeared first on Digital Photography School.


Digital Photography School

 
Comments Off on Two Useful Lightroom Print Module Custom Layouts

Posted in Photography


Modern Motorcycles: 15 Super-Sleek Custom Rides

23 Jun

[ By Steph in Technology & Vehicles & Mods. ]

modern motorcycles eve2

With their streamlined silhouettes, exposed mechanical parts, high-end detailing and powerful motors, these 15 modern motorcycle designs represent a new era of aesthetics in the industry, even when they’re customs built on the bases of classic bikes.

Akrapovic Full Moon

modern motorcycles akra

modern motorcycles acra 2

Looking unlike any motorcycle we’ve ever seen on the streets, the Akrapovic Full Moon motorcycle concept features a massive 30-inch aluminum and carbon front wheel and a sculpted, aerodynamic metal sheet frame that envelops the rear wheel. Hydraulic suspension keeps the bike upright when it’s parked, and automated steering keeps the handlebars looking sleek.

BMW Apollo Streamliner

modern motorcycles apollo

modern motorcycles apollo 2

A combination of traditional styling and futuristic looks keeps this concept by industrial designer Mehmet Doruk Erdem firmly rooted within the BMW brand, while bringing it into this century and beyond. Designed for speed rather than everyday use, the Apollo Streamliner features a pointed front end to reduce wind drag on the rider.

Rectilinear T005 Cross

modern motorcycles too5

modern motorcycles too5 2

In contrast to the sleeker curvilinear designs, the Thrive Motorcycle T005 Cross goes for a chunky rectilinear look. The whole thing is actually a modified 1984 Yamaha – the designers stripped it down, fitted it with off-road tires and added a custom body made of sheet aluminum, updated for the modern era with a smartphone slot.

Bandit9 Bishop

modern motorcycles bandit9

modern motorcycles bandit9 2

Another custom modification takes a Honda Supersport and transforms it into a minimalist design enthusiast’s dream, with wood burl side panels contrasting with the steel unibody. Bandit9 released only nine models of this bike, with a 90cc or 125cc engine.

Bandit9 Eve
modern motorcycles eve

modern motorcycles eve4

Bandit9 also used a 1967 Honda SS bike as the basis of a custom design, pairing it with fashions from Konstantin Kofta in this editorial for a futuristic effect. The bullet-like chrome-finished unibody puts the focus on the exposed mechanical parts.

Next Page – Click Below to Read More:
Modern Motorcycles 15 Super Sleek Custom Rides

Share on Facebook


[ By Steph in Technology & Vehicles & Mods. ]

[ WebUrbanist | Archives | Galleries | Privacy | TOS ]


WebUrbanist

 
Comments Off on Modern Motorcycles: 15 Super-Sleek Custom Rides

Posted in Creativity


Mushroom Materials: DIY Kit Grows Custom Compostable Products

30 Mar

[ By WebUrbanist in Design & Products & Packaging. ]

mushroom lamp

Turning agricultural waste and fungal mycelium into construction materials, this do-it-yourself kit lets you grow your own compostable bio-plastic objects, from packaging furniture to surf boards and architectural building blocks.

mushroom award winning architecture

Providing a natural alternative to synthetic options, Ecovative’s Mushroom Materials line competes on cost with petroleum-based equivalents and can be shaped in all kinds of ways using custom and reusable molds.

bag of mushrooms

mushroom in a mold

Their latest creation is this home Grow It Yourself kit – they will ship you the organic components (a mixture of crop waste, like corn husks and stalks, and the vegetative part of mushroom fungus). Upon receipt, you can wait and leave things in a dry dormant state, or add water and fit the mixture into a mold to build whatever you want – nature and time take care of the rest.

mushroom as product pacakging

surfboard surf organics

So far, Mushroom Materials have been used to make everything from award-winning architectural creations (using blocks made out of organic matter) to biodegradable surf boards, flower pots, lamps and other everyday objects.

plant pot mushroom

pendant lamp mush lume

From Evocative: “We grow materials made from agricultural byproducts and mushroom mycelium. Mycelium is a natural, self-assembling glue, digesting crop waste to produce cost-competitive and environmentally responsible materials that perform. Our large-scale grow factories are truly revolutionary. We harness the power of nature – the cleanest technology on Earth, eliminating the pollution generated across the petroleum-based plastics supply chain.”

Share on Facebook


[ By WebUrbanist in Design & Products & Packaging. ]

[ WebUrbanist | Archives | Galleries | Privacy | TOS ]


WebUrbanist

 
Comments Off on Mushroom Materials: DIY Kit Grows Custom Compostable Products

Posted in Creativity


Exo-Prosthetics: Light, Cheap & Custom 3D-Printed Body Parts

09 Jan

[ By WebUrbanist in Conceptual & Futuristic & Technology. ]

3d bio printed leg

Lightweight, individualized and inexpensive, this design and manufacturing strategy bends artificial limbs in new directions and promises a more personalized product for those in need of a replacement (or upgrade).

3d custom titanium prosthesis

Developed by Adam Root, the process involves inverted laser scanning, 3D modeling and printing to generate form-fitting body parts that are comfortable, affordable and suited to a particular individual. The result is a “highly precise virtual model of the patient’s residual limb and matches its anatomy to within a fraction of a millimeter” which together with the “MIT biomechatronics lab-developed fitsocket captures leg tissue properties to enable a better fit.” Off-the-shelf parts round out these customized creations.

3d proesthetic pictures renderings

3d space frame mesh

A custom-patterned mesh model forms the basis for fabricating an exo-skeletal structure, held together with titanium dust particles that are laser-sintered into place for strength and durability. This technique obviates the need for cumbersome central supports by spreading the loads in a sort of three-dimensional ‘space frame’, to borrow an architectural term. The resulting aesthetic is not only personalized but compelling – stylistically, it leaves choices up to the user and gives a unique look to each individual creation.

3d scanned bio limb
3d stage two rendering

3d printed limb connections

3d modeled exo prosthetic

Gizmag puts these developments in context: “There are over 2 million amputees in the United States with 185,000 amputations every year. More than 90 percent of these involve amputations of the lower limbs. Traditional prostheses can be prohibitively expensive due to their complexity and the specialized labor required to customize them for each patient. They also have a very mechanical and robotic look and feel about them, which can exacerbate the sense of loss and negatively affect the psychological wellbeing of some amputees.”

Share on Facebook


[ By WebUrbanist in Conceptual & Futuristic & Technology. ]

[ WebUrbanist | Archives | Galleries | Privacy | TOS ]


WebUrbanist

 
Comments Off on Exo-Prosthetics: Light, Cheap & Custom 3D-Printed Body Parts

Posted in Creativity


The Easy Way to Make Your Own Custom Photoshop Brushes

26 Nov

If you’ve never heard about the creative use of brushes in Photoshop, this article is for you. If you already know about using brushes, you’ll be able to ramp up your creativity once you learn this easy skill – making your own brushes.

DSC_0974Pond2W

What are Photoshop brushes and why you’d want to learn how to make your own?

Photoshop brushes are tools that are mostly used just like regular paint brushes to add strokes of color to your images. Most often people will use them as part of their dodging and burning workflow. Some people also use them in digital painting. The built-in brush set comes with a great assortment of  brush styles, such as soft bristles, round, square etc., but you can also make your own “fancy” custom brushes (which are reusable) to speed your workflow and add elements of interest to your images.

The creative side of custom brushes allows you to use all sorts of imagery, textures, individual shapes, and even other photos like an old fashioned stamp pad, so you can quickly add artistic treatments to your images. You can even make a brush of your signature to easily sign your work.  Then combining the stamped brushes with layers and blending modes you have a whole other set of easy creative tools you can use to multiply your photographic impact.

brushes-palette

Screenshot of the Brushes Palette – notice the birds and my name close to the bottom? These are custom brushes.

Making reusable items into brushes helps you to easily add objects of interest or even subject matter to your images. Birds are very popular in landscape images these days. Who doesn’t instantly feel the freedom and purpose of birds in flight? Adding a carefully placed flock of birds, or even just one bird in flight, can change the entire story of the image and add a powerful element to your composition.

_300385203W

Adding a “flock of birds” brush to create a better story.

By creating your own “instant flock” with brushes you will never be at a loss to fill an empty sky. As well, this technique is the same whether you’re making a birds brush, a signature brush, sparkles, snow flakes, or music notes – what you can create is entirely open, limited only by your imagination.

The Simple Process for Making Custom Brushes

Let’s use birds for this example. Birds are popular and a versatile addition to landscape images, so this demo will show you how to make a custom reusable brush for adding a flock of birds to your images. This assumes you have a photo of birds. If you don’t, but still want to follow along, the zip file below contains all the elements you need to replicate this specific tutorial.

Step 1

Open the image you want to make the brush of – birds, trees, etc. – in Photoshop. The best images to use are ones where the item that is to be the brush is isolated on a plain background, in the case of birds a clear blue sky is perfect. If you want to make brushes from images of trees, try to use images where the trees are against a plain uncluttered background.

A good image for a brush base.

A good image for a brush base.

Step 2

Double click on the background layer to make it editable – it should now be called Layer 0. Make a new empty layer and move it beneath Layer 0 as shown below.

layers

Step 3

Next,  you are going to select the background and cut it out. Using the Magic Wand tool, set the Tolerance in the top menu to around 50. This will ensure that all your background pixels are selected. If you have a more complex background, you will have to play with the Tolerance, or perhaps try the Lasso tool to cut out the background.

magicwand

Background selected with the Magic Want tool.

Step 4

With Layer 0 as your active layer, and the background with the marching ants, hit Backspace on your keyboard to delete the background. Click CTRL D to remove the marching ants. Your image should now look like this:

brush-base

Step 5

Now you’ll will make the actual brush. You can use the Rectangular Marquee tool or the Freehand Lasso to select the birds or the subject of your brush. Which tool you use will depend on your brush subject. I will use the Rectangular Marquee tool for this example. Using the marquee tool draw a selection  around your birds.

selection

Under the Edit menu, look for Define Brush Preset and select it. You’ll get a pop up that wants you to name your brush. Give it a creative name and click ok.  Now go into your Brush Preset palette by clicking on the brush tool, and you’ll see your newly minted brush at the bottom of the list.

brush tool     brushes context menu


your-new-brush

Step 6 IMPORTANT!

The final step is to SAVE your new brush so you can use it over and over. Look for the little gear in the top right corner of this brush preset palette. Click Save Brushes and give your new set a name.

You’re done! Yay. Birds in flight forever. Whenever you want to add birds, just select this brush from the palette and stamp away (use the brush at 100% to have solid birds, anything less they will become see-through).

One big hint for using ANY brush is to use it on a new layer. This way if you don’t like its position, opacity, size, etc., you can easily edit it without having to start your image over again.

You may have noticed that this SAVE you just did, saves all the other brushes together with your new one.  If you want to really get savvy with custom brushes to create special brush sets with only your brushes watch for my article on Advanced Brush Creation and Management.

Download the zip file for this image: DPS Making Brushes – use it to create your bird brushes. Show us the images you’ve made using brushes,  especially the ones you’ve created with this file!

The post The Easy Way to Make Your Own Custom Photoshop Brushes by Alex Morrison appeared first on Digital Photography School.


Digital Photography School

 
Comments Off on The Easy Way to Make Your Own Custom Photoshop Brushes

Posted in Photography


Richard Franiec offers Canon PowerShot G7 X custom grip

01 Nov

Richard Franiec is now offering a Canon G7 X custom grip, joining the examples he makes for the Sony RX100 series, Panasonic Lumix GM1 and other small camera models. Like his other products, it’s machined from high-grade aluminum alloy and attaches to the camera’s front plate with 3M VHB transfer tape that can be safely removed without leaving residue. Read more

Articles: Digital Photography Review (dpreview.com)

 
Comments Off on Richard Franiec offers Canon PowerShot G7 X custom grip

Posted in Uncategorized


Richard Franiec creates custom grip for Panasonic GM1

22 Jan

lumix_dmc-gm1.jpg

Accessory grip maker Richard Franiec has created a custom grip for the Panasonic Lumix DMC-GM1. The grip is made from anodized aluminium alloy and should improve handling when using the GM1 with larger Micro Four Thirds lens. It weighs about 20g and leaves the battery/card door and tripod socket unobstructed. It should be available later this month and cost $ 34.95 plus shipping. Learn more

News: Digital Photography Review (dpreview.com)

 
Comments Off on Richard Franiec creates custom grip for Panasonic GM1

Posted in Uncategorized


3D-Printed Prosthesis: Custom Casts & Artificial Limb Covers

18 Jul

[ By WebUrbanist in Gadgets & Geekery & Technology. ]

custom 3d printed cast

Customization has long been a limiting factor in certain aspects of medical practice, particularly those centering around damaged or lost limbs  creating different person-specific needs. 3D printing technologies, perfect for one-off, fit-to-purpose projects, may just promise ideal solution(s).

custom cast design process

Jake Evill dubs his project, Cortex, an exoskeleton rather than a cast. First, an x-ray of the injured limb is performed. Next, a scan of the exterior of that same limb is made. Finally, based on both of the above, a suitably stiff-but-flexible 3D print is made. The result is customized to the needs of the user for both recovery and comfort.

custom efficient cast design

The resulting design addresses issues of aesthetics, but more importantly deals with waste, healing, safety, durability and other everyday needs. Unlike its cumbersome traditional counterparts, it is readily washable, comfortable and compact enough to fit under clothing that would otherwise require modification.

custom style prosthesis cover

Bespoke Innovations, meanwhile, addresses the needs of those with artificial limbs through what they call Fairings. Their process likewise involves scanning the limb, but in this case of the non-organic variety, then creating a custom cover to fit the functional and stylistic needs and wants of the wearer.

custom artificial limb covers

From the company: “Fairings infuse the individual’s lifestyle and taste into the design from the start. But to make this an even more personal part of the prosthetic leg, Fairings can be enhanced with patterns, graphics, and materials—including leather, ballistic nylon fabric, chrome plating, and even tattoos. By creating a unique custom form that presents the individual, Bespoke Innovations hopes to change the way the world thinks of prostheses.”

Share on Facebook


[ By WebUrbanist in Gadgets & Geekery & Technology. ]

[ WebUrbanist | Archives | Galleries | Privacy | TOS ]


WebUrbanist

 
Comments Off on 3D-Printed Prosthesis: Custom Casts & Artificial Limb Covers

Posted in Creativity


Traditional to Contemporary: 6 Cool Custom Bedroom Lofts

29 Mar

[ By WebUrbanist in Design & Fixtures & Interiors. ]

loft rooms

Sometimes you have nowhere to build … but up. And really, there is something nice and relaxing about removing oneself from the main floor of a home – which can be done at times even in a one-story dwelling, as these lovely lofts illustrate.

loft bedroom manhattan skylight

Long and narrow is the name of the game in most of Manhattan, including the East Village where this condo by JPDA Architects is located. Taking advantage of a unique pop-up opportunity at the roof level, this stellar little bedroom manages to be bright and spacious while being tucked away at the top of a slim staircase (which doubles as drawers).

loft industrial bedroom study

Switching styles and approaches for a moment, consider this lofted space by Maxim Zhukov. Instead of lofting the bed, this industrial space lofts a little study above the bed instead, taking advantage of the vertical opportunity in a totally unexpected way.

loft a frame bed

loft bunk bed examples

lofted kids bedroom design

rustic cabin loft bedroom

For some greater stylistic variety, here is some (P)inspiration – a few Pinterest finds to pique your interest in other built-in and add-on ways to use existing or create new upper-level spaces for everyday occupation by kids or adults.

Share on Facebook


[ By WebUrbanist in Design & Fixtures & Interiors. ]

[ WebUrbanist | Archives | Galleries | Privacy | TOS ]


WebUrbanist

 
Comments Off on Traditional to Contemporary: 6 Cool Custom Bedroom Lofts

Posted in Creativity