[ By WebUrbanist in Design & Products & Packaging. ]
From color-your-own and converted-umbrella dresses to hoodies-turned-tote-bags and color-scanning sewing machines, a simple, clever and clearly-executed design concept can be as brilliant as the most fashion forward runway piece. See some cool and colorful prototypes first, or skip ahead to learn simple tricks and tips to turn your most ordinary, disused and abused clothes into one-of-a-kind wonders.
Inside the Lines: Self-Colored Convertible Outfits
Consider Berber Soepboer, who started with the most obvious of blank slates: a black-and-white base made to be filled in by the wearer with colored markers.
From that baseline, she has gone on to incorporate buttons, snaps and folds that allow each outfit to convert on the fly.
Wash, Rinse, Recolor: Color-Changing Dresses
For those afraid they might color outside of the lines, Fernando Brizio has an even simpler alternative. A series of simple pockets in these modest white outfits provide the basis for custom color schemes.
You can choose how to arrange the results by deciding which colors to slot in where, and watching them bleed outward to form patterns … then wash them out and start again.
Upcycled Apparel: Old Shirts to New Tops & Skirts
But what about your existing wardrobe? It turns out there is lot to be done on that front as well, like this series of old baggy shirts turned into stellar new tops and dresses by Mari Santos.
Step by step, she takes clothing items that would normally be destined for the dumpster (or at best: the thrift store) and makes dynamic new outfits from them.
[ By WebUrbanist in Design & Products & Packaging. ]
[ By WebUrbanist in Gaming & Computing & Technology. ]
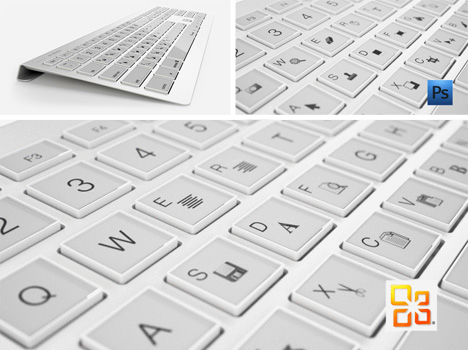
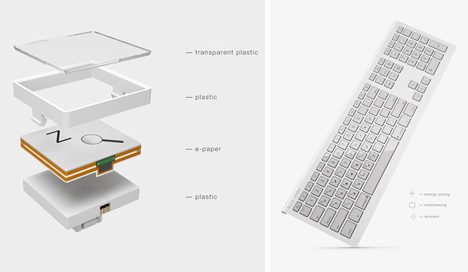
Electronic ink is energy efficient and easy on the eyes, so why not adapt it to the keyboard? It is, after all, one of the few components of everyday technology that still has printed type in a screen-dominated world.
Designed by Maxim Mezentsev & Aleksander Suhih the E-inkey keyboard for Pixel Studio (p1x.ru), the concept is simple: e-ink key displays that can shift to gaming keys, shortcuts or program-specific icons smoothly on demand, just like turning the digital page in your favorite e-book reader.
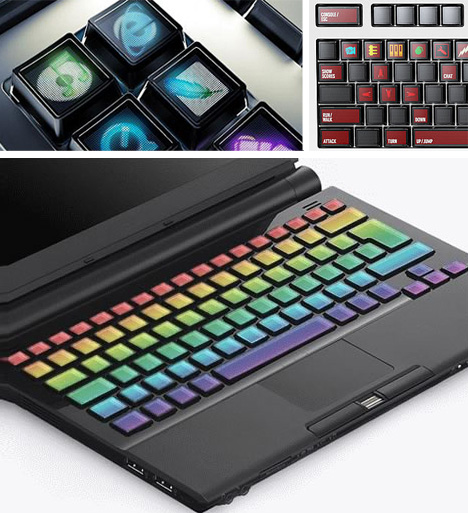
There is already a working precursor to this, and it is more than a prototype – the Optimus Maximus keyboard has configuration software for full customization (letters, images, icons, colors), but uses power-sapping and heavy-touch OLED technology (making it harder to go wireless or even push buttons).
While this is not yet in production, the specs give some hope that it might make its way to Kickstarter or an equivalent soon – it definitely falls under the “please take my money!” category for tech geeks and design professionals alike.
[ By WebUrbanist in Gaming & Computing & Technology. ]
You’ve probably got a bag of them stashed away with old envelopes and Mr. Sketch markers.
Rubber stamps. The classic currency of Valentine’s Day and letters from your penpal.
Stamps don’t have to be boring or cheesy. They can be classy, and they can even be art.
Especially if you design them from your very own photos!
Follow along with our DIY stamp project as we take you from the pixel to the pad without breaking a sweat.
Make a Custom Photo Stamp!
p.s. Need Photoshop skillz? creativeLIVE is hosting a week of Photoshop classes. You can take over 40 different online classes taught by pros for free!
p.p.s. Happy V-Day! Sign up for Phoneography 101 and add your sweetheart (or pal) on us. TODAY ONLY!
Why it’s cool:
Remember that feeling of opening the mailbox and actually finding a letter addressed to you?
Give facebook a rest and show the world that snail mail isn’t dead!
Turn up the fun on your postcard with a stamp of your fat cat, or make that party invitation fancy with a stamp of people dancing.
The possibilities are endless so why not send someone a little love for the price of a stamp!
THE GOODS:
A stamp worthy photograph
A computer with Photoshop or similar
Some carving material, this Speedy-Cut rubber block is a great option
A cutting tool, this Speedball linoleum cutter is the stamp carvers weapon of choice
A No. 2 pencil
Tracing paper
An ink pad
An X-Acto knife or box cutter
A paint brush
Newspaper or a cutting mat
A block of wood or similar for mounting your stamp
Super glue
A NOTE ABOUT THE PHOTO:
When choosing a photo for your stamp aim for an image with high contrast and a plain background. The best designs will have strong lines and simple geometries.
STEP 1: GENTLEMAN, START YOUR STENCIL
Import your image into photoshop and turn up the contrast as needed. The more defined the lines of your photo the easier it will be to carve.
Now turn it black and white by going to Image>>Adjustments>>Desaturate.
STEP 2: ERASE THE EXTRAS
Use your eraser tool to get rid of any distracting background elements from your photo leaving a clean white backdrop.
Trickier portions you may want to select with your lasso tool and delete. When using the lasso just select, hit the delete key, and set the color to white.
STEP 3: SLIM IT DOWN NOW
To get that Banksy stencil effect go to Image>>Adjustments>>Threshold and adjust the toggle until you’ve got the prefered balance of black and white.
If you don’t get the perfect lines from your adjustment, you can always clean up your image with the brush and eraser tools.
Then you’re gonna tape your watercolor sheet of paper on top of the print out.
STEP 4: DE-DIGITIZE YOUR DESIGN
Pixels? Where we’re going, we don’t need pixels.
We’ve reached that magical time where we’ll take your pic off the computer and onto your carving surface. Start by printing your design in the size that you would like to carve, and grabbing your tracing paper and a No. 2 pencil.
Trace over your printed design using a dull pencil to give you thicker lines. Also, try and leave out any tiny details which will be too tricky to carve.
STEP 5: RUB IT IN
Now it’s time to break out a bucket of elbow grease for our transfer step. Place your tracing paper graphite side down onto a corner of your eraser and use the back of your cutting tool to rub over your design.
Make sure to hold down your tracing paper securely so it doesn’t slippity slide. Voilà! It transfers just that easy.
STEP 6: CUT IT OUT
Use your exacto knife or box cutter to trim down your stamp block to just the area surrounding your image. Be careful: These things are sharp!
Start with the smallest blade of your cutting tool, carving around the outside edges of your stencil. You may also want to carve any small details first just in case your lines start to smudge. Apply only light pressure when making cuts. You can always go back and cut deeper if you need to.
Once you have your outline carved, you can switch to a larger blade to carve out unfilled space. Your paint brush will help to clear off the dusty rubber bits that build up while carving.
Hint: If you’re not sure whether to cut something out or not, don’t! Wait until after you’ve tested your design to see how your stamp looks. Its a lot easier to take pieces off afterwards then to glue them back on!
STEP 7: TEST THE INKY WATERS
Ink up your carved creation with your ink pad and press it firmly into a piece of scratch paper. This will show you any stray dots or dashes that may need to be removed.
Excess rubber bits will show up black after you’ve tested your stamp and can be easily airbrushed out with your cutting tool.
STEP 8: MOUNT YOUR MASTERPIECE
A little super glue and a wooden block will work wonders to class up that already ravishing stamp of yours.
Don’t limit yourself though, mount your stamp however you like: on a domino, an oversized lego, a serving spoon, or on the back of an old pattern block.
KEEP STAMPING
Use your new cutting tools to carve the ultimate pumpkin!
Turn your stamp into a fashion statement! Use it to design t-shirts, make earrings, or decorate your kicks.
Use your stamp to create a custom iPhone case. Get yourself a clear plastic case, cut out a template, and stamp away.
Take your game up tp the next level with linoleum printing (think rubber stamps, just on a bigger scale).
Related posts:
Mykea: Photos + Ikea = Custom Furniture Art Darn you Ikea: so easy on the wallet, so hard…
Make Custom-Printed Fabric Using Your Photos Don’t miss our second New York Photo Safari this Sunday!…
Turn your photos into a custom sketch: The best $ 1 you will ever spend The almighty dollar doesn’t go as far as it once…
Check out Bas Rutten’s Liver Shot on MMA Surge: bit.ly www.mahalo.com This video explains how to set up a custom white balance on your Canon 60D DSLR See the rest of our 60D Videos: www.youtube.comCheck Out These Related Mahalo Pages: DSLR Buying Guide: www.mahalo.com DSLR Comparison Guide: www.mahalo.com How to clean your DSLR: www.mahalo.com Digital SLR Camera: www.mahalo.com Check Out these Mahalo How-To Playlists: How To Apply Makeup: www.youtube.com How To Become a Pharmacist: www.youtube.com How To Become a Photographer: www.youtube.com How To Dance the Fox Trot: www.youtube.com How To Dance the Salsa: www.youtube.com How To Dance the Waltz: www.youtube.com How To Flirt: www.youtube.com How To Get 3 Stars on Angry Birds 1st World: www.youtube.com How To Get 3 Stars on Angry Birds 2nd World: www.youtube.com Royalty Free Music by DanoSongs.com Video Rating: 4 / 5
[ By WebUrbanist in Gaming & Computing & Technology. ]
Electronic ink is energy efficient and easy on the eyes, so why not adapt it to the keyboard? It is, after all, one of the few components of everyday technology that still has printed type in a screen-dominated world.
Designed by Maxim Mezentsev & Aleksander Suhih the E-inkey keyboard for Pixel Studio (p1x.ru), the concept is simple: e-ink key displays that can shift to gaming keys, shortcuts or program-specific icons smoothly on demand, just like turning the digital page in your favorite e-book reader.
There is already a working precursor to this, and it is more than a prototype – the Optimus Maximus keyboard has configuration software for full customization (letters, images, icons, colors), but uses power-sapping and heavy-touch OLED technology (making it harder to go wireless or even push buttons).
While this is not yet in production, the specs give some hope that it might make its way to Kickstarter or an equivalent soon – it definitely falls under the “please take my money!” category for tech geeks and design professionals alike.
Want More? Click for Great Related Content on WebUrbanist:
Tap That: 10 Terrifically Techy Keyboard Concepts
Tap tap tap! These keyboard concepts go beyond QWERTY to provide new levels of freedom and fun while typing.
Click Here to Read More »»
Hidden Logos: 12 Creative Designs with Secret Symbols
What do you see when you look at these logos – letters and seemingly random shapes? Take a closer look; hidden symbols and meanings abound.
Click Here to Read More »»
[ By WebUrbanist in Gaming & Computing & Technology. ]
Hi! Here’s my latest finished model, the MSA-0011-XXXX PLAN303E DeepStriker Perfect Custom. This model won the BAKUC 2008 North America. Too bad I didn’t make it to HK for the Finals since I was not available to go to HK at that time. Have a BAKUC Trophy for 1st runner up. This is made up of MG Ex-S Gundam and G-System Deepstriker 4th Attempt. Heavy mods done, scratch builds, customization, and added details. LEDs used from G-System, modified for the chest. This is a poseable model. even the side boosters move. This was started early last year, on and off, then finished last October 2008. Check out www.fichtenfoo.com forum, Mechapinoy, etc. for my WIP. Thank you for viewing! Enjoy! Taken by Nikon D90. Music by Bomfunk MC — Uprocking Beats. Video Rating: 4 / 5
Hi, here’s my 3rd finished customized Gunpla, Wing Gundam Zero piloted by Heero Yuy. Was finished last Nov. 2007. This is a kit-bash kits of MG Wing Gundam Zero Custom EW and 1/100 HG Wing Gundam Zero. Most parts were modified. Option parts were used like total of 10 G-option Thrusters. Can transform into Neo Bird mode except the feet cannot transform like the original TV series Wing Zero. Please check my BAKUC page for more old pics: www.bakuc.com Music used: Just Communication and Rhythm Emotion Techno Remix by TWO-MIX Pics and video taken by: Canon D90 Thanks for watching!!! Video Rating: 4 / 5
Comments Off on 1/100 MG Wing Gundam Zero vic01 Custom
Demonstration of Canon’s Custom Shooting modes for www.FStoppers.com. Recap: 1) Menu, Camera User Settings 2) Register 3) Select C1, C2 or C3 4) Confirm “OK” Video Rating: 3 / 5


 When choosing a photo for your stamp aim for an image with high contrast and a plain background. The best designs will have strong lines and simple geometries.
 Import your image into photoshop and turn up the contrast as needed. The more defined the lines of your photo the easier it will be to carve.
  Use your eraser tool to get rid of any distracting background elements from your photo leaving a clean white backdrop.
  To get that Banksy stencil effect go to Image>>Adjustments>>Threshold and adjust the toggle until you’ve got the prefered balance of black and white.
  Pixels? Where we’re going, we don’t need pixels.
  Now it’s time to break out a bucket of elbow grease for our transfer step. Place your tracing paper graphite side down onto a corner of your eraser and use the back of your cutting tool to rub over your design.
  Use your exacto knife or box cutter to trim down your stamp block to just the area surrounding your image. Be careful: These things are sharp!
 Ink up your carved creation with your ink pad and press it firmly into a piece of scratch paper. This will show you any stray dots or dashes that may need to be removed.
  A little super glue and a wooden block will work wonders to class up that already ravishing stamp of yours.


You must be logged in to post a comment.