RSS
 

Posts Tagged ‘Creative’

Creative Color Processing (Part 1/3 – White Balance)

12 Dec

It is often said that photography is a visual language. Through our photographs we tell stories, share experiences, and communicate emotions. Aside from journalism, where faithful captures are important for ethics reasons, photography is often about creatively interpreting a scene, rather than simply recording what is in front of the lens.

Tokyo street scene with creative color

Tokyo street scene with creative color

Tokyo street scene with 'normal' color

Tokyo street scene with ‘normal’ color

Creative use of color can be a powerful tool for controlling the mood in your photographs. In a series of three posts I will discuss three Lightroom controls that can be used to control color and mood in your photos:

1. White Balance
2. Split Toning
3. Tone Curve

In this first article in the series I will discuss white balance, the simplest of the three tools.

Note: I shoot Raw and import my photos into Lightroom, converting to DNG on the way into Lr. Shooting Raw gives me much more flexibility to make creative color decisions in post processing. The screenshots from are from Lightroom 4, but with the exception of the Tone Curve technique that I will cover in Part 3 of the series, these techniques can be used in previous versions of Lightroom.

White Balance

White balance allows you to control the overall color temperature of your image, and adjust for different light sources like tungsten, daylight, flash, etc. If you’ve never heard of white balance take a look at this post.

White Balance Example

Example of different white balance settings

Most of the time you’ll read that white balance is there to help you get accurate color in your photos. This article is not about accurate color. For the next few minutes, forget about accurate color and let’s just look at how white balance can be used to change the mood in a photo. I like to think of white balance as just another tool for controlling color image my images. Thinking of white balance this way is liberating and encourages experimentation.

Tokyo Taxi White Balance Example

Tokyo Taxi White Balance Example

Notice how a cool white white balance creates a totally different mood than a warm white balance for the same scene? Which of the above images do you prefer? When you feel like getting creative with your images, try shifting the white balance either cooler or warmer for creative effect.

I hope this article has encouraged you to think creatively about white balance, and to experiment with shifting white balance for creative effect. I love hearing your feedback, please comment below or feel free to connect with me through Facebook or Google+.

In Part 2 of the Creative Color series I will discuss Spit Toning, and demonstrate how white balance and split toning used together for even more creative control over color.

Post originally from: Digital Photography Tips.

Check out our more Photography Tips at Photography Tips for Beginners, Portrait Photography Tips and Wedding Photography Tips.

Creative Color Processing (Part 1/3 – White Balance)


Digital Photography School

 
Comments Off on Creative Color Processing (Part 1/3 – White Balance)

Posted in Photography


Adobe announces updates exclusive to Creative Cloud members

11 Dec

shared:AdobeLogo.png

Adobe has announced CS6 updates that are exclusive to Creative Cloud subscribers. Adobe Photoshop 13.1 offers among other things, the ability to apply Liquify and Lens Blur effects as Smart Objects and use conditional statements when creating Actions. However, these changes are unavailable to those who’ve bought traditional versions of Photoshop CS6, and Adobe has not said when, or even if, ‘perpetual users’ of CS6 will have access to these features. Retina Display support for Mac, also announced today, is available for all users.

News: Digital Photography Review (dpreview.com)

 
Comments Off on Adobe announces updates exclusive to Creative Cloud members

Posted in Uncategorized


Power Trip: 13 Creative Cord & Outlet Concepts

10 Dec

[ By Steph in Gadgets & Geekery & Technology. ]

We use power outlets and extension cords every day, yet they seem to have been left behind when it comes to both aesthetic and practical improvements over the last few decades. These 13 (more) products, concepts and DIY projects include power outlets with built-in retractable extension cords, super-flat tape cords that are invisible under rugs, and modular power strips that can be customized to your electricity needs.

Super-Flat Retractable Tape Cord

This extension cord works just like a tape measure, with the cord extending from the base unit to plug into an electric outlet. Just give the tape a tug and it’ll wind back up inside the unit.

Power Bridge Hides Unsightly Plugs

We don’t really like looking at a mess of plugs in a power strip, so why have them on top? The Power Bridge by Hyukjae Chang flips the strip, keeping the visible side clutter-free. Each outlet also has an indicator light that lets you know how much power that particular device is using.

Belkin TimeOutlet

In the Belkin TimeOutlet, four quadrants corresponding to various times of day keep your lights and devices powered up only during the time that you actually use them, cutting off the power at other times.

Lithoss Frameless Switch

Light switches become design details with the Lithoss Frameless Switch, which uses piano-like keys to turn lights on and off.

Rotating 360 Multi-Outlet Strip

The variety of oddly shaped plugs makes it hard to fit all of your gadgets onto a single power strip. The Rotating 360 ensures that they’ll all fit with a modular design with individual sockets that can be rotated to the side or bottom, or removed altogether if they’re not needed.

Totally Flat Tape Cord is Perfect Under Rugs

There’s no need to tape extension cords to the floor with ugly duct tape or run them along walls and ceilings to keep them out of the way, when they’re entirely flat – and work like tape themselves. This design by Chen Ju Wei uses a sticky electrostatic paste material and circuit-printing technology to embed electric wires within a length of reusable tape that can be wiped clean when needed.

Donut Outlet Features Circular Design

Isn’t it annoying when you’re trying to plug a cable into an outlet you can’t see, and just can’t seem to line up the prongs? With the DONUT outlet, a circular design allows the plug to be inserted from any angle.

Energy-Saving Wind-Up Sockets

Sometimes you only need a light or appliance to be on for a set period of time, but you forget to unplug it afterward. The Wind Up Socket keeps that from happening with built-in timers that cut off the electricity after the chosen length of time.

Recoiling Wall Socket

The ‘Rambler Socket’ by Meysam Movahedi features a 1.5-meter extension cord on a reel that fits within the wall, eliminating the need for extension cords. When you don’t need it, it simply goes away.

E-Line Cord Wrapping System

The habit of wrapping extra cord around an appliance can burn you – literally – if you forget to unwrap it before using the item, especially if it’s something that gets hot, like a toaster or electric kettle. The cord on the E-line wrapping system is coated in such a way that it coils into a compact configuration when it doesn’t need to be stretched.

Plug Extension Cord Project

No need to reach under the desk to unplug your computer or phone charger from an extension cord. The Plug Extension Cord Project by Anton Zetocha provides a little flat piece beside the outlet that makes it easier to use one hand or even your foot to pull the plug.

Floor Plan-Shaped Light Switch

More people would turn off all the lights before leaving the house if it were more convenient. This concept is a master switch for all the lights in the house, shaped like your floorplan. You simply press the shape of the room where you want to turn off lights.

Sculptural Braided Extension Cords

If you can’t hide your extension cords, why not show them off? Design Sponge offers a DIY project that’s admittedly not practical, but makes these eyesores infinitely more visually interesting. Three ordinary power cords are wrapped in plastic tubing and then covered in colored yarn before being braided together. The result is basically a piece of art for your floor (that you’ll probably trip over more than once.)


Want More? Click for Great Related Content on WebUrbanist:

Buzz Cool: 10 Shockingly Creative Power Strips

These 10 creative power strip concepts pick up where bland & boring store-bought outlet bars leave off, adding a cooler buzz to increasingly plugged-in lives.
4 Comments – Click Here to Read More »»


Powerhouse Ideas: 10 Futuristic Clean Power Concepts

Fossil fuels won’t be around forever. Is the world prepared for alternative energy? Judging from these 10 amazing concepts, we’ll be just fine.
4 Comments – Click Here to Read More »»


Share on Facebook


[ By Steph in Gadgets & Geekery & Technology. ]

[ WebUrbanist | Archives | Galleries | Privacy | TOS ]


WebUrbanist

 
Comments Off on Power Trip: 13 Creative Cord & Outlet Concepts

Posted in Creativity


art-2010 / resultaat creatiever speelsheid / result creative playfulness

10 Dec

Some cool visual art images:

art-2010 / resultaat creatiever speelsheid / result creative playfulness
visual art
Image by dietmut

art-2010 / resultaat creatiever speelsheid / result creative playfulness
visual art
Image by dietmut

ST_7462
visual art
Image by westconn

 
Comments Off on art-2010 / resultaat creatiever speelsheid / result creative playfulness

Posted in Photographs


5 Ways to Get Creative with a Fisheye Lens

07 Dec

A fisheye lens is easily one of the best ways to get creative and have a blast with photography. As far as lenses go, a fisheye is relatively cheap (around $ 650) making them accessible to a wide group of photogs. It’s important to know what a fisheye lens is, where it came from, and where the uses of a fisheye lens begin and end.

Originally used for meteorology to study the sky and cloud formations, fisheye’s were originally called “whole-sky lenses.” These lenses quickly became popular in the general photography field because of their fun and unique uses, and of course their incredibly distorted lines. They can be used for many different purposes, both professional and for fun (but mostly for fun). Here are 5 creative ways to use a fisheye lens that you can implement immediately…

1. Radial Blur

Shooting a wedding reception with a fisheye lens can be an absolute blast. These receptions are usually in low light and are a challenge to get great images out of. When I’m shooting a reception, I get right in the middle of the dance floor and just shoot away. To get this radial-blur effect, simply slow down your shutter speed to around 1/25th of a second. Next, you need to spin the camera 90 degrees counter clockwise. To do this, simply cradle the lens with your left hand while using your right hand to pivot the camera body around. Not every image is going to come out, but you can almost always walk away with a few keepers.

2. Exaggerate the Curvature of the Earth

One thing to note when using a fisheye lens is this: The further you move an object or line to the edge of the frame, the more distorted it becomes. If you place the horizon in the middle of the frame, it will be perfectly straight across the entire image. The exaggerate this distortion, place the horizon dangerously close to the top of the frame. Just be careful, you might get home and find your legs in the bottom of the frame ;-) .

3. Shoot Super Wide Landscapes Without The Fisheye Look

Sometimes, a fisheye can be used simply to capture everything you want in a scene. Sometimes, you don’t want distorted lines but still need that super wide angle. If you have a landscape without straight lines (buildings, trees, telephone poles, etc) you can sometimes position the lens in a way that it simply looks like a wide angle lens. Just make sure your horizon is towards the middle of the frame. Doing this will allow you to capture a nearly 180 degree view of a scene while avoiding the distorted, crazy look of a fisheye lens.

4. Capture Entire Ceilings

There’s no way you could capture this much of a ceiling with a normal lens. This was taken at the Gaylor Texan in Grapevine, Texas and this ceiling is absolutely massive. With symmetrical architecture like this, a lot of times there will be a clear marker on the ground to signify the exact middle of the room. When I looked up and saw this site, my fisheye was the only lens that crossed my mind!

5. Change Your Perspective and Embrace Those Lines!

The most important thing is to have fun Whether you’re shooting for fun, or for clients (as pictured above). A fisheye is a prime lens, meaning that you can’t zoom in or out with it. Therefore, it’s up to you to act as the zoom for the lens. Be sure to change perspectives and experiment with different angles and lines. Get down low to the ground, even if it means laying on your stomach in the gravel on a railroad track. Lean up against a wall and use the distortion of the lens to wrap the wall around the frame. Just have fun!

If you have examples of fisheye photography that you’d like to share, be sure and leave a link in the comments below!

Also – Check out these 15 Fun and Fabulous Fisheye Photos for a little more inspiration!

Post originally from: Digital Photography Tips.

Check out our more Photography Tips at Photography Tips for Beginners, Portrait Photography Tips and Wedding Photography Tips.

5 Ways to Get Creative with a Fisheye Lens


Digital Photography School

 
Comments Off on 5 Ways to Get Creative with a Fisheye Lens

Posted in Photography


Linking Up a Creative 2.1 Wireless Modular Speakers

20 Nov

Applies to D5x, D3x and DSx
Video Rating: 4 / 5

 
Comments Off on Linking Up a Creative 2.1 Wireless Modular Speakers

Posted in Nikon Videos


12 Ways to Inspire the Creative Photographer Inside You: Part II

19 Nov

A Guest Post by Andrew Gibson

Note: Andrew Gibson is currently offering his 5 popular eBooks for under $ 20 on SnapnDeals.

0707.jpg

In the first part of this article I came up with six ideas that you can use to break out of a creative rut. I’ve been there myself, when it seems as if there is nothing around to photograph and no subject seems appealing.

The idea behind these articles is to give you some inspiration for those times when creativity seems hard to come by. Here are the rest of the ideas:

7. Try a new Genre

Part of the fascination of photography is that there are so many genres and techniques to try out. That’s part of the fun. Even professional photographers have a comfort zone of subjects and techniques that they are familiar with. Anybody can learn a lot by trying a new genre.

For example, if you’ve never photographed a stranger before then why don’t you look for a model on a website like Model Mayhem? The whole exercise of finding a suitable model and coming up with the concept of a shoot and taking the photos will be challenging and educational.

08

I tried some steel wool spinning photos last week for the first time. Great fun, and a new way to use a local location for photos.

8. Build a photoblog or a website

What do you do with your photos after you’ve taken them? Uploading to Facebook, Flickr or 500px is one thing, but an interesting challenge is to set up your own website or photoblog.

If you have no idea how to do this, don’t panic – it’s fairly easy once you know how. You can use WordPress or Pixelpost to set up a photoblog with an absolute minimum of programming knowledge. The instructions for both are easy to follow. And if you don’t want to buy your own domain name and a hosting plan (essential in order to have your own website) then Blogger, WordPress.com or Tumblr may be the answer. The important thing here is to create your own personalised space on the web for publishing your photos.

The best approach is to be critical of your work and only post your best images. Online portfolios are usually judged by the strength your weakest images. Weed those out to improve your portfolio.

A website or photoblog can work well if you have a long-term project to publicise. Check out Bill Wadman’s 365 portraits as an example.

An added bonus, if you’ve never done this before, is that learning to create a website or blog may be a useful skill to add to your CV.

09
I created the photo gallery on my website using photo blogging software Pixel Post.

9. Create a Photo Book

Do you print your photos? I printed some of my favourites out a few years ago on a borrowed A3 printer and most of them are still stored in a wardrobe. I framed a few, but not the rest. This is a problem for me when it comes to making prints – what to do with them afterwards?

One answer is to create a photo book instead. Blurb is perhaps the most well known photo book service but there are plenty of others. The quality from the best companies is extremely high.

Designing a photo book is not just a matter of placing photos on pages. It will force you to edit your images, look for themes, juxtapose images on the same spread and learn about graphic design. If you have a long-term project a photo book could be a great end product and a nice reward for the hard work you put it in.

Another reason I like the concept of photo books is for the legacy. Books are easier to give out to friends and relatives than prints. You can create a meaningful collection of your best images that people can look at for many decades to come.

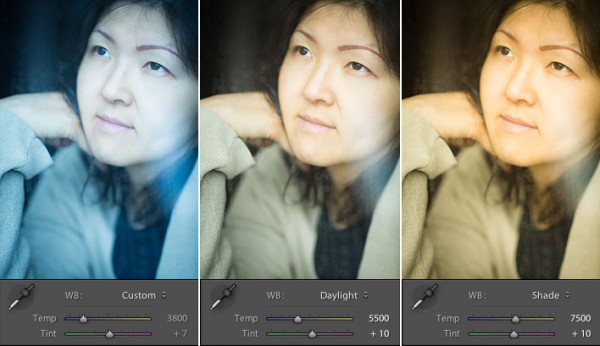
10. Make the most of the Light

Are you lazy with light? One of the quickest ways to improve your photos is shoot in the best light. If the light is beautiful, this will inspire you to take better photos.

Here are three types of light that I like:

The golden hour

This is the hour around sunset and sunrise when the sun is low in the sky and casting low, raking light over the landscape. Ideal for landscapes, seascapes, architecture and portraits.

The blue hour

This is the period from after sunset to night when the natural colour of the ambient light is deep blue. This is a beautiful time for taking landscapes and seascapes. If you take photos by the sea, as long as you have a tripod you can take photos until it is nearly dark. The water reflects the light left in the sky so that you don’t end up with large black areas in the image.

Shade

For portraits my favourite type of lighting is shade. The light is soft, flattering and beautiful. On a bright sunny day any light bouncing off nearby sunlit areas brings a real glow to the model’s face.

It’s important to make the most of the light. It requires effort to make sure that you’re in position when the light is at its best for your subject. But you’ll be rewarded with stronger images.

Now, reverse that idea. Why not try different types of light? For instance, is it possible to take photos of the landscape in strong midday light? I’ve seen it done – one solution is to convert to black and white to take advantage of graphic shapes and shadows created by the direct light.

And what about portraits? Shade is beautiful, but what if the subject is backlit? Or in the midday sun? How can you make this light work? A technique to try in midday light is to use portable flash to fill in the shadows or overpower the light from the sun.

10

One of a series of photos shot on the beach in the middle of day in the summer. I used portable flash to light my model and counter the harsh light of the sun.

11. Shoot in Black and White

I love black and white photography. In black and white there is no colour and the image requires a strong composition using elements such as shape, line and tonal contrast to succeed. It takes time to learn how to see in monochrome. Here’s an easy way to get started.

Set the camera to its black and white mode (check your camera’s instruction manual if you don’t know how to do this). Set the filter colour to red or orange and increase the contrast. Now, when you take photos, the image is displayed on the LCD screen in black and white. This gives you immediate feedback on how well the composition works in black and white.

The image is displayed in black and white even if you set the file format to Raw. The beauty of shooting in Raw is that you have a full colour file that you can do anything with afterwards. That includes converting to black and white in software that gives a better result than the black and white mode on your camera.

11
You may not think of photographing colourful subjects like flowers in black and white. It’s a different approach to a common subject that can work really well.

12. Work in Colour

Here’s another way to look at things in a fresh way. Why not set a colour project? Spend the day just taking photos of things that are red. Or blue, yellow or green…whatever colour inspires you.

An alternative is to work with a more subtle colour such as brown or grey. This can really challenge your creativity as you look for ways to make interesting photos from subtle colour palettes.

14

A selection of photos utilising the colour red. Not all taken on one day – but it shows how effective it can be to group photos together that share a strong visual element such as colour. Going back through your old photos and arranging them by colour may give you a new way to present your work – or inspire you to take more colour based photos.

Andrew Gibson currently is offering a bundle of 5 of his amazing eBooks for sale for under $ 20 on SnapnDeals. You’ll get eBooks on Understanding Lenses, Understanding Exposure, Understanding DPP and square format photograph. Check them out here.

Post originally from: Digital Photography Tips.

Check out our more Photography Tips at Photography Tips for Beginners, Portrait Photography Tips and Wedding Photography Tips.

12 Ways to Inspire the Creative Photographer Inside You: Part II


Digital Photography School

 
Comments Off on 12 Ways to Inspire the Creative Photographer Inside You: Part II

Posted in Photography


Canon EOS 60D Tutorial – In Camera Creative Filters 9/14

17 Nov

EOS 60D: On-Camera Tutorials Canon On-Camera Tutorial Videos explore a specific feature or technology of the EOS 60D.

Merry Christmas everyone! Here’s a short video about…Life in Korea. Canon EOS 60D Lens: Canon EF-S 17-55mm f2.8 IS …and for the two shots on top of the building, the Canon 50mm f1.4
Video Rating: 4 / 5

 
Comments Off on Canon EOS 60D Tutorial – In Camera Creative Filters 9/14

Posted in Nikon Videos


12 Ways to Inspire the Creative Photographer Inside You: Part I

14 Nov

A Guest Post by Andrew Gibson

Note: Andrew Gibson is currently offering his 5 popular eBooks for under $ 20 on SnapnDeals.

01

Have you ever had the feeling of being stuck in a rut with your photography? It happens to all of us at one time or another. Sometimes it’s difficult to find inspiration or to think of new subjects to photograph.

Here are some ideas to get your creative juices flowing again. Pick one or two that interest you and take the opportunity to learn some new skills and challenge yourself. Afterwards, you can look back at what you’ve achieved with a renewed sense of accomplishment and satisfaction.

1. Read a Photography Book

The photography book (both printed book and ebook) publication industry is booming and there is no shortage of inspiration. You don’t have to buy a new book either – your local library should have plenty in stock.

Try reading a photography book written by an author you’re unfamiliar with or who is writing about a genre you’ve never tried before. Then go out and put some of what you’ve read into practice. The great thing about the best photography books is that they have both beautiful photos to inspire you and the practical information you need to try out the same techniques.

Don’t limit yourself to photography books. I spent time yesterday looking at Jamie Oliver’s latest cookbook. The quality of photography is breathtaking and makes me want to try out food photography for myself (as well as the recipes).

02

I learnt the toning technique used in this photo from a book about black and white photography.

2. Use a New Lens

Buy (or borrow) a new lens – then use it. Or you may have a lens in your kit that you haven’t used for a while. Lenses are the eye to your camera’s system and using a new lens (or rediscovering one you have’t used for some time) can give you a new way of seeing.

Try this. If you normally use a wide-angle lens, then try a telephoto lens instead. Or if you normally use a telephoto, try a wide-angle. If you usually use a zoom lens, then how about a prime? You get the picture. It’s all about using a new lens to force yourself to take a fresh approach.

New lenses don’t have to be expensive. There are plenty of inexpensive wide-angle and normal prime lenses around. Another option is to buy a Holga lens for your digital camera (they are available for all the major camera manufacturers at Holga Direct). These are inexpensive and great fun.

03

A simple image taken with a Holga lens on an EOS 40D.

3. Take a Photo Holiday

Sometimes all that is needed to re-energise your creative self is a trip to somewhere new. Even a short trip for a day or a weekend can help. What’s important is that you dedicate it to photography. That way you can concentrate on exploring the most photogenic locations and making sure you are then when the light is best.

You don’t necessarily have to travel far. But it helps if you’ve never been there for a while so you see it with fresh eyes. It should also be visually exciting and inspiring.

04

Who could fail to be inspired by a trip to Venice? But any trip to somewhere new has the power to re-energise your creative vision.

4. Be more Critical

Look at your work through fresh eyes. What are your favourite images? What photography and post-processing techniques do you like to use? How can you improve?

Editing your photos ruthlessly. What are the ten best photos that you have taken in the past 12 months? Don’t be afraid to ask someone else’s opinion. It’s often difficult to be objective about your own work. Does a style emerge when you look at your best images? Does this suggest fresh ideas for future projects?

Imagine that an art director or magazine editor is looking at your portfolio. What might they say about your photos? What are your strengths and weaknesses? Don’t be over critical. It’s just a thought exercise that may help you obtain a clear idea of your strengths and the skills you’d like to develop.

Here’s an idea. Once you’ve selected your best photos why not send them to a photography magazine? They may be published, earning you some money or a prize. Seeing your images in print is always a good feeling, especially the first time.

05

Photos of mine used in a spread in EOS magazine.

5. Enter a photography Competition

There are plenty out there. Just beware of competitions that are rights grabs (there is a list of approved photography competitions here). Most competitions have tight briefs that can inspire and focus you. The prizes can be pretty good too.

6. Set a photographic project

Set a project, something you can return to again throughout the year. Projects give you direction. For example, this year I’ve been experimenting with long exposure photography. This new way of taking photos has encouraged me to view my local area with new eyes, evaluating different locations for their photographic potential.

Projects are good because they give you chance to develop your skills in a certain area. The photos taken at the end of the project will be better than the ones taken at the beginning. You’ll also need a good variety of images to create a cohesive set of photos. Thinking long term gives you time to think up ideas and execute them.

06

A long exposure photo taken a few minutes walk from my front door. Choosing a project that you can carry out close to home can save you time and motivate you to complete the project.

Have you ever been stuck in a creative rut? How did you get out of it? Leave your comments below, I’m sure we will see some good ideas.

The next six ideas will be published in part II of this article.

Andrew Gibson currently is offering a bundle of 5 of his amazing eBooks for sale for under $ 20 on SnapnDeals. You’ll get eBooks on Understanding Lenses, Understanding Exposure, Understanding DPP and square format photograph. Check them out here.

Post originally from: Digital Photography Tips.

Check out our more Photography Tips at Photography Tips for Beginners, Portrait Photography Tips and Wedding Photography Tips.

12 Ways to Inspire the Creative Photographer Inside You: Part I


Digital Photography School

 
Comments Off on 12 Ways to Inspire the Creative Photographer Inside You: Part I

Posted in Photography