RSS
 

Posts Tagged ‘Create’

[3DZ] Create Depth Maps – AfterEffects

22 Nov

This tutorial goes over how to use rotoscoping in Mocha, a very powerful roto tool that comes free with After Effects CS5, to create depth footage. The resulting footage can then be used to create stereo pairs from a single camera. The tutorial is quite long but goes over the entire process from start to finish and tries to explain aspects of Mocha and AfterEffects along the way.

 
Comments Off on [3DZ] Create Depth Maps – AfterEffects

Posted in 3D Videos


How to Create a Black & White High-Contrast and Filmic Image in Lightroom 4

13 Nov

Introduction

This tutorial is a demonstration of the SLR Lounge Lightroom 4 Preset System. With over 200 presets, the LR4 Preset System has been critically acclaimed as the most powerful and intuitive preset system available for Lightroom 4, click the link above to learn more/purchase. DPS users can get 10% off by using the DPS10 coupon code.

Overview

This is a step-by-step tutorial that will show you how to take a portrait and create to create a high contrast black and white portrait, as well as a film-like black and white portrait.

Lightroom 4 Preset System Mixology

If you own the SLR Lounge Lightroom 4 Preset System, this effect can be achieved in around 10 seconds. If you don’t own the preset system, please skip to Step 1 to learn how to do it manually.

High-Contrast Black & White Portrait
1. MY MIXOLOGY > 00 Standard Import
2. MY MIXOLOGY > 13 Standard B&W (Soft | Portrait)
3. BASE ADJUSTMENTS > 45 Medium Darken (Blacks)

Filmic Black & White Portrait
1. MY MIXOLOGY > 00 Standard Import
2. MY MIXOLOGY > 13 Standard B&W (Soft | Portrait)
3. ANTIQUE CURVES > 41 B&W (Vintage Punch)
4. BASE ADJUSTMENTS > 42 Neutral (Blacks)
5. BASE ADJUSTMENTS > 33 Light Boost (Contrast)
6. SPECIAL EFFECTS > 23 Medium (Film Grain)
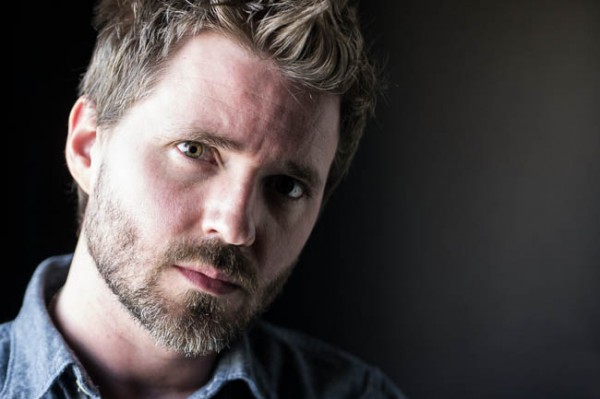
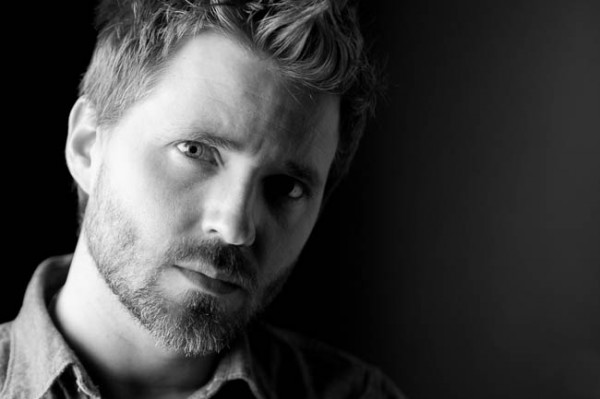
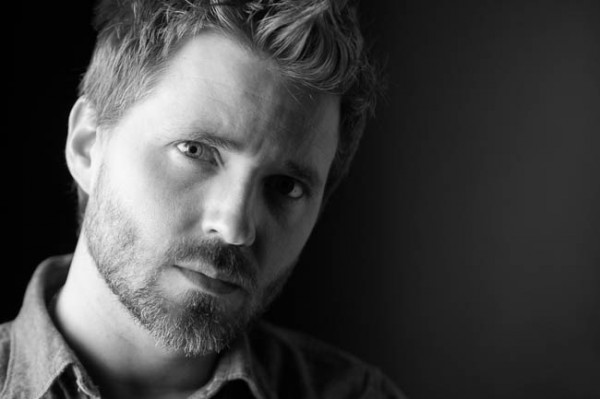
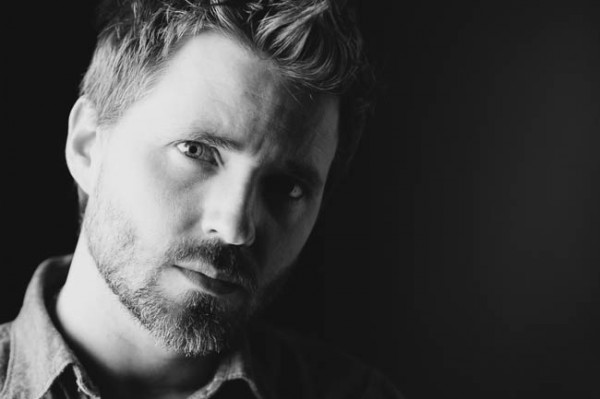
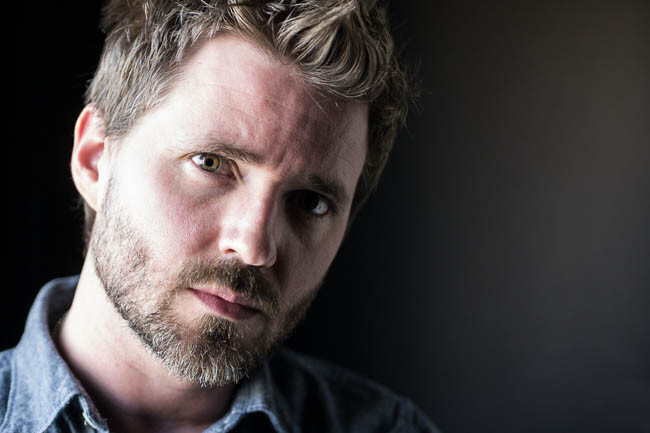
The Original Image

Fotosiamo_Original SLR Lounge

Step 1. Removing Dust and Particles from Our Image

Whenever we are preparing images for printing, we always run a Dust Correction Curve check to make sure that we don’t have any noticeable dust on our image. The great thing about this curve is that it is also useful in detecting dandruff on dark clothing in addition to any other distracting dust or flecks in the scene. We do this by applying the 82 Advanced Dust Correction Curve temporarily.

For those that don’t have the Lightroom 4 Preset System, here is what the curve looks like.

Fotosiamo_Dust Correction Curves SLR Lounge

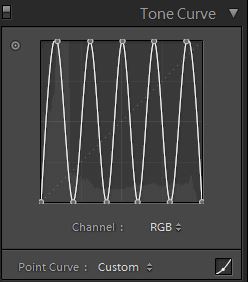
The spikes and troughs on the curve creates a super high contrast (and frankly quite wonky) look to our image which helps in detecting hard to see spots, dust, flecks and anything else that might be distracting as you can see below:

SLR Lounge Dust Correction Curve

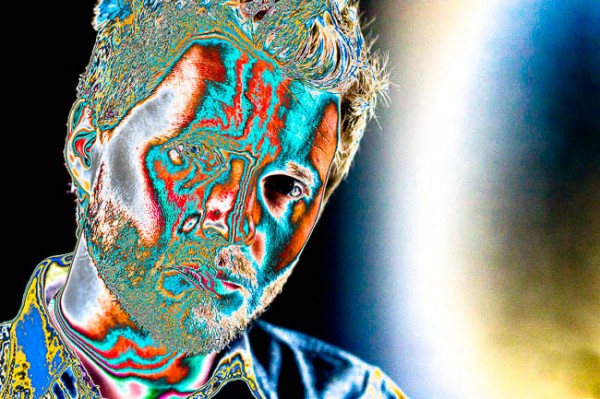
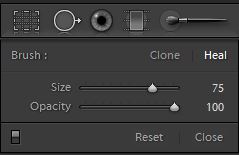
From here, we will select the Spot Removal Tool (Q) to remove any distracting elements.

Spot Heal Brush

Once we have finished, we will simply reset the Curve (without resetting the Spot Removal adjustments that we just made).

Step 2. Applying Our Basic Adjustments

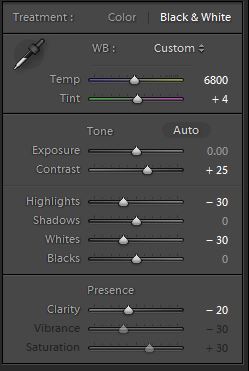
At this point, we need to first convert our image to Black and White by hitting “V”. Since this is a portrait, we will want to smooth out highlights on our skin tones, add contrast, and make other Basic Panel adjustments necessary for our Portrait. We are going to smooth skin tone highlights by decreasing our Highlights and Whites, while adding additional contrast by reducing our Shadows and Blacks. In addition, to further boost contrast, we will also adjust the Contrast slider. Finally, to further smooth the skin, let’s decrease Clarity. Your final Basic Panel adjustments should mirror the following:

01b SLR Lounge HiB&W Basic

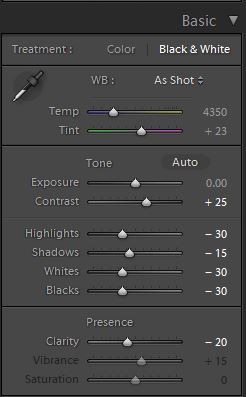
Your image should now look like the following:

SLR Lounge HiB&W Basic

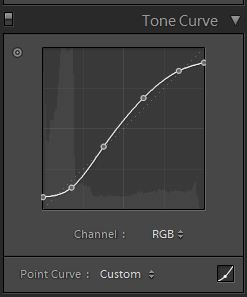
Step 3. Adding Additional Contrast via Curves

The adjustments made to smooth out our highlights are leaving our image just a bit flat. Rather than adding additional contrast with the Contrast slider, we are going to do so with the Tone Curve so that we have more control over where the contrast is added.

Make sure that you are using the Point Curve mode by clicking on the Curve icon at the bottom-right of the panel.

Using a custom Tone Curve, we will dial in a subtle contrast boosting “S” curve that looks like the following:

SLR Lounge HiB&W Tone Curve

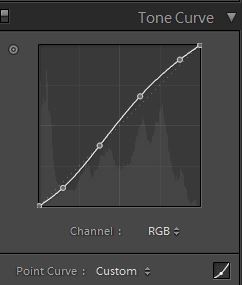
This adjustment is quite subtle, so let’s move on to the next step.

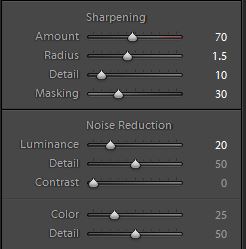
Step 4. Sharpening and Noise Reduction

Normally, if you are using the SLR Lounge Preset System, the Sharpening are automatically applied. Here is what we typically apply to our image:

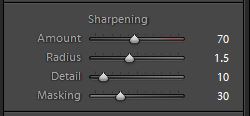
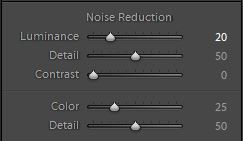
We also want to add Noise Reduction because we may have added some noise when we opened up the Shadows and Blacks. The key here is to balance out Noise Reduction and Sharpness so you can smooth out the skin while retaining the fine details in the hair and eyes. We use this setting for Noise Reduction:

SLR Lounge B&W-Noise-Reduction

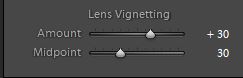
Finally, let’s add some Lens Vignetting at +30 Amount and +30 Midpoint simply to even out edge to edge brightness.

SLR Lounge B&W-Soft-Portrait-Lens-Vignetting

That is all the settings that we use to create our High-Contrast Black and White Portrait. Your image should look similar to the image below:

Fotosiamo_HiB&W Finished SLR Lounge

Now we are going to create a black and white image with a filmic look. At this point, let’s create a Virtual Copy of our image so we can retain both black and white versions by hitting CTRL+’ on Windows and CMD+’ on Mac.

Step 4. Applying Our Basic Adjustments

Compared to the High-Contrast Black and White Portrait, the filmic black and white portrait is going to have less contrast. Additionally, the blacks are lifted by zeroing out Blacks and Shadows. The Highlights, White, and Clarity are still lowered in order to smooth out the skin tone. We also want to keep Contrast at +25 in order to retain contrast across the tonal range.

Your Basic Panel adjustment should look like this:

SLR Lounge FilmicBW Basic

Your image should look like the following:

SLR Lounge FilmicBW Basic

Step 5. Clipping The Blacks & Whites with Curves

The Tone Curve is the key to achieving the filmic look that we are looking for. In order to limit the dynamic range on both the blacks and whites, we are going to clip both ends. Additionally, we are going to increase the shape of the ”S” curve in order to push the contrast outward towards the shadows and highlights. This will also compress the highlights and the shadows, as well. Your Tone Curve should look similar to this:

SLR Lounge FilmicBW Tone Curve

And your image should look like the following:

SLR Lounge FilmicBW Tone Curve

Step 6. Sharpening and Noise Reduction

The Sharpening and Noise Reduction remain the same as the High-Contrast Black and White image, so your settings should look like the following:

SLR Lounge FilmicBW Detail

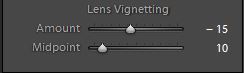
Step 7. Darkening the Edges with Vignette

Instead of opening up the edges by adding a lighter Lens Vignette like we did with the High-Contrast Black and White, we are going to darken them instead. We are only darkening the edges subtly, so your Vignette should like this:

SLR Lounge FilmicBW Vignette

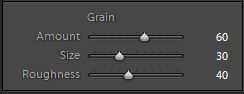
Step 8. Adding Film Grain

Finally, to achieve the filmic look for our Black and White portrait, we are going to add a medium amount of Grain to the image.

SLR Lounge FilmicBW Grain

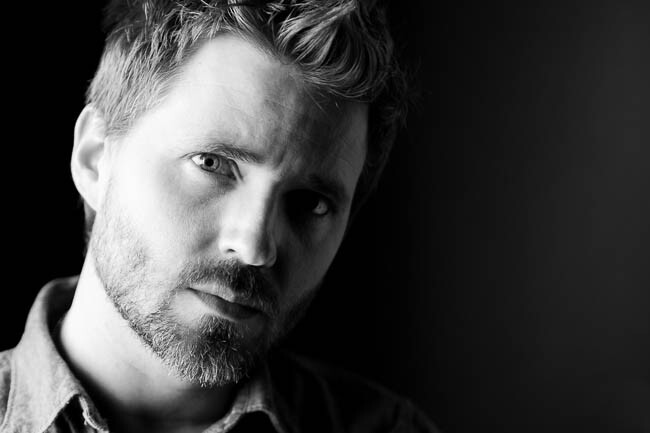
Here is the final image after we add the Film Grain:

Fotosiamo_FilmicBW Final SLR Lounge

Final Before and After Images

Here are the before and after images comparing the original image against the High-Contrast Black and White image and the Filmic Black and White image that are created using the SLR Lounge Lightroom 4 Preset System.

Fotosiamo_Original SLR Lounge
Original

04 Fotosiamo_HiB&W Finished SLR Lounge
High Contrast Black and White

09 Fotosiamo_FilmicBW Final SLR Lounge
Filmic Black and White

The Lightroom 4 Preset System

The SLR Lounge Lightroom 4 Preset System is designed to enable users to achieve virtually any look and effect within 3-5 simple clicks. From basic color correction, vintage fades, black & white effects, tilt-shift effects, faux HDR, retouching, detail enhancing, and so much more. The sky is the limit with what has been dubbed the most powerful and intuitive preset system available. Click the link above to learn more/purchase.

Post originally from: Digital Photography Tips.

Check out our more Photography Tips at Photography Tips for Beginners, Portrait Photography Tips and Wedding Photography Tips.

How to Create a Black & White High-Contrast and Filmic Image in Lightroom 4


Digital Photography School

 
Comments Off on How to Create a Black & White High-Contrast and Filmic Image in Lightroom 4

Posted in Photography


3D Photoshop Tutorial 01 – Create Stereo 3D from 2D Comic Images

02 Nov

3D Tutorial – Create Stereoscopic 3D from 2D Images with Adobe Photoshop. Learn the basics of creating stereo 3d from normal 2d still image or photograph using Adobe Photoshop. Output as red cyan anaglyph for old school 3D glasses.Enhanced Dimensions is giving away a whole heap of cool 3D freebies. 3D Cards, 3D Videos and 3D Desktops – all for FREE! Visit enhanced-dimensions.com right now to grab the goodies. +++++++++++++++++++++++++++++++++++ The Stereoscopic 3D Video Channel is an online 3D TV channel dedicated to showing the best in creative stereoscopic 3D videos and 3d animations. +++++++++++++++++++++++++++++++++++ LEARN HOW TO MAKE 3D VIDEOS FOR YouTube & YT3D If you are interested in learning how to create Stereo 3-d videos, or how to convert 2d to 3d movies using Adobe After Effects please visit enhanced-dimensions.com/wordpress for comprehensive tutorials. FREE 3D GOODIES Get FREE 3d glasses, 3D Cards, 3D Videos, 3d desktops and more from enhanced-dimensions.com/wordpress For more info on Enhanced Dimensions: Contact us on 3d@enhanced-dimensions.com +++++++++++++++++++++++++++++++++++ The Stereoscopic 3D Video Channel on YouTube www.youtube.com +++++++++++++++++++++++++++++++++++ Built and tested for Cyan Red 3D Glasses in Adobe After Effects. A 3D Stereoscopic Production for Enhanced Dimensions by Andrew Murchie.
Video Rating: 4 / 5

Short review 3D Glasses from Dealextreme – .79 – free shipping DX item link – dx.com More 3D Glasses from DX link – dx.com DX item description: – Re-useable Plastic Frame Resin Lens Anaglyphic Blue + Red 3D Glasses – Fashion design with normal gentle glasses size – Clear and quality…

 
Comments Off on 3D Photoshop Tutorial 01 – Create Stereo 3D from 2D Comic Images

Posted in 3D Videos


Create floor plan graphic from sketch in Photoshop

22 Oct

Tutorial on converting a sketch into a floor plan graphic for use as an interactive floor plan on www.tourvista.com
Video Rating: 5 / 5

For more tutorials visit arenacreative.com Blown out skies ruin a lot of good photos – don’t worry, they’re very easy to fix in Photoshop in under 5 minutes. Music Credits: NKOTB-Click Click Click Photo Credit: www.brookewhatnall.com
Video Rating: 5 / 5

 
Comments Off on Create floor plan graphic from sketch in Photoshop

Posted in Retouching in Photoshop


Photoshop CS4: Create Smooth Bubbles

19 Oct

Like us on facebook! www.facebook.com Learn to create bubbles with Photoshop. I was wondering of a basic tutorial to teach from a “orb” design I was working on and a snow globe I did during the holiday seasons, and decided well since I am in a bubble all the time in Super Mario Bros I decided to create a bubble tutorial using the same techniques I use when creating orbs or snow globes. (Those type of tutorials will need narrator, longer indepth tutorials will be coming soon) I hope you enjoy the tutorial, also don’t forget to try and go farther then what the tutorial shows you, and create something really awesome and post a video response of it.
Video Rating: 4 / 5

 
Comments Off on Photoshop CS4: Create Smooth Bubbles

Posted in Retouching in Photoshop


What Makes A Great Street Photograph and How Do We Create Them

16 Oct

This post is written by James Maher – author of The Essentials of Street Photography – an eBook currently onsale at SnapnDeals (25% off).

Pushups, Rucker Park, Harlem

Pushups, Rucker Park, Harlem.

Growing up I obsessed with basketball.

I would skip school; I would play in light rain and sometimes snow; I occasionally failed classes and always fell asleep in them.  From age 8 until 22, it’s pretty much all I did and all I wanted to do.

The best players were often reserved, relaxed, and mentally tough and focused.  The intense look in the child’s eyes above explains it all and shows how innate this mentality and focus can be.

What Makes A Great Street Photograph?

So how does this story relate to you taking a ‘great street photograph?’

I want to share with you what I have learned, because it has nothing to do with tips, tricks, or techniques. The techniques are necessary to be able to take a technically good photograph but they are not the reason why you take great photographs.

Great street photographs say something about life; they speak to us; they fill us with an emotion; or they give us insight.

They are not about light; they are not about shapes or forms; they are not about faces.  Light, shapes, and faces can only aid in the success of a photo; they cannot be the reason for it.  When you look at a great street photograph you should not leave it saying, ‘Wow that light was amazing.’  You should leave it saying, ‘Wow the emotion or story in that photograph really hit me – AND the light was amazing.’

A great street photograph is one that makes a person think or one that brings up a specific feeling, story, or idea.

For a quick example, you shouldn’t be trying to capture a face; you should be trying to capture an expression.

If Only For A Moment

If Only For A Moment.

“If Only For A Moment” – A fleeting moment with a story.  No faces, subtle blue lighting, and no spectacular forms that stop you in your tracks.  What is here is the subtle body language of the pass and that split second ‘what if’ thought going through their minds.  This photo leads you on a mental journey through all of those ‘what if’ moments in your life and youth.  It makes your heart beat.

How Do We Create Them?

So how do we create these photographs with meaning?  Aren’t we at the whims of randomness and our surroundings in street photography?

Not necessarily.

The answer to this comes back to you and it is the reason for the personal stories in this article.

Street photography is a form of self expression.  We go out and we search for the type of content that means something to us.  When we are out there we are basically photographing ourselves, and searching for people, ideas, stories, and thoughts that we relate to and want to share.

Look at the body of work of any street photographer and you will be able to get some consistent insight into their personalities and how they see the world.  They, like us, were at the whims of their surroundings and everyday randomness, yet this meaning still broke through in their work.

That is why you cannot copy another photographer’s style.  You can only learn from them and their techniques and apply them to your own way of shooting and your own personality.  Style isn’t about a look; it is about meaning.

It is about you.

Street photography is about exploring the world through our eyes and sharing the insights and stories that we see and find.  It is showing the viewer how we see and think about the world.

The best photographers are not just interested in photography; they have an interest in people, in life, in social issues or cultural issues.  They read and they explore new places and new ideas.  They are curious both about others and about themselves.  They have a good eye for design, but more importantly they have a good nose for the ideas that are floating around them.

Guess in Red

Guess in Red.

“Guess in Red.” – I grew up with a serious case of Attention Deficit Disorder, which luckily subsided as I got older.  Even simple stimulations would lead my mind way off track.  Because of this and over time, I became very sensitive to advertising and how it intrudes on our attention, because it would break mine constantly.  Walking around the streets was like a sensory overload.  It’s led me to become fascinated with advertising and their intrusive nature and influence on our lives.

Is the above photo a coincidence or is it the result of influence?

If you want to take better street photographs, figure out why you are shooting and what you want to capture from it.  What do you relate to most?  Is there a specific type of content or person you are attracted to?  Are you attracted to specific emotions or are there cultural issues that you want to show us?  There are an infinite amount of ideas that you can go out and capture.

To better understand yourself and your work, study you archives and search for themes.  Group similar photographs together.  You might notice some ideas that you had previously missed.

It’s not easy.

Think about what your personality is like and how that relates to what you see out there.   Maybe you can start by photographing a specific aspect of what life is like in your town or street.

Just because you live in an unpopulated area doesn’t mean you can’t do street photography.  Give us insight into what it’s like to live where you are.  You don’t even have to leave your home and it doesn’t matter if people are in the photographs or not.  If you live in a town without a lot of people, then perhaps out of a series of twenty images, only 5 to 7 of them should actually have people in them.  Photograph that sparseness.  Let us into your world.

I can’t think of many things that sound more interesting than that.

Waiting in Grand Central

Waiting in Grand Central.

New York is a city where there are a lot of people, a lot of stimulation, and a lot of things happening all at once.  However, it is also a very lonely city.  Living here, you feel like everyone is competing with you and that everyone is moving so fast that you can barely keep up.  This shot was my way of portraying these feelings visually.

A great street photograph is one that comes from your soul and explains how you see the world.  Light, faces, composition, and forms are all part of the recipe but they are not the reason why you click that shutter.

And you can create better street photographs by better understanding yourself and your world.

What are your thoughts about what creates a great street photograph?

This post is written by James Maher – author of The Essentials of Street Photography – an eBook currently onsale at SnapnDeals (25% off).

Post originally from: Digital Photography Tips.

Check out our more Photography Tips at Photography Tips for Beginners, Portrait Photography Tips and Wedding Photography Tips.

What Makes A Great Street Photograph and How Do We Create Them


Digital Photography School

 
Comments Off on What Makes A Great Street Photograph and How Do We Create Them

Posted in Photography


Using Tight Framing to Create a Sense of Infinity

16 Oct

CroppingThe way you frame and crop your shots has power to give a sense of size to a scene that may not actually be there.

For example – the shot to the left of a field of tulips is framed in such a way that there is not beginning or end to the tulips anywhere inside the frame.

While the field tulips may in fact end just beyond the edge of the frame in any direction – the feeling that this framing gives is that of a never ending sea of tulips.

To get the effect the photographer has managed to get the angles right so that there’s no horizon and they’ve filled the frame with their subject.

To see the same principles illustrated again – check out the two following images. The first shot actually contains a lot more flowers than the second one – but because there’s a break in the flowers with the horizon there’s a sense that the flowers are limited to a certain area. Whereas the second scene could actually have a lot less flowers in it – but they go on and on in the mind of those viewing the shot.

Infinity

The same principles can be applied to numerous other situations. For example the same thing is done in the following image of a sailing boat:

Sailing

The boat is seemingly in the middle of an ocean – as there’s no end to the water in the frame. However the inclusion of land in any direction or even a horizon would have interrupted the water and given the image a different feeling.

Again it is a combination of the angle that the photographer is shooting from (from slightly above) and the framing of the subject.

Post originally from: Digital Photography Tips.

Check out our more Photography Tips at Photography Tips for Beginners, Portrait Photography Tips and Wedding Photography Tips.

Using Tight Framing to Create a Sense of Infinity


Digital Photography School

 
Comments Off on Using Tight Framing to Create a Sense of Infinity

Posted in Photography


[MODIFIED] Clipboard Managers – Enhancers – Monitor the Clipboard and Create Permanent Clipboard Entries with ArsClip

01 Aug

ArsClip can monitor your Windows clipboard and lets you paste recently-copied items, plus you can define permanent items accessible via hotkeys.

ArsClip is a freeware clipboard enhancer for Windows XP and up. Arsclip remembers previous text and non-text items placed in the clipboard, accessible from most everywhere by pressing a Ctrl + Shift + Z hotkey.

When run, the software places an icon on the System Tray – right-click to select options or press the customizable hotkey. History items can be edited or removed. You can also create permanent history items accessible via other customizable hotkeys, allowing you to create hotkeys for, as examples, your name, web or blog address, Facebook page, and Twitter account….

Read more at MalekTips.
New Computer and Technology Help and Tips – MalekTips.Com

 
Comments Off on [MODIFIED] Clipboard Managers – Enhancers – Monitor the Clipboard and Create Permanent Clipboard Entries with ArsClip

Posted in Technology


Miscellaneous Software – Freeware to Create Backups as .7z or .ZIP Files at Two in the Morning

17 Jul

Simple Data Backup is a freeware backup application for Windows that can be configured to turn on your machine automatically to run backups at off-hours.

Most of us could do a better job making backups of our files to ward against hard drive failure, spyware or malware attack, or other disasters. One option for doing this is the freeware Simple Data Backup application for Windows, which can be set up to backup files every day. Depending on your computer setup, it can even wake up your computer to activate and shutdown when done, so you can perform backups at three in the morning, for example.

Files can be backed up directly or compressed as .7z or .zip files. Other options include forcing certain programs to close before backups occur (to help ensure files aren’t locked due to being in use), placing a shortcut to the backup options on your Desktop, and deleting files from the backup if they no longer exist in the source directory. The software even supports a variety of command-line switches….

Read more at MalekTips.
New Computer and Technology Help and Tips – MalekTips.Com

 
Comments Off on Miscellaneous Software – Freeware to Create Backups as .7z or .ZIP Files at Two in the Morning

Posted in Technology


How to create VIVID BLUE SKIES in PHOTOSHOP

11 Nov

This is my 1st video tutorial which explains probably the most simple way to transform dull boring skies into vivid blue and exciting ones, and to make your sky photos stand out. Hopefully you will enoy this, my future video tutorials will be much better, this one is more of a test. I presume it will mainly be viewed by my DEVIANTART watchers (pierredevlin.deviantart.com
Video Rating: 4 / 5