RSS
 

Posts Tagged ‘Conditions’

Let’s Talk About Light – 3 Types of Lighting Conditions and how to Use Them

27 Mar

What‘s all this talk about light?

About light photography 04

When I started my photography journey I remember every article (or so it felt like), blog or book I read talking about light. “Find the light!”, “SEE the light!”, “It’s all about the LIGHT!”, “Follow THE LIGHT!”… AHHHH WHAT’S ALL THIS TALK ABOUT LIGHT!!!

Sound familiar?

I soon became obsessed about light. I would stare at people as they were talking to me; daydreaming, watching how the light was falling on their faces. When I was out walking I would always be looking at the direction of light and the way it behaved at certain parts of the day. It seemed however, that the harder I looked for The Light, the less I was able to see it. I honestly thought I would never be able to see the light!

Then something happened. I can’t tell you exactly when, but after months of obsessing about light, I finally saw ‘it’; its beautiful, soft, illuminating quality and its ability to change the mood and style of a scene.

Light plays a huge part in my photography style and the soft, romantic images I create. There are so many different types that I could easily write a whole book about light alone. For now however, I’m going to focus on three types of lighting conditions and how I use them to their advantage.

Open shade

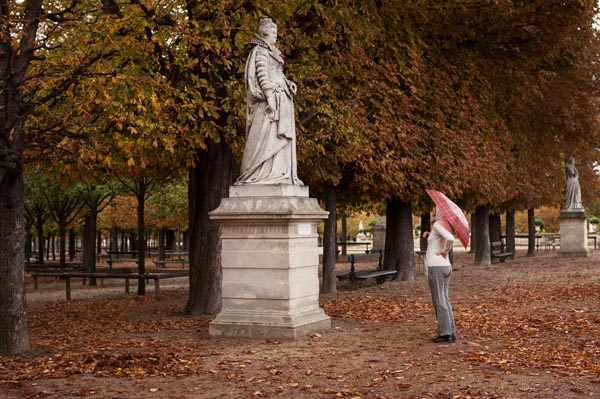
Open shade is that spot between the sun and shade. The shade can be created by a building, a tree, a wall, etc. When using open shade it’s important to ensure that you still have available light reflecting into the shaded area. Choosing areas that have white, or light pastel, walls or floors will also help create additional soft, illuminating light by reflecting light off their surfaces. The reflected light will bounce all over your model giving them a lovely soft, gentle and even glow.

About light photography 01

The above image was taken in open shade. Can you see the line in the bottom left of the frame that divides the light and shade area? I’ve placed my model just with in it, so that the light is still reflecting onto her. The limestone wall also acts as a reflective surface and bounces light back onto my model.

Another thing to consider when using open shade is the direction your model is facing. If facing in the wrong direction, open shade can leave your image looking dull and flat. Make sure to look at where the light is coming from and have your model facing it. Use reflective surfaces, or a reflector, to direct the light back towards your subject. By doing this, the light is still illuminating their face and you’re still getting those beautiful catch lights in their eyes. Open shade offers the flexibility to shoot any time of day. It’s a great tool to use when shooting in midday light, when the sun is high in the sky and is creating harsh shadows on your model.

About light photography 02

Overcast days

Overcast days are my favourite sort of days to shoot. It’s like shooting in open shade, but instead the open shade is everywhere! While it’s still important to look for where the light is coming from, overcast days don’t limit you to shaded areas. The clouds act as a giant diffuser or soft box, giving you gentle, even light.

When shooting on an overcast day, I always look at where the sun is. Even if I can’t see it behind the clouds, I make sure I know where it would be if the clouds weren’t there. There are plenty of mobile phone apps available that will tell you where the sun is situated at that specific moment in time. They will also usually tell you where the sun sets and rises, which is a great tool to help you plan your shoot in advance.

The image below was taken on a wet, grey, overcast day. I still wanted to make sure that my models face was illuminated by light. For this frame I made sure that the sun was behind me. Although I couldn’t see it through the clouds, I could still see its brightness lighting up the area in the sky. Although my model was facing directly towards the sun, he wasn’t squinting and there were no harsh shadows being cast. The clouds where acting as my soft box giving me beautiful even light.

About light photography 03 About light photography 07

When starting out, many photographers are put off shooting on cloudy, overcast days. On the surface, the light appears dull; but look a bit deeper and you’ll see its wonderful illuminating quality. Some of my favourite images have been captured on days like this.

About light photography 05 About light photography 06

Backlighting

About light photography 08Backlighting, if done properly, can create some beautiful atmospheric and dramatic images. It takes a lot of practice to nail a backlit shot, but I think it’s worth the effort.

There’s different ways of positioning the sun in your frame. You can have it directly behind your model, just outside the image or in the shot completely. Each one will create a different effect and will influence how much sun flare and haze is captured in your image.

When backlighting, your metering plays a huge part in how successful the image will be. Shooting in manual mode will help ensure that perfect shot. When shooting towards the sun, I always meter for the models face, usually just under the eye closest to me. I know that this might blow out some of the highlights in the background or areas around my model, but I like the added glow that this creates.

About light photography 09

Camera’s aren’t always too keen to shoot directly towards the sun. This is where having a lens hood comes in useful. However, sometimes even this isn’t enough and you’ll hear the whirring of your lens struggling to focus on your chosen spot. When this happens, try creating a small spot of shade for the camera by holding your left hand above the lens to bloke out the light. This usually does the trick but if not, the other option is to focus manually.

Some food for thought…

One of the best pieces of advice I ever got when starting out was to always look for the light first and the background second. It’s easy to be drawn into standing you models in front of something that looks pretty or interesting, but if the lighting in that location is poor, you’ll end up with a dull lifeless image, or a model that’s squinting and has harsh shadows on her face.

I’d love to know how you get on finding the light! Please share your comments and images below.

For more articles on lighting try these:

  • 6 Portrait Lighting Patterns Every Photographer Should Know
  • Setting the Mood with Low Key Lighting
  • Lighting Ratios to Make or Break your Portrait
  • 14 Amazing Portrait Recipes – a dPS eBook

The post Let’s Talk About Light – 3 Types of Lighting Conditions and how to Use Them by Daniela Beddall appeared first on Digital Photography School.


Digital Photography School

 
Comments Off on Let’s Talk About Light – 3 Types of Lighting Conditions and how to Use Them

Posted in Photography


Tips to Protect your Gear in Harsh Weather Conditions

18 Dec

Do you live in a cold and snowy climate? Are you planning a trip to a desert or a tropical island? Although adverse weather or harsh environments can yield some of the best images, those situations can also play havoc with your camera gear if you don’t plan accordingly. Here are some simple steps to help you shoot without ruining your equipment.

Tips to Protect your Gear

Rain

I love photographing in the rain. Of all adverse weather conditions, rain is one of the easiest to deal with to protect your camera. ©Valérie Jardin

I love photographing in the rain. Of all adverse weather conditions, rain is one of the easiest to deal with in regards to protecting your camera. ©Valérie Jardin

Don’t let a rainy day stop you from making amazing photographs. Just protect your camera, and yourself, and get out there! Although some of the most expensive DSLRs and lenses are weather sealed and can be used in the rain without protection, most cannot. The good news is that they can easily be fitted inside a rain sleeve specifically designed to keep them dry on rainy days. Rain sleeves will cost from a few dollars for a clear plastic model, to $ 30+ for a more durable water proof material. The more expensive rain sleeves come is different sizes to fit your lens. Note that they work best when you use a lens hood.

It’s harder to find rain protection for smaller camera systems. A makeshift cover with a shower cap or a freezer bag will usually do the trick. Since I mostly shoot street photography with a mirrorless camera, I find that holding an umbrella is quite convenient if it’s not too windy. The camera is small and light, one hand to shoot is all you need!

Snow and cold

Again, what most would consider adverse weather makes for a photographer’s ideal playground. Heavy snow falls should be treated like rain and the same protection applies. Dealing with the cold, on the other hand, is a different story. When out in the cold, your camera doesn’t need any special protection as long as it stays dry. One of the biggest issues with shooting in cold weather is the moisture and condensation that can build up on your camera and lens when you go from cold, to the warmth of your home or car. Excessive moisture on your lenses can cause mold to form inside the lens, which will ruin it.

To prevent damage from condensation, here is what you need to do: Before you go back inside your house or car, make sure you seal your camera in an air-tight plastic bag. This will allow the camera to reach room temperature while the condensation builds on the outside of the bag, not on your precious gear.

Mirror lock-up can also happen in very cold temperatures when the lubricant that helps activate the moving parts freezes. Cameras can usually handle colder temperatures than stated in the manual, but be aware that this type of lock-up could happen if you end up in the arctic circle.

Another thing to worry about when the temperature dips, the battery will drain much faster. So, make sure you carry a spare or two that you keep in a pocket, as close to your body heat as possible. Smaller cameras don’t have as many moving parts, and no mirror freeze up to worry about, but their batteries will drain even faster, so be prepared for that.

Your camera needs some special attention in cold and wet conditions. ©Valérie Jardin

Don’t hibernate with your camera in cold weather. Just take some special steps to protect it and yourself! ©Valérie Jardin

Extreme humidity

Besides the obvious inconvenience of your lens fogging up as soon as you leave your air conditioned room and step into the hot and humid environment, humidity can also lead to mold. You can alleviate the fogging up of the lens by placing your gear in a sealed plastic bag and letting it slowly adjust to the change of temperature. Avoid changing lenses as much as possible and remember that zooming in and out will pump humidity inside. Favor prime lenses!

Keep sensitive equipment in sealed bags and keep small silica desiccant packets in your camera bag to absorb some of the moisture. Dry your hands before you change batteries or memory cards to prevent trapping moisture in the compartment.

Tropical environments bring a lot of great photo opportunities, just make sure the moisture doesn't get inside your camera! ©Valérie Jardin

Tropical environments bring a lot of great photo opportunities. Just make sure the moisture doesn’t get inside your camera! ©Valérie Jardin

Heat

Just like extreme cold, the opposite can also give you some gear trouble. Use common sense and avoid prolonged exposure to direct sunlight. Keep your camera cool, and in the shade when not in use. Cameras can overheat and this can cause damage to the internal components. You can use an empty cooler which will help keep your camera cool when you’re not using it. It’s also a good idea to carry one of those space blankets when you are out in the wild or extreme weather. You can use it to protect your camera from the sun as well.

Sand and dust

Have you ever been on a beach during a sand storm? I have! No matter what you do, sand will get everywhere! If you are going to be in an extremely dusty environment, I would highly recommend protecting the front element of your lens with a good quality filter. An occasional scratch from wiping some of the dust or sand off the front of your lens won’t hurt as much if it happens on the filter rather than the lens itself. Also, don’t set your camera bag on the sand! Camera bags are perfect sand traps.

Salt

If you shoot near the sea on a windy day, there will surely be some spray of salty water on your gear. Again, a UV filter will help protect the front element of your lens. Make sure your battery is full and your memory card is empty before you head out so that you avoid opening the battery or memory card compartment at all costs to prevent corrosion to form inside. It may not be a good time to change lens on the beach either.

Never leave home without them

A blower such as the Giottos Rocket blower. It’s such a small investment and one of the best accessories you can have in your camera bag at all times. I not only use it to blow any dust from the lens before I wipe it with a lens cloth. But I also blow the back of the lens before I put it on the camera to prevent dust from reaching the sensor. I also use it to blow air on the lens and camera before I wipe them clean.

Microfiber cloths. Keep one separate that you will use for the front of your lens only. Carry extras to wipe the dust or water from your lens and camera body. The key is to remove as must moisture or dust as quickly as possible.

Common sense when changing lenses

Avoid changing lenses in adverse weather. If you absolutely have to, follow these simple steps: Do it in your car if you can. If not, turn your back to the wind and be ready to do it quickly. Place the new lens on a clean, flat surface. Unscrew the back cover but leave it on. While shielding your camera from the elements with your body, put the camera upside down and quickly switch lenses. This should only take a second or two to minimize the amount of dust that will get to your sensor.

Protect yourself

Protecting your gear from extreme weather won’t do much good if you don’t make it back alive! Whether you are dealing with extreme cold or heat, don’t mess with extreme weather if you’re not prepared. No picture is worth risking your life for!

I hope you found some of those tips useful. Please share your own with the community in the comment section below.

More reading on this subject

  • How to protect your gear in extreme conditions
  • Storm jacket cameras cover – a review by Valérie Jardin
  • 7 digital camera predators and how to keep them at bay
  • Camera insurance – assure peace of mind


The post Tips to Protect your Gear in Harsh Weather Conditions by Valerie Jardin appeared first on Digital Photography School.


Digital Photography School

 
Comments Off on Tips to Protect your Gear in Harsh Weather Conditions

Posted in Photography


A Guide to Shooting Outdoors in Low Light Conditions

22 Jun

A Guest Post by James Farley.

1

Shooting in low light as for many other forms of photography requires a bit of thought beforehand in order to get the most from the time you have, first and foremost will be making sure you have the right equipment with you.

Besides your camera and lenses, top of the list of things you will need will be a tripod, sturdier the better as exposures can get up to 30 seconds and sometimes even longer which is where even the slightest vibration or movement of the camera can ruin a shot.

2

Other items that you can get by without but if you have them will be very helpful include:

  • Remote release, these come in many forms, infra-red/wired/wireless, I’ve used all of them at some point or another and would now always opt for a wireless trigger, can be inexpensive and give you a good mix of reliability and range.
  • ?There are now also apps that you can use on your smartphone with a suitable cable that act as a release and can offer some great features above and beyond being a simple trigger, one I’ve used that is worth a look is called TriggerTrap

  • A torch – trying to get your camera to autofocus in very low light can be a right headache at times, shining a torch on your desired area of focus will allow it to lock on quickly (but remember to switch to manual focus when it has!)
  • ?Also useful for changing settings on camera and just generally seeing your way around!

  • ND Grad filters – by no means essential, but if still a bit of colour in the sky these can be helpful to ensure things in foreground are correctly exposed, particularly if already in shadow when beginning to shoot.
  • Warm clothes! Depending on where you are in the world, it can get very cold very quickly as it goes dark, nothing worse than standing round shivering as your 60 second exposure ticks very slowly by!

3

Personal safety is also very important to mention if you are out to shoot in limited light conditions, ideally take someone along with you, not least to give you someone to talk to, can get very boring waiting for long exposures to finish!, or at least tell someone where you plan to go and what time you expect to return. Carry a mobile phone and try not to make it obvious you have valuable equipment with you where possible.
You will probably already have locations in mind that are suitable for low light photography, I tend to find that cities offer the best opportunities and will set out with the intention of shooting specific buildings from various viewpoints, and then improvise as the night progresses and other things present themselves.

4

Artificial lighting can greatly enhance a dark scene, and if you use a narrow aperture, f/16 for example you should capture lights with a starburst effect to add some drama to the image.

Once you have found the composition you like the look of, set your tripod up ensuring it’s not in the way of others, if it has a bag hook as some do then hang your camera bag from it to give you a bit more stability.

Compose the scene in your viewfinder and use the torch as mentioned if needed to focus, then switch to manual focus which will stop the lens from ‘focus hunting’. At this point I will wait for any moving light sources such as vehicles to leave the composition so I can check the settings selected by the camera before then plugging these into the cameras manual mode to ensure they do not change when shutter is triggered.

5

If the scene is very dark, it may be the case that your camera cannot meter it sufficiently well to give a correct exposure (DSLR’s generally will not automatically select an exposure longer than 30 seconds), if this is the case, you will need to go into manual mode, choose your aperture and then select the cameras ‘Bulb’ mode which will open the shutter when you use the remote release, and keep it open until you press it again, this is where guesswork comes into it, you will need to try out some exposure times until the image is sufficiently exposed, use the histogram on back of camera to give you some idea of how far under/over your exposure is.

Longer exposures can also produce ‘noise’ within an image, similar to when using higher ISO’s, to reduce this most DSLR’s will have some sort of ‘long exposure noise reduction’ setting somewhere within the menu system, if you turn this on when you have taken your image, the camera will then close the shutter and take a similar length exposure. You won’t see this second exposure and it doesn’t get saved to your memory card, but the camera will use it to subtract any hot pixels showing from your original image which can greatly reduce noise, can get annoying though as every exposure will then take double the time to capture!

White balance can be tricky in low light with all kinds of artificial light spilling across your scene, for this reason I would suggest shooting in RAW to give you the flexibility to adjust this later, plus it will capture more detail in the image which can sometimes be an issue in very dark areas.

Don’t let rain put you off either, wet surfaces can look brilliant as light bounces off them!

And if you are feeling really creative, timelapse sequences can look fantastic as the light slowly disappears, this clip was made from about 140 photographs taken on Tower Bridge in London.

Now just grab your coat and get out there!, love to see what you get if you’d like to share some links in the comments below.

James Farley is a semi professional photographer in the UK covering a wide range of genres, recently including wedding photography, and a self confessed ‘kit geek’.
More of his work can be found on Facebook and at www.jamesfarley.co.uk

Post originally from: Digital Photography Tips.

Check out our more Photography Tips at Photography Tips for Beginners, Portrait Photography Tips and Wedding Photography Tips.

A Guide to Shooting Outdoors in Low Light Conditions


Digital Photography School

 
Comments Off on A Guide to Shooting Outdoors in Low Light Conditions

Posted in Photography