RSS
 

Posts Tagged ‘Choosing’

Choosing the Correct ND Filter for Your Desired Long Exposure Photography Effects

25 Oct

Long exposure photography has quickly grown to become one of my favorite styles of photography and it’s quite clear by looking through the images I’ve captured the last few years. More and more images use a shutter speed slower than half a second and it’s further between the handheld shots.

Which ND Filter to use?

One of the reasons I’ve grown to become such a big fan of long exposure photography is that it opens so many doors. You’re much less limited in your work and you have endless of options when it comes to how you want your image to look. However, it’s exactly this benefit which also becomes a challenge for many: how do you choose the right shutter speed and ND Filter? 

Choosing the Correct ND Filter for Long Exposure Photography Effects

I don’t believe that there’s one correct shutter speed or filter when it comes to landscape photography. A big part of the creative process is to do what you prefer and go for the look you want to achieve. However, if you want to be able to achieve the look you want, you’ll also need to know how to get there and that’s why it’s important to understand how each of the different ND filters will affect your image.

In this article, we’ll look at how each of three different (three, six and 10-stop) ND filters will affect your image and in what scenarios they are each most beneficial.
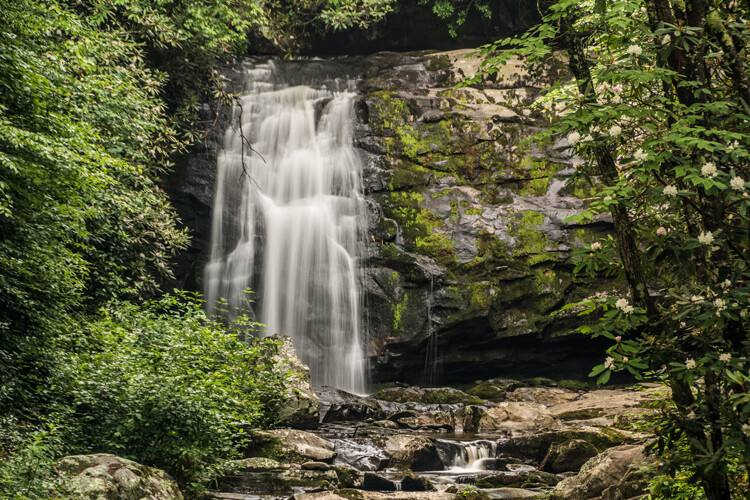
3-Stop ND Filter

If you’re familiar with Neutral Density filters you may already know that a 3-stop filter won’t have a huge impact during brighter hours. Compared to the six and 10-stop filters, the 3-stop is not particularly dark and it won’t allow you to use those extremely slow shutter speeds of several minutes.

That being said, the 3sStop ND Filter remains one of my personal favorites. I particularly enjoy working with it when photographing waves from a low perspective.

Choosing the Correct ND Filter for Long Exposure Photography Effects

The picture above was taken a couple hours after sunrise but due to the sun’s low position on the Arctic sky, it still wasn’t daytime-bright outside. However, without using a filter, the shutter speed would have been too quick to capture the motion I wanted in the water. So I knew that a 3-stop ND filter would do the job. Using it allowed me to lengthen the exposure time to 1/3rd of a second, which was just enough the get some motion in the rushing waves and to achieve the look that I wanted for this shot.

Had I used a 6-stop ND filter instead, the image would look quite different since the longer shutter speed would blur the water and lose the texture that I was aiming for.
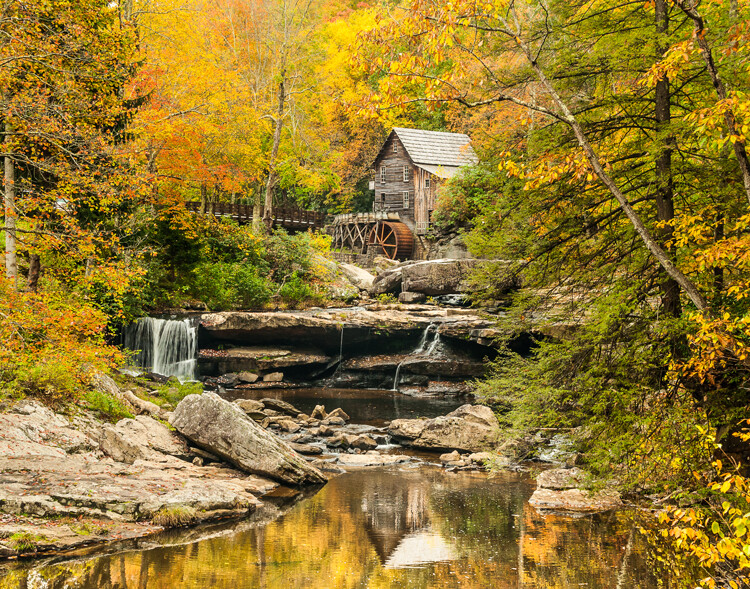
6-Stop ND Filter

As the name indicates, a 6-stop ND filter lets you lengthen the exposure time by six stops (not six times – six stops is 2x2x2x2x2x2 = 64 times). If you’re already using a relatively slow shutter speed due to the sun’s low position in the sky, this means that you can achieve a very slow shutter speed when using this filter.

Choosing the Correct ND Filter for Long Exposure Photography Effects

For the image above, I used a 6-stop ND filter to blur the water and create an overall softer feel to the scene. Using the filter allowed me to lengthen the exposure time to 15 seconds, which was just enough to blur the water and create some motion in the sky. As you can see, however, the iceberg in the foreground is already blurring out when using a 15-second shutter speed.

Had I instead used a 10-stop ND filter and an exposure time of a few minutes, all the ice would be blurry due to them constantly moving. On the other hand, a 3-stop ND filter wouldn’t have allowed me to slow down the shutter speed enough to blur the water and I wouldn’t be able to achieve the look I wanted.

10-Stop ND Filter

The 10-stop ND filter is perhaps the most popular filter for many who are just getting started with long exposure photography. The effect is extremely visible and the images created with it can grab attention right away. Even though there are darker filters available (such as a 16 and 20-stop), the 10-stop filter is often what people think of when talking about long exposure photography.

Choosing the Correct ND Filter for Long Exposure Photography Effects

The image above is a typical example of how a 10-stop ND filter can create a surreal look to the image. With the filter placed in front of my lens, I was able to use a shutter speed of four minutes to completely blur the lake and get a soft, dramatic look in the sky as the clouds were dragged out.

While it does require some more planning and patience than the other two filters, it is also the one that has the biggest visual impact straight out of the camera.

Choosing the Right One

As I mentioned earlier in this article, there isn’t necessarily one correct filter that you should use. Instead, you should be aware of how the different filters will affect your image and then choose the one which will get you closest to your envisioned image.

Choosing the Correct ND Filter for Long Exposure Photography Effects

Conclusion

Long exposure photography opens many doors and gives you several new creative elements to work with. As with anything else, a big part of this technique is trial and error but as you continue learning you’ll also begin seeing what you need to do in order to capture the images you want.


If you want to learn more about Long Exposure Photography I’ve shared everything I know in my eBook The Ultimate Guide to Long Exposure Photography. This eBook is for those who are ready to take their images to the next level and expand their creative vision.

The post Choosing the Correct ND Filter for Your Desired Long Exposure Photography Effects by Christian Hoiberg appeared first on Digital Photography School.


Digital Photography School

 
Comments Off on Choosing the Correct ND Filter for Your Desired Long Exposure Photography Effects

Posted in Photography


Choosing Big Lights

13 Oct

If you shoot small lights long enough, you will run up against some limitations. You might be trying to light big areas, or trying to get a combo of soft light with a large working distance. Most likely, you might be trying to light against full sun. Or, obviously, any combination of the above.

Suffice to say that at some point you might want a big gun in your lighting bag. But how do you choose? Read more »
Strobist

 
Comments Off on Choosing Big Lights

Posted in Photography


Choosing the Right Camera Bag – and Why You May Need More than One

22 May

You’ve just bought yourself a new camera, or perhaps a new lens. Now you find yourself wanting to get a new bag for new purchases – after all, a good bag will protect your equipment, and can serve as an ideal place to store your photography gear when not in use.

camera bags

These are some of my bags. The two end ones are both roller bags. From left to right: ThinkTank Roller Derby; ThinkTank Airport Accelerator; ThinkTank Airport Security.

However, choosing a camera bag that’s right for you may not be as straight forward as it seems, but it is something that some thought should be given to. Choosing the right bag can make photography more enjoyable for you, as it can help carrying your equipment easier and more comfortable.

The days of buying the generic shoulder bag are gone! Now we are spoilt for choice with offerings of backpacks, shoulder bags, sling bags, belt packs, roller bags; the list goes on. But which one is right for you? Which one is the best fit for you and your equipment needs?

1. Camera Bag Size

This is my largest camera bag. I use this bag when I need to carry more equipment than normal.

This is my largest bag. I use this bag when I need to carry more equipment than normal.

How much equipment do you have, and will you want to carry all, or only some of it with you? This will help you decide on which size bag you need to look at. Also, think ahead; will you be buying more equipment such as additional lenses or camera bodies? Will you be adding a flash system, etc.?

All of these will obviously increase the size of your kit, and influence the size of the bag you purchase if you wish to use the bag for all of your stuff. But, do bare in mind that the more kit you carry with you, the heavier the bag will be. Also do be aware that if you use a pro-sized or gripped body, some bags may not fit your camera as the bag is not deep enough to accommodate such sizes. Generally, bag manufacturers will give a list of what can fit into a bag, and list so you can see if pro-sized or gripped DSLRs are suited to that particular bag.

2. Camea Bag Style – The Personal Part

camera bag backpack

Choosing the size of your bag is relatively easy. It’s choosing the style of bag that I think is the most challenging, and this is where most people can get a little stuck. There are just so many choices available, it really does come down to personal choice.

I take my backpack, the ThinkTank Airport Accelerator (left), to nearly every job I do. I use this bag to carry my laptop, laptop accessories (charger, internet hub, card reader, etc.) and any other bits and pieces I may need such as wet weather gear. If I need it, I also put my modular set (not pictured) inside this bag to use on site.

You may prefer to use a shoulder bag, where the next person may prefer to have a backpack. It’s important to consider just how much equipment you want to carry around in your bag, as this can influence the style of bag you end up purchasing. Below is a small table with a short list of pros and cons to each style of bag.

Let’s have a look at some of the pros and cons of the following bag types:

Backpacks

Backpack style camera bag

By ????? KhE ?

Pros:

  • Completely frees your hands, enabling you to use your phone, change lenses, etc.
  • Varying levels of carrying capacity.
  • Weight is moved from one shoulder (on a shoulder bag) to both shoulders, and your lower back.
  • Can be more comfortable that other options.
  • Can be ideal for storing equipment when not in use.

Cons:

  • Can be slow to access your equipment and/or change lenses etc
  • Bags can have the ability to carry too much equipment and become too heavy
  • Can become uncomfortable with sustained activities; especially in warmer climates

Roller Bags

Roller bag style camera bag

By See-ming Lee

Pros:

  • Can carry the largest volume of equipment easily.
  • Easy to transport equipment, as you are not required to carry anything; simply roll the bag along.
  • Perfect for keeping all of your gear in one bag, and storing equipment when not in use.

Cons:

  • Not well suited if you require more mobility whilst out photographing.
  • Require somewhere secure to be left when no longer needed on a shoot.

Modular Systems

modular camera bag system

Image courtesy Lowepro

Pros:

  • Ideal for photographers who want maximum mobility.
  • Smal pouches that attach via a belt sit on your waist, thereby removing the weight off your back and shoulders, and transferring it to your hips.
  • Ideal for carrying extra pieces of equipment without the need for a bag on your back.

Cons:

  • Not ideal for transportation as the pouches to not offer enough protection.
  • Each pouch has a very limited carrying capacity, so not suited to carry all of your equipment.
  • Not suited for storing equipment as each pouch can only hold a very limited number of items.

Sling Bags

Pros:

  • A hybrid of backpack and shoulder bag; these bags sit on your back via a single strap.
  • Can be more comfortable for prolonged use than a shoulder bag.
  • Quickly and easily access your equipment without take the bag off.
  • Perfect for storing smaller amounts of equipment.

Cons:

  • Generally have a lower carrying capacity than other bag styles.

Shoulder Bags

Thomas Wanhoff

By Thomas Wanhoff

Pros:

  • Easy access to equipment as it’s by your side.
  • Can look more casual, allowing you to blend in easier.
  • Varying levels of carrying capacity to suite your equipment.
  • Can be great to store equipment when not in use.

Cons:

  • Weight of equipment is on one shoulder and can cause discomfort.
  • Not ideal if you have larger lenses (greater than ~200mm for example).

3. Active or Passive Bag Concept

Personally, over the years I have used pretty much every style of bag around from backpacks, sling bags, shoulder bags, to roller bags and modular belt systems; you name it and I’ve most likely used it at some stage!

What I have learned from this experience is that one style of bag is no better than the next and that what works on one adventure, won’t necessarily work as well on another. I have also learned that generally, one bag will not fit every situation. This brings us to an interesting concept that I have called Active Bag and Passive Bag.

An Active Bag is a one that allows you to easily carry equipment with you and be more mobile; one that can go with you all the time. The styles of bag that are suited to this are: backpacks, sling bags, modular systems and shoulder bags.

This roller bag - the ThinkTank Roller Derby - is the bag that I take to pretty much every job I have. It's small enough to easily fit in the car, yet carries everything that I need on a job.

This roller bag – the ThinkTank Roller Derby – is the bag that I take to pretty much every job I have. It’s small enough to easily fit in the car, yet carries everything that I need on a job.

Passive Bags are great at transporting all your equipment to and from your shooting location and even providing a great storage solution for storing your kit whilst it’s not being used. But these bags are not ideal for the photographer who is constantly on the move. What I have found to work best is having a combination of both Active and Passive Bags with me. I use my roller bag to transport my kit to my shooting location and it provides great protection during the transport phase – not to mention a great portable desk to sit my laptop on! I then compliment this by using an Active Bag, usually a modular belt system or backpack, to carry the extra lens and flashes that I may need.

I already have two cameras over my shoulders, each with a lens, so the bags I have are there to carry what I cannot hold in my hands, or do not need right at that moment. It is a little more expensive, yes, but the benefits are great. This is something worth considering if you’re find yourself in a similar situation where you want/need to carry a larger amount of equipment, but do not need that bag once you are at your location.

Cable Lock

Some manufacturers also include a cable that is made in to the bag. This is ideal to lock the bag to an immovable object; perfect for Passive type bags.

4. Bag Quality

So you’ve decided on the size and style of bag you wish to purchase; but please do not overlook quality. You’ve spent a small fortune on your equipment, and the last thing you should do it cut corners on what protects it.

A good camera bag should have nicely padded, removable inserts inside. The removable inserts will allow you to customize the bag to best suit your equipment, and the padding will provide greater protection and help prevent your equipment from crashing into each other.

Generally, the first thing to fail in a camera bag are the zippers, so looking for a good feeling zipper (especially for the main camera compartment) is very important. A poor quality zipper can unexpectedly fail, and potentially cause your equipment to fall out and break.

You also want your bag to last, so make sure the exterior fabrics used are tough and wear resistant. Personally, I use ThinkTank Photo products and to be honest, I cannot fault them at all. They’re extremely well made and have withstood everything that I have thrown at them.

Zipper

A close up of the zipper on the main camera compartment on one of my bags. The zippers used on this bag are YKK Fuse zippers.

Lockable Zipper

Some bags also offer zippers that are lockable; ideal for that little bit of extra security.

Conclusion

Whilst this is an introduction into buying a bag for your camera, by no means is this exhaustive and you will still need to do a little research before you make a purchase. But, this article should offer some guidance on which bag may be right for you. You will find that most of your decisions will be based upon your own requirements. I would highly recommend you go in to a store, and bring your kit with you to try the various bags to help you find the best one.

I’d love to hear if you have anything else you want to add and offer some advice based on your own experiences. What kind of bags do you have?

googletag.cmd.push(function() {
tablet_slots.push( googletag.defineSlot( “/1005424/_dPSv4_tab-all-article-bottom_(300×250)”, [300, 250], “pb-ad-78623” ).addService( googletag.pubads() ) ); } );

googletag.cmd.push(function() {
mobile_slots.push( googletag.defineSlot( “/1005424/_dPSv4_mob-all-article-bottom_(300×250)”, [300, 250], “pb-ad-78158” ).addService( googletag.pubads() ) ); } );

The post Choosing the Right Camera Bag – and Why You May Need More than One by Daniel Smith appeared first on Digital Photography School.


Digital Photography School

 
Comments Off on Choosing the Right Camera Bag – and Why You May Need More than One

Posted in Photography


All cameras are great, but that doesn’t make choosing one any easier

22 Jan

It’s often said all modern cameras are good. And it’s true: That’s the reason most of the cameras we review get some kind of award. But it’s also close to meaningless. It seems to imply that it doesn’t matter which camera you buy, yet that’s as far from the truth today as it’s ever been.

The thing that stood out to me as we selected our recommendations in our recent roundups was that, no matter how much technology improves and cameras converge, there’s still a huge difference in terms of what each camera does well and what it falls down on. Which means there’s still a right and a wrong camera for you.

Not just any camera will do

It is also true of course that it’s your own skills, rather than the limitations of technology, that are most likely to hold you back. But again, this doesn’t mean that just any camera will do.

One of the most witless arguments I regularly see is: ‘it won’t improve your photography – Ansel Adams would get better photos using an iPhone.’ (And it’s always Ansel Adams, isn’t it?).

Follow that logic to its conclusion and none of us would ever use a proper camera. Sure, a great photographer will be able to take better photographs using any old camera, but they’ll probably take an even better photo if you give them a better camera – especially if it’s a better camera for them. And, while it’s obvious that a better camera won’t instantly make me a better photographer, it could result in me enjoying photography more.

There is no ‘best’ camera

Predictably enough, there were howls of outrage at the cameras we recommended, with owners of other brands passionately advocating for the camera they’ve chosen. And it’s easy to see how this comes about: along with a healthy dose of post-purchase justification I’d like to think that a lot of these people have bought cameras that are well suited to their needs. But this doesn’t mean they’d be well suited to everybody else’s.

We recommended the Sony a6000 in our roundups because it’s probably the best all-rounder in its class: it’s got a viewfinder, really good video, excellent autofocus and competitive image quality (despite its age). Yet it’s not the camera I’d buy for myself, in this category.

Just look at the mid-range interchangeable lens camera category. There is no camera that’s best at everything so in the end we selected the Sony a6000. It no longer offers the very best image quality or the very best specs, nor is it the stand-out leader for video at this point. However, without knowing more about the person we’re recommending it to, it stands out as the best all-rounder because it’s consistently competitive in every respect. By this same logic, we didn’t end up recommending a couple of cameras that we as a team really like.

The Fujifilm X-T10, for instance, is a cracking little camera, it borrows most of its technology from the much more expensive X-T1 and retains just about everything we like about that camera (the JPEGs, the controls, the choice of lenses…). However, its continuous autofocus simply isn’t a match for the likes of the a6000, NX500 or D5500 and its video is a significant weak spot, meaning it was never going to be one of our overall recommendations. And yet, for a certain type of photographer, it’s the best camera in its class.

Know your needs and be willing to grow

One of the key lessons, then, is that it’s important to think hard about what you want to use a camera for and what your priorities are. And just as a good camera can encourage you, a limited camera can limit you.

The Nikon D5500 offers some of the best image quality in its class, a well worked-out user interface, great autofocus and excellent battery life. But it’s also one of the bulkiest cameras in its class, one of the least video-friendly and one of the few not to include twin control dials for the price.

I regularly see comments saying ‘I don’t care that my camera isn’t very good at Movie shooting/Dynamic Range/Autofocus tracking, I never use it.’ Which increasingly prompts me to wonder whether that person might use the feature more it their camera was better at it. As I review cameras it’s occasionally frustrating to have to continue to use a feature that doesn’t work very well. I know I’d just stop using it if it wasn’t my job to persevere. So, before you consider your next upgrade, think carefully: might you use a feature more if it was easier to use or gave better results?

It still matters

This is why I think saying ‘all cameras are great’ is such an unhelpful statement: because they’re not equally great at everything and the differences still matter.

The Fujifilm X-T10 is the last camera I’d choose for video work and its continuous autofocus isn’t a match for the best of its peers. Yet there are plenty of people I’d recommend this camera to. Or the Olympus E-M10 II, for that matter.

The difference between the best and worst autofocus performance is the difference between it being easy to get the shot and there being a high chance you’ll miss the moment. The difference between the best sensor and the weakest is the difference between you having the latitude you need when you get to Lightroom and having to work out how to hide the noise. The difference between the best movie shooting camera and the worst is the difference between being able to easily capture great-looking footage and finding yourself thinking ‘can I really be bothered with this?’

So yes, most modern cameras are amazing, but not all of them will encourage, support and inspire you in your photography. And that’s got to matter, hasn’t it?

Articles: Digital Photography Review (dpreview.com)

 
Comments Off on All cameras are great, but that doesn’t make choosing one any easier

Posted in Uncategorized


A Beginner’s Guide to Choosing the Right Post-Production Software

12 Jan

When it comes to choosing your first piece of post-production software you may find yourself spinning in circles. There’s so much to choose from, and the whole idea of learning to do something new can be intimidating. This article will cover a number of the most well known software options available, and hopefully lead you towards the right decision for you.

Adobe Photoshop CC

Over the years no one has truly been able to displace Adobe’s dominance of the photography software market. Both Lightroom and Photoshop are hugely popular pieces of software and regarded as the go to platforms for professionals. Let’s break down both Lightroom and Photoshop individually to see what makes them so popular.

Adobe Lightroom

LR

Lightroom is the most popular tool available for post-processing your images. It can be used as an all-in-one solution for post-processing, image storage, and printing. Due to this all-in-one nature, Lightroom becomes a convenient and powerful option for both new photographers and pros alike.

One of the biggest differentiating factors of Lightroom verses other post-production tools is that it is widely supported by third party developers. What this means is that you can find a number of plugins for Lightroom that will allow you to extend your workflow beyond the core program. You’ll also be able to find a number of Lightroom presets, which can help you speed up your workflow by saving time for tedious edits. On top of that, sites like Smugmug and Zenfolio allow you to hook right into Lightroom, enabling you to share your photographs directly from your Lightroom catalog to your website.

Finally, due to the popularity of Lightroom, there is no shortage of support for you on the web. If you have a question about something related to processing an image with Lightroom look no further than YouTube or the many eBooks written on a number of different aspects of Lightroom’s features (including Loving Landscapes, a dPS ebook about processing your landscape images in Lightroom).

This whole package of features, extendibility, and resources, is why I’d suggest Lightroom as the first program for any new photographer looking to get into post-production. Not only are you getting a very capable program for editing and organizing your images, but you have the ability to extend the core features as your skills develop. You also have an endless supply of help from the many tutorials written on the platform over the years.

Adobe Photoshop

PS

Lightroom may be the best place to start as a new photographer, but Photoshop is a close second. The only reason I place Photoshop second on this list is due to its complexity. You still get the same great community of professional photographers, which enables you to learn more quickly, and you’ll still find a wealth of Photoshop Actions to help you speed up your workflow, but the learning curve for Photoshop is quite a bit more challenging than that of Lightroom, making it harder to recommend to a total beginner.

Adobe’s Creative Cloud platform is a subscription based model, which gives you access to both Photoshop and Lightroom for $ 10/month. The reason to pay the premium for Adobe’s products, over the ones I’ll list below, is not because they will perform better edits, but rather because of the way they integrate with other pieces of software, and the availability of tutorials on the web.

Open Source Options

If you’re not ready to invest money into your post-production workflow just yet, then these open source platforms are where I’d direct your attention.

GIMP

wilber_painter
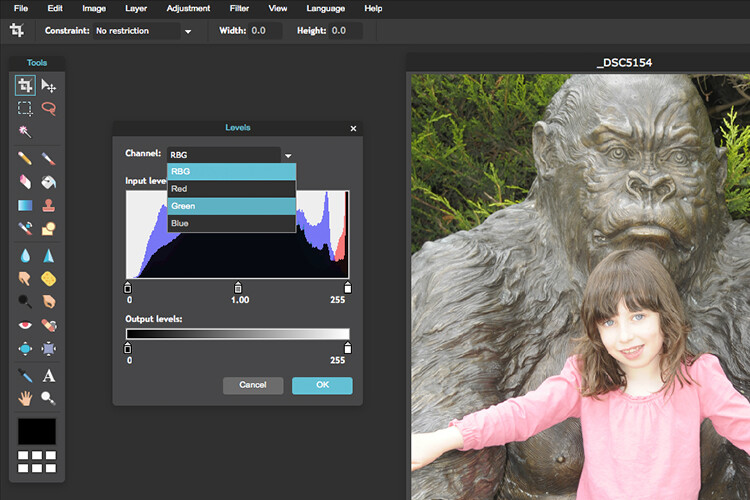
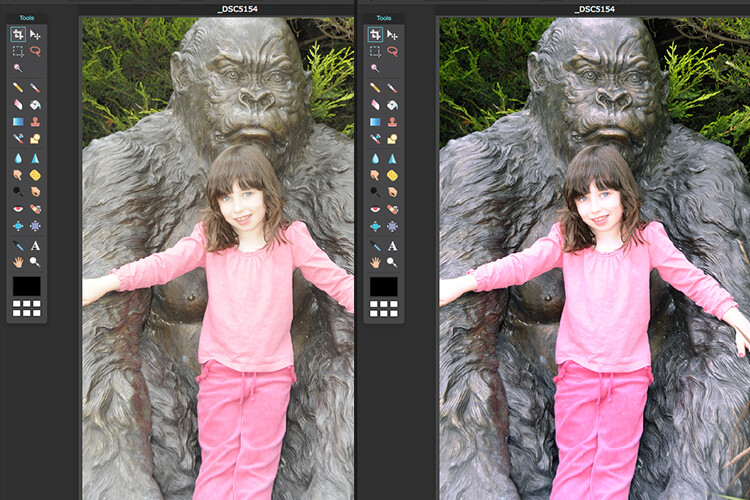
GIMP is the most well known Photoshop alternative out there. It has been around for years, works on both PC and Mac, and will provide you with many of the same tools that Photoshop offers. Being open source it doesn’t have the polish that Photoshop does, and won’t offer nearly as many third party options or tutorials. However, as a budget friendly way of processing your images, this is by far the best way to go.

Darktable

darktableDarktable is what I’d recommend if you’re looking for a RAW developer to substitute for Lightroom. Like GIMP, this is an open source option, which offers a number of features that will give you complete control of your images, and truly does compete with Lightroom in that area. Again where it’ll fall flat is that you’ll have less extendibility, and not as many resources to help you along the way. Note: Darktable does not work on Windows.

Other Tools

When it comes to post-production there are a number of what I’d call, supplemental tools available. These tools are designed to work in conjunction with Photoshop and/or Lightroom, and help you further refine your style as a photographer.

TopazLabs

logo_smallThe TopazLabs line of products includes 17 different pieces of software, each one specifically designed for its own unique purpose. These tools are designed to help you enhance and speed up your post-production workflow, but not necessarily replace Photoshop or Lightroom, although some of Topaz’s programs, like Impression and Texture Effects, do offer some standalone functionality that will let you create very different types of images.

Nik Softwarenik-logo

Like TopazLabs, Google’s Nik collection is a set of tools that will help you enhance and speed up your workflow. There aren’t as many different tools, and Google has a recent track record of killing off products that weren’t working for them without warning. But, the Nik collection is powerful, and will give you some great functionality beyond just Lightroom’s basic toolset.

Photomatix

photomatixPhotomatix has been the leader of the HDR post-production world for quite some time. Their product continues to produce some of the best controlled tone mapped images, and would be a great addition to your set of tools if you wanted to get deep into HDR photography.

Aurora HDR

aurorahdrAs an alternative to Photomatix, Aurora HDR is a newly released product from Macphun, in partnership with Trey Ratcliff. At the moment Aurora HDR is only for Mac and is an early stage product, so there’s bound to be some growing pains. That said, with backing from Trey Ratcliff, who’s made his name on HDR photography, this product could eventually get to where it wants to be – which is an all-in-one HDR tool, that doesn’t require Lightroom or Photoshop to produce images.

Not a beginner? What else would you recommend?

If your favorite piece of software didn’t make this list let us know why you like it, and why you’d recommend it over the others in the comments below.

googletag.cmd.push(function() {
tablet_slots.push( googletag.defineSlot( “/1005424/_dPSv4_tab-all-article-bottom_(300×250)”, [300, 250], “pb-ad-78623” ).addService( googletag.pubads() ) ); } );

googletag.cmd.push(function() {
mobile_slots.push( googletag.defineSlot( “/1005424/_dPSv4_mob-all-article-bottom_(300×250)”, [300, 250], “pb-ad-78158” ).addService( googletag.pubads() ) ); } );

The post A Beginner’s Guide to Choosing the Right Post-Production Software by John Davenport appeared first on Digital Photography School.


Digital Photography School

 
Comments Off on A Beginner’s Guide to Choosing the Right Post-Production Software

Posted in Photography


Tips on Choosing a Free Photo Editor for Post-Processing

08 Oct

A question I get asked a lot is, “What software for post processing would you recommend if you were starting out in photography today?”

Don’t know which photo editor to choose, here are some free options worth considering.

My go-to software for editing photos is Adobe Photoshop. This doesn’t mean I am advocating that Photoshop is the only photo editor worth considering – far from it. I will be using Photoshop as a frame of reference only, and not as a direct comparison to other software products mentioned in this article.

Title

Deciding which Photo Editor can be daunting for a beginner, especially as there are so many to choose from!

However, it is the industry’s number one software for professionals. Prior to the new subscription model, Photoshop was a standalone piece of software and was expensive. But even with the subscription model, it’s a recurrent expense, which over time will amount considerably for your buck.

After doing some research, I was quite amazed at the plethora of photo editing software applications, on the market that are relatively inexpensive to purchase. Most of which equip the beginner with more than enough features and tools to get your images looking great.

Also, most of the applications can be downloaded free, for a limited trial period. This gives you a better idea what it’s like, and you’re able to test the software and its capabilities.

Other products can be downloaded for entirely free and some are even web based, so you don’t have to download any software onto your computer. The disadvantage is that you do need a reliable internet connection. Also, I did find the annoying ads that pop up alongside the interface distracting. An alternative to get rid of these ads is to pay for an upgrade.

Let’s take a look at some of the free options:

Pixlr

Pixlr is a web based, online editing tool. You can create a new image, upload an image, or grab one directly from a URL location. I found this product very intuitive and easy to use. The images load up fast in the web browser. The interface is quite similar to Photoshop. It has all the tools like: layers, lasso tool, brush controls, cloning, and filters.

Pixlr-web-based-launch-screen

The Launch screen as it appears when you load Pixlr in your web browser.

Pilxr-web-based-image-editor-interface

You have four options to choose from when you go to open your file. It’s that easy.

Ok, so where do you start with your post-processing?

When you have your image open, duplicate it so that you keep the original intact. That way, if you completely mess up, don’t worry, you still have the original to begin again.

Post editing is a skill. It does take patience and time to master.

Color correction

I would consider color correction an important area to begin your post-processing.

The Levels setting exists in many image editors. It is a powerful tool for adjusting the tones (contrast) in your image, and for making color adjustments. In Photoshop, you select Layer> New Adjustment Layer > Levels. In Photoshop Elements choose Enhance > Adjust Lighting > Levels. Other image editors place it differently, but essentially it does the same job. The Levels setting is a bit daunting and complex to begin with, but I do feel it is worth the time to get to know.

The Levels dialog box has an image histogram which is similar to the display on the back of your camera. A simple explanation of the histogram is: the shadows (blacks) are on the far left, mid-tones (grays) are in the middle and the highlights (whites) are on the far right. So by adjusting any of the sliders on the bottom, you will affect the contrast of your image.

Levels-in-Pixlr-and-Photoshop

The Levels setting on the left belongs to Pixlr, and on the right is the Levels adjustment as it appears in Photoshop CS6.

Okay, but what about the color of the image?

An easy way to adjust color correction is by changing the color channels which are found in the Levels dialog box. The default setting is RGB in Pixlr.

Adjustment-Levels-Pixlr

Where you find the Levels setting in Pixlr.

Go to Adjustment Tab and select Levels. Click on the downward arrow next to RGB in Channel, this brings up a drop-down menu for the red, green and blue channels. Choose the first one, which is red. Look at the histogram graph and check for gaps in it.

Color-channels-in-Levels-pixlr

The colour channels appear in a drop down menu by clicking on the small arrow to the right of RGB.

For this image, as it is quite over-exposed a lot of the shadow detail is lost (overly gray and no black in the image), see left of the graph. Move the shadow slider to the right, in towards the middle, where the graph starts to go up.

You want your graph to represent a nice mountain shape starting from the shadows rising high in the midtones and back down to the highlights. See photo. Repeat this process for the other two channels. Click back to RGB.

To add some contrast, just move the middle slider (mid-tones) to the right, see photo below. There is a lot more to learn about the Levels adjustment, but this is just an easy way for beginners to start.

Before-and-after-color-correction-pixlr

Before and after colour correction on the RGB channels using Pixlr.

Some other alternative web based solutions are SumoPaint, which has a similar interface to Photoshop, and another called PicMonkey.

SumoPaint

Similar to Pixlr, SumoPaint was very easy to use. I was able to adjust the color correction on this image using the Levels adjustment and modifying the color channels, as I did using Pixlr.

Sumopaint-in-browser

Sumopaint-Levels

Sumopaint-Levels-channels

If you prefer to download software onto your computer. Again there is a wide choice of free products available.

  • Paint.net, which is Windows based.
  • Picasa is Google’s photo manager and editor. It plugs into Google+.

Photoscape

Here’s another one that you may or may not have come across, called Photoscape. This software is packed with excellent features for free. It has a built-in image viewer, which lets you see all your images quickly at a glance using thumbnails. It also has a Batch Editor, so if you apply an edit to one photo or resize it – using the Batch Editor will apply the same edit to multiple images. It even has a RAW Converter. For beginners, it offers image cropping, brightness and colour adjustment, red eye removal, and some great effects too. It does appear to more intuitive and offer a less steep learning curve for beginners.

Photoscape

Photoscape

Editor-tool-in-Photoscape

Main editor tools in Photoscape

Adding-frames-in-Photoscape

Adding frames in Photoscape

Edit-photo-edge-photoscape

Edit photo edge in Photoscape

Preview, which is Apple’s built-in image and document viewer for OS X, surprised me. It has the capability to crop, resize, and do color adjustment which was quite impressive.

Conclusion

In summing up, there is a vast range of post-processing image editors to choose from. In this article, I only hinted at a mere few. The list is endless!

As a guide for beginners, I would experiment with the free options and test them out for yourself. There is no financial investment only your time. The time invested will give you a better idea which application suits you best in the long run.

Post-processing does require time, no matter how skillful you become at it. Once you have established a certain level of skill at post editing, you can then graduate to purchasing a reasonable priced standalone image editor, if you prefer.

Example products are:

  • ACDsee19 for $ 59.99
  • Photoshop Elements 14 for $ 99.00
  • Adobe Lightroom 6 for $ 149.00
  • Affinity Photo for the Mac is only for $ 49.99
  • PhotoPlusx8 for $ 99.99

Or you could simply download GIMP, (some equate this software as being powerful to Photoshop) which is an open source image editor with versions available for Windows, OS X, and Linux. There are lots of tutorials and resources already on the web to help you further with this software.

In fact, if I was new to photography and I had to decide which photo editor to pick, I would feel spoilt for choice!

Disclaimer: I was not contacted or sponsored to test any of the above software applications. Opinions are purely by the author only.

googletag.cmd.push(function() {
tablet_slots.push( googletag.defineSlot( “/1005424/_dPSv4_tab-all-article-bottom_(300×250)”, [300, 250], “pb-ad-78623” ).addService( googletag.pubads() ) ); } );

googletag.cmd.push(function() {
mobile_slots.push( googletag.defineSlot( “/1005424/_dPSv4_mob-all-article-bottom_(300×250)”, [300, 250], “pb-ad-78158” ).addService( googletag.pubads() ) ); } );

The post Tips on Choosing a Free Photo Editor for Post-Processing by Sarah Hipwell appeared first on Digital Photography School.


Digital Photography School

 
Comments Off on Tips on Choosing a Free Photo Editor for Post-Processing

Posted in Photography


A Beginner’s Guide to Choosing Shooting Mode

22 Sep

Even the most seasoned veteran photographer may use a pre-programmed mode occasionally in order to concentrate immediately on a shot rather than take the time to calculate exposure and miss the opportunity for the great image. But if you are a beginner at photography or want to advance your photography skills beyond the use of Auto mode, begin by adventuring away from the green box.

When you are setting up your camera to capture an image, there are four basic results to consider: wide depth of field, shallow depth of field, motion blur or freeze motion. How do you know which mode to use to control these basics of photography? Let’s take a look.

Nikon-Canon-mode-dail

Auto (Green box)

In Auto mode, your camera will automatically set the shutter, aperture, ISO, white balance, and even the pop-up flash for you.

Advantages: This is a great option for beginners with a digital camera – but don’t become dependent on it! Only use it until you learn to take control of your camera.

Disadvantages: In certain lighting conditions the auto settings may produce undesirable images. For instance, a portrait that is heavily back-lit might just produce a silhouette. In low-light, you may end up with blurry and grainy images; also in low-light, the camera may choose to fire the flash to give more light and many camera models don’t provide a way to disable the flash if you don’t want it.

When to use: Any time you want to use your camera just as a point and shoot camera, this is your mode.

This portrait was intentional shot into the sun in Auto Mode. While the camera did a decent job with exposure, it might be a 1/2 stop under exposed. Auto exposure settings choose by the camera are 1/250th of a second at f/6.3 with ISO of 100. while the shutter speed and ISO are good, a wider aperture would have lessened the DOF and made the background less distracting.

This portrait was an intentional shot into the sun in Auto mode. While the camera did a decent job with exposure, it is a 1/2 stop under-exposed. The auto exposure settings chosen  are 1/250th of a second at f/6.3 with ISO of 100. While the shutter speed and ISO are acceptable, a wider aperture would have lessened the DOF and made the background less distracting.

Program (P)

In Program mode, your camera will automatically set the shutter speed and aperture, but will allow you to choose ISO, white balance, exposure compensation and flash options.

Advantages: This is a great next step for a beginner who wants to take a little more control of their camera and improve their images.

Disadvantages: As in Auto mode, certain lighting conditions may lead to unpredictable results, due to the partial automatic settings which leave some results to chance.

When to use: Use this mode if you want to take a good first step to ultimately taking complete control of your camera’s options.

Shutter Priority (TV – Canon) (S – Nikon)

In Shutter Priority mode, you select the shutter speed and ISO and the camera will automatically choose the proper f-stop for what it determines to be the correct exposure.

Advantages: Great for controlling freeze action and motion blurring of moving objects.

Disadvantages: In this mode you have control of your shutter speed, so you must be careful that your camera can choose an f-stop to give you a proper exposure. The type of lens you have available to use comes into play here. Most cameras can shoot at a very fast shutter speeds, but if your lens doesn’t have a large enough aperture to match that shutter speed the resulting image will be under-exposed.  For example, if you are shooting with a shutter speed of 1/4000th of a second, and the proper exposure for the speed of the subject requires an f-stop of f/2.8, but the widest opening on your lens is f/3.5, the image will be under-exposed.

When to use: Use this mode when you want to control the motion of the object you are photographing. Use a fast shutter speed if you want to freeze the motion or use a slow shutter speed if you want to blur the motion. This mode is also useful when using large mm lenses where you need to set a fast shutter speed to avoid blurred images due to camera shake.

Choosing shutter priority and setting shutter to 1/8th of a second to blur the water.

Shutter priority with a shutter to 1/8th of a second was used to blur the fast moving water.

Here are some suggested shutter speeds for Shutter Priority:

  • Freeze very fast motion – 1/3000th of a second
  • Athletes in motion – 1/500th to 1/1000th of a second
  • Birds in flight – 1/1000th to 1/2000th of a second
  • People walking – 1/250th of a second
  • Panning moving objects – 1/30th to 125th of a second
  • Blurring fast moving water – 1/8th of a second
  • Blurring slow moving water – 1/2 to 1 secondshutter

Aperture Priority (AV – Canon) (A – Nikon)

In Aperture Priority mode, you select the aperture and ISO and the camera will automatically choose the proper shutter speed for what it determines to be the correct exposure.

Advantages: Other than Manual mode (next paragraph), Aperture Priority is the most popular shooting mode photographers use, mainly because it controls what is in focus in your image. And in most cases the item you have in focus is the element that will make or break the success of your image.

Disadvantages: In low-light situations your camera may choose a very slow shutter speed that will produce a blurry image, either because of movement by the subject or camera shake.

When to use: Use this mode when you want to control the Depth of Field (DOF) of your image. The larger the aperture the more light reaches your camera’s sensor and the shallower the DOF. Reversely, the smaller the aperture the less light reaches your camera sensor and the deeper the DOF. Beware that changing your aperture will also affect your shutter speed. More light from large apertures requires a faster shutter speed and less light from small apertures requires a slower shutter speed.

Using Aperture Priority to set a larger aperture to increase DOF

Aperture Priority to set a larger aperture to increase DOF.

Here are some suggested f-stops for Aperture Priority:

  • Landscapes -f/8 or higher for more DOF
  • Portraits – Large aperture  (f/2.8) for shallow DOF to blur the background
  • Macro – f/8 or higher for more DOFaperture

Manual (M)

Manual mode allows you to change both the shutter speed and aperture settings independently from each other. No settings will be automatically set by the camera. Your camera’s built-in light meter will guide you on the exposure it determines to be correct, but you have complete control to adjust the shutter and aperture separately to get the exposure you determine to be correct for the image you are creating. Before you use the manual mode it is recommended that you have an understanding of the exposure triangle (shutter speed, aperture and ISO) and how each will affect your final image.

Advantages: This mode gives you complete creative control of the image you are capturing.

Disadvantages: While this mode has many creative advantages, you must be careful to always check the exposure with every image, especially when shooting in fast changing lighting conditions.

When to use: After you have learned to use this mode and learned the effects and results of the settings and how they work together, you will use this mode almost every time.

Here Manual mode was used to control the DOF and to use a slow shutter speed to blur the waterfalls.

In Manual mode, a small aperture was used to control the DOF while also setting a slow shutter speed to blur the motion of the waterfall.

Scene Modes

Scene mode is very similar to Auto mode. You choose the scene you are shooting and the camera will choose settings for you optimized for that scenario. Different camera models may have different scene modes, but listed here are some of the most popular:

  • Sports – Camera will increase ISO and use a fast shutter speed to capture fast action.
  • Landscape – Camera will use a small aperture to maximize the DOF; flash may also be disabled.
  • Portrait – Camera will use a large aperture to  throw the background out of focus. Some models of cameras will also use face recognition in this mode.
  • Macro – Camera will choose small aperture to give as much DOF as possible.

Advantages: As with the Program mode, these Scene modes are a beneficial starting point for beginners and will often give a better result than shooting in Auto mode.

Disadvantages: While these settings can produce desirable images at times, the results may vary and will not be reliable.

When to use: While these scene modes may be a step up from Auto mode for beginners, use these options as a starting point to learn your camera, understand its workings, and upgrade your photography skills.

Aperture-Shutter


So which mode is the best?

It is completely up to you which mode you feel most comfortable using. But if you are using the Auto, Scene or Program modes and you want to improve your photography, learning how to set exposures using the exposure triangle of shutter, aperture and ISO will help you make the best possible choices to create better images.  The two most popular modes used by professional photographers are Manual and Aperture Priority. Remember, professionals were once beginners too. Enjoy your camera experiences, no matter which mode you choose!

googletag.cmd.push(function() {
tablet_slots.push( googletag.defineSlot( “/1005424/_dPSv4_tab-all-article-bottom_(300×250)”, [300, 250], “pb-ad-78623” ).addService( googletag.pubads() ) ); } );

googletag.cmd.push(function() {
mobile_slots.push( googletag.defineSlot( “/1005424/_dPSv4_mob-all-article-bottom_(300×250)”, [300, 250], “pb-ad-78158” ).addService( googletag.pubads() ) ); } );

The post A Beginner’s Guide to Choosing Shooting Mode by Bruce Wunderlich appeared first on Digital Photography School.


Digital Photography School

 
Comments Off on A Beginner’s Guide to Choosing Shooting Mode

Posted in Photography


10 Keys to Choosing the Best Domain and Hosting for Photographers (+Free Giveaway!)

03 Sep

You might have already found a website design of your dreams and even picked a platform to create it. But if you haven’t yet chosen a domain name and reliable hosting for your photo website, the job is not done. We have you covered, though. In this post you will find some essential tips on how to choose the best domain and hosting for the Continue Reading

The post 10 Keys to Choosing the Best Domain and Hosting for Photographers (+Free Giveaway!) appeared first on Photodoto.


Photodoto

 
Comments Off on 10 Keys to Choosing the Best Domain and Hosting for Photographers (+Free Giveaway!)

Posted in Photography


Tips for Choosing a Tripod Head

04 Apr

NO PARKING

One of the first accessories many people buy after getting a camera is a tripod, and most of those are the all-in-one kind with three legs on the bottom, and a top part called a head, onto which you mount your camera. Typically these heads feature a handle that juts out from one side that can be tightened or loosened to allow you to change the angle at which your camera is situated. These tripods usually cost about $ 25 to $ 50 which makes them quite attractive to photographers looking to invest in some gear to help them take better photos. However, one of their main limitations involves the head: it is usually non-removable, which means you are bound by its constraints, and you may soon discover that your creative sensibilities outstrip the capabilities of the tripods.

two-tripods

All-in-one tripods like this are inexpensive and great for beginners.

I remember the first time I walked into a camera store to look at a some tripod heads and was shocked to find that the sticker price was well beyond what I thought was reasonable. I thought to myself, “Why would anyone spend $ 150 on a tripod head alone, when a basic tripod could be had for less than half that amount?” Then I looked at the price of tripod legs and just about hit the floor. Over the years I came to realize that the reason these components are so expensive was because they are made of much higher-grade materials and built to specifications that demanding photographers need.

When you’re ready to take the step of buying a tripod head and set of legs separately, there are so many options from which to choose it can leave you in a state of confusion with no clear answers. When you’re thinking about spending hundreds of dollars you don’t want to make a bad choice. So, I’m going to take a look at four of the most common types of tripod heads and discuss how they would suit different types of photography. Hopefully it will give you a better idea of what to look for the next time you walk down to your local camera shop, or browse through some of your favorite online photo stores.

Ball Heads

manfrotto-496rc2

Manfrotto 496CR2 ball head

This is my favorite type of tripod head, and one that I think suits most casual or enthusiast photographers quite well–much moreso than the standard pan/tilt head that comes with all-in-one tripods. Ball heads are designed around a 360-degree swivel (basically a large ball bearing, hence the name, ball head) which you can tighten or loosen with a lever or dial on the side. You can turn your camera from side to side, rotate it in a circle, or change its orientation from portrait to landscape in an instant, all with virtually no effort on your part.

Some are specifically designed to let you change just one direction of motion at a time, which is useful if you are into special types of shots like panning. The first time you use one it can be a bit disorienting until you get used to the sheer amount of freedom they offer. But be careful to keep one hand on your camera while you adjust the locking mechanism on the ball head. If you don’t, your camera may suddenly flop to the side which can be a bit scary the first time it happens. This degree of freedom can actually be a bad thing if you only want to adjust one parameter at a time, and it can be tricky to operate ball heads when you want micro-level adjustments. But, as an overall step up from an entry level tripod, it’s hard to go wrong with a ball head.

Pan/Tilt Tripod Heads

manfrotto-804rc2

Manfrotto pan/tilt tripod head 804CR2

If this model looks familiar to you, it’s because you might already have one like it, or have seen them on all-in-one tripods. Basic models have one or two adjustment levers, but if you spend a bit more you can get one with three levers to give you fine-tune control over specific adjustments. They are much more precise than ball heads in this regard, and it is not uncommon to find pan/tilt heads with built-in bubble levels to help you make sure you have your camera positioned exactly how you want. While it takes more steps to reposition your camera compared to a ball head, it can actually be a good thing because you can adjust just one parameter at a time. For example if you have your subject perfectly aligned up but need to rock your camera to one side, you can use one lever to adjust only the tilt. A pan/tile head is not as simple as a ball head, but the added control it offers is nice, once you get the hang of working with multiple levers.

Pistol Grip Tripod Heads

vanguard-gh-200

Vanguard GH200 pistol grip tripod head

Pistol grips are designed to give you the same degree of control as a ball head but some photographers find them much easier to adjust, due to their full-handed grip mechanism. Whereas a ball head requires you to turn a relatively small knob in order to alter the position of your camera, which can leave your camera flopping around like a wet noodle unless you keep one hand on it too – the pistol grip head, which is also available as a joystick style, gives you precise one-handed control over the exact position of your camera. To use it, just squeeze the grip and the head will unlock so you can reposition it. Most of these have tension dials to adjust how easily you can change things when you squeeze the grip, and more advanced ones allow you to rotate the camera along one axis which makes panning shots much easier. As you can see in the photo they are much larger than ball heads which makes them slightly less portable, but the tradeoff can be well worth it if you need precise control over the position of your camera, while maintaining a high degree of freedom, as well as quick access to a full range of motion with a squeeze of your hand.

Pan/Tilt Tripod Heads for Video

manfrotto-700rc2

Manfrotto 700CR2 tripod head

Similar to the pan/tilt head shown earlier, these specialty heads are designed with video shooters in mind, and while they can be used for still photography, they are less than ideal due to some important limitations. As is common with most video heads, these often feature a long extension arm which allows for greater control and smooth movements for panning shots, but is not very practical when shooting still photography. Contrary to what you might think, the extension arm does not twist in your hand to let you adjust your camera: it is merely a lever that lets you swing your camera from side to side, and does not actually do anything itself. You lock your camera in place by turning knobs on the side of the head, and loosen them to gain access to movement. This particular head is designed for two types of movement: rocking back and forth and twisting from side to side. This means if you want to tilt your camera to the left or right (to shoot a vertical image) you simply can’t do it–at least not without spending much more money on a high-end version.

Recommendations

vanguard-sbh-100

Vanguard SBH-100 ball head

If you’re looking to step up from a basic tripod my recommendation is almost always to get a ball head, partially because it allows such a fantastic amount of control, but also due to the more intimate relationship it creates between you and the camera. Using a ball head with your eye to the viewfinder (as opposed to the LCD screen) while positioning your camera is an incredibly freeing experience if you have only used an all-in-one tripod, and might even help you find new types of shots that you had not considered before. While ball heads do not offer the same type of precision control as dedicated pan/tilt heads, some like the  model shown here, do allow you to at least adjust the rotation of your camera separately from the other movements which can assist with motion or panning shots. If you like to shoot video with your DSLR perhaps a video head would suit your needs a bit more, and virtually all dedicated tripod heads feature solid construction and well-lubricated parts which make operating them much smoother overall.

Using a ball head made positioning my camera for this shot much easier than if I was working with a standard all-in-one tripod head.

Using a ball head made positioning my camera for this shot much easier than if I was working with a standard all-in-one tripod head.

What about you? What is your favorite type of tripod head, or do you have any other tripod tips to share? Leave your thoughts in the comments below!

googletag.cmd.push(function() {
tablet_slots.push( googletag.defineSlot( “/1005424/_dPSv4_tab-all-article-bottom_(300×250)”, [300, 250], “pb-ad-78623” ).addService( googletag.pubads() ) ); } );

googletag.cmd.push(function() {
mobile_slots.push( googletag.defineSlot( “/1005424/_dPSv4_mob-all-article-bottom_(300×250)”, [300, 250], “pb-ad-78158” ).addService( googletag.pubads() ) ); } );

The post Tips for Choosing a Tripod Head by Simon Ringsmuth appeared first on Digital Photography School.


Digital Photography School

 
Comments Off on Tips for Choosing a Tripod Head

Posted in Photography


Taking out the Garbage – 7 Tips for Choosing Your Best Photos Fast

07 Oct

style2

One of the most time-consuming and difficult things in photography is going through all the unedited images you took and choosing your best photos, the ones to keep, and which images to pass by. When I first started out as a photographer, I’d get hung up on this every time. I’d spend way too much time agonizing over every photo, and worrying so much about throwing away a good one. If this sounds like you, then read on, maybe I can save you a lot of time and headaches with a few simple tips!

#1 Don’t take so many in the first place

When you take hundreds of images at a time, the idea of looking through every photo and choosing the best is daunting! If you take each photo with intent, and wait for the right moments before pushing the shutter, you won’t have so many throw-aways to wade through. Be careful to notice composition as you shoot, and focus carefully. Time is money (and if not money, time is sanity), so don’t waste your time with so many extra images to go through.

#2 Choose images that reflect your style

It’s actually quite surprising how much the images you choose reflect who you are as a photographer. Two different photographers could take the same set of images and they’d choose completely different images to keep or toss. This is actually a great thing. It’s what makes you stand out from all the rest, and it lets your heart and soul shine through. I might keep images that others wouldn’t, and toss some that they’d keep, but many people have told me that they can always tell a Melinda Smith, and that is one of the greatest compliments anyone could give me.

#3 Watch for distractions

style

You may notice something in the photo that you know you’ll have to fix in post-processing. You have to decide if this is a deal-breaker, or if it’s worth the fix. In the image above, there was a garden hose (I should’ve moved it before we took the photo, but it was someone else’s home, and I didn’t know how much I should disturb). I decided that I loved the style of the image (my style) enough that it was worth fixing the garden hose. Other times I might decide that I have enough images that don’t require extra work, and it’s not worth the hassle. It’s your call, but try not to keep too many that require extra time.

 #4 Blurry photos go

blurry

If any photos have softness, or blurriness, they’re automatically out. What if the client wanted to print that particular image on a huge canvas? I don’t want to be the one to have to tell them that yes, the expressions are adorable, but it’s going to look horrible when it’s blown up big. It’s so hard sometimes when everything else is great, but if you missed it, you missed it. You can’t fix blurry. You might have to pick a second choice photo, but do you want to be the photographer that gives out blurry photos? There are rare exceptions to this; sometimes a photographer will shoot out of focus on purpose, or a particular photo will work as an abstract blurry image, but be very picky. This rule can also apply to any photos that are way off with exposure. Just let them go!

#5 Eliminate similar photos

same

You may have two (or more) photos that are very similar. They might both be cute, but one must go. You will lose a lot of impact with your collections of photos if many of them look the same. I know that it can be hard to give up a photo that you like, but nobody needs five photos of nearly the same look and pose. Decide which one speaks to your style better, check sharpness, or choose the one that shows the subject’s personality a little better. In the above set I chose the photo on the right. They are almost the same photo, but the one on the right was slightly more enthusiastic, and this little girl was FULL of enthusiasm! I had to keep it.

#6 Don’t miss the hidden gems

potential

You might have a photo that you know could be really great with just a little bit of work. Maybe a head swap, or a little bit of magical editing will make it into a photo you absolutely love. Sometimes photos that you might pass by initially may end up being your favorite. Watch for those photos that might be your favorites with a little wave of your editing wand.

#7 Be ruthless, be quick

ruthless

I know, this sounds like a contradiction of the last tip, but unless you want to be agonizing over every photo for hours, you have to move quickly. You have to be somewhat ruthless as you go through your photos. You can’t edit every single one, and sometimes you just have to make quick judgment calls and move on. In the photos above, the one on the left is cute, but I decided that I liked the connection in the one in the middle the best, so that’s the one that I kept. If I’m having a really hard time giving photos up, I will give them star ratings as I go through them; five stars for definite keepers and four stars for maybes. I usually end up with more five stars than I need, so the four stars automatically go. Sometimes it’s easier to let them go after you’ve given them a fair trial.

What are some strategies that you use to choose which photos to keep and which to toss? I’d love to hear your ideas in the comments:

The post Taking out the Garbage – 7 Tips for Choosing Your Best Photos Fast by Melinda Smith appeared first on Digital Photography School.


Digital Photography School

 
Comments Off on Taking out the Garbage – 7 Tips for Choosing Your Best Photos Fast

Posted in Photography