RSS
 

Posts Tagged ‘Change’

Kickstarter Project That Will Change Your Photography Career Forever (Exclusive Freebie Inside)

17 Mar

You might have already heard about Defrozo, a free multi-tool business app for photographers as it has been mentioned in the media quite a lot lately. Today the Defrozo Kickstarter went live, and it’s become a Staff Pick in less than 1 hour after the launch! With a working Beta, over 2000 users on board, and some quite ambitious goals, the Continue Reading

The post Kickstarter Project That Will Change Your Photography Career Forever (Exclusive Freebie Inside) appeared first on Photodoto.


Photodoto

 
Comments Off on Kickstarter Project That Will Change Your Photography Career Forever (Exclusive Freebie Inside)

Posted in Photography


Photographers Ignite – 5 Minute Power Sessions to Change Your World

15 Mar

Screen Shot 2015-03-11 at 7.17.19 PMI only just heard about Photographers Ignite, which is a twist on the extremely popular Ignite Sessions. It is produced by Kevin Kubota and I had a chance to sit in on the sessions on the last day of this year’s WPPI (Wedding and Portrait Photographers International) conference.

I asked Kevin if I could share some of the videos and he agreed, so while the sessions from this year aren’t online yet I hand picked a few from the archives that I think you’ll enjoy.

#1 – There’s gotta be something more . . .

This video by Matt and Katie spoke to me on so many levels. I’ve been to the burnout stage and like Katie, survived and got my love for photography back. Giving back using my photography is something I believe in passionately and we even have a few articles about how to do that here on dPS (I’ll put some links below the video for you). Watch and see if it speaks to you as well.

  • Why to Consider Doing Photography Related Volunteering in Your Community
  • Using Photography to Make a Heartfelt Difference
  • Photography As A Means For Societal Betterment
  • Use Your Camera to Give
  • Photography projects that make you feel alive

#2 – The Creativity of a child

On a very similar theme of finding that lost passion or creativity, Melissa Niu tells her story of how her daughter helped her recapture hers. As adults with busy lives we seem to lose a little of ourselves and creativity is suppressed or put on the shelf. Find a way to rekindle yours.

  • Kick Your Creativity Up A Notch
  • 6 Ways to Enhance Your Creativity
  • 12 Ways to Add Randomness and Creativity to Your Photography
  • 5 Cheap and Easy Ways to Re-inspire Your Photographic Creativity

#3 – Need to know

Adobe teacher and guru Julieanne Kost (and self proclaimed geek) goes through the things she feels are the need to know items in terms of the technical side of photography. “Learn the technology” says Kost so you it becomes an asset which allows you to focus on your creativity not the technology.

So? Are you inspired and motivated?

Let here what you plan to do now. If you watch the Matt and Katie video he urges everyone to do what? DO! Take action. Because . . .

“Inspiration and awareness without action is just entertainment.”

googletag.cmd.push(function() {
tablet_slots.push( googletag.defineSlot( “/1005424/_dPSv4_tab-all-article-bottom_(300×250)”, [300, 250], “pb-ad-78623” ).addService( googletag.pubads() ) ); googletag.pubads().enableSingleRequest();
googletag.pubads().disableInitialLoad();
googletag.pubads().collapseEmptyDivs( true );
googletag.enableServices();
} );

googletag.cmd.push( function() { googletag.display( ‘pb-ad-78623’ ); } );

googletag.cmd.push(function() {
mobile_slots.push( googletag.defineSlot( “/1005424/_dPSv4_mob-all-article-bottom_(300×250)”, [300, 250], “pb-ad-78158” ).addService( googletag.pubads() ) ); googletag.pubads().enableSingleRequest();
googletag.pubads().disableInitialLoad();
googletag.pubads().collapseEmptyDivs( true );
googletag.enableServices();
} );

googletag.cmd.push( function() { googletag.display( ‘pb-ad-78158’ ); } );

The post Photographers Ignite – 5 Minute Power Sessions to Change Your World by Darlene Hildebrandt appeared first on Digital Photography School.


Digital Photography School

 
Comments Off on Photographers Ignite – 5 Minute Power Sessions to Change Your World

Posted in Photography


21 January, 2015 – Time For A Change

21 Jan


It’s been a long time coming.  Like a reliable car that continues to get you where you need to go Luminous-Landscape has been there and going for quite sometime. During the last few years though things have been changing with internet content delivery and the old reliable LuLa was just keeping up.  We have been working very hard for a while now and today we want to share a preview of the NEW Luminous-Landscape.   

Our latest article Time For A Change will walk you through the new look of the site and what to expect in a few weeks when we launch.  This is an exciting time for us and you as the reader.  Everything we have done is to make the experience you have more enjoyable and to deliver more content your way.  Get a preview of the article and come back on February 14, 2015 when the new Luminous-Landscape makes its debut.


The Luminous Landscape – What’s New

 
Comments Off on 21 January, 2015 – Time For A Change

Posted in News


How to use Photoshop’s Quick Selection Tool to Change a Background

20 Jan

It’s the question I get asked the most in my workshops and classes – “How do you change the background of an image?” Or “How can I cut my subjects out of an image and place them on a new background?”

A quick capture of my parents at a coffee shop.

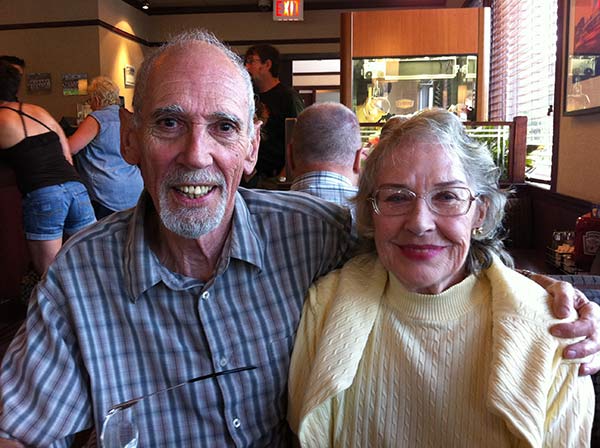
A quick capture of my parents at a coffee shop. The BEFORE image.

Perhaps, despite your best efforts at placing your subjects in a pleasing, non-distracting environment, the situation made it impossible. Maybe you used your smartphone to capture a spontaneous moment and now the image needs a little background work? Maybe you want to cut your subjects out of the background to isolate them or use them on a website banner or other marketing material? Whatever the reason, this task has challenged every photographer, beginner or pro, since the invention of the camera! I’m going to show you how to use one of Photoshop’s most underrated tools for easily extracting your subjects from the background.

This photo (above) was a very spontaneous iPhone capture of my mom and dad, the photo itself isn’t great (lots of things wrong with it technically) but it has big sentimental value for me. It’s the last photo I have of my parents together.  But it also has a busy background which typically causes problems for many photographers when trying to use Photoshop’s Selection Tools to remove it. In previous Photoshop versions, selection tools like Magic Wand and Lasso would get confused by the similar colors, and patterns of this type of background, making it a difficult and frustrating project. But with a relatively new selection tool it’s pretty straight forward, so this is a good example photo for learning the technique.

In this demonstration, you can make this a stronger image by removing the cluttered background to make it less like a snapshot and more like a portrait. The secret of any image editing is to use the right tool for the job. In this situation you want to use the Quick Select Tool to remove your subjects from an image and place them on a different background.

How to use the Quick Select Tool

In the past, you may have avoided most of the Selection Tools in Photoshop because they were not easy to use. The Quick Select Tool has changed all that. It has never been easier to make selections that don’t look like they were “cut and pasted.” There are two, or sometimes three steps.

Choose the Quick Selection Tool from the Toolbox palette:

tool

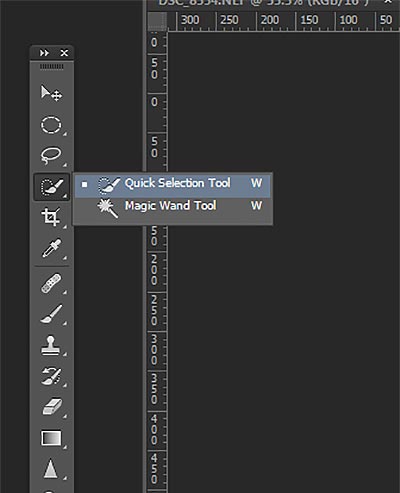
It works like a Brush so you can change the size of the tool by using the [ –  ] keys on your keyboard (  [ to make it smaller, and ] to make it larger).  Give the tool a size that makes it easy to select your subject.

Step 1: Make your selection

Just drag the tool over your subject and stop when the “marching ants” get to the edge. The tool is smart and can detect the change in pixels so most of the time it will stop on the edge correctly. If it selects something that you don’t want it to, just click on the Alt key to switch to “deselect” mode and drag the selection back to where it should be.

selection

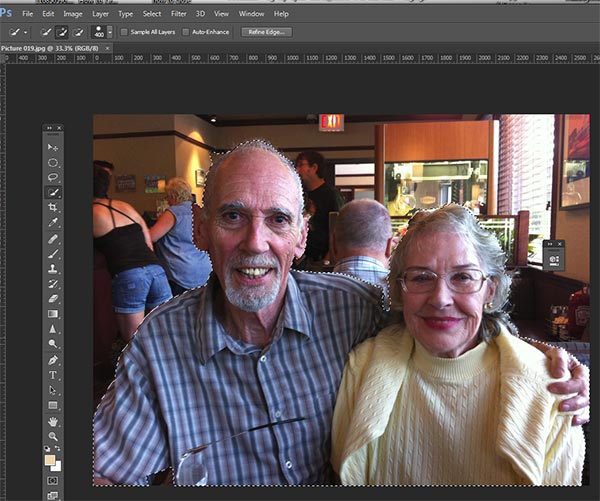
The Quick Select Tool selecting the subject with the “marching ants” outline.

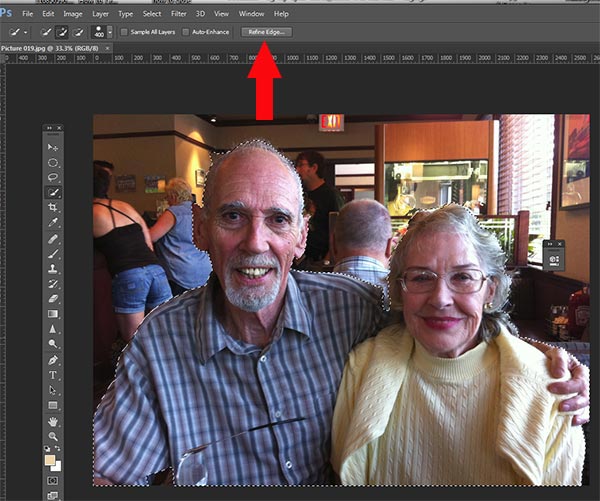
Step 2: Refine the Edge

Once you’ve got everything selected as you want it, click on the Refine Edge button on the top menu. In this area, you’ll adjust the pixels around the edges of the selection. This will make the “cut” more smooth and realistic.

refine-edge


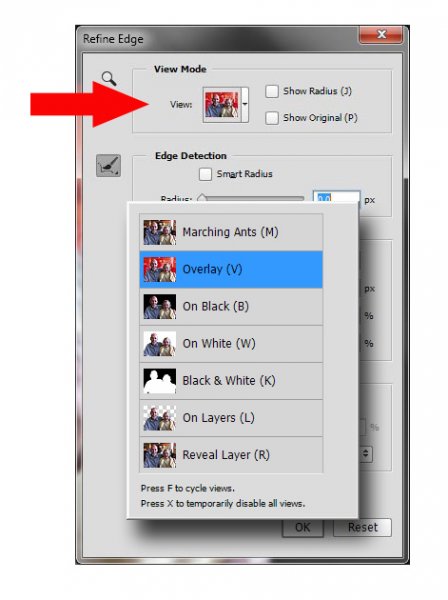
The refine Edge tool opens a pop up that looks like this:

refine-edge-palette

From here you can select how you want to view your selection against a few background options. You can select the Mask overlay which you may be familiar with if you’ve used layer masks before. This view allows you to see the background as well as your selection. But you can also check it against a black background, which I like, so you can clearly see how your edge looks and if you have selected everything accurately. To change views, click the drop-down to get the View Options box. Scroll through these to get a feel for how they display your data. The Adjust Edge sliders give you many options to smooth, feather, and further refine your edge if needed.

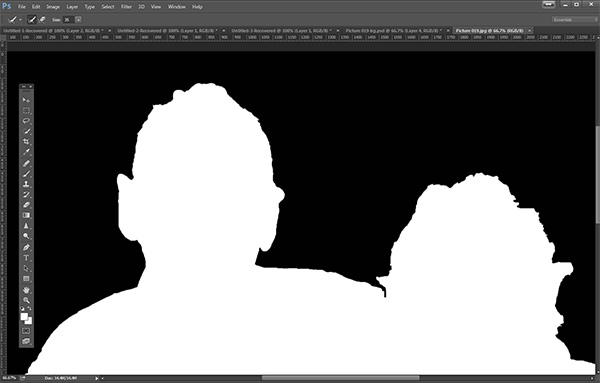
For now, select Black & White view mode. Hover over the Black & White Box and click.

popup

You should see something like this (below). You can see your edges very well against the black. You can see that the edges look okay, they are well defined, and not pixelated or blocky. But what about that hair? My poor dad with his fine and wispy (almost no hair), and my mom who had recently undergone chemo also has fine baby-like hair, making the hair selection task a bit of a challenge. But the Quick Selection Tool has a method for this too!

b+wmask

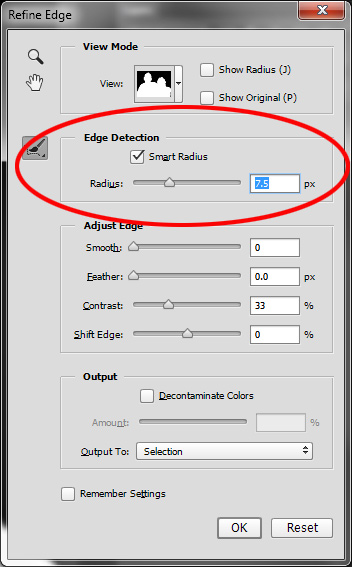
Click the Edge Detection Smart Radius box and move the slider to the right just a bit. watch how the edge around the hair change to be a bit more transparent. Be sure to watch the rest of your edges to make sure they don’t change too much.

Step 3: If needed, use the Edge Detection Brush

If you still need to get more transparency for hair, make sure the brush icon on the left is selected and carefully brush around where you need more transparency. You can switch between the View modes to see what is being displayed or removed. If you remove too much you can click and hold the Refine Edge brush to reveal the Eraser which lets you undo your brush strokes, much like a regular layer mask.

Untitled-2

When you’re happy with your results, Look for the Output section at the bottom of the Refine Edge box, and click on Decontaminate Colors and select a small number as the amount, 2 is usually good, depending on your image.  Change Output To: New Layer with Layer Mask.

This is what you should see now:

layermask

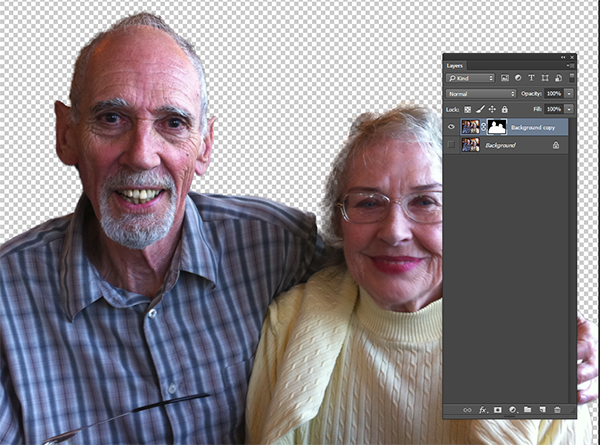
Note: to see the transparent background you must turn off the visibility of the bottom layer.

Your cluttered background is gone!  You have a nice transparent background and all on new layer. This will be your main image.

Add your new background layer

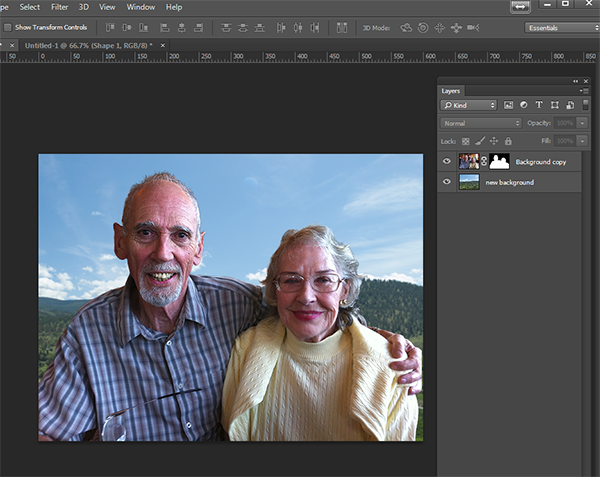
Open the image you want to use as your new background, and using the Move Tool, drag the new background into your main image. Voila! You have a great new background layer and your subjects look very realistic and not like cut and paste paper dolls.

You may have to drag the new background layer under the subject layer – the one with the mask. I’ve deleted the original Background layer and replaced it with the scenery background and called it new background. You could also make any existing background layer invisible if you don’t want to display it.

almost-done

Here’s a 100% close up look at the job the Quick Select tool and Refine Edge brush did on my mom’s hair (yes the image is a bit shaky at 100%, but I think you can see that took works pretty well to give you very realistic extractions, with the right amount of transparency and detail preservation).

100crop-hair

The finishing touches

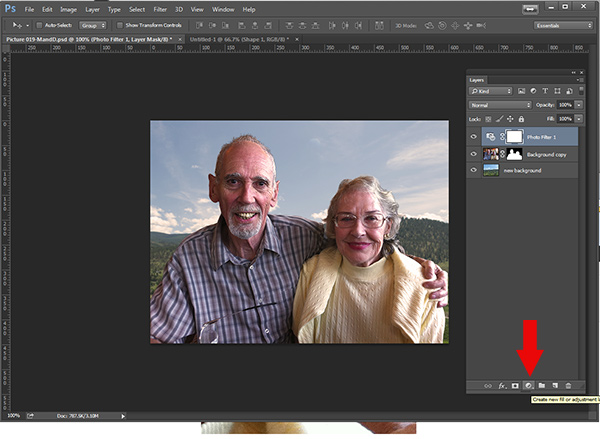
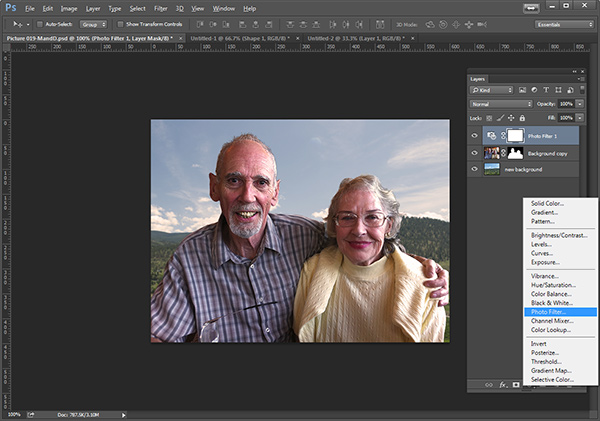
So for the final image, let’s balance the colors a bit and give this photo a nice warm tone, by using a layer mask and a warming Photo Filter.

layermaskto-photofilter

photofilter

And here is the final image:

final-warming-filter

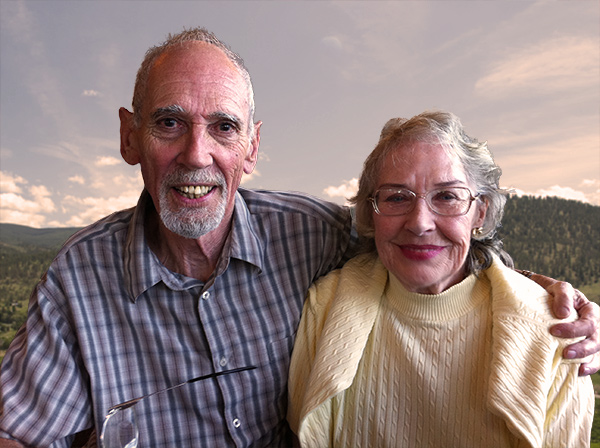
Final image AFTER changing the background. Not a snapshot any more!

What do you think? Is it better than the original? Was it worth the 10 minutes to edit and give it a new background? Just imagine, with a well captured image (not a shaky iPhone capture) think  of all the new possibilities you will have if you master this process.

Why not give this nifty tool a try and post your results here – I’d love to see how you use this. If you have questions or problems, just let me know, I respond to my comments and questions regularly.

googletag.cmd.push(function() {
tablet_slots.push( googletag.defineSlot( “/1005424/_dPSv4_tab-all-article-bottom_(300×250)”, [300, 250], “pb-ad-78623” ).addService( googletag.pubads() ) ); } );

googletag.cmd.push(function() {
mobile_slots.push( googletag.defineSlot( “/1005424/_dPSv4_mob-all-article-bottom_(300×250)”, [300, 250], “pb-ad-78158” ).addService( googletag.pubads() ) ); } );

The post How to use Photoshop’s Quick Selection Tool to Change a Background by Alex Morrison appeared first on Digital Photography School.


Digital Photography School

 
Comments Off on How to use Photoshop’s Quick Selection Tool to Change a Background

Posted in Photography


Small change: Samsung NX mini review

27 Nov

The Samsung NX mini is truly tiny, offering a 20MP 1″ sensor inside a highly compact body which features a 180-degree tilting LCD and extensive connectivity features. The mini’s touch-sensitive display is the camera’s primary interface for changing shooting settings, and an interchangeable lens mount should make this the ideal combination of versatility and point-and-shoot simplicity. Read our review to find out how it compares

Articles: Digital Photography Review (dpreview.com)

 
Comments Off on Small change: Samsung NX mini review

Posted in Uncategorized


Change Lenses for a New Perspective and Story

12 Oct

Recently we’ve had a few articles by dPS writers about lenses on such topics as:

  • Which Three Lenses do You Need for Photography?
  • The Only Three Lenses You Need for Travel Photography
  • Ready to Upgrade Your Kit Lens? Tips for Which Lens to Invest in Next
  • Buyers Guide – Prime Lenses vs Zoom Lenses

change-lenses-new-storyThis video produced by Canon shows the photographers using pretty much the same three lenses as mentioned on the second article above: a really wide-angle lens, a 50mm, and a medium telephoto. See how the photographers used each lens to create a very different look and feel from each of the scenarios they encountered.

The lenses mentioned in the video are (Nikon equivalents also listed):

  • Canon EF 10-18mm f/4.5-5.6
  • Nikon 10-24mm f/3.5-4.5G
  • Canon EF 50mm f/1.4
  • Nikon 50mm f/1.4G AF-S
  • Canon EF 70-200 f/2.8L IS
  • Nikon 70-200mm f/2.8G AF-S

There are also many other great options for lenses including Pentax, Olympus and Sony. You could also consider some of the third party brands like Tamron and Sigma which are making some really  nice, highly rated, lenses.

What can you take away from that? How can you use the lenses you already have to tell different, or perhaps even better, stories?

Show us the same subject shot with three different lenses and let’s see your stories!

The post Change Lenses for a New Perspective and Story by Darlene Hildebrandt appeared first on Digital Photography School.


Digital Photography School

 
Comments Off on Change Lenses for a New Perspective and Story

Posted in Photography


CAMS wants to change how you carry your camera with new ‘Pro’ camera and lens plates

06 Sep

Delaware-based company CAMS is raising money to create a range of mounting plates for DSLR users to carry their gear from a mount on the bottom, rather than the top of the camera. The low-profile CAMS Pro Camera Plate and Lens Plate attach to the tripod screws on the bottom of your camera (and lenses with a tripod collar) and provide a firm mounting point for the company’s quick-release neoprene straps, allowing your gear to be carried comfortably at hip level, ready to be brought quickly into the shooting position. Read more

Articles: Digital Photography Review (dpreview.com)

 
Comments Off on CAMS wants to change how you carry your camera with new ‘Pro’ camera and lens plates

Posted in Uncategorized


Rotating Rooms: Push a Button, Change Your House Layout

29 Jul

[ By Steph in Architecture & Houses & Residential. ]

Rotating Rooms 1

Maybe in the summer, you’d prefer cooler, shadier lodgings, and in the winter, you wish you could extend your living space out into the sun. The lucky people who live in the three-story Sharifi-Ha house in Tehran, by design firm nextoffice, can transform the layout of their house in various cool ways with the simple push of a button.

Rotating Rooms 2

Rotating Rooms 3

Three mobile wooden volumes containing different living spaces – a guest room, home office and dining room – can be aligned flush against the fixed part of the home, rotated so the glassed-in ends face a variety of angles, and extended in or out telescopically.

Rotating Rooms 4

Rotating Rooms 5

When the movable rooms are facing straight out, they open up terraces on each level, bringing more daylight into the rooms that are deeper within the home.

Rotating Rooms 6

When the occupants want more privacy and a sense of coziness, the home closes up, essentially going into either extroverted or introverted mode along with the humans who live there.

Share on Facebook


[ By Steph in Architecture & Houses & Residential. ]

[ WebUrbanist | Archives | Galleries | Privacy | TOS ]


WebUrbanist

 
Comments Off on Rotating Rooms: Push a Button, Change Your House Layout

Posted in Creativity


How to Change your Photography by Simply Changing your Perspective

12 May

Perspective…it is a central component of photography, although it’s one that you probably don’t actively consider when composing a shot.  For our purposes, perspective can be described as the dimensions of objects within a scene and the measurements between them as they correspond to the viewpoint of the camera.  This simply means how things appear in a composition from the camera’s point of view. Continue Reading

The post How to Change your Photography by Simply Changing your Perspective appeared first on Photodoto.


Photodoto

 
Comments Off on How to Change your Photography by Simply Changing your Perspective

Posted in Photography


Internet Explorer 11 – Change the Default Search Provider to Google, Yahoo!, or Something Else

17 Apr

Tired of IE11 always searching the web with Bing? Learn how to easily change the default search provider to something else.

By default, when you search the web with Internet Explorer 11, the Bing search engine from Microsoft is used.

While some enjoy using this website, others would rather search the web with Yahoo!, Google, or another search provider by default….

Read more at MalekTips.
New Computer and Technology Help and Tips – MalekTips.Com

 
Comments Off on Internet Explorer 11 – Change the Default Search Provider to Google, Yahoo!, or Something Else

Posted in Technology