RSS
 

Posts Tagged ‘Change’

How to Use the Channel Mixer in Photoshop to Change Colors in Your Images

24 Feb

There may be times when you want to play around with some elements in your images. Perhaps you want to change a color to a more suitable one in post-processing. One of the tools you can use in Photoshop is the Channel Mixer. It is a simple process that allows you to change the color of any element in your image to any other color under the rainbow. The Channel Mixer adjustment is widely used for making good black and white image conversions, correcting color casts, and exaggerating color. But why not use it for fun too, such as changing the color completely!

channel-mixer-photoshop-tutorial_0007

Before you start, however, there is one vital thing you must know, if you want to work in Photoshop in a non-destructive way: layers and masks.

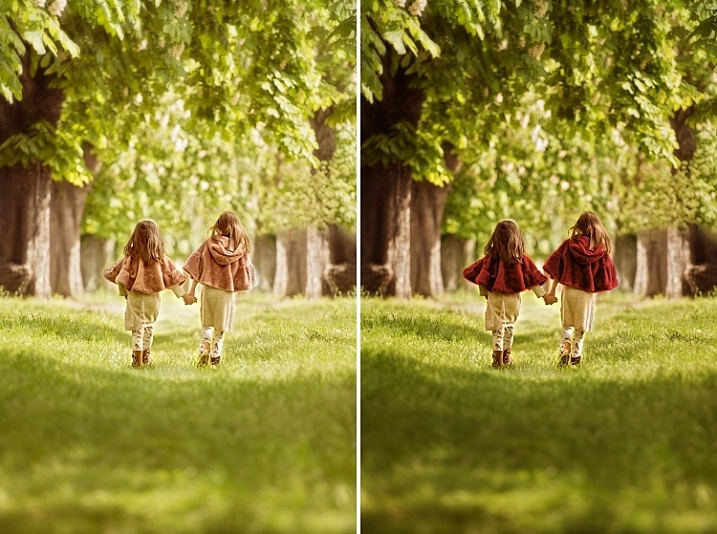
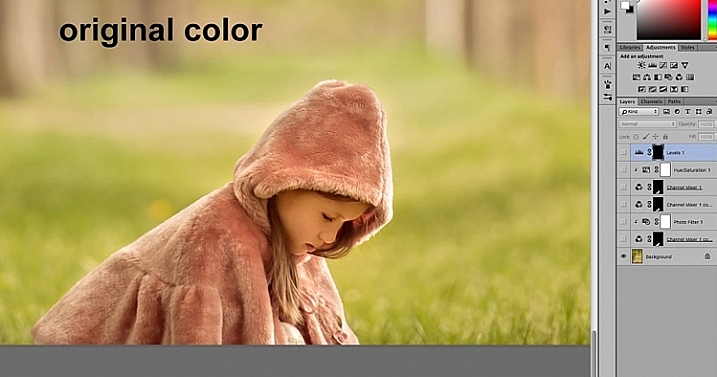
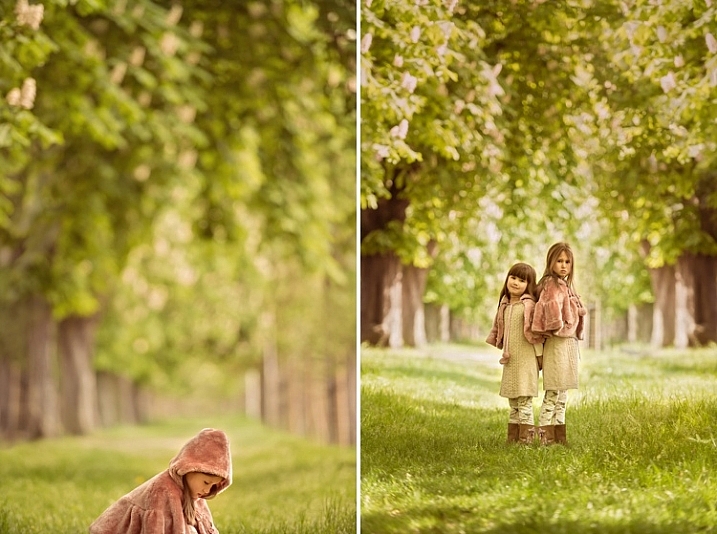
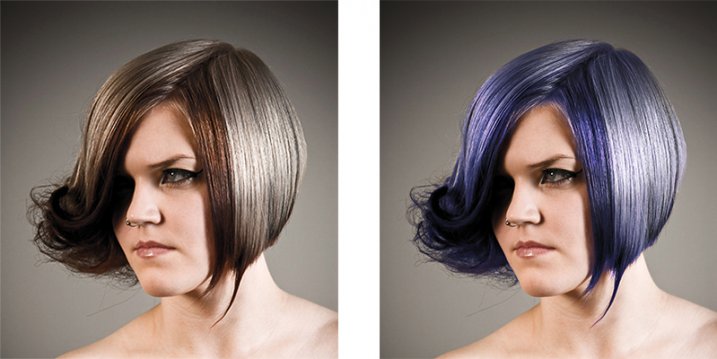
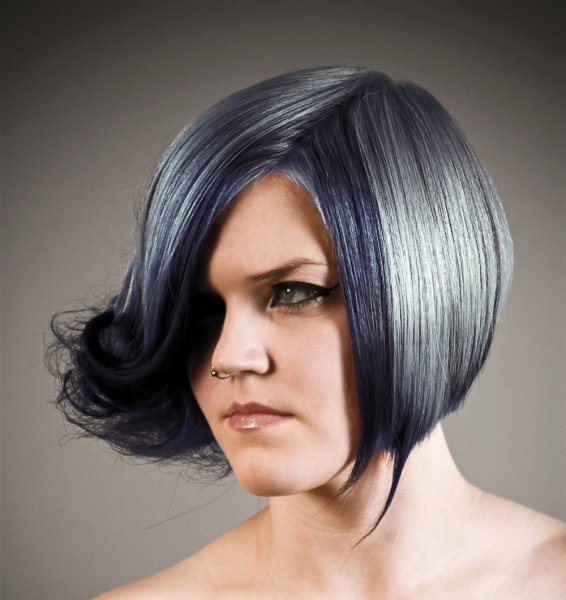
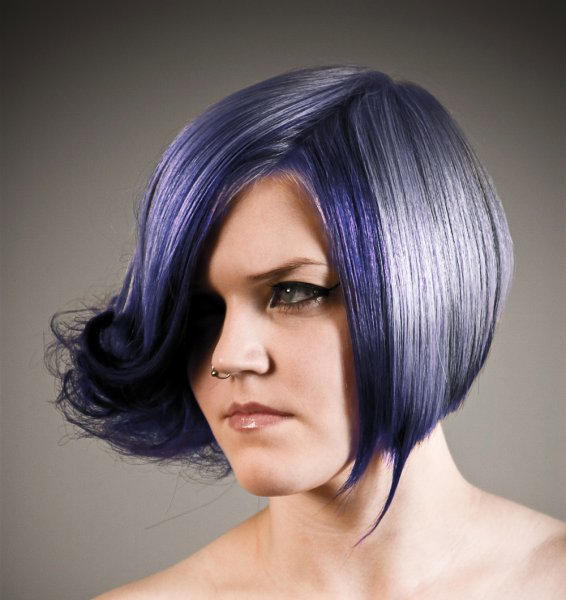
The examples below are from a photoshoot I did with my girls. I did not like the colors of their capes, and didn’t have any other alternative, so Photoshop was to be the answer.

channel-mixer-photoshop-tutorial_0000

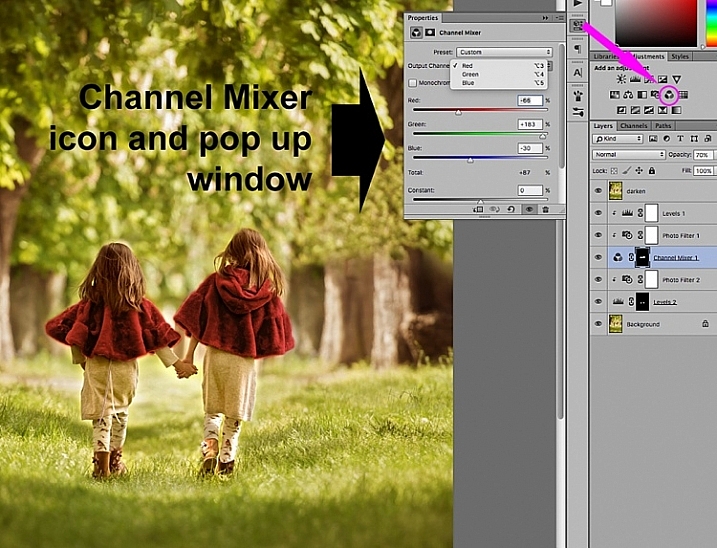
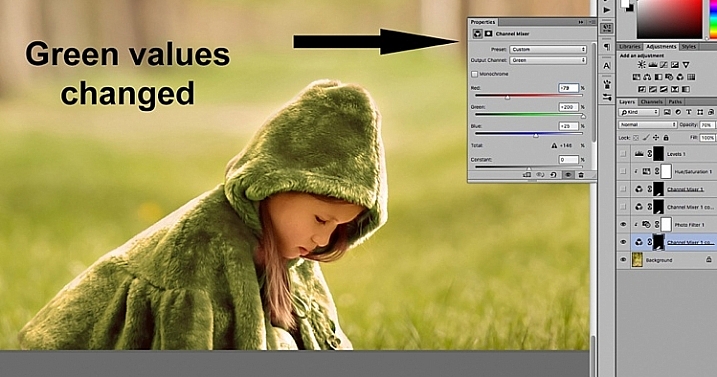
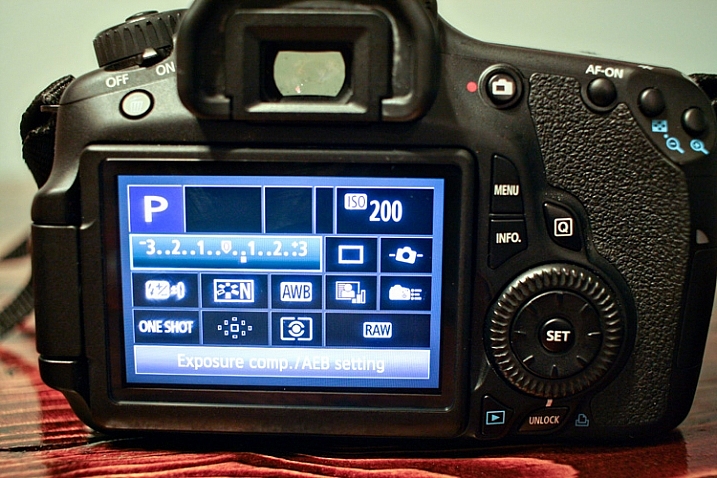
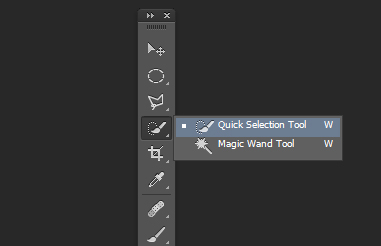
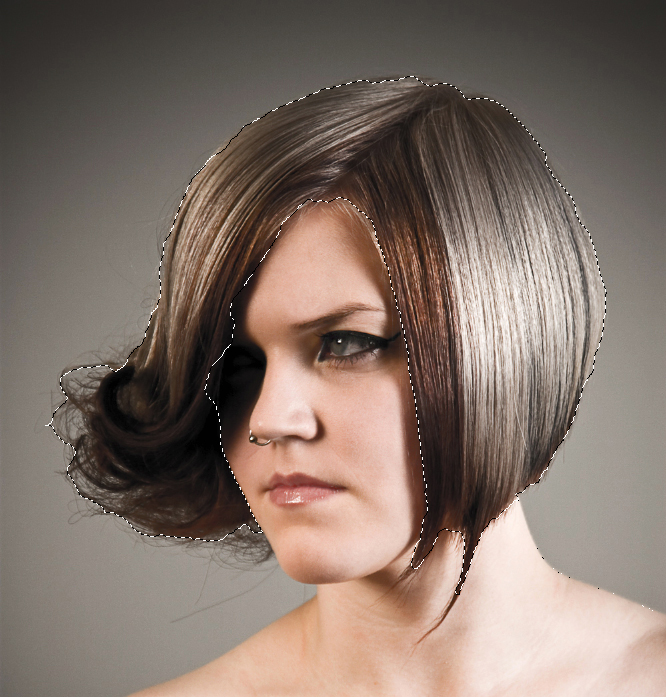
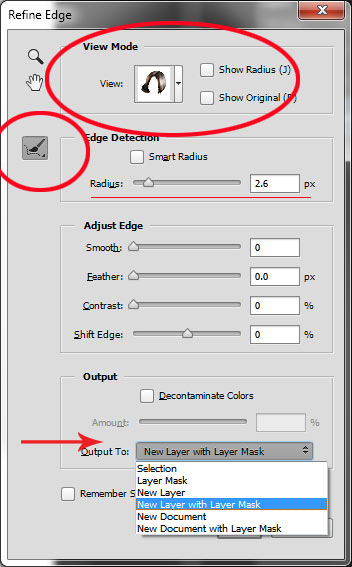
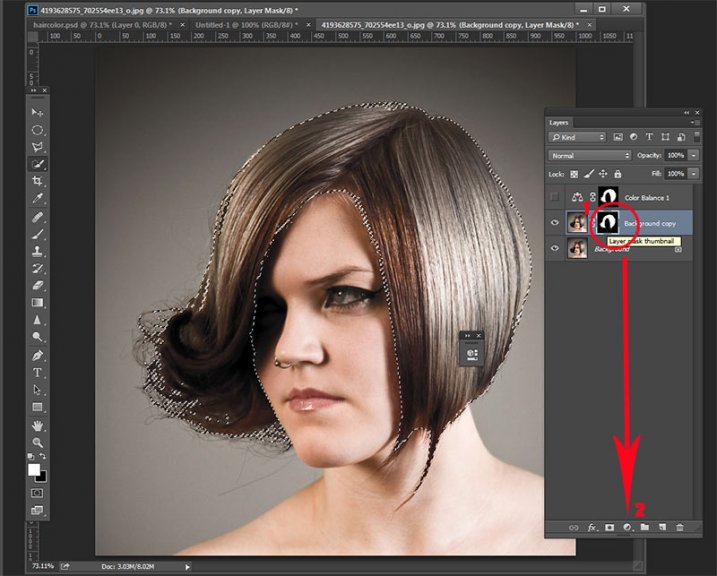
The first thing you need to do once your file is opened, is to select the area where you want the color changed using either the quick mask mode, or one of the lasso tools. While your selection is highlighted, add a channel mixer adjustment layer and your selection will automatically be added as a layer mask. Click on the channel mixer icon to the left of the layer itself and a window pops-up.

channel-mixer-photoshop-tutorial_0001

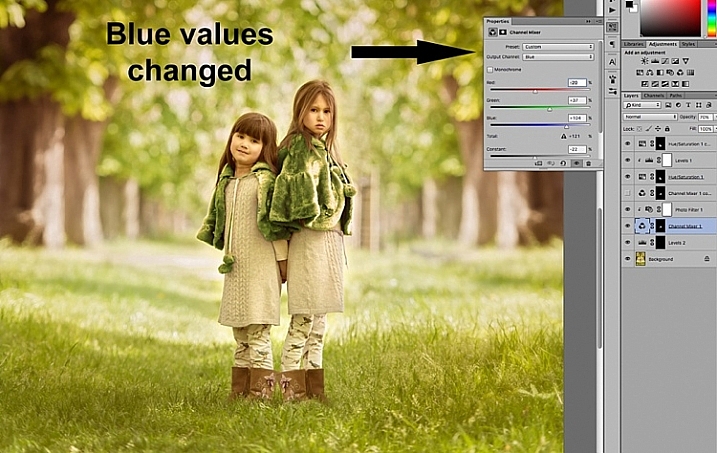
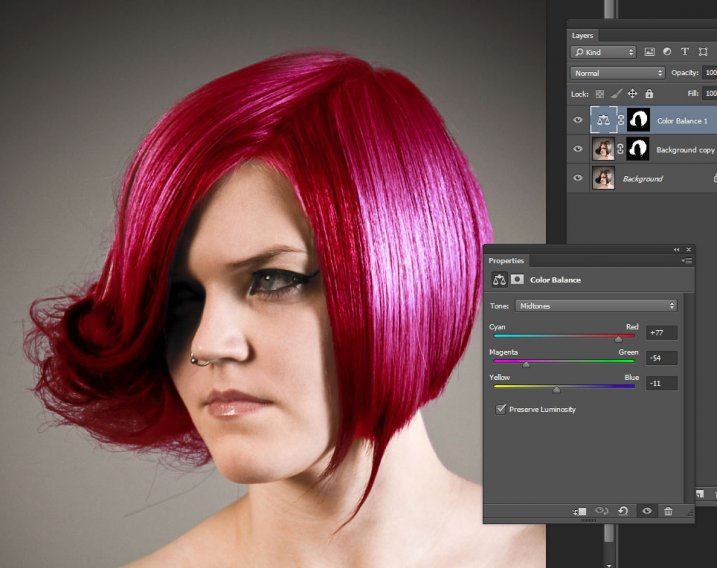
There are three values under the output channel: Red, Green, and Blue . You need to bring up each value and move the sliders until you get your desired color. It will take a little experimenting, and going backwards and forwards between the three colors, until you arrive at your chosen color. When the color change is vastly different, you will notice that the RGB values individually requires major changes.

channel-mixer-photoshop-tutorial_0002

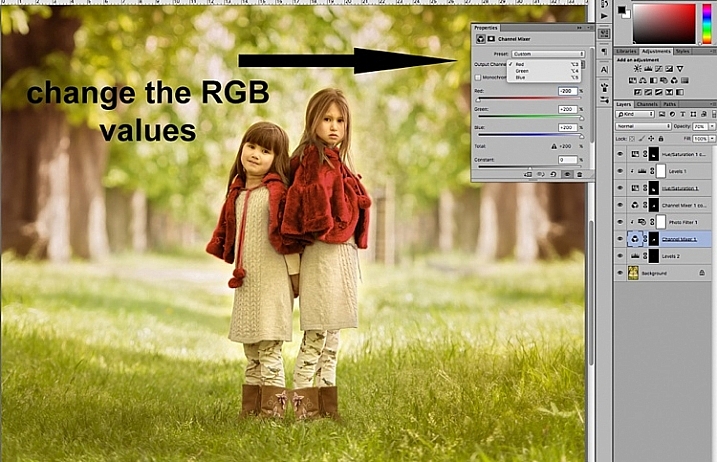
You need to keep an eye on the total value for each channel, aim to keep it within 100%. A warning is displayed when you go over 100%, as this means the color output is too bright or dark, and you are losing data in the darkest areas or the highlights. A negative value means you are adding more of the colour to the channel, and a positive value means you are taking away.

channel-mixer-photoshop-tutorial_0003

channel-mixer-photoshop-tutorial_0004

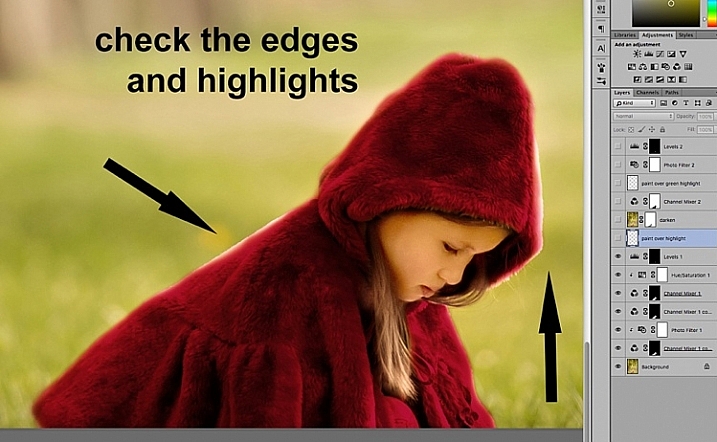
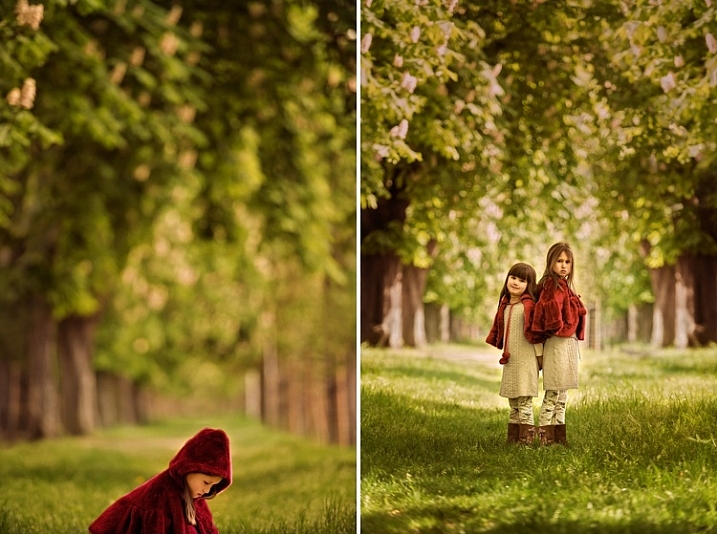
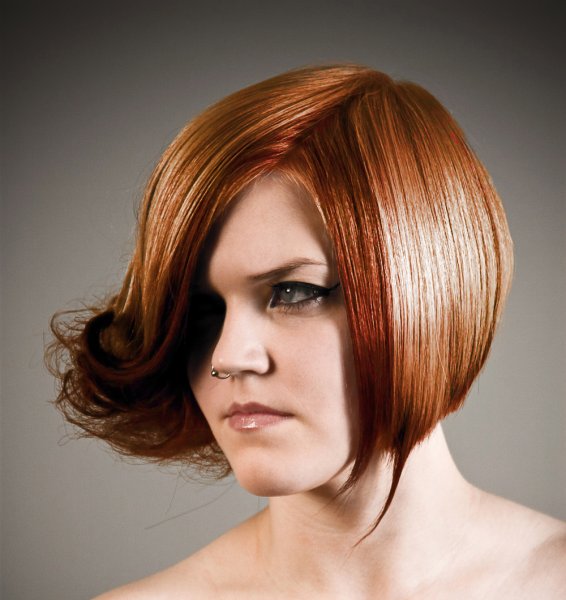
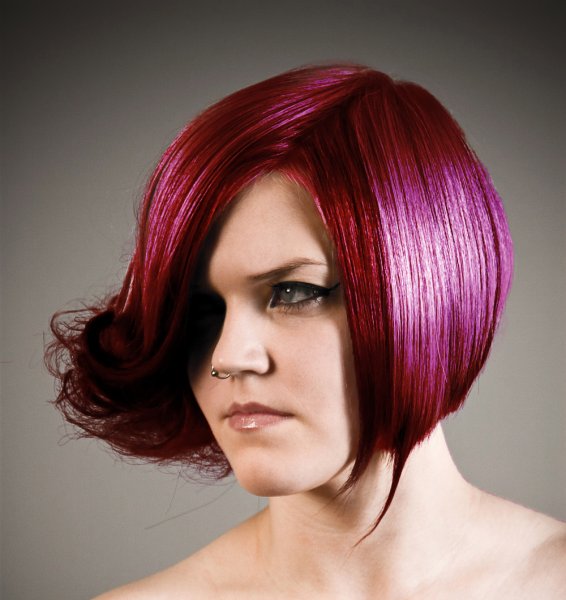
Once you have decided on your new color, don’t forget to check the edges and carefully mask around if necessary. When the new color is a lot darker than the original color, such as on the image below, more meticulous masking is necessary to clean up the edges. In some cases, painting the highlights with the same color is needed for the image to look natural. You may also have to adjust the opacity of the brush, or the adjustment layer as required. The important thing is to make sure the image looks believable, if that was your original intention.

channel-mixer-photoshop-tutorial_0005

Once you have changed the color and cleaned up your masking work, check the overall look, and adjust the background accordingly.  In the case of the image below, the original background looked too bright for the new moodier look so I darkened it to go with the scene I was after.  There are various ways of darkening an image in Photoshop. The method I used here was to duplicate the original image (duplicate layer), and change the Blend Mode to Multiply. You can then mask out any areas you don’t want to get too dark, or change the opacity of the layer, as done on the image below.

channel-mixer-photoshop-tutorial_0006

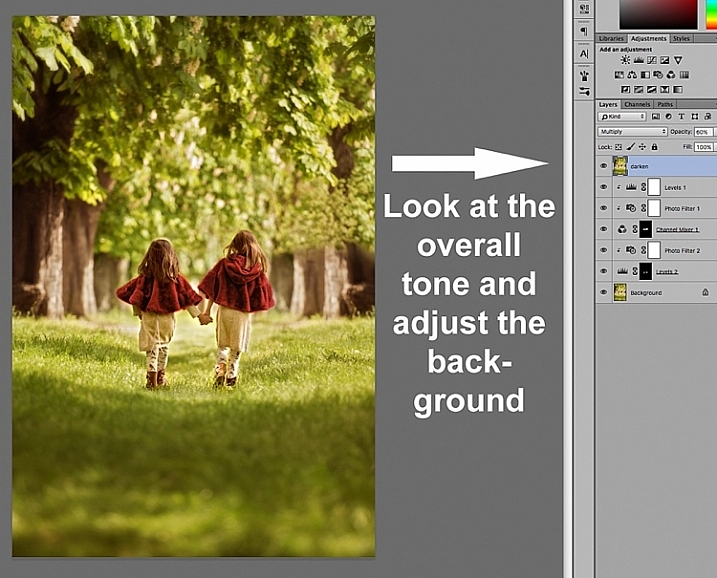
You will notice that I have added additional layers such as levels for brightening some areas, and photo filters for warming up or cooling down other areas. It is essential to have a good look at the overall picture, not just the isolated area and selective changes you have made. This is because our perception of color is relative and mostly dependent on the colors around them. Here are the before and after images (below).

channel-mixer-photoshop-tutorial_0010

channel-mixer-photoshop-tutorial_0008

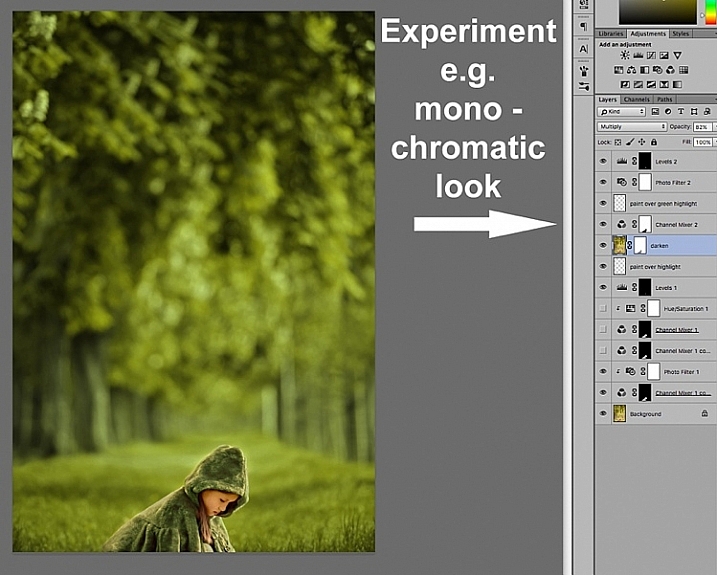
Your Photoshop play doesn’t have to end in isolated color changes. You can experiment in many various ways to achieve any look you desire. In the image below I decided to go for a more monochromatic look. This involved selecting the background, applying another channel mixer adjustment layer, and moving the sliders on each RGB value until I got the color I was after.

channel-mixer-photoshop-tutorial_0009

Or you can throw all caution to the wind and go totally crazy. You can add and remove colors from each channel at purely 100% in a mix and match fashion, and see what array of unrealistic looks you get, such as the magenta image below – for fun!

channel-mixer-photoshop-tutorial_0011

I hope this has been a little helpful tip for your Photoshop play.  Do you have other ideas on how to use the channel mixer to achieve various effects in Photoshop? Share them in the comments section below please.

googletag.cmd.push(function() {
tablet_slots.push( googletag.defineSlot( “/1005424/_dPSv4_tab-all-article-bottom_(300×250)”, [300, 250], “pb-ad-78623” ).addService( googletag.pubads() ) ); } );

googletag.cmd.push(function() {
mobile_slots.push( googletag.defineSlot( “/1005424/_dPSv4_mob-all-article-bottom_(300×250)”, [300, 250], “pb-ad-78158” ).addService( googletag.pubads() ) ); } );

The post How to Use the Channel Mixer in Photoshop to Change Colors in Your Images by Lily Sawyer appeared first on Digital Photography School.


Digital Photography School

 
Comments Off on How to Use the Channel Mixer in Photoshop to Change Colors in Your Images

Posted in Photography


Beginner Tip: How to Use the Canon Quick Menu to Change Cacmera Settings

16 Feb

canon-quick-menu-3

When it comes to beginner photographers, one of the first major goals is often to get off Auto. Doing so really is an important step to using your camera to the best of its capabilities. However, the concern that I hear most often from beginners in terms of stepping away from auto mode, is that it takes so long to get their shutter speed, aperture, ISO, white balance, and focal points set, that sometimes they’ve missed the shot that they were hoping for completely. I understand how frustrating that dynamic can be, and I have one Canon tip to share that may make life a little simpler if you’re just starting out.

Canon EOS cameras have a feature called the EOS Quick Menu. For the vast majority of EOS cameras, you’ll access the Quick Menu or Control Screen by pressing the button on the back of the camera with the letter Q. For a few older EOS cameras, you’ll have to push the button in the center of the multi-controller (that’s the big wheel on the back of your camera to the right of the screen). Once you hit that button, a very handy screen pops up that looks something like this:

canon-quick-menu-1

Now, you’ve got many of the most commonly changed settings right at your fingertips. You can change shutter speed, aperture, ISO, metering mode, focal point, file type, and several other features, right from the Quick Menu, without having to scroll through several different menus or adjust settings located in several different places on your camera body. You just use the multi-controller to navigate to the setting that you’d like to change, and then press the SET button to access that setting.

It’s worth noting that your available options will change somewhat depending on which camera mode you’re in. In the above image, the camera is set to manual mode and thus there are high number of settings available to be changed.

canon-quick-menu-2

If you switch the camera to Program mode, the option to change shutter speed and aperture vanishes, as those are set automatically by the camera. You still have access to other controls like ISO, file type, metering, and exposure compensation through the Quick Menu in this mode.

canon-quick-menu-4

Of course, all of these features can also be accessible via the buttons/dials on the top and side of your camera, or in the standard menu screens. I do think it’s important to learn how to change your settings in those traditional ways, as the Quick Menu may not always be the most effective, or efficient, way to change a particular setting depending on the circumstances. The more you know about your camera, the better you’ll be able to utilize all of its features! That said, it’s never a bad thing to know how to accomplish the same task in more than one way, and the Canon Quick Menu can be a huge help when you’re trying to make changes to your settings in a short amount of time. In my opinion, both shorthand and longhand have their time and place!

If you’re a Canon EOS user, have you found the Quick Menu to be a helpful tool? Are there some settings you still prefer to access and change in other ways? Do you shoot Nikon or another brand of camera – and does it have something similar? Please share in the comments below.

googletag.cmd.push(function() {
tablet_slots.push( googletag.defineSlot( “/1005424/_dPSv4_tab-all-article-bottom_(300×250)”, [300, 250], “pb-ad-78623” ).addService( googletag.pubads() ) ); } );

googletag.cmd.push(function() {
mobile_slots.push( googletag.defineSlot( “/1005424/_dPSv4_mob-all-article-bottom_(300×250)”, [300, 250], “pb-ad-78158” ).addService( googletag.pubads() ) ); } );

The post Beginner Tip: How to Use the Canon Quick Menu to Change Cacmera Settings by Meredith Clark appeared first on Digital Photography School.


Digital Photography School

 
Comments Off on Beginner Tip: How to Use the Canon Quick Menu to Change Cacmera Settings

Posted in Photography


The Long Night: Tim Matsui on creating social change through stories

26 Jan

Award-winning and Emmy-nominated visual journalist and filmmaker Tim Matsui used to view stories as a means of having experiences. Now, he sees them as a means of creating change, engaging audiences and helping them see that they can make a difference. In this PIX 2015 video, Matsui speaks on The Long Night, his documentary on human trafficking, and how he leveraged grassroots distribution to effect social change.

Matsui’s insistence on grassroots distribution stems from the difficulty he found in getting sponsorships to fund creation of the project and get the final film in front of audiences. ‘This is a difficult subject,’ Matsui says. ‘Brands don’t want to touch it. It’s a little too dark. This pisses me off.’

After exhausting his grant money, leveraging his own savings and going into debt just to get the filming done, Matsui explored every avenue he could find to take his film to his audience. He explored social media, Kickstarter, mainstream media like TIME Lightbox and the Huffington Post, and GATHR, a crowdsourcing platform for bringing small productions into mainstream movie theaters.

To be successful in creating change, ‘don’t make them come to you,’ he says about his audiences. ‘Go to them.’

Articles: Digital Photography Review (dpreview.com)

 
Comments Off on The Long Night: Tim Matsui on creating social change through stories

Posted in Uncategorized


PIX 2015: C.C. Chapman on using photography to drive change

20 Dec

Writer and photographer C.C. Chapman is a savvy businessman and creative thinker. He is the author of the bestsellers Content Rules and Amazing Things Will Happen, and his work has appeared on the pages of Rolling Stone and The Wall Street Journal. But when you meet C.C. you quickly realize that his real passion is helping other people use their creative abilities to drive positive change in the world. In this presentation from PIX 2015, C.C. shares his thoughts on how to use photography to influence social change, even if it’s only in your own backyard.

Articles: Digital Photography Review (dpreview.com)

 
Comments Off on PIX 2015: C.C. Chapman on using photography to drive change

Posted in Uncategorized


Using Your Photography to Create Social Change

05 Oct

There are images that immediately come to mind if someone mentions them. For instance, the image of the man being shot in the head during the Vietnam War, or the girl running naked down the road (also in Vietnam) after being burned by a napalm bomb. I don’t want to use the word iconic, but they are well-known, and very emotive images. The Vietnam War was like no other, and these images helped to show the devastation.

An image of an event, or a place, can create a lot more connection than written words or stories; humans are visual and we relate to visual cues. But images don’t have to be about war to generate a response from people.

In late-1970s Australia, the government wanted to dam part of a river in Tasmania. It was something that upset many people. It would mean that many parts of stunning rainforests in the area would be drowned and lost forever. When I think back to that time, there is a beautiful image of the place that immediately comes to mind. It is an image of the river by photographer Peter Dombrovskis, and its catchphrase was that it would be submerged by the dam.

peter-dombrovski-franklin-river

Rock Island Bend, Franklin River, South West Tasmania, by Peter Dombrovskis, National Library of Australia, an6631500 (Bib ID#2899361)

Here I am 30 years later, and this image is still strong in my mind; it says, “This image stopped the Franklin Dam”. Images can very powerful. Who wouldn’t want to have an image that changed the world – well, at least helped save a small part of it? With so many images in existence now, it may be hard to imagine that any could have the same impact. With the world of digital perhaps we are in image overload.

It doesn’t mean you can’t try. There is no reason why you can’t highlight a cause that you are passionate about, using your photography.

In the area around where I live, there is a large green belt that follows the Yarra River, which is the main source of water for the City of Melbourne. It is wonderful that the land has been preserved and not given up to development. Parts of the area were still being farmed until very recently, around 2o years ago.

Cole-social-change-photography0374

Morning Light over Banyule Flats. The area has been allowed to return to its natural state as it would have appeared over 250 years ago.

Part of the area is a swamp (wetland) and was here before European Settlement. Once the land was claimed, the swamp was drained and the water course moved so it didn’t fill anymore. Fences were put up, and cattle grazed there for over 150 years.

Cole-social-change-photography0376

Early Autumn Mists on the Water.

Eventually, the land was sold to the local council, and they have helped the area recover over the last 20 years by revegetation, and putting the water course back, so the swamp would fill again. It did – and it has become a place rich with native birds and plants. The fence posts are still there, but the trees that grew while it was dry have since died from being waterlogged.

The area is ecologically and communally important and is in constant use – but there is a problem. Banyule Flats is situated right in the middle of where they want to connect two freeways. This is an area that I love and want to help protect, so I started thinking about how I could use my photography to help stop the freeway.

Cole-social-change-photography0375

Winter Sun Casting Long Shadows.

My first thought was to start putting photos up on my blog. If I could get people from around the world to build a connection with Banyule Flats, perhaps I could get a whole lot more people to fight for its survival.

About 12 months ago my local council, Banyule City Council, was offering Environment Grants and I wondered if I could get one to do a book on the area using my photography. I rang the coordinator for the grants and spoke to her about my idea for the book. She seemed to really love it, and gave me ideas of what to put in the proposal. I had to join the Warringal Conservation Society to be eligible for it, but that was never a problem, and I have loved being a member.

The grant was approved, and I will use the photos I have been taking for two years now. It is time to put the book together and work out what is the best way to present the images. We can’t just put them all together with no story because, it has to be interesting.  It has to be done in a way that people find not only beautiful, but helps build a connection to the area so they won’t want to see it destroyed.

This is an opportunity to use photography to bring about social change. If you can help people build a relationship or feel something for a cause, then that gives you a lot more people who want to fight for it with you. Your case becomes stronger, and there’s power in numbers.

Cole-social-change-photography0377

Cattle Egret Surveying the Water Below. One of many birds that inhabit the area.

One thing that is happening with the book on Banyule Flats is that we are inviting the Wurundjeri Elders and people to be involved. They are the traditional owners of this land, and having their input will help highlight the area, give the book a unique look, and help showcase part of their culture. Of course, I will not take advantage of them and will make sure that proper credit is given, and they will get a share in the royalties as well.

If we can make the book show off the area, we hope that more local people will get involved in the fight for the Flats, and we can then introduce the area to a much wider, potentially worldwide, community.

The book is going to be visual, have lots of photos throughout showing the area through the seasons, and contain big landscapes, as well as macro images of the flora that grow there. The photos have to be powerful to get our message accross: there will be no freeway through Banyule.

Cole-social-change-photography0378

Bottle Brush. One of the indigenous plants at Banyule Flats.

Images are very strong. If I just tell you about the area then you are not going to want to protect it, but if I show you what it looks like then you start to feel a connection. Beauty has to be seen, and that is where photography becomes very powerful.

Think back to causes you have felt very passionate about. Do you think of them in words, or in images?

Cole-social-change-photography0373

Sunrise Around the Back of Banyule Flats.

When I think about the Vietnam War, images come to my mind, like the two I already mentioned. The Franklin Dam project was one of the first major campaigns that I have a really good memory of.  The image of the Franklin River gave people an understanding of what they were going to lose if the dam went ahead.

If you have a cause that you want to assist or save, use your photography to help. Get the best photos that you can, and show people what you want them to see. The stronger your photography is, the better the effect it will have. You want to create images that people will remember. In the years to come when people talk about Banyule Flats and how we stopped the freeway, I want them to think of my images in the book.

googletag.cmd.push(function() {
tablet_slots.push( googletag.defineSlot( “/1005424/_dPSv4_tab-all-article-bottom_(300×250)”, [300, 250], “pb-ad-78623” ).addService( googletag.pubads() ) ); } );

googletag.cmd.push(function() {
mobile_slots.push( googletag.defineSlot( “/1005424/_dPSv4_mob-all-article-bottom_(300×250)”, [300, 250], “pb-ad-78158” ).addService( googletag.pubads() ) ); } );

The post Using Your Photography to Create Social Change by Leanne Cole appeared first on Digital Photography School.


Digital Photography School

 
Comments Off on Using Your Photography to Create Social Change

Posted in Photography


5 Ways to Change Your Composition For Better Photos

28 Aug

If there is one thing in photography that every photographer can work on, it’s composition. Like many of the other techniques in photography, your composition will improve the more you practice. Very often, photographers seem to go to their comfort zone of the rule of thirds. I personally like the rule of thirds as a starting point, not every photograph however, needs to be composed on the rule of thirds. In fact, it is a good idea to shoot the same scene in a few different compositions, even depth of field can be used as a compositional tool.

A good way to work on your composition is to start with the rule of thirds, then change it up, try a few different compositions and see how that works. The challenge is this, what other compositions can you use? Let’s take a look at some advanced compositional techniques that you can try out on your next shoot.

1. Left to right

The smooth curving water leads our eye to the rock on the right of the image

The smooth curving water leads your eye to the rock on the right of the image

In the western world, we read the words on a page from left to right. It is logical to think that when someone views your image, they will generally begin on the left side of the image, and move to the right. You can use this technique in a few ways.

Firstly, you could place your subject on the right hand side of the frame with a leading line drawing the eye to your subject. The leading line could be a river, a road, or a railway track – it doesn’t really matter, all that it needs to do is allow the eye of the viewer a natural entry point, then lead them to the subject.

Secondly, if you were shooting street photography, you might have a person in the frame on the left hand side, looking toward your subject on the right. You might even have a vehicle such as a car or a motorcycle, moving from left to right. These techniques will immediately draw the eye to the right side of your image.

2. Use shapes – both seen and unseen

In many images, there are hidden and visible shapes. Window frames are square or rectangular, doors are rectangles, and so on. Look for shapes in your images, look beyond what the actual object is and see its shape. You can also compose the scene to create a shape. Sand dunes can become triangular shapes, open fields can be green rectangles, so look for shapes in your scene and compose your image to include them.

There are many shapes in each scene, use them to enhance your composition

There are many shapes in each scene, use them to enhance your composition

3. Use numbers – not literally!

If you are shooting a scene with trees or leaves, or even a river with some exposed rocks, try and use odd numbers of things. Odd numbers tend to create a dynamic feel in your scene – three trees or rocks will feel more dynamic than two trees or four rocks. This also works well for groups of people. If you have a large group of say 12 people, try not to make three rows of four people, maybe have them pose in two rows, one with seven people and one with five. For people photography, you can also try and create a triangle shape with your subjects. Three people naturally creates a triangle, give it a try!

Odd numbers work well in most images

Odd numbers work well in most images

4. Use negative space

Negative space can really make an image interesting. Negative space is essentially blank space, but really, it helps to anchor your image. It provides really important information about the image. A blue sky can be used to create negative space. The blueness of the sky tells the viewer that it was a sunny day. Your blue sky may have one small cloud in it and that can make the negative space seem interesting.

The blue sky and the hint of a cloud makes this negative space interesting

The blue sky and the hint of a cloud makes this negative space interesting

5. Framing

Framing can be used very effectively to showcase your subject. You can use a window, a door, or even trees to frame a subject. The idea is to create a frame around the subject that does not distract from the subject, but causes the viewer to know immediately where to look.

A tree, framed by an old wooden door.

A tree, framed by an old wooden door.

When you are looking at a scene for the first time, try some of these techniques, or try a combination of them. Shoot from different angles and move around your subject before settling on a composition. You will find that by looking at the scene in many different ways, you will unlock more creativity. Your best shot, may not be your first compositional choice. Composition is one of the more flexible tools in your creative toolbox. You don’t need any particular piece of equipment to change it, you simply need to move your camera around. Give it a try, load your results up in the comments!

googletag.cmd.push(function() {
tablet_slots.push( googletag.defineSlot( “/1005424/_dPSv4_tab-all-article-bottom_(300×250)”, [300, 250], “pb-ad-78623” ).addService( googletag.pubads() ) ); } );

googletag.cmd.push(function() {
mobile_slots.push( googletag.defineSlot( “/1005424/_dPSv4_mob-all-article-bottom_(300×250)”, [300, 250], “pb-ad-78158” ).addService( googletag.pubads() ) ); } );

The post 5 Ways to Change Your Composition For Better Photos by Barry J Brady appeared first on Digital Photography School.


Digital Photography School

 
Comments Off on 5 Ways to Change Your Composition For Better Photos

Posted in Photography


3 Steps to Easily and Realistically Change Hair Color in Photoshop

18 Jul

For those who follow trends you’ll know there is a move to “metallic” hair colors for both men and women, and this is especially evident in fashion photography.

From this, to this in 4 steps.

From this, to this in 3 steps using Photoshop

Whether you want to add extra pizzazz to a fashion shot, jazz up a promotional photo without having your models spend hours (and probably big bucks) at the salon, or to simply see what you’d look like with a different or metallic hair color –  this simple process will help you change the color of a subject’s hair color in a realistic way, with no frustration. You can even use this technique to create fantasy animals for your artistic digital manipulations, by changing the color of their fur with the same steps.

Editing hair has often been a challenging process. Even with the most meticulous editing, the results were often unrealistic, and obvious as manipulations. This workflow changes all that.

Step 1: Masking the Hair

Thankfully Photoshop’s Quick Select tool makes masking hair a breeze. Open the image you want to edit. Select the Quick Selection Tool from the tool palette.

quickselect

Change the size of the brush by using the square brackets keys on the keyboard, you’ll find these next to the “P” on  most keyboards. Now select the hair using the selection brush – you’ll see the famous marching ants as you make your selection. If your selection extends too far use the CTRL key to subtract the selection.

selection

When you have the hair selected, click on the Refine Selection button in the top context menu. This will allow you to soften the edges and add some transparency to the selection to make it very realistic. You’ll see a new palette pop up with some edge options to choose. First, select On White from the View Mode dropdown. This will enable you to see only the hair selection. Next select the Brush from the left hand side, and make the radius between 1.5 and 2.5, this will vary with your image. Now you can brush to bring back some of the transparency around the edges, especially where there are fine hairs such as the bottom left in this image.

selection-tools

Once you’ve refined the edges, go to the Output section and select New Layer with Layer Mask. This will output your refined edge selection on a new layer, which you’ll use in the next step.

Step 2: Create your Color

Here’s your opportunity to bring our your inner stylist. First, go over to the Layers Palette. Here, you’ll make a special Adjustment Layer using Color Balance adjustment. To do this first make sure that the layer mask thumbnail on your recently created layer is active. Don’t click on the thumbnail of the photo. What you’re doing here is telling the Adjustment Layer you’re creating, to ONLY affect the hair selection.

Now CTR+click in the layer mask thumbnail to get the marching ants selection on your image. Next, at the bottom of your layers palette, click on the Adjustment Layers icon to create your new adjustment layer. From the pop-up  menu, choose Color Balance. You’ll now see your new adjustment layer called Color Balance, at the top of your stack.

create-color-balance-layer-mask

Now make the Color Balance layer active by clicking on the scales icon thumbnail. This will bring up the color balance sliders where you can now create the color for your hair. Remember to also use the top drop-down in the slider pop-up to also adjust the highlight and shadow tones.

color-balance

You’re now ready to apply your color. Depending in whether you’re going for a bold and artistic look, or fashionable and metallic, your color choice will be made here in the color balance adjustment layer. Play around with changing all the colors, and note the results. In the final step you’ll be adjusting the intensity and the opacity of the color to make it look realistic, no matter what style you want to show.

Step 3: Blend Modes and Opacity

At this point, you’re ready for the fine detail adjustments to ensure your new hair color looks realistic, and not Photoshopped. All you need to do now is adjust the opacity and the blend modes of your color balance layer. T0 achieve the metallic look try blending mode HUE with an opacity of 75%.

For bolder looks try SATURATION or SOFT LIGHT. Depending on what colors you’re using you can also achieve great looks with DARKEN and SCREEN.

Stylistic Color

Here we have four totally different looks. They are all from the same file and one adjustment layer, just by changing colors with color balance; and varying the intensity using opacity and blending modes.

haircolor3 haircolor4 haircolor6 version

Here’s the PSD file for you to practice with (zip format). Download it to your computer. Unzip and open the PSD in Photoshop.

The original image is used under the Creative Commons license and is attributed to Looking Glass.

googletag.cmd.push(function() {
tablet_slots.push( googletag.defineSlot( “/1005424/_dPSv4_tab-all-article-bottom_(300×250)”, [300, 250], “pb-ad-78623” ).addService( googletag.pubads() ) ); } );

googletag.cmd.push(function() {
mobile_slots.push( googletag.defineSlot( “/1005424/_dPSv4_mob-all-article-bottom_(300×250)”, [300, 250], “pb-ad-78158” ).addService( googletag.pubads() ) ); } );

The post 3 Steps to Easily and Realistically Change Hair Color in Photoshop by Alex Morrison appeared first on Digital Photography School.


Digital Photography School

 
Comments Off on 3 Steps to Easily and Realistically Change Hair Color in Photoshop

Posted in Photography


Examples of Perspective Change for More Dynamic Images

08 Jul

There’s a line in Return of the Jedi that has always struck me as particularly insightful, especially considering its inclusion in a movie filled with a two-ton slug-shaped bounty hunter and a planet full of fighting teddy bears. In a conversation with his former mentor Obi-Wan Kenobi, newly-minted Jedi Knight Luke Skywalker asks his sensei if Darth Vader is indeed his father. When Obi-Wan confirms the awful truth, Luke asks why his teacher had formerly lied to him, telling him instead that Darth Vader “betrayed and murdered your father.”

Luke Skywalker and Obi-Wan Kenobi discussing the importance of perspective.

Luke Skywalker and Obi-Wan Kenobi discussing the importance of perspective.

“What I told you was true,” Kenobi calmly replies, “from a certain point of view.” Incredulous, Luke balks at this assertion and wonders aloud how his mentor can claim such a relativistic stance on what is, in his mind, clearly a black-and-white issue. With a dose of characteristic zen Kenobi explains to his pupil, “Luke, you’re going to find that many of the truths we cling to depend greatly on our own point of view.”

Perspective and Photography

Without wading too deep into philosophical waters I just want to point out that this concept, also known as perspective, is critically important in photography, as well as cinematic space operas. Learning to shoot photos from different perspectives is a way of not only shaking up the status quo, but injecting new life into what might otherwise be dull, boring, or entirely pedestrian pictures. To illustrate how perspective changes can radically alter a picture, here are three examples that will hopefully give you an idea of some things to try if you want to breathe new life into your own photography.

Perspective in Nature

grass-full

Not a very photogenic location unless you look at it from a few different perspectives.

This is a fairly common scene you might find in any city: a fire plug with some tufts of grass sprouting clumps of purple seeds. It may not seem all that special, and indeed it’s the kind of scene I would probably pass by in pursuit of a more interesting picture. Look what happens with just a bit of perspective change, though:

grass

Looking down and focusing on one strand of grass yields an entirely different picture.

By getting up close with one of the stalks of grass and focusing on its purple seeds dripping, and slightly bent with fresh rain, I now have an entirely new picture of the same exact scene. This little perspective change results in a photograph that is much more intimate and reveals details that were invisible in the initial photo. Background elements such as the out-of-focus grass still give the impression that this stalk is part of a much larger scene though we also lose a few things too: the bicycles and other buildings are gone, which means the picture is much more isolated than the first one and lacking a larger context. Neither picture is inherently better, but both are quite different, even though they contain the same subject. One final perspective shift results in an entirely different picture yet again.

grass-building

Re-framing the same piece of grass makes for a new, and much more interesting image.

Now the same stalk of grass as the previous version (literally the exact same one and not a different piece of grass on the same plant) is given an entirely new context and the picture here is quite different. It has a much more urban feel with brick buildings instead of green grass in the background, and it feels more majestic and powerful overall. To get this picture I had to get out of my comfort zone a little by kneeling down and contorting my body, but the extra effort resulted in a photo that I like quite a lot. Perspective changes like this can add entirely new dimensions to a picture, and even change its whole meaning, and all it takes is a few seconds of extra work before you click the shutter.

Perspective in Architecture

For another example of how perspective can alter a picture here’s a shot I took of the Edmon Low Library on the campus of Oklahoma State University in the midwest United States:

library-far

This perspective shows the Low Library within a larger context, sitting between trees and at the end of a grassy open mall.

It’s an interesting shot but virtually identical to hundreds if not thousands of other pictures you might find on a simple Google Images search. Watch what happens when I change perspective just a bit by walking closer:

library-medium

This perspective isolates the library itself, and imparts a feeling of scale and grandeur on the viewer that was missing in the first shot.

To get this picture I walked about a hundred yards down the lawn which isolated the building from its environment, and now the picture is much more constrained: it’s about the building itself, not the building in relation to the surrounding campus features. The picture is similar but subtly different, and its overall meaning has been changed by taking a very short walk (and as a bonus, getting a bit of exercise in the process). Watch what happens with one final change in perspective:

library-close

Finally we see the same building, on the same day, but in a much more dynamic and interesting context.

It’s still the same library, but the picture has changed dramatically from the first shot. Instead of a static image of a building surrounded by green spaces, this now shows the library in a whole new context. The imposing bell tower looms large over the veranda, and the student walking past adds a new dynamic element, to what was formerly a rather boring picture. Showing the building from this angle as it recedes into the background, illustrates how it is part of a much larger campus, and overall I find this a much more interesting image.

Working with People

Looking at buildings and nature is one thing, but changing perspective when taking pictures of people can blow the doors wide open when it comes to creating pictures that are new, interesting, and much more impactful. To illustrate this, here are a few photos of my nephew skipping rocks at the beach on a recent family vacation.

My nephew practicing his rock-skipping technique.

My nephew practicing his rock-skipping technique.

There’s nothing particularly wrong with this photo but there’s nothing especially interesting about it either. To get this picture I stood on the beach with my camera while he skipped rocks, and did put in much effort to take perspective into account. It’s a decent snapshot that more or less captures the scene, but watch what happened when I changed my perspective:

photography-perspective-skipping-rocks-front-side

The same scene as above, but far more interesting with the background activity and low angle of view.

The scene has been drastically improved simply by walking 20 feet down to the beach, and crouching down to my nephew’s eye level. There’s now a sense of action and movement, and you can also see the intense concentration on the boy’s face as he winds up to skip a rock. In addition to these alterations you now have a sense of context; you see where the subject is in relation to his surroundings. By changing perspective I am able to show the rest of the beach, which includes some of his cousins and my brother having fun in the background. Here’s one final perspective change that alters the picture even more:

photography-perspective-skipping-rocks-front

That rock went sailing, and skipped a half dozen times.

This one is all about my nephew with nothing else except the beach to provide a sense of context and is, in my opinion, the best of the bunch. You see him alone, along with the same intense expression as in the previous photograph but without any distracting background elements. To get this picture I waded into the water and crouched down until my camera was just a few inches above the surface. It was more difficult to get this shot, and certainly would have been easier if my camera had an articulating LCD screen, but the payoff was well worth it. Compare this to the initial shot, and you will see a massive difference just from a little work on my part to change perspective.

Hopefully these examples give you a few things to ponder the next time you are out with your camera. It takes a little more work to shoot things from different perspectives, but you may find yourself with new creative possibilities and new ways of looking at your subjects and the world around you.

What are your favorite tips and tricks for finding and exploring new photographic perspectives? Share your thoughts in the comments below.

googletag.cmd.push(function() {
tablet_slots.push( googletag.defineSlot( “/1005424/_dPSv4_tab-all-article-bottom_(300×250)”, [300, 250], “pb-ad-78623” ).addService( googletag.pubads() ) ); } );

googletag.cmd.push(function() {
mobile_slots.push( googletag.defineSlot( “/1005424/_dPSv4_mob-all-article-bottom_(300×250)”, [300, 250], “pb-ad-78158” ).addService( googletag.pubads() ) ); } );

The post Examples of Perspective Change for More Dynamic Images by Simon Ringsmuth appeared first on Digital Photography School.


Digital Photography School

 
Comments Off on Examples of Perspective Change for More Dynamic Images

Posted in Photography


Ricoh delays new Star series Pentax 70-200mm F2.8 for design change

17 Jun

Ricoh has announced it is to push back the availability date of its premium Pentax-D 70-200mm lens, as it needs more time to ensure it meets the standards required for a member of the Star-lens series. Initially due this Spring, the HD Pentax-D FA* 70-200mm F2.8ED DC AW is now set to arrive in Autumn. Read more

Articles: Digital Photography Review (dpreview.com)

 
Comments Off on Ricoh delays new Star series Pentax 70-200mm F2.8 for design change

Posted in Uncategorized


Winds of Change: Shooting changing landscapes

26 Apr

There are more people taking pictures now than ever before, and as a consequence, some of the world’s most beautiful views have been photographed to death. In this article, nature and landscape photographer Erez Marom explains the value of shooting ‘changing’ landscapes, which offer different perspectives every time you visit – or even from day to day, or minute to minute. Click through to read his article

Articles: Digital Photography Review (dpreview.com)

 
Comments Off on Winds of Change: Shooting changing landscapes

Posted in Uncategorized