A guest post by Phil Hart – author of the Shooting Stars eBook (use code DPSTARS for a 25% discount).
In this post, I’d like to share the back story to a new video I have released after a nine week ‘extreme astronomy’ adventure in the Yukon earlier this year, where I went to capture timelapse footage of the Northern Lights (the ‘Aurora Borealis’).
First the video, ‘Valentine’s Aurora’, which I hope you will enjoy with the lights down and the music up:
Valentine’s Aurora from Phil Hart on Vimeo.
The Location
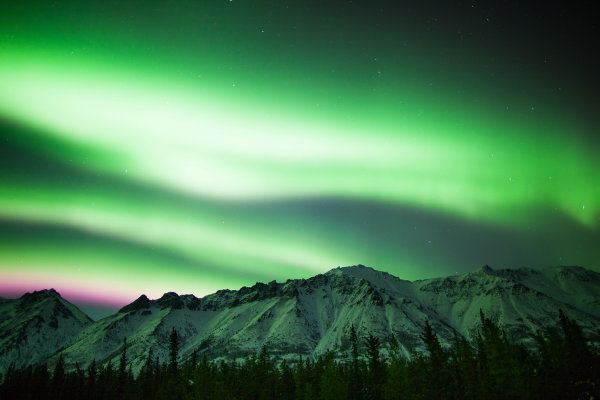
All of the footage for this video (except the fisheye sequences) was shot on Annie Lake Road, south of Whitehorse the capital of Canada’s Yukon Territory. See this Map Link.
It was the 14th February, and only my second night out on location away from home base where I was staying on the shores of Shallow Bay, Lake Laberge, to the north of Whitehorse. The weather was good during the day and I was confident of clear skies, so I made the trek an hour and a half south. There was nothing to indicate that aurora activity was going to storm that night, but that’s the nature of aurora. When you’re this far north you have to get out whenever the weather is good and capture whatever happens. Further south, you might like to monitor the forecasts on spaceweather.com.
I could actually see aurora curtains low in the north even before the end of twilight, so I had an idea I was in for a great night, and had to get moving quickly.
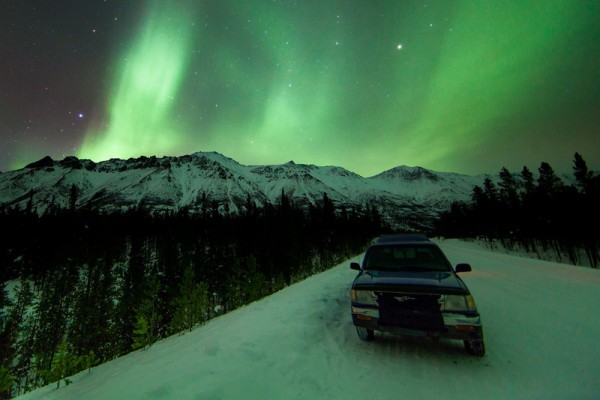
On location at Annie Lake Road: Canon 5D Mark II, 14mm lens, 30 secs, f2.8, ISO800
Camera Gear and Exposure Settings
I used four cameras to capture all the footage in this video:
- Canon 5D Mark II with 24mm f1.4 lens
- Canon 5D Mark II with 14mm f2.8 lens
- Canon 1100D (Rebel T3) with 10-22mm lens
- Canon 5D (original) with Peleng 8mm Fisheye lens (running autonomously with an intervalometer back at Shallow Bay)
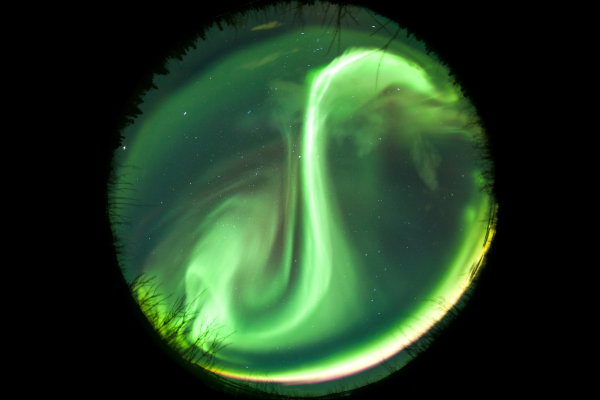
Fisheye Aurora: Canon 5D, 8mm lens, 30 secs, f3.5, ISO800
All of these lenses were used at their maximum aperture, as to capture the motion of the aurora requires exposures that are as short as possible. In general, exposures were ~6-8 seconds with the fast f1.4 lens and ~15-25 seconds with the slower lenses. But when the aurora was very bright and active, I was using exposures as short as ½ second with the f1.4 lens. In fact, there were actually a few minutes that night where I could record live video of the aurora, but that footage was too grainy to use in this compilation.
Although I was recording long timelapse sequences of images very quickly, I still tried whenever possible to capture full size RAW files. Only when the exposures were short (<1 second) was I forced to shoot straight to JPG as the camera could not keep up otherwise. At the end of the nine weeks, I had nearly three terabtyes of data, which is quite a headache!
Motion Control and Accessories
- The 5D Mark II and 24mm lens were carried on an alt-azimuth panning mount with a custom controller, to create some of the panning sequences in the video.
- The 1100D (Rebel T3) with 10-22mm lens was carried on a little Vixen Polarie, used in a horizontal panning mode, which provided for simple panning sequences.
- The other 5D Mark II with 14mm lens was used on a standard tripod.
These last two cameras were set to continuous shooting mode, and a simple push button remote release was used to fire off the shutter for as long as the button was locked down.
Canon 1100D (Rebel T3), 10-22mm lens @10mm, 25 secs, f3.5, ISO800
Composition
With aurora, like other night sky photography and landscape work in general, it’s the combination of foreground and sky that makes an image. So I spent a lot of time looking for rugged mountains and other attractive foregrounds. But location scouting is quite difficult in the Yukon in the middle of winter, with very few roads open and clear. Despite several more weeks touring around after this, Annie Lake remained one of my favourite locations and it was one of the more accessible as well.
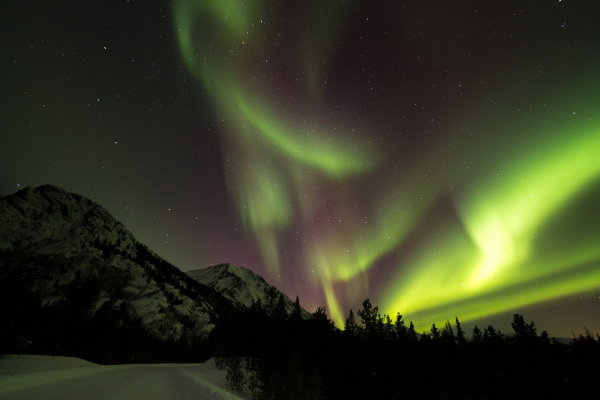
One of the factors to consider when chasing aurora, and one of the advantages of this site, is to look for a low northern horizon to increase visibility when aurora activity is low, but interesting horizons around to the east and west for when activity increases.
Landscape with low northern horizon: Canon 5D Mark II, 14mm lens, 15 secs, f2.8, ISO1600
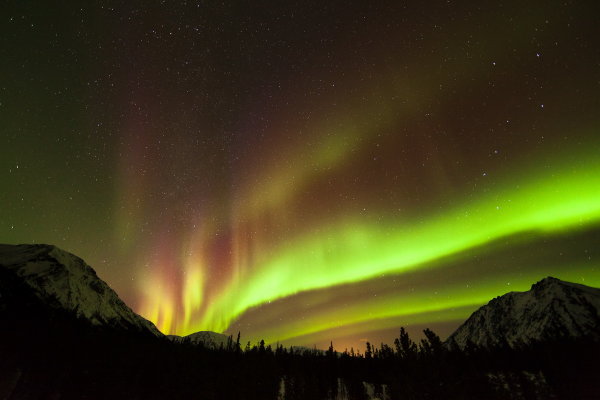
Unless you resort to light painting, in general the foreground appears silhouetted against the aurora, so you need strong profiles (isolated trees for example, rather than a wall of them). But occasionally the aurora is so bright overhead that it can actually illuminate the scenery. You can see that in the image below. Other times you may have moonlight which creates a very different lighting environment, and turns the sky blue just like the daytime sky.
Bright aurora illuminating the landscape: Canon 5D Mark II, 24mm lens, 5 secs, f1.4, ISO800
Post Processing
I learnt a lot as I began to process these Image sequences back home in Melbourne. To get the most out of them, I used Adobe After Effects to directly import the RAW image sequences. I also used the Neat Video noise smoothing plugin to reduce the appearance of noise without sacrificing too much detail. In some cases I also used Lightroom and LR Timelapse to smoothly vary some development parameters across the sequence, to cope with large variations in brightness of the aurora, before importing the sequence into After Effects. These frequent and often fast changes in brightess of the aurora is one reason why I often shot at lower ISO settings (~ISO800) than I normally would for night sky photography, to prevent clipping of bright areas of the aurora as much as possible.
The Star Trail effect at the end of the video was created using the ‘Lighten’ blending mode in the freeware program StarStax by Markus Enzweiler, which I highly recommend.
I hope you enjoy this Valentine’s Aurora video and a little of the behind the scenes story. Feel free to share it!
Post originally from: Digital Photography Tips.
Check out our more Photography Tips at Photography Tips for Beginners, Portrait Photography Tips and Wedding Photography Tips.
Capturing the Northern Lights in Timelapse Video


Digital Photography School

 You’d be hard-pressed to find many people who don’t love to travel – especially amongst camera wielders. We love exploring new places around the globe and bringing back photos to share with all our friends. It’s exciting, and a look at the world outside our own perspective.
 Perhaps my favorite phrase and one I pass along to anyone looking to create better people-based photography is this, “Check your shame at the door.” What that simply means is never be afraid to ask, dance or make a complete fool of yourself in pursuit of a great photo.
 Travel portraiture relies heavily on context. You don’t want someone to look at an image and think you captured it right outside your house – you want to show portraiture that tells the story of this person’s culture. What makes this person unique and interesting to you and your audience? Part of answering that question is knowing the main audience for your images. To a Tibetan a portrait of one of their fellow villagers may be nothing special – but to a Western audience it could be incredibly unique. It’s all about context.
 Add variety to your images not only through different environments, but also different poses, expressions and actions. Get that mountain man to smoke his pipe, the chef with a plate of food, the business person with their notepad or the kite surfer holding her board. Use different lighting – front, side, backlit, shade, etc. All these build toward a body of work.
 Wilderness photographer Ben Hattenbach advises on how to capture images of the Northern Lights. In this article he explains how to find an aurora and how to equip yourself to photograph it. He also gives advice on camera settings and composition.
You must be logged in to post a comment.