RSS
 

Posts Tagged ‘Black’

Tips for Black and White Wildlife Photography

16 Aug

South African photographer Heinrich van den Berg once said, “I believe that if black-and-white photography is done correctly, it can convey much more emotion and a deeper meaning than color ever could. It’s as if by subtracting color, the viewer is forced to add his own emotion to the images. Color photography is like a novel that spells everything out in detail, whereas black-and-white photography is like poetry—its strength isn’t in what’s said; it’s in what’s left out.”

Close your eyes for a moment and imagine a deer standing in a forest. Was the image you imagined in color? Most people will visualize the image in color. But are the colors necessary to produce an image of the deer? Let’s take a look at some advantages of wildlife photography in black and white.

Deer image

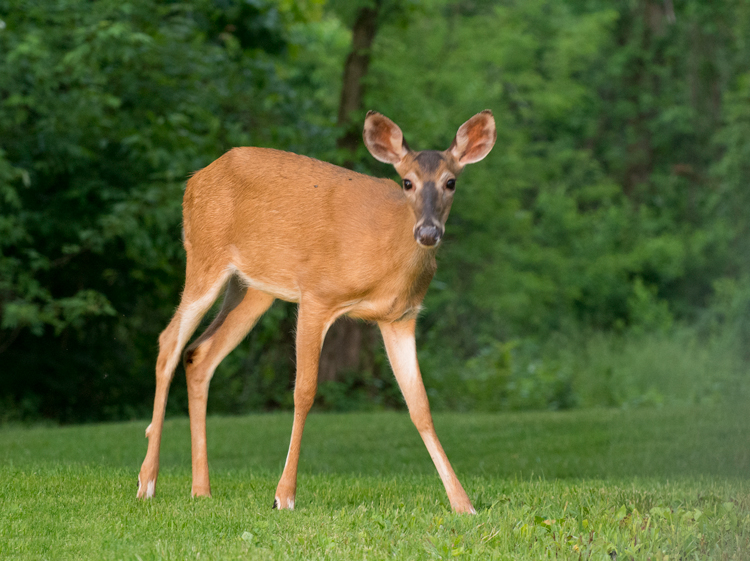
Original color image

Black and white deer

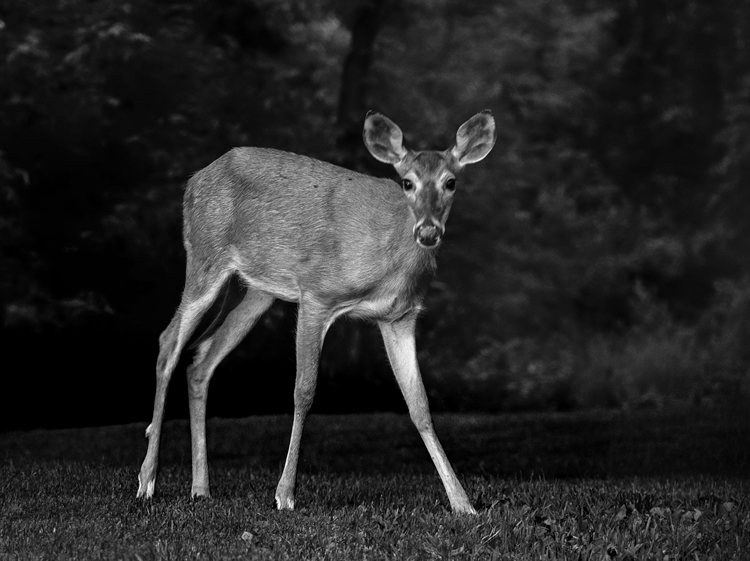
The black and white processing in Nik Silver Efex Pro 2 in this image converted the green foliage into a dark background.  Now the emphasis is on the deer and the texture of its coat.

Why Black and White?

Color, though admirable, may be a distraction that interferes with the viewer’s ability to see the textures, lines, patterns, and contrasts within an image. Often your wildlife subjects are surrounded by lush green foliage and blue sky backgrounds, and in color photos, the trend is to saturate them. With black and white photos we take the attention away from those colors, and draw it to the wildlife subject. Colorful images may tell a story, while black and white can reveal a more emotional portrait of the wildlife. Color may show the actuality of a scene, black and white is a perception of the captured reality. Black and white can add drama to your wildlife images that color will hide from the viewer.

It is important to note that not every image will make a great black and white one, some images and subjects will require color to make an impact. If color is the purpose of an image –  say, for instance, your subject is a red-headed wood pecker, then black and white may not work for that subject. Some photographers hold the opinion that an image lacking color is a good candidate for black and white conversion; however, even very colorful images may be hiding a dramatic black and white image.

Hawk Eye

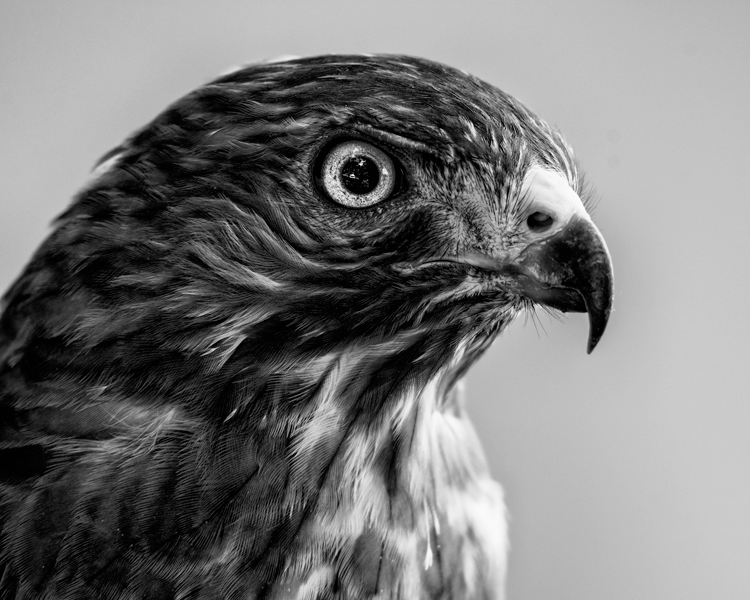
The textures, lines and contrast of the feathers create a dramatic portrait of this Broad-winged Hawk.

DSC_5418-Edit-Edit

Shooting

Without color, the key ingredients to shaping your image are light, composition, contrast, and tones. When photographing for black and white, lighting can transform an image. Black and white works well in all ranges of lighting conditions. Even the harsh midday sun, (difficult lighting for color shots) can products some fantastic results. How many times on a gloomy, rainy day have you grumbled about terrible lighting? Well, maybe for color photography it isn’t ideal, but the great thing about shooting for black and white results, is that even overcast days can produce some great images. It can allow you to capture the tones and textures of your wild animal subject, features which may be hidden in a color image, shot on a bright sunny day.

Of course, the morning and evening glow hours are going to work great when the low angle of light brings out the textures and lines of wildlife. If you are just starting to develop your skills shooting for black and white wildlife, or you are having problems visualizing your images as you shoot, here is a helpful tip. Most DSLR cameras with allow you to set your picture style to monochrome when you are shooting in RAW. The preview will appear in black and white, but your RAW file will still contain all the image’s color information, that you can use later as you convert to black and white. Stripping out all the color from the preview will help you see the forms of the image without the distractions of color. Use this process to help train your eye to see in black and white.

Bison Portrait

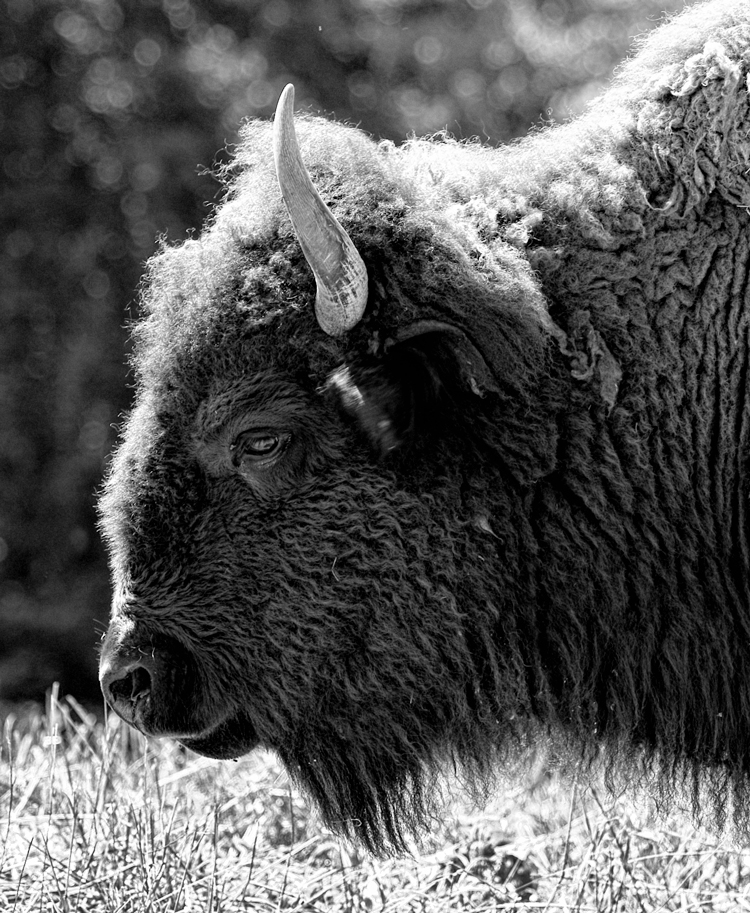
In this image, the harsh mid-day sun still produced a dramatically lit portrait of a Bison.

Swan on the lake

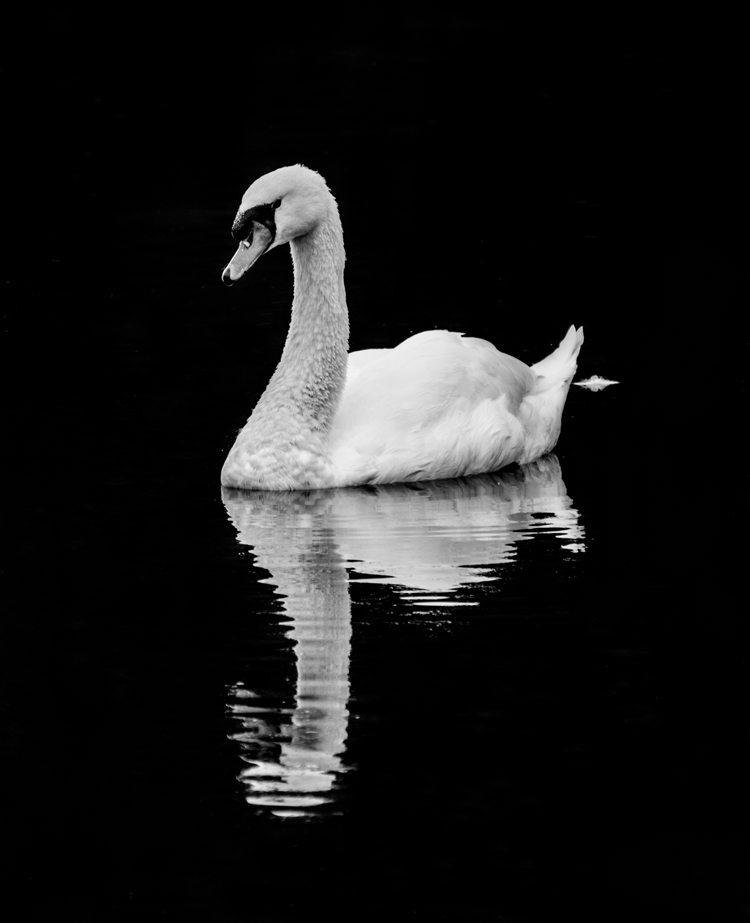
When exposing this image to keep the detail in the swan’s white feathers, the background was exposed to nearly black. Converting to black and white required very little processing.

Composition

Composition is even more important in black and white than in color. While a colorful image sometimes hides poor composition, black and white enhances and brings out the composition of your wildlife shot. Use shallow depth of field to isolate the subject, making a dramatic portrait and bringing out the textures of the fur or skin. Remember to use the KISS theory of composition. (Keep It Simple Silly)
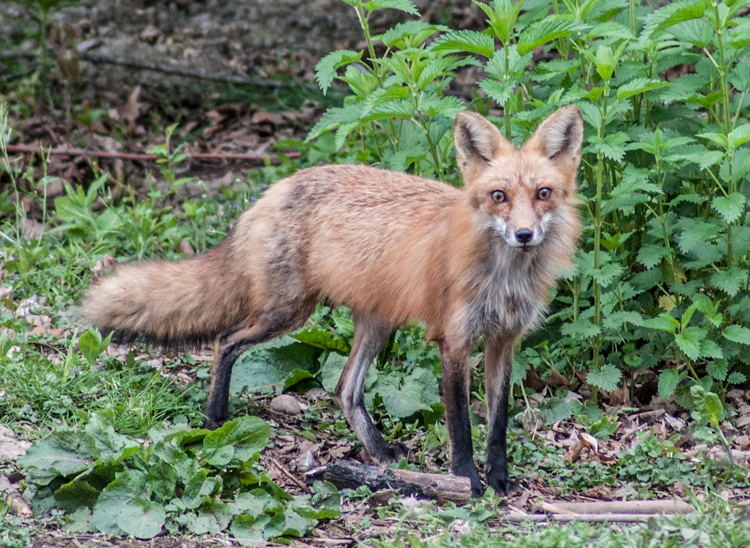
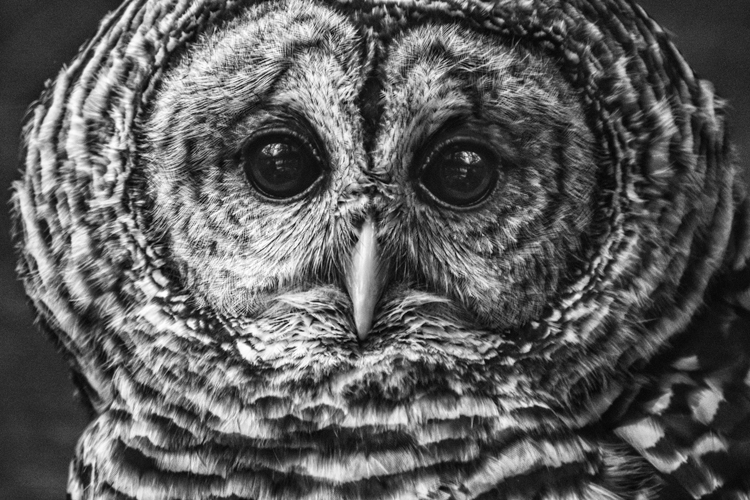
Fox

Original image

black-white-wildlife-photography-fox-final

Without the distractions of color this image becomes a moody and detailed portrait.

Processing

There are too many ways of converting images to black and white to mention them all. But Photoshop, Lightroom and Silver Efex Pro 2 are the three processing means I use the most. Whichever program you use for your conversion, you must learn to take control of the process. Instead of stripping the color out, use the tool in your editing program to turn colors into controlled shades of gray. Different processes applied may produce different emotional reactions to a single image.

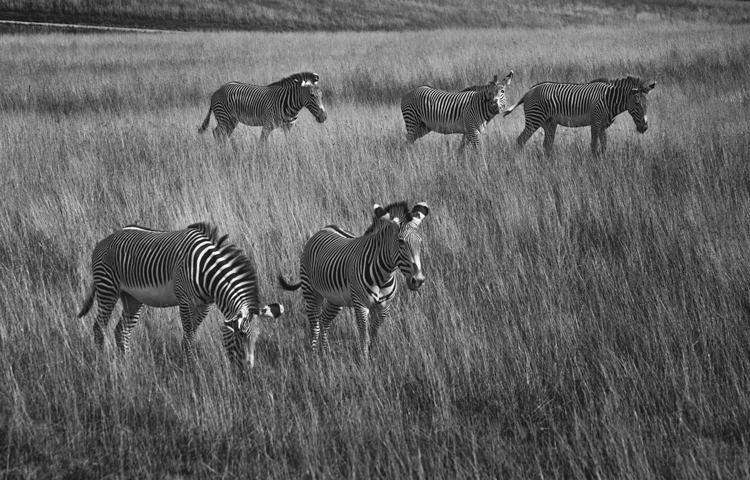
As illustrated by the photo of the grazing zebras below, high-key processing creates a cheerful or upbeat image, while a low-key interpretation of the same image reveals a more somber or mysterious aspect to the image. Though a high-key image is very light, it should still have black areas; and conversely, a low-key image is mainly dark but should also contain some white areas.

  • Photoshop: Use a black and white adjustment layer to fine-tune how each color tone is converted to a shade of gray. This is a great starting point, but you may also want to adjust contrast, and dodge or burn areas to dramatize the subject. If you use Photoshop to convert your images to black and white, don’t be afraid to experiment. Never just use the Image Mode – Grayscale to convert your image, that is like “throwing away the baby with the bath water”! You will throw out too much useful color information that could be used to create the mood you are looking for in your image.
  • Lightroom: Using the black and white tab, similar to Photoshop, you can also adjust how each color tone is converted to shades of gray.
  • Nik Silver Efex Pro is a very powerful black and white software. One of its greatest features is the preset effects already preloaded into it. Use one of those presets as a starting point, and follow up with the powerful adjustment panel to really fine tune your images.
High Key processing

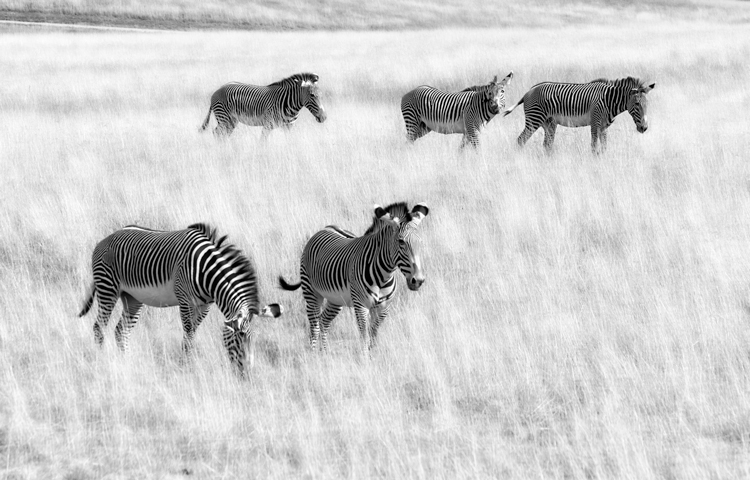
High-key processing in Lightroom creates a cheerful image of zebras grazing in a field. The same image was then opened in Photoshop and the layer was duplicated adding a motion blur.  The layer blend mode was changed to Overlay and a layer mask was added to keep the zebras from being blurred. This gives an artistic effect to the grass.

Low Key Processing

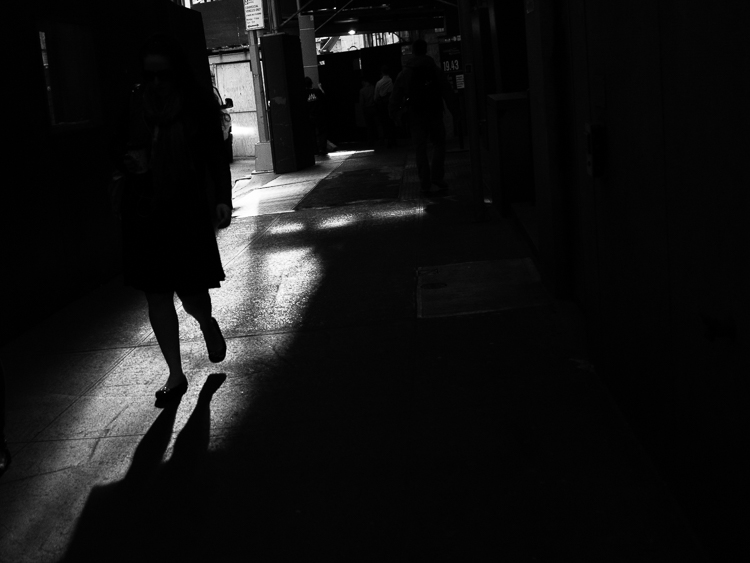
Low-Key processing in Lightroom creates a more mysterious effect.

Conclusion

The next time you are out photographing wildlife, look for opportunities to shoot black and white images. What wildlife do you like to photograph? Get out there and discover some stunning black and white wildlife opportunities!

Editor’s Note: This is the second article in a week full of features on black and white photography. Look for 5 Simple Ways to Create Expressive Photos in Black and White earlier today and more daily over the next week.

googletag.cmd.push(function() {
tablet_slots.push( googletag.defineSlot( “/1005424/_dPSv4_tab-all-article-bottom_(300×250)”, [300, 250], “pb-ad-78623” ).addService( googletag.pubads() ) ); } );

googletag.cmd.push(function() {
mobile_slots.push( googletag.defineSlot( “/1005424/_dPSv4_mob-all-article-bottom_(300×250)”, [300, 250], “pb-ad-78158” ).addService( googletag.pubads() ) ); } );

The post Tips for Black and White Wildlife Photography by Bruce Wunderlich appeared first on Digital Photography School.


Digital Photography School

 
Comments Off on Tips for Black and White Wildlife Photography

Posted in Photography


Weekly Photography Challenge – Black and White Techniques

15 Aug

This week on dPS it’s all about black and white photography. We are featuring a series of tips and articles around that topic. You can earlier ones below and more daily over the next few days.

  • 5 Simple Ways to Create Expressive Photos in Black and White
  • Tips for Black and White Wildlife Photography
  • 7 Tips for Black and White Portrait Photography
  • 28 Images with Strong Black and White Compositions

Photograph Happy Holidays! by Sam Assadi on 500px

Happy Holidays! by Sam Assadi on 500px

Photograph  One Railroader by Silvia S. on 500px

One Railroader by Silvia S. on 500px

Weekly photography challenge – black and white techniques

Your challenge this week is to try out different black and white techniques. Try any or all of the following:

  • Shoot in b/w mode
  • High contrast lighting
  • Convert to b/w in Lightroom
  • Convert to b/w using Photoshop
  • Try out a black and white plugin
  • Try out some sepia tone or split toning
  • Do a b/w portrait, landscape, macro, night shots, street photography, or flowers
  • Try a b/w silhouette

Photograph The essence of night by Liban Yusuf B&W on 500px

The essence of night by Liban Yusuf B&W on 500px

Photograph Venice Nostalgia by Csilla Zelko on 500px

Venice Nostalgia by Csilla Zelko on 500px

Photograph Time to go ... by Gaelle Lunven on 500px

Time to go … by Gaelle Lunven on 500px

Photograph The Last Ride by Rob Dweck on 500px

The Last Ride by Rob Dweck on 500px

Photograph Ways of Life by Eileen Hafke on 500px

Ways of Life by Eileen Hafke on 500px

Share your images below:

Simply upload your shot into the comment field (look for the little camera icon in the Disqus comments section) and they’ll get embedded for us all to see or if you’d prefer upload them to your favourite photo sharing site and leave the link to them. Show me your best images in this week’s challenge. Sometimes it takes a while for an image to appear so be patient and try not to post the same image twice.

googletag.cmd.push(function() {
tablet_slots.push( googletag.defineSlot( “/1005424/_dPSv4_tab-all-article-bottom_(300×250)”, [300, 250], “pb-ad-78623” ).addService( googletag.pubads() ) ); } );

googletag.cmd.push(function() {
mobile_slots.push( googletag.defineSlot( “/1005424/_dPSv4_mob-all-article-bottom_(300×250)”, [300, 250], “pb-ad-78158” ).addService( googletag.pubads() ) ); } );

The post Weekly Photography Challenge – Black and White Techniques by Darlene Hildebrandt appeared first on Digital Photography School.


Digital Photography School

 
Comments Off on Weekly Photography Challenge – Black and White Techniques

Posted in Photography


5 Simple Ways to Create Expressive Photos in Black and White

14 Aug

Can you visualize the world around you in black and white? It’s not easy to do at first with an array bright colors competing for your attention. Look a little closer however, and you may recognize the broad potential for expressive imagery. Of course, not every situation lends itself to this artistic style. There are however, certain characteristics you can look for, to identify the best opportunities.

1) Embrace High Contrast

A subject with dark shadows and bright highlights would not be ideal for a color photograph. In fact, it’s one of the reasons techniques like HDR have become so popular. Yet, for black and white photography, this type of high contrast light can be extremely effective. The harsh mid-afternoon sun is no longer a detriment, but an enhancement. This is a major shift in the way one thinks about exposure. To help recognize these chances, look beyond what is immediately evident and pre-visualize the scene in grayscale. A scene you passed on, in color may prove quite dramatic in black and white.

As is always the case in all good art, rules are meant to be broken. The same is true with black and white exposures. You have even more flexibility as shadows can be inky black, and highlights can clip the histogram while retaining the image’s visual appeal. To maximize the dynamic range of the camera, use the “ETTR” technique (expose to the right). Rather than a muddy exposure, you’ll enjoy the crisp contrast of the full tonal range.

2) Simplify with Shape and Form

In the absence of color, shapes and patterns become more pronounced. Lighter tones will stand out boldly when placed in front of a darker area. This is an effective way emphasize the important parts of a subject while minimizing distractions. To compose this way, think about the process of subtraction. What can you remove from the image that’s not essential to the story? As you simplify, the design of the photo will get stronger.

Even something as simple as a shadow on the ground can be used creatively. To the human eye, detail is evident in the pavement, but with a camera they can be rendered as inky black. This may be a very different style of seeing for you. To practice, I recommend taking a photo hike in which you search for nothing but shadows. You may be pleasantly surprised by how many interesting shots you’ll find.

3) Details Tell a Story

It’s been said that a person’s eyes are the windows to their soul. Their character however, can often be revealed in their hands. In black and white, the subtle details that often go unnoticed become more evident. Wrinkles and texture, for example, benefit from a deeper more textured appearance. This method is especially effective when using flat or overhead light. Typically this direct light would be undesirable, but in grayscale it can be preferable to that of a softer, diffused quality light.

4) Imagine a Mood

Blue skies are often used to symbolize happiness. You’ll see this pattern in magazine ads, television commercials, and even movies. Black and white images however, are associated with a different variety of moods. The precise emotion is ultimately up to the viewer, but a few common themes include solitude, contemplation, and pensiveness. Photographers of all genres can work with these traits to effectively portray their vision.

Use your imagination to visualize the mood you want an image to have. A great place to start is to study some of the masters. While Ansel Adams’ landscapes in black and white are very well known, go further in your research. For example, look at the emotion in Edward Weston’s famous “Pepper No. 30”. Another fine representation of this medium is “White Sands, New Mexico” by Ernst Haas. Of course the list goes on, but these are a good place to start. A visit to a local library will undoubtedly prove inspirational as you may discover work by artists you are not yet familiar with.

5) Dark Spaces and Silhouettes

Subjects that linger in darkness are sometimes more compelling than well-lit scenes. Using black and white photography, you have the ability to show the world in a completely different way. Instead of eliminating the shadowy areas, use them to your advantage. An empty space can actually be an effective method of composition. This type of artistic exposure is more edgy than a literal interpretation.

Take a look through your own catalog of images. There will likely be a number of photos that could be quite dramatic as a black and white. As you convert them from color, experiment with different post production filters to see how it impacts the scene. For example, a blue filter may lighten the sky dramatically, whereas a yellow filter will make it darker. If you’re looking for even greater control, there are a number of excellent plugins available. One of my favorites is Exposure by Alien Skin as it offers nearly endless customization. More terrific options include software by Nik, Topaz, and OnOne.

Editor’s Note: This is the first article in a week full of features on black and white photography. Look for another one later today and daily over the next week.

googletag.cmd.push(function() {
tablet_slots.push( googletag.defineSlot( “/1005424/_dPSv4_tab-all-article-bottom_(300×250)”, [300, 250], “pb-ad-78623” ).addService( googletag.pubads() ) ); } );

googletag.cmd.push(function() {
mobile_slots.push( googletag.defineSlot( “/1005424/_dPSv4_mob-all-article-bottom_(300×250)”, [300, 250], “pb-ad-78158” ).addService( googletag.pubads() ) ); } );

The post 5 Simple Ways to Create Expressive Photos in Black and White by Chris Corradino appeared first on Digital Photography School.


Digital Photography School

 
Comments Off on 5 Simple Ways to Create Expressive Photos in Black and White

Posted in Photography


7 Tips for Black and White Portrait Photography

14 Aug

Why would you choose to create black and white photographs in the era of digital cameras that are capable of accurately capturing millions upon millions of colors? Black and white photography seems to be a constant in the history of the medium, with color technology only propagating itself into wide use around halfway between Nicéphore Niépce’s first heliograph and today.

Black and white portrait tips 3201

There’s a lot of debate on both sides of the argument, but for me and many others it’s a simple matter of aesthetics. A good black and white treatment has a way of stripping unneeded information from an image, helping you to emphasize specific elements to your viewer without the distractions color can provide.

Portrait photography is a genre where black and white images can really shine. Like any technique, there are considerations that you should regard that can help to make sure your images have the most impact.

1 – Start with black and white in mind

For many photographers, black and white is more than a creative choice at the post-production stage; it’s a mindset. If you can start the creation of an image knowing that you intend it to be black and white, you can take steps to ensure that all of the elements of a good monochrome image are in place before you press the shutter. Things like contrast in tonality, contrast in lighting, and appropriate expressions from your subjects are all elements that are difficult, if not impossible, to fix after an image is taken.

If you have trouble imagining how an image may look in black and white, try setting your camera to a monochrome setting. While it isn’t recommended to do this for a final image, as long as you shoot in RAW file format, then all of your image’s color data will still be present in the file, and Lightroom and Adobe Camera Raw will reset the photo back to color once it’s imported. Doing this will allow you to have an idea of how an image will work in black and white, while still providing the highest amount of versatility in post-production.

2 – The eyes are more important than ever

Black and white portrait tips 3088

The most important part of the majority of portraits are the eyes. They are usually the focal point that the rest of your image is built around. This is especially true with black and white. With the omission of color, a black and white image often breaks down into graphic forms and shapes. Eyes are shapes that everyone recognizes and they draw immediate focus from your viewers. Make sure that your subject’s eyes are well lit, and focus is critical.

3 – Expressions are emphasized

Black and white portrait tips 3191

Like the eyes, other facial features become more prominent in a black and white portrait. You can use this to your advantage by conveying emotion in your images. Even tiny changes in your subject’s expression can make a difference. Things like a raised eyebrow, a twitch at the corner of a mouth, and smile lines under the eyes can all be used to great effect.

Here is an exercise you can do with your portrait subjects to get a mixture of great expressions. Prepare a list of words or phrases and ask them to react to how they feel to each one. The words you choose can be simple descriptors of emotion like: love, sad, joy, angry and melancholy. For more diverse expressions try more abstract words, or funny ones like: cheeseburger, politics, Teletubbies or Hulk smash. As a bonus, this sometimes works extremely well to lighten the mood when you have a subject who’s tense or nervous during a sitting.

4 – Lighting considerations

Black and white portrait tips 3335

When it comes to lighting a black and white portrait image, there are no hard and fast rules. If you like high contrast images with hard gradations in tone, then choose a harder source of light. If you like soft tones and subtler images, then you want a softer light source.

It’s all about personal preference here. If you’re not sure what yours is, try finding the first ten black and white portraits that stand out to you the most and see if you can deconstruct them in terms of lighting.

5 – Add contrast with light

Black and white portrait tips 3107

If you’re going to create high contrast black and white photos, the best advice is to add it with light, not in Photoshop. Small global adjustments are okay and won’t hurt your images, but definitely do not crank the contrast slider to 100. Try to limit it between +15/-15. For local adjustments, use a dodging and burning technique of your choice. The key point in this, and all post-production, is subtlety.

6 – You can’t save a bad image with black and white

If you’re working on an image that you feel isn’t up to scratch and you ask yourself if it will work in black and white, the answer is probably no. A black and white treatment will often emphasize the flaws that made you question the image in the first place, and a bad photo is a bad photo regardless of its color scheme or lack thereof.

7 – Choose black and white in spite of color

Certain subjects scream out to be shot in black and white. Other subjects may not be so obvious. Bright, punchy colors obviously make for vivid color photos, but by removing the color element you can completely change how a subject or scene is perceived. When you want to ensure your viewer is focused on a particular element, color as a graphic element, can become a distraction. Try removing it.

This can be a difficult concept to understand without seeing it, so I have included an example of a color version of one the images above. Ask yourself: How did your perception of the photos change? What did you notice first in each of the images? Do you feel differently or think differently of it when you view it in color than in black and white?

Black and white portrait tips 3088 colour

Hopefully, you can see that even though bold colors can make for vivid imagery, their absence can as well.

If you’re new to black and white photography, do remember that these are guides and not rules. If you need to stray from them to get the result you’re after, do so without hesitation.

Finally, if you try black and white and you like it: welcome to the addiction!

Editor’s Note: This is one of a series of articles this week featuring black and white photography tips. Look for earlier ones below and more daily over the next week.

  • 5 Simple Ways to Create Expressive Photos in Black and White
  • Tips for Black and White Wildlife Photography

googletag.cmd.push(function() {
tablet_slots.push( googletag.defineSlot( “/1005424/_dPSv4_tab-all-article-bottom_(300×250)”, [300, 250], “pb-ad-78623” ).addService( googletag.pubads() ) ); } );

googletag.cmd.push(function() {
mobile_slots.push( googletag.defineSlot( “/1005424/_dPSv4_mob-all-article-bottom_(300×250)”, [300, 250], “pb-ad-78158” ).addService( googletag.pubads() ) ); } );

The post 7 Tips for Black and White Portrait Photography by John McIntire appeared first on Digital Photography School.


Digital Photography School

 
Comments Off on 7 Tips for Black and White Portrait Photography

Posted in Photography


Understanding Black and White Filters in Lightroom

13 Aug

Shooting in black and white can be an amazingly creative way to explore new areas of photography, and help you see not only your pictures, but the world around you in a whole new light. However, unless you are shooting with black and white film or with a dedicated black and white camera like the Leica M Monochrom, all your pictures will initially be shot in color and later transformed into black and white through software tricks or filters.

Lightroom has an impressive array of presets that allow you to apply black and white effects to your color pictures, but in order to select the right filter for your particular pictures it’s important to understand how these presets work behind the scenes, and what they are really doing to your photos.

black-and-white-filters-hispanic-student-association

Back in the days of film photography, black and white film was composed of a single layer of silver crystals that were sensitive to light and affected the film in different ways depending on the wavelength, or color, of the incoming light. Green light (like reflected off of plants and trees) had a different effect on the film than red light (reflected off apples) or blue light (reflected off the sky).

When color film was invented it contained not one, but three layers of silver halide crystals, each of which produced different colors when exposed to light–similar to how the photosensitive pixels work on modern digital cameras. The problem with this method was that sometimes a photographer would need his or her film to be extra sensitive to different wavelengths of light, depending on the particular scene being photographed. One popular solution was to use colored filters that screwed onto the front of the camera lens, which still left the resulting image monochrome but changed its properties in significant ways.

A collection of color filters that can be quite useful in black and white photography.

A collection of color filters from Amazon that can be quite useful in black and white photography.

These filters operate by absorbing light on different parts of the spectrum while letting other colors pass through much more easily: green filters absorb more of most colors except green, blue blocks most colors except blue, and so on. This means that portions of the spectrum similar to the color of the filter will be lighter since more of that color of light makes it through the filter and essentially over-exposing those portions of the film. Conversely, portions on the opposite side of the color wheel from a given filter color will be darker since less of that light is allowed to pass through. For example, this diagram illustrates the basic principle behind a red color filter:

black-and-white-color-filters-diagram

The fact that more red is allowed to enter through the camera lens means the camera’s light meter would then adjust itself accordingly: you’re essentially exposing for the reds, which means that a properly exposed black and white image with a red filter would have pleasing reds with very dark cyans, blues, and greens.

black-and-white-color-filters-diagram-stars

By taking this basic idea and applying it to modern digital photography you can start to see how different black and white post-processing solutions work. In Lightroom you can mimic the effects of a color filter when converting an image to black and white. It’s not quite the same as actually using a physical filter on your lens and shooting using black and white film, but it’s a decent approximation that gets the job done for most circumstances. The trick is knowing which filter to use in a given situation.

This shot of kids’ feet would be nice in black and white, but in order to choose the right style it’s important to know how each type of color filter will affect the results. A green filter will make the leaves lighter while darkening the skin colors, since they are somewhat opposite on the color wheel. A blue filter will lighten the bluish hue of the rocks and the darker areas in the leaves but darken the skin colors, though perhaps a bit too much.

black-and-white-filters-feet-original

Here’s what the same image looks like with five different Lightroom black and white filter presets applied:

black-and-white-filters-all

In the end I chose a yellow filter to create the final image because it exposes the legs and feet a bit more while underexposing the blue and purple hues in the rocks:

black-and-white-filters-feet-yellow-filter

Of course Lightroom is not actually putting a color filter over your picture, but using digital tricks to approximate the same effect. It does this by altering the values of various parameters in the Develop module when a given preset is applied. After selecting a Black and White Filter preset you can see how various color values change by choosing the B&W panel in the Develop module. Note how the sliders change for various selected Presets, such as the Yellow and Blue in the example below.

black-and-white-lightroom-presets

Lightroom is not applying different colors to a black and white image, but deciding how much of each color value to over or under-saturate in order to mimic the effect of putting the same type of physical filter on your camera. While it’s not quite the same as shooting in pure black and white, one of the nice advantages is how Lightroom allows you to essentially create custom black and white filters by adjusting the slider values yourself. You can tweak any of the existing Presets, not just the Black and White ones, by increasing or decreasing various sliders, and even save your adjustments as new Presets that you can apply instantly to any image.

As one more extreme example, here’s an image of some bocce balls with different filters applied.

black-and-white-lightroom-balls-original

The original color image, properly exposed.

Applying a red filter preset in Lightroom produces an image where the reds are properly exposed and a bit lighter, but the blue shirts are dramatically darker since red and blue are rather opposite on the color spectrum.

black-and-white-lightroom-balls-red-filter

The same image with a Red black and white filter preset applied.

Now look what happens when a blue filter preset is applied. Just like a real physical filter on the front of the camera lens, the blues are lighter while all opposing colors are incredibly dark because very little of that light was allowed to pass through–or at least that’s the effect that Lightroom attempts to mimic.

black-and-white-lightroom-balls-blue-filter

A Blue filter preset now changes the image dramatically.

So how do you get a properly exposed image, with a well balanced amount of black and white across the frame? In real life you would use a green filter since this would block roughly equal amounts of both reds and blues, and the effect works quite well in Lightroom as well.

black-and-white-lightroom-balls-green-filter

Using a green filter preset results in a well balanced image.

As you can see, getting a proper black and white conversion in Lightroom is not always as simple as just clicking a button. It helps to know not only what options are available, but why they function the way they do.

What about you? What are your favorite black and white tips and tricks in Lightroom? There is much more I have not covered in this article, and if you have anything you’d like to share leave your thoughts in the comments below.

Editor’s Note: This is the second article in a week full of features on black and white photography. Look for 5 Simple Ways to Create Expressive Photos in Black and White earlier today and more daily over the next week.

googletag.cmd.push(function() {
tablet_slots.push( googletag.defineSlot( “/1005424/_dPSv4_tab-all-article-bottom_(300×250)”, [300, 250], “pb-ad-78623” ).addService( googletag.pubads() ) ); } );

googletag.cmd.push(function() {
mobile_slots.push( googletag.defineSlot( “/1005424/_dPSv4_mob-all-article-bottom_(300×250)”, [300, 250], “pb-ad-78158” ).addService( googletag.pubads() ) ); } );

The post Understanding Black and White Filters in Lightroom by Simon Ringsmuth appeared first on Digital Photography School.


Digital Photography School

 
Comments Off on Understanding Black and White Filters in Lightroom

Posted in Photography


4 Tips to Help you Decide Between Black and White or Color for your Image

09 Jul

Why do black and white photographs speak to us? In nature, colors are meant to attract, and cause things to catch our attention. Still, even without color, black and white images are a mainstay of our craft, and are powerful representations of the artistic spirit.

Half Color

There are many differing opinions when it comes to black and white photography. Some photographers love it, and shoot black and white exclusively, while other photographers absolutely shun the notion and shoot only in color. Then you have the majority of our lot who fall somewhere in between the love and hate poles. Luckily, the digital imaging age allows photographers to decide after the fact whether our images make us happier in full color, or in black and white. However, this ease of conversion can become somewhat of a problem because it is in fact so simple to switch from color to black and white, that it can cause conflicting feelings about which route to take. While there is really no absolute magic formula to determine the best choice for your particular image, there are some guidelines that you can follow to make your decision a little easier.

Here are four tips to help you decide if an image will be more appealing in black and white than in color.

Black and white or color?

#1 Does color have a large impact on the image?

This may seem like an easy judgment to make, but it is not always so simple. Color can be a fickle thing, and can either add to, or unintentionally detract interest from a photograph. Ask yourself, “does this image rely exclusively on color or are there other interesting aspects that can be emphasized?” Just how nice would it be to look at as a colorless rainbow? This not to say that all colorful objects and scenes won’t do well as black and white, but as a general rule most highly or diversely colored subjects should remain just that – colorful.

Silhouette
This image really had nothing to say in the way of color, so I made use of the heavy backlighting to create a strong contrast with the subject.

Two Giraffes
The original image didn’t have a lot going on as far as color, so I choose to convert it to black and white to really make the patterns pop.

The opposite of this usually proves to be true also. When you have an inherently bland scene or subdued colors, the image will usually do well when converted to black and white and this leads us to tip #2.

#2 Are there interesting light or contrasts?

This is where new photographers tend to encounter a little bit of difficulty because seeing good light or contrasts usually requires quite a bit of pre-visualization. Don’t worry! Developing an eye takes, well, some developing. The more you force yourself to look past what is readily apparent, the more you will learn to almost see in black and white.

When you remove color from the photographic equation, you are left with only differences in tone; lights and darks. These differences are what truly make good black and white images, and the differences in light and shadow bring contrast to the photograph. So, when you see that a given scene or subject presents the opportunity to exploit stark contrasts and unique lighting or shadow, it might be a great opportunity to try black and white. Take a look at this image of the leaf of a house plant.

Plant Leaf

I used a single flash behind the leaf to really bring out the contrasts within. Ordinarily these details might have gone unnoticed, and the black and white treatment really compliments the lighting.

The great Ansel Adam’s said that he; “could convey a greater sense of color with well executed black and white images using only light, shadow, and even subtleties in texture to express the qualities of the photo”. It’s that last variable, texture, that brings us to tip #3.

#3 Are there interesting textures?

When we think of texture, we can easily describe it in terms of how things feel physically, when we perceive them through our sense of touch. Texture in photography, however, can be a little more challenging to put into words. Texture in a photograph has to be perceived with our eyes and then we determine if it’s smooth, rough, or coarse. Transforming the tactile tangible into a visually tangible image takes practice and a trained eye, and this is where working in black and white can be the best choice. Examples of textures that work well for black and white photos are wood, metals and stone, even plants and human skin. Directional lighting (light from largely one source coming from the side) compliments, and helps emphasize textures.

This image was made with natural lighting coming in directly from one side. This really brings out the texture, imperfections, and grittiness of the photograph.

Hands

This last tip goes beyond the physical attributes of an image and delves into the feelings we want to convey through a photograph. This is where black and white photography can really shine.

#4 What is the mood you want to create?

Have you ever looked a photograph, and been immediately struck by how the photograph felt? This is often referred to as the mood of a photo. It could be a bleak and rainy street scene, or an image of a warm and welcoming sunset. In any case, using black and white is a good way to convey a sense of mood in your photography. Admittedly, black and white usually imparts dark, bleak, somber, or an etherial overtone to a photograph, but that does not mean that it doesn’t work well for more upbeat images. Convert some of your landscapes to black and white to see how the mood can change. Experiment with black and white portraits which can portray your subject with a more stoic and brooding persona.

This photo of a hot day on Boston Common had lots of differences in lighting, along with some great coloring especially in the sky. Still, I chose black and white because it simply felt better to me, and matched what I saw in my mind more closely.

Boston Common

Keep in mind that you may run into some different terms if you decide to work more with black and white photography. These terms are usually interchanged, but in reality they are not all the same. It will help you to understand the differences in each so you can know what to expect.

Monochrome

Monochrome simply means varying shades of only one color are used to make an image. This is often thought of as black and white (which are technically monochromatic) but in reality any color can be used. Sepia toned photographs are a good example of images which are monochrome.

This is an example of a monochromatic photograph that is not black and white.

Sepia Waterfall (2)


Grayscale

The term grayscale is another one that gets thrown around to label black and white images. Though not completely incorrect, grayscale images use only varying shades of gray (256 to be exact), and no other color. Grayscale can be a very bland when no other edits are used because it tends to leave the entire photo as middle gray. Notice how bland and uninteresting the below image looks when it’s converted to grayscale.

Grayscale

True Black and White

As I have said, black and white images are indeed monochromatic but not all monochrome images are black and white. True black and white photos use only black and white to produce the image although the majority still use a mix of gray tones.

This is the same image as above after it has been further processed to be closer to a true black and white photo. The differences in tones become becomes more apparent, and the photo becomes much more pleasing.

True BW

Black and white photography has been a staple genre since literally the inception of photography, and has evolved into a high art-form. Of course there are some people who simply do not like black and white images and prefer everything in color. Still, black and white photography is something that should not be discounted, and certainly not underestimated in terms of artistic expression. Today’s processing software makes converting color images to black and white nearly effortless, so use these tips and give it a try!

googletag.cmd.push(function() {
tablet_slots.push( googletag.defineSlot( “/1005424/_dPSv4_tab-all-article-bottom_(300×250)”, [300, 250], “pb-ad-78623” ).addService( googletag.pubads() ) ); } );

googletag.cmd.push(function() {
mobile_slots.push( googletag.defineSlot( “/1005424/_dPSv4_mob-all-article-bottom_(300×250)”, [300, 250], “pb-ad-78158” ).addService( googletag.pubads() ) ); } );

The post 4 Tips to Help you Decide Between Black and White or Color for your Image by Adam Welch appeared first on Digital Photography School.


Digital Photography School

 
Comments Off on 4 Tips to Help you Decide Between Black and White or Color for your Image

Posted in Photography


Black Gold: Turning Oil Tankers into Giant Land Architecture

09 Jun

[ By WebUrbanist in Conceptual & Futuristic & Technology. ]

black gold ship reuse

For an inevitable future when oil gives out in the Middle East (or nautical supply chains are replaced by pipes), a series of designers have envisioned creative ways to reuse the behemoths that currently ship this infamous commodity around the world.

oil tanker at night

oil tanker permanent dock

The Black Gold Project proposes a different kind of design revolution for an area of the world currently striving to build the tallest and most stunning structures on the planet: pragmatic conversions of shipping vessels into functional land structures.

oil tanker inteiror design

oil tanker open space

A joint project of  Chris Collaris Design, Ruben Esser, Sander Bakker, and Patrick van der Gronde, the resulting renderings take advantage of the versatility found inside such huge and open interior volumes.

oil tanker at sunset

oil tanker section diagram

Cultural exhibitions, shopping centers and art museums could all be housed inside these massive hulls, not to mention residential and office spaces. The decks above could become public parks and performance spaces.

oil shipping frieight conversion

oil tanker aerial plan

There are practical drawbacks to be considered, however, including the impact of waves, saltwater and wind over time as well. Still, as a conceptual project, the idea is compelling (if more poetic than realistic): turn the very vessels responsible for the rise and fall of these oil-producing nations into something new that remains, at the same time, a monument to days gone by.

Share on Facebook


[ By WebUrbanist in Conceptual & Futuristic & Technology. ]

[ WebUrbanist | Archives | Galleries | Privacy | TOS ]


WebUrbanist

 
Comments Off on Black Gold: Turning Oil Tankers into Giant Land Architecture

Posted in Creativity


Vortex: Black Whirlpool Spins Endlessly in a Movie Theater

30 May

[ By Steph in Art & Installation & Sound. ]

anish kapoor vortex 1

A seemingly bottomless vortex of black water spins endlessly in the unlikeliest of places: the floor of a brightly-lit movie theater in San Gimignano, Italy. Peer into its mesmerizing depths, however, and it’s easy to forget where you are, feeling as if you might get sucked inside.

anish kapoor vortex 5

anish kapoor vortex 3

‘Descension’ is an installation by artist Anish Kapoor, specifically conceived for the former cinema, which has now been transformed into a gallery. The whirlpool is among a series of works by Kapoor on display in the space, including alabaster sculptures and large-scale works in fiberglass.

anishkapoor vortex 2

anish kapoor vortex 4

“I have always thought of it (the void) as a transitional space, an in-between space,” says Kapoor. “It’s very much to do with time. I have always been interested as an artist in that very first moment of creativity where everything is possible and nothing has actually happened. It’s a space of becoming.”

anish kapoor vortex 6

The artist, who’s best known for massive inflatable buildings, London’s ArcelorMittal tower and Chicago’s iconic Cloud Gate, previously installed a spiraling black whirlpool in the floor of the Aspinwall House in Fort Kochi, India for the country’s 108-day-long contemporary art biennale.

Share on Facebook


[ By Steph in Art & Installation & Sound. ]

[ WebUrbanist | Archives | Galleries | Privacy | TOS ]


WebUrbanist

 
Comments Off on Vortex: Black Whirlpool Spins Endlessly in a Movie Theater

Posted in Creativity


Ona introduces black version of the Leica M edition Berlin ll bag

21 May

US luxury camera bag brand Ona has announced a new black version of its Berlin ll messenger-style bag. Designed especially for the Leica M system, the Berlin was originally a limited edition model created to celebrate the 100th anniversary of Leica, but the Berlin ll went on general release beyond Leica stores. Previously only available in the Vintage Bourbon tan finish, the black version of the Berlin has been created, according to Ona, because so many people asked for it. Read more

Articles: Digital Photography Review (dpreview.com)

 
Comments Off on Ona introduces black version of the Leica M edition Berlin ll bag

Posted in Uncategorized


GoPro Hero4 Black – Camera Review

15 Mar

GoPro Hero 4 Black Review

The GoPro Hero 4 Black edition is an action cam for recording video but it’s also a very powerful stills camera if you’re interested in getting super wide angle shots on a budget, especially if you want to shoot underwater.

If you are into shooting video of the 4K variety, don’t overlook this tiny but powerful little camera. Here’s a short test film I put together to show the 4K chops of the GoPro Hero4 Black.

The 4K Image Quality

I was so impressed with the clarity of the 4K video captured by the GoPro that I decided to shoot a little film while visiting Thailand and Cambodia. With only a cheap tripod and a slider you can create some beautiful looking 4K footage. To watch the above film in 4K click on the Youtube quality setting and set it to 2160p. Even if you don’t have a 4K capable screen you’ll still benefit from seeing that glorious extra resolution.

The 4K image quality is amazing when you consider the price tag, but only in the right light. When shooting in dark or shaded conditions the image quality takes a massive drop with lots of noise and hardly any shadow detail.

In low light conditions you’ll get better results on your still images by shooting in the 8 Megapixel still mode.

Not Just an Action Cam

With my film I set out to create a little art piece rather than the usual death-defying action or skateboard fails that you usually see from GoPro footage. It’s actually when using the GoPro in a fairly slow and stable setting, that you really get to see that crisp 4k at its best.

Once you start jumping around and adding major vibration to your recordings, you might as well just shoot in 1080p and save yourself some disc space.

Gopro Here 4 Review by Gavin Hardcastle

Shooting Stills

Once I’d gotten over the outrageous fisheye (Wide and SuperWide) perspective of the GoPro, the sharpness of that cheap little piece of glass blew me away. Not only are stills very, very crisp if you keep the camera still, but the 4K footage is so sharp that you can easily grab stills from frames in your video and that is where the GoPro really excels for stills photography.

Yes, you’ll get better dynamic range and overall image quality from hitting the shutter button to actually take a still image, but if you missed the moment, the 4K video recording most likely didn’t.

Imagine having a DSLR that shoots at 30 fps. When that day arrives you’ll never miss a moment of action but I doubt you’ll be paying $ 500 for that kind of power. Until that day, the GoPro Hero4 Black Edition will have to do. It fits in your pocket, weighs less than a muffin, and can go underwater when placed in the skin-tight waterproof housing.

Try doing that with your DSLR. Actually, don’t!

GoPro Hero Camera Review

Ease of Use

In terms of what photography settings you can control, things are very limited. You can’t set focus, do long exposures, or have any control over depth of field. You can change the white balance, ISO, and exposure value by two stops but that’s about it.

The idea with the GoPro is switch it on and start shooting. It’s about as automatic as it gets.

You get three buttons to set the shooting mode and the preferences of those modes. Sounds simple but having used professional cameras for years I have to say this is really frustrating. I was forever switching into the wrong mode accidentally which ruined some shoots. I’d often think I was shooting a 4k video sequence when in fact all I’d done was take a still image.

You’ll get much better control of the GoPro if you use the Smartphone app but even that is limited. The image quality that gets transmitted to your phone is so bad that you won’t be able to clearly see everything in your frame, meaning you’ll get some nasty surprises during editing.

GoPro Here 4 Black Edition Review

The Touch Screen Option

For an additional $ 90 you can attach a touch screen to the back of the GoPro. I found it to be a total waste of money and much prefer using the phone app. Of course, the app option won’t be much help for surfers and water warriors in general, in which case, the touch screen is better than nothing.

I guarantee that it will drive you crazy the first time you try the Unlock Touchscreen swipe action, that you’re forced to use through the plastic housing. It’s kind of like scratching an itch while wearing boxing gloves.

GoPro Hereo 4 Review in Cambodia

Battery Purgatory

I take back all my previous complaints about the battery life on mirrorless cameras. I’ve had sneezes that lasted longer than the battery in the GoPro. If you’re really lucky you’ll get around 20 minutes of battery life in clement temperatures. I shudder to think what the battery life would be in subzero temperatures.

Dynamic Range

I realize I’m totally spoiled with a background using DSLR and mirrorless cameras so it’s unfair to expect the GoPro to perform on that level, especially at just $ 500. I have to say though that the dynamic range of the GoPro 4K footage is pretty feeble. You’ll have to get used to blown out skies and murky shadows that you just can’t recover in post.

I’d happily pay considerably more for a Pro version that allowed for better image quality and some kind of RAW video format that allows better control of shadows and highlights, but I’m not sure if that’s currently possible for such a tiny little camera.

The Gopro Hero 4 Review

There was no chance of recovering the blown out highlights of the trees in the background in this 4K video frame.

Exposure Shifting Issues

I had to scrap a lot of footage due to the fact that you can’t lock the exposure on the GoPro. As you move the camera around it’s constantly adjusting exposure. While that’s an essential requirement for action footage recording, it totally ruins artistic slider shots. If ever a Pro version of the GoPro becomes available I’d like to have a RAW video format and exposure locked where I decide to set it.

Slow Motion

Another cool feature of the latest GoPro is that it can record at 120 fps (frames per second) but unfortunately that’s only at 1080p resolution. When played back at 30 fps in editing software you get super smooth slow motion. I can’t wait for the next generation of GoPro that records 4K at 120 fps.

The Gopro Here 4 Black Edition Camera Review

Should GoPro Owners Upgrade

If you already own a previous version of the GoPro and you’re thinking of upgrading, I’d ask yourself if the 4K recording means that much to you. If you’re recording dirt bike adventures in 4K you’ll not see much of an improvement over upscaled 1080p footage. All that shaking and fast movement really makes the 4k quality pointless.

If you’re filming drone or slider footage, the 4K image quality is a major upgrade and gives you that added option of grabbing sharp stills from the frames of your video.

Things I love about the GoPro4 Black Edition

  • Fits in your pocket
  • Sharp 4K video for under $ 500
  • It’s waterproof (when placed in the housing)
  • Weighs less than a muffin
  • Super wide angle for less than the cost of a DSLR fisheye lens
  • Ideal for drones
  • The phone app

Things I dislike about the GoPro4 Black Edition

  • Battery life is beyond pathetic
  • You cannot lock the exposure value
  • The three button controls are annoying
  • The optional touchscreen is painful to use

Conclusion

Grumbles aside, I’m still impressed by the things I can do with this sub $ 500 camera. Capturing crispy 4k video footage from a palm sized toy is a breath of fresh air for me, especially when you consider the heavy gear I usually lug around on my travels. I’m giving the GoPro Hero4 Black Edition a generous four out of five stars.

googletag.cmd.push(function() {
tablet_slots.push( googletag.defineSlot( “/1005424/_dPSv4_tab-all-article-bottom_(300×250)”, [300, 250], “pb-ad-78623” ).addService( googletag.pubads() ) ); googletag.pubads().enableSingleRequest();
googletag.pubads().disableInitialLoad();
googletag.pubads().collapseEmptyDivs( true );
googletag.enableServices();
} );

googletag.cmd.push( function() { googletag.display( ‘pb-ad-78623’ ); } );

googletag.cmd.push(function() {
mobile_slots.push( googletag.defineSlot( “/1005424/_dPSv4_mob-all-article-bottom_(300×250)”, [300, 250], “pb-ad-78158” ).addService( googletag.pubads() ) ); googletag.pubads().enableSingleRequest();
googletag.pubads().disableInitialLoad();
googletag.pubads().collapseEmptyDivs( true );
googletag.enableServices();
} );

googletag.cmd.push( function() { googletag.display( ‘pb-ad-78158’ ); } );

The post GoPro Hero4 Black – Camera Review by Gavin Hardcastle appeared first on Digital Photography School.


Digital Photography School

 
Comments Off on GoPro Hero4 Black – Camera Review

Posted in Photography