RSS
 

Posts Tagged ‘Better’

8 Important Composition Tips for Better Photos (video)

07 Mar

The post 8 Important Composition Tips for Better Photos (video) appeared first on Digital Photography School. It was authored by Caz Nowaczyk.

In this video from Jamie Windsor, he explores composition tips for better photos.

As Jamie states in his video, sometimes a new photographer can be overwhelmed by all the so-called “rules” of photography. Those, such as the rule of thirds, Fibonacci spiral, and the phi grid. Jamie breaks it down for you, using some classic images by renowned photographers, such as Annie Leibovitz, Sally Mann, Steve McCurry, and Bruce Gilden as examples. While this helps to visualize the points that he is making, it is also great to see many of these fantastic images.

  1. Get your position right
  2. Use your phone to practice composition
  3. Beware the Rule of Thirds
  4. Squint or blur your eyes
  5. Think conceptually as well as aesthetically
  6. Keep it simple
  7. Keep the edges clean
  8. Work in post-processing

You may also like:

  • How to Use Radial Composition in Photography to Create Awesome Images!
  • Four Rules of Photographic Composition
  • Composition Checklist for Beginners
  • 4 of the Most Common Composition Mistakes In Photography
  • How to Make Brilliant Black and White Photos with Dramatic Composition
  • The S-Curve: A Landscape Photography Composition Technique
  • How to Break the Rules with a Central Composition

The post 8 Important Composition Tips for Better Photos (video) appeared first on Digital Photography School. It was authored by Caz Nowaczyk.


Digital Photography School

 
Comments Off on 8 Important Composition Tips for Better Photos (video)

Posted in Photography


Learning to See, Read, and Interpret Light for Better Photography

26 Feb

The post Learning to See, Read, and Interpret Light for Better Photography appeared first on Digital Photography School. It was authored by Herb Paynter.

interpret-light-for-better-photography

In the game of photography, lighting conditions occasionally throw your camera a curveball. In the game of baseball, the pitcher and catcher must coordinate and communicate their actions precisely through a series of gestures or signs. By learning to read the signs that a scene tells you about the existing light, you will be able to capture the light exactly the way your eyes perceive it.

Image: The catcher must know exactly what kind of pitch the pitcher is going to throw so he knows ex...

The catcher must know exactly what kind of pitch the pitcher is going to throw so he knows exactly where to position his mitt.

Interpret light for better photography

To learn to see, read, and interpret light, let’s first take a look at some typical lighting conditions that are best captured by certain photographic settings.

Golden lighting

When you take outdoor pictures (especially nature), try to schedule them during the golden hours, usually between 7-9 am and between 5-7 pm. This is when the lighting is at its richest intensity for photography. During morning and afternoon/evening hours, the light is warmer in color and more flattering to all colors of skin.

Image: Even this faded wood fence took on a golden color during “golden hour.” f-4.5, 1/4000, ISO 16...

Even this faded wood fence took on a golden color during “golden hour.” f-4.5, 1/4000, ISO 1600, 35mm.

Conversely, try to avoid taking pictures of people when the Sun is directly overhead as the shadows it creates are very harsh and unflattering to facial features.

Mid-day sunlight

The light from direct sunlight is more intense than your camera’s image sensor can deal with.

Typically, your camera’s metering system caters to the brightest light in the scene. When this happens, the darkest parts of the image lose definition!

interpret-light-for-better-photography

Despite the Sun providing ample light, the use of a fill flash illuminated the shadows caused by the noonday light. f-4.8, 1/500, ISO 200, 82mm.

Fill flash

Believe it or not, it is usually a good idea to use a flash during the brightest hours of the day. Simply interpret light and keep your subjects from displaying too much contrast.

Your flash won’t affect the lightest parts of the photograph, but it will shed some much-needed light in the darkest parts of the image. Unless you take preventative measures (using either a fill flash or a carefully positioned reflective surface), these “shadow” tones will print too dark!

Lighting and people

If you are outside, try to keep the Sun behind you and off to the side. This way, the light will illuminate their faces and create good definition and shading.

But watch out for your own shadow in the picture.

interpret-light-for-better-photography

Outdoor pictures provide only a single light source. Be very careful about that big lights’ position. f-2.2, 1/1900, ISO 25, 29mm.

If you are inside during daylight hours and want to interpret light without a flash, set the camera’s white balance (WB) to Shade and brace yourself for a longer exposure.

If there is not enough available light for a good exposure, set the WB to Daylight and let the camera’s flash take care of the lighting.

Manual flash

If you must take a picture of people outside with the Sun in front of you instead of behind you, remember these two things:

  1. Keep direct sunlight from entering the lens, and
  2. Manually direct your camera to use the flash.

If you set your camera flash to fire “automatically,” it may misread the overall lighting and not fire the flash at all. Unless you are looking for a good silhouette, you won’t be pleased with the result.

The use of a flash inside requires you to pay close attention to distance. Standing too close to your subject (less than four feet) may put too much light on the subject’s face and wash out the skin color.

Alternatively, standing too far away (more than 25 feet), the flash could fail to light the skin tones correctly.

Skin is very picky about the light it likes. Light that is either too strong or too weak just doesn’t look natural.

interpret-light-for-better-photography

Shooting indoors under mixed, existing light is best captured with the camera set to AWB (automatic white balance). This sets the camera to seek the most neutral color in the scene and to record balanced gray light. f.1.8, 1/35, ISO 320, 24mm

Light shaping

Your digital camera measures the brightest light, compares it with the darkest areas, and determines how to interpret the light and expose the picture based on an average of the two readings.

Always keep extremely bright light from entering the camera through the lens. And that includes camera flash lighting reflecting from shiny surfaces, like glass and mirrors.

Beware of specular light of any kind reflecting from any surface, as it influences these meter readings.

Cloudy and overcast lighting

Some of the very best lighting for color happens on cloudy and overcast days. Overcast days allow your camera to capture much more of the natural light and, therefore, provides a much more natural feel to your photos.

Image: Softbox lighting softens harsh shadows even when used as a single light source in close proxi...

Softbox lighting softens harsh shadows even when used as a single light source in close proximity to the subject.

Softboxes

Professional photographers in the controlled setting of a photo studio use special lighting enclosures called “soft boxes” to limit the contrast created by their bright studio lights.

Direct lighting from studio flash units (called strobe lights) can be so strong and brilliant that it creates very harsh shadows.

To avoid these shadows, these lights are either enclosed in softbox tents or bounced off special photographic umbrellas to disperse the intense light.

Made from material similar to an umbrella, these enclosures are translucent and absolutely neutral white in color.

Nature’s softbox

An overcast day serves the same purpose outdoors as the tents and diffusers used in studios. The clouds soften and diffuse the direct Sun’s harsh light.

On an overcast day, the light is so evenly diffused that you can position your subject in almost any direction.

Since the clouds tend to make the scene color slightly bluish, your camera’s Overcast Mode setting interprets light with a slightly warm tone that neutralizes the bluish cast.

Image: Cloud cover softens the harsh lighting of direct sunlight and allows the full tonality and sa...

Cloud cover softens the harsh lighting of direct sunlight and allows the full tonality and saturation to show without either plugged shadows or blown-out highlights. f-4.5, 1/250, ISO 200, 105mm.

The three major outdoor lighting modes are:

  1. Daylight,
  2. Shade, and
  3. Overcast (or Cloudy).

Daylight WB allows the natural coloring of the existing light to expose the shot.

Shade provides a slightly yellow cast to the scene.

Overcast WB applies an even more intense yellow cast.

All three WB settings attempt to record whites, grays, and blacks in the scene as completely neutral in color.

If you want to capture the natural lighting mood of any daylight color temperature, leave the WB setting on Daylight.

Low-key vs. high-key lighting

Photographs generally get divided into three groups: full range, high key, and low key.

Full range photos are the most common since they display a full range of tones from dark to light.

High-key photos contain more light tones than dark tones, while low-key photographs display a near absence of light tones.

Image: High-key images contain more highlights than mid-tones and shadows, while low-key images cont...

High-key images contain more highlights than mid-tones and shadows, while low-key images contain more shadow tones than mid-tones and highlights. The most important challenge with either type of image is to maintain the distinction of detail in each.


Generally speaking, to properly interpret the light and record low-key pictures, set the camera’s Exposure Value (or EV) compensation to a minus setting.

Alternatively, to compensate for the lighting of high-key pictures, set this EV compensation to a plus setting. These adjustments will override the camera meter’s intent to expose all subjects as middle tones.

With shooting either high or low-key lighting, great care must be taken to preserve the minor presence of highlight tones in low-key scenes and the minimal shadow detail in high-key situations.

But as a general rule, the absolute extremes of pure black and pure white should be avoided unless the drama of the scene requires that level of contrast.

The post Learning to See, Read, and Interpret Light for Better Photography appeared first on Digital Photography School. It was authored by Herb Paynter.


Digital Photography School

 
Comments Off on Learning to See, Read, and Interpret Light for Better Photography

Posted in Photography


Luminar vs Lightroom: Three Reasons Luminar is Better (and Two Reasons It’s Not)

24 Feb

The post Luminar vs Lightroom: Three Reasons Luminar is Better (and Two Reasons It’s Not) appeared first on Digital Photography School. It was authored by Jaymes Dempsey.

luminar-vs-lightroom

Are you struggling to decide whether you should be working in Luminar vs Lightroom? Do you want to know how these two post-processing powerhouses match up?

You’ve come to the right place.

Luminar vs Lightroom

Because this article will give you three ways Luminar excels over Lightroom, followed by two areas where Lightroom dominates.

And it’ll help you decide which option is best for your needs.

Let’s dive right in, starting with the biggest reason to choose Luminar:

1. Luminar offers one-click features for quick edits

When dealing with the question of Luminar vs Lightroom, I always recommend you take a look at the biggest feature Luminar offers:

One-click editing.

You see, Luminar offers a modern approach to editing, where you tap a few buttons and the software does most of the editing for you. This is ideal for photographers who don’t feel comfortable doing advanced edits in a program like Lightroom, or who simply don’t have time to carefully edit every photo.

These one-click options include the Orton Effect (which gives your photos a soft glow), to the Sunrays tool (which adds surprisingly realistic sun rays to your photos), to the Fog tool (which adds, well, fog).

Luminar vs Lightroom: Three Reasons Luminar is Better (and Two Reasons It's Not)

Even more impressive, some of Luminar’s best editing features are powered by artificial intelligence.

For instance, Luminar’s AI Enhance tool offers an AI Accent slider that often looks quite good; it makes your photo pop with some carefully applied color and tonal adjustments, among others.

And the Luminar AI Sky Replacement is nothing short of amazing. With a couple of clicks, you can take a boring sky and turn it into something eye-catching (an edit that could previously only be pulled off by a Photoshop expert).

Luminar vs Lightroom AI sky replacement tool

So if quick editing is your thing, then Luminar is a great choice.

2. Luminar offers useful layer-based editing

If you’ve ever used Photoshop, then you’ll know that one of its most powerful features is layer-based edits.

Because with layers, you can stack edits on top of one another, selectively delete edits, mask out certain edits, and more.

And while Lightroom doesn’t offer layer-based editing…

…Luminar does.

In Luminar, you can make adjustments on different layers. Then you can selectively apply these adjustments by masking out different areas of the layer, ensuring that only part of the photo is enhanced by a slider or corrected by a tool.

Luminar vs Lightroom layer editing

You can also use Luminar’s Luminosity Mask tool to selectively adjust areas of your photos based on their underlying brightness.

Now, Lightroom does offer some similar features, though they don’t technically use layers. Features such as the Adjustment Brush.

But these aren’t quite as useful as true layer-based editing, not least because you can only apply some edits via the Adjustment Brush, whereas Luminar allows for almost every slider to be separated into a different layer and masked out (if you so choose).

Personally, I’m a huge fan of layer-based editing, and I love that Skylum included it in their software.

On the other hand, layer-based editing can be a bit complex for newcomers. Fortunately, as discussed in the section above, Luminar also has a handle on basic editing tools.

So you have a choice:

Do more complex, layer-based editing.

Or work with the one-click edits.

(Or both!)

Very cool.

3. The Luminar editing interface is incredibly easy to work with

Here’s the third big area where Luminar dominates Lightroom in the Luminar vs Lightroom question:

The Luminar interface is streamlined, simple, and ridiculously easy to use.

Open up Luminar, and you can immediately tell that it’s great for beginners. There’s a toolbar at the top that lets you access basic options, no matter the module you’re in, and the tool panels on the right are simple and uncluttered.

To do some quick editing, all you have to do is tap the Looks icon at the top, and a handy image carousel pops up:

Luminar vs Lightroom interface

Lightroom, on the other hand, is far less sleek, and a little bit messy.

Take a look at the Lightroom interface:

Luminar vs Lightroom: Three Reasons Luminar is Better (and Two Reasons It's Not)

Sure, it’s workable, but it’s not exactly simple, and it can feel overwhelming at times. There’s a huge number of editing panels, quite a few modules, and many sliders.

So while a professional probably wouldn’t balk at the Lightroom display, a beginner may feel far too out of their depth.

Which is why Luminar is worth a look.

4. Lightroom offers far superior image organization options

Now it’s time to look at areas where Lightroom excels over Luminar, starting with Lightroom’s digital asset management capabilities.

You see, Lightroom is carefully designed to catalog, group, and label your photos. It has ultra-useful collection options and a huge number of ways to filter your images (in case you’re after an elusive image buried somewhere deep in your catalog).

image organization Luminar vs Lightroom

I love Lightroom’s organization features, and I still use my Lightroom catalogs to keep track of all my images, even when I’m doing editing in Luminar.

You see, Luminar’s photo organization options are far less powerful compared to Lightroom’s. Luminar does offer a Library feature, which gives you the option to group your photos into Albums.

But Albums don’t offer much in the way of functionality; for instance, you can’t group one album under another, nor can you sort them into a meaningful hierarchy.

Hence, when it comes to Luminar vs Lightroom in photo organization capabilities, Lightroom is the winner. Hands down.

Lightroom features a set of powerful, complex tools for precise editing

One other gripe that I have with Luminar compared to Lightroom:

It’s just not as precise.

Even though Lightroom has a complex interface, there’s a lot of options within that interface. Whereas Luminar’s editing tools are often a bit too simple.

For instance, look at Lightroom’s Split Toning panel:

Luminar vs Lightroom: Three Reasons Luminar is Better (and Two Reasons It's Not)

You can drag around a point on the color display, and your photo will respond.

Then compare this to Luminar’s Split Toning tool, where you’re stuck dragging sliders in a far less helpful way:

Luminar vs Lightroom luminar split toning

The same is true of Lightroom’s HSL/Color editing panel. You have basic HSL options, which allow you to modify colors according to hue:

Luminar vs Lightroom: Three Reasons Luminar is Better (and Two Reasons It's Not)

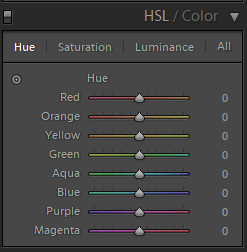
But then you also have a more targeted color adjustment tool, where you can click and drag to edit particular colors of your photos.

This is in contrast to Luminar’s Color tool, where you have the basic HSL options, and that’s all:

Luminar vs Lightroom Luminar color tool

Now, for a beginner, this may not be a big deal. You may not be interested in more complex editing tools.

But more experienced editors want this sort of thing, and so you should be aware that you can’t find it in Luminar.

Luminar vs Lightroom: Conclusion

Lightroom and Luminar are both excellent for post-processing, just in different ways.

Luminar offers fantastic one-click editing, along with powerful AI options.

Whereas Lightroom features superior image organizational features and complex editing tools.

So which is better, Luminar vs Lightroom?

In the end, the choice is yours!

The post Luminar vs Lightroom: Three Reasons Luminar is Better (and Two Reasons It’s Not) appeared first on Digital Photography School. It was authored by Jaymes Dempsey.


Digital Photography School

 
Comments Off on Luminar vs Lightroom: Three Reasons Luminar is Better (and Two Reasons It’s Not)

Posted in Photography


Panasonic S1H vs GH5S: not simply ‘bigger is better’

03 Feb

The S1H can be seen as a large-sensor GH5S, but it’s not simply the case that the bigger camera gives you better quality. There are times it can, but it’s not just about cleaner footage.

Articles: Digital Photography Review (dpreview.com)

 
Comments Off on Panasonic S1H vs GH5S: not simply ‘bigger is better’

Posted in Uncategorized


Finally, a Road Map to Taking Better Photos of People!

22 Dec

The post Finally, a Road Map to Taking Better Photos of People! appeared first on Digital Photography School. It was authored by Darren Rowse.

Finally, a Road Map to Taking Better Photos of People!

Day 11 of dPS Holiday Deals brings you this fundamental portrait photography course like no other – and it’s from our previous long-time Editor Darlene Hildebrand of Digital Photo Mentor.

Save $ 100 now

If you’re feeling lost when it comes to taking photos of people then you need Portrait Fundamentals: a road-map to portrait photography skills and confidence for beginners. 

Especially if you are disappointed by how your portrait shots turn out, or don’t even take photos of other people for fear of messing it up!

  • Unsure what camera settings to use for portraits?
  • Can’t get sharp, well-exposed images consistently?
  • So overwhelmed by all the technical stuff you struggle to focus on your subject and enjoy the portrait process?

Then, let Darlene and her team from Digital Photo Mentor guide you. They’ll give you a plan to follow so you can start improving your portraits immediately. 

Portrait Fundamentals Product

This is no ordinary course, it includes over 6 hours of video lessons, a 245-page PDF notebook, 21 practice exercises, quizzes at each stage, and a private Facebook group for students to interact with each other.

Learn to take great portraits even if you are a beginner!

Save $ 100 and get the course now for only $ 97 USD (usually $ 197)

Check it out before the next deal arrives in less than 24 hours.

PS – Did you miss yesterday’s deal? You can save 50% on Andrew Gibson’s Art of Black and White in Lightroom and Beyond course. Check it out here.
We receive an affiliate commission when you purchase from our trusted partners.

The post Finally, a Road Map to Taking Better Photos of People! appeared first on Digital Photography School. It was authored by Darren Rowse.


Digital Photography School

 
Comments Off on Finally, a Road Map to Taking Better Photos of People!

Posted in Photography


How to Overcome Photo Envy and Become a Better Photographer

13 Dec

The post How to Overcome Photo Envy and Become a Better Photographer appeared first on Digital Photography School. It was authored by Mat Coker.

overcome-photo-envy

You’ve got a goal to become a better photographer. Along the way, you’re going to have to confront your weaknesses. Photo envy is one of the greatest weaknesses a photographer can face because it is a weakness that hurts other people.

If you regularly feel jealous when you see another photographer’s good photos then you probably suffer from photo envy.

Photo envy will make you bitter and pessimistic. When envy takes root, it leaves you feeling inferior and resentful at other people’s success.

I’ll show you how to overcome photo envy so that you can get on with becoming a great photographer.

overcome photo envy

The one time I forget all about photo envy at a photo session. That’s because my only concern is for my subject.

How do you know for sure that you have photo envy?

Admiring another photographer’s work and aspiring to be as good as them is not envy. It’s natural to be captivated and inspired by other people who are better than you.

You’ll know photo envy by its tell-tale effect on your emotions.

The test is simple: if you take an immediate emotional turn for the worst when you see other people’s good photography, then you suffer from photo envy.

You probably first noticed your photo envy while scrolling through social media. A really good photo posted by a friend or another photographer took you by surprise. You felt a terrible sinking feeling in your gut and chest. You’re jealous.

Perhaps you regularly have beaten up by thoughts of inferiority, or even felt hopeless or like crying? You wonder how they can be so skilled, and why they’re getting all the attention. You think, “when will I finally get noticed.” What does it take?

The stakes

You’ll be tempted to think that simply becoming a better photographer or getting more business is the solution to your photo envy. But it’s not.

Envy is a weakness within yourself and the only way to cure it is to face it directly. And you must overcome photo envy before you become a good photographer.

If you don’t overcome envy before you become a better photographer, you’ll simply become a good photographer with a harmful weakness. You’ll naturally take out your resentment on other photographers, not to mention your friends and family.

overcome photo envy

Even though I don’t think about photo envy during a session, I know the next time I’m on social media, I’ll see a photographer’s amazing photos and feel envious again. So I employ my regular tactics to defeat photo envy.


How do you overcome photo envy?

You don’t have to be jealous, inferior and resentful forever. Follow this plan, and you will overcome photo envy.

Envy is something that needs to be overcome in the moment. Remember, you’re good at spotting moments as a photographer!

Here is how to overcome photo envy.

The very second you feel envious of somebody’s photography, stop what you’re doing. Stop scrolling, stop clicking and stop thinking about yourself. Now get ready because you’re about to tell the photographer how much you love their photos.

Whether you’re envious of a friend or a competitor, you need to send them a personal message immediately. Do not put it off for later. Simply send them a message letting them know how much you enjoy their photos. After all, the reason you’re envious is that they’re so good.

If you’re not sure what to say then try something like this:

Hi there, I just wanted to tell you how amazing I think your photography is! Your images never fail to wow me. How long have you been into photography?

Overcoming photo envy is that simple.

overcome photo envy

I know that becoming a more skilled photographer isn’t enough to deal with my photo envy. Becoming a better photographer out of spite isn’t a good game plan.

Be a better person and a better photographer

Why does this method work so well? Because you’re retraining yourself to be a good person. Envy has become automatic when your response should have been admiration and encouragement.

When you tell the person how much you love their photography you will notice the feeling of envy leave your body and good feelings will flow in to replace it. Just wait until they write back and compliment you.

Every time you’re scrolling through Instagram, Facebook, Pinterest, etc and you feel envious, send a personal note right away telling them how much you like their photography. Pretty soon you’ll be an encouraging person rather than an envious one.

But you can take all this a step further.

overcome photo envy

With my photo envy under control, I’m free to pursue my goal of becoming a better photographer. When I go to a session, I have a toolbox of creative elements that I use. I’ve memorized them so I don’t have to overthink it. I can focus on my subject and know that I’ll get home with some good photos.

Lead the locker room

Telling the person (especially competitors) how much you love their photography is the key to overcome photo envy.

But you can do better than “not be envious.” You can become a generous leader among photographers.

overcome photo envy

Backlight is one of my favorite creative ingredients.

Let’s think about a locker room for a moment. You likely experienced a locker room or a change room in high school, so you know what a humiliating experience it can be. Inferiority and envy can run wild and then spill out beyond the locker room.

If you follow sports, then you hear about the rivalries in the locker room and how it can bring the whole team down.

But when somebody steps up to lead the locker room in a good direction, everything changes. When somebody is an encourager and a problem solver, then envy and rivalry burn out. If anyone chooses to remain miserable and envious, they quickly lose their place in the locker room, they’re ignored until they’re just gone.

overcome photo envy

I always look for some interesting gesture in the moment.

Now let’s get back to the world you’re a part of. Would you like to be an important part of your photography community rather than just sitting home and feeling jealous about how everyone else is doing? Then step up and lead the locker room.

Be the encourager in online forums and Facebook groups. Start an in-person group to help new photographers or unite photographers that act like competitors.

I don’t mean that you have to be a traditional leader. You just need to bring order to the chaos. Pump out positive energy and watch it chase envy and rivalry away. A simple compliment from you might be what helps another photographer overcome their photo envy.

By this point, there isn’t a shred of envy left in you. You are happy to see others do well. In fact, you even start making others look good.

overcome photo envy

Lower angles make everything look more dramatic.

Make another photographer look good

Be a shameless promoter of others. Look for good photographers and share them with the world.

It could be as simple as showcasing them through a guest post on your blog or social media.

But how can you make your competition look good and expect anyone to remember you? You simply have to trust that when you make others look good you will not be forgotten.

Envy can’t touch you when you do this.

overcome photo envy

Along with backlight and low angles, I love a photograph with texture. This helps your photo to pop.

Up your game every step of the way

We’ve almost forgotten about your real goal, which is to become a great photographer. That’s actually the easy part! You figure out what you wish you could do and learn it!

Find an ebook, course, or mentor who can show you. Learn, practice, refine, celebrate.

I used to be jealous of photographers who had beautiful light in their photos. I had no idea how to achieve that look and didn’t know what to do about it. Eventually, I had an opportunity to learn the skills I was surprised to see that there was no magic involved; all I had to do is learn.

overcome photo envy

When possible, look for a frame within a frame.

You’re on a journey of becoming a better photographer, but pay attention to who you become along the way. Becoming a better photographer will not make you less envious. You can let photo envy take root and bring you down. Or, you can overcome photo envy by being an encouragement to others. Lead the locker room and make a lot of other photographers look good.

Whenever you feel a twinge of jealousy, get in touch with that photographer and tell them how great their photos are. This is how you overcome photo envy.

Do you have any other tips to overcome photo envy? If so, share them with us in the comments!

The post How to Overcome Photo Envy and Become a Better Photographer appeared first on Digital Photography School. It was authored by Mat Coker.


Digital Photography School

 
Comments Off on How to Overcome Photo Envy and Become a Better Photographer

Posted in Photography


The One and Only Thing That Will Make Your Photography Better

29 Nov

The post The One and Only Thing That Will Make Your Photography Better appeared first on Digital Photography School. It was authored by John McIntire.

make-your-photography-better

This is a fantastic time to be getting into photography.

Even if you don’t take into account the wonderful array of options you have for equipment and the like, there is an enormous amount of information available at the click of a button to anyone who wants to learn any kind of photography. There are millions (I’m sure) of written and video tutorials that you can access at a moment’s notice with a device that you keep in your pocket. There is also a huge number of courses, books and real-life photographers offering tuition and workshops all over the world. I do feel this abundance is a great thing for photography as a whole.

However, this abundance comes with a subtle trap. When fallen into, it can hinder your progress and growth as a photographer.

make-your-photography-better

With a wide array of techniques, equipment and possibilities available, now might just be the best time to start learning photography.

The trap

It’s easy to spend time consuming content and learning new things. Some outlets, like Youtube, are designed to keep you consuming for as long as possible – and long after you watched what you intended to in the first place.

The problem is, when you go from tutorial to tutorial consuming information indiscriminately, you are only part-learning it. Sure, the theory is important, but knowing something isn’t the same thing as being able to do it.

It’s also easy to sit and think about photography and what you can do with all of the information that you have accumulated.

Image: You can read about black and white conversions all you want, but until you actually put that...

You can read about black and white conversions all you want, but until you actually put that information into practice, it’s just that: information. It’s not yet a skill.

What isn’t so easy is the most important step. Reading about and thinking about photography is great, but neither one is actually photography. Putting all of that information to use is the difficult part. It’s the one thing I see people struggle with consistently (myself included at times). Boiled down, it’s basically the same thing as lusting after and buying that fancy, expensive lens, but then never using it.

Break the cycle

The cycle goes like this:

Read/watch a tutorial — think about it a bit — read/watch another tutorial — think about it a bit — rinse, lather, and repeat.

When you get stuck in a loop like this, you’re only doing half the job of learning something new. Unless we’re talking about something really easy like where the shutter release is on your camera and how to use it, most things require actual practical experience to learn properly.

Take something like Rembrandt lighting.

Sure, you can read a tutorial and know that your light source should be at a 45-degree angle to the side of your subjects and 45 degrees above and pointed down. However, if you get something like that right on the first try, there’s more luck involved then anything else.

Techniques like this have a lot of nuances that are not very easy to infer without practical experience. Many factors can interfere with getting them right that you might not be able to read about, meaning you have to figure it out for yourself.

make-your-photography-better

In this example, I had a new modifier to figure out. To do so, it was a matter of trying it at various angles and positions to see what it did and didn’t do.

The new cycle I would propose looks a bit like this:

Read/watch a tutorial — think on it — act on it — evaluate — alter — evaluate.

Keep going like this until you feel that you have a complete understanding of whatever it is you are trying to learn.

Going back to the Rembrandt example, if you’ve read a tutorial and took some time to figure out how to implement it, you could then set up a practice session and put what you’ve learned to the test.

Once you’ve tried it, you can evaluate the results.

Let’s say that the triangular highlight that appears on the shadow side of the face with Rembrandt lighting isn’t quite right.

Here you would identify that problem and then try to figure out why it has happened that way. Then you would try the technique again and again until you’ve sorted that out, and you have images with perfect Rembrandt lighting.

Image: Once you’ve figured out one technique, you can now try to break it. Add things flags an...

Once you’ve figured out one technique, you can now try to break it. Add things flags and reflectors and fill lights one step at a time as I did with the same modifier in the previous example.

You shouldn’t stop here though. Continuing with Rembrandt: now you can start to experiment and add to it.

What does the setup look like if you add a reflector?

How does it look if you add a fill light or a hair light?

What does it look like when you have your subject move into a different position?

make-your-photography-better

Taking incremental steps like these will help ensure you learn everything you want to more thoroughly.

Going through questions like these with practical, incremental experience will not only help you to learn faster but will help you to learn more thoroughly. Also, because you have intentionally tried a variety of things that probably don’t work, once those scenarios come up in the real-world application of your new skills, you will be able to identify and fix those problems immediately.

Every aspect of photography

Image: This concept encompasses every aspect of photography. From basic camera craft to lighting and...

This concept encompasses every aspect of photography. From basic camera craft to lighting and to post-processing. Focusing on one skill at a time is the fastest way to learn.

It doesn’t matter if the technique in question is a lighting pattern, using different metering modes, manual focus, or post-processing techniques. The process is the same.

Learn it. Use it. Master it.

One thing at a time

If you want to learn as much as possible in photography, there is no set order in which you do things. I do suggest, however, that you only do one thing at a time.

Early on, things will be easy (like learning where the basic controls of your camera are, how to focus, and using manual mode) and won’t take much time. If you focus on each of these basic skills in isolation, you’ll probably find that they all mesh together a lot easier. Then, before you know it, you will be tackling much more complicated skill-sets and techniques.

That said, the most important thing of all is that you need to do your best to get out and practice.

The post The One and Only Thing That Will Make Your Photography Better appeared first on Digital Photography School. It was authored by John McIntire.


Digital Photography School

 
Comments Off on The One and Only Thing That Will Make Your Photography Better

Posted in Photography


DPReview TV: Why electronic image stabilization works better on your GoPro than your camera

21 Nov

Have you ever looked at your smartphone or GoPro and said, “I wish my camera could stabilize an image like that?!” Chris explains the limits of electronic image stabilization, and why your camera probably can’t stabilize like that.

Subscribe to our YouTube channel to get new episodes of DPReview TV every week.

  • Introduction
  • What is electronic stabilization?
  • The effect of shutter speed
  • The effect of rolling shutter
  • The effect of frame rate
  • Conclusion

Articles: Digital Photography Review (dpreview.com)

 
Comments Off on DPReview TV: Why electronic image stabilization works better on your GoPro than your camera

Posted in Uncategorized


Creative Photography Exercises: Setting Limitations to Achieve Better Photography

19 Nov

The post Creative Photography Exercises: Setting Limitations to Achieve Better Photography appeared first on Digital Photography School. It was authored by Ana Mireles.

creative-photography-exercises

Every photographer can feel stuck at some point. I find this often happens when you have learned all the technical basics, and it’s time for you to start finding your way. Is this you? Here are some creative photography exercises than can help you shake things up. Keep on reading to see how setting limitations can help you to achieve better photography.

Creative photography exercises

Have you ever been to a restaurant that has a huge menu but you can’t decide what to order? The same thing can happen with your photography. Having the ability to photograph anything can seem daunting. That’s why setting limits before you start shooting can help you focus.

Creative photography exercises

You can set a limit regarding the idea or project you want. In this photo, I decided to limit my idea to fruits as a topic. You can also limit the tools and techniques that you can use – for example, using long exposure times. Here are some creative photography exercises to get you started.

Technical Limitations

Use only one focal length

As you probably know, there are zoom lenses and prime lenses. A zoom lens means that you can change your angle of view in seconds, which gives you great versatility. A prime lens has a fixed focal length, and this will force you to move around and re-compose your images.

Creative Photography Exercises: Setting Limitations to Achieve Better Photography

If you don’t have a prime lens, use your zoom but choose a focal length and stick with it for the entire exercise. Here I used an 18-55mm and put some tape as a reference on 40mm. This doesn’t mean that you can’t use both lenses, it’s just a way for you to practice without buying new gear.

Think in terms of film photography

Pretend you’re using a film camera and set yourself a limit of 12, 24 or 36 images that you can use. I suggest these numbers because film rolls were sold like that, but feel free to set a different limit without overdoing it. This will push you to put more thought into the final image before you press the shutter button.

Creative Photography Exercises: Setting Limitations to Achieve Better Photography

If you want to make it more challenging, try only using the viewfinder and not reviewing your images after shooting. Not having the chance to delete images in order to stay within the maximum amount gives you that extra push.

Project Limitations

Ride the bus

This is a fun project because you can approach it in many different ways. For example, you can choose to photograph the street while riding the bus or the metro. This takes away much of your control over the scene in front of you. You also have to deal with motion and reflections. And most of all, you have to react quick before you’re gone.

Creative photography exercises

You can also choose to photograph the inside of the vehicle. This is very close quarters so it will help you to overcome shyness. It is also challenging to compose and focus on short distances. So you may want to explore a wide-angle lens if you want to capture the full scene. The light probably won’t be very bright so you may need to bump up your ISO. Combined with the fact that you’re moving, you may find it challenging, but give it a try!

Always shoot at the same time

Program an alarm on your phone to remind you to take a picture exactly at the same time every day. If you have a routinary life, it will challenge you to shoot the same thing or place differently. If you have a flexible schedule, and the time, you will find yourself in different places, where you’ll have to deal with a variety of challenges each time.

Creative photography exercises

Either way, it will kick start your creativity. This image, for example, is only the heater from my studio. Try looking for different angles, play with lighting, etc.

Conclusion

These are just some ideas for creative photography exercises. Feel free to create your own according to your interest, gear and even the place you live. You just need to follow the same rule of establishing some guidelines as limitations to strengthen your abilities and creativity. I’ll leave you here some other articles that can give you more ideas:

  • Expand Your Creativity by Taking Self-Portraits.
  • An Apple a Day Keeps Creativity Awake.
  • How to Boost Your Creativity by Including Props in Your Photography.
  • How to Reboot Your Creativity with 15-Minute Exercises.

Feel free to share any other creative photography exercises in the comments. And, as always, we love to see your images, so try some of these techniques, and share your images below.

The post Creative Photography Exercises: Setting Limitations to Achieve Better Photography appeared first on Digital Photography School. It was authored by Ana Mireles.


Digital Photography School

 
Comments Off on Creative Photography Exercises: Setting Limitations to Achieve Better Photography

Posted in Photography