RSS
 

Posts Tagged ‘Better’

How to Choose Your Camera Angle to Take Better Portraits

18 Sep

Taking portraits involves so many variables that it can feel overwhelming for a new photographer. What lenses do you use—zoom, prime, or a mix of both? Do you shoot full-frame or cropped sensor? Will you shoot indoors or outdoors. Even the subject matter can be tricky, with some portrait photographers working exclusively with families, others who only shoot high school seniors or newborn babies, and still more who do a mix of everything.

all-about-angle-husband-wife-outdoors

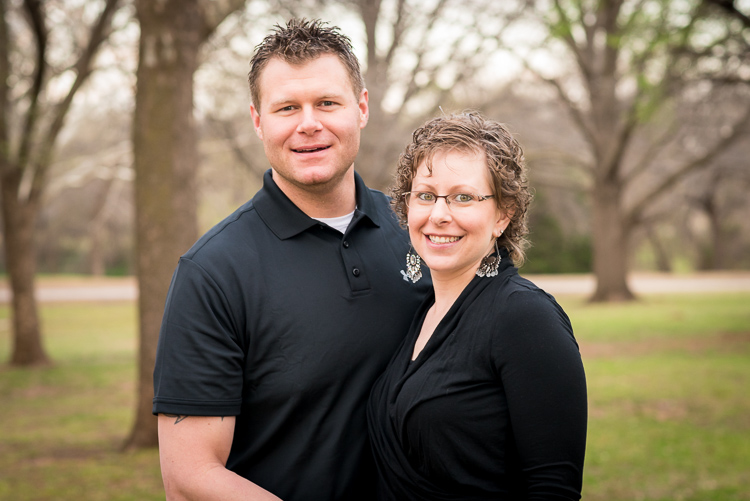
Nikon D750, 85mm, f/4, ISO 900, 1/250 second

While you are pondering all these variables it can be easy to lose sight of the forest for the trees and forget about a few key basics such as posing and lighting, and no matter what style of portraits you choose to pursue there is one thing that always comes into play which may not seem obvious: the camera angle from which you shoot. This can make all the difference between happy clients and complaining customers. Understanding how you can use camera angles and points of view can greatly enhance any portrait session.

Point of view – up high or down low

Understanding how your camera angle, or point of view, can affect your shots will go a long way towards improving not just your portraits, but your photography in general. How you position yourself in relation to your subjects can have a dramatic effect on the resulting pictures. As an illustration of how this works, here are two pictures of a family from a recent home-based session I did. Both show a very similar scene, and yet the different angles from which I shot them results in two vastly different images.

all-about-angle-family-indoors-low

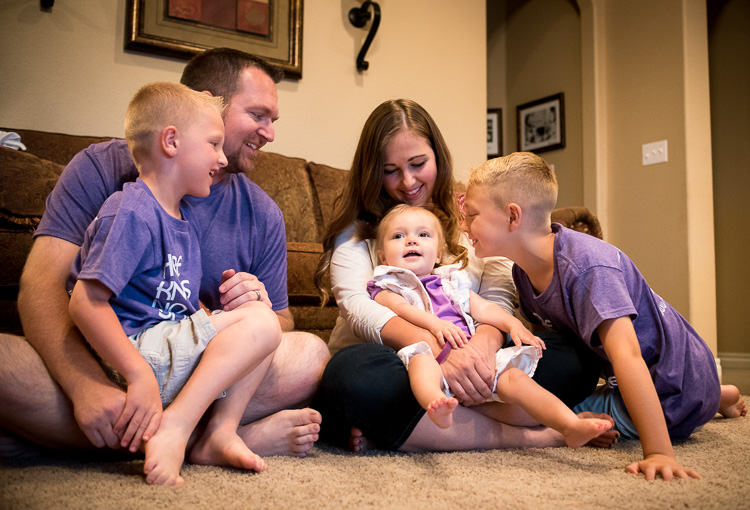
Nikon D750, 35mm, f/4, ISO 5600, 1/90 second

As I shot the image above I was very low to the ground. Crouching down on my hands and knees, I got very close physically to the family while the mother and father watched the boys play with their sister. It feels like the viewer is part of the scene, right there with them as they all share a fun moment together. This is entirely due to the low angle from which the picture was shot. Now take a look at virtually the exact same scene but shot from high above.

all-about-angle-family-indoors-high

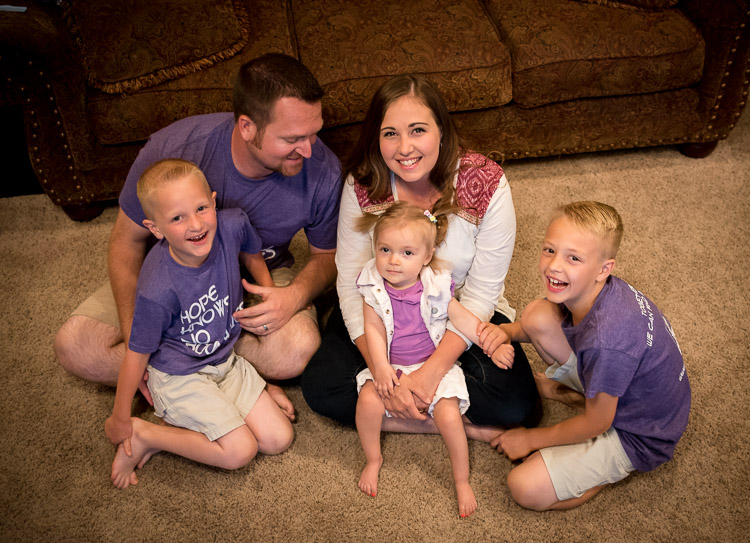
Nikon D750, 35mm, f/4, ISO 3600, 1/90 second

To get this picture I grabbed a dining room chair and stood on it to get a shot from a much higher angle. The result is a picture that feels quite different from the first one. It doesn’t seem like you are a part of the scene, but an outside observer looking at the family as they gather together.

While I like both images, each one creates a very different emotional response on the part of the viewer. Even though both were shot with the same camera and lens, at the same location, with the same subjects, the result is two pictures that are vastly different from one another all because of the angle from which they were taken.

Even subtle changes make a difference

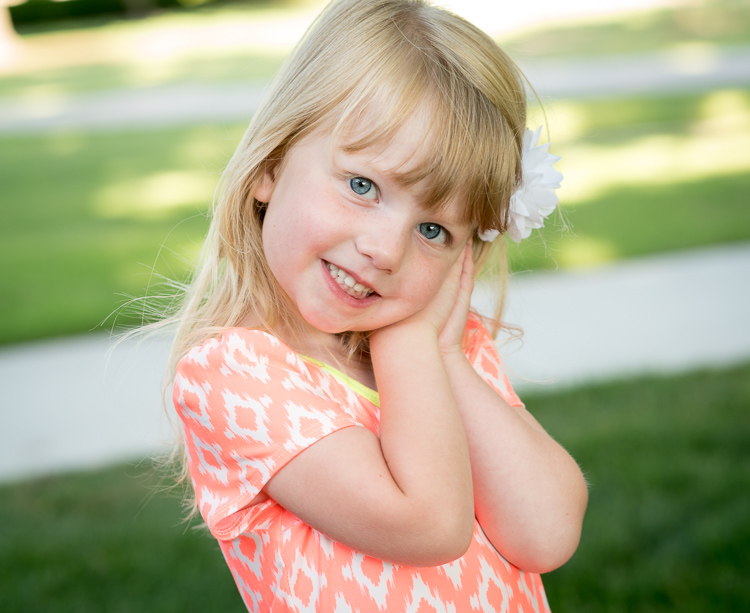
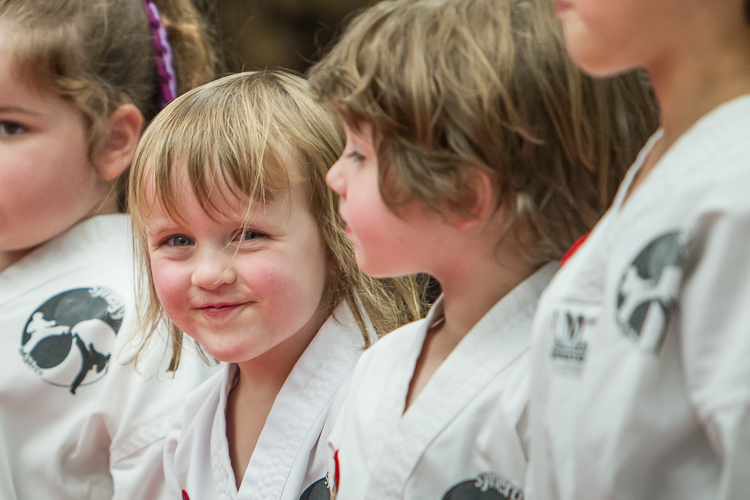
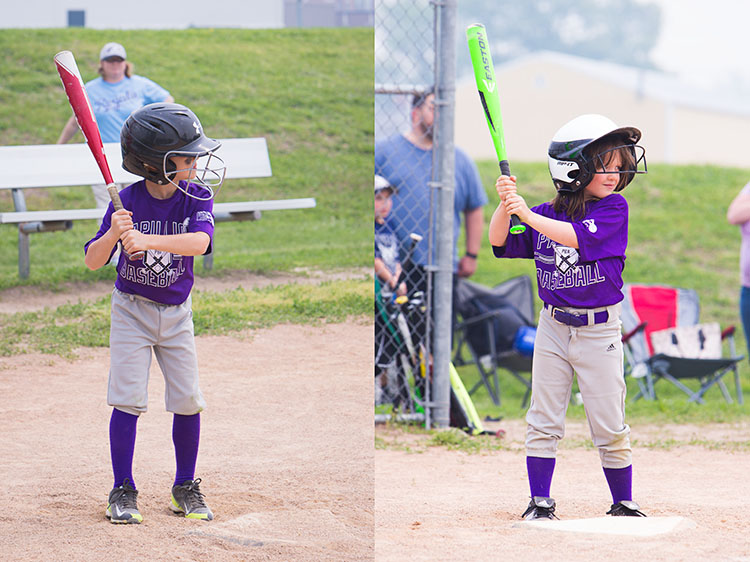
You can see a similar, but more subtle, effect in this pair of portraits I took of a young girl near her birthday.

Shot with a Nikon D750 and 85mm lens.

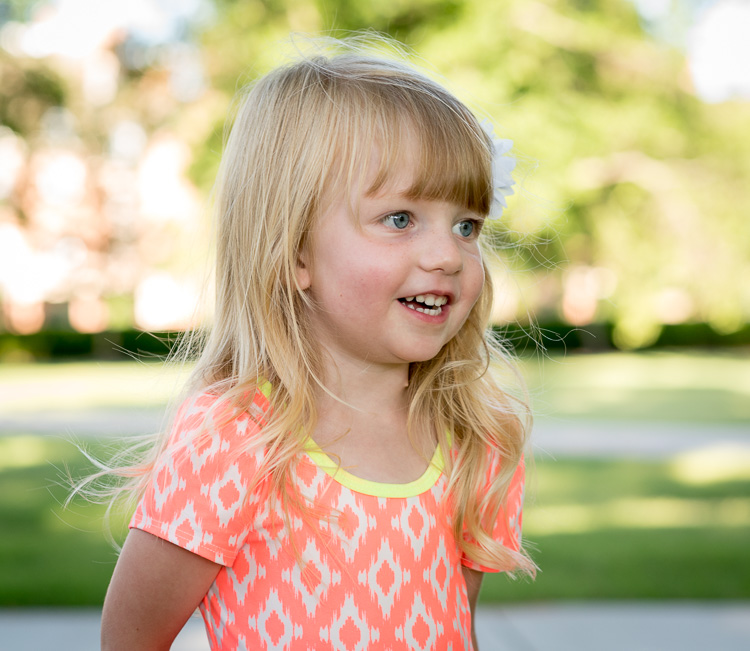
Nikon D750, 85mm, f/4, ISO 800, 1/500 second

The angle here isn’t as low as the first one of the family, but it’s low enough to be on the girl’s eye level. To get this I had to kneel down and stand a few meters back as her mother talked with her from my right-hand side. It gives a similar sense of intimacy as the first picture of the family and feels as though the viewer is near the girl and part of the scene.

This changes a bit when the girl is shot from an adult’s eye level looking down (below).

all-about-angle-child-playing-high

Nikon D750, 85mm, f/4, ISO 560, 1/250 second

While the effect here is not as dramatic as the example with the family, you will still note a similar result in terms of emotion and tone. Instead of getting down on eye level I shot this while standing up about the same distance away. It doesn’t feel like you, the viewer, are a part of the scene and instead it seems like you are merely an observer. Notice how the sidewalks in the background cut across the frame at odd angles whereas in the first one the sidewalks neatly cross in horizontal lines, adding a subtle touch without being too obvious or gaudy.

Once again I don’t think either picture is necessarily better or worse, but both are quite different as a result of the camera angle.

Kids – break the rules

This is, incidentally, one of the most common issues I see with people who are taking casual snapshots of their kids, whether with a fancy DSLR or just their mobile phone. Taking a few seconds to crouch down and get on eye level with the children can make all the difference in the world between an intimate moment frozen in time, and a boring snapshot.

However, I don’t want to give the mistaken impression that shooting from a high angle is necessarily a bad thing. It can be a very good thing indeed, and quite effective when used intentionally, such as this image of a girl with her two-week-old baby brother (below).

Shot with a Nikon D750 and 50mm lens.

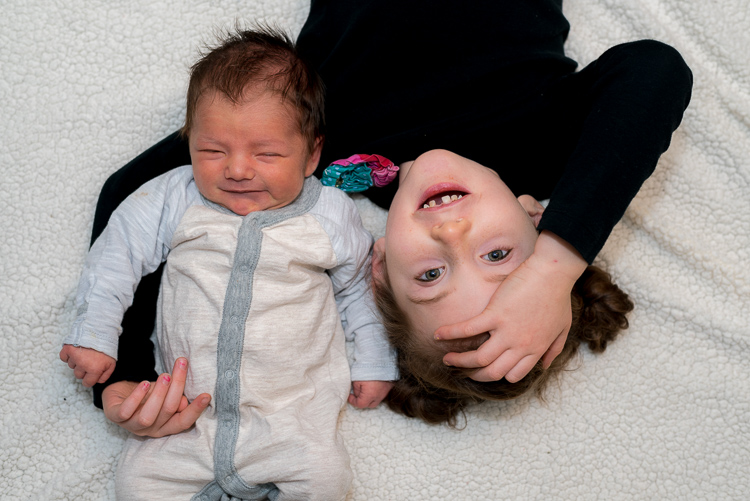
Nikon D750, 50mm, f/4, ISO 400, 1/125 second

This picture was a bit tricky, but the results were well worth it. I was doing this on location in the family’s home so I didn’t have a lot to work with, but I wanted to get something a bit unique. I put the two kids on a blanket on the floor, got a chair to stand on, and positioned myself directly above them while bouncing my flash off the ceiling.

It resulted in an image that feels more fun and playful as if the viewer is peeking in on a fun moment between the two siblings. The equipment here was nothing all that special (I could have just as easily used my old D7100 and 35mm lens to get the same shot) but paying attention to the angle made for a picture that stood out quite a bit from the rest of the image I shot that day.

Other camera angles to consider

Sometimes finding the right angle involves something as simple as choosing where to put yourself in relation to your subject, not necessarily whether to shoot from high above or down low. You can see this in the example below. After an hour of taking a variety of traditional portrait-style

After an hour of taking a variety of traditional portrait-style shots, I stood back while the family walked back to their car and took some pictures with the sunset casting a warm glow through the trees above.

Shot with a Nikon D750 and 85mm lens.

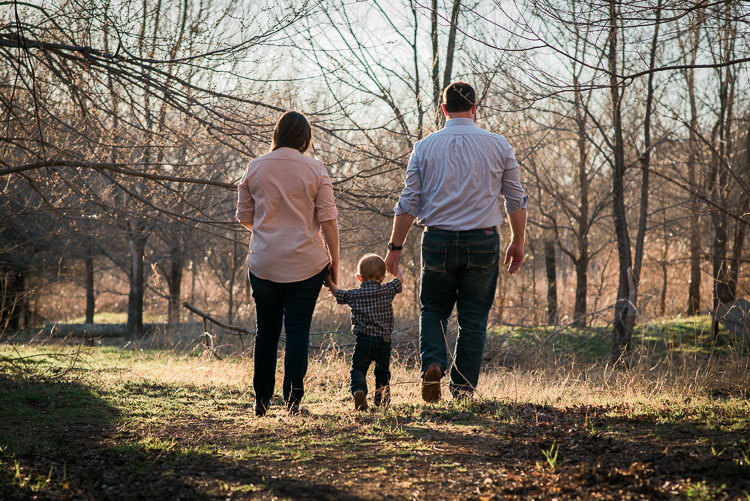
Nikon D750, 85mm, f/4, ISO 180, 1/400 second

There are some elements that I could do without, such as the tree branches coming from the left-hand side. But overall the picture feels warm, cozy, and conveys a sense of comfortable intimacy as if I have captured the family in a quiet and sincere moment. It puts you, the viewer, as an outside observer to the scene and almost feels like you are watching from afar as the family shares a special time together.

This is in stark contrast to the next picture, which despite being at a different location is composed in almost exactly the same manner except for one variable: the angle.

Shot with a Nikon D7100 and 85mm lens.

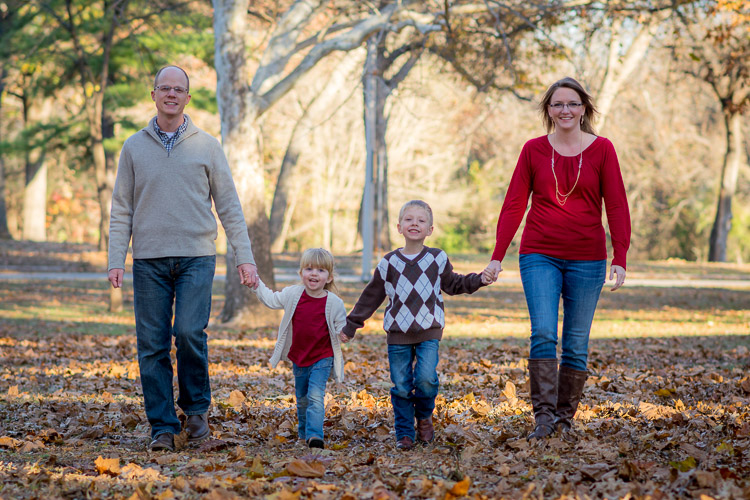
Nikon D7100, 85mm, f/2.8, 1/250 second, ISO 100

This picture feels like it’s full of energy, excitement, and enthusiasm as the family holds hands and walks towards me. I like both pictures quite well, but changing the angle resulted in two images that are vastly different from one another.

Summary

Hopefully, these examples give you an idea of how your camera angle and point of view can dramatically affect the types of portraits you take. If you are looking to try something new and kick your photography up a notch without spending any money on more gear, try doing something as simple as changing your angle and see what happens.

In fact, this now makes me wonder about your favorite tips and tricks for shooting portraits at different angles. Leave your thoughts in the comments below, and feel free to share pictures as well!

googletag.cmd.push(function() {
tablet_slots.push( googletag.defineSlot( “/1005424/_dPSv4_tab-all-article-bottom_(300×250)”, [300, 250], “pb-ad-78623” ).addService( googletag.pubads() ) ); } );

googletag.cmd.push(function() {
mobile_slots.push( googletag.defineSlot( “/1005424/_dPSv4_mob-all-article-bottom_(300×250)”, [300, 250], “pb-ad-78158” ).addService( googletag.pubads() ) ); } );

The post How to Choose Your Camera Angle to Take Better Portraits by Simon Ringsmuth appeared first on Digital Photography School.


Digital Photography School

 
Comments Off on How to Choose Your Camera Angle to Take Better Portraits

Posted in Photography


Canon applies to patent double-sided micro lenses designed for better edge performance

23 Aug

Canon engineers have developed a new design for the micro lenses it uses on imaging sensors that it claims will reduce vignetting and false coloration at the edges of the picture. The new designs have a bi-convex lens that uses the upper surface to collect light and the lower to channel the light more effectively to the photodiode. The patent application shows the lower face of the micro lenses with a convex surface featuring an off-center vertex. Canon says these would be placed at the edges of the sensor to direct light approaching from a steeper angle. The idea is to direct more of the light toward the photodiode than can be achieved with standard single-micro-lens designs.

As pixels have depth it can be difficult to channel light from the camera’s lens down the ‘well’ to reach the photodiode unless it approaches straight-on. When a pixel is positioned at the edge of the sensor array it becomes more difficult because light approaches from an extreme angle and can miss the photodiode, as the refractive index of the micro lens isn’t high enough to bend it directly down the well. Since certain colors experience different refractive indices, some wavelengths of light don’t make it to the photodiode either. Thus, pixels outside the central area can report less light – and false colors – compared to those in the middle of the sensor.

Canon’s new dual micro lens design aims to take more control of the light as it enters and exits the micro lens, and to channel it in a more vertical direction down the well so that less is lost. This should in theory improve both vignetting and false coloration nearer to the edges of the image.

For more information see Canon’s full patent application.

Extract from the patent:

The lower surface 102 of the microlens 103 has an asymmetrical shape with a position nearest to the photoelectric conversion device 104 (a position at which the thickness from a center plane 130 of the microlens 103 is the maximum) shifting from the center position of the microlens 103 to the central side of the pixel array 110A. The lower surface 102 of the microlens 103 has a convex shape with respect to the photoelectric conversion device 104.

Each microlens 103 is formed from a material having a higher refractive index than a material in contact with the lower surface 102 at a position between the microlens 103 and the photoelectric conversion device 104. The microlens 103 is formed from, for example, a color filter material.

The upper surface 101 of each microlens 103 has a convex shape with respect to the incident side of incident light. The incident light 111, incident light 121, and incident light 131 entering the microlens 103 from the same direction as that of the straight line 115 each are refracted by the upper surface 101 of the microlens 103 and focused onto the photoelectric conversion device 104. In this case, if the upper surface 101 of the microlens 103 lacks in refractive power with an increase in curvature radius, the lower surface 102 of the microlens 103 compensates for the refractive power to cause the incident light 111, 121, and 131 to enter the photoelectric conversion device 104. At this time, the refractive power of the lower surface 102 of the microlens 103 is larger than that of the upper surface 101 of the microlens 103. As described above, the microlens 103 can focus incident light onto the photoelectric conversion device 104 by using the upper surface 101 having a convex shape extending upward and the lower surface 102 having a convex shape extending downward with respect to the center plane 130.

Articles: Digital Photography Review (dpreview.com)

 
Comments Off on Canon applies to patent double-sided micro lenses designed for better edge performance

Posted in Uncategorized


6 tips for better wildflower photos

15 Aug

Tips for better wildflower photos

Shooting wildflowers can be an intimidating endeavor, especially if you’re looking to capture grand scenes and vistas. Navigating the crowds, finding the perfect composition and nailing the shot can all be overwhelming. But it doesn’t have to be that way – in this article I’ll help you navigate these challenges so you can enjoy the experience and make the most of peak wildflower season.

Choose the right gear for the job

This isn’t a one-size-fits-all gear list as it really depends upon how much hiking you have to do to get to your desired location. That being said, I’ve highlighted some of the most important items from my kit in this list.

  • Tripod: A sturdy tripod is a must if you plan on focus stacking, it also comes in handy if your shooting in conditions that require slightly longer shutter speeds.
  • Lenses: When I’m out shooting wildflowers I always try to cover a focal length of 16-300mm. The majority of my compositions fall in the 16-35mm range, but you never know when you may want to snap an abstract shot or try something new when you’re out in the field.
  • Headlamp: You may not plan on staying out late, but loosing track of time while shooting an amazing sunset is very easy to do.
  • CPL: The sky in your composition will benefit a great deal from using a circular polarizer and the vegetation’s rich colors will be brought out as well.
  • Bug/Bear Spray: This may sound trivial but if you’re shooting anywhere in the mountains this is a must. Watch out for ticks as well when you’re out shooting. Bears aren’t always an issue, but in certain areas they can be a problem so it’s definitely best to check trip reports and stay well informed.
  • Well stocked backpack: A camera backpack or your favorite hiking backpack with a first aid kit, water, extra batteries, wireless remote, cleaning cloths, tripod tools, extra layers (Gortex jacket etc.) and snacks is a must. Anytime you go hiking it’s a great idea to be prepared for anything in the field.
  • Maps/GPS: I always bring a map or a guide book in addition to a GPS unit with me to areas that I’m not familiar with.

Check flower reports and scout locations

Before heading out into the field I always make sure to scout out locations and check on the condition of the flowers I’m intending to photograph.

  • Check local wild flower reports online – hiking trip reports are great places to look for wild flower updates
  • Aim to photograph the flowers when they are just starting to peak; this is where checking reports pays off. Staying slightly ahead of the curve will ensure that you will be able to photograph the flowers when they are looking their best.
  • Talking with other local photographers is a great way to network and to get an idea of what the flower shooting conditions are like in your area of interest.
  • Scout your location to determine what areas are best for sunrise, sunset and day/night time shooting. Figure out how many miles you’ll be hiking and plan accordingly.
  • Remember to give yourself plenty of time to drive to your location, hike in, take photos and hike out.
  • Mark the areas that you’re interested in shooting on a map or set waypoints on a GPS to give yourself a guide of sorts to roughly follow while you’re out in the field.

Find your composition

Choosing your composition can feel like a tricky task – especially with the added element of flowers thrown into the mix. Here are some helpful tips that can make the process a bit less overwhelming.

  • Look for flowers just approaching the peak of their bloom: once you have found a nice patch of flowers make sure that they can be incorporated into your composition effectively.
  • Add depth through layers: flowers can add a really nice foreground element to your photo so try to fill the lower 1/3 to lower 1/2 of your frame with them to give your photo lots of FG interest and depth. Focus stacking is one way to achieve this look.
  • Let the flowers be your leading line: sometimes nature can provide you with nice patterns and colors to lead your eye through the frame to your focal point. Look for flowers that can provide that ‘line’ to your focal point or that offer depth through layers.
  • Don’t let the conditions dictate whether or not you choose to go out and shoot: shooting in foggy and challenging weather conditions can offer up some amazing and unique results!
  • Shoot in both landscape and portrait orientations: don’t get too set on one composition, move around and experiment! This is something that I have to continually remind myself to do.

Get creative: go abstract

When you find yourself surrounded by fields of gorgeous flowers it’s very easy to become overwhelmed and bogged down by the seemingly endless photographic possibilities. Finding abstract compositions requires some work, but the results can be very rewarding.

  • Take a step back and look for subtle opportunities to photograph the flowers and vegetation themselves.
  • Look for different kinds of texture and layering in the vegetation.
  • Let the plants and flowers become your composition.
  • Look for natural leading lines, patterns, curves and turns in the plant life.
  • Pay attention to complementary colors and patterns as color can add a great deal of interest to your photo.

Etiquette

This isn’t something that’s discussed very often in landscape photography, but I think that it’s especially applicable for this type of shooting.

  • Show up early and find your composition: One of the biggest issues that I see in the field is dealing with people fighting for compositions. If another photographer was there before you, then respect their space and look for different compositions. Remember that a wide-angle lens covers a lot of real estate, so keep that in mind when looking for alternative compositions. Get there first and you will be rewarded with lots of options for outstanding compositions.
  • Respect the Flowers: This almost goes without saying, but never pick the flowers and move them to improve your composition – this happens more often than you would care to believe. Also, take care not to sit on or trample the meadows when composing your shot(s).
  • Tread Lightly: Chances are that if you’re shooting wildflowers you will find yourself off trail at some point. Follow game trails and stick to paths that have already been well traveled. Never create your own trail through a meadow unless you have no other options and always tread lightly. These areas have very fragile ecosystems and see a great deal of foot traffic, so it’s important to practice sustainability.
  • Leave No Trace: Surprisingly this is still a huge issue. The bottom line is; if you pack it in, pack it out – don’t leave anything behind.

Articles: Digital Photography Review (dpreview.com)

 
Comments Off on 6 tips for better wildflower photos

Posted in Uncategorized


Using a Flat Picture Style for Better Finished Images

13 Aug

During my career in photography, I’ve continued to evolve, both my shooting and editing styles, to achieve the results I wanted. Several years ago, while working with film editors on a cinema project, I came across a concept that I decided to apply to my own photography, and I have to say, it has improved my final images a great deal. Let me explain about using flat picture styles.

Finished-Image

When Hollywood studios film a movie using a digital cinema camera, many times the camera will be set to record what is known as Log Gamma. This is similar to the picture styles that we DSLR and camera users have come to know and love. But while picture styles or picture controls are for the most part intended to provide a finished look, Log Gamma does just the opposite. A video file shot using Log Gamma will be very flat, with little contrast and color saturation. The purpose of shooting video this way, is so that it retains as much information as possible about the range of tones in the image, so the colorists who work on the video later can bring out that detail, and create a visual look to the film. This process is called color grading.

As I began to understand what the colorists were doing, I adjusted my workflow to allow me to take advantage of the same concepts. I find that by using a flat, low contrast, low saturation picture style, when I process the RAW file I can bring out better detail and contrast, and avoid clipping in the highlights and shadows.

Choosing a Flat Picture Style

Before Image With Histogram

A flat or neutral picture style will give you an image with the least contrast, maintaining better highlight and shadow detail. This allows you to bring out those details in processing. The histogram on your camera, and later in Photoshop or Lightroom, allows you to see where your highlight and shadow tones fall, to avoid clipping.

I had been shooting RAW for some time, but have left the Picture Style set to Standard or Landscape, for the most part. Once I saw this technique, I decided to change my picture style on my camera to Neutral (for Canon cameras) or Flat (on newer Nikons).

Canon Picture Style

Canon Picture Style

The reason is that the histogram shown on the back of the camera, as well as the image preview, reflect the selected picture style. The result is that if the picture style selected is a more contrasty one, such as Landscape, the histogram will reflect that, and may indicate clipping of highlights or shadows, especially in a contrasty scene.

Clipped Histogram

This histogram shows clipped highlights, meaning detail is lost in the brightest areas of the image.

On my Nikon D810, I use the Flat picture control, because it is the best choice for capturing the full range of tones in the scene, and those tones are reflected on the histogram on the back of the camera when I review the shots. This is important because I need an accurate indication of where the highlights and shadows in a scene fall in my histogram.

Nikon 810 Flat Picture Control

Nikon 810 Flat Picture Control

Nikon picture control

Nikon picture control – if you do not have Flat, choose Neutral or Faithful

The histogram on your camera is a graphed indication of where the pixels in your image fall in relation to highlights and shadows. The left edge represents blacks, the mid-left represents shadows, the middle is midtones, the mid-right is highlights, and the far right is whites. While not all cameras have a Flat picture control or style, most have a Neutral or Faithful picture style or control, that works similarly. Also, most cameras give you the ability to edit the picture styles, so you can turn down the contrast if you like, ensuring that you capture more highlight and shadow detail, and reducing the chances of clipping highlights or shadows.

When you clip highlights, objects in the scene that are clipped will show as pure white with no detail. When shadows are clipped, objects in those areas will show as pure black in the scene, also with no detail. When viewing the histogram, if the squiggly lines that make up the graph are pushed up against either the left or the right side, that is called clipping. When that happens, you are losing detail in the shadows if it’s pushed against the left, and in the highlights if the graph is pushed against the right. By reducing the contrast in the picture style, you’ll reduce the chances of losing detail in the scene.

Shooting RAW, and knowing I’ll be making adjustments in post, it doesn’t really matter what picture style I use, because I can change that when processing the RAW file. But it’s essential to be able to see an accurate histogram on my camera, to ensure I’ve captured as much tonal range as possible.

Processing the RAW File

Image photographed using flat picture control

This image was shot using the Flat picture control, and then the highlight and shadow sliders in Adobe Camera RAW were adjusted to further reduce contrast.

Once I begin processing the RAW file, I’ll do even more, if necessary, to flatten the image and compress the range of tones within the histogram. This includes using the Highlights and Shadows sliders in Adobe Camera RAW to bring out details on both ends of the histogram.  You can watch the histogram change in Adobe Camera Raw or Lightroom as you do so, to be sure you don’t go too far. If the highlights begin to look muddy, you’ve gone too far. By the same token, if the shadows start to look washed out, that’s probably too far as well. You want to maintain detail in each, but not lose the depth of tone completely. It’s important to note that this adjustment will vary for different images, depending on where the highlights and shadows fall in the images.

In addition to adjusting the highlights, shadows, and contrast here, I will use the Dehaze slider, Lens Correction, and Spot Removal brush in Adobe Camera RAW. If you prefer, you can use the Vibrance, Saturation, and Adjustment Brush to complete the image in Adobe Camera RAW or Lightroom, but my preference is to work in Photoshop. There I can use a Layers workflow along with masking and Adjustment Layers and with various plugins, to achieve my final image.

Building Up Color and Contrast

Using Adjustment Layers

Using Adjustment Layers in Photoshop, I built up the color saturation and contrast to achieve the final image.

Once I have the image at the desired level of flatness, I then go about building up color saturation and contrast, or in Hollywood terms, color grading my image. After bringing the image into Photoshop, there are a number of ways you can go about this. The first is to use adjustment layers so that you can continually adjust each layer as desired, until you flatten the image for your final output. In addition, if you’re making an adjustment that you only want to apply in certain areas, you can use layer masks to hide or reveal it as desired.

Many of these adjustments will be to personal taste. I personally prefer my images to have punchy color and contrast. So a set of adjustment layers I might use would be Vibrance, Exposure, Hue/Saturation, Curves, and Exposure.  The flexibility of using adjustment layers allows me to direct adjustments where I need them, rather than being forced to make them globally.

Image processed with Nik Color Efex Pro

This is the same image, but I used Nik Color Efex Pro to achieve the final image instead of adjustment layers.

If adjustment layers aren’t your thing, perhaps using a plugin such as Google’s Nik Efex Pro. It’s now available at no cost, and is a software package I highly recommend. I’ve created several presets in Color Efex Pro, and will also use Viveza and its control points to further adjust my image. For landscapes, in Color Efex I have created a preset using Brilliance/Warmth, Pro Contrast, Skylight Filter, Detail Extractor, and Vignette:Lens, that I find to be pleasing for a majority of my landscape images. Depending on the image, I will tweak these settings to meet my vision.

Summing Up

Before and After

On the left is the image with its tones flattened and desaturated, using a Flat picture control and adjusting highlights and shadows as needed. On the right is the image fully processed building contrast and color saturation.

By starting with a flattened file, you give yourself room in the range of tones to build contrast and saturation, without clipping highlights, shadows, or any of the color channels. While shooting with a more finished picture style may look more pleasing on the camera’s LCD screen, or upon import into Lightroom or Photoshop, the contrast has already been adjusted to give it a pleasing look. Any adjustments to Saturation or color may result in a file that at the very least looks overcooked, and at worst, shows evidence of clipping highlights, shadows, or color channels.

An image showing before and after color grading.

On the right is the image with the flat picture style, while the left has been “color graded” in Photoshop.

Building-contrast-2

googletag.cmd.push(function() {
tablet_slots.push( googletag.defineSlot( “/1005424/_dPSv4_tab-all-article-bottom_(300×250)”, [300, 250], “pb-ad-78623” ).addService( googletag.pubads() ) ); } );

googletag.cmd.push(function() {
mobile_slots.push( googletag.defineSlot( “/1005424/_dPSv4_mob-all-article-bottom_(300×250)”, [300, 250], “pb-ad-78158” ).addService( googletag.pubads() ) ); } );

The post Using a Flat Picture Style for Better Finished Images by Rick Berk appeared first on Digital Photography School.


Digital Photography School

 
Comments Off on Using a Flat Picture Style for Better Finished Images

Posted in Photography


3 Tips for Taking Better Motorsport Photos

11 Aug

If you’re a fan of motorsport, then you’ve probably tried to take photo of a race car on the track. It’s not as easy as it looks is it? The high speed nature of motorsport photography tests even the best photographers and cameras. So it takes a special skill set to move your motorsport photos up to the next level.

Taking a photo of a car on track is one thing, but if you’d like to add one or more of the following elements to your photos, you’ll start to create some special images. So make sure you keep these three things in mind next time you are at a race track shooting motorsport: speed, action and emotion.

DPS Panning 001

#1 Speed

One of the biggest things that draws people to motorsport is the speed. If you’d like your photos to stand out, you need to showcase that speed in your photos. The photographic technique for doing this is called panning.

Panning is basically using a slow shutter speed to introduce motion blur into your photos. The easiest way to do this, is to focus on a particular point of the car, and move your camera in a smooth motion in the same direction as the car. This will keep the car nice and sharp, and blur out the background.

I would recommend that you start with a shutter speed of around 1/200th of second. As it takes a lot of practice to get a nice smooth motion. As you improve your technique and grow in confidence, you can progress to slower shutter speeds.

DPS Panning 002

Panning is one of the hardest techniques in photography. It takes a lot of practice to get it right. The slower the shutter speed, the less likely you are to get the car sharp in the photo. But the trade off is a more dramatic the effect when you do get it right.

Just remember that not even the professionals get every shot perfect, though they may not admit it. But once you have mastered the art of panning, you can look to add some more creativity to your shots by panning through objects, or using interesting angles.

DPS Panning 003

#2 Action

Getting a photo of one car on track is great. But those action moments are what really tell the story of the race.

Ideally you want to be on the look out for the moments when two or three cars are jostling for position. Usually in the opening laps of a race. Shots of the race leaders fighting for the lead will give your photographic story more definition.

To capture those actions moments, you will want to position yourself at one of the slower corners of the track. One that encourages passing. To do this you’ll need to be familiar with the venue. Each and every track is different.

DPS Action 001

Photographically, you’ll be looking to use a fast shutter speed to freeze the action. I would recommend using a shutter speed of 1/1000th at a minimum. Although the speed really all depends on how fast the cars are traveling at that section of the track.

Now, since you are freezing the action, you’ll still want to make the cars still look fast. To do this you will need to hide the wheels of the cars. Either shooting the cars directly front on, or from behind. Hiding the lack of motion in the wheels will give the cars a sense of speed, while still showcasing the action.

DPS Action 002

DPS Action 003

#3 Emotion

Motorsport, much like all sports, has high highs and low lows. That is reflected in the emotions you’ll see around the race track.

To complete a photographic story of the race, you’ll need to capture either the fans, teams, or drivers celebrating victory. That could be a victory burnout, it could be driver waving to the crowd, or it could be the team applauding as their driver crosses the checkered flag.

DPS Emotion 001

While the highs are good, the lows also tell an equal part of the story. It could be a crash between two competitors. It could be a driver walking away from his broken down car. These all add up to telling the story of the race.

Unfortunately, it takes a little bit of luck to capture the emotion in motorsport. That’s why these shots are the most rewarding.

Photographically these emotional moments take split second decisions to capture. If you’re photographing a driver doing a burnout, you’ll need to quickly drop the shutter speed to showcase some motion in the wheels. but not so much that the car starts the blur. I’d suggest something along the lines of 1/250th.

For capturing other celebrations, which are often just fleeting moments. I’d recommend a high shutter speed and wide aperture to create shallow depth of field to draw focus to the part of the celebration that tells the best story.

DPS Emotion 002

Summary

If you can keep those three things in mind while you are taking photos trackside, you’ll take your motorsport photos to the next level. Then you’ll really telling the story of an event, instead of just capturing cars on a track.

googletag.cmd.push(function() {
tablet_slots.push( googletag.defineSlot( “/1005424/_dPSv4_tab-all-article-bottom_(300×250)”, [300, 250], “pb-ad-78623” ).addService( googletag.pubads() ) ); } );

googletag.cmd.push(function() {
mobile_slots.push( googletag.defineSlot( “/1005424/_dPSv4_mob-all-article-bottom_(300×250)”, [300, 250], “pb-ad-78158” ).addService( googletag.pubads() ) ); } );

The post 3 Tips for Taking Better Motorsport Photos by Rhys Vandersyde appeared first on Digital Photography School.


Digital Photography School

 
Comments Off on 3 Tips for Taking Better Motorsport Photos

Posted in Photography


Tips and Tricks to Help You Take Better Youth Sports Photos

07 Aug

A favorite photography subject of any parent is their child’s sporting activities. But, sports photography can be challenging for the beginning photographer. It requires a robust understanding of camera settings and how they relate to one another. It can also be hugely rewarding to capture exhilarating moments that will be cherished for years to come.

Here are a few tips and Tricks I’ve learned for getting awesome sports photos.

_88J6306

1 – Know the Sport

Every sport has the picture perfect moment. You know the one – the horse with its leg tucked just so, or the peak of the handstand. The moments captured on trading cards, or those that appear on the front covers of sporting magazines are good examples.

Chances are that because you’ve sat on the same bleachers week after week, that you know your child’s sport inside-out. A good sports photographer can anticipate the play, and is ready to capture the shot. For sports that are routine based – gymnastics, figure skating, equestrian, and the like – be sure to watch the practice so you’ll know when and where the picture perfect moments will occur, and where you need to position yourself to capture them.

Sports 2

Capturing the passion of the athlete. The flare from the flash in the background was a happy accident. Exposure info: 85mm, f/6.3, 1/160th, ISO 500.

2 – Be Courteous

Before the game, have a chat with your child’s coach and make sure it’s okay for you to photograph the game – some sporting organizations have special rules for photographers which you’ll need to be aware of beforehand. During the game, be courteous to the other parents who are watching their own children. Please don’t be “that guy”, taking up half the bleachers with mountains of gear, or the one standing at the front, blocking the view of others.

3 – Choose your Lens

Generally speaking, longer lenses are better for sports photography, as the action is occurring some distance from you (and it’s uncool for a parent photographer to be on the field during play). A lens around 200mm is a good place to start. If you’ve just won the lotto, I’m well informed that professional 400mm and 600mm lenses are awesome (they can also be rented if you really want to try them out, and don’t have a winning lotto ticket in your back pocket).

Sports 6 Sports 7

Exposure info on above images: 200mm lens, ISO 200, f/5.6, 1/320th of a second.

4 – Get the Camera off Auto

Yes, I know your camera has a sports/action mode. It might even have a cute little picture of someone running. But shooting sports in manual mode (or at least shutter priority) is a perfect way for you to learn how the exposure triangle works. It will also be a lesson in compromise because I can pretty much guarantee that unless you’re shooting in bright sunlight, something will have to give. Do you accept high ISO noise but stop the action, or do you accept some motion blur for less noise?

Sports 1

Shooting the pause moments. Note the ridiculously high ISO needed for this dimly lit indoor venue. Exposure info: 105mm, f/4, 1/160th, ISO 10,000.

Shutter Speed – Sports shooting is one occasion where the age old adage of “minimum shutter speed = 1/focal length” doesn’t work. In reality, you’ll need to go much faster if you want blur-free images. To stop action at walking speed, try at least 1/250th of a second. For running, you’ll need 1/500th or faster. If these shutter speeds aren’t possible (most likely due to low light), try to anticipate and shoot the posed moments – those times when the athlete pauses for a microsecond (image above). It might be landing a trick, a look before throwing the ball, the moment before throwing a punch.

Sports 10 Sports 4

Exposure info on above images: 200mm lens, ISO 200, f/5.6, 1/320th of a second.

Aperture – Shoot with the largest aperture your lens allows. Professional lenses will generally open up to f/2.8. This will have two benefits – you’ll minimize depth of field (throwing the background out of focus and drawing more attention to your subject), plus you’ll be letting more light in (thus allowing a faster shutter speed).

Sports 9 Sports 8

Exposure info on above images: 200mm lens, ISO 200, f/5.6, 1/320th of a second.

ISO – You’ll often have to shoot at a high ISO to get enough light, especially if you’re shooting indoors. Trial and error will tell you how high your camera can go while still achieving an acceptable image. If you end up having to shoot at ISO 6400 and end up with a noisy image, just turn it black and white and tell people (in your best British accent), “It’s art, dah’ling!”

Focus mode – Check that your focusing mode is set to Continuous or Servo mode. This will ensure that the camera is constantly recalculating focus as you track a moving subject in your viewfinder. Every camera will handle this slightly differently, so it’s worth thumbing through your camera manual to understand how your particular model works.

5 – Get Down Low

Many beginner photographers make the mistake of shooting from a standing position. For youth sports, this means that they are generally shooting down on the athlete – not a very flattering angle. Instead, try kneeling on the ground for a better perspective.

These two images, taken from different camera angles, show how shooting from a lower angle can make all the difference.

These two images, taken from different camera angles, really show how shooting from a lower angle can make all the difference. Notice you can see more of her face in the image on the right, taken from a lower camera position.

Exposure info on above images: 200mm lens, ISO 200, f/5.6, 1/320th of a second.

6 – Practice

As with all genres of photography, practice makes perfect. Try different angles or shooting from different positions around the field to see what works best. I guarantee you’ll see improvement as you keep shooting.

7 – Beware the Light Cycle

If your sport is being played in a large indoor venue (or outdoors at night), more than likely it will be lit by cyclic lights (mercury vapor, sodium vapor, fluorescent, etc). These cheap and efficient lights are a sports photographer’s worst nightmare. Unlike natural sources, these lights emit certain frequencies, and completely miss others, resulting in a unique color temperature that is difficult, if not impossible, to properly white balance in camera.

In addition – and completely undetectable to the naked eye – these lights have distinctive cyclic patterns, varying in both light intensity, and color temperature, multiple times per second. Shooting under them can be very much a hit-and-miss affair. Sometimes you’ll catch the light in a blue phase of the cycle; a millisecond later you’ll get magenta. You might get slightly darker, or brighter. Sometimes neighboring lights will be on different cycles, so part of your photograph will be dark and part will be light, each with a different color temperature. (Don’t believe me? Try this test: under a fluorescent light, set your camera to manual with a fast shutter speed like 1/250th, take a series of identical images in rapid succession, then compare the frames. The faster the shutter speed you pick, the more the effect will be visible.)

The lights here cycled yellow.

This image was shot under sodium vapor lights and shows the intense yellow frequencies emitted by this type of light, even with the camera color balanced for the white uniforms. Exposure info: 150mm, f/3.2, 1/320, ISO 5000.

Commercial architecture photographers combat this problem by lowering the shutter speed to allow more than one full cycle of light to be read by the sensor. However as we’ve already discussed, slow speed doesn’t usually work for action sports photography. Worse, many sports in these type of venues (equestrian, figure skating, gymnastics) don’t allow flash for player safety reasons, so you’re stuck using available light.

There is nothing you can really do about cyclic lights, other than to simply take more photos, and pray that you hit the cycle right. For odd colors, you could play with the individual channels in Photoshop, or convert the entire thing to black and white (this will be the only time you’ll ever hear me say “fix it in post-production”).  Regardless, it is something that you should be aware of so you don’t make yourself crazy trying to figure out why you got the results you did.

8 – Have Fun

Sports 5 Sports 3

Exposure info on above images: 200mm lens, ISO 200, f/5.6, 1/320th of a second.

Youth sports are all about participating and having fun. Photographing them is no different. If your cherub is playing in the sand or picking her nose instead of chasing the ball, capture it! These are the memories you’ll treasure one day (or so they tell me). And remember that it’s okay to put the camera down sometimes and just enjoy the game too.

googletag.cmd.push(function() {
tablet_slots.push( googletag.defineSlot( “/1005424/_dPSv4_tab-all-article-bottom_(300×250)”, [300, 250], “pb-ad-78623” ).addService( googletag.pubads() ) ); } );

googletag.cmd.push(function() {
mobile_slots.push( googletag.defineSlot( “/1005424/_dPSv4_mob-all-article-bottom_(300×250)”, [300, 250], “pb-ad-78158” ).addService( googletag.pubads() ) ); } );

The post Tips and Tricks to Help You Take Better Youth Sports Photos by Rebecca Olsen appeared first on Digital Photography School.


Digital Photography School

 
Comments Off on Tips and Tricks to Help You Take Better Youth Sports Photos

Posted in Photography


19 tips for better live music photography

06 Aug

Tips for better live music photos

There is no one-size-fits-all approach to shooting live music. Depending on the genre of music, the size of the venue, the quality of the house lighting, the rowdiness of the crowd and any photographic regulations imposed by the band or venue, your approach to getting the shot can vary greatly.

It is for all these reasons I find live music photography irresistible; no matter how much you prep, you simply never know what the rock and roll gods will throw at you. And the combination of difficult lighting, fast moving musicians and a mass of people competing for sight lines makes getting the shot all that more sweet. Especially when your shot conveys the pure, unfiltered energy of a live performance.

I’ve been shooting live for about seven years, in both stadiums and basements, dive bars and dance halls (I currently run a site called NWSoundExchange.com, which seeks to visualize Seattle’s DIY music culture), and I’ve picked up on some general tips and principles that help me feel a little more prepared each time I walk into a new venue. Some of these tips come from advice given to me by more seasoned music photographers I’ve bumped into over the years, like Mick Rock, others come from shooting hundreds of shows and learning from my own mistakes.

Of course, these tips alone won’t guarantee you the next cover of Rolling Stone. After all, excelling at live music photography requires on-the-fly thinking and problem solving, creativity, as well a mastery of photographic principles. But hopefully these tips will at the very least inspire you to bring a camera long to the next concert you attend.

By the way, the most important tip of all for shooting rock and roll is this: showing up with your camera to the show is half the battle. If you can make it that far, well, the rest should be pretty easy.

Do your homework

The Screaming Females are a very high-energy band. The lead singer/guitarist Marissa is known for her epic guitar solos. Knowing this going in gave me the foresight to position myself directly in front of her. 

I’m not trying to sound like your mother, but seriously, do your homework before shooting a show! Fifteen minutes spent watching Youtube videos can clue you in to how a band sets up on stage and who in the band you might want to keep your camera pointed at. This way, when you arrive at the venue, you can position yourself perfectly to get the most high-energy images.

Leave the extra gear at home

This image was shot during a very crowded and rowdy show in the basement of a dive bar. Bringing only one camera rig and an extra lens (kept in my pocket) meant I did not have to worry about stashing my bag anywhere and could easily move around within the crowd to make my shots.

Roll light! Being able to move around is crucial for getting good shoots. Also no one likes the guy in the crowd wearing the massive camera backpack.

I used to shoot live music with far too much gear: two bodies, a flash and a few extra lenses. These days I keep it much more simple: a full-frame camera, 35mm F2 lens and a flash. I do occasionally bring a wider or more telephoto lens, depending on where I’m shooting. But at the end of the day, the less I’m worried about switching gear, the more I’m tuned into the music that is happening in front of me.

If you must use a flash, bounce it

Shooting a show under a highway underpass was a unique experience. This was a show where I had no choice but to use a flash. Still, I used it sparingly, waiting for the most decisive of moments to pop a frame.

No matter what, I always go into a concert planning on shooting available light only. Of course this can be wholly impractical if the venue you’re shooting in is literally beneath a highway overpass with no light of any kind. It’s in situations like these that I’ll bring out the on-camera strobe.

Flashes should always be used sparingly in a live music environment. The whole point of a concert is for the crowd to experience and enjoy the music happening in front of them, and constant pops of bright light can detract from that enjoyment. Don’t make the concert about you. Be there to document the experience, not take away from it.

I also bounce my flash off the ceiling whenever possible. This results in the light falling back down on your subjects nicely. If you shoot direct flash, not only will you blind your subjects, but the lighting will look much less natural.

Fast glass is your friend

This images was shot at ISO 12,800 1/500 sec at F2.2 using the Nikon 35mm F2 D lens.

Zooms are great, but they are often not fast enough for shooting live music without flash (which should always be your goal going into a concert). Many photographers show up to concerts with a full-frame camera and a 24-70mm F2.8 lens, which can be fine. But I prefer to use primes with faster apertures. I’m not talking expensive glass, but rather lenses like Canon and Nikon’s 50mm F1.8.

When shooting using only the venue’s lights, my ISO is usually cranked all the way to 12,800 (I shoot with a D750) and my shutter speed hovers around 1/200 – 1/320 sec, the slowest speed I feel comfortable using in such an environment. This gives me little wiggle room for a slow aperture. Thankfully, the Nikon 50mm F1.8 D is pretty sharp by F2 and even better by F2.2. The point is, given the choice, always opt to bring along your fastest glass. Also don’t forget to micro adjust your lenses!

Avoid eye level composition

This image would probably have been a total snooze-fest had it been shot at eye-level.

Shooting images at eye-level is lazy and boring. So get super low, get high up; if you have an articulating screen, put it to use! But whatever you do, avoid eye-level. Your composition will thank you.

Try to shoot in full manual

This one is not set in stone, but generally speaking, you’ll learn more and have a better understanding of light and how you camera works if you shoot in full manual mode. Shutter Priority and Aperture Priority can both be useful in some live music shooting scenarios, but if you’re serious about getting better, keep it on the big ‘M’.

Whenever I walk into a new venue, I always try to guess and dial in the exposure without looking at my camera’s meter (advice given to me by a good friend). The more I do this, the better I’ve gotten at ‘reading a room’s light.’ Try it yourself! You’ll probably find that over time your intuition about exposure will improve.

Know when to use AF-C, AF-S (and know your camera’s AF system)

Focusing and recomposing using AF-S can be a good method to achieve creative compositions, just as long as the subject doesn’t move too much from the time you acquire focus to the time you take the shot. Of course, this image was taken using a manual focus lens. 

Continuous autofocus is generally your best bet for live music photography. It goes without saying that if you’re shooting a moving subject, AF-C makes more sense than AF-S. However, there are times when switching to AF-S can be useful, especially when trying to get creative with a composition.

When shooting live music in a dark environment, even the best cameras will likely struggle with subject tracking, meaning you are left with either using AF-C and keeping your focus point over the subject (which restricts your composition) or focusing and recomposing (if the subject is not changing depth from the camera). The latter is a method best used when the subject is relatively still.

Also, many modern cameras have central AF points with increased sensitivity for low light and low contrast scenarios. Knowing whether or not this is the case with your own cameras is definitely worth investigating.

Photograph the crowd

Live music is about more than just the band on stage.

Don’t forget to turn around and snap some photos of the crowd. An image that conveys the flavor of the environment and the energy of the crowd is a great addition to any set of live music photographs.

I’ve found the best time to turn around and get this shot is toward the end of any high-energy song, but not after. This ensures those in the frame are still sucked into the music, allowing you to go largely unnoticed. The last thing you want is folks staring at the camera like a deer in the headlight. One person blatantly acknowledging the camera can ruin the overall feel of a good crowd shot.

Look for interesting light

We already talked about how you should avoid using a flash whenever possible. Assuming you’ve followed that advice, you’ll largely be at the mercy of the venue lighting, which is not necessarily a bad thing!

Look for interesting beams of light and reflections to incorporate into your image. Using the venue lighting creatively can help you to better convey the mood of the performance. Also, be sure to be patient. One of the advantages of not shooting with a flash is that you can fire as many frames as you like, without bothering anyone. This means you can experiment to your heart’s delight.

In general, the rule of thumb with gelled lighting is this: avoid shooting skin tones lit by red lights as they tend to blow out all detail (unless you’re planning to convert to b/w in post). Wait instead for the lighting to switch to any other hue before taking a shot.

Find the details

A cowboy hat at a punk show?

Most live music imagery revolves around one of two subjects: the band and/or the crowd. Obviously, making photographs of said subjects is what shooting rock and roll photography is all about, but don’t forget to look for interesting or unusual details in and around the venue.

Even the most subtle details, like a pair of bare feet on stage, or a strangely out-of-place man in a cowboy hat, can add a new layer of intrigue to a set of already interesting live music photographs.

Be ready for the action

The last thing you want to do is get caught fumbling with controls when something epic is happening. I’ve certainly been there, missing excellent shots because I was too busy staring at my camera settings. It’s a terrible feeling.

To avoid this, try your best to be very in tuned to what is happening in front of you at all times. Change settings with your eye to the finder and only look at the back of you camera in between sets. Oh, and above all, don’t chimp during a set!

Keep one eye open

Shooting with both eyes open allows you to better predict when something visually interesting might occur.

This one also goes along with the previous point. Practice keeping both eyes open at all times when shooting live music. Better yet, try to keep your non-shooting eye honed in on the drummer. I’ve found that if you’re in tune with the drummer, you can often use their body language to predict when something interesting might happen.

Try the ‘pop and drag’

It can be a bit cliche, but it can also convey a band’s energy really well if executed correctly.

The old ‘pop and drag’ goes a little something like this: Mount a flash on your camera and point it at the ceiling, drop your shutter speed down to somewhere between 1/15 and 1/50 sec, while keeping your ISO reasonably high (it’s OK to stop down a little using this method). The general idea is to ‘pop’ the light from the flash, which bounces off the ceiling and falls back down on the band that you’re photographing while ‘dragging’ your shutter. Because of your slow shutter speed, the flash won’t completely freeze your subjects, causing blurring and glow.

The most important thing to remember when trying the ‘pop and drag’ is to experiment with your settings. Depending on the height of the ceiling and color of the ceiling, your flash output may vary greatly. If you’d like to use this method, I advise getting to the venue early to dial in your settings before anyone arrives.

Back up from the band, use the crowd

This one is pretty simple: While it makes sense to try and shoot a show as close to the band as possible, its also nice to change up your perspective and pull back a little. Moving back will allow you to get more creative with your framing. It also can help to convey the energy of the room better.

It’s OK to underexpose (shoot Raw)

I often underexpose by two stops to get a faster shutter speed, then push in post.

This one is dependent on the camera you are shooting, but Raw files from most modern full-frame cameras can hold up just fine being pushed a stop or two in post (much further if you’re converting to b/w). When you’re shooting in an environment where your settings are maxed out but your images are still too dark despite being at the maximum native ISO, it van be very reassuring knowing you can still push two stops when you get home.

Just make sure you’re shooting Raw.

Use creative aides

Everyone knows star filters are played out, which is why just about no one uses them. All the more reason to pick one up and make photos that look a little different. Just don’t rely on creative aides as a crutch!

Everyone’s a photographer these days, and rock and roll photos are a dime a dozen. So if you’re serious about setting your images apart from others, what do you do? Try experimenting with creative aides, like gels, star filters, prisms etc. to give your shots a slightly different look.

Star filters have not been cool for a very long time, but used selectively, they can be really effective. Take a look through this article, how many star filter photos can you find? More than you realized now that you’re looking for them? The point is, being subtle is important when employing creative aides. Don’t be a one-trick-pony and don’t rely on them too much. But used selectively, they can give some really cool results.

Shoot with heart, edit with brain

This phrase is my religion when it comes to shooting live music.

What exactly does this mean? For me it means, go to the show, have fun, be polite, dance and take photos without overthinking. Let the music envelope you, feel the energy, interact with the crowd, chat with the band, be a part of what’s happening. Doing so will allow you to subconsciously be more connected to the whole situation. Also, don’t be afraid to shoot ‘too much, ‘ (so long as you aren’t using a flash).

I used to be upset with myself when I came home from a show with 1000 images to shuffle through. But as I’ve gotten better at editing, I’ve gotten better at quickly pin-pointing the good stuff from the bad after the fact. And at the end of the day, if you got one killer image from a show, but shot 100 or 10000 images, no one will know but you.

B/W is your friend when editing

This image looked terrible in color. A conversion to black and white saved it.

B/W is the little yellow pill of the music photography world. A quick conversion can turn a noisy, ugly image into something much more attractive. Or, in the case of the image above, in which most of the detail in Dave’s face was blown out due to bad colored lighting, a quick conversion turned an ugly duckling into a tattooed rock and roll swan.

Have fun and be nice to everyone

When shooting a show it is important to remember that you are very unimportant in the grand scheme of the event. Please, please don’t be that photographer ruining everyone’s good time by constantly popping flashes and blocking people’s view of the band.

Live music is a lot of fun. Photography is a lot of fun. When combined, well, you get the point. At the end of the day, don’t take away from that inherent fun. Be polite to everyone in the crowd, ask before you step in front of someone to take a shot and don’t stand in their way too long. Use your flash sparingly. Don’t bring a massive bag and definitely do not wear a bag while shooting in the crowd. Respect gets respect and the golden rule certainly applies to live music photography.

Add your tips below!

Got a solid tip for live music photography? Please share it in the comments below!

Articles: Digital Photography Review (dpreview.com)

 
Comments Off on 19 tips for better live music photography

Posted in Uncategorized


Astropad 2.0 brings better performance and increased compatibility

04 Aug

Astropad, the app that turns your iPad into a graphics tablet for your Mac, has released its first major update. Astropad 2.0 comes with a range of improvements that allow for a more responsive drawing experience and increased compatibility with Mac software packages. The makers of the app claim the technology is so good that users are starting to replace their Wacom tablets with Astropad.

The new version of Astropad comes with the following improvements:

  • Astropad’s LIQUID technology, which allows for very smooth operation at 60 fps, has been upgraded to run three times faster and with significantly reduced pixelation.
  • The new velocity control analyzes network conditions at a very high frequency to find the optimal balance between image quality and latency.
  • Astropad 2.0 uses 3x less CPU power and 4x less memory than before, extending the iPad’s battery life.
  • The pressure curve has been refined for a more natural drawing feel.
  • Ehanced software capability means that the app now supports panning and zooming gestures across more software applications, including: Affinity Designer, Affinity Photo, Art Rage, Clip Studio Paint, Lightroom, Mischief, Autodesk Sketchbook.
  • The cursor can now be auto-hidden while drawing.
  • The user interface has been updated for a sleeker look and feel.

The update to Astropad 2.0 is free for existing users. Anyone else can purchase the app now for $ 29.99 on the Apple App Store. Astropad 2.0 works on all iPads with iOS 8 and all Macs with 10.9 (Mavericks) or later.


Articles: Digital Photography Review (dpreview.com)

 
Comments Off on Astropad 2.0 brings better performance and increased compatibility

Posted in Uncategorized


More Ways to Create Better Images Without Buying More Gear

28 Jul

Jay Maisel has to be one of the most interesting photographers alive today. He is 85 years old and he still makes a point of carrying his camera with him every day, everywhere he goes. I recently watched a few videos where Scott Kelby spent a few days with Jay, just wandering through the streets of New York and later, walking through Paris.

In these two different videos, Jay imparts his photography philosophy, and how he makes his images. The remarkable thing I noticed is that Jay almost never talks about photography equipment. Rather, he speaks about technique, about getting it right in camera, and making sure you spend time getting the best shot possible.

This article is a follow on from an article I did a while ago, which had a similar title to this one – 5 Ways to Create Better Images Without Buying More Gear. I now want to expand on that and add 5 more things you can do to improve your photography without buying more gear.

#1 Show the viewer something different

This is something really important that, but we don’t often think about. There are so many things being photographed every day.

5 more things image 8

Think about this: if you go to Paris, you will no doubt want a photo of the Eiffel Tower. Of course, every photographer does. The challenge is, we have all seen photographs of the Eiffel Tower, so, how will your image be different from anyone else’s? Better still, how will you make the image look like it is taken from a new vantage point or angle.

These are the tough questions, the things that we need to think about as photographers. You could try a few things, go in really close and get some detailed shots of the metal structure, find an area of it that is looking old and grungy, maybe try and shoot it from a very extreme angle, work hard to show your viewer something they haven’t seen before.

Think of the photos you have seen of the Eiffel Tower. If your image looks like any of those shots, then you need to try something different. The goal here is not to be different for the sake of being so, but to try and be unique.

Of course, you should shoot the usual postcard shot, at least you have that, but then play around, walk around, lie on the ground, shoot straight up, put your camera lens against the structure, try anything to get an angle that you have never seen before.

Show me something I have never seen before. – Jay Maisel

Look for something you have not seen before

This is one of Jay Maisel’s key messages, “Show me something I have never seen before”. He is not being flippant, we have all seen a car, a tree, a glass building, and people on the street. What he is looking for is to be shown these everyday subjects in a different way, that’s the key to this principle.

#2 Practice patience

In the video with Jay Maisel, he mentions that he was once out doing street photography with another well known photographer. As a typical New Yorker, he was walking at a pretty quick pace. After some time, the other photographer turned to him and said, “Jay, do you know why you aren’t getting any good shots? You’re walking too quickly”.

That comment caused Jay to slow down. Not only did he slow down his walking pace, but he slowed everything. He would stop in a place for five or 10 minutes. He would find a scene he liked and then, like a theatre stage, he would wait for the actors to appear, the people on the street. So he stands in a particular spot sometimes, for up to 20 minutes, and just waits for something to happen.

Sitting and waiting can result in some great images

Sitting and waiting can result in some great images

Give it a try. Next time you are out photographing in your city, stop for a while. Observe the scene in front of you. Make note of how people are moving through that scene, and start looking for an opportunity to make an image. It may take a while, if you can, sit down and just watch, pretty soon, the right person will enter your “stage” and you will have your image.

#3 Change your composition

We all know about the rule of thirds, very often it is our first introduction to composition. It’s a good starting point for creating good composition, but there are many other ways to make your images look compelling.

Composition is one area of photography that can make a vast difference in your images. Simply changing from landscape to portrait orientation for example. More than that, look a little deeper. There are some great techniques you can use to enhance your composition.

5 more things image 10

One of these is using depth of field. A shallow depth of field will isolate your subject and make the background less distracting. Speaking of backgrounds, make sure that you have looked at the background in your image and that there is nothing distracting that will take the viewer’s eye off the subject.

You could also try and frame your subject using a door frame, a window, or some overarching trees. The frame will point the viewer to the subject and, if done correctly, framing can be a very powerful compositional tool.

Remember to change your viewpoint. Lie on the ground, get as low as you can, or maybe get up as high as possible. If your viewpoint is unusual, your subject will benefit immensely.

Shooting from a different viewpoint can make all the difference

Shooting from a different viewpoint can make all the difference

#4 Go out empty

Another piece of Jay Maisel wisdom is to go out empty, and let your images fill you up. What does that mean?

Very often, you may go out on a shoot and are “hunting” for a particular image. Maybe you are looking for a man with a blue shirt riding a red bicycle, which is pretty specific, and really difficult to find. The challenge is that if you are looking for only that one type of shot, you may miss all the others that are out there.

By going out empty, you are open to whatever comes into your viewfinder. You may get a shot that you never thought of before or have seen before, that’s the point. Sometimes it is good to shoot with constraints, it forces you to be creative.


By going out empty, you may be surprised at what you will see

By going out empty, you may be surprised at what you will see

At other times, go out without any limitations, simply look at what unfolds in front of you and shoot whatever you find interesting. That’s one way to get some great shots. Also, be open to what happens while you are out shooting.

I was photographing in an old area in the East Side of Vancouver. A lady came up to me and asked what I was doing, and I told her I was looking for some great shots of the homes in the area. She asked if I wanted to see inside her home, I am so glad she invited me. Her home was amazing, and it was a great opportunity to see inside a true heritage home.

#5 It’s not about cropping, but about framing

As photographers, we can become a little lazy. We will compose the shot, look at the scene, and realize we need to move a little to the left because there is something distracting in the shot. Many times, we might think, “It’s okay, I can crop that out later”.

5 more things image 9

Yes, that is true, you can crop it out later, but it may change the whole perspective of the shot. I might mean that you lose another important piece of information.

Jay Maisel reminds us that it’s about framing, not cropping. He says that it is the photographer’s responsibility for what is in the frame and, sometimes more importantly, what is NOT in the frame. Instead of assuming you can crop something out later, maybe move around the subject a bit, look at it from different angles, and then decide what needs to be in the frame and what doesn’t.

As Jay says, “The photographer is responsible for everything in the frame”. Make sure that everything that’s in the frame is there for a reason, otherwise, change it.

5 more things image 5

You are responsible for everything in the frame.

Of course there are no rules in photography, there are only guidelines. These ideas are simply suggestions that can help you improve your images, and to see more clearly. Once you begin practicing these things, you won’t have to think about them as much. You will do them instinctively, and that’s when your photography will change and become more mature.

So get out there and give these ideas a try, practice one of these suggestions on each photoshoot or photowalk you do. Keep making the changes and slowly working on your craft, and you may look back in a year and be astounded at how much your work has improved.

googletag.cmd.push(function() {
tablet_slots.push( googletag.defineSlot( “/1005424/_dPSv4_tab-all-article-bottom_(300×250)”, [300, 250], “pb-ad-78623” ).addService( googletag.pubads() ) ); } );

googletag.cmd.push(function() {
mobile_slots.push( googletag.defineSlot( “/1005424/_dPSv4_mob-all-article-bottom_(300×250)”, [300, 250], “pb-ad-78158” ).addService( googletag.pubads() ) ); } );

The post More Ways to Create Better Images Without Buying More Gear by Barry J Brady appeared first on Digital Photography School.


Digital Photography School

 
Comments Off on More Ways to Create Better Images Without Buying More Gear

Posted in Photography


Microsoft Pix aims to capture better people pictures

28 Jul

Microsoft has released a new camera app that puts its focus on taking better pictures of people. The Pix app is now available for iPhone and iPad, and Microsoft says an Android version is in the works. When active the app is constantly recording and saves 10 frames before and after its shutter button is pressed. A series of algorithms then analyzes the recorded images, evaluating technical quality characteristics, such as sharpness or exposure, but also looking at facial expressions of human subjects.

Based on those characteristics among others, the app then selects three best shots and presents them to the user. The filtered shots are discarded to save space, but not before the image information contained in them is used to enhance the selected shots. For example, the app can brighten app images that have been captured in very dark conditions. 

Additionally, Pix converts a bunch of similar images into a moving Live Image, but only if it thinks the motion in the scene is interesting. The app also integrates Microsoft’s Hyperlapse feature. In addition to recording stabilized time-lapses, in its latest incarnation it also allows you to turn existing images into time-lapses or simply stabilize previously recorded video footage. 

One of the most interesting aspects of Pix is that we can expect the app to get better with time. Anonymized settings data and information on what pictures users delete or favorite is sent back to Microsoft where developers look at the data and fine-tune the app’s algorithms accordingly. Microsoft Pix for iOS can now be downloaded from the Apple App Store.

Articles: Digital Photography Review (dpreview.com)

 
Comments Off on Microsoft Pix aims to capture better people pictures

Posted in Uncategorized