RSS
 

Posts Tagged ‘Beautiful’

Great Crates: 10 Beautiful Shipping Container Conversions

10 Jun

[ By Steph in Architecture & Houses & Residential. ]

converted shipping containers cantilevered office 1

Incredibly strong, durable, lightweight and affordable, shipping containers are integrated into into all sorts of architectural projects, whether they’re still highly visible components or completely disguised. Since the focus is on practicality and price, the resulting structures aren’t typically too pretty. These 10 converted shipping container houses, schools, galleries and train stations prove that in the right hands, reclaimed crates can be beautiful, too.

WFH Shipping Container House

converted shipping container wFH 1

converted shipping containers wfh 4

converted shipping containers wfh 2

You can’t even tell, from inside or out, that this home in Wuxi, China by ArcAgency was made from three shipping containers. It’s set on a steel frame and covered with a sustainable bamboo facade, and even features a solar cell-clad green roof. Producing more energy than it consumes, the modular unit is a prototype for this new way of building. In addition to being made into a single-family home, it could be stacked into multi-story townhouses.

Maison IEDEKIT Quebec Container House
converted shipping containers idekit 1

converted shipping continers idekit 2
Seven shipping containers form the basis of the Maison Idekit in Quebec, which disguises them from the outside but leaves them visible inside. The container shapes, covered in timber, can still be discerned from the house’s silhouette, some jutting out at angles and others stacked in the center. Maison Idekit helps homeowners craft containers into their own custom-designed, low-cost homes.

Container Corner House

converted shipping containers corner tokyo

converted shipping containers corner tokyo 2

converted shipping containers corner tokyo 3

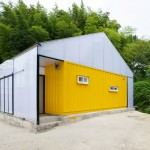
Two shipping containers stacked at an angle take advantage of a tiny sliver of land in urban Tokyo, and can easily be moved as needed. Tomokazu Hayakawa architects split one of the containers in half to form the ground floor gallery spaces, with the second crate functioning as an office. They simply painted the exteriors black, but framed out the interiors as required by Japanese law. The hatch doors still open to let in light and air.

Whitney Studio Gallery + Education Space

converted shipping containers lot ek whitney 3

converted shipping containers lot ek whitney 2

converted shipping containers lot ek whitney

When New York’s Whitney Museum of American Art needed a new gallery and education space, they turned to shipping container experts LOT-EK to craft a temporary low-cost structure that would see them through until the museum moved to a new location in 2015. Six containers stacked two-high are sliced diagonally, the operable windows highlighted in neon yellow. This cut-out detail makes the structure more dynamic, and improves air flow inside.

Rooms Within Rooms at the Adriance House

converted shipping containers adriance house

converted shipping containers adriance house 2

converted shipping containers adriance house 3

Not only do the 12 shipping containers that make up the Adriance House in Maine help hold up the glazed envelope that surrounds them, they also function as individual rooms within a room. Two of the containers are cut open on the ground level to connect the kitchen and living rooms to the common area, while the rest hold bedrooms, bathrooms, offices and lounges. The whole home measures 4,000 square feet and can be opened to the outdoors via a double-height garage door.

Next Page – Click Below to Read More:
Great Crates 10 Beautiful Shipping Container Conversions

Share on Facebook


[ By Steph in Architecture & Houses & Residential. ]

[ WebUrbanist | Archives | Galleries | Privacy | TOS ]


WebUrbanist

 
Comments Off on Great Crates: 10 Beautiful Shipping Container Conversions

Posted in Creativity


Quality of Light – What is Beautiful Light?

22 Apr
quality of light

This photo is lit by the soft light found inside on a sunny day. The light suits the subject because it reveals all the detail on the antique scales.

We talk about quality of light a lot in photography. I often use the word beautiful, and tell people that great photos require beautiful light. But what is beautiful light?

To answer that we need to understand that light has many qualities that vary immensely, depending on factors like the light source, time of day, season, and location. Light can be extremely hard (one extreme) or very soft (the other extreme) or anywhere in-between. It takes time to appreciate the nuances and variations of light and learn how to use light that suits both the subject matter, and the style that you are shooting.

What is hard light?

Hard light is strong, directional light that casts deep, hard-edged shadows. It’s the quality of light you get in the middle of a sunny, cloudless day, or from an unmodified flash head.

quality-light-hard-soft-10

Hard light, generally speaking, is considered bad lighting for many types of photography. There are two fundamental problems with hard light.

One is contrast – the brightness range (between the area lit by the light source and the shadows it casts) is so great that the camera’s sensor (or film) can’t record detail in both. The other is that hard light is not as aesthetically pleasing as soft light in many situations. It’s another generalization, I know, but it’s the reason that time and time again you will be advised not to take photos in midday sun or with an unmodified flash head.

The key to working with hard light is to recognize its limitations and find suitable subjects to work with. Personally, I find that black and white is better than colour for working in hard light, and that subjects like buildings can work quite well.

quality of light

Hard light is considered unsuitable for portraits because the hard shadows create too much contrast across the model’s face and are not flattering. However, you may be able to work in hard light with a male model, especially in black and white, as it tends to suit the ruggedness of a man’s face. Regardless of whether your model is male or female, simply facing them into the light so that shadows are as small as possible can work well.

I don’t have any portraits that show these techniques myself, but here are a couple of examples from photographer Betina la Plante. Just click the links to see the photos.

Female portrait taken in hard light. Note how the model faces the light so that the shadows are minimized.

Male portrait taken in hard light. See how the photographer used the deep shadow cast by the hard light to throw one side of the model’s face into shadow and bring out the texture of his skin.

quality-light-hard-soft-11

In both cases the black and white treatment suits the hard light.

Another solution is to use portable flash to light the model when shooting in hard light. The idea is that the softer light from the flash (fitted with appropriate modifier) overpowers or fills in the hard light from the sun. That’s what I did with the following image.

quality of light

What is soft light?

Soft light is that which casts either no shadows, or shadows with soft edges. It is more suitable than hard light for many subjects, including many types of landscape and portraits (but especially portraits).

For example, if you are taking someone’s portrait during the middle of a sunny day, then one of the best things you can do is find some shade, and take a photo of your model there. The softness of the light, and the fill from the brighter, sunlit surroundings, is a very flattering type of light that makes the model’s face glow and creates large catchlights in her eye.

quality of light

You also get nice light for portraits after the sun has set at the end of a sunny day, when the sky is filled with a soft glow from the last rays of the setting sun. This works best during the longer days (and twilights) of spring and summer.

quality of light

If you are using flash, then a modifier such as a softbox or umbrella softens the light, making it more flattering for portraits (although it won’t be as soft as the types of natural light just described).

In-between light

I’ve just described several scenarios, starting with midday sun, which is very hard, through to shade or twilight, where the light is very soft. The truth is that most light falls somewhere between these two extremes.

For example, lets say you are taking a landscape photo on a sunny day. The light changes as the sun gets lower, softening and changing in colour. The exact changes depend on the time of year, atmospheric conditions and the weather. Here in New Zealand, the light is very hard, especially during the summer, until the sun slips below the horizon. In other places the prevalent atmospheric conditions may make the light much softer, even on a sunny day.

This photo was taken just after the sun had set. The light was soft and warm, but still hard enough to pick out the side of the island.

quality of light

The key is to find the point at which the light suits your subject, in the style that you’re trying to shoot. Depending on what you want to achieve, the light is most likely to be suitable sometime during the transition from the hard light of the day to the soft light of twilight. It’s up to you to familiarize yourself with the lighting conditions in the places that you shoot, and to learn to recognize how hard or soft the light is, and when the quality of the light matches the subject you want to shoot.

This photo was taken on an overcast day. The soft, even lighting means the toy car casts a soft shadow. The soft light makes it easy for the camera to record all the important details, avoiding clipped highlights and overly dark shadows.

quality of light

Size of the light source

So far I’ve just talked about light in terms of its quality. I think the best way to evaluate the quality of light is to learn to look at it and assess the direction it’s coming from, plus the hardness or softness of the light, for yourself by seeing how it falls on the subject.

But it will help if you understand the key factor that differentiates a hard light source from a soft one is the size of the light source relative to the subject.

The key factor that differentiates a hard light source from a soft one is the size of the light source relative to the subject

For example, if you use a flash head without a modifier to take a portrait, the light is hard because the light source is much smaller than your model. To make the light softer, you need to use the largest modifier you can and move the flash as close to your subject as you can.

quality-light-hard-soft-9

The light on a sunny day is hard because the sun is small in relation to your subject. If you were able to look at it without damaging your eyes it would appear to be just a dot in the sky.

Yet if it is cloudy, foggy, or raining, the weather conditions diffuse the light, spreading it out so that it seems to be coming from the entire sky, rather than a single point in the sky. The light source is now very large compared to the subject, and the light much softer.

A similar diffusion effect occurs as the sun nears the horizon at sunset.

Your turn

Hopefully this article has helped you understand the key differences between hard and soft light. How important is the quality of light in your work? What types of light do you prefer to shoot in? Please let us know in the comments.


Mastering PhotographyComposition and line

My ebook Mastering Photography: A Beginner’s Guide to Using Digital Cameras introduces you to digital photography and helps you make the most out of your digital cameras. It covers concepts such as lighting and composition as well as the camera settings you need to master to take photos like the ones in this article.

googletag.cmd.push(function() {
tablet_slots.push( googletag.defineSlot( “/1005424/_dPSv4_tab-all-article-bottom_(300×250)”, [300, 250], “pb-ad-78623” ).addService( googletag.pubads() ) ); } );

googletag.cmd.push(function() {
mobile_slots.push( googletag.defineSlot( “/1005424/_dPSv4_mob-all-article-bottom_(300×250)”, [300, 250], “pb-ad-78158” ).addService( googletag.pubads() ) ); } );

The post Quality of Light – What is Beautiful Light? by Andrew S. Gibson appeared first on Digital Photography School.


Digital Photography School

 
Comments Off on Quality of Light – What is Beautiful Light?

Posted in Photography


Beautiful Bacteria: Infectiously Intricate Paper Cut Art

07 Apr

[ By Steph in Art & Sculpture & Craft. ]

bacteria paper cut 1

Few people outside of research scientists are quite so well-acquainted with the bacteria that grows inside the human body as artist Rogan Brown, who spends up to four months studying, cutting and assembling his paper reproductions of microbes and pathogens.

bacteria paper cuts 11

The series ‘Outbreak,’ completed in 2014, was inspired by a meeting with a group of microbiologists planning a new exhibition center focusing on the human microbiome, and its exhibition just happened to coincide with the deadly ebola outbreak last summer, when everybody had infectious diseases on the brain.

bacteria paper cuts 7

bacteria paper cut 2

“Fascinated by this hidden world I spent months researching the strange shapes and forms of microbes and pathogens,” says Brown. “I wanted to create a piece that examined our fears of the microbiological world, so out of one of the petri domes a group of bugs burst forth, full of ferocious uncontrollable energy.”

Bacteria Paper Cuts 8

bacteria paper cuts 9

bacteria paper cuts 3

Stacks upon stacks of finely-sliced white paper make up each organism, nestled into white foamboard dishes. A more recent piece, ‘Cut Microbe,’ measures over 44 inches in length, about a half a million times the bacterium’s actual size.

bacteria paper cuts 6

bacteira paper cuts 4

The details are scientifically accurate, including the tentacle-like flagella that allow the bacteria to swim through our intestinal tracts, yet rendered in white paper, they become something aesthetically pleasing to gaze at, removed from the grotesque nature most often associated with them.

microbe detail

“People often marvel at the time I spend on a sculpture but Time is the fourth dimension that gives my work part of its value. Few other art forms foreground the amount of time spent making them as a paper sculpture does: every cut is a moment. The end result is the sense of something incredibly hard won and precious which is precisely the message I wish to convey: we need enormous concentration and effort to really SEE and appreciate what we see.”

Share on Facebook


[ By Steph in Art & Sculpture & Craft. ]

[ WebUrbanist | Archives | Galleries | Privacy | TOS ]


WebUrbanist

 
Comments Off on Beautiful Bacteria: Infectiously Intricate Paper Cut Art

Posted in Creativity


Brutal but Beautiful: Book of 88 WWII Coastal Military Ruins

08 Mar

[ By WebUrbanist in Abandoned Places & Architecture. ]

world war eerie images

Traveling 23,000 miles over 4 years, photographer Marc Wilson has amassed an amazing collection of images spanning bunkers, gun emplacements, observation posts, command centres and other wartime infrastructure around Europe.

wwii coastal war ruins

war time bunker remnants

In his book, The Last Stand, 86 of the resulting images are arrayed to tell a complex story of different times and places. More than merely photographing these haunting remnants of war, however, Wilson also provides highly articulate reflections on everything from their site-specific purposes and aesthetics to their broader places in military and architectural histories.

war ruins woods

world war remnant architecture

“Composed of copious quantities of poured concrete,” many of these structures “defy and eschew any established aesthetic sensibilities: no hint of the classical, the gothic or the baroque here. Their geometries, purely contingent, were designed to resist the effects of the latest developments in projectile technology, their profiles shaped to deflect such missiles and avoid any direct percussive explosions on their structures.”

orld war brutalist remains

world war encampments

world war concrete bunker

His shots are carefully composed and timed, often taking place in the early hours of the morning when eerie mists and dim lights grant the subjects a surrealistic atmosphere. There is a dreaminess and dreariness to his work that manages to make the objects captured seem both ordinary and otherworldly. Prints of many of the pieces featured in the book can be purchased as well.

world war castle tower

world war winter imagery

world war water barrier

Unlike even the most pragmatic warehouse of the time, “there was nothing speculative or arbitrary about the bulwarks of their sometimes bizarre and often ungainly forms: they were purely functional. While far from being graceful or classically proportioned, there is something visually appealing about the alien (and sometimes sinister) forms of those bunkers. Novelty does not quite describe this appeal: more surprise perhaps – a surprise that courts the sublime.”

Share on Facebook


[ By WebUrbanist in Abandoned Places & Architecture. ]

[ WebUrbanist | Archives | Galleries | Privacy | TOS ]


WebUrbanist

 
Comments Off on Brutal but Beautiful: Book of 88 WWII Coastal Military Ruins

Posted in Creativity


Beautiful Dreamer: Garret Suhrie’s moonlit landscapes

04 Jan

Concentrating on landscapes, waterways and exotic locations, Garret Suhrie’s fascination with nighttime photography was sparked as a creative outlet for a demanding day job. Now as a full-time photographer, Suhrie has been traveling the world to capture nature-by-night for more than ten years now. Take a look at his work and find out more about his process. See gallery

Articles: Digital Photography Review (dpreview.com)

 
Comments Off on Beautiful Dreamer: Garret Suhrie’s moonlit landscapes

Posted in Uncategorized


Shooting Sunspots or How to Get a Beautiful Lens Flare

26 Nov

Sunspots, they’re such an enigma. They’re huge right now. Everyone wants to see them in their photos, but they don’t want to have them on their wall…unless you do it right. When I first started in photography, 20 years ago, there were Big Taboos, the Uncrossable Chasms that one never even considered crossing; Never use a flash on camera, keep Continue Reading

The post Shooting Sunspots or How to Get a Beautiful Lens Flare appeared first on Photodoto.


Photodoto

 
Comments Off on Shooting Sunspots or How to Get a Beautiful Lens Flare

Posted in Photography


Create Beautiful Portraits with CameraBag 2 Software

27 Sep

CameraBag for portraits

Do you use Lightroom for processing portraits but get frustrated by its limitations?

One way around this is to use a plug-in or buy some Develop Presets. But these can be expensive, so you may be interested in a cheaper alternative.

One of my favourites is Nerve Center’s CameraBag 2. It’s a bargain at just $ 20, and while it’s not as convenient to use as a plug-in that you can access directly from Lightroom, it is easy to incorporate into your workflow. Let me give you a couple of examples. Here’s the first; I selected it because there’s a dramatic difference between the photo created in Lightroom and the one created in CameraBag.

CameraBag for portraits

CameraBag for portraits

Here’s another one. The changes are more subtle, to show you can use the software with a light touch.

CameraBag for portraits

CameraBag for portraits

Lightroom workflow

Now you’ve got a taste for what CameraBag can do, I’d like to show you how to incorporate it into your Lightroom workflow.

As CameraBag is not a Lightroom plug-in, you need to export your photos as either JPEG or TIFF files (I recommend 16-bit TIFF) before you can open them in CameraBag. Start by creating a folder on your hard drive to store the photos. I call mine Photos (plug-ins temporary).

In Lightroom, select the photo/photos you want to edit in CameraBag. Go to File > Export. These are the settings you need to adjust in the Export window.

Export Location: Select the folder you just created. This is where Lightroom will save the files.

CameraBag for portraits

File Settings: Set Image Format to TIFF, Color Space to sRGB and Bit Depth to 16 Bits/Component.

You don’t need to touch any of the other settings in the Export window.

CameraBag for portraits

You can speed up the process by creating a User Preset. Click the Add button and give the new preset a name. All you have to do in future is click on the preset to apply the same settings. Easy!

CameraBag for portraits

Processing portraits in CameraBag

Start by opening the portrait you want to edit in CameraBag. You will see something like this:

CameraBag for portraits

The layout is minimal. Use the four buttons* in the top-right corner to access the program’s editing options.

CameraBag for portraits

* Alternatively, you can access the controls by clicking on the tabs on the very right of the screen. The functions are the same, just laid out differently.

My Styles and Cameras

Click either of these buttons to instantly choose from over 150 filters. Naturally, not all of them will suit your portrait. But look closely and you will definitely find something you will want to work with.

CameraBag for portraits

My Style filters. This is where you’ll find the majority of the filters.

CameraBag for portraits

Camera filters. There are some additional choices here.

On the surface, CameraBag may look as if it’s just another program designed to give your photos an Instagram type look. But dig a little deeper and you’ll see that it is a high quality photo editor. There are two important things to note here. The first is that CameraBag uses a 32-bit processing engine, preserving your portrait’s fine graduations of tone and colour.

The second is that all editing is non-destructive. You can adjust or undo any edits you make. For this example I’ve chosen the Film NC-1A filter. It’s a subtle preset that adds a slight matte effect and a blue cast to the shadows.

CameraBag for portraits

Now look at the tiles that have appeared below the photo.

CameraBag for portraits

Some of these represent the edits that have been made by the filter to your portrait. The others are additional, allowing you to alter the effect of the filter. For example, when I click on the Toning tile, a slider appears that lets me adjust the strength of the effect.

CameraBag for portraits

When I click on the Saturation tile, the slider is set to 50, indicating that no change to colour saturation has been made. But the option is there to increase or decrease it.

CameraBag for portraits

Adjustments

This is where you’ll find CameraBag’s photo editing tools. It’s a comprehensive selection. Among other things you can adjust colour, contrast and tonal values, add grain or a vignette, tweak the RGB or colour curves, crop, and adjust the colour temperature. I won’t bore you with detailed explanations, because you will be able to figure it out easily enough for yourself if you download the trial.

However, there’s one tool I’d like to draw your attention to (I used it in both opening images at the beginning of the article), and that’s Lightleak. There are two sliders: Remix, which changes the appearance of the light leak effect, and Amount, which adjusts the strength.

CameraBag for portraits

Borders

Finally, we come to the borders. You can choose one of CameraBag’s borders, or create your own in another program (such as Photoshop) and use that. While I used borders in the opening images to highlight one of the differences between CameraBag and Lightroom, they are something that I tend to avoid as I see them as bit of a gimmick. But they are there if you want to use them.

You should also note that if you use one of CameraBag’s built-in borders, it reduces the size of your image to 2000 pixels along the longest edge.

CameraBag for portraits

By the way, you can create your own filters using the current settings you have picked for the photo you are editing. Just go to File > Add Filter to My Styles to do so. CameraBag prompts you to enter a name and it is stored under My Styles.

You can download more filters, created by other CameraBag users, from the CameraBag website. You can also submit your own for others to share. Here’s the final version of my portrait (without the light leaks effect).

CameraBag for portraits

What CameraBag lacks

Is there anything that CameraBag doesn’t have? There are two features that I would really like to see included in future versions. The first is some kind of masking feature so you can control which part of the image is affected by an edit. The second is some portrait retouching tools. Having said that, if you use CameraBag at the end of your workflow, to edit portraits that you have already processed in Lightroom or Photoshop, then these features won’t be missed much.

Here’s a summary of CameraBag’s good and bad points.

Pros:

  • Quick and easy to use.
  • Lots of interesting built-in presets.
  • Complements Lightroom and Photoshop.
  • Good control over colour, contrast and tonal values like highlights and shadows.
  • 32-bits per component colour depth.
  • Non-destructive editing.
  • Raw file support.
  • Inexpensive!

Cons

  • Reduces image size to 2000 pixels along the longest edge if you apply a built-in border.
  • Only works with one colour space (whatever your monitor is set to).
  • Can’t be added as a plug-in to Lightroom, Aperture or Photoshop.
  • No local adjustments or portrait retouching tools.
  • No batch processing tool.

Give it a try

As with any software or plug-ins, the best way to see if CameraBag is for you is to download the trial version and have a play. Follow the link to download the software or learn more about it. You’ll find lots of information about CameraBag on the website, including how-to videos here.

Your turn

Have you used CameraBag or an inexpensive/free image editor such as Pixelmator, Picasa or GIMP? I’d like to hear about your experiences. What inexpensive software would you recommend for our readers?


Mastering Lightroom: Book Four – The Photos ebookMastering Lightroom: Book Four – The Photos

My new ebook Mastering Lightroom: Book Four – The Photos takes you through ten beautiful examples of photography and shows you how I processed them step-by-step in Lightroom. It explores some of my favourite Develop Presets and plug-ins as well as the techniques I use in Lightroom itself. Click the link to learn more.

The post Create Beautiful Portraits with CameraBag 2 Software by Andrew S. Gibson appeared first on Digital Photography School.


Digital Photography School

 
Comments Off on Create Beautiful Portraits with CameraBag 2 Software

Posted in Photography


Lastolite ‘Out of Focus’ backgrounds bring beautiful bokeh to your home studio

26 Jul

Everyone loves the look of a nice out of focus background, but it’s hard to achieve in a home studio. Accessory manufacturer Lastolite believes it might have the solution, with two new reversible backgrounds printed with out of focus images of the ocean / autumn foliage and summer foliage / city lights. Measuring 1.5 x 1.2m, the backgrounds are big enough for almost full-length portraits of most adults, and weigh in at 3kg (6.6lb) each. Click through for more details.

Articles: Digital Photography Review (dpreview.com)

 
Comments Off on Lastolite ‘Out of Focus’ backgrounds bring beautiful bokeh to your home studio

Posted in Uncategorized


Crowdsourced Data Reveals Most Beautiful Urban Walking Routes

14 Jul

[ By WebUrbanist in Destinations & Sights & Travel. ]

best walking routes study

Using a mapping algorithm coupled with citizen reviews of sights and scenery, a team of researchers has developed a way to choose paths through cities based on beauty, quiet and happiness rather than simply the shortest distance between two points.

shortest or beautiful route

The project employed Google Street View and Geograph as well as Flickr images and their metadata to build out an initial estimation of probable best paths, then solicited human feedback (to check and enhance the results) from a group of participants on the website UrbanGems (shown above).

london main sites map

The study, published by Cornell University’s arXiv, came up with a number of route suggestions in Boston and London and contains a number of interesting findings. For starters, the ‘beautiful’ routes were only slightly longer than the shortest routes, and significantly shorter than typical tourist-oriented directions and guided-tour paths. As the algorithm improves, it is increasingly able to generate paths through new cities via metadata alone, reducing reliance on input from people.

beauty and shortest boston

boston main sights map

The project’s creators included Daniele Quercia and Luca Maria Aiello of Yahoo Labs in Barcelona and Rossano Schifanella of the University of Torino, Italy. From their abstract: “When providing directions to a place, web and mobile mapping services are all able to suggest the shortest route. The goal of this work is to automatically suggest routes that are not only short but also emotionally pleasant.

beauty walking route london

shortest walking route london

The assessments are not simply qualitative value judgments, but a hybrid of human and machine input: “Based on a quantitative validation, we find that, compared to the shortest routes, the recommended ones add just a few extra walking minutes and are indeed perceived to be more beautiful, quiet, and happy.”

happy walking path london

quiet walking route london

From UrbanGems: “Buildings and neighbourhoods speak. They speak of egalitarianism or elitism, beauty or ugliness, acceptance or arrogance. The aim of UrbanGems is to identify the visual cues that are generally associated with concepts difficult to define such beauty, happiness, quietness, or even deprivation. The difficult task of deciding what makes a building beautiful, or what is sought after in a quiet location is outsourced to the users of this site using comparisons of pictures. With a comprehensive list of aesthetic virtues at hand, we would be more likely to systematically understand and re-create the environments we intuitively love.”

Share on Facebook


[ By WebUrbanist in Destinations & Sights & Travel. ]

[ WebUrbanist | Archives | Galleries | Privacy | TOS ]


WebUrbanist

 
Comments Off on Crowdsourced Data Reveals Most Beautiful Urban Walking Routes

Posted in Creativity


DPReview Reader Showcase: The beautiful game

01 Jul

In honor of one of the World Cup, underway in Brazil right now, we asked DPReview forum members to share their best football shots (or soccer, as it’s known in this corner of the world). We suspect more than a few devoted fans are spending time at the pub and not in front of their computers, but a faithful few submitted some of their favorite photos. They capture the spirit of the sport beautifully, from youth games to pros going toe-to-toe. Take a look at some of their work. See gallery

related news: Digital Photography Review (dpreview.com)

 
Comments Off on DPReview Reader Showcase: The beautiful game

Posted in Uncategorized