The scene: Outdoors with full sunlight. The gear: Your camera, lens, and flash. The problem: You find that your flash only works at 1/200th or below so you need to be at f/16 or f/22 to get the shot. Everything is in focus, including all the cars and other distractions in the background. Those dust spots you keep meaning to clean are also perfectly visible. Why won’t it work with a higher shutter speed so you can have a wider aperture? Well, it’s all down to the issue of sync speed, more specifically using flash and high-speed sync.

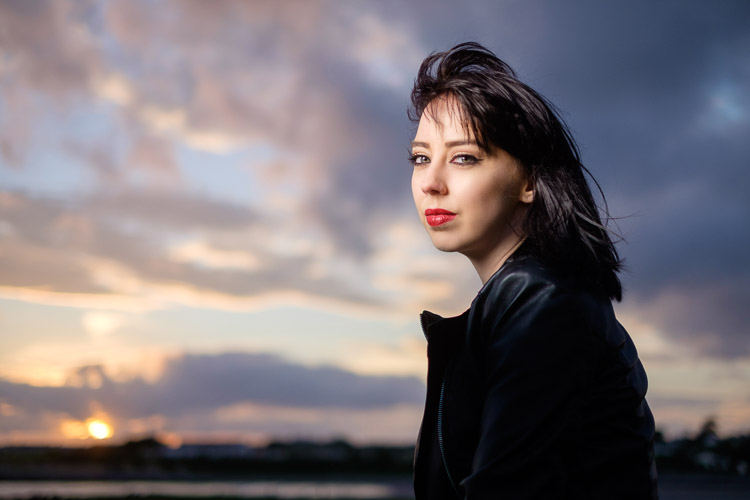
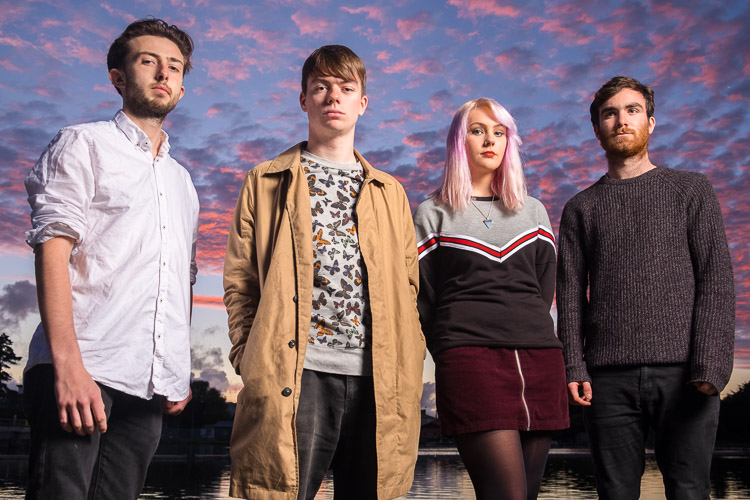
A typical portrait shot with off-camera flash.
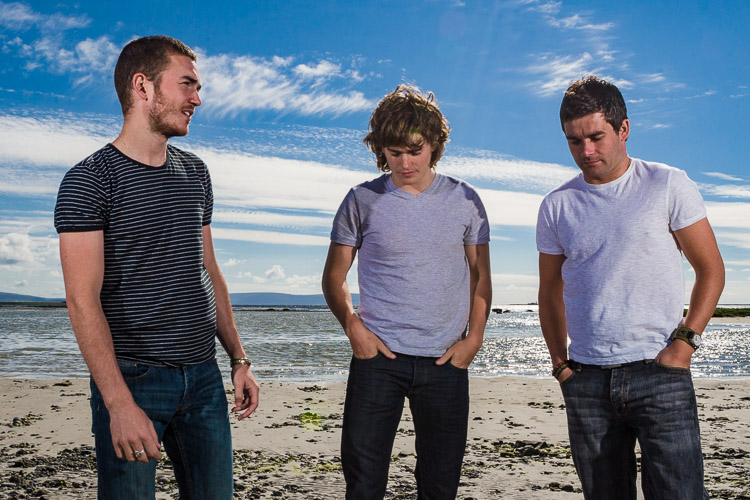
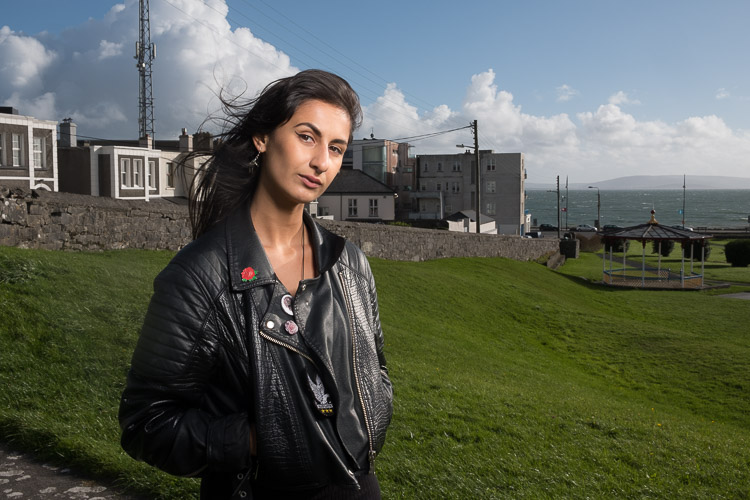
To overpower the sun and stay below the camera’s sync speed, you’re forced to use a narrow aperture. Here I’m at f/20 just to stop the backlight overpowering the hair and the sky from blowing out. The resulting aperture means that everything is pretty much in focus, leaving the background looking cluttered. This shot is for example only, you should generally make a point of choosing clutter-free backgrounds
Sync Speed
Sync Speed is the fastest shutter speed where the camera exposes the whole frame at once. When you fire any shot below this speed, the first shutter curtain opens fully, revealing the entire sensor to light. At the end of the exposure time, the second shutter curtain moves across the frame to finish the capture. Both curtains then reset together (this means you get no light leaking in).
Generally, the sync speed varies between 1/125th and 1/250th, depending on your camera. You’ll find some quoted sync speeds are not indicated correctly. For instance, the Canon 5D series are rated at 1/200th but often show a black band at the bottom of the screen at this speed when it’s used with flash.
When you go above the sync speed, the second curtain starts to move before the first one has completed its journey. As your shutter speed gets shorter and shorter, the gap between these curtains narrows to a tiny slit. Despite this, all parts of the sensor receive light, and a full exposure is made. On a bright day, with a prime lens, you can easily shoot at 1/8000th at f/1.4 and have a perfect exposure. All parts of the frame still receive light, because it’s continuous throughout the exposure.
The Sync Speed Problem
It’s when you introduce flash that you start to have problems. You see, when a flash is fired (usually when the first curtain is opened) all the light from it comes out in a very short space of time (in order of milliseconds). When you go above (faster than) the sync speed, the position of the curtains doesn’t reveal the entire frame at the time the flash fires. The means the shutter curtain blocks part of the flash and prevents it from reaching the sensor. Any ambient light will expose normally, but the flash gets hidden in part of the frame. As your shutter speed gets faster and faster, more and more of the flash is blocked until it’s no longer visible in the shot.
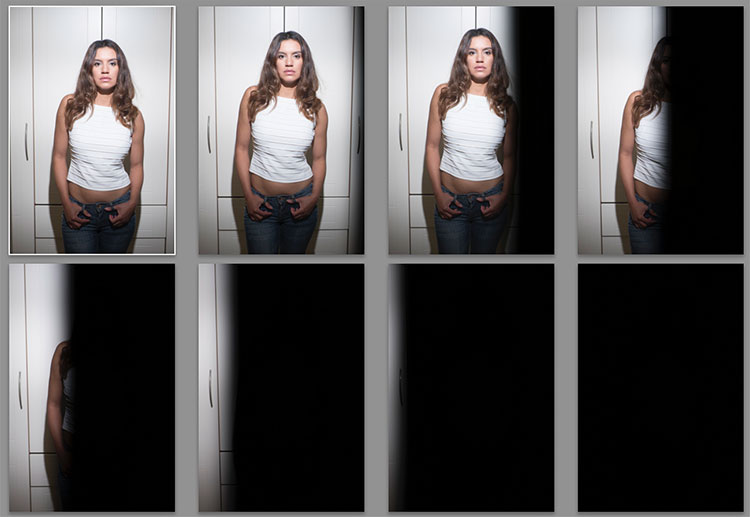
Here’s a set of images taken at 1/3 stop increments with a flash. Shot on the Fuji X-T2, the first is at 1/250th, the native sync speed of the camera. In order (left to right, top to bottom) 1/250th, 1/320th, 1/400th, 1/500th, 1/630th, 1/800th, 1/1000th, and 1/1250th. Even 1/320 is useable if the subject being lit is away from the edge.
Everything in Focus
Normally when you use flash outside in daylight, you end up having everything in focus. Remember the Sunny f/16 Rule? If your subject is in direct sunlight during the day, you can set your aperture to f/16 and your shutter speed will be one over your ISO value. So if your ISO is set to 100, your shutter speed would be 1/100sth (and f/16). As another example, if your ISO is 200, then the shutter speed would be 1/200th. To get a richer sky, you’d really need to be at f/22, making it a tough job for your flash. Because you can’t get faster than 1/250 (sync speed), you have to increase the aperture to expose the shot correctly.
Shooting at f/20, 1/160 to get a richer sky for this band promo shot. It’s quite an old shot, so there were few options for reducing the aperture at the time. Even the hills in the background are in clear focus. The beach isn’t exactly pretty either.
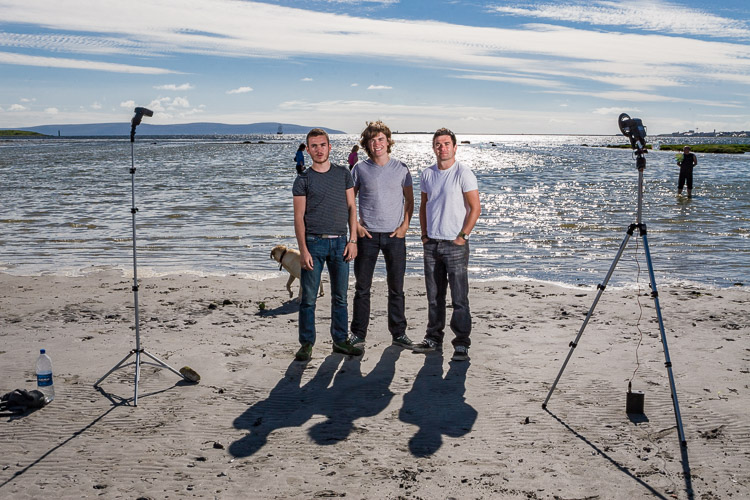
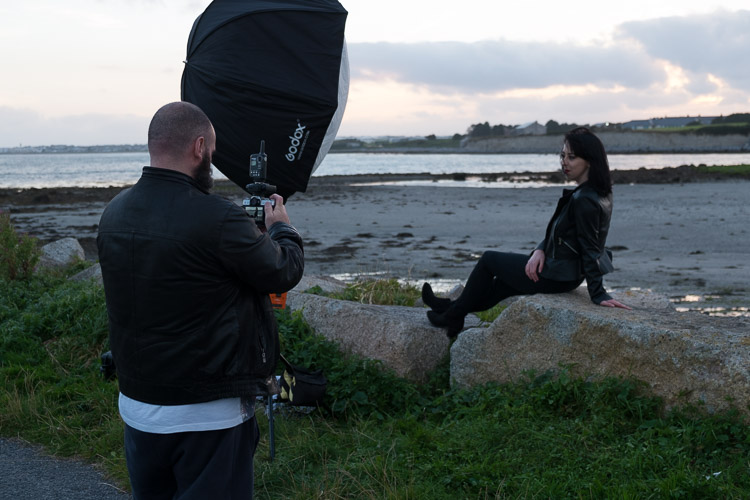
A behind the scenes shot – two flashes on full power.
Softer light
Most speedlights at full power, bare bulb, in close, can give you just enough power to look natural at these settings. Bare flash is not flattering, though it can add character. If you want softer, more flattering, light, you need more power. Most modifiers that give soft light will take two stops of power compared to the bare flash. That’s a lot of power. You could use a more powerful light, like the Godox AD360, the Elinchrom Quadra, or the Profoto B1. Alternatively, you could use a bracket that takes multiple speedlights. Either option allows you to get soft, flattering, light while outdoors.
A higher power option is the Godox AD360. This is coupled with the Godox 120cm Octa for softer light. This is shot at f/2.8, ISO200 and 1/125th. Because it’s after sunset, you can easily get wider apertures. just one of the options you have for the shallow depth of field look.
This solves the soft light issue, but it doesn’t solve your aperture issue. For creamy bokeh (the soft out of focus background look), you need to get our aperture down. If you’re shooting in the early morning or late evening, you can do this easily, but during the day it’s an issue.
The Solution: High-Speed Sync
You’ll need to find a way to get around the issue of sync speed for daytime shooting. Fortunately, there is a solution. It’s not perfect, but it does work. It’s called High-Speed Sync, also known as Focal Plane Sync. High-Speed Sync (HSS) works in a unique way. Instead of firing the flash at the start of the shot, HSS pulses the flash throughout the whole exposure, trying to simulate the effects of a continuous light.

The AD360 set to High-Speed Sync. Usually, there’s a single button hold, or a double button combination to turn HSS on.
It works well, but it comes at the expense of power, and heat. HSS works the flash really hard. After a few shots, the flash may even shut down for cooling. For HSS to work, you need the camera to transmit HSS to flash, and for the flash have HSS built-in. All major brands allow it, though Fuji only just introduced it. Cactus Image makes a trigger called the V6II which allows you to use any HSS flash with any camera. Read my review of the Cactus V6II trigger here.
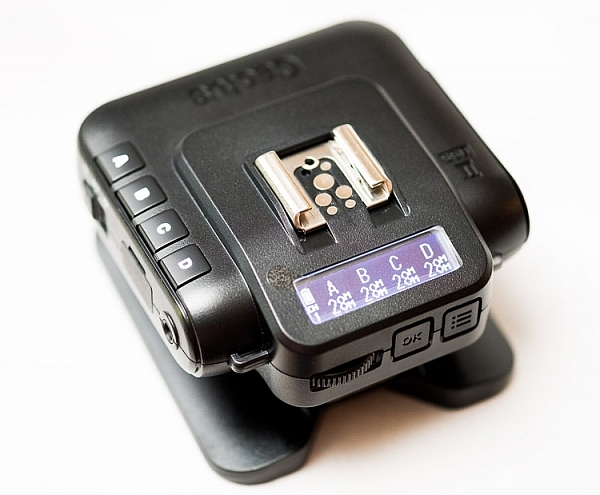
The Cactus Image V6II allows power and zoom control over a wide range of speedlights, as well as offering High-Speed Sync abilities.
The Look of HSS
You can use HSS to go over the sync speed barrier, so settings like 1/4000th at f/1.4 are achievable with flash. You get the complete control of the light using flash, but with the wide aperture you usually associate with natural light photographs. Yes, please!
Photographers like Dylan Patrick use this technique to create cinematic portraits. By shooting wide shots with shallow depth of field, you really have the option to create images that look like they were stills from the silver screen.
Settings for High-Speed Sync
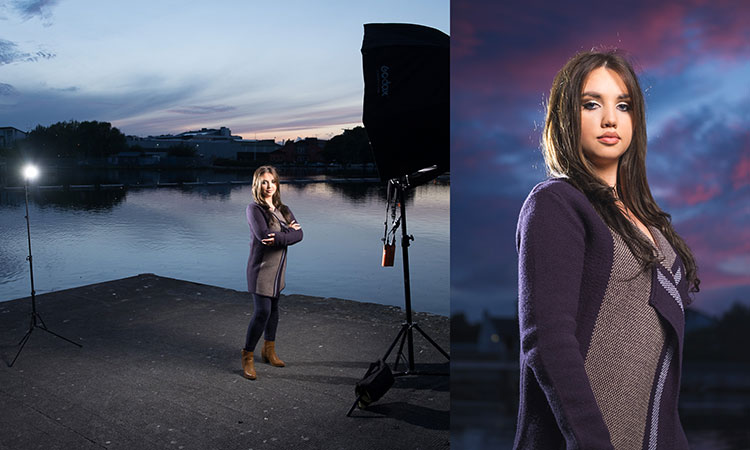
Let’s look at a typical setup and settings for a shoot using HSS. This shoot happened to be done on an evening, but I really wanted shallow focus. The camera was set to f/1.4 for super shallow depth of field. To get the clouds properly exposed, I had to drop the shutter speed to 1/4000th. To get the flash (an AD360) to work I had to set it to HSS. Using a Cactus V6II trigger, I could easily get my Fuji X-T10 to shoot with HSS.
An evening HSS photo shot at 1/4000th, ISO200, f/1.4. Notice the shallow depth of field in the image.
The BTS, an AD360 with 120cm Octa, shot by my assistant Ola.
If you use Canon, the Cells II trigger provides HSS with the AD360. It would also work speedlights like the v850.
Using HSS on the AD360, I captured this shot at about 3:00 in the afternoon with the sun high in the sky. Shot with an 85mm lens at 1/2000th at f/2.5, ISO100 on a Canon 5DIII. The sun acts as a second light in the shot. Again the background is nicely out of focus.
Another High-Speed Sync portrait example.

1/1000th, f/4, ISO800. An issue with shooting outdoors on overcast days is your shutter speeds can be low enough to cause camera shake. By bumping up the ISO, you can get a faster shutter speed, keeping you safe from camera shake. Using HSS then lets the flash do the work. I’ve shot to keep the flash looking as natural as possible here.
The Alternative
High-Speed Sync isn’t the only way, you’ve got other options. The first has been mentioned. Shoot at the beginning or end of the day. You can get great sky color and you’re not fighting strong sunlight. Of course, if you’re doing any work, even as favors, you often have to work to the subjects schedule rather than your own. So, you may have to shoot at midday to suit them. That leads to the next option.
A shot of the band Drown for The Thin Air magazine. The evening light makes the shot. I needed a higher aperture to get the whole band in focus, so opted not to use HSS here.
Using Neutral Density Filter
If you shoot landscape photography, you will be familiar with Neutral Density (ND) filters. This filter allows you to slow the shutter speed down to get nice silky water. Neutral means that it adds no color, while the density part refers to blocking light. You can get them in a range of values from 1 stop to 16 stops.
For portraits, these allow you to drop the aperture down instead of shutter speed. So a 4 stop ND would take you from f/16 to f/4. The drawback is that as you block light, focusing can become harder. Another potential issue is that not all ND filters are actually neutral. Some tend to have a color cast. I have a Firecrest 10-stop for landscapes, which is neutral, but the older 4-stop I have from the same company is slightly pink.
Without the ND filter applied, the entire scene is in focus. ISO 200, f/16, 1/250th.
With the 4-stop ND filter applied, the background can be rendered out of focus. The flash is still at the same power as the shot above without the filter. The filter does have a color cast, which is hard to remove completely. ISO 200, f/4, 1/250th.
Conclusion
I hope this gives you some options and ideas for how you can make portraits outdoors even when the sun is bright, by using flash and high-speed sync. Please put your questions and comments below, and share your high-speed sync portraits as well.
googletag.cmd.push(function() {
tablet_slots.push( googletag.defineSlot( “/1005424/_dPSv4_tab-all-article-bottom_(300×250)”, [300, 250], “pb-ad-78623” ).addService( googletag.pubads() ) ); } );
googletag.cmd.push(function() {
mobile_slots.push( googletag.defineSlot( “/1005424/_dPSv4_mob-all-article-bottom_(300×250)”, [300, 250], “pb-ad-78158” ).addService( googletag.pubads() ) ); } );
The post How to Make Beautiful Portraits Using Flash and High-Speed Sync by Sean McCormack appeared first on Digital Photography School.

Digital Photography School


You must be logged in to post a comment.