A Guest Post by Tom Di Maggio from Tom Di Maggio Photography.
When I posted the my article about creating Eye Catching Composites I got some comments and a lot of emails asking for more details on my post processing technique.
This article will be more focused on how to achieve the wanted effect. I will describe the technique used for the background as well as the one used on the subject. I used Lightroom 4, Photoshop CS6 and NIK Color Efex Pro 4 to achieve this. I presume that the reader has a basic understanding of Layers and Blending Modes in Photoshop.

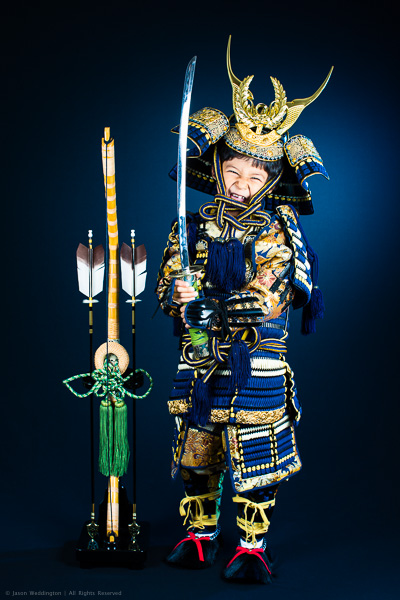
Here’s a picture of the original to the left and the finished picture to the right.
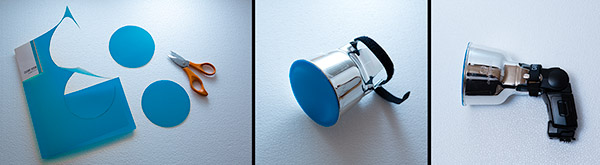
As with any picture the background is very important for the final feel of the image, for this one I choose an old stock photo of a metal door. I didn’t want it to be as hard though, I wanted something bright and soft with a touch of hardness. I placed the picture on top of a white Layer and reduced it’s Opacity until I had the visual impact I was going for. In this case it was 13% only. I could have used a different blending mode but I am a fervent adherent to the “KISS” principle…
As with most of my pictures I tend to darken the borders or lighten the center of the image in order to draw the eye to where I want it to go. In this case the background itself is bright enough, so I use another Layer with a slight vignette. To achieve this I use the elliptical selection too and draw a rough ellipse. I invert the selection and feather it with a value of 250. You can repeat this step a few times until the feather suits your wish. Finally I just fill it with black and adjust it’s opacity to where I think it will fit for the end result. I have to say here that I usually end up readjusting the vignette once the image is finalized. Group the Background Layers into a folder that you will call “Background” and hide it, we won’t need it until after the masking procedure. Actually as I always start with my backgrounds I always end up fine-tuning it after the subject is in place. One could argue that I should start with the subject, but I feel that I slightly adapt the post processing of my subject to the background. I feel that it makes it easier to blend the subject better into the background.

The door original on the left, with an Opacity of 13% (over a white Layer) in the middle and the final version with the vignette on the right.
As you can see with the original picture I tend to slightly underexpose my composite pictures. If I wasn’t going to use this picture for a composite it would have lit it a bit lighter than this. For the post processing technique I use it is vital not to loose any detail in the picture. I don’t do any adjustments to the picture at this stage. In Lightroom I simply right click the image and choose the option: Open in Photoshop as Smart Object. You will now see a new Layer in Photoshop that has a small square in it. If you double click on that little square it will open the adjustment panel for that Layer. This is where I remove as much contrast from the image as I can without loosing and detail. I drag the contrast slider all the way down to -100 and the shadows slider to the right until it starts creating artifacts. Depending on the picture I will also drag the Blacks slider to the right. Basically what I want to achieve here is a picture that has the less amount of contrast possible. Once you are happy with the way the picture looks you can click “ok”. Keep in mind that you will be able to come back to this screen and adjust the settings until you are confident with the outcome of the procedure.
?

Here’s the first Layer where most of the contrast has been removed.
Once done I create a copy of this smart object as another smart object. To do this I right click on the Layer I want to duplicate and choose copy to new Layer as smart object. Double click on the small square again and choose the “HSL” button and switch the image to B&W by checking the “Convert to Grayscale” tick box. You can argue here that there are better ways to get a black and white picture, and I would be the first one to agree with you. But the goal here is not to convert the image to Black & White but to get some contrast and detail back into the picture. Sometimes I slightly adjust the brightness at this step, but that’s about it. Then I change the blending mode of this Layer to overlay and check the result. If I want to fine tune something at this stage I do it on one of the two Layers by double clicking the little square and going back into the adjustments panels. More often than not it will be the saturation and brightness of the picture. I sometimes also play with the opacity of the B&W Layer. It is important at this stage that you like the combination of the two Layers as we will now move on to steps that will make it harder to adjust these things.
?

The Black & White Smart Object Layer
??

The BW adjustment Panel

The color adjustment
If you’ve followed these steps you will have two Layers by now. We will merge these two into a new Layer by hitting the Command-Control-Shift-E keys on the keyboard. This will create a third Layer that we will apply a Gaussian blur filter to. I usually choose a value between 10 and 15 here for the blur. Again this is a matter of taste and you should experiment a bit with this. Change the blending mode to Overlay and turn the Opacity down to somewhere around 30 to 40 percent. Hit the Command-Control-Shift-E keys again and choose Filter-Other-High Pass with a value of 3 or 4 and change the Blending Mode to Overlay again. These two Layers will sharpen the image a bit and give it some colors back that went lost during the first steps of the post processing. You can play around with the Opacity of the blurred Layer until it fits your taste. I usually group the four Layers into one Layer Folder at this stage.
 Picture of the 4 Base Layers merged together.
The next steps are purely image/skin corrections and optional. That being said I use them on every picture that includes a face. For this we have to merge the Layers again to a single one. We do this by using the same keyboard shortcut as before: Command-Control-Shift E and name that Layer “Blur”. And then simply duplicate the Layer again with Control-J and name that Layer “Apply”. Group both Layers to a new Folder. Apply a Gaussian Blur with a value of 22 on the “Blur” Layer. (The value has to be 22 for this to work). Select the “Apply” Layer and choose the Menu Image – Apply Image. In the window that just opened choose the “Blur” Layer in Layer and Subtract as Blending. Set the scale to 2 and the offset to 128. (These are the values that you need to use for this to work). Hit ok and change the Blending Mode of the “Apply” Layer to Linear Light. If you’ve done this correctly and with this Group on and off you should see no difference at all. Now you can choose the “Healing Tool” and start cleaning up the skin of the subject on the “Apply” Layer. What this does is to allow you to “heal” the skin without changing the color values. It will only affect texture. It’s a very effective way to clean up skin or other surfaces without loosing or changing the color values of the subject. This is a technique I use a lot and depending on the image this is where I will spend most of the time. As you can see on the image below I also brightened up the image a tiny bit with a Brightness Layer Adjustment.

Picture after the corrections. In this case only the face was retouched.
At this point I export a copy of the image into Color Efex Pro 4 and apply the three following effects on it: Bleach Bypass, Tonal Adjustments and Detail Extractor. There are no fixed values for this. I adjust them to the individual picture. I do however overdo this phase on purpose as I will play around with the opacity on the Layer in Photoshop. Once done save the image and import it as a Layer into Photoshop at the top of the Layers. Adjust the Opacity until the effect is as strong as you need it to be. I sometimes use a Layer Mask here if I want to do some fine tuning to the effect.
??

This is the picture after the Color Efex Pro treatment.

As you can see it’s hugely overdone, but on the right the final look with the opacity set at ….
This leaves us with the last part of the workflow. The extraction or masking of the subject. To be honest this is quite fast nowadays. There are multiple ways to extract a subject from it’s background.The method I will describe is the one that works best for me at the moment. I start by creating an automatic selection of the subject with the Quick Selection Tool. Then I zoom in and make sure I didn’t miss anything and try to make the selection as precise as possible. Doing this at this stage will save some time later on in the process. Once happy with the selection click on the “Refine Edges” Button at the top of the screen. This is where a lot of people will do things differently, I check my selection against a white and a black background. This will show me most of the areas I will have to correct later on. I use the Refine Radius Tool around the hair a bit without changing any settings. I then will feather the selection by 1 or 2 pixels and contract it by 1 or 2 pixels. That’s it for the moment….. I will do the rest manually on the Layer Mask. Hit ok and select the Layer Mask. Usually one can notice imperfections around the hair and some fringing around the contours of the body. I use the much underestimated Smudge Tool at this point. Set it’s strength to 20% (average value to start with) and adjust it’s size to fir the area I am fixing and start smudging the mask in the direction of the subject. I usually spend a lot of time at this step to do this carefully and I keep on adjusting the size and strength of the Smudge Brush depending on the area I am working on. I Keep on doing this all around the subject until the extraction is precise enough for the purpose.

The extraction is done. I verify it against black and white backgrounds to get a better result.
Now I can reactivate the background and check the Layer Mask of the extraction and fine tune it to fit the background exactly. At this stage I am done with the heavy work. Sometimes at this stage you might notice that the subject doesn’t really fit the background, it sticks out in terms of color toning. This can be fixed by using color adjustment Layers on both the subject and the background in Photoshop. Or you can do it the same way I do by doing this in Lightroom. You can do this with manual adjustments or by using presets in Lightroom.

The final image
I wanted to add some flare to the picture as I wanted to make it a bit more attracting to the eye. To do that I used a stock photo of flare on a black background and changed the Blending Mode to “Screen” in order to let through the flare only. And I also noticed at this point that I wanted the subject to be a bit brighter, so I added an adjustment Layer to achieve this.

?
The final Photoshop version with Flare and adjusted Brightness.
See more of Tom Di Maggio’s work at Tom Di Maggio Photography, InFocus Photography and on his Flickr Account.
Post originally from: Digital Photography Tips.
Check out our more Photography Tips at Photography Tips for Beginners, Portrait Photography Tips and Wedding Photography Tips.
Preparing your Model and Background for a Successful Composite


Digital Photography School


How To Make A Desktop Background – Adobe Photoshop CS5 (HD) (Commentary)
Hello Guys! My First Tutorial! Sorry It’s a bit weird haha! This is the first part, I will soon be making another tutorial on how to make a background like I have! Sorry it is Crap Haha, It’s my first tutorial IGNORE THESE: how to computer tutorials hacks cmd never again will i be able to make money online with youtube ebay myspace hacks crack white black facebook he was so cute irfanview audacity photoshop retouching effects sony vegas platinum eight 8 1 2 3 4 5 6 7 8 9 10 lol he got owned everyone lets party like a rock star rockstar sean paul ownage hitting drunk these are my tags lol coming for pizza eating pig squealing technician techie making cash with your profile account on youtube haha charlie bit me smosh fred fred gets his finger bit off the song charlie the unicorn funny stuff to look at making cash online scratched chalk videos scratchedchalkvideos we own the tutorial making industry the how to masters ignore these tags tags ignore these MONEY FREE AWESOMEThis is an E3 preview of the new Xbox 360 dashboard soon to be released. xbox 360 new dashboard gears marcus dom halo e3 electronic enterntainment expo dashboards fall update 2008, including new avatars, 1vs100, and Netflix support. New Xbox 360 Dashboard Fall Update 2008 walks you through some of the new features xbox dashboards fall update including avatars 1vs10 Demo game installation process for the New Xbox Expe… SUBSCRIBER HACK WEBDemo game installation process for the New Xbox Experience dashboard …
Video Rating: 4 / 5
Posted in Retouching in Photoshop