RSS
 

Posts Tagged ‘avoid’

10 Tips to Help Photographers Avoid Back Problems

21 Jan

Studies state that one time or another, about 80% of the world population experiences some kind of back problems or pain. This is either due to nerve and muscular problems, degenerative disc disease, arthritis or some kind of trauma. Age, poor physical fitness and being overweight may explain some causes of back pain, but the main reason responsible is for sure bad posture.

A lot of jobs require physical efforts like lifting, pushing, or pulling while twisting your spine, but sitting at a desk all day may be just as bad, as a static posture increases stress in the back.

Nick Haskins

By Nick Haskins

Photographers are for sure high-risk candidates to back pain, either for carrying heavy cameras or bags on their necks or shoulders or by spending a long time at their computers editing images. Every photographer I know always complains about how bad their back hurts after a long shooting session or many hours editing images.

For many years I was one of those photographers with constant back pain. I was always trying to relieve it with pain medication or visits to a chiropractor until the day I woke up with my left arm completely numb. The doctor told me I had two really bad herniated discs in my cervical and that I needed surgery to fix it.

It was not an easy surgery let me tell you; the recovery was long and painful and it all made me realize that I could have avoided reaching this point if I had paid more attention to my posture. So here are some tips I have learned along the way that can help you take better care of your back while doing your photography work, so you can avoid what I went through.

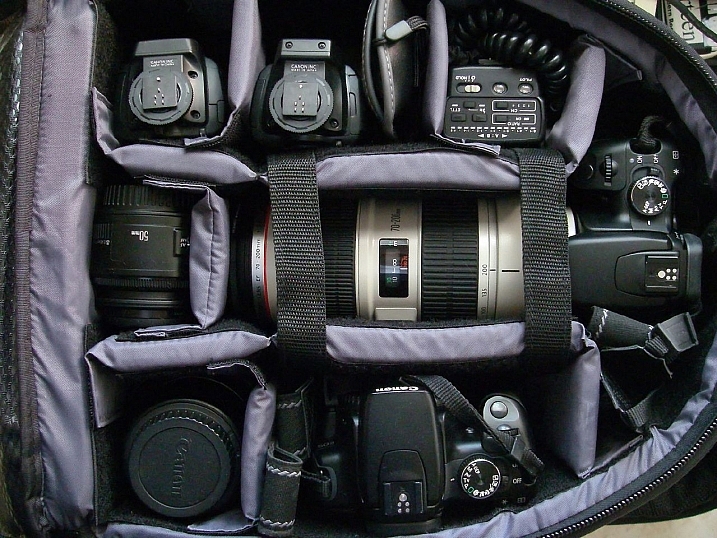
#1 – Trade your shoulder bag for a backpack

10 Tips to Help Photographers Avoid Back Problems

A shoulder bag is a signature style for most photojournalists, and it is indeed practical when you need to have easy access to your equipment while on the move. But it is also a big enemy of your posture, as it puts all the weight in one of your shoulders making your spine curved and unbalanced.

Backpacks distribute the weight equally on both shoulders, making it a much better solution for carrying your equipment. Rolling trolleys are an even better option, but they are not as practical if you need to move fast and don’t have smooth terrain.

#2 – Trade the neck strap on your camera for a sling strap

Having a heavy camera and lens hanging from your neck by a strap is obviously a really bad idea. It causes a lot of stress on your neck, leading to issues with either the spinal discs or in the joints of the cervical spine. Sling straps minimize the impact of the camera’s weight, hanging it from the shoulder and across the torso. This makes it easier for you to move around and reach the camera, reducing the impact on your neck.

10 Tips to Help Photographers Avoid Back Problems

#3 – Get a good office chair

If you spend a long time working on your computer, then a good office chair is something you must invest in. It is really important that your chair is adjustable, and can be regulated to your size, and the position you adopt in relation to the table and the computer you are working on.

The optimal angle position between your legs and back is around 125 degrees.

10 Tips to Help Photographers Avoid Back Problems

Also avoid chairs with wheels that cannot be blocked, as they tend to move back and forward leading you to bad posture while seated. Also, avoid arm rests as they might cause pressure on the elbow tendons leading to tendinitis and ulnar nerve compression.

#4 – Adapt the computer position to your body

Almost everyone uses their computer in the worst possible position as they are most of the time located very low, especially if it is a laptop.

Hunching over and looking down for a long time causes really bad stress on the cervical spine and neck muscles, This can lead to a stiff neck, headaches, and in a long run degenerative spinal problems. The correct thing to do is to place your computer monitor in a position that you can look straight ahead without having to curve your neck.

10 Tips to Help Photographers Avoid Back Problems

#5 – Use a pen and tablet instead of a mouse

A mouse is a fundamental piece of hardware for most people’s computer work, but at the same time, it is a bad ergonomic tool. It forces your hand to stay in an unnatural position, leading in the long run, to hand, wrist, shoulder and arm problems like tendinitis and arthritis.

The use of a pen and tablet, besides giving you much better control of design functions in image editing software, allows a much more natural hand position, avoiding health problems.

10 Tips to Help Photographers Avoid Back Problems

#6 – Take regular breaks and stretch your body

A common mistake we all make is to stand in the same position for long periods of time whether it is photographing, driving, standing at a desk, or simply just relaxing on the couch.

It is fundamental to take small breaks in your daily activities and simply just stretch, allowing the fibers in your muscles to move and avoid cramps and contracting.

10 Tips to Help Photographers Avoid Back Problems

#7 – Get your blood flowing

Poor circulation is the starting point to a lot of really serious health problems. Of course, we would all like to have a healthier life, eat better, and exercise more, but the truth is that it takes a lot of time and discipline.

A great way to overcome this is to turn your regular activities into small exercises.

Simple things like taking the stairs instead of the elevator, or turn a walk down the street to the coffee shop into a power walk, just by adding more movement to your arms while you walk, can make a big difference in your overall physical condition.

10 Tips to Help Photographers Avoid Back Problems

#8 – Always lift with your knees, not your back

Most severe back injuries come from trauma or heavy weight lifting. Trying to pick up something heavy from ground level, using just your back, is a true recipe for a disaster like a herniated disk.

The trick here is to always keep you back straight and use your knees as a lever to lift up the weight. Your legs muscles are much stronger than your back, trust me.

10 Tips to Help Photographers Avoid Back Problems

#9 – Adjust your sleeping position

We spend roughly one-third of our lives sleeping, so if we worry about our posture during the day, we should also worry about our posture while we sleep.

Most hard working people I know are so tired when they get to bed, that they just lay down, close their eyes and get to sleep right away. Most of the time that’s in really awkward positions and they spend most of the night wrestling with their pillow or sinking in really bad mattresses.

The best sleeping position is a really controversial discussion as it is a personal thing due to your body shape, weight, breathing difficulties, etc.

We move a lot in our sleep, but whether you sleep most of the time on your back, side or stomach, always try to have a mattress and pillow that keep your spine as straight as possible. You will rest a lot better and wake up a lot more fresh.

10 Tips to Help Photographers Avoid Back Problems

#10 – Hydrate yourself properly

Our body is 90% water, but yet we tend to forget how much we need to drink water just to be alive.

If you are a busy person, it’s not easy to reach the 2 liters per day of optimal water intake. But if you just make an effort and carry a water bottle around with you and drink regularly during the day you will see that your internal organs will function a lot better, your skin will look younger and your joints and bones will not get old so fast.

10 Tips to Help Photographers Avoid Back Problems

Conclusion – over to you

So there it is, a small list of simple tips that might make a significant change in your life.

They may seem obvious for most people, but the fact is that we are all so busy with our daily life and work routines, that we seem just to forget to take care of ourselves and only realize when it is just too late.

What about you, do you have some tips we could add to this list to help other photographers avoid back problems?

googletag.cmd.push(function() {
tablet_slots.push( googletag.defineSlot( “/1005424/_dPSv4_tab-all-article-bottom_(300×250)”, [300, 250], “pb-ad-78623” ).addService( googletag.pubads() ) ); } );

googletag.cmd.push(function() {
mobile_slots.push( googletag.defineSlot( “/1005424/_dPSv4_mob-all-article-bottom_(300×250)”, [300, 250], “pb-ad-78158” ).addService( googletag.pubads() ) ); } );

The post 10 Tips to Help Photographers Avoid Back Problems by Ivo Guimaraes appeared first on Digital Photography School.


Digital Photography School

 
Comments Off on 10 Tips to Help Photographers Avoid Back Problems

Posted in Photography


How to Avoid Blurry Photos of Kids

29 Nov

One of the most frequent questions that I see on the Digital Photography School Facebook Group is some variety of this: “Help! Every photo of my kid is blurry! What am I doing wrong?!” If you’ve found yourself wondering the same thing, I’ll walk you through five things that you can do to help you avoid taking blurry photos of kids.

photographing-kids

1. Mind Your Aperture

When it comes to photographing children and experiencing blur, many issues can be solved by either stopping down or opening up your aperture. That said, if you’re relatively new to photography, it can be difficult to know which direction you need to go.

sharp-kid-photos

If you’re currently shooting with a large aperture and notice some issues. Like an aperture of f/1.4 or f/1.8 and only part of your child’s face is in focus, or only one of several children in the image is in focus even when they’re fairly close together. Then, you might want to try stopping down (making it smaller) your aperture (in other words, make the number larger like f/4 or f/5.6).

If you’re currently shooting with an aperture of f/5.6 or greater (like f/8 or f/11) and you notice a lot of camera shake or motion blur, you may want to try opening up your aperture (make the number smaller like f/4 or f/2.8) if you can. That will allow in more light, which can help create a better balance between the aperture and shutter speed.

2. Utilize Shutter Priority Mode

photograph-moving-kids

If you’re using one of your camera’s shooting modes and are currently photographing kids that are moving, you may want to try shooting in Shutter Priority Mode with your shutter speed set at 1/500th or even faster. By using Shutter Priority Mode, you’ll set the shutter speed, and your camera will select the other settings to balance out the shutter speed that you’ve selected.

Keep in mind that you can still select your ISO in Shutter Priority Mode. You will definitely want to watch your exposure make sure you’re making adjustments to your ISO (or set it to auto). Often, leaving your ISO at 100 in Shutter Priority Mode with a fast shutter speed can result in very dark, or even black images.

3.Use Burst Mode Selectively

photos-moving-kids

In the photography world, the practice of “spray and pray” where you take a series of images using burst mode and hope that one of them turns out, has received a lot of negative attention lately. Certainly, we shouldn’t use burst mode through the entirety of every session, but there are some instances when it comes in handy photographing kids.

The other day, we took my girls to the park. They were having a blast tossing piles of leaves into the air and letting them fall down onto their heads. In that instance, I chose to use burst mode because it allowed me to capture an event in which the action/movement changed very quickly, as did their expressions.

I sometimes use burst mode in a short series of images to capture kids twirling, running, or any time they’re moving very quickly for a limited period of time. It’s never a bad idea to practice capturing those same events without using burst mode. But when I know that my opportunity to capture a particular event is limited (a child attempting a goal in a soccer game for example), I choose to use burst mode to my advantage.

4. Don’t Be Afraid of Autofocus

sharp-images-moving-kids

Somewhere along the way, a rumor was started that you’re not a “real” photographer unless you shoot in full Manual Mode all the time. I don’t know how that particular rumor got started or why it has taken such a hold on the photography world, but it’s garbage.

If you’re trying to photograph really active kids, please don’t be afraid to use autofocus! It will make life so much easier! If you’re already using autofocus but are still experiencing problems, there are two other things to try adjusting. First of all, it has been my experience that selecting a single focus point for my camera yields far more in-focus images than allowing the camera to auto-select one. If you have the ability to select a focus point for your camera, you may want to try selecting a single point (start with the center point if you’re unsure where to begin) for your camera, and see if the focus improves.

moving-kid-photo2

Focus modes

Another option when it comes to autofocus is to change the autofocus mode. If you’re trying to photograph moving children, and your autofocus mode is currently set to One Shot (Canon) or AF-S (Nikon), try switching to continuous autofocus mode – Al Servo (Canon) or AF-C (Nikon).  One Shot mode is designed to focus on objects that are largely inanimate, and consequently it’s not the best choice when you’re photographing quickly moving children.

When you switch to Al Servo, you’re selecting continuous autofocus. In continuous autofocus mode, you can push down the shutter halfway and let the camera focus, but the camera will continue to track that subject and recompose focus (even as the subject moves) until you depress the shutter button all the way.

moving-kid-photo-2

Some camera models also have a hybrid setting called AI Focus (AF-A for Nikon), which is designed to fluctuate between an object that starts out as stationary but then begins to move. I have been less satisfied with the images I’ve captured in AI Focus than other modes. But each camera model works a little differently, so it’s certainly worth experimenting with the hybrid autofocus mode if your camera has that option.

5. Use a Flash (Sparingly)

fix-blurry-photos

Though I prefer to shoot without a flash whenever possible, there are certainly instances in which using a flash can help to freeze the action, and help you avoid blurry images. When it comes to using a flash, my best advice is to use it sparingly.  Balance it with the available/ambient light (use only the strength of flash you absolutely need), and diffuse or bounce the flash whenever possible in order to create an image that looks crafted rather than like a snapshot.

Photographing children can certainly be a test of patience. These five tips will help you eliminate the blur, and begin to capture photographs of your children that you’ll treasure for years to come! Do you have any other tips? Please share them, and your images of kids in the comments below.

googletag.cmd.push(function() {
tablet_slots.push( googletag.defineSlot( “/1005424/_dPSv4_tab-all-article-bottom_(300×250)”, [300, 250], “pb-ad-78623” ).addService( googletag.pubads() ) ); } );

googletag.cmd.push(function() {
mobile_slots.push( googletag.defineSlot( “/1005424/_dPSv4_mob-all-article-bottom_(300×250)”, [300, 250], “pb-ad-78158” ).addService( googletag.pubads() ) ); } );

The post How to Avoid Blurry Photos of Kids by Meredith Clark appeared first on Digital Photography School.


Digital Photography School

 
Comments Off on How to Avoid Blurry Photos of Kids

Posted in Photography


Avoid These 5 Common Mistakes in Black and White Photography

29 Sep

Black and white photography has been around for nearly 180 years, ever since Louis Daguerre introduced the daguerreotype process to the world. It is still hugely popular despite the rise and ease of color photography. And yet, whenever I look at other people’s black and white photos, I see the same mistakes over and over. Are you making any of these? Let’s find out!

Black & white photography mistakes

Mistake #1: Shooting in JPEG format

Ouch! This is a big one. It’s the single worse thing you could do.

The difference between RAW and JPEG

To understand why, you need to appreciate the difference between Raw files and JPEGs. Raw files contain all the information captured by your camera’s sensor. A Raw file is not a finished picture file. It has to be processed (using software like Lightroom or Adobe Camera Raw) and converted to a JPEG or TIFF file in order to be usable.

You can think of a Raw file as the equivalent of a negative (as in from film photography). You can’t send a Raw file to a photo library or a magazine any more than you could send a negative. You need to process the Raw file (or scan and process the negative) first.

JPEG files are created by the camera. It takes the information captured by the sensor, processes it (much like you would do with a Raw file in Lightroom, but according to the camera’s built-in parameters), compresses it, discards the unused information, and saves it as JPEG. They don’t necessarily need processing in software like Photoshop or Lightroom, although most can be improved by doing so.

Advantages of shooting RAW

Using the Raw format gives you the following advantages.

  • Control: You process the file yourself, rather than letting the camera do it. You can process it to your taste from a stylistic point of view. Using Raw lets you interpret the file as many ways as you want. Using JPEG means the file gets interpreted one way only – the way the camera does it.
  • More data: The Raw file contains much more information than a JPEG, especially in the highlights and shadows, that you can draw out when you process the file. The extra information helps prevent banding in areas of smooth continuous tone like clear skies.

Black & white photography mistakes

Black & white photography mistakes

Using Raw helps you get from the before image shown above to the processed version here. With Raw, you can increase contrast and make the sky darker without introducing banding in the sky or halos along the edges of buildings. You can’t do this with JPEG files.

More advantages of shooting RAW

  • Adjust sharpness: JPEG files created by your camera are sharpened. The sharpening limits the amount you can change tonal values before introducing halos and artefacts. Yes, you can turn JPEG sharpening off in-camera – but how many people bother?
  • RAW format keeps the color info: Raw files contain all the color information captured by the sensor, so you can create a color version of the photo in Lightroom, Photoshop, etc., as well.
Black & white photography mistakes

Using Raw let me create both a color and black and white version of the same image in Lightroom, without any loss of image quality.

  • Improvements: The software gets better every year. The version of Lightroom or Photoshop you use in five or 10 years time will be much better than the current one. With Raw, you can take advantage of these new improved tools and reprocess your images in the future.

So please, don’t use the JPEG format any more for black and white photography. There are, however, advantages to using your camera’s monochrome mode, as discussed in my article Mastering Monochrome Mode.

Mistake #2: Trying to save photos by making them black and white

Black and white is not a method for rescuing poorly crafted color photos. If your photo is bad in color, it will be bad in black and white too (although there are always photos that work better in black and white for compositional reasons).

There is nowhere to hide in black and white. In color, if the lighting or composition isn’t as good as it could be, the emotional impact of the colors in the photo may rescue the image (or, depending on how you look at it, cover up its shortcomings). Black and white images rely on factors like tonal contrast, textural detail, line and strong composition to work.

That’s why some photographers consider black and white to be a kind of higher art form than color photography.

Black & white photography mistakes

The texture in this photo is essential to make it work in black and white.

Mistake #3: Not processing the photos properly

Before digital cameras and Lightroom came along, many pro photographers used a professional printer to print their images. Creating top quality black and white prints in the darkroom is hard, and it was often outsourced to professionals.

This was a beneficial arrangement that let photographers concentrate full-time on photography and left printing to the specialists. Perhaps the best known pro printer in the UK is Robin Bell, who has worked with big names such as David Bailey, Terry O’Neil, and Eve Arnold.

Nowadays it is much easier to create beautiful black and white images in programs like Lightroom, Photoshop, or Silver Efex Pro 2, than it is to master the chemical darkroom process. But, sadly, many photographers don’t get to grips with the basics. The result is that their black and white photos are not nearly as good as they could be.

Take the time to learn how to use your software properly and your photos will get better.

Black & white photography mistakes

Black & white photography mistakes

This before and after example shows the photo how it looked straight out of the camera compared to the final version, processed in Lightroom. Learn how to get from one to the other in order to get the most out of your black and white images.

Mistake #4: Not shooting in the best light

One of the advantages of black and white is that you can often shoot in lighting conditions not suitable for color photography. For example, on a cloudy day you can create beautiful black and white seascapes with a tripod and neutral density filters (this is called long exposure photography). Yet, in color, you would really need to shoot close to dawn or sunset to make the most of the scene.

But what some people do is use black and white to shoot in lighting conditions that are simply unsuitable for the subject. Using black and white isn’t the solution. The important skill is in matching the light to the subject. This takes a while to learn but it’s very important. Don’t be lazy just because it’s black and white.

Black & white photography mistakes

A long exposure photo made on a cloudy day. The light suits the subject – it wouldn’t have worked in sunny weather.

Mistake #5: Not having a strong composition

Black and white is a true test of your compositional skills. The best monochrome images use visual elements like tonal contrast, texture, line, shape, pattern, and negative space. The emotional power of color can mask poor composition. But in black and white there is nowhere to hide. You have to learn how to use these building blocks of composition effectively.

That starts with learning how to see them. For example, you can’t use lines in your compositions if you haven’t trained yourself to see straight, diagonal, or curved lines in the scene.

The good news is that once you understand the fundamentals of composition in black and white, you will instinctively apply them to your color photos as well.

Black & white photography mistakes

I took a lot of care with the composition of this landscape photo. It has foreground interest and plenty of texture – important elements in black and white landscapes.

Have you made any of these mistakes?

Can you think of any other mistakes that photographers make when working in black and white? Please share your thoughts in the comments below.


If you’d like to learn more about black and white photography then please check out my ebook Mastering Lightroom: Book Three – Black & White.

googletag.cmd.push(function() {
tablet_slots.push( googletag.defineSlot( “/1005424/_dPSv4_tab-all-article-bottom_(300×250)”, [300, 250], “pb-ad-78623” ).addService( googletag.pubads() ) ); } );

googletag.cmd.push(function() {
mobile_slots.push( googletag.defineSlot( “/1005424/_dPSv4_mob-all-article-bottom_(300×250)”, [300, 250], “pb-ad-78158” ).addService( googletag.pubads() ) ); } );

The post Avoid These 5 Common Mistakes in Black and White Photography by Andrew S. Gibson appeared first on Digital Photography School.


Digital Photography School

 
Comments Off on Avoid These 5 Common Mistakes in Black and White Photography

Posted in Photography


5 Critical Mistakes to Avoid When Buying New Camera Gear

05 Sep

The day you’re finally in the market for a new camera gear is certainly an exciting one when you’re a photographer. Visions dance in your head of all the killer shots you’ll be capturing with a sleek new set-up. You get excited about finally having gear that not only meets your current needs, but that you can grow with into the future as well.

However, it goes without saying, that the buying process can be daunting to say the least. There’s a lot to choose from out there! You want to make absolutely sure that what you buy is actually worth the investment you’re about to make.

Buying New Camera Gear mistakes

In this article I’ll go over some of the most important (and most common) mistakes to avoid when shopping for a new camera or any other piece of photography equipment.

Mistake #1. Taking advice from the wrong person

It’s normal, and wise, to ask for other people’s advice before you finalize a major buying decision. However, it’s important to get it from the right sources. It’s not enough for someone to simply sound like they know what they’re talking about.

Do they actually know what they’re talking about? Is this someone that really knows their way around a camera, and could be considered an expert when it comes to photography gear? Do they actually understand all of the features associated with the item you’re shopping for well enough to have an informed opinion? You should be able to say “yes” with assurance to all of these questions. You need to make sure the person actually understands your unique needs, and the many ways they might differ from theirs.

Buying New Camera Gear mistakes

I need this camera for the work I do, but you may not need one so large. Get what’s appropriate for your needs.

Avoid buying anything just because another photographer you know has one, or because all the online reviews say it’s the one to have. Definitely don’t buy on the say-so of one person, who may or may not really understand photography. Ask for advice from trusted experts and take it for what it’s worth – a great tool that can help you make a decision. Even the best advice isn’t a proper substitute for research and careful comparison shopping.

Mistake #2. Assuming quality is equal to price

Yes, good quality gear should be considered an investment. It’s most definitely a purchasing decision that should be made with care, especially if you’re a professional photographer or hope to become one. However, it’s important not to simply assume that a higher price tag automatically equals a better item.

Buying New Camera Gear mistakes

Do your research and due diligence.

Even if money isn’t personally an issue for you, paying more money doesn’t guarantee that your purchase will actually meet your needs. It doesn’t guarantee you the spectacular photos you’ve been dreaming about either. Even great photography equipment is only going to be as good as the person actually taking the photos.

Focus less on the price tag, and more on whether or not a given item is right for you, especially when buying a camera. Does it fit your current skill level? Are you familiar with all of the functions and tools it comes with? According to your research, is it a good fit for the type of photography you do? Lots of bells and whistles, and tons of different settings won’t do you any good if you either won’t use them, or don’t understand them.

Buying New Camera Gear mistakes

Mistake #3. Failing to budget properly

Proper planning is the key to success when it comes to many endeavours, and shopping for a new camera or photography gear is no different. A big part of that is budgeting, and there are a number of ways people can stumble in that arena.

Many drastically overestimate what they’re likely to get in exchange for their money. An outrageously expensive camera won’t magically allow a beginner to somehow start pulling off National Geographic quality images. Nor will world class photography skills make up for a cheap camera, that’s incapable of taking professional quality pictures.

Buying New Camera Gear mistakes

A lot of shoppers also fail to factor the full cost of all the accessories they’ll need into their budget. Okay, so you did your homework when it comes to the camera you’ll need in order to take your landscape photography to the next level. But, did you also remember to consider the lenses you’ll require? What about the batteries, tripods, memory cards, and everything else? It’s important to be thorough from the get-go.

Mistake #4. Becoming distracted by bargains and specials

So you’re finally ready to walk into the photography shop and make your purchases. You’ve done your homework. You’ve figured out which camera is right for your needs, both present and future. You’ve even picked out the accessories and other tools you’ll need to go with it. You’re sure you know exactly what you’re looking for.

Buying New Camera Gear mistakes

Then you get inside, and see all the signs advertising special deals on this, and bargain pricing on that. Do you lose your focus, or do you remind yourself that item isn’t really what you went there for? Hopefully it’s the latter.

Never buy any piece of photography gear just because it’s displayed under a flashy sign, or a salesman insists that it’s what you really want. If something sounds way too good to be true, it probably is. Keep your eye on the prize, and make sure you walk out of that shop with what you actually need.

Mistake #5. Not being realistic enough

Buying New Camera Gear mistakes

Most of us entertain really big dreams that we hope will come true someday, when it comes to our interest in photography. However, it’s important to ask yourself whether those dreams are realistic as far as the near future goes, before you actually sink your money into them.

Are you brand new to photography, but already picture yourself traveling the world, making big money as a travel photographer within a couple of months? Are you shopping based on a desire to jump straight into professional photography with a ton of new, expensive gear, even though you’ve never used anything more complicated than the Instagram app on your iPhone?

Buying New Camera Gear mistakes

Make sure you’re not getting ahead of yourself when it comes to what you think you’ll accomplish, by spending lots of money on new camera gear right now. Shop according to what your needs and skill level are currently, not what you’re hoping they’ll be “someday”. You’re that much more likely to be happy with your purchases not only now, but in the years to come as well.

If you have any other gear buying tips, please share in the comments below. What is your though process?

googletag.cmd.push(function() {
tablet_slots.push( googletag.defineSlot( “/1005424/_dPSv4_tab-all-article-bottom_(300×250)”, [300, 250], “pb-ad-78623” ).addService( googletag.pubads() ) ); } );

googletag.cmd.push(function() {
mobile_slots.push( googletag.defineSlot( “/1005424/_dPSv4_mob-all-article-bottom_(300×250)”, [300, 250], “pb-ad-78158” ).addService( googletag.pubads() ) ); } );

The post 5 Critical Mistakes to Avoid When Buying New Camera Gear by Destin Sparks appeared first on Digital Photography School.


Digital Photography School

 
Comments Off on 5 Critical Mistakes to Avoid When Buying New Camera Gear

Posted in Photography


6 Still Life Photography Mistakes and How to Avoid Them

28 Aug

As a beginner photographer, I still remember experimenting with random photo-shoots of colorful fruits, leave,s and flowers. Believe it or not, capturing the inanimate has always been one of our favorite pass time activities as photographers. But, not anymore! With so much demand for lively product shoots in magazines and websites, still life photography is a million dollar business today.

Capturing the still life is a very unique photographic experience. With your subject being inanimate, you get enough time to play with all the creative controls on your camera, and keep snapping until you end up with a shot to which you say – Woah! That is the perfect one.

Rikaguite 225579 compressed

Capturing still life photographs seems easy, but breathing life into those inanimate objects requires a great deal of creativity and obviously, a lot of practice. Should you mess up with the lighting and framing, it’s fairly easy to end up with an austere shot of that already dull bunch of keys. Here are the six most common mistakes that photographers make while doing still life photography.

Still Life Mistake #1 – Improper Lighting

Rule one, your subject needs to be well lit up. After-all, it is the central theme of your photo-shoot. Using natural light generally gives superb results.

In case you are shooting inside a room, you need to be a little creative with the way light falls on your subject. One of the most common mistakes is to photograph your subject under full blown artificial light sources like LEDs and fluorescent tube-lights. Why? Because such light sources add a color temperature to your subject that makes it look less natural. Moreover, they make your inanimate object look just what they are – lifeless and boring.

Rikaguite 846293 compressed

Solution

Place your subject near a natural light source, such as an open window. Get creative with the light falling on the subject. Does it look amazing when light falls on it from the side? Or does it look more attractive with light falling on it from behind? I personally find natural light from the side to look more attractive. The subtle shadows and visible details under the natural light, sparks interest in the otherwise dull object.

Rikaguite 552047 compressed 1

Another important thing to take care of is the intensity of the natural light falling on your subject. Avoid shooting it under direct sunlight. The bright sunlight may washout the otherwise delicate details and colors of your subject. As a remedy, in case you really need to shoot under broad sunlight, use a light modifier such as a soft-box (or translucent reflector) that will help produce an overcast effect, and will direct the light to softly diffuse over your subject.

Still Life Mistake #2 – A Distracting Background

Placing your subject on a backdrop full of distractions is another potential mistake in still life photographs. Your product being the central theme, deserves all the attention. Therefore, you need to ensure that the background is free from all such distractions. By this, I mean anything that shifts your attention from the main product to the backdrop behind it. For example: capturing a vase of flowers in a background of a home furniture shot.

Rikaguite 336911 compressed 1

Solution

Choose a wall that’s simple, and painted with a plain color. If your wall is not plain, use a piece of white chart paper to cover the wall, so that it doesn’t interfere with your main subject. One more tip, if you’re shooting your product over a table top, again make sure that the table is neatly covered with a white piece of cloth or paper. The main idea is to focus as much attention on your product as possible.

Still Life Mistake #3 – Not Using a Tripod

In case you need to shoot your subject with longer shutter speed, you need to make sure that you do not end up with a blurry shot. An example under this kind of setup can be a decorative indoor water fountain. You may want to use longer shutter speed to capturing the motion of the falling water. So in this case, it makes any sense to use a tripod because even a slight camera shake can result in a blurry shot.

With a tripod, you may also wish to use a wireless remote control for shutter release. This makes sure that not even the slightest of the shakes can blur your photo. Alternatively, in case you do not have a remote control shutter release, you can capture the shot by setting your camera on the 2-second timer mode.

Still Life Mistake #4 – Improper Framing

Rikaguite 534724 compressed 1

Framing your shot helps focus and arrest the attention of the viewers on your main subject. While framing the shot, determine whether the subject fills the frame in a way that draws the required attention. Utilize the rule of thirds, move around and experiment with different possible angles. You’ll definitely come up with that perfect shot.

Still Life Mistake #5 – Not Experimenting

Rikaguite 486072 compressed

Being fastidious really pays off when it comes to taking still life photographs for professional and commercial purpose. When you’ve finished setting everything up for the shoot, take a few good clicks and randomize the entire setup – shift your subject to a little different location, add something to the scene that complements the subject, use different angles and lights, try framing the shots all over again. You’ll end up with a unique piece of art each time.

Still Life Mistake #6 – Wrong Choice of Lens

Still life photography is all about creating depth, and bringing out the subject in a way that directly interacts with the viewer. How will you achieve this level of focus? By utilizing the shallow depth of field.

This works great with subjects with high levels of detail such as: flowers, leaves, and fruits. Under this kind of a setup, you will want to come closer to your subject, set the camera to AV mode (Aperture Priority), and keep the focal length as long as possible. A telephoto lens is your best bet for this kind of a setup, because the longer focal length compresses perspective, helping your subject stand out more.

Rikaguite 868377 compressed 2

This doesn’t mean that only telephoto lenses work for still life photography. If you wish to bring out, and focus on the delicate details of your subject, go ahead and shoot with a telephoto lens. On the flip side, if you wish to capture everything on your table top setup, you would be fine with a either a standard 50mm lens or a wide angle.

How do you capture the still life?

What has been your experience with still life photography? Do you have any other useful tip to share? We look forward to your thoughts and suggestions on this article.

googletag.cmd.push(function() {
tablet_slots.push( googletag.defineSlot( “/1005424/_dPSv4_tab-all-article-bottom_(300×250)”, [300, 250], “pb-ad-78623” ).addService( googletag.pubads() ) ); } );

googletag.cmd.push(function() {
mobile_slots.push( googletag.defineSlot( “/1005424/_dPSv4_mob-all-article-bottom_(300×250)”, [300, 250], “pb-ad-78158” ).addService( googletag.pubads() ) ); } );

The post 6 Still Life Photography Mistakes and How to Avoid Them by Rika Guite appeared first on Digital Photography School.


Digital Photography School

 
Comments Off on 6 Still Life Photography Mistakes and How to Avoid Them

Posted in Photography


3 Habits Every Outdoor Photographer Should Develop to Avoid Missing Shots

14 Jul

Have you ever been out to photograph a gorgeous sunset, just to realize that you can’t, because your batteries are dead? Perhaps you’ve come home and imported your images, and noticed that all of them are unusable due to hundreds of dust spots?

Don’t worry. Most of us have experienced the exact same things. Luckily, there are certain habits you can develop to avoid ever missing a shot again. None of them are time consuming, so there’s really no excuse not to implement them into your workflow.

Kerry-Park-Sunset

Habit #1 – Charge your batteries

It might sound obvious that you should charge your batteries but you would be surprised how often I meet people that are out in the field without any battery power. In fact, I’m guessing you’ve experienced this yourself (don’t worry, so have I, and most other photographers too).

About a year ago I decided to take a seven hour drive to Åndalsnes in Norway, known for its spectacular landscape, in particular the iconic Trollstigen road. I had been there a few times before, but the weather was never ideal, so I wanted to go back and capture at least one good image. When I arrived at the scenic road and walked out to the viewpoint I managed to take a handful of pictures before my battery died. Weird, I thought, but no problem, I still have two spare batteries. Turned out both of them where empty too. I guess you can imagine my frustration when I realized that this entire trip was ruined because I had forgotten to charge my batteries.

trollstigen-sunset-glow

I managed to capture one decent image before my batteries died

I made it a habit after that incident to always charge my batteries after I come home from a trip, or evening out photographing. I set my batteries to charging even before I import my images, because I know if I don’t do it right away I may forget.

Habit #2 – Clean your equipment

Cleaning your camera gear is extremely important (especially for outdoor photographers) not only to lengthen the life of your equipment but also to improve image quality. I always get a bit upset when I view a beautiful image that is broken due to hundreds of small (or a few huge) dust spots. This is so unnecessarily, and easy to get rid of, so why let others believe you’re not as talented as you actually are.

Honestly, you don’t need more than a cheap microfiber cloth to remove dust and dirt from your lens or filters. Even though that is enough in most cases (and something that should always be in your camera bag), I do recommend purchasing a liquid lens cleaner too, as this helps get rid of all smudges and especially salty spots.

After bad weather on Iceland my lens was filled with dus spots

After bad weather on Iceland my lens was filled with dust spots, as you can see here in Lightroom.

I’ve made it a habit to clean my equipment after each photo trip that lasts more than a day. If I’m out photographing seascapes or in windy/rainy conditions, I usually spend an extra minute afterwards getting rid of the worst. Making this a habit will help save you a lot of time in post-production using tools such as Lightroom’s Spot Removal.

If you’re getting serious with your photography, and perhaps you have even began selling a print or two, it’s even more important to get rid of those nasty spots. Just imagine selling a large print, then seeing that those small spots suddenly look large and take away the attention of the image. Don’t make that mistake!

Habit #3 – Don’t leave before it’s over

My final habit is perhaps one of my most important advice for any outdoor photographer.

Don’t leave before it’s over!

An unexpected sunset this winter in Norway

An unexpected sunset this winter in Norway

This is a habit I had to learn the hard way. It happened many times when I was an amateur photographer that I decided a sunrise or sunset wouldn’t turn into anything good, because the weather looked a bit shabby. Instead of staying at the location longer, I preferred to go home and hope for better conditions next time. What happened as I was driving back home? The sky turned red for just a few minutes.

Even though the conditions look a little dull it doesn’t mean that you won’t have a few minutes of good light. Alright, in most cases it doesn’t turn into something spectacular, but the times it does you will wish you had stayed for that 10-20 minutes extra.

So, remember this the next time you’re considering leaving early: it’s not over before it’s over. Stay a little bit longer, and perhaps you will be treated with great light that results in a portfolio worthy image. It’s worth it!

Bird flying through a stormy sunset at Liencres, Cantabria.

Bird flying through a stormy sunset at Liencres, Cantabria.

Are you guilty of missing these 3 habits? Have you developed any other habits, either in the field or when you’re back home? Let us know by leaving a comment below!

This week we are doing a series of articles to help you do nature photography. This is the first – watch for more coming soon! 

googletag.cmd.push(function() {
tablet_slots.push( googletag.defineSlot( “/1005424/_dPSv4_tab-all-article-bottom_(300×250)”, [300, 250], “pb-ad-78623” ).addService( googletag.pubads() ) ); } );

googletag.cmd.push(function() {
mobile_slots.push( googletag.defineSlot( “/1005424/_dPSv4_mob-all-article-bottom_(300×250)”, [300, 250], “pb-ad-78158” ).addService( googletag.pubads() ) ); } );

The post 3 Habits Every Outdoor Photographer Should Develop to Avoid Missing Shots by Christian Hoiberg appeared first on Digital Photography School.


Digital Photography School

 
Comments Off on 3 Habits Every Outdoor Photographer Should Develop to Avoid Missing Shots

Posted in Photography


3 Rookie Mistakes to Avoid When Shooting on a White Background

05 Jul

Because the ubiquitous white background portrait is so commonplace, many people think it’s easy to achieve. Simply put your subject in front of the camera against a white background, preferably with a flash or strobe, and take the picture.

how-to-shoot-white-seamless-tutorial

Unfortunately it’s not as simple as that. Doing just that would result in a photo with either a gray, dull, muddy toned background. The best possible result would be an off-white background after you have done some edits. That’s not the only issue though, you’d be dismayed to see unwanted shadows everywhere too.

I have replicated the setup with my little model Sven – Kristoff’s beloved reindeer in the movie Frozen. It is easier doing this on small scale subject as the lights are oversized in comparison. With people, to do this to scale, you need to have massive size octoboxes and flags. But this tutorial will show you the process clearly.

Here are 3 rookie mistakes to avoid when trying to achieve a 100% pure white background:

Mistake #1 The background is not lit properly

The background must be lit with approximately two stops more light, than the amount of falling on the subject. For example, if you want to photograph your subject at f/8, set your background lights to two stops brighter, so the meter would read f/16 on the background.

Note: You need to meter both background lights separately, so that when metering for the main light (on the subject) you would turn the background lights off, and vice versa. When both the background and main lights are on, your meter should still give you f/8 on the subject, because you are metering the light that falls on your subject and not on the background.

The photo below (right) shows what it looks like when you don’t light the background at all. You get a tone and color other than the intended white. In the photo on the left the background was lit, but there was no main light illuminating the subject; thus the resulting image is almost a silhouette of the subject.

how-to-shoot-white-seamless-tutorial

My camera settings for all the shots in this setup were: ISO 250, 1/160th of a second, shot at f/8 for Sven, (the background read f/16). The speedlights were set to 1/16th power. I rarely use them at full power because the batteries run out very quickly that way. If you are using the SB900 Nikon, firing at 1/1 power, not only does it drain the batteries very quickly, but also makes the flash overheat. Nikon has solved this problem with the SB910. These are some reasons why I did not shoot this at ISO 100. The camera used was a Nikon D750, which handles noise superbly, so that ISO is not an issue. Two SB910s and one SB900 were used for this setup.

The photo below shows a pull back of the setup with only the left background light firing.

how-to-shoot-white-seamless-tutorial

You will notice in the two images below that only the right background light fired on the left photo, and only the left background light fired on the right photo. This lighting is acceptable of course if that were your intention. The main light was positioned at a 45 degree angle on camera right. I wanted to bounce my flash onto the white rogue bender to modify it.

how-to-shoot-white-seamless-tutorial

You may also notice that on the left photo (above) there is a pleasing shadow of Sven behind him on the background – because the left background light didn’t fire. Where the background light did fire on the left, this shadow was eliminated (right photo above).

Below is the setup with all three lights firing correctly.

how-to-shoot-white-seamless-tutorial

Now that you have your background and main lights set up, you need to make sure these lights only hit the intended subject. This leads us to the next rookie mistake… separation.

Mistake #2 Not enough subject background separation

Because the background lights are so much brighter, you need to separate them from the main subject. There are two key ways of doing this:

  1. Flagging
  2. Distance

Flagging

You can use anything block to flag your lights; the black side of a reflector, black cardboard sheets, black foam core. Black does not let light in, instead it absorbs light rather than bounces it. It also blocks light from seeping through to places where you do not want it. If you don’t flag (block) your background lights, your subject will get a halo effect and look very backlit.

Distance

Once you have flagged your lights, you need to distance your subject far enough away the background (and background light) so that any spills won’t touch your subject. This depends on your personal preference and intention of course – you may want some spill on your subject for a certain look or effect, or you may not.

If you do want some spill on your subject, make sure to run a few tests with various lenses, as chromatic aberration tends to occur around the edges due to the abundance of light. Some lenses are prone to chromatic aberration irrespective of aperture, while others can handle it very well even at wide apertures, where it is most commonly observed. Also, be careful with the amount of spill you allow so as not to chop off parts of your subject from the spill overexposure.

how-to-shoot-white-seamless-tutorial

The photos above show a properly lit Sven. The two background lights firing at f/16 and the main light firing at f/8. There are no unwanted shadows on the background, as was my intention. However, I wanted to have a reflection and shadow in the foreground. This leads nicely to the third rookie mistake to avoid…a floating subject.

Mistake #3 The subject is floating

If you do not include some floor shadows, your subjects will look like they are floating on white air, or cut out and pasted on a white sheet of paper.

The best tip for avoiding floating subjects is to use a reflective surface like translucent white plexiglass, or white tile sheet, as a base for your subject to stand on. You can adjust the opacity of this reflection in Photoshop during post-processing, but having the reflection shows that your subject is planted firmly on solid ground.

how-to-shoot-white-seamless-tutorial

The left image shows Sven floating, and on the right you see the reflection showing Sven standing on solid ground. The latter looks more pleasing and natural, and not like a cut-and-paste job.

Bonus Mistake #4 Overexposed background

Be careful not to add too much light to the background. If you go past pure white and really overexpose it, the white will start almost glowing around the subject just like if you had sun flare outdoors. It lowers contrast and your subject looks like that have a bit of a halo, as you can see in the images below.

white-seamless-overexposed-background_0000

For more tips on a white or high key background see: 4 Tips for a Perfect White Background in High Key Photography

Conclusion

I hope this little tutorial has shed some light on basic techniques for shooting a white background, where you want the background to be 100% white, and that it has dispelled any mystery over how to achieve this look. If you have other more advanced techniques, do share them here!

googletag.cmd.push(function() {
tablet_slots.push( googletag.defineSlot( “/1005424/_dPSv4_tab-all-article-bottom_(300×250)”, [300, 250], “pb-ad-78623” ).addService( googletag.pubads() ) ); } );

googletag.cmd.push(function() {
mobile_slots.push( googletag.defineSlot( “/1005424/_dPSv4_mob-all-article-bottom_(300×250)”, [300, 250], “pb-ad-78158” ).addService( googletag.pubads() ) ); } );

The post 3 Rookie Mistakes to Avoid When Shooting on a White Background by Lily Sawyer appeared first on Digital Photography School.


Digital Photography School

 
Comments Off on 3 Rookie Mistakes to Avoid When Shooting on a White Background

Posted in Photography


8 Tips to Avoid Crowds at Popular Landscape Locations

11 May

Photographing popular tourist destinations can at times be a great challenge. Hundreds of people are walking within your frame, and regardless of the direction you’re facin,g it’s nearly impossible to capture an image without people in it.

1

I often visit beautiful landscapes, many of which are popular among tourists, even though I prefer to shoot more unique locations, and enjoy photographing in quite areas where it’s nothing but nature and me. So when I visit extremely crowded landscapes, I get slightly stressed. But these touristic places are popular for a reason.

When I visited the famous Svartifoss, Iceland a few weeks back, I left without taking more than a couple snapshots, most with my phone. Even though the roughly 40 minute long hike is considered challenging by some, I was amazed to see the amount of people gathered around the waterfall, not to mention the bunch of tripods placed all over. It seemed to be impossible to take the classic image with the river leading up towards the falls, as a group of tourists had occupied the entire place.

Even though it might seem impossible to take professional looking landscape images from these places, there are ways to avoid the crowds and enjoy them alone. It all comes down to planning and prioritizing.

1 – Choose the Hour Wisely

If you’re into landscape photography you may already know that the best time to photograph is during the Golden Hour. This is the time of the day where the sun’s position in the sky is at the lowest, which creates a soft light ideal for photography.

2

2 – Wake Up Early

Since many tourists aren’t dedicated photographers, most of them won’t be awake and out in nature for sunrise. Normally they prefer spending a couple extra hours in bed and having breakfast at the hotel.

3

This is a great advantage for us who wish to capture the beautiful landscapes in optimal light. It’s rare that you meet large crowds this early in the morning, but you may meet a fellow photographer or two. Usually most photographers, and non-photographers, that are up for sunrise try not to get in each other’s way.

About one or two hours after sunrise, depending on what time of the year it is, the first busses filled with tourists begin to arrive. This gives you a lot of time to enjoy these places, and take the images that will be difficult to capture when it gets annoyingly crowded.

3 – Enjoy the Sunset

It’s no secret that it’s more normal to be awake for sunset than for than sunrise. Accordingly the crowd will be a larger during this hour, and if you’re photographing close to a large town it might even be very crowded. Since I’m a landscape photographer and this article is mainly focused on avoiding crowds at popular landscape destinations, I won’t get into cityscapes, etc.

4

What you will see when you are photographing landscapes during sunset is that most people present are fellow photographers. Most normal tourists tend to head back towards the town or hotel, for dinner or other activities.

4 – Photograph the Night Sky

If you haven’t photographed landscapes at night yet, I strongly recommend you try it. Be aware though, as it is highly addictive!

Images captured during the night can often be quite different than what you normally see from these touristic locations, since the majority of people prefer to sleep at this time. I would say the lack of sleep is part of a landscape photographer’s life (for both beginners and professionals).

5

Another benefit of photographing at night is that you might witness certain astrological events, such as meteorite showers, or the northern lights in the northern hemisphere. Be sure to bring something warm to drink as it may get chilly throughout the night.

5 – Choose the Month Strategically

I know that getting vacation days outside the normal holidays might not be possible for everyone, and some locations are definitely best to visit during certain times of the year. But, visiting during low-season is the best method to avoid the crowds.

6

If you want to photograph events such as the Tulip Festival in the PSNW (Washington/Oregon), or the Cherry Blossom in Japan, you have to visit during a specific time of the year, and most likely it’s going to be crowded with both photographers and tourists. While the tips above still will be beneficial, you will most likely not be at these places alone.

However, if you’re not photographing a specific event, visiting during low season can be a great choice. Not only will you avoid the biggest crowds, you may also be rewarded with some unique scenery and weather.

7

I’ve visited Iceland during low season a couple times, and the results have been great. Yes, it has been challenging with the harsh weather but when the light is good, it’s GOOD!

6 – When the Crowds Won’t Leave

But what if you’re not able to go during low season, sunrise, or sunset? What if there is still a large crowd even during these times? Should you just give up and head back home? Of course not! There’s always a solution, so don’t worry.

7 – Use a Neutral Density Filter

While I won’t get too into the technical aspects of Neutral Density Filters, they allow you to use a longer shutter speed. By placing the dark piece of glass in front of your lens, you need a longer shutter speed to get the correct amount of light to reach the camera sensor. Just be sure to bring a tripod, I doubt you will be able to hold your camera completely still for several seconds or minutes.

8

Why it’s Beneficial to use an ND Filter at Crowded Locations

When you are using a long shutter speed, all motion within the frame will become blurred. The longer your shutter speed is, the less visible people will be. In fact, if you set the shutter speed to a couple minutes, you may even completely remove all people from your image.

8 – Stack Multiple Images

Stacking multiple images is another method to remove crowds from your pictures. This is a little more advanced than using an ND Filter, and requires that you have an image editing software such as Adobe Photoshop. Let’s do this step by step:

  1. Take a set of images from the exact same position. Ideally you should use a tripod so that the frame is the same on each image. Try to take 20-25 images with an interval of roughly 20 seconds. Having this interval will allow people to move a little between each shot.
  2. Import the images to your computer.
  3. Open Photoshop
  4. Click File > Scripts > Statistics
  5. Choose Median as your Stack Mode in the box that appears, and check the box for “Attempt to Automatically Align Source Images”.
  6. Go to YouTube and watch funny videos until Photoshop is done processing…
  7. When the image is done, zoom in to 100% and look for any spots where the script wasn’t able to do a perfect job. If you find such spots select the Spot Removal Tool and carefully heal these places.

9

This is a great technique to remove people from your images. My experience is that the script works well on 99% of images, and even on the remaining 1% it does a decent job.

Final Words

I think most of us have experienced being frustrated due to the large crowds more than once. Personally I think it’s important to remain respectful to both fellow photographers and other tourists when we are at these popular places. Sometimes all you need is a little patience.

10

On another note, the best way to avoid the crowds is to go somewhere less known. I know it’s scary for many to go explore new locations, as you already know how beautiful the popular spots are, but the best images are often taken at less known locations.

What do you do when photographing these popular locations?

googletag.cmd.push(function() {
tablet_slots.push( googletag.defineSlot( “/1005424/_dPSv4_tab-all-article-bottom_(300×250)”, [300, 250], “pb-ad-78623” ).addService( googletag.pubads() ) ); } );

googletag.cmd.push(function() {
mobile_slots.push( googletag.defineSlot( “/1005424/_dPSv4_mob-all-article-bottom_(300×250)”, [300, 250], “pb-ad-78158” ).addService( googletag.pubads() ) ); } );

The post 8 Tips to Avoid Crowds at Popular Landscape Locations by Christian Hoiberg appeared first on Digital Photography School.


Digital Photography School

 
Comments Off on 8 Tips to Avoid Crowds at Popular Landscape Locations

Posted in Photography


How to Avoid Fake Smiles in Your People Photography

03 Feb

DPSarticledee_cover750

A genuine smile is one of the most attractive expressions of the human face, and as photographers, we love them because they brighten up our pictures with warmth, and create connection.

When you look at it on a body language level, you discover that a genuine smile informs others that we are:

  • A friend, not a foe
  • Happy
  • In a good place mentally.

It’s a universal safety and happiness cue that we recognize on an instinctive level. It draws people in, and creates a sense of positive connection with the person in your image.

I’ve been talking so far about a genuine smile, because a smile can also be deceiving. We humans have developed the ability to fake smile when we want to pretend that we’re happy or friendly, even when we’re not… and this happens a lot in front of the camera.

DPSarticledee_danimontage_750

Let’s face it, standing in front of a lens is not the most happiness inducing moment in most of our lives. To many people, this is actually really uncomfortable, but yet you are asking them to smile, which often ends up looking tense and fake.

What a fake or tense smile says about the person in the image, is that they are not being honest, that they are uncomfortable, or even submissive.

People will fake a smile to appease others, when:

  • They are nervous or uncomfortable
  • Showing submission
  • Being polite (when someone cracks a really bad joke for example)

No matter the reason, a fake smile will give off a low-power impression of the person in the image.

So what’s the difference between genuine and a fake smile?

  • A genuine smile is visible mainly in the eyes. Smiling eyes are relaxed, with raised cheeks, and a nice tension appearing on the side of the eyes. The mouth can be anywhere from slightly raised or wide open, but it’s the eye action (not the mouth) that communicates the honesty of a smile.
  • A fake smile on the other hand, will have no, or very little, eye engagement. The mouth smile can still be very wide, but you will not see any action in the upper cheek and eye areas. It looks more like a grin, than a smile.
  • The expression of contempt is often mistaken for a smile. The most obvious sign of disdain is a one sided smile, with the lip slightly pulled up.

DPSarticledee_smilesmontage_750b

How to get a real smile? Don’t say cheese!

As a portrait photographer, your job is not only to make a beautiful image, but also to be the director of the shoot, helping your subject relax into the right emotion. If your subject is uncomfortable, you’ll most certainly end up with a fake smile or worse, an expression of contempt, and lose the warmth and honesty that comes from a genuine smile.

It has become a habit for many photographers to shout out, “Say cheese!!!” to get someone to smile in front of the camera. But this method usually ends up with embarrassed grins, or fake smiles, instead of genuine ones.

So what should you do instead?

It’s impossible to fake a feeling (unless you’re a sociopath) and the only way you can get your subject to genuinely smile is to help them connect with a real feeling of happiness. Asking them to think of something, or someone, they love allows them to connect with a genuine feeling of happiness, and you’ll see their cheeks raise and create a beautiful honest smile within seconds. As soon as you see it, let them know so they can feel it for themselves, and reproduce it. I ask my clients to give me a keyword for what they just felt and I use that for the rest of the shoot.

If they can’t think of anything, you can tell them a funny story, or a joke, and that can work really well, but can be a two edged sword if the joke falls flat and makes the situation very awkward instead.

Smiles are also a very useful barometer of your clients comfort level. If they can’t seem to relax and connect with a happy thought, it’s a good time to check your own body language and see if you are sending off stress, or discomfort, cues that they are mirroring back to you.

Differences between men and women

DPSarticledee contemptmale

Contempt

DPSarticledee femalesmilerapport

Genuine smile

Smiling is recognized universally as a sign of happiness and safety, by both women and men, but there are a few differences:

  • For women, smiling is a way of creating rapport and a sign of appeasement, but to men a smile can come across as submissive.
  • Men smile less often, and less widely than women.
  • Women are attracted more to photos of men smiling, but men prefer more serious photos of other men.

When coaching your client on the image selection, it’s important to know the usage they are going to make of their photos. A man needing a photo for a dating website would probably have more success with a smiling photo than a serious one. But if he’s looking for a job in a male dominated workplace, then he’d probably be better off choosing a more serious one for his LinkedIn profile.

DPSarticledee_rehmontage_750

I hope you have found these tips useful and I look forward to hearing about your own experiences with genuine and fake smiles. Please leave your comments below.

googletag.cmd.push(function() {
tablet_slots.push( googletag.defineSlot( “/1005424/_dPSv4_tab-all-article-bottom_(300×250)”, [300, 250], “pb-ad-78623” ).addService( googletag.pubads() ) ); } );

googletag.cmd.push(function() {
mobile_slots.push( googletag.defineSlot( “/1005424/_dPSv4_mob-all-article-bottom_(300×250)”, [300, 250], “pb-ad-78158” ).addService( googletag.pubads() ) ); } );

The post How to Avoid Fake Smiles in Your People Photography by Dee Libine appeared first on Digital Photography School.


Digital Photography School

 
Comments Off on How to Avoid Fake Smiles in Your People Photography

Posted in Photography


12 Common Newbie Photography Mistakes to Avoid

14 Jan

None of us are perfect and we all make mistakes. While some photographers might be naturally gifted, and just do amazing work from the moment a camera is put into their hands, that is not the case for most of us. Chances are, if you are new to photography, you are going to muck things up. You shouldn’t feel bad however, as you can be sure that many newbies have done exactly the same things. Here are a number of very common mistakes that new photographers make. Learn to avoid them, and you will improve your images.

1 – Centering everything in your images

The horizon line is right in the middle, cutting the image in two.

The horizon line is right in the middle, cutting the image in two.

When most of us look back at our early images, we usually see the horizon line placed very much in the middle of the image (see photo above). This is one of the most common mistakes new photographers make when they start. Sometimes it’s a good thing to do, but not always. The problem is that it cuts the image in half, and leaves people looking at the image, unsure of which half to look at, which is the intended subject.

When you take photos of landscapes, or anything with a horizon line, it is best to put the horizon on one of the third lines.The Rule of Thirds is one of the compositional guides for photography. As you get more into photography you will hear more and more about it.

With the horizon in the top third most of the ground is showing, telling the viewer what to look at.

With the horizon in the top third, more ground is showing than sky, telling the viewer where to look

It’s the same idea for your subjects. If you are photographing a person, put them to one side of the image, on one of the vertical third lines. Which line you use is up to you. Sometimes it is better to do both and see which one looks better. Experimenting is the key to getting great photographs.

2 – Taking attention away from the main focus in the image

Without meaning to, you may include something in your frame, that takes the focus off the main subject in the image – things like bushes, or a light post that is just a line through the image. It goes back to the previous point about giving your subject so much attention, that you aren’t taking the time to look around it.

3 – Cutting things off at the edge of the frame

It is amazing how many times you can look at someone’s photo and ask, “Why have you cut off their feet?” They then look back at you blankly, saying they had never noticed it before.

LeanneCole-common-newbie-mistakes-0029

Be careful not to cut off parts of limbs, like feet, when you are taking photos.

It is a very typical thing that newbies do. It may not be the feet, but it could be someone’s hand or the top of their head. It can happen in architecture and landscapes as well; the tip of a church dome will be missing, or the top of a tree.

It is all about learning to look at your subject and making sure you concentrate on getting them all in the frame. If you can’t fit them in the image, then you need to make decisions about what you will include, and what to crop off. Often if you take more than two thirds of a leg away it looks deliberate. If you only take one third away it looks like you weren’t paying attention.

Missing toes or feet.

Missing toes or feet.

Make sure to include feet.

Make sure to include feet.

4 – Thinking that having a great camera is enough

“I bought this fantastic camera and I paid a lot of money for it, but my photos don’t look great.” There is an assumption that if you have a good camera, you will automatically take amazing photos. This is not the case.

Just because you have a great camera, doesn’t mean you don’t need to learn photography. It is the person behind the lens that is responsible. If you see amazing photos by other photographers, that it is because they have learned about composition, and how to use their camera properly. Scroll to the bottom for links to more beginner articles to help you with this one.

5 – Not looking behind your subject

“Look at the tree coming out of that person’s head.” This similar to the previous point. You need to consider everything in the frame. You can usuallt remove the tree from their head by taking one or two steps to either side.

LeanneCole-common-newbie-mistakes-0027

Look behind your subjects and make sure there aren’t things like trees coming out of their heads.

leannecole-newbiemistakes-portrait

Slight camera reposition and no tree coming out of her head any more.

6 – Taking only photo of a subject and from a common viewpoint

We all see people who want to take photos of a building, they walk straight up to it, take one photo from the middle position, and that’s it.

Think about other angles you can use as well. Try moving to the left, the right, or both. Take some from low camera angles and then some standing up. As you take more shots, you will learn what works and what doesn’t. Again, it is all about experimenting.

LeanneCole-common-newbie-mistakes-0031

Taking a photo of a place by standing right in front of it. 

7- Having a really good camera and never learning how to use it properly

If you get an amazing camera that is capable of so many things, and never take it off auto, you are missing out on a lot. Learning to use your camera is one of things you can never regret. While you may be able to get some great photos with it on automatic, if you learn about aperture, shutter speed, and ISO, you will have more control over your images. It is usually something that no one is ever sorry about doing.

Once you have the basics worked out, you can then learn more advanced things like long exposures and HDR. The world of photography really opens up to you when you know how to use your camera to its full potential.

8 – Not giving your camera enough time

I was at an event once and I handed my camera over to friend to grab a few shots for me. When I got home and looked at the photos he had taken, they were all out of focus. I realized that he was pressing the shutter release without giving the camera time to focus properly.

You have to learn how to let the camera focus for you and give it time to do that. They are fast, but not always fast enough. The same goes with exposure, you have to give it the time to get the correct exposure. It doesn’t ask for a lot, so just give it the time it needs.

9 – Forgetting to check the settings you used the last time

It’s common for newbies to go out to take photos, making adjustments on their camera for what they are shooting at the time. But, the next time they go out to shoot, they forget to look at how the camera was set up. Afterwards, when they put the images on the computer, they realize they have lots of photos that didn’t turn out, because the camera settings were wrong for that subject or situation.

I was photographing a four day event a few years ago, and I couldn’t work out why some photos were really overexposed, while some were really dark. It took nearly three days to realize it was because my camera was set on auto bracketing (AEB). It was around that time I had just started taking photos at different exposures (bracketing) and had forgotten about it. Now I pick it up straight away.

LeanneCole-common-newbie-mistakes-0028

Checking your camera setting when you take photos in case the last time you were out your were underexposing or bracketing your images.

Always look at the settings you have on the camera. Check what the aperture is set to. Work out if you have it on manual, shutter priority, aperture priority or auto. Be aware of what the ISO is at all times. It is a good habit to get into, to check them all every time you start.

Make sure you have a memory card in the camera too. I have gotten into the habit of leaving the card out of my camera, and when I pack my gear to go somewhere, I put the card in the camera. It is part of my routine now, I also pack an extra as well.

10 – Never turning the camera vertically

One thing you often notice with new photographers is that they only use their camera in landscape mode. They never seem to consider turning their cameras up on the side, to shoot vertically. It isn’t always necessary to do so, but some subjects would benefit more from that orientation. When you are taking photos, try turning the camera into the portrait mode (vertical) and see if you can get a better image.

leannecole-newbiemistakes-horizontal

Don’t always have your camera in landscape mode, like this image, turn the camera up into portrait mode as well.

Try vertical for a different perspective.

Try vertical for a different perspective.

11 – Not asking for help

You should never be afraid of asking for help. Generally, photographers are more than happy to help someone who wants to learn. Don’t badger people with too many questions, but asking a few questions isn’t going to hurt.

12 – Don’t panic

A friend was telling a story about how she was in a Cathedral taking photos and they were all turning out black. She started to panic and couldn’t work out why. Once she calmed down she realized it was because her ISO was too low.

If you get into a situation where your photos are not working, don’t panic. Think logically about it. In most cases it is going to be your aperture, shutter speed or ISO. Just take the time to think about them and check the settings. You will work it out.

Have fun

The best advice anyone can give you is to enjoy your time with your camera. Explore the world around you. Remember that the mistakes you make are being made by nearly everyone in your situation. You aren’t alone.

googletag.cmd.push(function() {
tablet_slots.push( googletag.defineSlot( “/1005424/_dPSv4_tab-all-article-bottom_(300×250)”, [300, 250], “pb-ad-78623” ).addService( googletag.pubads() ) ); } );

googletag.cmd.push(function() {
mobile_slots.push( googletag.defineSlot( “/1005424/_dPSv4_mob-all-article-bottom_(300×250)”, [300, 250], “pb-ad-78158” ).addService( googletag.pubads() ) ); } );

The post 12 Common Newbie Photography Mistakes to Avoid by Leanne Cole appeared first on Digital Photography School.


Digital Photography School

 
Comments Off on 12 Common Newbie Photography Mistakes to Avoid

Posted in Photography