Some of the wildlife photos you’ve seen may not have been taken ‘in the wild,’ thanks to game farms with captive animals.
Articles: Digital Photography Review (dpreview.com)
Some of the wildlife photos you’ve seen may not have been taken ‘in the wild,’ thanks to game farms with captive animals.
Articles: Digital Photography Review (dpreview.com)
 |
| The first issue of Popular Photography from May 1937. Yes, that is a woman getting out of the shower on the cover. |
Franklin D. Roosevelt was president of the United States of American when the first issue of Popular Photography Magazine hit newsstands in May of 1937. Now, nearly 80 years later, one of the world’s most widely circulated photography print publications is closing.
The upcoming March/April issue will be the last, and as of Friday, March 10th, no new content will be published on PopPhoto.com. This news comes after the publication switched to a bi-monthly print schedule about six months ago.
Pop Photo’s sister publication, American Photo Magazine, had been Web-only for the past couple of years; it will also stop updating its website as of this coming Friday.
Eric Zinczenko, the CEO of Bonnier, parent company of both titles, made the announcement earlier today via a company-wide email.
This news hits especially close to home, as I had the distinct privilege of starting my career as an intern, and later an assistant and associate editor at Popular Photography and American Photo magazines. And I know first hand how dedicated and passionate the staff of these titles is. After all, they’re what made me first fall in love with this industry. So go get yourself a nice hoppy beer (their PP tech editor Phil Ryan’s favorite) and take a long deep gulp, because the photography world just got dimmer by a stop.
Articles: Digital Photography Review (dpreview.com)
[ By WebUrbanist in Art & Sculpture & Craft. ]

This ongoing series of sculptural floating cities and suspended towns could be mistaken for pencil drawings when glanced on a wall or seen in a two-dimensional medium like photography.


Spanish artist David Moreno sees it that was as well: at attempt to draw sculptures, but using steel rods lashed together with piano wire rather than a pen on a pad. Background depth, shadows and other slight dimensional clues cue viewers into what they are really seeing.

These stick-figure structures correspondingly look deceptively simple: what would normally be a single stroke is instead a meticulous assembly process, the rods tied together by hand and piano wire wrapped and clipped to support them.


The Barcelona-based artist has also toyed with 3D-printing extrusion devices to shape similar works in more colorful formats, combining, for instance, a series of stylized chairs into a mass of interconnected hanging sculptures.


In other cases, strings and wires are looped and stretched to form complex shapes or interact with other objects – stories and figures emerging from a combination of materials and forms.


While the specifics of his work shifts from one installation to the next, a common theme is clear: taking traditions of line art into the third dimension and seeing what can come of the process (via Colossal).
![]()


[ By WebUrbanist in Art & Sculpture & Craft. ]
[ WebUrbanist | Archives | Galleries | Privacy | TOS ]
[ By SA Rogers in Architecture & Houses & Residential. ]
Not every radical home makeover turns an ugly duckling into a beautiful swan, but they sure can render the original structures completely unrecognizable, for better or worse. Sometimes no more than the bones of the home stay in place as an entirely new sort of residence rises in its place, while other renovations maintain a starkly visible division between the old and the new. These transformations certainly prove the value of looking past a building’s flaws to its potential, as no matter what a house may look like when it’s purchased, it can ultimately be anything the homeowners want it to be.


There was nothing particularly special about this two-story 1920s bungalow residence in Sydney, Australia, before CplusC Architects got ahold of it and transformed it into a sustainable home. An existing extension to the first floor is vastly improved by a timber screen that improves natural ventilation and gives it loads more curb appeal.


A 110-year-old Brooklyn row house looked very 1980s with its vinyl siding, boring sash windows and afterthought of an awning, not to mention missed opportunities for vertical expansion and a visual connection to the private outdoor space. Office of Architecture renovated the space inside and out, integrating a second-floor extension, lots of glass and a wooden facade.
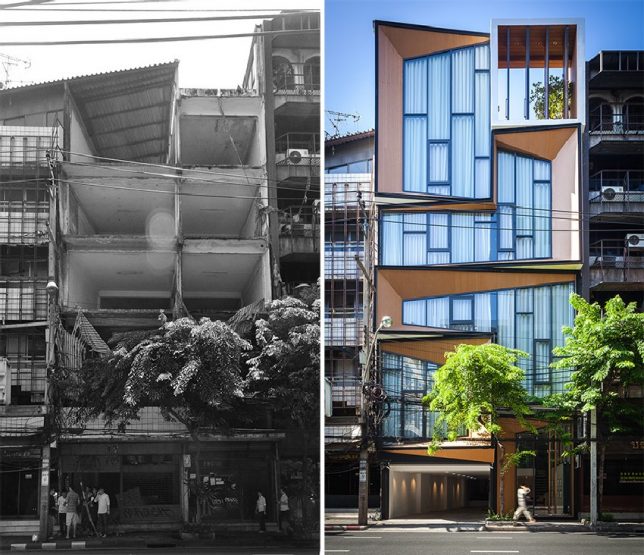
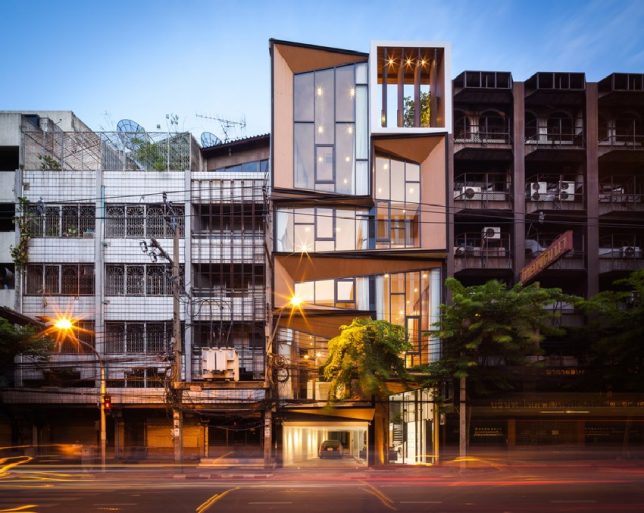
A gutted five-story commercial building becomes a spacious, luxurious home for an extended family of siblings, their spouses and children in this stunning Bangkok renovation project by IDIN Architects. The first level accommodates the family’s jewelry store, while the rest serves as their private home, full of atriums planted with live trees.
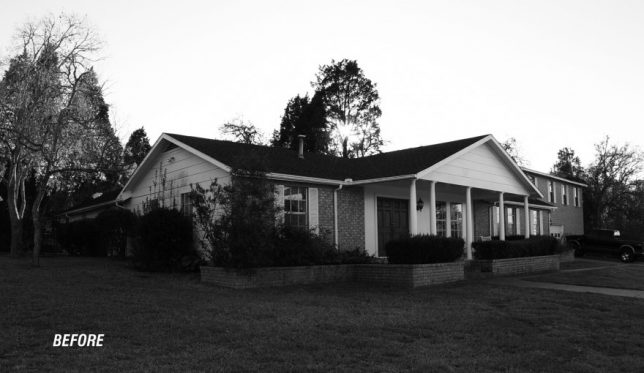

Who would ever think that a ranch house had so much potential? This residence east of Austin, Texas had already been expanded several times and was full of dark, disconnected interior spaces. MF Architecture conserved most of the exterior envelope while knocking out lots of the interior walls, but gave the facade a fresh look with white brick, timber cladding and a high row of narrow windows that bring light inside.


The couple who bought this property in Canada called it a “run-down, boring sausage-box cookie-cutter house built in ’73 on a large lot with ramshackle garbage-filled sheds.” But they knew it could be more, and took on the project of renovating it themselves, adding a third-floor volume that extends to the ground in the front and back, transforming the facades and tacking on two carports.
![]()
[ By SA Rogers in Architecture & Houses & Residential. ]
[ WebUrbanist | Archives | Galleries | Privacy | TOS ]
[ By WebUrbanist in Culture & History & Travel. ]

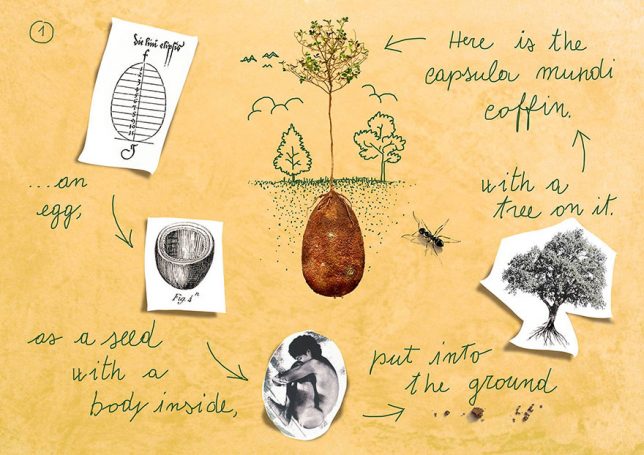
Amidst a huge array of natural burial initiatives and urban cemetery alternatives, the Capsula Mundi stands out as a sustainable solution that serves wishes of the deceased as well as the land of the living.
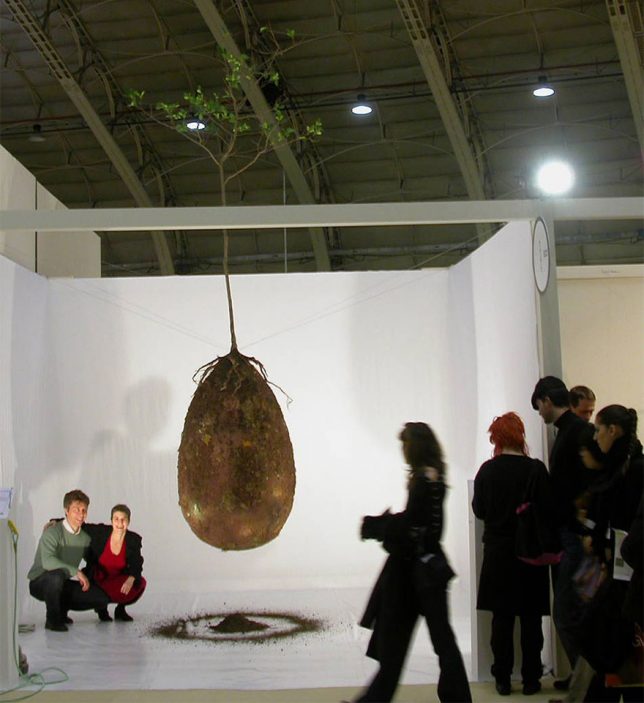
Italian designers Anna Citelli and Raoul Bretzel developed this solution in part to challenge constrictive existing laws surrounding burials in their home country.

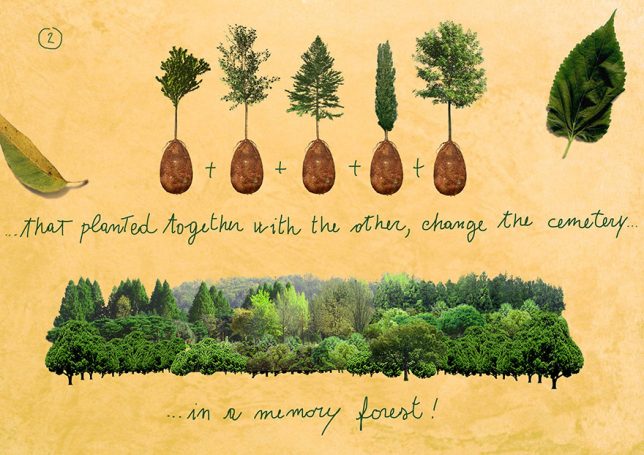
Essentially, a body is interred in an organic and biodegradable burial capsule situated beneath the seedling of a chosen tree. Instead of filling graveyards with caskets and stone monuments to the deceased, this system would populate parks with living memorials – trees over tombstones. In turn, family and descendants can come to visit and care for the plants in honor of their loved ones.
Many other “green” burial solutions are generally not as ecological as they would first appear. Cremations, for instance, generate huge amounts of carbon dioxide in the burning process. And, of course, traditional burials are not very sustainable – chemicals, caskets, concrete, stone and space are all wasted in an effort to preserve something that will inevitably return to nature, one way or another.
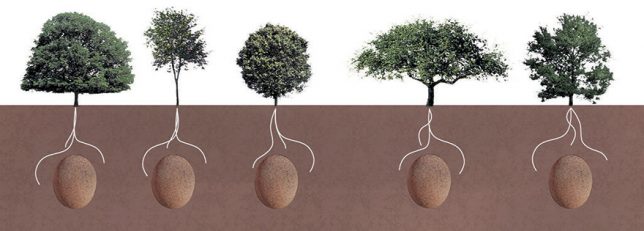
More from the project website: “Capsula Mundi is a cultural and broad-based project, which envisions a different approach to the way we think about death. It’s an egg-shaped pod, an ancient and perfect form, made of biodegradable material, where our departed loved ones are placed for burial. Ashes will be held in small Capsulas while bodies will be laid down in a fetal position in larger pods. The pod will then be buried as a seed in the earth.
“A tree, chosen in life by the deceased, will be planted on top of it and serve as a memorial for the departed and as a legacy for posterity and the future of our planet. Family and friends will continue to care for the tree as it grows. Cemeteries will acquire a new look and, instead of the cold grey landscape we see today, they will grow into vibrant woodlands. The project is still in a start-up phase, but encouraged by worldwide enthusiasm for our concept, we are working to make it become a reality.”
![]()
[ By WebUrbanist in Culture & History & Travel. ]
[ WebUrbanist | Archives | Galleries | Privacy | TOS ]
 |
| Re-creation by UK Military Aviation Authority |
A military pilot in the UK is reportedly facing a court martial after his camera became wedged against a military transport plane’s controls, causing it to plunge 4400ft/1.3km before the captain regained control. The Ministry of Defense is being sued over the matter, which took place in February 2014, by nine soldiers and one civil servant who were in the plane during the incident.
Per the government’s investigation of the matter, the cause was determined to be the pilot’s Nikon D5300 camera, which at some point during the flight became positioned against the plane’s steering control. When the pilot readjusted his seat position, the seat pressed the camera against the control, causing the plan to drop at a rate up to 260ft/80m per second.
According to The Times, the lawyer representing these ten individuals says they suffer PTSD as a result of the plane’s sudden descent; a total of 198 people were onboard at the time of the incident. The pilot has reportedly been charged with negligently performing a duty, perjury, and making a false record.
Via: Quartz
Articles: Digital Photography Review (dpreview.com)
 |
| Photo By: Office of U.S. Marine Corps Communication, Headquarters Marine Corps |
One of the officers in Joe Rosenthal’s iconic ‘Rasing the Flag on Iwo Jima’ has been mis-identified for over 70 years, according to a statement by the U.S. Marine Corps. The man (highlighted in the image above) was previously believed to be John Bradley, but a review panel considering ‘all available images, film, statements and previous investigations’ found the man to be Private First Class Harold Schultz.
How did this case of mistaken identity come about? According to his son James, John Bradley remembered raising a flag on Mount Suribachi, and was later told as he lay recovering in a hospital bed that he was one of the men in the photo. He was believed to be the sixth man in the Pulitzer Prize winning photo for more than 70 years.
When a Smithsonian Channel research team approached the Marine Corps with a theory that Bradley was not the man in the photo, an investigation was launched. A panel led by retired general officer Jan Huly started looking over evidence in April, and released its findings late last week.
Articles: Digital Photography Review (dpreview.com)
 |
| Bourne & Shepherd Studio, Kolkata, India. Photo by Biswarup Ganguly. Used under CC 3.0 |
A studio in India, founded by British photographers Charles Shepherd, Samuel Bourne and William Howard in 1840 will close its doors after 176 years in operation. Considered the oldest continuously operating photographic studio, Kolkata-based Bourne & Shepherd’s current owner cites the recent major changes in photographic technology as a reason for the closure.
The studio was known for its portraiture, producing images of religious figures and government officials, from the British Raj era onward. Speaking to Indian publication The Hindu, a former employee explains that the shift to digital made it difficult for the studio to survive, saying ‘How can you expect that a studio can operate in this generation where everyone is clicking photos from their mobiles and digital cameras?’
Though the studio will no longer be in operation, the current owner says that he’ll continue to maintain the shop’s collection of historic photos and equipment.
Articles: Digital Photography Review (dpreview.com)

Early morning light illuminates Sky Rock and the eastern Sierra Mountains
This is the 1st of a 3 part series on my experience jumping back into film photography after a 10 year hiatus focusing purely on digital photography.
The Camera
10 years ago I vowed I’d never shoot film again. I enjoyed shooting film to a degree, but compared to digital it became unnecessarily onerous. Back in the day I was shooting 35mm and medium or large format photography was both imposing and expensive. As much as I said “never again” to film there was a 0.01% chance I might jump back in, but it would only happen if I ever landed a very special camera. In the late 90’s I always dreamed of owning Fuji 6×17 medium format film cameras. They were used by top landscape photographers and produced amazing panoramic photos. These cameras and their lenses are so good it’s one of the few film camera systems that have held their value the longest. Fast forward to 2013, I set up an eBay alert for GX617 cameras in the event the right camera at the right price surfaced. It only took a couple of years but earlier this year the right camera finally surfaced. I found someone selling a pristine Fuji GX617 with a 90mm lens (20mm equivalent for 35mm cameras) and 50 plus roles of 120 film. Even still it was a bit of a hit to my budget, but I finally took the plunge.
Fundamentals
This Fall when I decided to dedicate a trip to using my new 6×17 camera I started to wonder if I’d be able easily transition back to film photography. On one hand I didn’t want to waste any of the film I acquired (Fuji Velvia 50 & 100) and on the other I was concerned I’d take a hit to my pride feeling like a beginner again. As I dove in using the camera it became clear that my nerves were unwarranted in this area. A firm understanding of photography fundamentals will take you far no matter what system you use.
That said the Fuji Gx617 is very different than a modern DSLR and if there was anything that made me feel like a beginner again it was my lack of familiarity with how this camera functioned. The camera doesn’t have a mirrored viewfinder to preview your composition. Instead it has a dedicated viewfinder for each lens to approximate what will be exposed. The lenses are focused based on the approximate distance of your subject from the camera. Aperture is set manually with levers. A roll of 120 film produces 4 exposures and changing lenses mid-roll is not an option as it will expose the entire roll of film. Becoming reacquainted with manual photography versus relying on a variety of automatic systems we take for granted every day with 35mm DSLRs was quite eye opening.
Methodology
If any one thing tripped me up in my use of the Fuji GX617 it was establishing a routine to avoid basic mixups on selecting my camera settings. Even compared to my 35mm film SLR this was quit an adjustment. Film and digital SLRs enjoy a certain degree of automation where as a camera like the GX617 requires every setting to be made manually. After a couple slip ups I finally established a routine of composing my subject with the “external” viewfinder, check distance, set lens focus, using a light meter to determine exposure settings, set aperture, set shutter speed, and finally tripped the shutter via a cable release.
It all sounds logical, but being new to the camera it took some time to get this routine down. Distractions were plentiful so more than a few exposures were lost as a result of breaking from this routine. Sometimes the basic step of recomposing my next shot was enough for me to miss a basic setting adjustment. Complicating things further was retraining my brain to visualize how each focal length and aperture setting will translate to the medium format look versus 35mm. As an example 300mm on this system equates to 73.5mm on a 35mm system. Also depth of field is different for equivalent aperture settings. The fun was in the discovery.
Intent & Purpose
One thing that I found incredibly refreshing while using the Fuji GX617 was how the manual settings helped me slow down and connect with my subject more. The manual operation of the camera granted me time to take in my surroundings, more thoroughly observer my subject and feel more connected with Nature. I was far less prone to jump into a scene, rapidly setup & fire off shots and then bolt to the next location. The combination of camera adjustments taking time and only having 4 exposures to a roll put me in a mindset of wanting to get the most out of the location I was photographing. If I was going to use a precious frame of film and devote the time to set up I made sure that my image was going to not just expose correctly, but connect with viewers & myself. The end result was a much more thoughtful effort with less wasted time and film that produced higher quality results.
Continue on to Part 2 in this series – Revisiting Film Photography After 10 Years: Composing Through New Eyes
The post Revisiting Film Photography After 10 Years: The Readjustment appeared first on JMG-Galleries – Landscape, Nature & Travel Photography.
JMG-Galleries – Landscape, Nature & Travel Photography

Aspen Tree Fall Color in the Eastern Sierras of California
This is the 2nd of a 3 part series on my experience jumping back into film photography after a 10 year hiatus focusing purely on digital photography. You can start here at Revisiting Film Photography After 10 Years: The Readjustment if you missed it.
Mental Math & Visualization
As I’ve been shooting with the Fuji GX617 I’ve had to make a bit of a mind-shift in my approach. On one hand I have to account for slightly different mental calculations regarding how medium format focal distance, depth of field and vignetting might impact my composition. This is rooted with the fact that medium and 35mm formats follow the same mathematics, but the calculations for similar units (focal length, aperture, etc.) result in different visual aesthetics. 90mm focal distance on the GX617 equates to 20mm on a 35mm camera and a 300mm lens on the GX617 equates to ~70mm on a 35mm camera. f/8 on the GX617 is shallow for closer subjects while not so for most images on a 35mm camera. It’s an interesting adjustment, but frustrating if you forget or don’t fully make the right mental calculations as you’re taking photos. After all mistakes on film have a financial cost.
Volume versus Quality
Back in October when I took out the Fuji GX617 and the Canon 5DS R on a trip I found it notable how different my approach to shooting was with each camera. Unsurprisingly I shot less with the film camera and was much more generous in my shooting with my DSLR. I spent a lot more time on my film shots to focus on correct exposure and composition. With 4 exposures to a roll I took greater care to work a scene by walking around, looking for different angles, check focus, check settings, double check settings and account for various lighting conditions before triggering the shutter. The net result was feeling more connected to the scene I was photographing.
My efforts with the DSLR were much quicker and as a result I took more photos. Shooting RAW affords you to work fast and loose. It was eye opening to see how fast and loose normal shooting has become for me. Jumping back to film made that all too clear. The digital format affords you the ability to:
In the end the ratio of digital versus film photos taken on my trip was 1:20. For every film photo taken I took 20 digital photos, but that said I utilized my DSLR to experiment and photograph a much broader array of subjects. As for the photos I considered keepers and worth sharing the ratios broke down as follows:
Seeing photos that didn’t work out on film were much more painful. Psychologically I felt more angst either because of lost opportunities or the cost associated with a blown roll of film. I’m not sure if my history of shooting film makes me more or less prone to take extra digital photos for insurance than the average photographer, but it certainly has an impact on my emotional state.
Emotive Photographs
Beyond concerns about technical proficiency and productivity I was most concerned about being able to capture images that deeply resonated with me. It’s one thing to say that I got 5 or 100 publishable photos and it’s another to state that they’re photos I think will resonate with others let alone me. Sharp photos, well composed photos, etc. don’t always equate to a great photo. Images that resonate more deeply are not just about sharpness and composition, but atmosphere, artistic presentation and often “je ne sais quoi”. I’ve yet to compile stats for this as I’m still evaluating images from this trip, but if history is a guide the volume is always low.
The jump back into film has been interesting, fun and even anxiety provoking at times. Most of all it’s been eye opening in how I work, compose and think about photography in general.
Continue to Part 3 in this series – Revisiting Film Photography After 10 Years: Development & Post
The post Revisiting Film Photography After 10 Years: Composing Through New Eyes appeared first on JMG-Galleries – Landscape, Nature & Travel Photography.
JMG-Galleries – Landscape, Nature & Travel Photography
You must be logged in to post a comment.