RSS
 

Posts Tagged ‘Adobe’

Adobe Camera Raw 8.8 and DNG Converter 8.8 now available

21 Mar

Adobe has released its Camera Raw 8.8 final release for Photoshop CC/CS6, the company has announced. Support for several additional Canon, Panasonic, and Fujifilm cameras have been added, as well as the Hasselblad Stellar II, Nikon D5500, and Olympus OM-D E-M5 II, among others. Read more

Articles: Digital Photography Review (dpreview.com)

 
Comments Off on Adobe Camera Raw 8.8 and DNG Converter 8.8 now available

Posted in Uncategorized


Using the Adjustment Brush in Adobe Camera Raw

17 Mar
Adjustment-Brush-title2

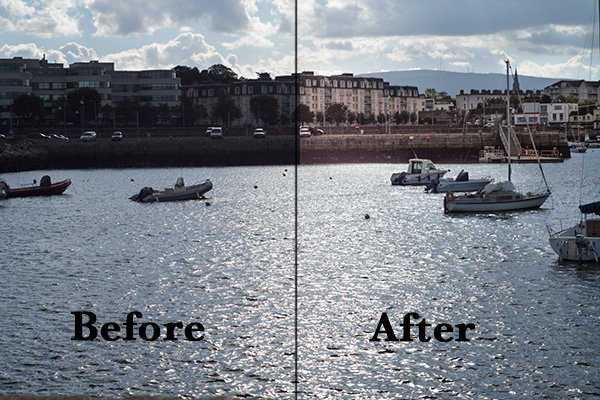
A before and after using the Adjustment Brush on the buildings.

What is the Adjustment Brush?

The Adjustment Brush is an editing tool in Adobe Camera Raw (known simply as ACR). This tool is possibly the equivalent of the Dodge and Burn tools in Photoshop. So what is dodging and burning? To dodge is to lighten and to burn is to darken a specific area.

What does it do?

When you make your initial global adjustments of a RAW file in ACR, more than likely, you will need to make local adjustments too. This is where the Adjustment Brush is useful for making adjustments to specific areas of your photo.

Recently, I have found I am using this tool more and more. If I am out and about just shooting for my own library, I tend to take photos slightly underexposed. This way, I can recover a lot of detail in the post editing stage. This is useful if you don’t have time for metering the shot perfectly, especially in the case where skies are involved.

How does it work?

The Adjustment Brush isolates a specific area by masking it, similar to using layer masks in Photoshop. When you click on the Adjustment Brush icon, the right panel changes to the Adjustment Brush tab. The bottom sliders modify the size of the brush and you can also determine how much feather and density (flow) you wish to apply.

When you use the Adjustment Brush on a particular part of your image, a pin icon appears to determine where your adjustment has just been made.

Adjustment-brush-zoomed-up

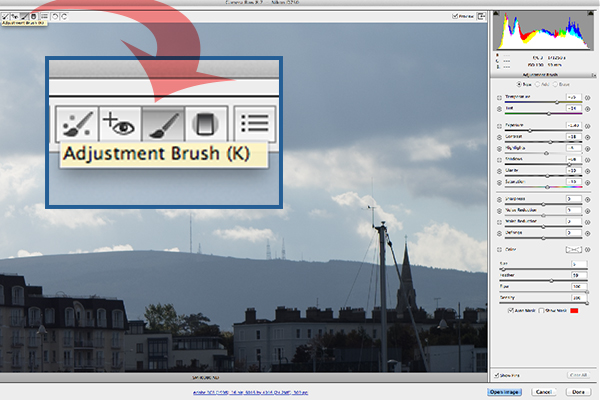
The Adjustment Brush is located at the top left of the dialog box.

Adjustment-Brush-and-Pin-icon

How the Adjustment Brush looks when in use and the Pin icon which determines where on the image the adjustment has been made.

Adjustment-Brush-slider

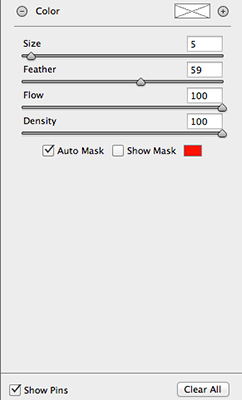
These sliders adjust the size, feather and flow of the Adjustment Brush.

I do find using the Adjustment Brush a bit cumbersome. But this tool definitely has its merits. Like most of the editing tools in ACR, Photoshop, Lightroom, etc., there is simply no one-click button that magically does it all.

You may find with a bit of practice using the Adjustment Brush that it could speed up your editing workflow. Take for example this image that I shot of some blue containers on a pier. I made the basic adjustments in ACR. I then used the Adjustment Brush in several areas: to lighten the sky; to keep the highlights on the small white boat on the left from being blown out completely. I also used the Adjustment Brush on the wood section to give it more warmth.

blue-drums

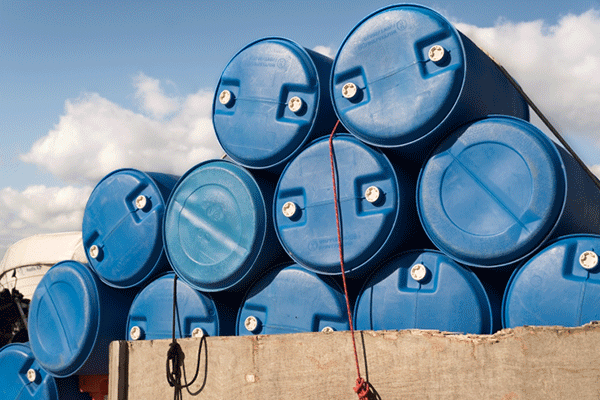
Several areas where the Adjustment Brush has been used as shown by the Pin icon.

The Graduated Filter in conjunction with the Adjustment Brush is a great combination. It behaves in a similar way to a Graduated Neutral Density filter. I use this filter on skies, then use the Adjustment Brush to mask areas that I don’t want the Graduated Filter to effect.

Pros

  • Broad local adjustments lightened or darkened.
  • Speed up your editing workflow as you may not need further adjustments in Photoshop or Lightroom.
  • Works really well in conjunction with the Graduated Filter tool.

Cons

  • Cumbersome and sometimes awkward to use.
  • More refined detail is better done in Photoshop using layer masks where you have more control.

Tip:

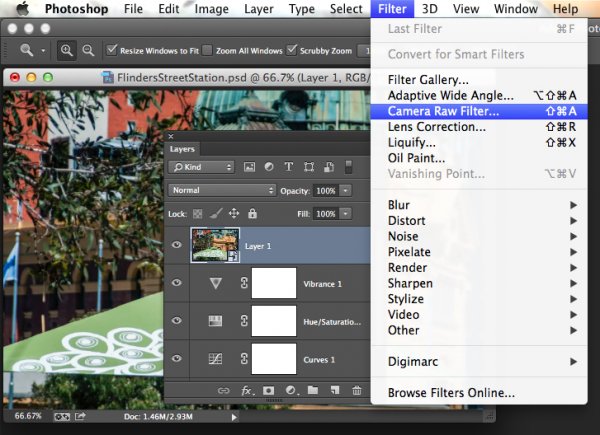
A fantastic feature in Photoshop CC is that Camera Raw is now a filter. However, if you are using previous versions such as CS5/6, a substitute workaround is before you open your image from within ACR to Photoshop, make sure you open it as a Smart Object. You can do this by holding the Shift key and the Open Image button changes to Open Object. Or you can have this option ticked in Workflow Options. This is a pop-up dialog box located by clicking on the link at the bottom of the ACR screen. That way you can go back into ACR by double clicking on the layer.

Harbour

By using the Adjustment Brush on just the buildings, I was able to recover a lot of detail.

googletag.cmd.push(function() {
tablet_slots.push( googletag.defineSlot( “/1005424/_dPSv4_tab-all-article-bottom_(300×250)”, [300, 250], “pb-ad-78623” ).addService( googletag.pubads() ) ); googletag.pubads().enableSingleRequest();
googletag.pubads().disableInitialLoad();
googletag.pubads().collapseEmptyDivs( true );
googletag.enableServices();
} );

googletag.cmd.push( function() { googletag.display( ‘pb-ad-78623’ ); } );

googletag.cmd.push(function() {
mobile_slots.push( googletag.defineSlot( “/1005424/_dPSv4_mob-all-article-bottom_(300×250)”, [300, 250], “pb-ad-78158” ).addService( googletag.pubads() ) ); googletag.pubads().enableSingleRequest();
googletag.pubads().disableInitialLoad();
googletag.pubads().collapseEmptyDivs( true );
googletag.enableServices();
} );

googletag.cmd.push( function() { googletag.display( ‘pb-ad-78158’ ); } );

The post Using the Adjustment Brush in Adobe Camera Raw by Sarah Hipwell appeared first on Digital Photography School.


Digital Photography School

 
Comments Off on Using the Adjustment Brush in Adobe Camera Raw

Posted in Photography


Adobe celebrates 25 years of Photoshop

19 Feb

Photoshop turns 25 today, and Adobe is marking the occasion with a look back at the software’s humble roots, along with a chance for users under the age of 25 to take control of the company’s Instagram handle for two weeks. Short of supplying its subscribers with complimentary birthday cake, the company has put together some entertaining graphics comparing Photoshop’s icons, toolbars and splash screens for a short trip down the digital memory lane. Read more

Articles: Digital Photography Review (dpreview.com)

 
Comments Off on Adobe celebrates 25 years of Photoshop

Posted in Uncategorized


Understanding the Basic Sliders in Adobe Camera Raw

26 Jan

In this short video tutorial by Tuts+ you can get a quick overview of how the basic sliders work in Adobe Camera Raw. It has a great demonstration using a white to black grayscale image which shows what each slider does, and which parts of your image each are affecting. There is also a good indicator of why you want to be shooting RAW format instead of JPG, showing the same corrections done on both formats and the difference the the larger RAW file makes.

Enjoy the video:

For more Photoshop tips check out our post-processing section. The Basic sliders in Lightroom do pretty much the same thing, but they have slightly different names. Give it a try yourself and see if this helps make sense of the basic panel.

googletag.cmd.push(function() {
tablet_slots.push( googletag.defineSlot( “/1005424/_dPSv4_tab-all-article-bottom_(300×250)”, [300, 250], “pb-ad-78623” ).addService( googletag.pubads() ) ); } );

googletag.cmd.push(function() {
mobile_slots.push( googletag.defineSlot( “/1005424/_dPSv4_mob-all-article-bottom_(300×250)”, [300, 250], “pb-ad-78158” ).addService( googletag.pubads() ) ); } );

The post Understanding the Basic Sliders in Adobe Camera Raw by Darlene Hildebrandt appeared first on Digital Photography School.


Digital Photography School

 
Comments Off on Understanding the Basic Sliders in Adobe Camera Raw

Posted in Photography


Adobe details OS support for next version of Lightroom

23 Jan

In a new blog post, Adobe has said Lightroom 6 will require a 64-bit operating system, meaning it will only run in 64-bit versions of Windows 7, or OS X 10.8 or newer. The announcement suggests Lightroom 6 will continue as a stand-alone application, rather than being swallowed into the company’s subscription-only Creative Cloud program. Read more

Articles: Digital Photography Review (dpreview.com)

 
Comments Off on Adobe details OS support for next version of Lightroom

Posted in Uncategorized


Adobe to acquire Fotolia for $800 million cash

13 Dec

Adobe has announced plans to acquire stock photography service Fotolia. Once the acquisition is complete, Fotolia will be offered to Adobe users as a ‘single Creative Cloud marketplace experience’, as well as a standalone service to others. Read more

Articles: Digital Photography Review (dpreview.com)

 
Comments Off on Adobe to acquire Fotolia for $800 million cash

Posted in Uncategorized


Adobe releases Camera Raw 8.7.1 with Sony a7 II support

12 Dec

Adobe Camera Raw and DNG Converter 8.7.1 final releases are now available, adding support for the Sony Alpha 7 II and a handful of lens profiles. A bug related to chromatic aberration with the Samsung NX1 has also been addressed in this update. Read more

Articles: Digital Photography Review (dpreview.com)

 
Comments Off on Adobe releases Camera Raw 8.7.1 with Sony a7 II support

Posted in Uncategorized


Adobe Camera Raw, Lightroom and DNG Converter add EOS 7D II, X100T, G7 X, NX1 and LX100 support

20 Nov

Adobe has launched Adobe Camera Raw v8.7 and Lightroom v5.7, adding support for the Canon EOS 7D Mark II, Samsung NX1, Fujifilm X100T, Canon G7 X, Panasonic LX100 and a host of other recent cameras. An update to DNG Converter allows files to be adapted for use with older versions of Adobe’s software. The latest downloads are available through the software update feature or the links provided. Learn more

Articles: Digital Photography Review (dpreview.com)

 
Comments Off on Adobe Camera Raw, Lightroom and DNG Converter add EOS 7D II, X100T, G7 X, NX1 and LX100 support

Posted in Uncategorized


Smarter Sharpening in Photoshop using Adobe Camera Raw

13 Oct

sharpen-in-Photoshop-using-Camera-raw-opener

Sharpening in Photoshop has traditionally involved a compromise between applying it to the places in the image that you want to sharpen and avoiding those that you don’t want affected. Both Lightroom and Adobe Camera Raw have always had a much better sharpening tool which not only lets you see what you are doing more clearly, but also includes a very smart mask that lets you limit sharpening to detail areas.

In Photoshop Creative Cloud a Camera Raw filter was added. This opens up a world of possibilities for sharpening images better and more easily and at the completion of your Photoshop editing workflow.

So now, in Photoshop CC as you can do in Lightroom and Adobe Camera Raw, you can take advantage of this better sharpening tool. So you can sharpen a photo of a building and apply the effect to the building but not to the sky above it. This is important because blue sky is typically an area of flat color which may contain noise that you certainly don’t want to sharpen and make even more obvious!

In the video below I show you how to sharpen an image from inside Photoshop CC using the new Camera Raw filter.

Before you do this, if your image contains layers, you need to create a flattened version of the image to sharpen it. To do this, select all the layers in the image and choose Filter > Convert for Smart Filters so you are operating on the entire image. Alternately, click the topmost layer of the image and press Shift + Control +Alt +E (Shift + Command + Option + E on the Mac) to make a new layer containing a flattened version of the photo. Lastly, convert that to a Smart Filter and you’re ready to go:

Do you have any other sharpening tips?

The post Smarter Sharpening in Photoshop using Adobe Camera Raw by Helen Bradley appeared first on Digital Photography School.


Digital Photography School

 
Comments Off on Smarter Sharpening in Photoshop using Adobe Camera Raw

Posted in Photography


Adobe rolls out CC update with new desktop and mobile tools

06 Oct

Adobe has announced updates to several of its mobile and desktop software applications, just in time to kick off the company’s Adobe Max conference. While Photoshop itself only receives a couple of minor updates, such as more 3D printing profiles, there are some interesting new features added to the Adobe ecosystem. Among them is a new Libraries feature, making it possible to save layers and graphic elements for use across apps and platforms. Read more

Articles: Digital Photography Review (dpreview.com)

 
Comments Off on Adobe rolls out CC update with new desktop and mobile tools

Posted in Uncategorized