RSS
 

Posts Tagged ‘Added’

Canon PowerShot G5 X and G9 X added to studio comparison, real-world G9 X gallery published

17 Nov

Canon’s PowerShot G9 X and G5 X offer two distinctly different shooting experiences, but are based around the same 20.2MP 1″-type sensor. The G5 X provides an SLR-style grip and an EVF with a 24-100mm equiv. F1.8-2.8 lens, while the smaller G9 X offers a 28-84mm equiv. F2.0-4.9 lens. We’ve put them through our standard studio scene testing, and we’ve also assembled a gallery of real-world samples from the G9 X. Read more

Articles: Digital Photography Review (dpreview.com)

 
Comments Off on Canon PowerShot G5 X and G9 X added to studio comparison, real-world G9 X gallery published

Posted in Uncategorized


Professional school and sports photography programming added to WPPI 2016 schedule

05 Nov

Emerald Expositions, the company that owns PhotoPlus Expo and the WPPI Wedding and Portrait Photography Conference, announced today the formation of a new association – the Professional School & Sports Photographers Association. The group will exist under the company’s Photo+ umbrella, alongside properties that include PPE, WPPI, PDN and Rangefinder magazine. Read more

Articles: Digital Photography Review (dpreview.com)

 
Comments Off on Professional school and sports photography programming added to WPPI 2016 schedule

Posted in Uncategorized


How to Light Creepy Halloween Masks for Added Drama

28 Oct

It’s October again and that means Halloween is around the corner. This is good news for you as a photographer, Halloween is a visual holiday like no other. With all of the decorations, theme shaped food, Jack-o-lanterns and costumes you have more potential for photography than you can shake a selfie stick at.

One of my favorite parts of Halloween are the masks. Many of the better quality masks available are extremely detailed and creepy, lending themselves well to visceral imagery.

halloween-lighting-tutorial-1923

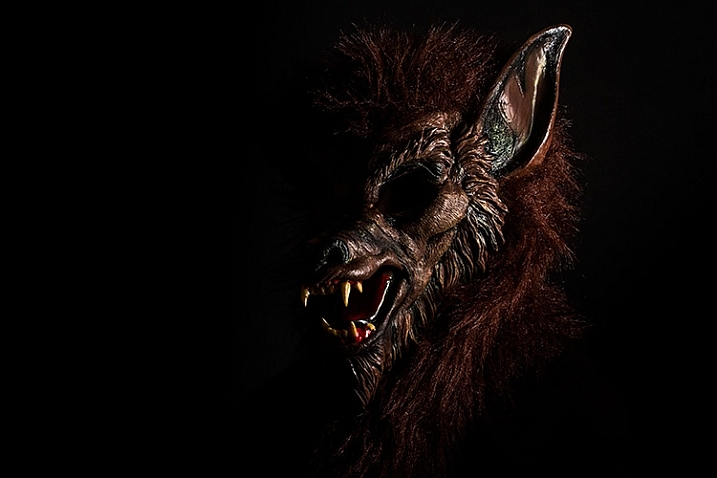
Because of the monsters they often portray, they also tend to be suited for a more cinematic approach to lighting, which will give you the opportunity to explore ways to create mood and drama in your images. This tutorial covers how to light using a basic side-lighting technique that will allow you to create heavy shadows, to shape and accentuate the creepiness in your masks.

What you need:

  • Studio strobe or speedlight fitted with a softbox or a window
  • Black paper – enough to cover the edges of the softbox (heavy, non-transparent curtains will work with a window)

Optional but useful extras:

  • Seamless paper, black background
  • Black reflector/ flag or a piece of black poster board

Setting it up

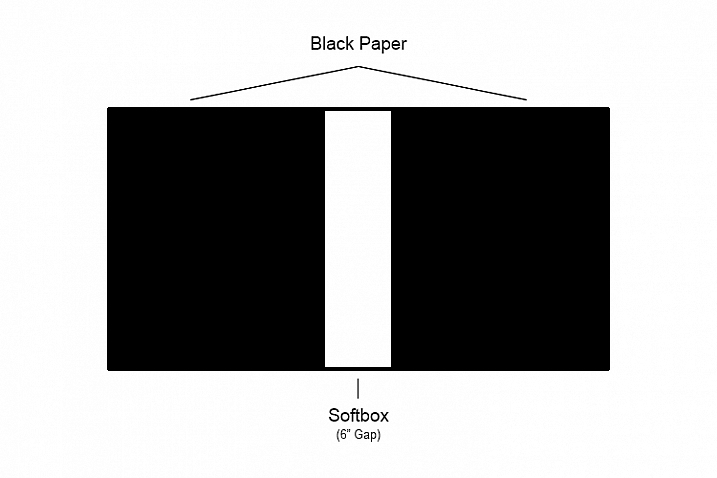
The first thing you need to do is turn your light source into a strip light. This will create a very narrow shaft of light that will skim the front of your subject, creating a lot of contrast that will emphasize all of the fine details.

To do this with a softbox, tape a few pieces of black paper over the sides leaving only about 6” (15cm) of white showing. You can make the gap smaller if you like, but for this technique you shouldn’t go for more than 6”.

halloween-lighting-tutorial-softbox-setup

Tip: If you use seamless paper backgrounds, save the scraps whenever you trim the ends. They always come in handy at times like these.

If you’re using a window with curtains, simply draw them closed until you have a six inch gap.

Execution

Once your light source is modified, you’re ready to go. To side-light, place your light so that it is pointed directly at the side of subject. If you start with the light aimed at the front of the mask, you can then fine-tune as your images require, by moving it an inch or two forward or backwards. Because the light source is so narrow, moving it in tiny increments will result in drastic changes to the final images.

halloween-lighting-tutorial-lighting-diagram

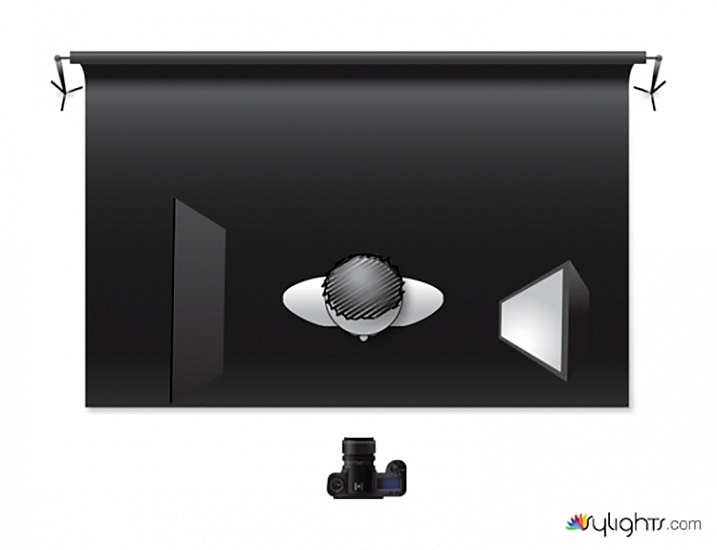
Pay careful attention to any light falling on the background. The narrow beam of light shouldn’t allow much light to spill over, but if it does, try moving your subject and light source a few inches forward (away from the background).

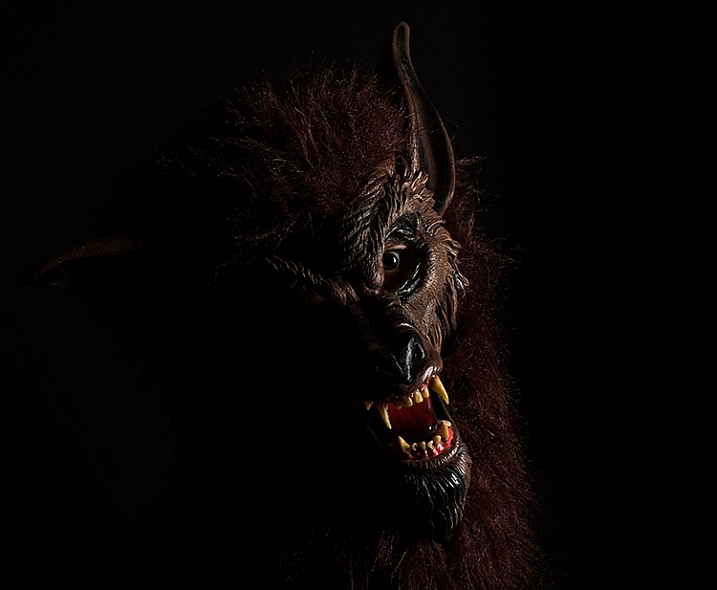
When working with detailed subjects like this, I like to use a smallish aperture like f/11. This ensures that all of the fine details are sharp in the final images. However, if you’re working with window light it may be a struggle to stop down that far without setting a high ISO (or using a tripod, which is a good idea for maximum sharpness anyway). Feel free to use whatever aperture provides you with the best quality results.

halloween-lighting-tutorial-1940

Flagging

When you’re attempting to get really deep shadows with a technique like this, sometimes things like white walls reflect a lot of light back onto the shadow side of your subject. This is where having a black reflector, known as a flag, comes in handy. By holding your flag to the side of your subject, you are blocking the light from reflecting off of other objects that can affect your images.

In the end

Even though this an easy technique, hopefully you can see that with some simple, but careful manipulation, you can take control of even the most basic lighting equipment to create bold and evocative imagery.

If you do decide to give this technique a go, I’d love to see the results you get with your masks. Happy Halloween!

googletag.cmd.push(function() {
tablet_slots.push( googletag.defineSlot( “/1005424/_dPSv4_tab-all-article-bottom_(300×250)”, [300, 250], “pb-ad-78623” ).addService( googletag.pubads() ) ); } );

googletag.cmd.push(function() {
mobile_slots.push( googletag.defineSlot( “/1005424/_dPSv4_mob-all-article-bottom_(300×250)”, [300, 250], “pb-ad-78158” ).addService( googletag.pubads() ) ); } );

The post How to Light Creepy Halloween Masks for Added Drama by John McIntire appeared first on Digital Photography School.


Digital Photography School

 
Comments Off on How to Light Creepy Halloween Masks for Added Drama

Posted in Photography


Super Raw? DxO ONE added to studio test scene

29 Sep

As far as pocketable cameras go, the DxO ONE is the most likely to fit into the smallest of pockets. Built as a companion to Apple mobile devices, it connects directly via integrated Lightning connector to bring your iPhone a 20MP 1″-type sensor and 32mm equivalent F1.8 lens. We put its standard shooting mode as well as its SuperRAW mode up against our studio test scene. Read more

Articles: Digital Photography Review (dpreview.com)

 
Comments Off on Super Raw? DxO ONE added to studio test scene

Posted in Uncategorized


PIX 2015: Live stage demos & talks posted, mini film festival added

22 Sep

Hard to believe, but PIX 2015 is fast approaching! Whether you’re planning on tuning in live October 6th and 7th or joining us in person at Seattle Center, there are more reasons than ever to get excited about PIX – our expo and interactive photo playground. Read more

Articles: Digital Photography Review (dpreview.com)

 
Comments Off on PIX 2015: Live stage demos & talks posted, mini film festival added

Posted in Uncategorized


Sony Cyber-shot DSC-RX10 II added to studio test scene comparison

07 Sep

The Sony RX10 II is built just like its predecessor, but under the hood are a lot of interesting improvements. We’ve done a lot of real-world shooting with the camera, but now we’ve put its 20MP 1″-type stacked CMOS sensor to the test in our studio. Take a look at how it stacks up against its peers. Read more

Articles: Digital Photography Review (dpreview.com)

 
Comments Off on Sony Cyber-shot DSC-RX10 II added to studio test scene comparison

Posted in Uncategorized


BSI Boss? Sony Alpha 7R II added to studio scene

01 Sep

Sony’s Alpha 7R II breaks a lot of new ground in terms of photographic technology. Its 42MP chip is the first full-frame backside-illuminated sensor, and it’s bolstered by a 5-axis stabilization system. We’ve been testing its autofocus and low light capabilities, and now we’ve put it in front of our studio test scene. Find out if a BSI sensor gives it an edge over its peers. Read more

Articles: Digital Photography Review (dpreview.com)

 
Comments Off on BSI Boss? Sony Alpha 7R II added to studio scene

Posted in Uncategorized


Turned up to 20MP: Panasonic Lumix DMC-GX8 added to studio scene comparison

06 Aug

The Panasonic GX8 introduces a new 20MP Four Thirds sensor to its class. It provides dual IS, ISO up to 25,600 and UHD 4K video recording. It’s an all-around enticing update to Panasonic’s Micro Four Thirds lineup, both for the potential of its new sensor and its rich feature set. We put it up against our studio test scene – take a look and compare it to its peers. Read more

Articles: Digital Photography Review (dpreview.com)

 
Comments Off on Turned up to 20MP: Panasonic Lumix DMC-GX8 added to studio scene comparison

Posted in Uncategorized


Canon PowerShot G3 X added to studio test scene comparison

23 Jul

We’ve already published an initial real-world gallery from the PowerShot G3 X, Canon’s newest enthusiast compact, and now we’ve put its capabilities to the test against our studio scene. The G3 X is weather-sealed and uses a 1″-type 20MP sensor with a 24-600mm equiv. lens, making it an appealing choice for outdoorsy types. Take a look at how it performs compared to its peers. Read more

Articles: Digital Photography Review (dpreview.com)

 
Comments Off on Canon PowerShot G3 X added to studio test scene comparison

Posted in Uncategorized


Nikon D810A added to studio test scene comparison

22 Jul

Nikon’s D810A is an astrophotography-oriented version of the D810. It’s the first full-frame camera dedicated to astrophotography, and is better able to capture the hydrogen alpha spectral line. It also expands long exposure options, and has garnered speculation as to improvements in low light capabilities. Take a look at its high ISO and color performance in our studio scene. Read more

Articles: Digital Photography Review (dpreview.com)

 
Comments Off on Nikon D810A added to studio test scene comparison

Posted in Uncategorized