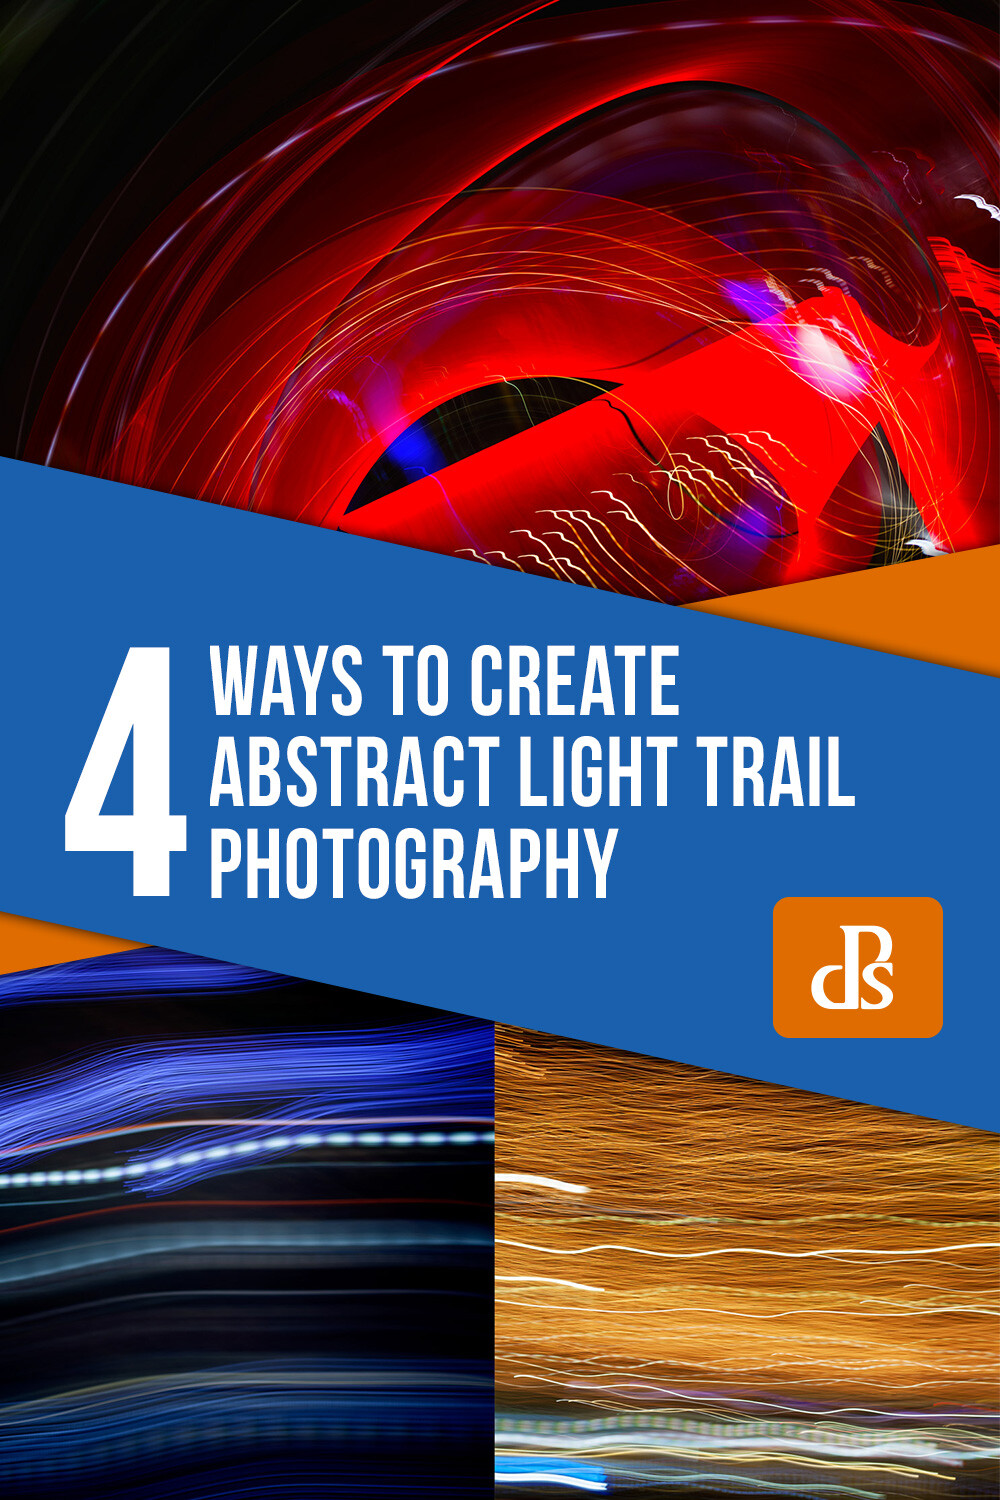
The post An Introduction to Amazing Abstract Automotive Photography appeared first on Digital Photography School. It was authored by Rick Ohnsman.
Some photographs document an event or show a person, place or thing. These are photos of record accurately capturing an image that represents what we see. Other times we want to take a more artistic approach, making a photograph more about a feeling than solely about the subject itself. Sometimes the two mix, for instance in advertising photography, where we might want to accurately show a product but do it in an artistic way that invites the viewer to also feel a certain way about the product.

The beautiful lines of a Porsche and the curves of a twisting road. Put the two together to create a story.
When leaning toward the artistic and sometimes abstract interpretations of photo subjects, I like to remember the words of famous photographer Minor White:
“One should not only photograph things for what they are but for what else they are.”

You don’t need to show the whole car to tell the story. The colors and lines contribute to the image of this American legend.
Applying this to the subject of abstract automotive photography, my intent here is not to teach you everything there is to know about making abstract automotive photos, but to simply get your creative juices flowing. You’ll note that none of the photos here show a complete automobile, but instead depict details, pieces, and parts.
The focus here is the artistic concepts of form, shape, line, tone, color, pattern, light, and shadow.

The shot is blurry by design. I wanted to create a feeling of motion here.

You can also get creative with interior images. The zoom-blur effect was added later in editing.

Ever get the feeling you’re being watched? The patterns and holes in wheels can look like faces – a phenomenon known as Pareidolia.
Automobiles may be a mode of transportation, but they are also art objects – the work of designers who pay much attention to form as well as function. Know that an automotive artist purposely and artistically designed every detail of every car. We, as photographers, can explore that art, find the beauty, note how light plays across the curves and surfaces of an automobile, and use it to craft beautiful photos.

You can make a shot like this on a car lot. It’s all about repeating shapes, lines, and patterns.
What and where
Finding cars to photograph and places to photograph them will depend on what’s available to you. I work part-time at a Ford dealership, photographing new cars for posting on the internet. These are not art photos. They serve the purpose I spoke of earlier: accurately representing the vehicles to interested buyers. The purpose, time, and volume don’t permit spending much time on each photo. However, when time does permit, the light is especially nice, or a particularly interesting car is available, I will get a little more creative.

Find an angle that works and you can use it over and over. Can you tell I like this composition when photographing Mustangs?

Why restrict yourself to the exterior components of a car? When I saw this transmission torn apart on the workbench, I asked the mechanic if I could take some shots.
You might not work at a car dealership, but you could probably talk a local dealer into letting you take photos of their cars particularly if you’d share some of your images with them.
Alternatively, perhaps you or a friend have a nice car you could start with. Begin making and showing some good work and, before long, you’ll have people asking if you can photograph their cars.

Car shows can be a great place for auto art photography. They often have a diversity of makes and models from different eras.
Car shows
Most areas have occasional car shows, where owners polish their vehicles to a mirror-like finish and proudly show them. Often there will be a nice variety of vehicles, sometimes exotics, hotrods, older classics, and antiques. Because the public is typically invited to these events, and they are held in public spaces, photography is generally not a problem.
In fact, the owners practically expect people to ogle and photograph their cars. One thing they will not appreciate (and will likely get you run off in a big hurry) is touching their beauties. Always be respectful and ask if there’s any doubt about whether you can photograph the vehicles.
And, above all, never touch the cars.

Raindrops on red Jags…These are a few of my favorite things. The color, the diagonal lines, the iconic symbols, and the interest added by the raindrops on a freshly-waxed hood all combine to make this image work.
One problem is that there will typically be lots of people around. Because cars are covered with highly reflective surfaces, getting shots without people’s reflections can sometimes be a problem.
I have no real solution for this, other than to make two suggestions:
- When making tight shots of particular pieces of a car, the chances of getting a reflection in your shot is much less than if you were photographing the entire car.
- Learn to be patient. Frame up your shot, be ready, wait for the person in the shot to move on, and then quickly make your photo.

It can be hard to keep bystanders, or even yourself, out of the reflections in glass, chrome, and shiny paint.

Fins up! How cool is this beauty, found at a local car show?

Sometimes monochrome is the best way to show the old classics, much like they might have appeared in an old film of the era. Sunstars are courtesy of the noon sun, a highly polished surface, and an f/22 aperture.
Lighting
High-end automotive photography can involve as much care in lighting as any product or model session. There are studios specially designed to drive a car inside to photograph. I know a local guy who has such a studio. It has full hard cyclorama walls, a glossy white floor, and a lighting system that includes the largest softbox I’ve ever seen. The softbox has to be at least 30 feet long, maybe more!

Hood ornaments are art objects unto themselves. Then add a sunstar with a specular highlight and a small aperture. Both images were made in full noon sun.

The hood emblem of an old Ford F-100 pickup reminded me of the symbol used by the superhero the Flash.
At the opposite end of the spectrum are the shots in this article. They are all made outside with just daylight, no flash, sometimes on a tripod, but many times handheld. Often they were made in the bright noonday sun. Sometimes the bright sun is nice, such as when the specular highlights on chrome, combined with a small aperture, create sunstars.
The point is that you don’t need anything fancy to try this kind of photography. A creative eye, some imagination, and the ability to properly control focus, depth of field, and exposure are all you need.

The door handle is the only touch of reality in this otherwise purely abstract image.
Gettin’ funky in the junkyard
Even the nicest cars will wind up here one day – the junkyard.
One might think it a strange place to make photos. However, for some reason (perhaps nostalgia?), many of us are fascinated by old things. In the auto junkyard, you’ll often find old classics quietly rusting in peace. The once-shiny paint fades to all kinds of interesting colors and patinas. And the layers of peeling paint and rust make an incredible canvas for abstract art.

On the right, an old tour bus used by country star Gene Autry is now parked in Palouse, Washington. On the left, a tight shot of the abstract art to be found if you explore the rust patterns on the old band bus.

Corruption of Power
A word of caution about junkyard photography: Always ask the owner if you can take pictures on their property.
Yes, oftentimes auto junkyard owners will puzzle over why anyone would want to make photos of a bunch of old beat-up and rusting cars. Ask nicely. Convince the owner you’re only there to make photos and you won’t be taking any spare parts home with you. You’ll often get the go-ahead.
Now, you’ll be working in an environment of sharp rusty metal, broken glass, spilled oil, gas, and other automotive fluids, so caution is important. (It might be a good idea to have your tetanus shot up-to-date and carry a first aid kit just in case.)
Whatever you do, just don’t head onto the property without permission, even if the area seems abandoned. You don’t want to meet the infamous junkyard dog or his angry owner.

You can likely still tell this is the hood of an old car. Even so, it’s really about the patterns, textures, lines, and colors.
Getting really abstract
It could be argued that the previous photos in this article really aren’t “abstract” images.
So let’s take a deep dive into really abstract automotive photography – the kind not everyone will appreciate. You’re almost guaranteed to have viewers ask, “What’s that??!!”
No matter. Abstract art is an acquired taste. But once the bug bites you, you’ll find an auto junkyard is practically a gallery of images all begging for your attention.
I took a photo workshop by noted photographer Art Wolfe earlier this year called “Photography as Art,” and he really opened my eyes to this kind of imagery. After the workshop, the auto junkyard became a whole new experience. It was suddenly a place where abstract imagery abounded and peeling paint, broken glass, rust, and decay were the stuff of great photos.

It’s still an old car, but now we’ve entered the world of pure abstract art. Unlike photographing iconic landmarks, where your photo is pretty much what everyone gets, making these kinds of images guarantees your photo will be one of a kind.

I have to wonder if this vehicle was painted numerous times over in its life, or if this is just how the paint ages.

I’ve seen abstract art like this selling for big money and displayed on the walls of corporate offices. I hope to someday figure out just how to tap into that market.
Go do it
I invite you to look at the shots here, look at other abstract automotive photography online, and get inspired. Then just go do it.
Make it a point to not photograph the entire car. Instead look at the shapes, lines, tone, color, and all the other artistic elements of the vehicle. Isolate these to make your shot.
If getting truly abstract images interests you, find some old cars in a junkyard and get in tight. Use the textures, colors, and patterns to make your shot. Be less concerned about what the subject is and more concerned about how the image feels.
Have fun and, if you get some good abstract automotive photography, share them in the comment section below. Best wishes!

The post An Introduction to Amazing Abstract Automotive Photography appeared first on Digital Photography School. It was authored by Rick Ohnsman.


You must be logged in to post a comment.