RSS
 

Archive for November, 2017

How to Make the Most of Your Camera Gear and Skills

01 Nov

Several years ago as I was just getting serious about photography, my only pieces of gear were a Nikon D200 and a 50mm lens. I was instantly enamored with the lens and almost overnight I stopped taking photos of my family and friends with a pocket camera. Instead, I preferred to bring my large DSLR setup with me everywhere because the resulting images were so good.

However, the more I used it the more I became aware of its limitations and I once told my friend Ryan, one of two people who were instrumental in getting me started on my path as a photographer, that I liked the lens but it wasn’t very well suited to wildlife photography.

He took umbrage with that assessment, and quite rightly so because that lens can be ideal for wildlife photography!

How to Make the Most of Your Camera Gear and Skills

As I slowly reversed my position over the years I started to realize that the same principle holds true for all sorts of photography types. The camera gear you have, combined with the skills you possess, can work just fine if you simply adjust your perspective a bit.

Whether you like to shoot portraits, sports, wildlife, astrophotography, nature, still life, or any other kind of images you can probably find a way to make it happen with the gear already on your shelf. The first steps involve some mental adjustments that can be somewhat difficult to wrap your head around but make all the difference in the end.

Here are some tips to help you.

Define your terms

When I made that regretful statement about a 50mm lens not being suited for wildlife photography it was partly out of ignorance because I was a new photographer. But mostly it was because I didn’t understand what was meant by the term wildlife photography.

What I had in mind were images of lions, tigers, and bears set against sweeping African vistas. There was simply no way I could get shots like that with a 50mm lens while living in a small town in the middle of Oklahoma. What I realized over the years was that wildlife photography can mean many things, and I didn’t need to put that term in such a small, limiting box.

How to Make the Most of Your Camera Gear and Skills

Would you consider a turtle sitting on a rock at the edge of a college campus pond to be wildlife? At first, I did not, but now I most certainly do.

Instead, I decided to expand it to include animals I would encounter in my normal everyday routine and even bugs and insects that were literally in my very own backyard. The simple act of re-defining what I considered to be wildlife photography made all the difference in the world to me and has helped me get shots of which I am quite proud and now find great joy in pursuing.

What does it mean to you?

The question for other photographers in a similar situation then becomes: what does [insert type of photography] mean to you? If you want to start photographing people do you mean close-up headshots? Full-body pictures? Street photography? Parties and weddings?

You can even break this down further by looking at sub-genres and defining those terms to be what you want. When you think of a headshot your first mental image might be that of a magazine cover. But headshots can be any number of things and people can be photographed in infinite ways.

The same thing goes for other types of photography as well. You might think sports photography means prize-winning shots of soccer players scoring a goal. But it might also mean shooting an archery competition or even a chess match. And those require very different skills and equipment compared to a football match.

In short, don’t let your pursuit of a specific type of photography be defined by what you think it should mean or, even worse, what other people say. Let it be what you want it to be, then go out and pursue it.

How to Make the Most of Your Camera Gear and Skills

Can wildlife photography mean shooting a spider on the side of your house? Of course! There’s no rule that says it can’t.

Know what you’re working with

Along with knowledge of your own perceptions of a certain type of photography, it helps to have a solid understanding of the gear you own and the skills you possess. That way you can play to the strengths of what is available to you while also understanding areas in which you could improve.

As I started using my 50mm lens for more wildlife photography I developed a much clearer idea of what the lens could do and its limitations. That helped me understand the types of animal images I could get with it.

For example, instead of zooming in on animals that were far away I learned to be patient and find ways of physically getting closer to animals. That wasn’t always an easy task, but it taught me a lot about myself and my willingness to get the shot I wanted. It also helped me understand that my humble little 50mm lens was capable of a lot more than I initially gave it credit for.

How to Make the Most of Your Camera Gear and Skills

The best camera is the one you have with you

Every now and then I would get lucky and have an animal cross my path. Then almost as if it were aware of what I was doing, it would pause and wait for a picture. Of course, this type of scenario is only possible if you have your camera with you instead of sitting on a shelf at home.

No matter what type of pictures you are pursuing, by not practicing and not having your camera with you it will not help you advance. I also learned to conquer some of my fears and do what it takes to get the shot even if it makes me uncomfortable.

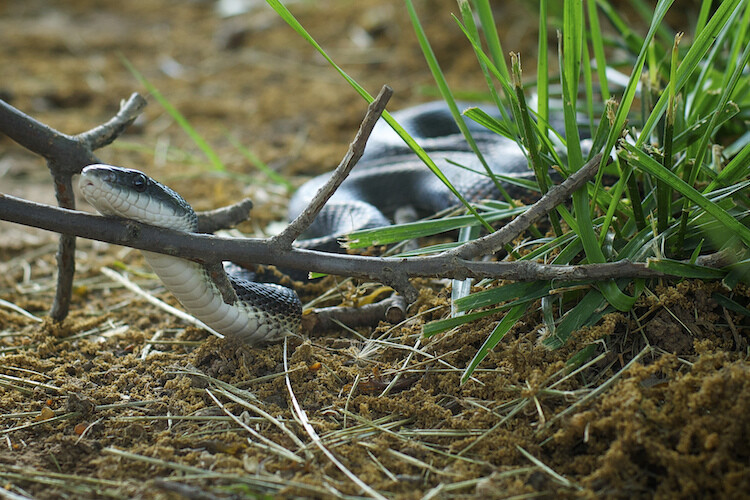
I made this image of a snake after seeing it crawl across the street and into my front yard. Not knowing whether the snake was venomous or not (turns out it wasn’t) I made sure to keep my distance and have an escape plan ready. But I wasn’t about to let an interesting photo opportunity pass me by.

How to Make the Most of Your Camera Gear and Skills

You’ll learn what gear you need

Several years ago I took the following picture of a spider outside my house and thought it was decent. But it was not nearly as good as it could have been because my lens would not focus any closer. (Are you seeing a theme here? You don’t need to go far to take wildlife photos!)

There were also problems with the picture from a compositional standpoint: the light is too harsh, the subject is somewhat unclear, and it’s not all that obvious exactly what is happening.

How to Make the Most of Your Camera Gear and Skills

One of my earlier photos of a spider eating on an evening snack. Much like the grasshopper, this picture clearly has some problems.

As I learned more about my gear while refining my skills I realized that I simply didn’t have what I needed to take close-up shots of bugs and insects. So I bought a set of close-up filters for about $ 35 that allowed me and 50mm lens to get much closer to subjects than before.

I also spent time studying light, composition, mood, emotion, and other principles of photography because I knew I had a lot to learn in those areas. The result is a similar image that I took recently which, in my opinion, is far superior to its earlier counterpart.

How to Make the Most of Your Camera Gear and Skills

It took several years and hundreds of shots before I was able to get a photo I was happy with.

Use what you have to its potential

The lesson here is that you don’t necessarily need to buy new equipment to get the kinds of shots you want. But you do need to know how to use what you’ve got and what you know.

Are you shooting with the kit lens that came with your camera? That’s fine! Those lenses are great for wide-angle shots and short telephoto images, and you can get fantastic shots especially if you have plenty of light.

Your camera might even have features you don’t know about, like fast autofocus or good high ISO capabilities that would make it well suited for sports or nighttime photography. The more you learn about what you have, the more photographic possibilities you will see open up right in front of your eyes.

Manage your expectations

No matter what type of photography you want to pursue it is essential that you have your expectations in line with the reality of what you are attempting to do.

If you want to take amazing poster-worthy images of basketball players going for a slam dunk, by all means, go for it! Are you looking to capture some brilliant wedding photos and fun memories from the reception afterward? Or maybe you want to do like I did and get into photographing animals and wildlife.

Have patience

Whatever type of photography you want to pursue, know that you won’t get from here to there overnight. Getting the pictures you want takes years of practice, education, and an intimate knowledge of what your photography gear can and can’t do.

Pursuing those photos is certainly a lofty and admirable goal and one that is obtainable given enough time and effort. But when you start out your photos will almost certainly not look like what you might be picturing in your mind.

How to Make the Most of Your Camera Gear and Skills

Be like this cottonwood borer beetle and reach for the stars! Just know that it might take a little while to get there.

Even if you can clearly define what you mean by portrait, sports, wedding, wildlife, landscape, real estate, or family photography and you have a solid understanding of your camera gear and your own abilities, your initial pictures will probably fall short of your expectations.

That’s perfectly fine, and it’s all part of the process of growing as a photographer. As long as you don’t let your initial shots get you down. Go into it with an understanding that you have time and room to grow. In the meantime, don’t let anyone tell you your pictures aren’t good enough, you don’t have the right gear, or you aren’t as skilled as you need to be.

This photo represents my White Whale: a goal I have been pursuing but always seems out of reach. I always seem to end up with images like this which are almost there…but not quite. Someday I would really like to get a shot of a bee drinking nectar from a flower, and I will keep at it until I finally get it.

Conclusion

What are some of your photography goals, and what are you doing to make those goals happen? Is there a type or style of photography you have always wanted to try but never thought you could do? Leave your thoughts in the comments below–I’d love to hear from the DPS community on this and hopefully help others find some encouragement and inspiration on their photographic journey.

The post How to Make the Most of Your Camera Gear and Skills by Simon Ringsmuth appeared first on Digital Photography School.


Digital Photography School

 
Comments Off on How to Make the Most of Your Camera Gear and Skills

Posted in Photography


Sony a7R III dynamic range improved, nearly matches chart-topping Nikon D850

01 Nov

Sony has claimed 15 EV dynamic range from its newest ILC iteration: the a7R III. Is it true, or is it like Sony’s odd claim that the a7S had 15 EV dynamic range? Turns out: Sony has some strong grounds for its claim here.

The Sony a7R III retains its dynamic range even in bursts. That’s a big deal for a Sony ILC

At the launch event in NYC, we were able to gather enough data to measure the ‘engineering dynamic range’ of the a7R III.* And boy is it impressive. Possibly even more important: for the first time the a7R III retains this dynamic range even in continuous drive. That’s a big deal for sports and action photographers. But how true is Sony’s claim?

The Sony a7R II already had impressive Raw dynamic range, with the ability to expose short enough to keep highlights from blowing, but with low enough sensor noise to lift shadows without too much noise. The a7R III improves on this.

Oh and think this image is too dark? Wait till you view it on a HDR display, which is another can of worms altogether the stills industry should be discussing.

Photo: Rishi Sanyal

Sony has found a way to reduce shadow (or ‘read’) noise in its files such that the final output has higher dynamic range, and cleaner shadows if you need them, than files from its predecessor. To summarize it in a number at base ISO: 13.6 EV at the pixel, or for a 42.4MP file. Or 14.8 EV if you like to compare to DXO numbers (and only generate 8MP images from your 42.4MP camera). Either way, that’s a nearly half-stop improvement over its predecessor. See our table below, which also compares the a7R III to the full-frame chart-topping Nikon D850, ranking based on highest performer:

Pixel Dynamic Range 8MP ‘Print’ Dynamic Range
Nikon D850 (ISO 64) 13.78

15.03

Sony a7R III 13.63

14.84

Nikon D850 (ISO 100)

13.27 14.53
Sony a7R II 13.21 14.41

While the Nikon D850 is the top performer here, its important to note that this is only the case if you can give the D850 the extra ~2/3 EV light it needs at ISO 64 (which you often can if you’re shooting bright light or a landscape photographer on a tripod). At ISO 100, the a7R III dynamic range actually exceeds that of the D850, thanks to incredibly low read noise. That’s impressive for a camera constantly running its sensor in live view.

At ISO 100, the a7R III dynamic range actually exceeds that of the D850… impressive for a camera constantly running in live view

Keep in mind, though, that if you can give the D850 the extra exposure to take advantage of its ISO 64 dynamic range, all tones in your image benefit from the higher signal:noise ratio—even midtones and brighter tones will be more amenable to post-processing and sharpening thanks to being more ‘clean’ and less noisy to begin with. The D850 is able to tolerate as much total light as the medium format Fujifilm GFX 50S, as we showed here. That’s what allows one to get unbelievably crisp, ‘medium format-like’ like files from a Nikon D810 (just zoom in to 100% on that shot and tell me you’re not impressed).

But the Sony a7R III gets you nearly there. While in some circumstances the Nikon D810/D850, or medium format, may afford you slightly cleaner more malleable files, the a7R III takes a significant step at closing the gap. And that’s nothing short of impressive for a mirrorless ILC constantly running its sensor for a live feed (and all its benefits).

As for Sony’s marketing, it sounds like the claim of 15 EV is believable, but only technically if you consider how your images look when shrunk to 8MP files. To be fair, there’s some benefit to comparing dynamic range figures after resizing camera outputs to 8MP, since it’s a common basis for comparison that doesn’t penalize cameras for having higher resolution (and therefore smaller pixels).

In depth vs. a7R II

Let’s take a deeper dive. Here are our ‘engineering’ dynamic range measurements of the a7R III vs. the a7R II. ‘Engineering’ dynamic range means we are measuring the range of tones recorded between clipping and when the shadows reach an unacceptable noise threshold where signal is indistinguishable from noise (or when signal:noise ratio = 1). Have a look (blue: a7R III | red: a7R II):

The a7R III shows a 0.42 EV, or nearly a half a stop, improvement in base ISO dynamic range over the a7R II. That’s not insignificant: it will be visible in the deepest shadows of base ISO shots of high contrast scenes. How did Sony do this given the already low levels of read noise its known for? Possibly by going to better or higher native bit-depth ADCs, something Bill Claff had suggested based on our largely 12-bit findings of the Sony a9’s output. But let’s save that for the PST forums.

Suffice it to say the a7R III improves on low ISO dynamic range, without sacrificing anything on the high end

It’s worth noting our a7R II figures are higher than DXO’s published 12.69 EV (13.9 EV ‘Print’) figures, possibly because they tested an older unit prior to uncompressed Raw and improvements to Sony’s compression curve. We retested it literally today with the latest firmware, and get figures of 13.2 EV or 14.4 EV normalized for ‘Print’ (Bill measures 13.3 EV, which you can see by clicking the camera name in the legend). See our 8MP, or ‘Print’ normalized, dynamic range figures below. These are more comparable to what DXO might report, for the benefit of your own comparative efforts (blue: a7R III | red: a7R II):

You can see the Sony a7R III encroaching on the ~15 EV rating of the Nikon D850 at ISO 64, but achieved at ISO 100 on the Sony, thanks to lower read noise. Impressive, though keep in mind again that the overall image quality improvement of an ISO 64 file from a D850 is due to total captured light (and it’s all about total captured light, which you can read about here).

Independently, our friend Bill Claff has tested the a7R III and also shows a similar 0.3 EV improvement over the Mark II (you can see the dynamic range numbers by clicking on the relevant camera in the legend at the upper right). He also shows the slight advantage of the Nikon D850 over the a7R III, which comes in at 13.7 EV vs. the a7R III’s 13.6 EV at the pixel level.**

Sony: a job well done. And all this at no cost to high ISO performance (we have comparisons coming showing parity between high ISO a7R III and a9 performance). Now please offer us visually lossless compressed Raw so we don’t have to deal with >80MB files for no reason. 🙂

ISO-Invariance

A camera with such great dynamic range performance suggests it’s probably fairly ISO-invariant, but is it?

Well, yes and no. It’s ISO-invariant in exactly the way it should be, but not so in the ways it shouldn’t be. Confused? Read on.

The a7R III, like many Sony predecessors, has a second gain step at the pixel level that amplifies signal, at the cost of higher tones, to preserve higher signal, and less noise, in dark tones. But it does so at a higher ISO—640 to be exact. At this point, the camera has amplified its signal in the analog domain so much that any remaining noise barely affects it.

That’s why the camera shows no difference between amplifying that ISO 640-amplified signal digitally (in-post) or in the analog domain in-camera. While we’ll have a more rigorous and controlled ISO-invariance test coming soon, you can see even in our cursory test at the launch event below that comparing ISO 6400 vs ISO 640 shot at the same exposure but raised 3.3 EV in-post to maintain the same brightness as ISO 6400 shows no difference at all in noise performance.

$ (document).ready(function() { ImageComparisonWidget({“containerId”:”reviewImageComparisonWidget-56009185″,”widgetId”:560,”initialStateId”:null}) })

What’s the advantage to the latter? 3.3 EV of highlights you otherwise lose by amplifying to ISO 6400 levels in-camera, but that you don’t lose if you ask ACR to digitally brighten 3.3 EV in post (anything that gets blown from that 3.3 EV push can easily be recovered in ACR since it’s there in the Raw file).

Below ISO 640 there’s some extra noise to, say, shooting ISO 100 and boosting 6 EV in post as opposed to shooting ISO 640 and boosting 3.3 EV. But there’s simply no excuse to the camera’s traditional ISO 6400 method of shooting ISO 6400-appropriate exposure and then amplifying the analog signal 6 EV in post to get ISO 6400 levels of brightness; instead, 2.7 EV of that push could be done in the analog domain by switching dual gain to ISO 640 levels, but the remaining 3.3 EV push should be saved for Raw conversion in order to retain 3.3 EV (or more) of highlight detail. Indeed, this is easily seen in Bill Claff’s ‘Shadow Improvement’ graphs that show little to no benefit to analog amplification above ISO 640 on even the Sony a7R II (or ISO 400 on the Nikon D850). And only a highlight cost of stops, upon stops, upon stops, since tones get amplified above the clipping point of the ADC at higher ISOs.

I’m going to use this as an opportunity to ask manufacturers like Sony, Nikon and the like: please accept the digital revolution that even your video departments have accepted (in their ‘E.I.’ modes). Please stop throwing away highlight data for almost no shadow benefit to ostensibly stick to poor antiquated ‘film’ analogies, or to work around CCD/CMOS read noise limitations that no longer exist. We’ve been singing this tune since 2014 when we designed our ISO-invariance test, and it’s even more relevant today with dual-gain architectures. ACR understands digital ‘push’ tags and you can brighten the image preview (and JPEG) as necessary. This is not to single out Sony: Nikon, Olympus and Panasonic are just as easy to blame, if not Canon of late after having modernized its sensor architecture to catch up with the rest.


Footnotes:

* Sony’s claim that the a7S had 15 EV dynamic range was patently false, as even the a7R II which has been measured to have less than 15 EV dynamic range performs better. But since there’s no standard for dynamic range measurement, it’s hard to say whether or not anyone’s claim is right or wrong – manufacturers can claim whatever they wish.

** But again, that’s not the whole story until you consider the higher signal:noise ratio of all tones at ISO 64 on a D850 compared to ISO 100 on any other full-frame at ISO 100.

Articles: Digital Photography Review (dpreview.com)

 
Comments Off on Sony a7R III dynamic range improved, nearly matches chart-topping Nikon D850

Posted in Uncategorized