Month: October 2017

  • Sigma to reveal new lens at PDN PhotoPlus Expo 2017

    Lens maker Sigma will showcase its full range of Sigma Global Vision lenses, Cine high-speed primes and zooms as well as the Foveon sensor-based sd Quattro and Quattro H cameras at the upcoming PDN PhotoPlus Expo 2017 Expo trade show in New York City later this month, but that’s not all they’re doing.

    The company has also announced it will reveal one completely new lens at the show, teasing us with this little detail without revealing anything else about the upcoming glass.

    Additionally, a number of photographers and other imaging professionals will take the stage at the Sigma booth and talk about how they use Sigma products in the areas of aviation, editorial, glamour, landscape, travel and wedding photography.

    As if those weren’t enough reasons to pay a visit, PPE 2017 attendees who visit Sigma’s booth (#837) will also have a chance to enter and win a Sigma 24-70mm F2.8 Art lens. Something to think about if you happen to be in New York at the end of October…

    Sigma Reveals its PDN PhotoPlus Expo 2017 Line Up and a Brand New Lens

    The breakthrough year for Sigma Global Vision Art, Contemporary and Sport lenses on display; brand new lens addition to be unveiled; Sigma Pros light up stage with new presentations

    Ronkonkoma, NY – October 4, 2017 Sigma Corporation of America, a leading still photo and cinema lens, camera, flash and accessory manufacturer, will showcase its full line up of Sigma Global Vision lenses, including a brand-new addition to the line, at the upcoming PDN PhotoPlus Expo 2017 Expo held at the Jacob Javits Convention Center in New York City from October 26-28, 2017 (booth 837).

    The company will also have on hand its breakthrough optics for the cinema market – the Sigma Cine high-speed Primes and Zooms – as well as the Foveon sensor-based sd Quattro and Quattro H cameras.

    “Sigma has had a landmark year with the introduction of seven new lenses across our Global Vision and Cine product lines,” states Mark Amir-Hamzeh, president of Sigma Corporation of America. “Our research and development team is dedicated to creating superior optics that meet the ever-growing requirements of today’s high resolution cameras, taking advantage of every possible design and element to capture the greatest picture detail for both still and moving images. We look forward to showcasing the culmination of what has been a remarkable year in optical advancements for Sigma at this year’s PPE event.”

    Sigma 2017 introductions include the award-winning 14mm F1.4 DG HSM Art, 24-70mm F2.8 DG OS HSM Art, 135mm F1.8 DG HSM Art, 100-400mm F5-6.3 DG OS HSM Contemporary Sigma Global Vision lenses and the new Sigma Cine FF High Speed 14mm T2 and 135mm T2 prime lenses.

    Sigma Special PPE Presentation – Sigma Pro Phenom Jen Rozenbaum
    Sigma Pro Jen Rozenbaum will take the PPE stage on Wednesday, October 25, 11:00 AM – 12:30 PM to deliver a PPE Master Class on “How to make every woman look amazing.”Jen will share with attendees her vast experience in boudoir photography, providing top tips and secret tricks – from wardrobe to posing – that flatter all women. Jen’s presentation will help attendees understand how to best dress and pose any woman of any size and shape as well as gain confidence behind the camera whether they are shooting boudoir, wedding or seniors!

    Master Photographers Take the Sigma Stage
    Showcasing the very best in photography craft, the expanded Sigma Pro family will headline the Sigma stage and offer attendees a behind the lens look at the techniques and technology that captured some of the year’s most outstanding photographs in the areas of aviation, editorial, glamour, landscapes, travel and weddings.

    This year’s prestigious Sigma Pro PPE stage line-up includes outdoor sports and adventure travel photographer Liam Doran, aviation photo expert Jim Koepnick, renowned bird and travel photographer Roman Kurywczak, fearless woman photographer Jen Rozenbaum, and glamour and wedding photographer Jim Schmelzer.

    The exciting topics include (listed by Sigma Pro) and showcase lenses from Sigma Global Vision Art, Contemporary and Sport lines:

    • Liam Doran – Adventure Sports Photography: Get a behind the scenes look at the fast-paced world of editorial adventure sports photography with Liam Doran clients Powder, Bike, Ski, Mountain, Outside, Aka Skidor and many more. Showcasing Art and Sport lenses.
    • Liam Doran – Signature Images – A Visual Journey: From skiing in Switzerland to mountain biking in Colorado, Liam shares the backstory on how some of his favorite images were shot and which Sigma lenses helped him capture some of his best work. Showcasing Art and Sport lenses. Liam shoots extensively with the 12-24mm F4 DG HSM Art, 24-70mm F2.8 Art, 100-400mm F5-6.3 Contemporary and the 150-600mm F5-6.3 DG OS Contemporary and the 70-200mm F2.8 EX DG OS HSM lenses among others.
    • Jim Koepnick – Documentary Photography…A Single Lens Solution: While there is a mystique about street photography with an old rangefinder camera and one lens, the bottom line is the photo that is captured, and the story that photo tells the viewer. Jim shares what a pro can do with a Sigma 18-300mm F3.5-6.3 DC Macro OS HSM Contemporary lens.
    • Jim Koepnick – Air Show Photography – Sigma Has It Covered: Air shows are one of the most popular spectator events in the country, and the wide variety of Sigma lenses make it easy to photograph every aspect of exotic aircraft in the air and on the ground. Learn the best techniques for capturing fast moving planes in flight and making creative images of planes and personalities on the ramp using the Sigma 12-24mm F4 Art, 24-70mm F2.8 Art, 100-400mm F5-6.3 Contemporary and the 150-600mm F5-6.3 Contemporary lenses.
    • Roman Kurywczak – For the Love of Landscapes: Roman will take attendees on an inspirational journey showcasing the magic of landscape photography through useful tips, suggested camera settings, instruction on innovative techniques and recommendations for the optimal Sigma brand lenses and gear for capturing stunning images of your very own. Showcasing the Sigma 12-24mm F4 Art, 14mm F1.4 Art, 100-400mm F5-6.3 Contemporary and the 150-600mm F5-6.3 Contemporary lenses.
    • Roman Kurywczak – Getting Close for Impact: This educational lecture will show you the technical tips and tricks needed to take your close-up photography to the next level. Attendees will learn how to consistently capture sharp images, front to back, handheld, and all in a single frame with a variety of Sigma lens options including the Sigma 105mm F2.8 EX DG OS HSM, 150mm F2.8 EX DG HSM, APO Macro 180mm F2.8 EX DG HSM, 18-300mm F3.5-6.3 Contemporary, 100-400mm F5-6.3 Contemporary and the EM-140 DG Macro Flash.
    • Roman Kurywczak – Photographing Wildlife – from Portraits to Action: This exciting photographic journey will give attendees the important information they need to know about photographing wildlife out in the field – from camera settings to Sigma lens and accessory choices. Roman will share striking examples illustrating how the right lens choice positively impacts the image without breaking your budget. Showcasing the Sigma100-400mm F5-6.3 Contemporary, 150-600mm F5-6.3 Contemporary, 300-800mm F5.6 EX DF APO HSM and the 500mm F4 DG OS HSM Sport lenses.
    • Roman Kurywczak – Photography After Dark: This informative how-to program is designed to open up your eyes to the possibilities of photographing landscapes after dark, whether a natural landscape with the star filled sky as a backdrop, or dazzling city lights photographed from a helicopter using a variety of Sigma lenses including the Sigma12-24mm F4 Art, 14mm F1.4 Art and the 24mm F1.4 DG HSM Art lenses.
    • Jen Rozenbaum – Bulletproof Posing for All Women: Confidence is just as important behind the lens as it is in front of it! Posing women is a creative challenge for all photographers. Join Jen as she shows her bulletproof tips and tricks for posing women to make them look simply amazing, and give the photographer and subject the confidence that generates an incredible shoot. Showcasing the Sigma 50mm F1.4 DG HSM Art,85mm F1.4 DG HSM Art, and the 24-105mm F4 DG OS HSM Art lenses.
    • Jim Schmelzer – Glamour Photography Using Exotic Lenses for Impact: Jim will showcase a variety of glamour images shot with Sigma Art and Sport lenses. He will deconstruct shots –sharing tips, including those that he used to capture the stunning images of world-class models from his latest commercial glamour shoot in Cancun Mexico. Showcasing the Sigma 85mm F1.4 DG HSM Art, 120-300mm F2.8 DG OS HSM Sport and the 135mm F1.8 Art lenses.
    • Jim Schmelzer – Choosing the Right Lens for Your Wedding Day Assignment:Wedding day photographers must wear a variety of hats. They need to be an architectural photographer, photojournalist, portrait artist and most importantly, they need to be fast and accurate. Look over Jim’s shoulder as he demonstrates how he captures the versatility in images required of today’s modern wedding photographer. Showcasing the Sigma 12-24mm F4 Art, 24-105mm F4 Art, 35mm F1.4 DG HSM Art and the 85mm F1.4 Art lenses.

    For the Sigma Pro presentation schedule days and times, please visit:https://blog.sigmaphoto.com/event/photoplus-2017/ ?

    Sigma Super Giveaways at PPE 2017
    PPE 2017 attendees who visit Sigma at booth 837 will have a chance to enter and win a Sigma grand giveaway – a 24-70mm F2.8 Art – an MSRP value of $ 1299.00 USD!

    Re-engineered and introduced in 2017, the newly updated 24-70mm F2.8 Art lens is Sigma’s workhorse zoom lens. It touts a brand new Optical Stabilizer (OS), Hypersonic Motor (HSM) for highly efficient and fast autofocus, as well as a dust- and splash-proof mount with rubber sealing.

    The 24-70mm F2.8 Art lens embodies all the technical qualities and finesse that define the high-performance Sigma Global Vision Art series. A popular industry focal range covering a wide array of shooting scenarios, the 24-70mm’s optical design also includes three SLD (Special Low Dispersion) glass elements and four aspherical elements to ensure image accuracy and sharpness. The 24-70mm F2.8 Art aspherical elements use Sigma’s thicker center glass design and highly precise polishing process, delivering stunning images and bokeh effects. The lens’ purpose-built structure boasts a new metal barrel for optimal durability with TSC composite internal moving components designed to resist thermal contraction and expansion. Available for Canon, Nikon and Sigma camera mounts.

    Articles: Digital Photography Review (dpreview.com)

  • Google unveils Pixel 2 phones: Adds OIS, Dual Pixel powered Portrait Mode and more

    Ever since the iPhone 8 Plus and iPhone X were announced, we’ve been waiting for Google’s response. When the original Google Pixel came out, it quickly became one of the most raved about smartphone cameras in the world… would the Pixel 2 follow suit? The short answer, at least according to Google, is yes.

    Just this morning, we sat down in the SF Jazz Center and, after an hour of other updates, Google finally unveiled the 5-inch Pixel 2 and 6-inch Pixel 2 XL.

    The new phones house a 12.2MP sensor with 1.4um pixels, Dual Pixel phase detect autofocus and an F1.8 lens on the back, and an 8MP camera with 1.4um pixels, fixed focus and an F2.7 lens on the front. The newer 1/2.55″ sensor is smaller than the previous-gen’s 1/2.3″ sensor, but the brighter aperture nearly perfectly compensates.* Video specs for the rear camera max out at 4K 30fps (sorry, no 4K/60p like the new iPhones) while the front camera can do up to 1080p at 30fps. The camera units are now raised above the back glass surface, which remedies the nasty flare issues the previous Pixels had.

    As we hoped, the whole phone is encased in an IP67 water and dust resistant aluminum unibody, and is powered by the latest and greatest Qualcomm Snapdragon 835 processor.

    More impressive than the base specs are how Google uses its hardware in concert with software and machine learning technology to deliver a better photography and video experience.

    Instead of opting for a dual camera on the back of the phone, the Google Pixel 2 and Pixel 2 XL uses just one camera, and combines this with Dual Pixel technology (split left/right pixels) and computational photography to create the now-ubiquitous fake bokeh Portrait Mode effect. And since stabilization is incredibly important, they’ve worked out how to use both optical and electronic image stabilization at the same time when you’re shooting video, which should deliver incredibly smooth footage. (more on that from San Francisco shortly…)

    Unfortunately, in our brief time with the cameras so far, we discovered that Portrait mode is still not rendered live on either camera… it seems there are downsides to using a single camera instead of a dual cam setup, or in Google’s (we think correct) choice to use a more computationally intensive ‘lens’ blur as opposed to the more Gaussian (smooth) blur that Apple opts for.

    Finally, no modern smartphone is complete until you look at the display your photos and videos will be viewed on.

    Unfortunately, Google made no mention of color management or proper display profiles—which caused issues with the previous Pixel smartphones—but the new AMOLED (for the 5-inch model) and pOLED (for the 6-inch model) displays are wide-gamut. The Pixel 2 claims 93% DCI-P3 coverage while the Pixel 2 XL claims full 100% coverage of the same standard.

    We bring this up because last year’s Pixel phones also offered a wide color gamut and high contrast ratio, thanks to their OLED display technology, but often displayed wildly inaccurate colors due to the lack of color management. It’s still possible the displays will come calibrated properly for the P3 or sRGB color spaces, but without any explicit mention of calibrated display modes that the OS automatically switches between based on the color space of the content (as Apple claims to do), we remain skeptical.

    The lack of any talk of HDR display of video or photos was also a disappointment after the announcement of iPhone X’s support for HDR10 and Dolby Vision video, and HDR display of photos. The latter should make HDR photos pop on the bright contrasty OLED display of the iPhone X, rather than give them the flat tonemapped look we’re often used to. It seems Google has chosen to go the traditional method of compressing a high contrast scene into a flatter image, rather than take advantage of the HDR display capabilities of its OLED display.

    We’re currently spending some time with the Google Pixel 2 and Pixel 2 XL in person today at the Jazz Center, so stay tuned for our hands-on impressions as the designated photography nerds at this event.

    In the meantime, you can find out more about either of these phones on the Google Store, check out our Live Blog to see what we were thinking as the announcements were going up, or argue about your Apple vs Google allegiance in the comments.


    * At least for low light performance, but perhaps not dynamic range. The discussion is complicated by the use of computational photography, of course, so it’s difficult to speculate on the overall impact of the smaller sensor / brighter aperture.

    Articles: Digital Photography Review (dpreview.com)

  • Here’s Google’s impressive OIS + EIS video stabilization demonstrated

    Optical image stabilization is a welcome update in the Google Pixel 2, but what’s really impressive is that it can be used in tandem with electronic stabilization in video mode. If Google’s demo at its launch event today is any indication, it’s pretty darn effective and makes for super smooth clips that look like they were shot with a steadicam. While we’ve seen this in the traditional camera space in 1″-type compacts from Sony and Canon, as well as ILCs like the Canon M5 and Olympus E-M1 II, it’s a first for smartphones.

    We got a chance to see this same video in person; it was certainly impressive. We’re eager to give it a try ourselves when we get our hands on a review unit.

    Articles: Digital Photography Review (dpreview.com)

  • Google Pixel 2 trumps iPhone as ‘best smartphone camera’ with highest DxOMark score ever

    It’s been a couple weeks of amazing camera phone tests over at DxOMark. First the iPhone 8 Plus beat all former phones with a score of 94. Then the Samsung Galaxy Note 8 came in and earned the same overall score, beating the iPhone 8 Plus in the Photo category but falling short in Video. And now… now we have a new proper king.

    After testing the brand new Google Pixel 2, DxOMark has awarded the flagship phone its highest ever marks for a smartphone camera with an overall score of 98.

    As usual, you can read the full review over on DxOMark’s website, where they pit the Pixel 2 against its main rivals in a few head-to-head challenges, but the overall score results can be seen below:

    In the Photo category, the Samsung Galaxy Note 8 is still the best phone out there, besting the Google Pixel 2’s score of 99 by a single point. But when it comes to video, the Pixel 2 is totally and completely unmatched. Its Video score of 96 makes Samsung’s paltry 84 seem a bit weak, and even Apple’s respectable 89 is nowhere close.

    Ahead of doing our own tests with these phones, we’ve been looking closely at the results in the DxOMark tests, and we are very intrigued to say the least. Some of the numbers themselves are rather subjective, and we don’t entirely agree with DxO’s assessment in every category.

    For example, in their outdoor bokeh comparison, the new Pixel 2 fares the worst:

    Google Pixel (original) Portrait mode: 5MP sRGB JPEG.

    The original Pixel simulated lens blur well (note the circular appearance of out-of-focus highlights), but did so at a resolution cost (you only got 5MP files). You also had to move the camera upward while taking the photo – problematic for moving subjects. There are artifacts present if you look closely.
    Google Pixel 2 Portrait Mode: 12MP sRGB JPEG.

    The new Pixel 2 fares the worst in this comparison, with multiple aritfacts throughout the image. At least it’s instantaneous (no need to move camera) and a full 12MP now though. Hopefully Portrait mode fares better in other situations.

    iPhone 8 Plus Portrait Mode: 12MP DCI-P3 HEIF (10-bit).
    The iPhone 8 Plus uses dual cameras to create the most artifact-free blur. It’s more Gaussian in nature than like a true lens blur (whichthe original Pixel simulated quite well). It’s also worth noting Apple is encoding images in higher bit-depth wider color space using the High Efficiency Image Format.

    Something else overlooked by the DXO assessment: Apple now saves images in a new image format: HEIF, which allows for a wider color gamut (DCI-P3) and higher bit-depth (10-bit). That means the potential for more vivid images with less posterization compared to the conventional 8-bit sRGB JPEGs even the new Pixel phones (and most phones / cameras) continue to use today. In fact, even some of the colors in the iPhone 8 Plus image above are outside of the sRGB color space. Point: Apple.

    Another point of contention we have: the sometimes overly tonemapped (flat) images HDR+ renders may or may not suit your taste. The Pixel 2 vs. HTC U11 high contrast scene demonstration shows the Pixel 2 preserving more overall detail in shadows and highlights, but doing so at the cost of global contrast. With the display capabilities of wide gamut, high brightness/contrast OLED displays that are technically capable of HDR display, that may not always be the optimal result. The iPhone X will likely be first device to show how good photos can look when you pair HDR capture with HDR display. We’re a bit disappointed that Google didn’t even mention HDR display, despite the devices’ displays clearly being capable of it.

    Still, DxOMark’s conclusion doesn’t skimp on the superlatives… except that they’re running out of them:

    We’re in danger of running out of superlatives when describing the major image quality attributes of the Google Pixel 2. That makes sense for a device that tops our scoring charts —up from the 94 of the Apple iPhone 8 Plus and Samsung Galaxy Note 8 to a record-setting 98. So for just about any Photo or Video ” href=”https://www.dxomark.com/glossary/use-case/”>use case, it recommends itself as the phone camera with the best image quality.

    To read the full review for yourself, head over to the DxOMark website by clicking here.

    Articles: Digital Photography Review (dpreview.com)

  • Pop-Up Parking Garage & Rooftop Green Space Rises Higher When it Rains

    [ By SA Rogers in Architecture & Public & Institutional. ]

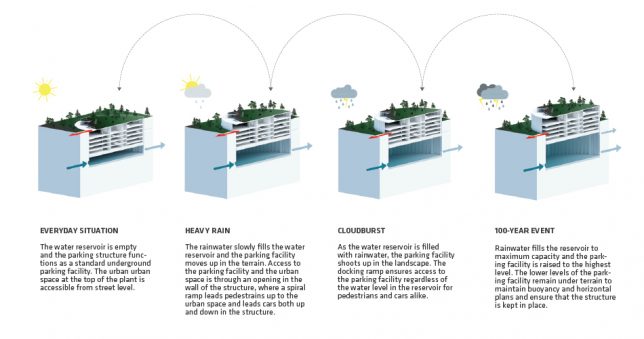
    Stormwater flooding, too few places to park and a lack of green space are three of the main issues plaguing every major city, and this strange but kind of brilliant building concept attempts to solve all three at once. ‘POP-UP’ by Danish architecture firm THIRD NATURE places a five-level parking garage topped with a public park on top of a stormwater reservoir, with the building’s height changing depending on how much it has rained lately.

    On a dry day, all that’s visible of the POP-UP structure is the rooftop park, which essentially sits at ground level. But when rain falls, it fills the underground reservoir, causing the parking structure to rise higher in the landscape, highlighting its adaptability in the face of changing weather. The architects present it as an alternative to constructing a rainwater reservoir that’s empty most of the time or a mono-functional parking facility that takes up valuable urban space.

    “By 2050, the Earth’s population is expected to grow to over 9 billion people,” says THIRD NATURE. “The migration to cities is on the rise and urban spaces are under pressure from the growing numbers of cars and traffic in the streets. With the quest for green, livable and human-scale cities cars and car parking have become an increasing challenge fighting for m2 in the dense cities – often at the price of urban areas and parks.”

    “At the same time, climate changes require cities to handle huge amounts of stormwater generated by more and more powerful cloudbusts – this by building large water reservoirs under roads and squares. The situation calls for a rethinking of the way we establish parking, storage of stormwater and new urban spaces.”

    They compare the building to a piece of cork in a glass of water. Hydraulic and mechanical lifts would help balance the weight ratios of parked cars in the structure to make sure it’s able to move up and down smoothly without changing the water level underneath. The two lowest levels of the parking structure would be off-limits, remaining underground to ensure the stability and buoyancy of the building.

    Though an approach that reduces the number of individual vehicles allowed into a city would arguably be more practical, it’s also true that many places (especially in the United States) are likely to remain car-centric for the foreseeable future. Is this a realistic compromise?

    Share on Facebook


    [ By SA Rogers in Architecture & Public & Institutional. ]

    [ WebUrbanist | Archives | Galleries | Privacy | TOS ]


    WebUrbanist

  • Google Clips is an AI-enabled hands-free camera that costs $250

    Meet Google Clips

    After some expected hardware update announcements, Google’s “one more thing” turned out to be Clips, a tiny, hands-free camera designed to automatically capture everyday moments.

    Meet Google Clips

    Small and lightweight, Clips is sold with a case that, uh, clips to things. Demo objects included toys and books. Point it at you and your loved ones, and Clips will do its thing without you ever needing to push the shutter button (although you can still push the shutter button if you want).

    Meet Google Clips

    Clips uses AI to identify and remember frequent subjects. When it detects a familiar subject smiling, for example, it will capture a burst of images. What’s more, Google says that it gets smarter over time, capturing more of the moments you want and fewer moments you’ll ultimately throw away.

    Meet Google Clips

    Clips works with the Pixel 2, naturally, but a rep we talked to said it will also work with an iOS app. It captures bursts of images from which videos (without audio) or stills can be extracted. Clips can be trimmed in the accompanying app, and they can be exported as GIFs as well.

    Meet Google Clips

    Clips will sell for $ 250, and eager customers can join a pre-order ‘waitlist’ now.

    Articles: Digital Photography Review (dpreview.com)

  • 6 Tips for Getting Consistent Results Shooting in Low Light

    It’s often challenging for photographers to get consistent results in low light. Problems encountered may include camera shake, out of focus photos, and noisy images. There are three main reasons that these things happen.

    How to Get Consistent Results Shooting in Low Light

    1. You may not be using shutter speeds fast enough to hand-hold your camera without getting camera shake.
    2. Your camera may struggle to focus properly in low light.
    3. Your photos might be noisy because of high ISO settings, underexposure, or a combination of both.

    With this in mind, let’s look at some steps you can take to get consistent results when shooting in low light conditions.

    1. Take your camera off full automatic

    If you’re using your camera in a fully automatic exposure mode, such as portrait or night scene, it’s time to stop. You have little or no control over your camera’s settings by using these modes. That stops you from getting the best results in low light.

    The only modes I recommend that you ever use are Aperture Priority, Shutter Priority, Program Auto or Manual (the last one only if you really know what you’re doing).

    How to Get Consistent Results Shooting in Low Light

    For best results in low light avoid your camera’s fully automatic exposure modes!

    2. Avoid using the built-in flash

    Fully automatic exposure modes may also engage the camera’s built-in flash in low light. The problem is that built-in flash doesn’t provide high-quality light.

    Don’t get me wrong. There will always be circumstances where it’s more important to get the photo than to worry about its aesthetic qualities. If you’re photographing a friend or loved one in the dark, it’s better to use the flash and capture the moment, however ugly the light, than not capture it all. But if you want to create beautiful photos, then you will want to either learn to use off-camera flash or make the most of the available light.

    I made this photo at dusk using an off-camera flash with a softbox. There’s no way you can replicate this quality of the light in this image without the right equipment.

    How to Get Consistent Results Shooting in Low Light

    3. Use Image Stabilization

    Image Stabilization lets you take sharp photos using longer shutter speeds than you could with a non-stabilized lens. This is useful to know if your photos tend to suffer from camera shake in low light.

    There are two types of Image Stabilization. Canon and Nikon build it into their lenses. That means the technology only works if you have the right lens. As most kit lenses are image stabilized it is likely you own at least one image such lens you can use in low light.

    Other manufacturers, like Olympus and Panasonic, place the image stabilization mechanism in the camera body. The advantage of this system is that it works with any lens. If you’re not sure how image stabilization works with your camera then check your manual for the details.

    Most image stabilization systems give you a four-stop advantage. Let’s look at what that means in practice.

    Let’s say you’re using an 18-55mm kit lens on an APS-C camera. Ideally, without image stabilization, you need a shutter speed of around 1/125 second to achieve a sharp image with a hand-held camera (some photographers may argue you could use a slower shutter speed). An image stabilization system that gives you a 4 stop advantage means you can drop the shutter speed to 1/8th of a second and still get a sharp image. That’s very helpful in low light.

    For example, I made this photo in a dimly lit museum with a non-stabilized 18-55mm lens at 1/160 second, f5.6, ISO 1600. If the lens was image stabilized I would have had the option of using ISO 100 and 1/10th of a second, giving me a much cleaner image with less noise.

    How to Get Consistent Results Shooting in Low Light

    4. Don’t be afraid of high ISO

    Most modern digital cameras give you excellent performance at high ISOs. It’s quite possible your camera is capable of giving great results at ISO 3200, 6400, or even higher. You won’t know until you try. This is another good reason for taking your camera off fully automatic. Now you can decide what ISO to use, rather than leaving it up to your camera.

    The best thing to do is test your camera at all its high ISO levels to find your noise tolerance level. For example, you might find that ISO 6400 is the highest setting you’re comfortable using. Once you’ve decided this, you know the ISO range you can work with for your camera.

    This photo is taken at ISO 6400, the highest ISO I’m comfortable using on my camera. I had to use the high ISO setting because the photo was taken indoors in low light.

    Low light

    5. Use a prime lens

    If you don’t have one already then it’s worth considering buying a prime lens. For example, most 18-55mm kit lenses have a maximum aperture of f/5.6 at the 55mm end. But on a 50mm prime lens that maximum aperture could be f/1.8 (or even wider). That’s a difference of over three stops (eight times more light), which means that you can take photos in much lower light conditions.

    The only caveat is that there is much less depth of field at wide apertures. But you can use this to your advantage by exploring the use of bokeh in your low light photos. I made this photo of a Chinese lantern, taken at night, using an 85mm lens set to f/2.

    Low light

    6. Use a tripod

    A tripod comes in really handy for taking photos of landscapes and cityscapes in low light. All the methods listed so far, such as using a high ISO, Image Stabilization, prime lenses and so on, have disadvantages. Noise increases at high ISOs, wide apertures don’t give much depth of field, and even Image Stabilization has its limits.

    The benefit of a tripod is that you can use your camera at its lowest ISO setting (giving good image quality), and a small aperture such as f/8 or f/11 (allowing for a greater depth of field).

    Shutter speeds will slow right down at these settings. Again, use this to your advantage. Slow shutter speeds are great for landscape photography because moving parts of the landscape, like water, become a silky blur. With cityscapes, the light from passing traffic becomes long streaks of light.

    A tripod also opens up techniques like long exposure photography (photos taken with shutter speeds between a minute and eight minutes long) and painting with light (using flash or torchlight to illuminate the scene during a long exposure).

    Low light

    I used a tripod to create this landscape photo, which needed an exposure of 30 seconds at f/8 and ISO 100. The water blurred during the exposure, which helps add mood and atmosphere to the photo.

    Conclusion

    The key to getting consistent results shooting in low light is understanding the limitations of your equipment and taking control of your camera to make it do what you need, rather than what it wants. With a bit of work and patience, you can learn to take great photos in low light. The benefit is that low light conditions are often beautiful. Most places and landscapes look beautiful at dusk. Shooting at these times will help you take moody photos.

    Do you have any ideas for shooting in low light? Let us know in the comments!


    If you enjoyed this article and would like to learn more about the creative side of photography then please check out my ebook Mastering Photography. It shows you how to take control of and be creative with your digital camera, no matter what your skill level!

    The post 6 Tips for Getting Consistent Results Shooting in Low Light by Andrew S. Gibson appeared first on Digital Photography School.


    Digital Photography School

  • It’s Alive! 14 Algae-Powered Inventions for Food, Light, Energy & Oxygen

    [ By SA Rogers in Conceptual & Futuristic & Technology. ]

    If we could just get beyond pesky hiccups like catastrophic climate change and wanting to obliterate each other with nuclear weapons, we humans could learn from our mistakes and create a future that’s actually cooler and more sustainable than anything we dreamed up during the 20th century. Making the most of microalgae, one of the most ancient and prolific organisms on earth, we could produce abundant clean energy and healthy foods while also reducing the amount of CO2 in the air and producing more oxygen. These designs show just how this symbiotic process could manifest in our lives.

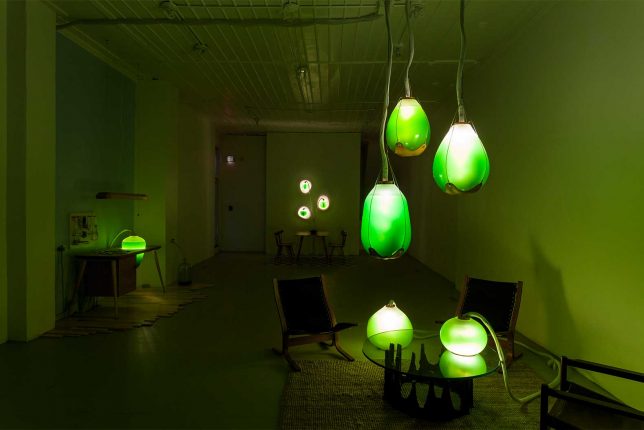
    Living Chandelier Filled with Algae

    Embedded with LED bulbs and sustained by daylight, ‘Exhale’ by Julian Melchiorri is a living chandelier with beautiful glass components filled with various shades of green algae. The glass ‘leaves’ take in CO2 from the room and release oxygen, too, making it a striking air purifier. Melchiorri is a designer and engineer, but he’s also a leading biochemical technology researcher, and he’s been working on his ‘artificial leaf’ concept for years.

    ‘Algae Green Loop’ Proposal for Chicago’s Marina City Towers

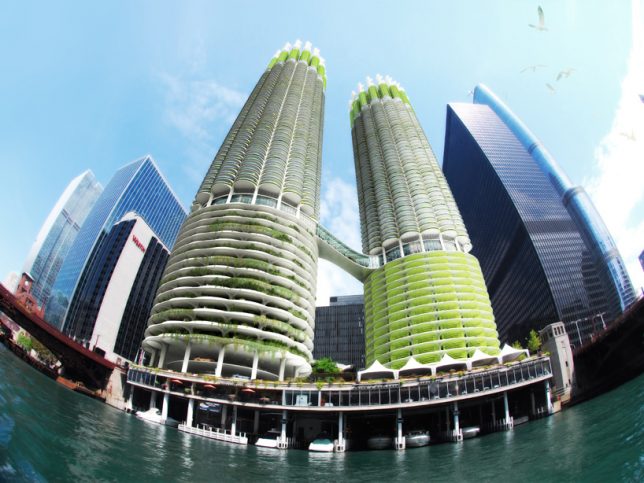
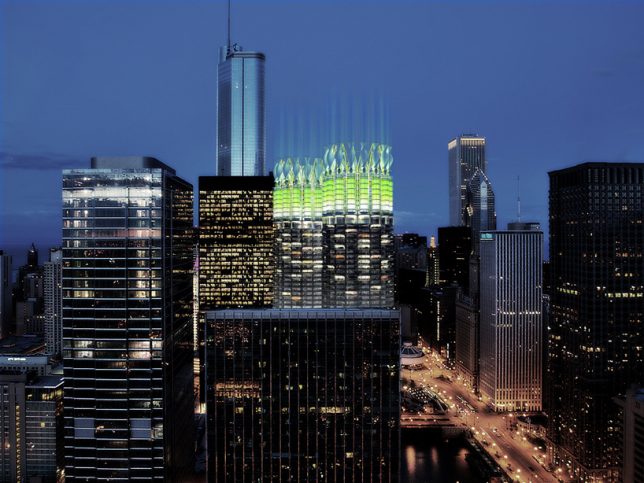
    Architecture office Influx Studio imagines a dramatic makeover for the Marina City Towers in Chicago, retrofitting them to absorb CO2 through loops of bioreactors to help mitigate climate change. The closed-loop system sequesters carbon from the air, absorbs it through vegetal photosynthesis and produces its own energy through the same wind turbines that suck in CO2 and through the algae bioreactors that process it.

    Photosynthetic Algae Furnishings

    [vimeo128654962]

    ‘Living Things’ is a series of bio-powered furnishings exploring ‘symbiotic living,’ his which micro-algae help light up our homes. Presented in a series of vignettes, the project contains furniture and lamps that are both beautiful and beneficial. “The morphologies of hand-blown glass vessels function both as lighting and heating elements for the human occupants, and high functioning photobioreactors which provide heat, light, agitation, air supply nutrient and waste control to the living algae inside.”

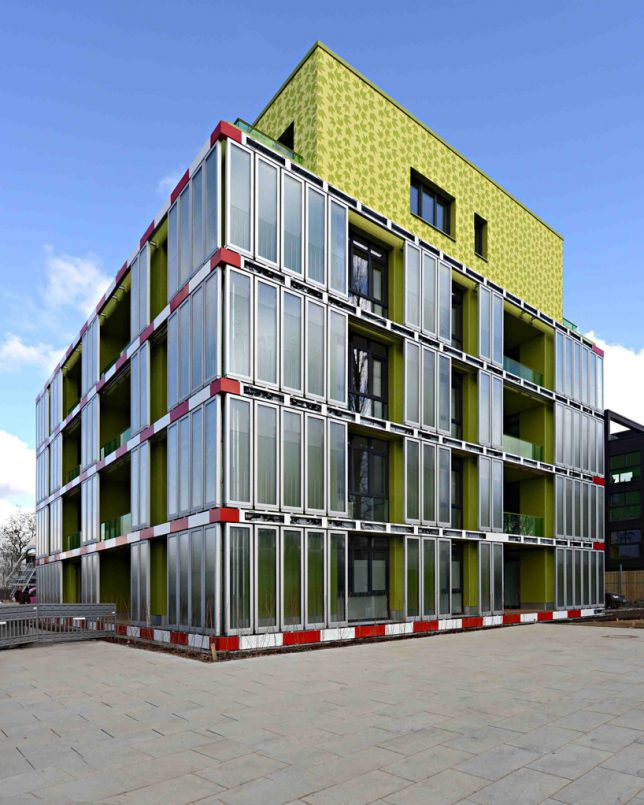
    World’s First Algae-Powered Building

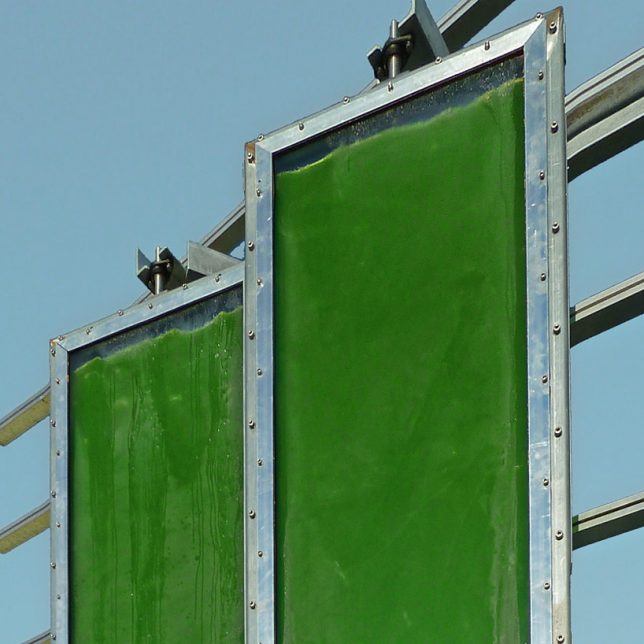
    Lots of concepts tout the ability to power an entire building on algae, but have you ever actually seen one built? BIQ House in Hamburg, Germany by Austrian firm Splitterwerk features the world’s first iso-adaptive facade in the form of algae-filled glass panels shading the southeast and southwest faces of the building. The algae is sourced from a nearby tributary of the Elbe River and constantly changes color as it grows. The panes produce biomass as the algae multiplies, and reduce the amount of energy needed for cooling inside the building.

    Living Portraits Made with Microscopic Algae

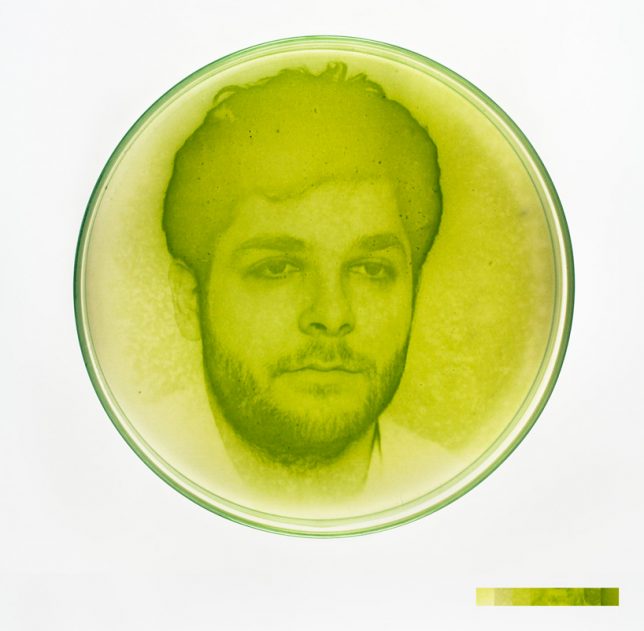
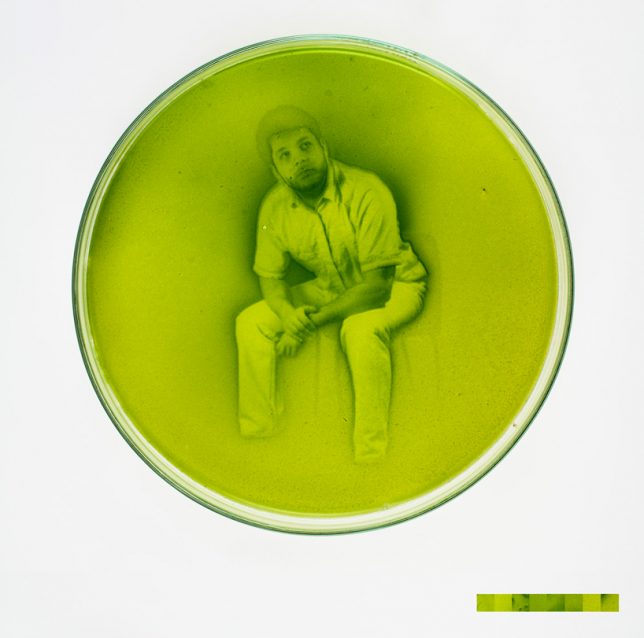
    Living algae cultured in petri dishes clump together to form images in a living twist on traditional photography techniques. Artist and researcher Lia Giraud places a mix of chemical nutrients in the dish and exposes them to an image, and the cells react to the light and form solids of various densities, resulting in the different shades of green that produce the image.

    Next Page – Click Below to Read More:
    Its Alive 14 Algae Powered Inventions For Food Light Energy Oxygen

    Share on Facebook


    [ By SA Rogers in Conceptual & Futuristic & Technology. ]

    [ WebUrbanist | Archives | Galleries | Privacy | TOS ]


    WebUrbanist

  • Camera+ 10 brings depth editing and HEIF support

    Third party camera apps are a great way of customizing operation and expanding the feature set of your smartphone camera. However, with mobile imaging technology advancing at lightning speed app makers are constantly having to catch up with the device makers’ latest hard and software developments.

    The makers of Camera+, one of the most popular third party apps for the iPhone, have now just done that and released version 10 of their app which brings support for Apple’s new HEIF image format and selective depth editing.

    The latter makes use of the dual-camera features on the iPhone 7 Plus and 8 Plus and lets you sharpen, tint and otherwise edit different depth levels in an image that contains depth information.

    In addition there are a new “Smile to shoot” trigger mode and a completely overhauled camera interface to incorporate the new features. Camera+10 is available for $ 2.99 on the Apple App Store.

    Articles: Digital Photography Review (dpreview.com)

  • Benefits of Using a Large Aperture and Tips for Shooting Wide Open

    Upon first glance of one of my most prized lenses, the Canon 50mm f/1.2L USM, a bewildered remark typically arises from professionals and hobbyists alike. Though absolutely spectacular photographers in the industry love working with a wide open aperture, there are equally as many who wouldn’t touch anything lower than a f/4.0 with a ten foot pole.

    I’d never shoot as wide as f/1.2” is a common comment I’ve encountered over the years of working as a professional photographer.

    Stylistic choices aside, upon further inquiry as to why the response to a f/1.2, f/1.8, or f/ 2.0 f-stop yielded such results the truth came out. There are common misunderstandings of how to use and work with a wide open aperture! If your artistic aesthetic drools over soft, dreamy photographs and creamy bokeh, then you better get ready to play with some low, low, low numbers.

    Tips for Overcoming Common Misunderstanding of Shooting Wide Open

    Before we get to the “how”, let’s discuss the “why”. There are several beneficial reasons to shoot with a wide open aperture, aside from simply liking the result.

    Benefit #1 – Working with a Difficult Location

    Depending on the type of photography that you do, you may not always have the option of utilizing an ideal location. Maybe your client is only able to commute to one place? Maybe the location of a shoot that was booked months prior has changed for the worse upon your arrival on site? Or maybe you just have to get a specific photo done pronto and you aren’t able to find a new spot?

    Whatever the reason for your woes, a wide open aperture is here to help! With the depth-of-field being so shallow, whatever troubles you about the background can easily melt into a beautiful creamy bokeh. Utilizing an f-stop of f/2.0 or lower helps you work with a less than immaculate location, as the extremely shallow depth of field allows you to mask the flaws.

    Tips for Overcoming Common Misunderstanding of Shooting Wide Open

    Benefit #2 – Excellent for Detail Shots

    A shallow depth of field can make for very beautiful detail shots. If you look through current wedding photography trends, you may find that several heavy-hitters in the industry are turning to wide open apertures to capture photographs of the bouquets, rings, and table settings. This is because photographs taken with a large aperture allow all of the focus to lie on the subject, and the background ceases to remain a distraction.

    With events such as weddings, where the arrangements can appear cluttered if you only want to focus on one little aspect of the set-up, a shallow depth of field will keep the interest solely on your single subject. Music photography adores wide apertures for the same exact reason. If you want to bring out a detail while photographing behind-the-scenes of a recording session, f/1.2 is wonderful.

    Tips for Overcoming Common Misunderstanding of Shooting Wide Open

    Benefit #3 – Create a Dreamy Photographs without Post-Processing

    With all of the technology available for photo editing, almost anything is possible with the right knowledge. However, rather than spending countless hours in the editing room creating a specific look artificially, why not get it right in the camera?

    For those who adore dreamy, ethereal, or soft photographs, a wide aperture will quickly become your most trusted friend. Filmmakers consistently utilize wide open apertures in order to create a soft focus with a shallow depth of field to give the viewer the illusion of a dream-like state. When we dream, it is often hard to clearly and sharply recollect some of those thoughts when we wake. So the idea of soft and not perfectly in focus images came to mind.

    We can replicate this using an aperture of f/1.2 easily, especially if you have objects in the foreground which are just as out of focus as the objects in the background.

    Tips for Overcoming Common Misunderstanding of Shooting Wide Open

    Benefit #4 – Makes Low Light Photography a Breeze

    Possibly one of the most dreaded phrases in photography is “low light”. Two very short, simple words that cause some of the biggest photographer headaches. This is because there isn’t a lot of available light to play with, and as such, getting the right exposure can be hard.

    However, if you want to take a well exposed photo in low light, you need a lens with a wide enough aperture to let in more light. Using a lens that goes down to f/1.8, for example, is a great way to let enough light in and make the frame bright. Remember, the aperture is the hole the light passes through in your lens. The wider the aperture, the more light that enters the camera.

    Tips for Overcoming Common Misunderstanding of Shooting Wide Open

    Now that we’ve covered some of the “why”, let’s have a nice chat about the “how.” Many of the challenges associated with a wide aperture revolve around the focus and photographing in bright light. From a recent poll I took, here are the primary issues troubling photographers about low f-stops, and some solutions to help you solve them.

    Tip #1 – Shooting in Bright Sunlight Without Overexposing

    With the aperture being the opening that lets light in through the lens, and a wide aperture which lets in a lot of light, one may think that shooting in the bright sunlight is off-limits. The solution to this dilemma is taking advantage of tinted filters that darken your lens, such as a neutral-density (or ND) filter. The purpose (and benefit) of an ND filter is to reduce the amount of light entering the lens. Doing so allows you to utilize a wide aperture that would otherwise produce overexposed pictures.

    Benefits of Using a Large Aperture and Tips for Shooting Wide Open

    Tip #2 – Getting Critical Focus

    To quickly refresh you of the basics, when you focus your camera on a subject, it establishes a focal plane. To get your subject in focus, it has to be on the focal plane. Focal planes happen on an x (horizontal) and y (vertical) axis. This means anything along either of those axes will be in focus, and anything not on them will be out of focus.

    Simple, right? Well, the difficulty with a wide open aperture is that your focal plane is quite small. As you decrease your aperture number and make the opening wider, the invisible area in front and behind the plane of focus will get smaller and smaller, leaving you with much less wiggle-room. As such, distance from the subject plays a key role in your focus.

    When shooting wide open, even the smallest diversion from either of the focal plane axes will cause your subject to be out-of-focus photo. You cannot take a step forward or back without the need to refocus when shooting at a wide aperture. But by keeping this in mind, you can adjust your photography technique to better accommodate the small focal plane.

    Benefits of Using a Large Aperture and Tips for Shooting Wide Open
    A trick to help make sure that what you want in focus is indeed sharp, is to use single point autofocus. By default, your camera will probably select either the object that’s closest to the camera or what’s in the center of the frame. By using single point autofocus, you tell the camera exactly where to focus, which is extremely helpful with low aperture numbers. Refer to your camera model’s manual to find how to change the focus setting!

    Benefits of Using a Large Aperture and Tips for Shooting Wide Open

    Tip #3 – Getting Multiple Subjects Sharp

    Keeping in mind how the focal plane works, there are several things you can do to ensure your multiple subjects are all in focus. First, try to set up all of your subjects on the same axis. Keep everything you want perfectly in focus the same distance from the camera.

    Secondly, the farther away you are from the subject, the easier it is to get the subjects all in focus. If you have a large group of subjects you’d like in focus, move further away from them!

    Benefits of Using a Large Aperture and Tips for Shooting Wide Open

    Tip #4 – Getting Sharp Images Generally

    Sharpness is an interesting concept. How sharp a subject appears is a matter of two things: the focus the camera captures and the amount of contrast on your subject. The term “sharpness” is, in fact, an illusion. You see, for an image to be considered sharp, it needs to have contrast. If the there is little contrast in the image, the subject will not look three-dimensional regardless of whether the focus is perfect or not.

    Biologically, the way that our eyes work, our vision naturally detects edges to register sharpness, and shadows and highlights in order to record the depth in a subject. This is a very important concept to understand when answering the question of how to make images look sharp.

    With this now in your knowledge arsenal, proper lighting aids significantly in making your images look sharp. The other factor in an image being sharp is, of course, the focus. Ensuring that your subject is in focus using the aforementioned techniques, combined with great lighting, will make certain that your images come out sharp.

    Benefits of Using a Large Aperture and Tips for Shooting Wide Open

    Now that you know how to take advantage of those low numbers and wide openings, go forth, and create!

    Benefits of Using a Large Aperture and Tips for Shooting Wide Open

    The post Benefits of Using a Large Aperture and Tips for Shooting Wide Open by Anabel DFlux appeared first on Digital Photography School.


    Digital Photography School