Month: October 2017

  • From the sidelines to the driver’s seat: A photographer’s evolution

    I have worked as a race photographer, a wedding photographer, landscape photographer; I photographed architecture, food, portraits and hot air balloons.

    One of the most incredible things about a photography career is how it has this magical ability to open doors—how my camera has, time and again, taken me from a spectator on the sideline and put me right in the middle of the action.

    In my own career, I’ve experienced this many times. Here are just three of those stories (and some shooting tips along the way).

    A teenager at the race track

    I was fortunate as a teenager when a race car driver threw me a rag and told me to get under his race car and clean it from the tire rubber that was stuck to the underside. I had gone to the racetrack after spending earlier years building models of these very race cars. I wanted to see the real deal.

    From that relationship, I grew to become a professional photographer, since I was lucky enough to sell all of the images from my first roll of film to the drivers at that same racetrack. I always had a desire to drive one of those 200mph “funny cars.”

    This wonderful eye-opening experience led me to create work for the NHRA, AP and many racing magazines creating story-telling images of these now 300mph plus vehicles across the country.

    Shooting Tips

    What is most important to me when capturing cars in the drag racing world is to isolate the car from the distractions near the racecar. Generally, I let the car move down the track, away from the starting line crowds, creating a soft, dimensional background in order to allow the car to stand out.

    By using a telephoto lens like my EF 200-400mm f/4L IS USM Extender 1.4x on my Canon 1DX Mark II, I can create a background made of the heat and exhaust, totally drawing the viewers attention to the razor sharp car. Compression is a wonderful tool to use in order to maintain a story-telling image, but first and foremost seeing every detail of the subject: the race car.

    Another technique that I use commonly in my motorsports imagery is panning with the moving car as it goes by. Panning emphasizes speed by keeping the camera moving at the same speed as the race car. This then blurs the background, making the car look as if it is moving very quickly.

    A slow shutter speed helps illustrate the movement. I may select shutter speeds of 1/30 – 1/500 sec depending upon the speed of the car that I am photographing. For this effect I am choosing to use the TV or shutter priority setting in order to allow me to maintain that certain amount of motion blur. I still try to include some of the race signage to continue that story-telling aspect of your imagery. This image was created with my workhorse EF 70-200mm 2.8L II IS lens.

    While capturing the cars on the racetrack is a wonderful way to spend the day, I do look to see what I can do to add some personal element by visiting the drivers as they are strapped in to their cockpits or as they sit peacefully, contemplating their upcoming run.

    One of the last tips that I would like to share with you about capturing image of powerful race cars is about the launch. I prefer to stand down track and create interesting edges to frame the main part of the composition. A drag race uses a “Christmas tree” of lights to indicate when to go. Many cars have perfected the weight transfer of the start of the race which lifts the front wheels high in the air.

    The fun of flying and photography

    Not too long after that amazing career-carving experience of photographing race cars, I drove to Norwalk, Connecticut in order to see and photograph a small hot air balloon festival. A few weeks later, I needed another balloon festival fix and drove north to Glens Falls, NY where I would buy my first hot air balloon ride.

    All I can say is “Wow.” The hook was in. I would soon become a hot air balloon pilot.

    Fast forward to today: I will soon head out to New Mexico for AIBF happening October 7th-15th, 2017. I will be there to both fly and photograph this magnificent spectacle.

    5 a.m. comes early in the chilly desert air. My team and I need to be at the launch field for a 6:15 am pilot briefing in order for me and nearly 600 other pilots to take to the air filling the New Mexican blue skies with our colorful fabrics. I will be photographing right up until the time that I need to begin my inflation.

    We are treated to “Dawn Patrol” when eight to twelve hot air balloons will go aloft into the dark sky about 1 hour before the rest of us do, showing what the winds are doing that day.

    Shooting Tips

    As most balloon events happen in the still of the early morning, we are treated to the rising sun illuminating the rich, colorful, flowing fabric that can be backlit showing leading lines and the abstract beauty that surrounds them. Wide angle lenses as well as longer telephotos are often used here to create diversely different dimensional images.

    As a pilot, I so enjoy the ability to capture images from the air looking down to see so many unique compositions. This image of the “Mass Ascension” shows how you can create gorgeous landscape images as we fly over and into the river for a “splash and dash.” Pilots descend to gently float along in the rivers current.

    I choose to fly with the EF 28-300mm 3.5-5.6 IS L lens so I can create images that are either wide angle or zoom in to make a tight composition while carrying only one camera body. My best tip to you when you go aloft in a balloon is to be ready to react with lightning reflexes: images come and disappear quickly as everything is moving in many different directions all at once.

    I prefer to use TV or shutter priority in order to use a pre-determined shutter speed that should guarantee sharp images while moving along.

    My final tip as you walk amongst the bags of fabric that will soon grow to be a balloon as tall as a 10 story building is to search out a very pretty, colorful foreground that could nicely balance a floating balloon slowly flying past, creating a multidimensional look like the above image captured through the EF 28-300mm IS L lens.

    I can create images of hot air balloon events with hundreds of other balloons around me or I can fly in the desert at sunrise or sunset to have a unique perch in order to take some beautiful landscape images. It certainly puts a smile on my face whenever I get to fly, either in a balloon or even a small fixed-wing aircraft, all to enjoy being off the ground as well as seeing images from a different perspective.

    Taking to the skies… again

    My last story of coming from the sidelines into the driver’s seat (or in this case cockpit) would be when I furthered my flying abilities and accomplished my fixed-wing license that would carry me to locations that driving just would not allow in a relatively short time.

    My first flight after successfully adding to my airmen’s license was to head to the beautiful island off the Massachusetts coast called Martha’s Vineyard. From my home on Long Island, it would take me 5-6 hours to reach the ferry that would bring you over to the island. I could fly the same route in 45 minutes.

    I would do this a few times a year to go have lunch and shoot on the island before heading home for the day, very content. Photographing the beauty, flying and navigating and enjoying some remarkable culinary delights makes for a wonderful day!

    Shooting Tips

    Whether I’m in a fixed wing plane or a helicopter, I need to select the best lens that will be able to reach out beyond the boundaries of the aircraft to capture what I am looking for.

    I will then make sure to remove my lens hood and anything else that could come off the camera while flying along at over 100 mph, and set my ISO high enough to give me a shutter speed of at least 1/1000 sec for the sharpest images.

    Personally, I enjoy flying with the EF 100-400 mm f/4 IS L lens because it’s both compact and provides a great range of focal lengths. I find it important to crop my photographs in the camera, taking advantage of each and every mega-pixel my Canon gives me. Zoom lenses like this allow me to be exact in my cropping.

    I always consider the lighting as a part of the planning of the flight time. I want to be able to fly in the most dimensional light possible. That lighting will provide shadows that will define the landscape below. What a great way to see and create images of iconic locations but from a different perspective.

    Shape, shadow and color are very important tools that I make use of as often as possible. It may be the warm light of a sunset on the red rocks of the desert southwest or the cool morning flight over the lava fields of Hawaii. You can reserve any aircraft for the time that you would like to fly, so, select that right time for the image that you see in your mind’s eye.

    In order to create the best images of any subject, you need to be intimately familiar with that subject. Throughout my photographic career, I have been able to succeed at photographing anything as long as I had some knowledge of what I was photographing.

    Having knowledge of the race cars that I was learning about working on gave me the edge to be able to create story-telling imagery. I then took that and ran in order to be the best that I could be. The same followed when I chose to be a hot air and fixed wing pilot—photography opened the door to be more than a spectator, but then the experience provided me the knowledge and platform to succeed.

    So much of being a successful photographer comes down to being knowledgeable of the subject and the relationships that you make along the way. From there, it’s up to you to continue to drive to be the best that you can—you are only as good as your most recent project.

    I hope that, at least, will be an incentive for you to continue to grow and improve your skills. It certainly worked for me!


    Ken Sklute is a multi-talented photographer and Canon Explorer of Light with over 42 years of professional photography experience. Over the course of his career, he’s photographed people, professional sports, architecture, weddings and landscapes (among other things).

    To see more of his work, be sure to visit his website, or by following him on Facebook and Instagram.

    Articles: Digital Photography Review (dpreview.com)

  • Fujifilm releases firmware updates for X-T2, X-Pro2 and two lenses

    Fujifilm has released firmware updates for its X-T2 and X-Pro2 camera bodies. The update to version 2.12 on the X-T2 and version 3.12 on the X-Pro2 fixes an issue that could occasionally cause the cameras to lock up when shooting in continuous high speed mode.

    The X-T2 and X-Pro2 firmware updates are available to download at the links below:

    • X-T2 Firmware ver. 2.12
    • X-Pro2 Firmware ver. 3.12

    Additionally, the company released updates for its XF 18-55 and XF 10-24 lenses. The new versions of the lens firmware fix an issue that could cause the focal length to be displayed incorrectly, and/or cause shaking in peripheral parts of images, even with focal length focus fixed.

    You can download those updates by clicking on the links below.

    • XF18-55 Firmware ver. 3.22
    • XF10-24 Firmware ver. 1.12

    Articles: Digital Photography Review (dpreview.com)

  • Pixelstick creators unveil the Colorspike: An incredibly versatile LED lighting strip

    The inventors of pixelstick have launched a new Kickstarter campaign to fund their latest creation: a strip of LEDs they’re calling the ‘colorspike.’ Like the pixelstick, it can be controlled via an app to produce a range of effects; unlike the pixelstick, the colorspike panel is more about lighting and color than it is about fun effects or light painting.

    At about two feet long, the colorspike consists of a strip of LED lights that the user can program to produce a massive range of different colors and pulsating lighting effects. The results, when used in concert with, say, portrait photography, can be striking:

    The idea is that stills and video photographers can use these to add easily controlled color to their shoots, while videographers can also include flashing lights to emulate emergency vehicles, fire, lightning and any interrupted lighting.

    The colorspike panels are controlled via a smartphone app that allows colors and effects to be selected from an existing menu or to be custom mixed for the occasion (and saved for later use). Finally, groups of color spikes can be controlled together from the app to create more complex set-ups, and users can determine brightness, color and pulsation patterns via the app or the interface on the panel itself.

    For on-location shooting, a battery is supplied that the company claims will last at least 45 minutes; and for those working near a mains power supply, a DC adapter also comes included the kit.

    The colorspike is being launched on Kickstarter with a price of $ 270, and kits of four can be had for the discounted price of $ 1,000. The company, Bitbanger, expects delivery to begin in March next year if the target of $ 120,000 is reached—and given they’ve already reached over half of that goal with a full 42 days left in the campaign, chances are good the colorspike will become a reality

    For more information on this nifty new lighting accessory, visit the colorspike Kickstarter page or Bitbanger’s website.

    Articles: Digital Photography Review (dpreview.com)

  • 5 Tips for Taking and Caring for Your Camera Equipment in Far Away Places

    If the thought of being away from all your camera equipment stresses you out, this article is exactly what you need! I can safely say that being on the road for over two and a half months teaches you a thing or two about need and necessity versus wants.

    Road trip

    For the longest time, one of my dreams has been to live away from home and travel with my family for an extended period of time. I used to dream about all the places I could travel to, and how much fun I would have living a nomadic life. Of course, then I would wake up and the realities of my responsibilities would take over.

    However, earlier this year after suffering a big life setback with the loss of my mom to cancer, I decided that my life was too short to not make my dreams come true. After several months of discussion and planning, my husband and I decided that our little family would spend our summer in India – traveling and visiting family. Somewhere along the way a trip to Ladakh, London, Zurich and Rome got added to my roster and pretty soon I was in charge of planning and packing for a life on the road for two and a half months living out of just four suitcases – one for each one of us. Being a photographer, I knew that somewhere in there I had to pack my camera equipment along with my essentials.

    Taking and Caring for Your Camera Equipment in Far Away Places

    Sunsets along Lake Zurich were magical – one of my favorite cities that I have ever visited!

    Here are a few things that really helped me make the most of my time away from home. It is very likely that I have missed some key photographic opportunities but overall I am very happy with my time away, the opportunities that my family has experienced, and the images that I have created. And as an added bonus, all the camera equipment I did take made it back without any major mishaps along the way.

    #1 – Gear Choices

    Let’s face the reality of life as a photographer – we all love and want all the gear that we think we need wherever we go. When I was packing I realized that as a photographer I had so many things I wanted to bring, but as a mom, the need for gear was quickly overruled by the need for practical things like clothes, shoes, books, toys, etc. I had to make some very hard choices on the camera equipment that I could take, versus the gear I wanted to take. I narrowed down my list based on where my travels would take me and what gear I could realistically carry and transport safely without any damage.

    So, in the end, I settled for this kit:

    • A wide zoom lens – Canon EF 24-70mm f/2.8.
    • A simple point and shoot camera (yes, this was my backup as weight was a concern when flying to and from Asia with layovers on the way there and back).
    • One telephoto lens – Canon 70-200mm f/2.8L.
    • One camera body – Canon 5D MK III.
    • Four camera batteries.
    • One battery charger.
    • A small travel tripod – just a generic brand – mine fits in my carry-on bag.
    • A remote trigger.
    • Five camera CF cards ranging from 8GB to 32GB.
    • Two 2TB External Hard drives ( primary photo storage and a backup photo storage).
    • Two generic lens and camera cleaner kits.

    All of these things comfortably fit into my REI brand hiking backpack. I use this bag for everything and store my gear in individual soft-cover bags inside the pack. This is what I have done since day one and something that has worked well for me.

    The one thing I wish I had taken with me was a rain cover for my camera. My backpack had its own rain cover which I used numerous times during the trip because we got caught in sudden downpours in the mountains. But without a separate rain over my camera, I was not able to use my gear in the rain.

    #2 – Be Prepared and Organized

    For me, being prepared and organized included having a rough idea of where I was going and the kind of environment I was going to expose myself and my gear to. Before I left, I jotted down all the serial numbers, make, and brand for my camera equipment and stored them in a document on my cloud-based Dropbox account. All my external hard drives were stored off-site at a friend’s place as well as the remainder of my gear.

    Now, obviously, this is a friend I trust. But another option would be to lock it in off-site storage facility. As part of your research, another good thing to keep in your back pocket is the name, address, and contact information of authorized service dealers for your gear in the country you are visiting. Sometimes things just go wrong no matter how prepared you are. Being prepared with this information about services centers and authorized dealers for your gear is a time saver especially when you are traveling in areas where the internet connection is not very reliable.

    Taking and Caring for Your Camera Equipment in Far Away Places

    An hour’s hike from our campsite in the Himalayas got us to this beautiful alpine lake. But by the time I could get the camera and tripod out, the fog set it…and it was magical!

    During my travels, my gear choices on the road would depend on the activities that were planned for the day and the fact that this was a family travel trip, not just a photography expedition. In Rome and Zurich we traveled everywhere either on foot or used public transportation. So I just carried my camera body and the 24-70mm lens among other daily necessities in my backpack. The rest of my camera equipment was either packed away in the hotel room safe or locked away in my suitcase.

    When we hiked and camped in the Himalayas, my camera along with both my lenses were always on my person, and the tripod was handed off to the porters that were carrying our camping gear. For my camping trip, I just carried all my CF cards and ditched the charger and external hard drive at the house where we were staying because it was highly unlikely I’d find a charging port on that journey.

    All these choices were possible because of the research I had done ahead of time.

    Taking and Caring for Your Camera Equipment in Far Away Places

    Much of Ladakh is dry and barren and upwards of 10,000 feet above sea level. Altitude sickness is very real and sometimes your gear also acts up. Of course, these dramatic views almost make up for any hardships.

    Additionally, a good mindset to have when you travel to far-off exotic locations is one of acceptance of physical and mental limitations – both for yourself and your camera gear. I experienced some altitude sickness in Ladakh as we were traveling on roads at almost 17,000 feet above sea level. I also found my gear did not function as efficiently at that altitude. My batteries did not last as long and the camera also did not shoot as fast. The first few times it happened I freaked out. But then I just accepted it as something beyond my control and gave myself some extra time to be patient in getting the shot that I wanted.

    #3 – Know Your Gear

    This one is too basic to include here but it is amazing how many of us don’t follow this simple tip. We are so enamored with the latest and greatest gear available, but yet don’t quite know how to use the stuff that we do own.

    The best way to get over this is to really limit yourself to a few key pieces of camera equipment for an extended period of time. One of my goals for this trip was to try and capture star trails and The Milky Way when I traveled to Ladakh. After all, I was going to be in a remote part of the country at an altitude of almost 15,000-17,000 feet above sea level. Barring any bad weather, I should be able to get relatively clear shots of The Milky Way and star trails.

    Now astrophotography is not my thing. I always limited myself from trying it out because I don’t usually travel with a tripod, nor do I own an intervalometer. So this time I actually downloaded the camera manual on my phone and studied it before I left. With that information, I was able to comfortably and confidently use the B (a.k.a Bulb mode) on my camera to capture star trails in Ladahk. It was quite a thrilling experience for my maiden attempt.

    Taking and Caring for Your Camera Equipment in Far Away Places

    A 26-minute exposure while sleeping in the car near Jisp along the drive to Leh was one of the highlights of my trip. This is one of my first star trails shot and now I find myself looking out for stars every night! This would have been impossible without a tripod and proper remote trigger.

    Another good thing to practice before you head out is gear maintenance. I had to routinely clean my lens and camera throughout this trip. I made the decision to carry two camera cleaning kits just because I knew my gear would get a lot of use. Before every major outing, I spent the time to clean out the dirt and dust from the camera and the lens. The dust pen was kept in my camera bag just in case I needed it while I was out and about photographing.

    #4 – Be Local and Think Like a Local

    I have to include this one in any travel photography related article because it does relate indirectly to taking care of yourself and your gear. Often times I find photographers I meet along my journeys have a fake sense of entitlement. When you are a guest in someone’s house, are you not on your best behavior? Why is it that when you are a guest in another country, common sense and basic manners seem to fly out the window.

    Locals are still people who deserve the same amount of respect and courtesy as anyone. Put yourself in their shoes and try to imagine what they experience when someone shoves a camera in their face without so much as a hello or a smile.

    While in Ladhak, we visited a lot of beautiful monasteries. Most of them are still in use and we saw many temples where the monks were in prayer. Even if there is no sign discouraging photography, please use common sense to not invade their private space especially when they are chanting. I cannot tell you how many times I came across tourists that almost jumped over each other or hanging out of moving cars just to take pictures of them chanting and praying. Seeing this rude behavior almost made me embarrassed to take my camera out.

    Taking and Caring for Your Camera Equipment in Far Away Places

    The infamous cable cars in Lucern, Switzerland…the clouds adds a certain mystery and aura to these engineering marvels!

    Additionally flashing your fancy gear around is almost begging for the wrong kind of attention. I remember this one evening in Rome, I was out with my kids taking photos around some of the beautiful horse-drawn carriages. We lost track of time and soon found ourselves in a fairly deserted alley. I quickly put my gear away in my backpack, stuffed it with our jackets, grabbed my kids, and sprinted towards a more crowded piazza.

    #5 – Make Friends with Local Photographers

    The internet is an amazing tool for almost anything. It is such a great resource to find and connect with other photographers, especially if you are traveling to areas that are new and foreign to you. I was able to connect with some photographers in India as well as in Rome this summer. We chatted on the phone, met for dinner and just became friends.

    They even gave me advice on some of the local, non-touristy spots to photograph as well as offered to lend me gear if I needed it. We tried to plan a shoot in India but the timing was not right, I know that the next time around we are going to create some magic, though.

    Taking and Caring for Your Camera Equipment in Far Away Places

    I met up with another photographer and we attempted to do night photography in Mumbai. But the moisture in the air because of the monsoons was causing some weird light trails against all the lights. So we went for ice cream instead! But it was a cool experience none the less.

    Conclusion

    I hope these tips are helpful as you plan your next vacation in a far-off destination. If you have other tips and tricks that worked for you, please share them with the community so we may all learn new ways to have an exciting and creatively satisfying vacation.

    The post 5 Tips for Taking and Caring for Your Camera Equipment in Far Away Places by Karthika Gupta appeared first on Digital Photography School.


    Digital Photography School

  • Seagate’s 12TB BarraCuda Pro is the fastest, highest capacity desktop drive on the market

    As storage needs grow with the rise of VR content and ubiquity of 4K video, it looks like more and more hard drive options are becoming available that boast better reliability and performance at even bigger capacities. Case in point: Seagate has just announced new 12TB versions of its IronWolf, IronWolf Pro, and BarraCuda Pro hard drives, following hot on the heels of Western Digital’s recent 12TB drive launch.

    These new Seagate drives come in a 3.5-inch form factor, with the BarraCuda Pro drive designed for desktop use, while both IronWolf drives are designed for Network-attached Storage (NAS) devices.

    According to Seagate, the new 7200rpm 12TB BarraCuda Pro is “the fastest, highest-capacity and most reliable hard drive for desktop computing available on the market today.” The inclusion of Intel Optane non-volatile memory offers responsiveness and performance akin to that of an SSD, as well as twice the load and boot speeds compared to standard drives. This tech allows the drive to offer sustained data transfer rates of 250MB/s and burst data speeds up to 6Gb/s.

    The IronWolf drives, meanwhile, are designed for creative professionals and others who prefer centralizing data onto a NAS unit. Both of the new 12TB drives support Seagate’s IronWolf Health Management software, which is designed for use with the Asustor NAS, Synology DiskStation NAS, and QNAP NAS units and helps to protect data with ‘prevention, intervention, and recovery’ solutions.

    The IronWolf 12TB drive has a sustained data transfer rate of 210MB/s and the IronWolf Pro 12TB has a sustained transfer rate of 250MB/s. Both the IronWolf and IronWolf Pro 12TB HDDs are listed on Newegg for $ 470 and $ 540, respectively. Unfortunately, the ‘world’s fastest’ of the bunch, the BarraCuda Pro 12TB drive, isn’t currently listed, but you can probably expect a price north of $ 600.

    Press Release

    Seagate Expands Guardian Series Portfolio With 12TB Drives For NAS And Desktop Computing

    12TB IronWolf, IronWolf Pro and BarraCuda® Pro deliver highest capacity, reliability and performance available on the market

    CUPERTINO, CA – Seagate Technology plc (NASDAQ: STX) announced today its IronWolf, IronWolf Pro and BarraCuda® Pro hard drives are now available at capacities up to 12TB. Offering the highest capacity, reliability and performance in the industry among network-attached storage (NAS) and desktop HDDs, Seagate’s 12TB IronWolf and BarraCuda Pro drives further extend the capabilities of the leading Seagate Guardian Series to meet the growing data needs of large enterprise business, small and medium-sized businesses (SMBs), and creative professionals.

    Across the globe, we are experiencing a massive increase in the volume of data created, with a recent study by IDC and Seagate finding that data creation will swell to a total of 163 zettabytes (ZB) by 2025, 10x more than today. Seagate’s latest portfolio of 12TB drives are designed for today’s media storage needs – including augmented reality (AR), virtual reality (VR), 4K resolution and 360-degree videos – and offer scalability for the future with increased space and speed.

    “Our storage hungry customers and partners continue to ask for our latest and greatest technology along with increased capacity and performance in our purpose built products,” said Matt Rutledge, senior vice president of Business Marketing at Seagate Technology. “With the 12TB Pro products, Seagate buyers are overcoming capacity constraints in their systems and can access vast amounts of digital data anytime, from anywhere.”

    12TB BarraCuda Pro Desktop Drive
    Seagate’s 12TB BarraCuda Pro HDD is the fastest, highest-capacity and most reliable hard drive for desktop computing available on the market today. With 12TB of capacity – double the space of its closest competitor – the BarraCuda Pro can meet any number of demanding data management needs from creative editing workflows to gaming to desktop computing. The drive’s high speed means that data-intensive activities like large file transfers and photo-editing are faster when using BarraCuda Pro.

    12TB IronWolf and IronWolf Pro for NAS
    Offering the highest capacity, reliability, performance and system scalability in the industry, Seagate’s 12TB IronWolf and IronWolf Pro HDDs empower customers to centralize their data onto NAS systems to ensure round-the-clock access for multiple users. At 12TB and in only a 3.5 inch form factor, IronWolf and IronWolf Pro offer more capacity in less space, meeting the needs for file-sharing, remote access and backup for SMBs, enterprises and creative professionals.

    “Whether it’s storing your family photos, collaborating on important documents at work, or protecting your home with our video surveillance solutions, Synology NAS enthusiasts will be excited by the addition of Seagate’s 12TB IronWolf drives,” said Alex Wang, CEO of Synology America Corp. “By working together, Seagate and Synology are providing great ways for people to safeguard their digital lives and get the most out of their private cloud.”

    The new 12TB drives also support Seagate’s leading IronWolf Health Management (IHM) software. Designed to operate on enabled Synology DiskStation NAS, Asustor NAS, and QNAP NAS, populated with Seagate IronWolf or IronWolf Pro drives, IHM improves the overall system reliability by displaying actionable prevention, intervention or recovery options for the user and will be available within the next quarter with NAS partners.

    “We are excited with Seagate’s launch of the industry’s largest capacity NAS drive – the 12TB IronWolf and IronWolf Pro,” said Meiji Chang, general manager of QNAP, adding, “QNAP has collaborated with Seagate for many years on product and technology enhancements, working with them to create the best hard drives for NAS users. We believe that Seagate’s new IronWolf family provides the performance, reliability, and capacity needed to dependably store the vast data generated by virtualization, high-resolution media workflows, the Internet of Things, and other applications driven by modern QNAP NAS solutions.”

    The 12TB versions of IronWolf, IronWolf Pro and BarraCuda Pro are now shipping to customers worldwide. For more information on the Seagate Guardian Series, please visit www.seagate.com/internal-hard-drives.

    Articles: Digital Photography Review (dpreview.com)

  • Aputure launches 2K watt Light Storm 300D LED light, its brightest light yet

    Aputure has launched the Light Storm 300D, a 4.6lbs / 2.1kg LED light measuring 13.5in / 34.29cm long with up to 142,000 lux and an output equivalent to a 2,000 watts tungsten. The light can be powered with batteries or through AC power, and can be wirelessly controlled from distances up to 150m / 492ft. Control is also possible through what Aputure calls an intuitive control box.

    The light’s low temperature coupled with its Bowens mount enables users to attach nearly any Bowens mount accessory (if you can find them…), according to Aputure. Additionally, an integrated ultra-silent fan works alongside internal thermometers to intelligently adjust its speed based on the light’s temperature.

    Color accuracy is exceptional with a CRI rating of ?95 and TCLI rating of ?96 alongside a 5500K±200K color temperature.

    The Light Storm 300D is currently listed on Amazon with an in-stock date of November 15th and a $ 1,100 USD price tag.

    Articles: Digital Photography Review (dpreview.com)

  • Inflatable Luggage: Air-Framed ‘Zippelin’ Bags Made of Old Tarps & Bike Tubes

    [ By WebUrbanist in Design & Products & Packaging. ]

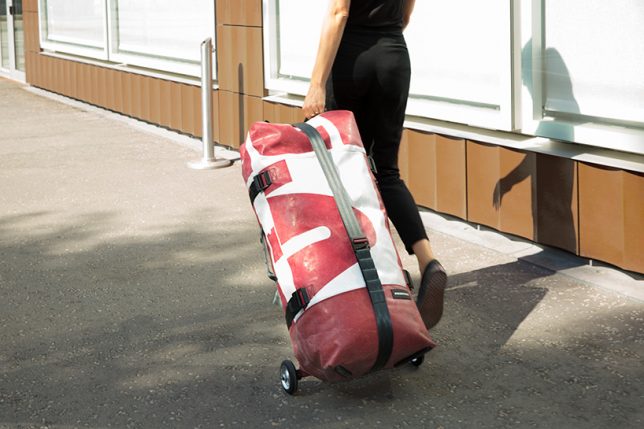
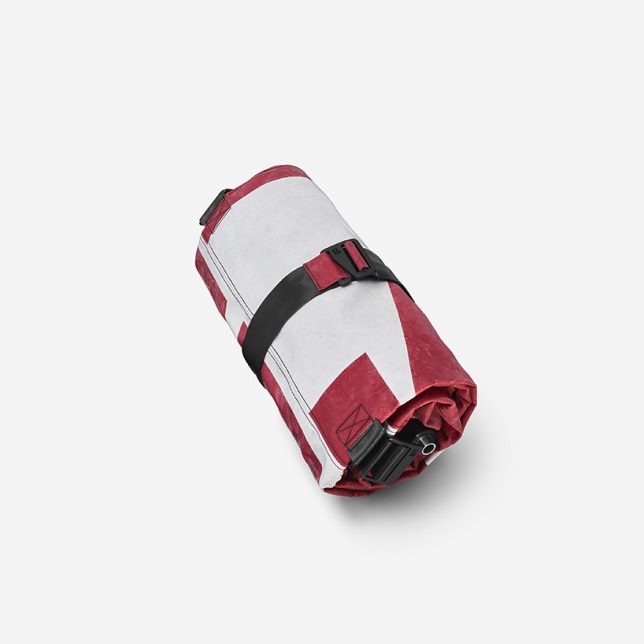
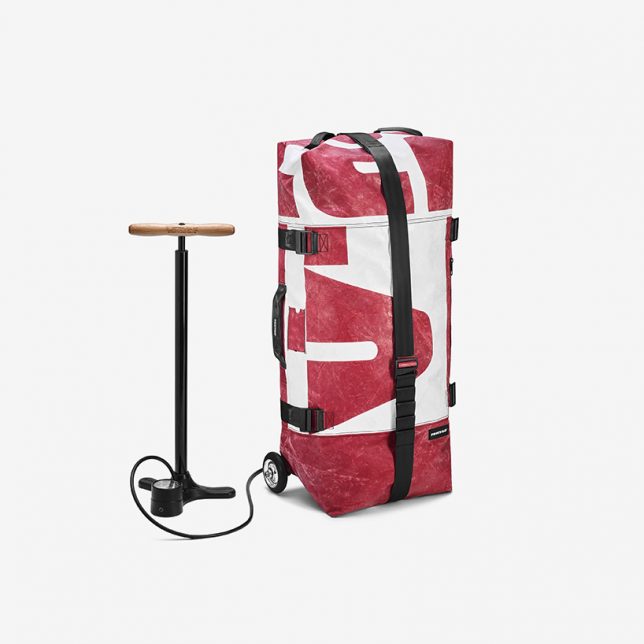
    Lightweight, durable and compact, this new recycled Zippelin bag series features wheels for rolling like any good luggage. But instead of metal or plastic frames, these bags employ bicycle tire inner tubes that can be inflated instead. This strategy also allows the bags to pack into tiny space for storage when not in use.

    Using truck tarpaulins that are made to resist water and withstand wear, the bags have evolved — early versions still included frames, which added weight. These were swapped out for bike tubes which, conveniently enough, can be inflated using a standard bike pump (no need to buy a specialized device).

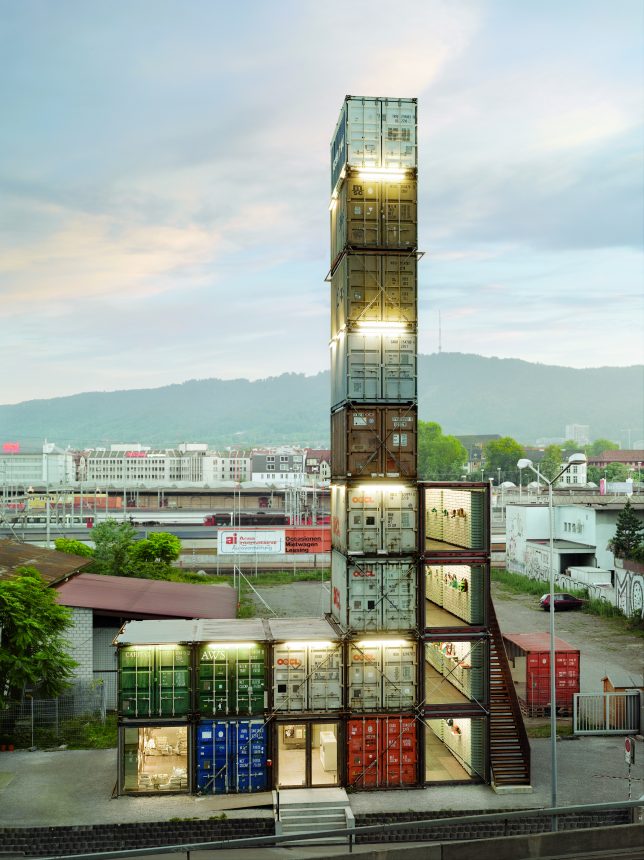
    FREITAG is not stranger to recycling — its headquarters in Zurich, Switzerland, is housed in a stacked shipping container building that boasts a similar rugged look, worn materials and an upcycling ethos.

    Like the variegated containers that make up its home, the company’s Zippelin bags are all different. Helpfully, this also makes each bag easier for its owner to spot and identify, since each one is unique.

    A product engineer at FREITAG and former architect, Nicola Stäubli says she’s “familiar with air-supported structures” and she also “used to be a bike messenger and was impressed by folding bikes that are fully functional when mounted, and compact when you stow them away.”

    Share on Facebook


    [ By WebUrbanist in Design & Products & Packaging. ]

    [ WebUrbanist | Archives | Galleries | Privacy | TOS ]


    WebUrbanist

  • From Mundane to Magical: Tips on Taking Your Photos to the Next Level

    You may be at a point with your photography where you are comfortable operating your camera and are capable of taking a good picture. You can work with exposure, you understand composition, and can even enhance your photos in post-processing. You should be pleased with this, as this puts you ahead of the vast majority of other photographers. But at the same time, perhaps you are not seeing the elevation in your results that you expect. You are beginning to wonder why you aren’t getting more stunning pictures. Are you doing something wrong? Is there some part of this you’re not getting?

    From Mundane to Magical: Tips on Taking Your Photos to the Next Level

    We all go through a phase where we feel like we know what we’re doing but are frustrated by a lack of great results. In fact, for some of us, it always feels like this. You’ll never go through a time where you’re hitting magical shot after magical shot. It just doesn’t work like that. You are after something extraordinary, and by definition that is rare.

    How do you maximize your chances of finding these great shots? The short version is, “through a lot of effort,” and – while true – that isn’t very helpful. So here are some areas where I focus my efforts and perhaps they will help you too.

    1. It Starts with Location

    We all seem to want to take our cameras down to the local park or take a stroll around a nearby lake and then come home with stunning pictures. For the most part, it just doesn’t work like that. You typically need a great location in order to end up with a great picture.

    You have likely heard that “you can take a great picture anywhere” – and that is true. But just because it is possible doesn’t mean it is probable. Magical lighting or sheer genius may allow some to get great shots in ordinary places, but it is extremely unlikely. To put the odds in your favor, you need to start with an extraordinary location.

    How to Scout Your Photography Locations

    From Mundane to Magical: Tips on Taking Your Photos to the Next Level

    Everyone from tourists to photographers, to the producers of the Game of Thrones use this location as the background for their shots. Dark Hedges, County Antrim, Northern Ireland.

    How do you find such a location? There are lots of ways. If you are going to a well-traveled place such as a large city or a national park, some enterprising photographer has likely done the work for you. They will have written a book on how to photograph that particular place. These guides are invaluable and often all you will ever need. Beyond that, there are a plethora of online resources. I personally start with the 500px World Map and look at where great shots have been taken. I also like to check out the work of photographers who specialize in whatever I am going.

    These resources will help you pick out good places to go. But they will also help you pinpoint specific spots to head to once you are in the area. None of this is to say you should slavishly copy any of these people, but rather that you should let their work inspire you and give you an idea of great locations that might serve as a backdrop for your upcoming stunning picture.

    2. Getting that Magical Lighting

    A great location alone will not result in a stunning picture. I’ve been to countless areas of great natural beauty or stunning urban environments only to walk away empty-handed. To create the stunning picture you are after, you are also going to need great lighting.

    Some of you will create your own lighting through the use of flash. In that case, you’ll be able to create your own stunning lighting – and the whole thing is up to you. But that doesn’t work for me since I am always out and about photographing scenes, which aren’t as conducive to using flash.

    Assuming you are like me and are relying on natural lighting, you just cannot guarantee great lighting. We all have to deal with bad weather and occasionally things don’t work out. That said, you can put the odds more in your favor.

    Photograph at Sunrise and Sunset

    From Mundane to Magical: Tips on Taking Your Photos to the Next Level

    When you are photographing the outdoors, the sky is often a big part of the picture. A great sunrise or sunset, therefore, goes a long way toward helping you create a great picture.

    The first thing to do is make sure you are photographing around sunrise or sunset. I cannot tell you the number of times people have asked me how to elevate their photography and when I look at their pictures I find that they were all taken in the middle of the day. Usually, that’s just not going to work.

    Photographing at sunrise or sunset has a myriad of advantages. The sky will often be very colorful. You will also not have to deal with the extreme contrast created by bright light and dark shadows. The diffuse rays of the sun are more pleasing as well. Think about it this way: there is a reason people sit outside and watch the sun come up or go down. Take advantage of that.

    Don’t Overlook Bad Weather

    Keep in mind that bad weather can often lead to the best shot. It is very much a risk/reward situation. Most of the time, cloudy hazy conditions result in failure. Sometimes, however, the sun might peek through or do something interesting such that you get magical rays in your photo. Typically, nice weather will result in nice pictures. Dramatic weather can result in dramatic pictures, and that is what you are going for.

    From Mundane to Magical: Tips on Taking Your Photos to the Next Level

    Even an average marina can become a great shot when there is a storm approaching.

    3. Creating the Composition

    A great scene does not necessarily make a great photo. You’re probably familiar with rules of composition such as the rule of thirds. That is great, but this alone won’t result in the stunning photos you are after. To get there, you need something more. Here are some ideas to think about.

    Start with a Center of Interest

    The first thing you need is a subject or center of interest. Again, simply capturing a scene in front of you might create a nice picture, but not the shot that will cause people to say “wow” that you are after. You need something to hold the picture together. I cannot tell you exactly what that is since there are so many different things to use in this world, just be on the lookout for that.

    Lead the Viewer’s Eye

    Another thing that will help you is if you think about leading the viewer’s eye. You might immediately leap to the concept of leading lines, but it goes further than that. Think about where you want the viewer’s eye to start in your picture and then the route you want them to travel around it. Many times this is done in the post-processing phase. Remember that the eye is attracted to areas of brightness and sharpness. You might darken areas where you don’t want the viewer to concentrate while sharpening areas where you do want their eyes to go.

    From Mundane to Magical: Tips on Taking Your Photos to the Next Level

    A nice view made more interesting by the path leading the viewer’s eye into the picture.

    Concentrate on the Foreground

    While you’re setting up your picture, be sure to think hard about the foreground. Think of your pictures as consisting of a background, subject, and foreground. The background is already largely set by your choice of location and lighting. The subject might be the thing that caused you to raise your camera to your eye in the first place (or in any event, you will already have thought about it). That leaves the foreground as the final variable. Don’t give it short shrift. Very often, getting low to the ground gives a sense that the viewer can walk into the picture and really enhances the image.

    Add Mood and Emotion

    Finally, be sure to think about the mood of your picture. A great picture stirs some emotion in your viewer. Therefore you’ll need to think about the emotion or mood as you are creating it. In the field, you might underexpose a bit to add some drama to your shot. Later, when you are on your computer, you will have time to consider this further and tweak your photo with an eye towards setting this mood.

    4. Enhancing the Shot with Post Processing

    There are photographers who shun the use of post-processing and devote all their time and energy to getting the shot right in the field. I’m not one of them. I have never taken a shot that I didn’t think could be improved with the use of post-processing.

    From Mundane to Magical: Tips on Taking Your Photos to the Next Level

    Of course, there are a million things you can do to enhance your photos in post-processing. It is not my intent to walk through them all here. Rather, I just want to stress the importance of taking your time and thinking about what you want to accomplish with your picture when you sit down with it at your computer. When you are sitting down in front of your computer, you have time to think it through and work on it. In the field, you may have been rushed – dealing with a moving subject or fleeting light. Now you have as much time as you want.

    Think about what your picture is about. If a part of your image does not support that idea, crop it out. Use some selective sharpening and brightening/darkening to lead the viewer’s eye. Set the mood of your picture using brightness values.

    The point is not to take a mundane picture and try to post-process it into some masterpiece. Rather, selectively take a few shots and enhance them with an eye towards both (a) what you were trying to accomplish and (b) what you want the viewer to think/feel when they are looking at your photo.

    From Mundane to Magical: Tips on Taking Your Photos to the Next Level

    5.  Have Realistic Expectations

    Finally, it is important to have realistic expectations. You aren’t going to go out and come home with a stunning picture every time. I fail all the time, and to avoid getting frustrated about it, I think about the words of Ansel Adams. He once said that he got about one great picture a month. Only one a month! If this master of photography was forced to settle for that kind of hit rate, then who am I to think I can do better? I ought to be happy with one shot a year.

    From Mundane to Magical: Tips on Taking Your Photos to the Next Level

    Creating the Magic

    This all takes time and effort. In a lot of ways, it is like waiting for the stars to come together. There is no magic formula for going out and getting a stunning picture every time. If there were, we would all do it. Again, the whole idea is that you are looking for the extraordinary – and that doesn’t happen all the time.

    Of course, these factors all work together somewhat. You can have magical lighting at a mundane location and end up with a stunning picture. Or the right post-processing can take a B+ picture and turn it into a winner.  The point is not to get you to wait around for perfect conditions. Rather just to keep moving forward with the mindset that it isn’t always going to work, but when it does it is magic.

    These are the things I look for in trying to create a great photo. But that’s not to say there aren’t other – even better – ways to go about it. What do you look for in trying to elevate your photos from the mundane into something magical? Please let us know in the comments below.

    The post From Mundane to Magical: Tips on Taking Your Photos to the Next Level by Jim Hamel appeared first on Digital Photography School.


    Digital Photography School

  • Throwback Thursday: Google Nexus One

    On October 4th Google introduced two new smartphones: the Pixel 2 and Pixel 2 XL. These phones pack the latest 8-core Qualcomm Snapdragon processors and large displays, along with the impressive AI systems that make these devices stand out from many of their peers.

    You have to be a real phone aficionado to remember the Nexus One – Google’s first smartphone (codeveloped with HTC) – which debuted in 2010. In 2017 terms the One’s specs are almost laughable, with its single-core processor, half gigabyte of RAM, 5MP rear camera and whopping 3.7″ display. The Nexus One actually had two different displays. It initially shipped with a PenTile AMOLED display but later switched to a Super LCD that promised better power efficiency and color accuracy (though saturation and deep blacks got worse as a result). It also had a trackball reminiscent of Blackberry phones of that era.

    The phone launched with Android 2.1 (Eclair) preinstalled and supported voice-guided navigation and voice-to-text transcription. Not long after the One got upgraded to Android 2.2 (Froyo), which added support for Adobe Flash (which was short-lived), a new home screen and Wi-Fi tethering. The final update the Nexus One received was to Android 4.0 (Ice Cream Sandwich), as its hardware couldn’t keep up with subsequent versions.

    Were you one of the lucky few who owned a Google Nexus One? Let us know in the comments.

    View our Google Pixel 2 launch coverage

    Product mockup by Zach Vega.

    Articles: Digital Photography Review (dpreview.com)

  • Live coverage of the Google Pixel 2 launch on DPReview

    10:45am PT

    That’s all folks! You can learn more about these products on the Google Store right now. As for us, we’ll be running over to get our hands on the new Pixel 2 and Pixel 2 XL in person, and see if they really are the world’s best smartphone camera. Stay tuned or our hands-on take later today!

    10:43am PT

    The Google Clips camera looks for clear moments to capture. You can clip it anywhere. It features an F2.4 lens, 130° field of view, and captures short ‘clips’ that can be saved as motion photos, videos, or high res stills. You can choose which high-res still to save by navigating through a clip. When reviewing clips on your phone, just swipe right to save any one.

    Will cost $ 250 and is “coming soon.”

    10:40am PT

    “A camera that takes photos for you, so you can enjoy the moment and get shots you could never get before.”

    Starts with an AI engine at the core of the camera. Google Clips looks for “moments” by analyzing the scene and capturing photos automatically, so you can be part of the moment you’re capturing.

    10:38am PT

    One more photography update, having to do with candid photography that lets you be part of the moment as the photographer.

    Meet Google Clips: a new lifelogging-style camera designed with parents and pet owners in mind.

    10:37am PT

    Here’s something they did NOT mention when talking about the new screen: the new Pixel 2 wide gamut display claims to offer “100% DCI-P3 coverage.” While OLEDs often offer close to full DCI-P3 coverage, our Technology Editor Rishi Sanyal is a bit skeptical of the 100% figure and wants to see an actual CIELAB diagram. Some estimates ‘cheat’ by counting extended gamut outside of the P3 space in one color to make up for the lack of gamut coverage in another color. We’ll have to wait and see, but most OLED coverage estimates max out at 99% DCI-P3 coverage.

    Plus, we’re still waiting to find out if the Pixel 2 phones offer proper color management to provide accurate color on these wide gamut displays. Even the original Pixel phones offered wide gamut displays, but displayed wildly inaccurate colors because of the lack of proper color management and display profiles.

    10:30am PT

    Worth noting about that DxOMark score of 98: that’s an aggregate of Photo and Video scores.

    The Samsung Galaxy Note 8 still beats the Google Pixel 2 in the Photo category, scoring 100 to the Google Pixel’s 99. The Pixel’s insane Video score of 96 is what gives it that high overall score. In Video, the iPhone 8 Plus scored an 89 and the Note 8 only scored an 84. We’re guessing this high score is largely due to the smooth video the combination of optical + electronic stabilization enables.

    Here’s DxOMark’s full review.

    10:27am PT

    Feature breakdown:

    • Ultra Vivid OLED Display
    • Super Fast Charging
    • Water Resistant
    • The Fastest Fingerprint Sensor
    • Smartest Assistant
    • First Phone with Google Lens
    • Exclusive AR Stickers
    • World’s Highest-Rated Camera

    Pre-orders start today.

    10:23am PT

    12MP F1.8 rear camera with OIS. Smaller 1/2.55″ sensor though (1/2.3″ on last year’s models). HDR+ still takes a burst of shorter exposure shots to preserve highlights, then combines (averages) them to reduce noise. The latter essentially simulates the effect of a larger sensor. While this works very well for static scenes, it can be problematic for moving objects like running kids.

    Portrait mode in the Pixel 2 uses Google’s computational photography tech. No second camera required. Just split pixels on the sensor combined with machine learning. This allows both the front and back camera to use Portrait Mode.

    It’s actually quite clever: the phone creates a rudimentary depth map using Dual Pixel technology and machine learning. Or, as our Tech Editor explains it, “The pixels are split just like on Canon Dual Pixel sensors. And the Samsung Galaxy. It’s used for phase-detect AF (fast focus) as well as to create a rudimentary depth map using the left and right perspectives viewed from behind one lens. Smart.”

    And you no longer have to move the camera upward while taking a photo in Portrait mode. You can just snap a shot. This would make it work better with slightly moving subjects compared to the original Pixel phones. Sadly, Portrait mode is not simulated in real-time as it is on recent iPhones.

    Oh, and the Video mode uses OIS and EIS at the same time. We’ve seen this on 1″-type compact cameras and some ILCs like Canon M-series and the Olympus E-M1 Mark II, but it’s a first for smartphones. This should lead to incredibly smooth video!

    10:20am PT

    Pixel camera now!

    “With Pixel 2, we have reimagined smartphone photography. DxOMark has issued Pixel 2 an unprecedented score of 98.”

    That trounces the iPhone 8 Plus and Samsung Galaxy Note 8 which both scored 94.

    10:18am PT

    Augmented reality updates now. Very similar to the AR updates we saw with Apple and the new iPhones—inserting furniture or games into the real world through augmented reality.

    Something ‘exclusive’ to Pixel 2 are AR stickers that interact with the world and with each other… because Google needed something to compete with Apple’s Animojis.

    10:14am PT

    Talking about Google Lens now. Using pictures, machine learning technology, and Google Assistant to pull information out of images and tell you all about them. Like pulling phone numbers off a flyer, or… telling the difference between muffins and chihuahuas (their example, not ours).

    10:10am PT

    Squeezing the phone triggers Google Assistant, so you can ask it to take a selfie. And it uses Machine Learning to tell if that squeeze was “intentional.”

    Still waiting on more comprehensive updates about the camera. Hopefully it’s not all software and AI-based improvements. We’re really hoping for some hardware updates like OIS and maybe a bigger sensor or better processor.

    *fingers crossed*

    10:05am PT

    Pixel 2: Full HD OLED display on the smaller 5-inch model. 100,000:1 contrast ratio. More than twice the contrast ratio of phones in its class (save for the iPhone X). Comes in three colors: Kinda Blue, Just Black, and Clearly White.

    Pixel 2 XL: Less bezel, ‘gently curved’ screen, wide color gamut display, integrated circular polarizer so you can view the screen through sunglasses, 538 ppi (up from 534 ppi in the first Pixel XL). Comes in two colors: Just Black and ‘stylishly simple’ Black and White. We’re told the screen is optimized for VR, which may mean a pixel arrangement more amenable to high magnification.

    “We don’t set aside better features for the larger device.” OOOO sick burn on Apple.

    And yes, they are both IP67 dust and water resistant! On par with the iPhone, but a bit short of Samsung’s IP68. That’s a big upgrade from the IP53 rating of last year’s phones (what do IP ratings mean?).

    10:00am PT

    Google VP Mario Queiroz on stage, getting ready to talk about a ‘smarter’ and ‘simpler’ smartphone.

    The Google Pixel 2, designed “with the best of Google built in.” Comes in 2 sizes, 5-inch and 6-inch XL. More Google Assistant capabilities and will “continue to offer the best photography.”

    9:58am PT

    One hour later, we’re FINALLY about to hear about Pixel 2 and Pixel 2 XL!!!

    9:55am PT

    The 12.3-inch Quad HD touchscreen is nice, it’s the first laptop with Google Assistant built in, and the laptop comes with the new Google Pen that can be used in concert with Google Assistant. 2,000 levels of pressure sensitivity… wonder how well photo editing in Lightroom on the Pixelbook works with the pen?

    9:49am PT

    *Sigh*…

    Still waiting on the Google Pixel 2 launch. Moving on to Pixelbook from Google Home. It’s like they’re TRYING to torture the photo nerds. Let’s see if there’s any photo-centric reasons to be excited about the Pixelbook…

    9:35am PT

    We’re getting a bunch of Google Home updates/announcements. There’s a small one now… something about fabric… they needed 100+ tries to find an appropriately grey grey… cool stuff… clearly we’re very interested in this part.

    *insert Jeopardy waiting music here*

    9:21am PT

    Next generation of Google devices are “fast” and “easy to use” and “anticipate your needs.” Products that get faster and more helpful over time thanks to machine learning.

    9:19am PT

    Rick Osterloh: “Pixel had the best and top rated smartphone camera. We’re really proud with how well the Pixel did as our first generation smartphone.”

    He’s not wrong. But there’s a lot of room to improve…

    Rick is talking about the challenges facing hardware development. So Google is going to take a “different approach” to smartphone [photography] advances by living at “the intersection of AI, software and hardware.”

    9:12am PT

    Pichai is confident that Google is at the forefront of driving the shift to this AI-first future.

    One of the major leaps forward Google has made, is in Object Detection, which he says is now at 45% accuracy! The company is using this tech in Google Lens and, says Pichai, in the Google Pixel smartphones.

    9:05am PT

    Google CEO Sundar Pichai on stage. Started with a somber note about the horrifying tragedy in Las Vegas, and the natural disasters around the world.

    Now talking about how Google is using machine learning technology to improve everything from Google Maps, to parking difficulty prediction, to Google Translate. Pichai is “excited about a shift from a Mobile-first to an AI-first world.”

    This shift will no doubt have a major impact on the future of mobile photography.

    8:59am PT

    Are you ready? The Google DJs are winding down the music.

    8:45am PT

    We’re officially inside the SF Jazz Center waiting for the presentation to start! A few things we’re hoping for: optical image stabilization, better depth of field simulation with live preview, and a much more durable Pixel 2/XL on par with the iPhones (IP67 rating) or even Samsung’s Galaxy Note 8 (IP68 rating).

    8:30am PT

    Hot on the heels of Apple’s own smartphone announcement, Google is taking on the iPhone 8 Plus and iPhone X with its own release. In T-minus 30 minutes, Google is set to unveil the Pixel 2 and Pixel 2 XL (among a few other things) and we’ll be covering the launch live from San Francisco on Twitter and on this page.

    Watch the livestream with us, and keep refreshing this page for up-to-the-minute takes on all things photography related from the Google event.


    Articles: Digital Photography Review (dpreview.com)