Month: October 2017

  • Outta Sight: 15 Closed & Abandoned Opticians

    [ By Steve in Abandoned Places & Architecture. ]

    The optics are all wrong when it comes to these closed and abandoned opticians, optometrists and ophthalmologist shops as anyone can clearly see.

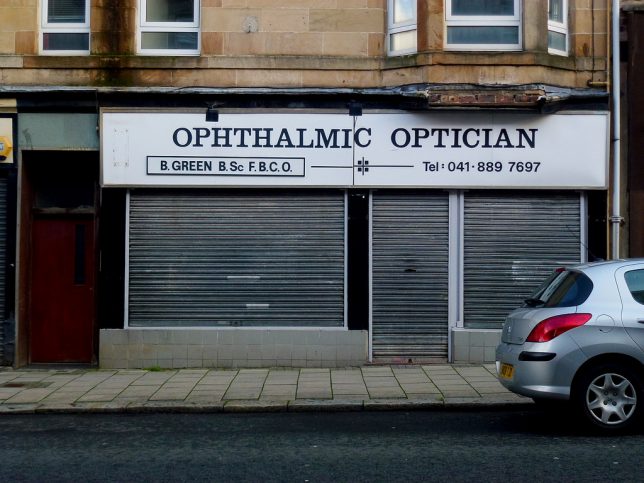
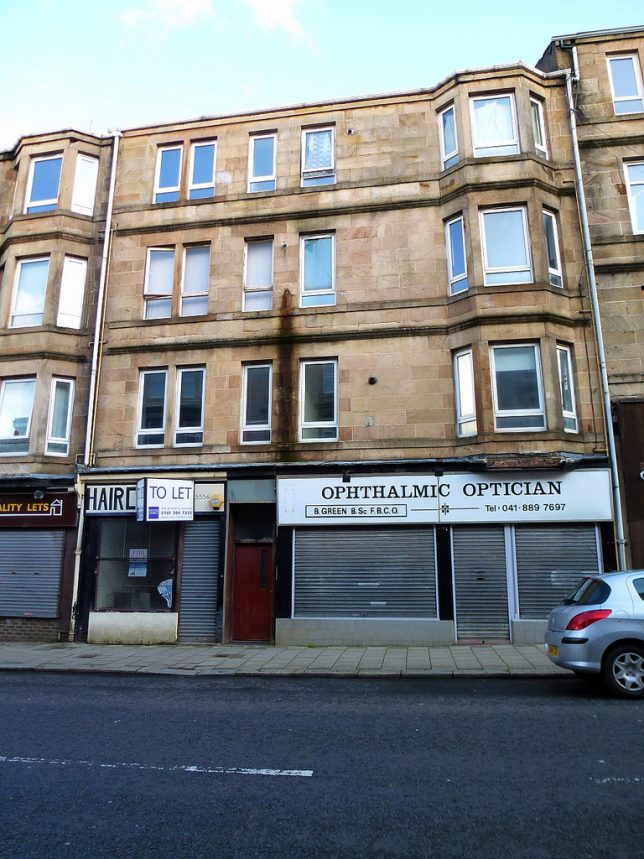
    There’s no optician like an Ophthalmic Optician, except of course when it’s closed and there’s, er, no Ophthalmic Optician no more. Such is the case in Castlehead, a declining district of West Paisley, Scotland, where it seems there are more steel-shuttered shops than stores still open for business. Flickr member David Cameron Paisley Photographer (dddoc1965) captured this sorry sight – or should that be “sorry site” – in early November of 2014.

    Spec Easy

    It takes some extra effort if you want to stand out between a Polish foods store and a tattoo parlor. Thus it’s not surprising this abandoned Bristol, England optician’s rainbow-hued sign is the last remaining sign of the store’s previous existence. Flickr member Graeme Dawes (HUNGRYGH0ST) snapped the store’s lurid yet eye-catching signage in May of 2016.

    Innercity Vision

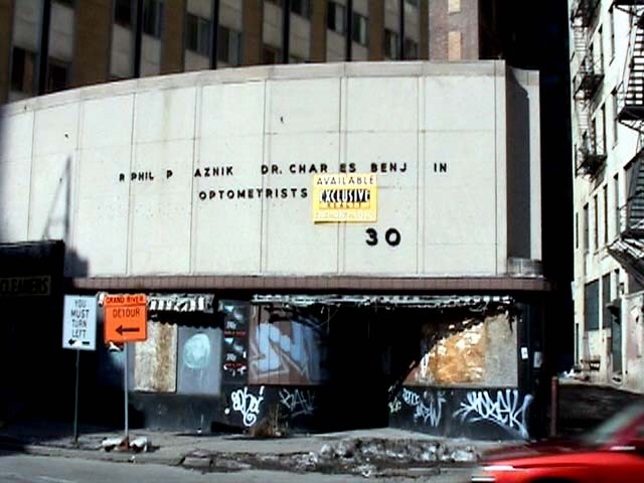
    Touring downtown Detroit by bus and on foot isn’t such a great idea today and it wasn’t so wise back in 2004, when Flickr member Lucas (bilateral) did just that – and survived to show & tell the tale. We presume Drs. Phillip Aznik and Charles Benjamin also survived their exodus out of urban Detroit though their long-abandoned optometrist store (and its sign) didn’t quite make it.

    Sol Survivor

    Sol Moscot Opticians (founded 1915) was a Lower East Side landmark from 1935 to 2013, when the business moved to new digs on the opposite side of Delancey Street.

    The old store sat sporadically abandoned for several years following the move, until demolition and construction on a 12-story mixed-use tower finally commenced in early 2017. We’re guessing the new development will be far less colorful which in hindsight (see what we did there?), would be a bit sad.

    The Italian Jobless

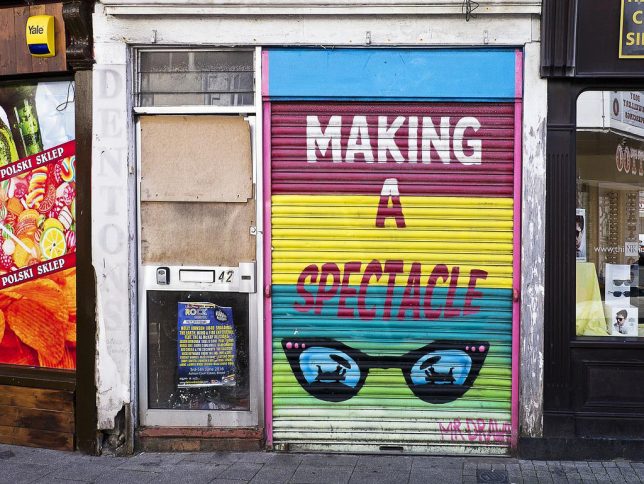
    While the late and lamented Sol Moscot store was, in its later stages, almost overwhelmed by a flood of (perfectly legal) graffiti, this unnamed abandoned optician in Rome, Italy has only the above painted panel to prove its previous occupation. Good thing that sole example is awesome! Flickr member Tobia Maschio (The Great Slug) snapped this brilliant work of anonymous street art on July 16th of 2010.

    Next Page – Click Below to Read More:
    Outta Sight 15 Closed Abandoned Opticians

    Share on Facebook


    [ By Steve in Abandoned Places & Architecture. ]

    [ WebUrbanist | Archives | Galleries | Privacy | TOS ]


    WebUrbanist

  • Gudsen Moza Air gimbal review

    Gudsen Moza Air
    $ 599, ($ 798 for the thumb controller kit)
    www.Gudsen.com

    There are whole lot of things about shooting video that are difficult, such as getting to grips with the specific terminology, mastering audio, understanding input/output files types and finding your way around new software. All of this stuff can be learnt, but what I struggle with most, and which just wrecks most of the videos I shoot, is just holding the camera steady. This beats me even when I’m standing still, but it destroys every beautiful or dramatic scene I encounter if I have to so much as pan across a view let alone actually move my feet as well. I can achieve smooth motion sometimes, but with such a degree of concentration that everything else goes out of the window. In short, I find this aspect of shooting movies almost impossible to overcome.

    The Moza Air is designed for compact system cameras and small to medium sized DSLRs

    I guess I’m not entirely alone here, as there are now quite a number of mid-sized gimbals designed to help videographers achieve smooth footage when they are moving with a handheld camera. The Zhiyun Crane has been a popular option for some time, but newer on the scene is the Gudsen Moza Air.

    Gudsen had mostly produced gimbals for small devices and mobile phones, but has recently moved into support for larger, heavier cameras. The Moza Air is designed for compact system cameras and small to medium sized DSLRs with a maximum payload of 5.5lbs/2.5kg – a restriction which actually only really excludes top-end professional models.

    Specification

    The Gudsen Moza Air is motorized gimbal platform-on-handle designed to create smooth motion and steadier stationary views for videographers. It is made from aluminum tubing and weighs 2.4lb/1.1kg when it is all put together and the batteries are loaded. The large camera platform offers two cut-out runners and two sizes of threaded screws, as well as plenty of room to shift cameras backwards and forwards to find a balance. There is less side-to-side space than front-to-back though, with the maximum gap between the camera retaining screw and the right hand arm being 3 7/8in/97mm. This isn’t necessarily an issue when it comes to actually fitting a camera in that space, so much as for attaching cables to ports on the right hand side of the camera.

    The platform allows continuous 360° yaw, tilt and roll movements, all of which can be controlled via the joy stick on the main handle. Built-in Bluetooth 4.0 allows these actions to be controlled remotely via a separate thumb controller too, and users can take charge of settings and motion via the Moza Air app. Further connections come in the form of a micro USB port for connection to camera remote control sockets.

    Three 3.7V lithium ion batteries drop into the handle to power the device and Gudsen claims their 2000mAh capacity will drive the gimbal for between four and eight hours. The dramatic discrepancy between the battery life figures is a function of the range of weights the gimbal can accommodate as well as the differences in power required to hold a camera in the normal position and at some contorted angle.

    Handling

    The Moza Air comes very nicely packaged in a hard case with a range of accessories. I’m not entirely sure what is in the standard kit, as I received two kits each with different accompaniments. The basic setup includes the main handle with the gimbal as well as the battery compartment and the thumb controller. Also in the box is a set of handlebars is that allow the device to be used with two hands while a second person deals with the head movements via the thumb controller.

    A set of cables allows you to connect the handle to certain compatible cameras for stop/start recording controls and there’s a support bracket for heavy lenses. In one package I got a mini-tripod that attaches to the threaded base of the handle. This is very useful for getting the camera balanced and can also be used to extend the handle for an even greater field of motion.

    Once the gimbal is assembled you have to balance the camera in the main cradle. It’s important to get the kit as well balanced as possible before switching the gimbal on so that you get the maximum out of the movements possible and so that you don’t use more power than you need to. Getting the balance right can be time consuming especially the first time you have to balance a kit. You have to remember to get the camera exactly was you want to use it first as well, as even taking the lens cap off, or flipping out the camera’s screen, will upset the balance.

    Having a tripod, mini or not, with you is a good idea for when the kit needs to be altered.

    Switching lenses during a shoot means taking a break to rebalance the gimbal, which is difficult to do in the field if there is nowhere level to position it – so picking a non-extending zoom makes life a bit easier. Having a tripod, mini or not, with you is a good idea for when the kit needs to be altered. Using in-camera levels is handy for ensuring the camera is perfectly balanced, if your camera has them.

    The Moza Air makes leveling reasonably easy by having arm-brackets that slide nicely to allow small adjustments. There are three brackets to get in balance so this isn’t a ten-second job – though measured markings on each of the arms makes positions easier to return to when re-attaching a previously used camera and lens combination. Some way of keeping the camera screw in place would be really useful, and in fact a quick release plate even better, so that after moving the camera for a battery change or a card swap you don’t have to rebalance it all over again.

    One of the more obvious differences between the Moza Air and the Zhiyun Crane is that the Moza Air features controls that face the user, so they can be operated with the thumb. There are only two control points and each can perform a range of tasks according to how many times it is pressed. It doesn’t take too long to commit these functions to memory, and I appreciated having all the controls in one place while trying to keep an eye on the screen while filming – so I guess it is better than having a collection of dedicated buttons for each task.

    The stop/start function is very useful, and the proximity of the thumb rocker is handy for controlling the camera angle without having to change the way your hand is gripping the handle. The rocker controls the left-right/up-down direction of travel of the gimbal, but there’s no way to tilt the camera left-to-right, and it takes some practice to get the motion slow and smooth.

    Despite its light weight, in use the Moza Air gets quite heavy

    Despite its light weight, in use the Moza Air gets quite heavy. That isn’t an inherent fault of the device so much as the nature of holding a camera on a stick at an angle for a long time.

    If you record sound from a hotshoe mounted microphone you’ll want to choose a small one that doesn’t restrict your movements too much. When using the gimbal in the upright position there is loads of room for a microphone, but as soon as you begin to tilt the gimbal forward into the flashlight position the brackets of the device will clash with the back of the microphone.

    When the camera is slung under the gimbal for low angle shots there is even less space for a microphone, but there are accessory points where a mic can be attached. I used the Rode VideoMic Pro and Pro+ in the hotshoe for most of this test, and attached it to the handle bars when shooting with the camera slung low.

    Motion in action

    The second version of this gimbal that I received was dramatically improvements over the first very early version I used. Its motor seems much stronger, or better tuned, so it can hold more weight in more difficult positions for longer without suddenly giving up and throwing the camera around – which happened a lot with the early model.

    The ability of the gimbal to support and steady the camera at quite a wide range of angles is pretty amazing, and allows the user to perform crane-like sequences with the camera coming from a low angle up to an overhead view in one smooth motion. The side-to-side support is also very good, and though side movements can create clashes with cables and screens sticking out to the side of the camera.

    at the extremes, the head can’t hold the camera for long before flipping out

    Using the controller on the Moza Air’s handle you can introduce tilt and twist actions. With the handle in the upright position you can rotate the camera 360 degrees about the vertical axis while the tilt motions are more moderate. Although I didn’t expect to be able to get the camera to look directly down I’d rather hoped to for a better range of tilt angles – and at the extremes the head can’t hold the camera for long before flipping out.

    The controller on the handle doesn’t really allow fine movements or adjustments during filming as the increments are crude and a bit jerky, so users will be better off using the Bluetooth thumb controller that comes in the kit. With a bigger joystick and a wider range of actions this provides a little more precision. The thumb controller can instruct the head to move at different speeds as well as customize the way it works and to instruct the system which camera is in use. It is important for the system to be informed of the camera brand so that the cabled remote that connects the head and the camera can operate properly.

    The new Mimic Motion Control feature makes a massive difference to the finesse with which movements can be communicated to the head. Attaching the thumb-controller to the handle bars and setting it to the appropriate mode allows users to control the head remotely just by moving the handle bars – and the head follows every action. This allows much finer movements as well as complete flexibility in the speed at which the head moves. It makes a huge difference to how the camera angle can be dictated when the rig is mounted on a tripod or being carried by a third party.

    recording can be initiated and stopped using either the thumb controller or from the buttons on the gimbal’s handle

    Using the cabled remote, which connects the camera’s remote control socket to the gimbal via USB, recording can be initiated and stopped using either the thumb controller or from the buttons on the gimbal’s handle. Canon users’ cameras compatible with the system can be made to focus from the remote buttons as well. The stop/start feature is particularly useful as it means you don’t have to alter your grip on the handle to kick off the recording – and suffer a few seconds of wobbly footage at the beginning and end of each clip. This can save time in editing and quite a lot of memory card capacity during a long shoot with a number of scenes.

    The App

    I used the smartphone app with my iPhone 5s and found early versions of it slightly prone to hanging and displays lagging behind what the head was doing. The app offers a virtual joystick for controlling the head, but I found the lag such that accurate instructions proved hard to communicate.

    The app also allows you to program the speed of the head as well as to calibrate the motors and determine the angles of movement in each of the controllable axes. The early version was not especially easy to use, but the more recent update has made a big difference.

    The head’s timelapse feature is also controlled via the app, and gives filmmakers the opportunity to determine start and end points for motion in the sequence as well as three other points for the head to cover during the action. Thus the head doesn’t just move from side to side or up and down – it can move in all directions across the four shooting segments of the timelapse. Initially the head moved continuously during the sequence, which wasn’t ideal for those wanting to use long shutter speeds. Consequently many of my first timelapse sequences are a bit jerky.

    The recent firmware update allows the head and camera shutter to synchronize and offer a move-stop-shoot-move routine that holds the camera still while the shutter is open – with cameras that are compatible with the head’s cabled remote. The timelapse feature of the app now offers plenty of control over the end result, and with cameras that plug into the head it will start and stop the shooting too.

    Performance

    I have been very pleasantly surprised by how well this gimbal performs. I had expected it to be of some assistance in keeping the camera stable during walking shots, but didn’t expect the degree of correction that it provides when running. When kept within the perimeters of the angles it can handle the gimbal works really very well, so it is a question of finding where those extremes are. Inevitably I wanted it to be able to cope with angles it could not manage, but in the course of normal shooting I suspect the more difficult poses I demanded in testing would not be required. I found that the more I got used to what it can do the more I was able to compensate with my own movements so that the gimbal didn’t have to work so hard.

    There were a number of occasions on which the humming of the motor rose to a level that would be noticed in the audio. These occasions were not limited to handheld and demanding shooting with heavy equipment, but also occurred while the Moza Air was mounted on a tripod. Usually the whirring could be solved by rebalancing the camera, but sometimes that wasn’t enough – but it would go away by itself.

    Battery life isn’t too bad, and I found a set of three could keep the Moza powered for at least four hours. I also found though that removing the batteries from the handle in between shoots was a surer way of there being power in them the next time of shooting.

    In general, I thought the Moza Air behaved rather well throughout the test, and it allowed me to get plenty of shots I wouldn’t have managed otherwise, and the updated timelapse feature is actually really useful.

    Conclusion

    The Gudsen Moza Air is slightly less than perfect in some respects, such as the complications of getting the camera balanced to begin with and in the arms clashing with each other when in certain positions. However, the company doesn’t appear to be sitting on its laurels – there have been really quite significant updates even during the period of this test. It is an excellent solution though for holding a recording camera steady for 80% of the shots any videographer is going to want to shoot. It can’t do angled up or down shots very well, but for everything else I found it a great assistance.

    In the world of video, where everything seems to cost a small fortune this device is relatively affordable

    Critically, the Moza Air has allowed me to create a video that doesn’t look like it was shot by a monkey even though this is pretty much the first time I have shot more than two clips that were intended to be stuck together, and my videography experience is slim to say the least. In the world of video, where everything seems to cost a small fortune this device is relatively affordable and actually presents very good value for money considering the difference it will make to your footage.

    Yes, some of the mechanical design is in need of refinement, but for the most part I can live with that for now – although when the motors give up when holding the camera during a difficult angle it can be frustrating. More powerful motors would allow it to hold better and would reduce the whine and wobble that can be produced in the extremities of the head’s operating envelope, but I suppose that would cost more money. If you don’t push it too hard, and don’t expect too much you will be very happy indeed with the Moza Air – as I have been.

    This little movie was made for a bit of fun – but primarily to demonstrate what the Moza Air can do in a range of situations. It was shot with the Panasonic Lumix DC-GH5 in VLogL and edited in Davinci Resolve. I used two Moza Airs – one to support the camera for the whole of the shoot and the other in the box that we could film being assembled. It’s neat that Gudsen supplies a hard case for the kit, but it struck me as something you might see in a gangster movie – hence the theme we went with for this clip.
    Pros:
    • Relatively good value
    • Supports most DSLRs
    • Nice button controls
    • Good stabilization
    • Mimic Control is excellent
    Cons:
    • Build quality could be refined
    • Could be made lighter with different materials
    • Hard to balance the camera quickly

    For more information see the Gudsen website.

    Articles: Digital Photography Review (dpreview.com)
  • 3 Powerful Tips for the Perfect Vignette in Lightroom

    The vignette is one of the most powerful ways to boost your photos. It reduces your photo’s brightness at corners and sides compared to the image center. It’s mainly used to highlight elements in the center even more. Besides, you can also use it to cover distracting details on the sides of your image.

    As popular as it is, it’s just as common to not apply vignettes properly using Lightroom or Adobe Camera Raw. Let me show you three powerful tweaks to squeeze out 100% of its potential and present your photos in a better light!

    1) How to decide which photo is suited for a vignette

    The vignette shifts the focus to the center of your frame. That’s why you’ll ideally have a photo where your subject is placed in the middle. Otherwise, the vignette will make your subject darker and take away the spotlight.

    To make the vignette even more powerful, it really helps to have the light in the center of the frame as well. Your subject is either lit up from the front or illuminated by some backlight. Of course, it depends on how strong you apply the vignette. If you use it lightly around the sides and corners, then the subject can also be a bit to the top, bottom, left or right of the frame.

    3 Powerful Tips for the Perfect Vignette

    Take a look at the two photos above. The one on the left has the subject on the far left. The vignette not only covers the subject, it also highlights the less important wall in the middle. The right photo, however, has the subject in the center. The vignette blends out the unimportant details of the office and highlights the person and the view in the center. Do you see how the vignette works much better in the example on the right?

    Whether you are capturing buildings in a city, trees in the countryside or animals in the zoo, the same rule of thumb applies: place the most important element in the center.

    2) How to make the vignette as smooth as possible

    The best vignette in the world is the one you barely notice. That’s why you always need to make sure that the transition is as gentle as possible. Once you notice the transition from dark to bright, it’s not done right. Do you see the circle of the vignette in this photo?

    3 Powerful Tips for the Perfect Vignette

    The reason for this is generally that the feather slider is too far to the left side. As you can see in the screenshot below, it’s at 33. The more you go to the left, the more visible the transition will be.

    Transition Bad - 3 Powerful Tips for the Perfect Vignette

    Always make sure to move the feather slider to the right side. For most of my vignettes, I slide it all the way to 100. That way, you will achieve the smoothest transition for your photos.

    Transition Bad - 3 Powerful Tips for the Perfect Vignette

    Once you’ve applied the feather more generously, the vignette’s border will largely disappear. As a result, your vignette will blend more smoothly into the natural light of the scenery. In case the transition remains too strong, you can always reduce the amount a bit as well.

    3 Powerful Tips for the Perfect Vignette

    3) How to create a custom vignette

    Although the post-crop vignette works best with subjects in the center, you will also use different placements. Luckily, you can always create a custom vignette that is tailored to your composition. The easiest way to do this is to use the Radial Filter.

    The following photo could really need a vignette. That way, we could highlight the sunset and the silhouette even more. In order to create a custom vignette, open the Radial Filter (Shift + M) first. Then you decrease the exposure to a level between -0.20 and -1.0. In this case, I set it to -0.64.

    Radial 3 Powerful Tips for the Perfect Vignette

    Click on the subject in your photo, hold and drag the circle around your subject. Everything outside of the circle will become darker.

    3 Powerful Tips for the Perfect Vignette

    Remember the first tip how the transition always needs to be smooth? We will do the same for the custom vignette. With the feather slider, you can make the transition from dark (outside the circle) to bright (inside the circle) smoother. The further you slide it to the right, the gentler the transition becomes. For this photo, I changed it to 81 instead of 50.

    Radial 3 Powerful Tips for the Perfect Vignette

    When you compare the original photo (left) with the custom vignette (right), you can clearly see the difference. The light atmosphere in the right photo is more intense and the vignette guides the viewer to the subject.

    3 Powerful Tips for the Perfect Vignette

    Conclusion

    I hope these three tips for better vignettes will you take your images to the next level. Of course, practice makes perfect. Play around with the sliders as much as possible to get a feel for the right amount. If you have any questions, let me know in the comments and I’m more than happy to help you out!

    The post 3 Powerful Tips for the Perfect Vignette in Lightroom by Marius Vieth appeared first on Digital Photography School.


    Digital Photography School

  • Taking the Canon 28mm F2.8 IS USM to Big Sur, California

    Big Sur, little lens

    Standing alongside the Bixby Creek Bridge in Big Sur, California. Processed to taste from Raw.
    ISO 125 | 1/160 sec | F11

    By virtue of a considerable quantity of dumb luck, we had timed it perfectly.

    Our belongings shifted gently to and fro in our rented cherry-red Hyundai Sonata as we zig-zagged freely along Highway 1 in California’s Big Sur region, a stretch of road that has been described as the ‘longest and most scenic stretch of undeveloped coastline in the contiguous United States.’*

    We were visiting Big Sur just into the off-season, with Highway 1 subdivided by a massive landslide to the south and a bridge closure to the north. As a result, the road was remarkably unoccupied, devoid of the typically ubiquitous caravans of gawking tourists.

    Although the extensive closures tacked on about six hours of additional driving onto our trip, the journey along the famous Nacimiento-Fergusson Road – the only way in and out of the region cut-off by the closures – was unforgettable. Unfortunately, thanks to the rampant switchbacks, it was also literally nauseating. Can’t have it all, I guess.

    It was into this scenario that I brought Canon’s diminutive 28mm F2.8 IS USM lens attached to an EOS 5D Mark IV; my only photographic tools for the duration of our time in central California.

    Fitting into the lineup

    Photograph courtesy Jordan Stead

    The Canon 28mm F2.8 IS USM is not a new lens by any means. So why write about it now? Well, for starters, we didn’t yet have a gallery on it here at DPReview. It also happens to be among the smallest and lightest full-frame Canon lenses around, and so a great way to (attempt to) minimize the bulk of bringing a full-frame DSLR on my vacation.

    Announced back in early 2012 alongside its 24mm cousin, the 28mm IS is very straightforward. You get a rubberized focus ring with a fairly long throw, an AF/MF switch and a stabilizer on/off switch. And that’s about it.

    Alongside Canon’s EF 40mm F2.8 Pancake and two ‘nifty fifties,’ it’s among the the lightest full-frame lenses that the company currently offers, though it is by far the most expensive of this group with a current MSRP of $ 499. Despite its price, the 28mm IS does not come with any claims of weather-sealing, which is a disappointment.

    I’m happy to report that, despite the lack of weather sealing, the EF 28mm F2.8 IS USM survived a few drops of salt water. Processed to taste in Adobe Camera Raw.
    ISO 100 | 1/200 sec | F8

    Regardless, the build seems very good. The outer barrel is polycarbonate, and the mount is metal. Due to the stabilizer, there’s a very slight rattle if the camera is jostled while the power is off, but the 28mm has an overall dense feel of quality to it.

    For use on 30MP (and even higher pixel count) cameras, the 28mm is good, if not mind-blowing in terms of sharpness. There are also noticeable amounts of green and purple fringing if you leave those corrections off, but both the camera’s JPEG engine and Adobe Camera Raw tame those handily, so it’s rarely an issue.

    Corrections off Corrections on
    I actually quite like some vignetting, and in certain situations, I think it can add to a certain ‘mood.’ It certainly won’t be everyone’s cup of tea, though.

    The biggest issue you’re likely to run into comes in terms of vignetting, which is readily noticeable with this lens. In particular, if you have the corrections turned on within Adobe Camera Raw, the corner exposure will be lifted enough as to perhaps introduce unwanted noise, especially if your image was already taken at a higher ISO value.

    Recommendations

    I’ll freely admit that I haven’t been much of a 28mm guy until this past year and half. That changed after I was tasked with reviewing the Leica Q, and subsequently purchased a secondhand Nikon Coolpix A as a casual carry-everywhere camera.

    Without a super fast aperture or a telephoto lens to fully isolate subjects and blur backgrounds into oblivion, the 28mm F2.8 IS USM made me slow down and focus on my compositions more. Processed to taste in Adobe Camera Raw.
    ISO 160 | 1/125 sec | F4

    What I find most intriguing about the 28mm focal length this Canon offers is that it forces me to think more holistically about the images I’m making. Without telephoto compression or a faster aperture to more easily isolate my subject, the context becomes nearly as important as the subject itself.

    When I pick up a 35mm, 50mm or 85mm lens, I know that I’m likely going to get a faster aperture, and more background compression, making the scene look a little more ‘interpreted.’ When I pick up a 24mm-and-wider lens, I’m often doing my very best to exaggerate the perspective between objects that are both near to me and far away for a more interesting look.

    But with 28mm, I feel almost as though I’m simply documenting what’s happening in front of me without letting the optics of wider or more telephoto focal lengths influence the look of the scene.

    Processed to taste in Adobe Camera Raw.
    ISO 100 | 1/250 sec | F8

    In other words, it’s a fun challenge if you’re used to those other options. As with many photographers, I’ll admit I sometimes find myself relying on fancy gear as a crutch to make a photograph more ‘interesting.’ On the other hand, this 28mm lens just got out of the way and recorded what I put in front of the camera; it was up to me to make the most of my subjects and compositions.

    If you haven’t given 28mm a try, I’d certainly recommend it, and if you happen to be a Canon shooter, the EF 28mm F2.8 IS USM represents a solid, lightweight and affordable option.

    Samples

    Please do not reproduce any of these images on a website or any newsletter / magazine without prior permission (see our copyright page). We make the originals available for private users to download to their own machines for personal examination or printing (in conjunction with this review), we do so in good faith, please don’t abuse it.

    Unless otherwise noted images taken with no particular settings at full resolution. Because our review images are now hosted on the ‘galleries’ section of dpreview.com, you can enjoy all of the new galleries functionality when browsing these samples.

    $ (document).ready(function() { SampleGalleryV2({“containerId”:”embeddedSampleGallery_6264240715″,”galleryId”:”6264240715″,”isEmbeddedWidget”:true,”standalone”:false,”selectedImageIndex”:0,”startInCommentsView”:false,”isMobile”:false}) });

    * Per Wikipedia: Marvinney, Craig A. (1984). “Land Use Policy Along the Big Sur Coast of California; What Role for the Federal Government?”. UCLA Journal of Environmental Law & Policy. Regents of the University of California. Accessed 22 August 2016.

    Articles: Digital Photography Review (dpreview.com)
  • Are You Too Much of a Perfectionist With Your Photography?

    Are you one of those people who winces every time you take a photograph that’s slightly skewed, with a foot cut off, overblown highlights, or too much grain? Well let me tell you something, sometimes the problem might not be with the photograph – it may be you. Are you a perfectionist? Is it affecting how you view your photography?

    In this article let’s take a look at this concept and see how it applies to you and your work.

    Are You Too Much of a Perfectionist With Your Photography?

    How much does it matter?

    Needless to say, there are many situations where a skewed horizon, a cutoff limb, or a white sky will ruin the photograph. But there are just as many situations where it won’t matter at all, yet many people will think it does, and they will trash their perfectly good photographs because of this.

    It’s hard not to over-think your photographs, especially if you are a bit of a perfectionist or like as much order as possible to things. And even if you’re not, you probably have moments where you over-think the details in your images. We all research cameras that have the sharpest lenses and most megapixels for a reason, don’t we?

    Are You Too Much of a Perfectionist With Your Photography?

    But a lot of the time, this stuff doesn’t matter that much. What matters is that the photograph looks beautiful, that it’s interesting, and that it has an alluring quality that engages the viewer. In those situations, straight lines and perfect sharpness are just a bonus.

    Negative critiques

    A big purveyor of this way of thinking comes from photo competitions or photo clubs. While I’m not knocking photo clubs – they are an amazing place for the knowledge, enthusiasm, and comradery. But they can also have the effect of making us question our photos in the wrong way.

    In a room full of people, there will always be a few that are hyper-focused on an element that they see as out of line, and this disregards the photo as a whole. No matter what image you show, there is guaranteed to be one person who will find something wrong with it, and that puts a lot of pressure on you.

    Similarly, think about the difficulty for judges in photo competitions, where they have to stare at hundreds or thousands of photos to pick a winner. They are just looking for any reason to disregard a photo. Nitpicking the little details is the easiest way to do this, so that becomes a prerequisite for your photo to do well.

    Are You Too Much of a Perfectionist With Your Photography?

    Find a balance

    The result of all of this is that I work with many photographers who get so nervous about making the slightest mistake, and it throws their whole photography experience off. Where they should spend their time enjoying themselves and looking for something amazing, they question their abilities and over-think each detail.

    I’m not trying to disregard the importance of technical quality in photography. It’s vital and necessary. You have to have good technical skills to become a good photographer, but the technical aspects should be in the back of your mind instead of in the front.

    After all, the only people that pixel peep and gaze at a photograph from six inches away, are other photographers.

    Are You Too Much of a Perfectionist With Your Photography?

    Embracing imperfections

    Going to galleries to view the work of the old masters is a great way to learn this. For every Ansel Adams, there was a Garry Winogrand. Cameras were often downright primitive compared to what we have today. Some of the most famous photographs of all time are slightly blurry or have technical elements that would make the judges of a photo contest today cringe.

    Some photographers even look to add imperfection into their work, often by skewing their photographs or including elements in strange compositions. Other photographers even will shoot at high ISOs in all lighting situations because they like to have a grainy look to their images. In this way, imperfections can improve your photographs by making them feel more real and of the moment. It shows that the photograph was a special and unplanned event.

    Are You Too Much of a Perfectionist With Your Photography?

    I do not want you to forget to think about the technical qualities of your photographs, but I want you to be more in the moment. Take the pressure off yourself. Be more spontaneous, enjoy yourself, and try to get lucky. Focus on the moment more than the photograph, and share that moment with us. If it’s a great moment, it won’t matter how off the horizon is.

    Bring back a photo that you love, that you relate to, that you want to put on the wall, and I guarantee there will be others that will love it as much as you do. Don’t worry about the ones who feel differently. Take their opinions into account, but try not to let it consume you.

    Just make sure not to photograph someone with a tree coming out of their head.

    Are You Too Much of a Perfectionist With Your Photography?

    The post Are You Too Much of a Perfectionist With Your Photography? by James Maher appeared first on Digital Photography School.


    Digital Photography School

  • Photo of the week: A heartbreaking photo of a bear in a landfill

    I was in the region on an assignment unrelated to bears, but a friend in the area said we could check out the landfill as there may be bears there, so we went for a drive. When we arrived at the landfill there were bears everywhere, I believe 7 total. I was speechless, in complete shock of what I was seeing and I actually didn’t shoot any photographs.

    That night I couldn’t shake the feeling about the bears in the landfill, and so the next day I asked my friend if we could go back. When we arrived the smokey pit was on fire with flames coming up taller than the bear. I immediately knew that, this time, I had to shoot.

    When I finished making the photograph, the bear turned slowly and walked down into the smoking pit, disappearing from my sight. He never came back up during the rest of my time there.

    It took me a very long time to process this photograph after, and I’m still not sure how I feel about it. All I know is that it’s the only photograph I’ve ever made that has made me tear up on multiple occasions. And I’m sure still has more to teach me.

    I used a Nikon D810 and 35mm F1.8 lens. Exposure was F11 and 1/400 second, as I wanted as much detail as possible and didn’t expect the bear to be so still, so I chose a high shutter speed to ensure clarity in case the bear moved around. I got pretty lucky with the smoke and position of the sun—just one of those moments I believe come to us photographers, when everything aligns just right.


    Troy Moth is an award-winning photographer based out of Sooke, British Columbia, Canada. His photography has been exhibited worldwide, and his work has appeared in Rolling Stone and Vogue among others. You can see more of his photos by visiting his website, or following him on Facebook.

    Articles: Digital Photography Review (dpreview.com)
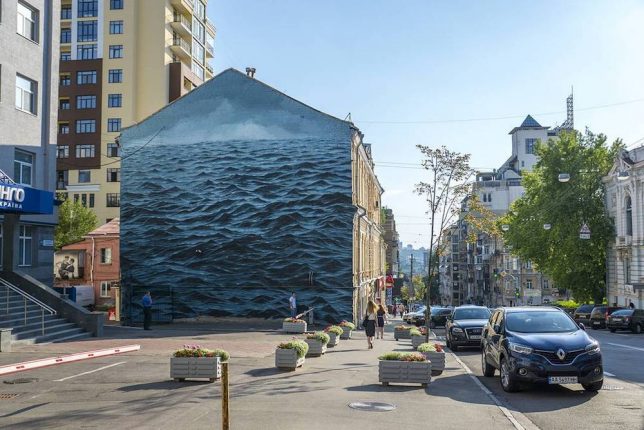
  • Sea Wall: Dark Multi-Story Mural Shows Stormy Waters on City Streets

    [ By WebUrbanist in Art & Street Art & Graffiti. ]

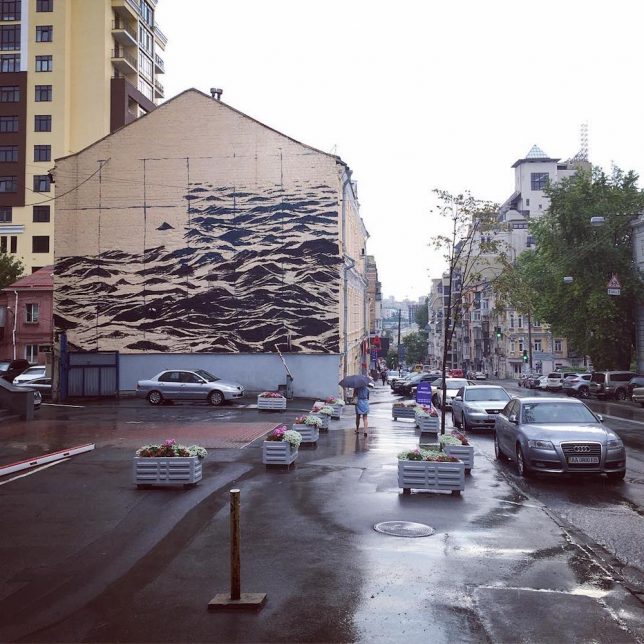
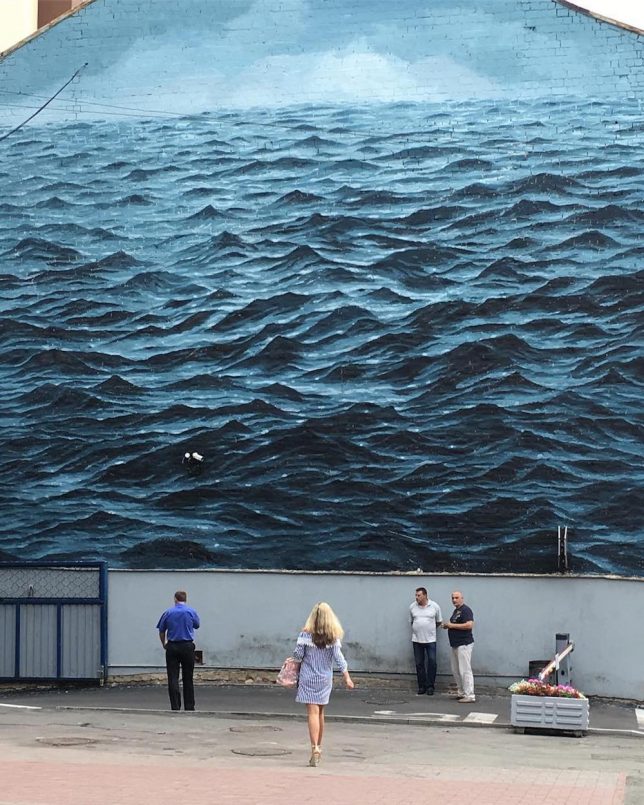
    Lapping up the side of a three-story building in Kiev, Ukraine, this dark mural mixes blue and gray hues to capture dark waters and skies of the Black Sea.

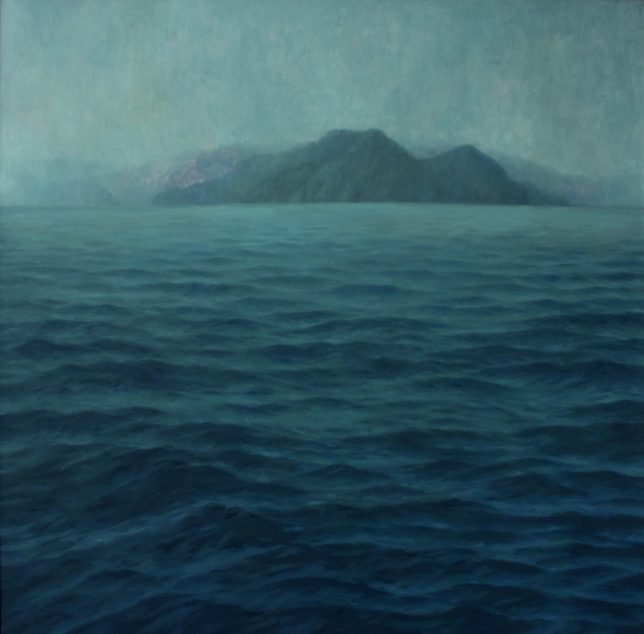
    Originally from London and based in Cape Town, South Africa, artist Jake Aikman enjoys working on extreme and dramatic landscapes, from dark blue oceans to dark green forests and distant lonely mountains.

    The focus in most of his pieces is not so much the scene but the setting — especially at larger scales and absent figures, as in this piece, they create a tone or mood rather than telling a particular story. In short: they leave a lot to the imagination, like a blank canvass providing a time and place but no characters.

    This particular piece is one of his largest to date and was produced for Art United Us. Spanning the entire side of a structure, it was completed in just over a week.

    Share on Facebook


    [ By WebUrbanist in Art & Street Art & Graffiti. ]

    [ WebUrbanist | Archives | Galleries | Privacy | TOS ]


    WebUrbanist

  • DxOMark: Samsung Galaxy Note 8 ties iPhone 8 Plus as best ever smartphone camera

    News that Apple’s new iPhone 8 Plus had suddenly taken the top spot on DxOMark’s smartphone camera rankings was met with the expected range of praise and critique—everything from “of course, iPhone’s are awesome cameras” to “how much did Apple pay DxOMark for this result!?” But it turns out the iPhone 8 Plus’ ranking as the best smartphone camera DxOMark had ever tested didn’t last very long.

    As of today, the iPhone 8 Plus has been tied by the Samsung Galaxy Note 8, which significantly bested its Photo score and only tied the iPhone 8 Plus overall because Apple’s smartphone does so much better in the video category.

    The full breakdown of the results can be found on DxOMark, but this comparison between the two phones’ scores speaks volumes:

    The Photo categories where the Note 8 really outperformed the iPhone include Autofocus (94 vs 74) and Zoom, where the Note 8 got a score of 66 to the iPhone’s 51. DxOMark’s conclusion is appropriately praiseworthy:

    When all the tests are verified, the scores calculated, and the perceptual analyses discussed, the Samsung Galaxy Note 8 comes out as an outstanding choice for the smartphone photography enthusiast, matching the top overall score of 94 points of the iPhone 8 Plus. Dual-cam setups offering a second telephoto zoom for portraits are a real step forward for high-end smartphone photography, and the implementation on the Note 8 is exceptional, making it the best smartphone for zoom shots we’ve tested.

    Read DxO’s full thoughts and see all of their sample and test photos at this link. And if you’re an Android user in need of some serious photography power from you smartphone, the Galaxy Note 8 should definitely make it to the top of your list.

    Articles: Digital Photography Review (dpreview.com)
  • Sharp and wide: Sony FE 12-24mm F4 G gallery updated

    The Sony FE 12-24mm F4 G was released earlier this year alongside the pricier FE 16-35mm F2.8 GM. While it may not be as fast as it’s GM ‘big brother,’ the 12-24mm F4 is smaller, lighter, and wider, offering a rectilinear 12mm field of view. It’s also impressively sharp.

    We’ve had some more time, collectively as a staff, to shoot with this ultra wide zoom since initially publishing our sample gallery in the summer. Take a look through and see how it holds up in the hands of several photographers and in a variety of shooting scenarios.

    See our updated Sony FE 12-24mm F4 G sample gallery

    $ (document).ready(function() { SampleGalleryStripV2({“galleryId”:”9004820076″}) })

    Sample photoSample photoSample photoSample photoSample photo

    Articles: Digital Photography Review (dpreview.com)

  • Congress is considering a copyright small claims bill you should know about

    Photo by Dennis Skley

    A bill has reached Congress that aims to establish a cheaper route for those seeking settlement of small claims in copyright infringement cases. Put forward by a bypartisan group of representatives, the Copyright Alternative in Small Claims Enforcement Act of 2017 (CASE) intends to provide a more viable alternative to federal courts for those making relatively small claims in cases where the cost of pursuing compensation deters individual photographers and small to medium sized business owners.

    The current system can cost professional photographers wishing to file a claim for unauthorized use of an image almost a year’s earnings, according to a report by Copyright Defence, and copyright lawyers are unwilling to take on a case in which damages would be less than $ 30,000.

    Copyright Defence says that the average claim made by photographers is $ 3,000 or less, making the pursuit of offenders impractical and letting infringers off scot-free.

    The new bill proposes that a small-claims style panel be set up within the Copyright office that would allow these low-value, high-volume disputes to be heard. Such an introduction would benefit not only photographers and artists, but also musicians, film makers and anyone who produces creative work.

    Bought to Congress by Hakeem Jeffries of the Democrat Party and Tom Marino, a Republican, the bill is supported by the American Society of Media Photographers, American Photographic Artists, National Press Photographers Association, Professional Photographers of America, North American Nature Photography Association, among others. The bill was first proposed by a collection of visual artists groups in February 2016.

    Press release from Hakeem Jeffries:

    Reps. Jeffries, Marino Lead Bipartisan Effort to Help Musicians and Artists Protect Their Creative Work

    WASHINGTON, DC – A bipartisan solution to help artists, photographers, filmmakers, musicians, songwriters, authors and other creators protect their life’s work from unauthorized reproduction has been introduced today by two key members of the House Judiciary Committee — U.S. Representative Hakeem Jeffries (NY-08), a Democrat, and U.S. Representative Tom Marino (PA-10), a Republican.

    The Copyright Alternative in Small-Claims Enforcement (CASE) Act of 2017 will create a Copyright Claims Board (“CCB”) in order to provide a simple, quick and less expensive forum for copyright owners to enforce their intellectual property. The majority of the copyright owners that are affected by piracy and theft are independent creators with small copyright infringement claims. The CCB will establish an alternative forum to the Federal District Court for copyright owners to protect their work from infringement.
    A broad coalition of legislators have co-sponsored the bill, including Democratic Congresswoman Judy Chu (CA-33), Republican Congressman Doug Collins (GA-9), Democratic Congressman Ted Lieu (CA-33) and Republican Congressman Lamar Smith (TX-21).

    Rep. Jeffries said: “The establishment of the Copyright Claims Board is critical for the creative middle class who deserve to benefit from the fruits of their labor. Copyright enforcement is essential to ensure that these artists, writers, musicians and other creators are able to commercialize their creative work in order to earn a livelihood. The CASE Act will enable creators to enforce copyright protected content in a fair, timely and affordable manner. This legislation is a strong step in the right direction.”

    Representative Marino said: “Creators, solo entrepreneurs, photographers, and artists often struggle to enforce their copyright in a timely and cost efficient manner. This can hinder creativity and prevent these professionals from being able to sustain a profitable livelihood. The CASE Act provides a boost to copyright holders and allows a forum for timely resolutions. This is a positive step in the right direction.”

    Representative Collins said: “America’s economic leadership depends on its commitment to protecting intellectual property, and I’m proud to work with my friend Congressman Hakeem Jeffries to provide another tool to make this possible. A copyright small claims system would offer small creators a simple, effective forum for defending their property rights against infringement. We’re working to modernize the Copyright Office to meet the needs of today and tomorrow—including music licensing structures—and this bill is a critical step in strengthening intellectual property protections for creators who find themselves disadvantaged by existing policies.”

    Representative Lieu said: “More than 2 million hardworking artists in the United States rely on the U.S. Copyright Office to protect their livelihoods. For too long, our legal system skewed in favor of low-volume, high-value industries. But for many independent artists, whose claims of infringement often total a few thousand dollars, it is far too expensive to sue in federal court – essentially forcing creators to forfeit their rights. The Small Claims Board is an important step toward ensuring that digital photographers, graphic artists, illustrators, and others have a way to resolve disputes quickly and affordably. I commend my colleagues on both sides of the aisle for supporting this crucial effort.”

    Representative Smith said: “Our founders enshrined copyright protection for creators’ works in the Constitution. The Copyright Alternative in Small-Claims Enforcement Act offers creators an efficient and cost-effective process to protect their creations. I look forward to working with the authors of the bill to protect the intellectual property of all innovators.”

    Representative Chu said: “Creators like artists, photographers, and songwriters contribute over a trillion dollars to our economy each year. But intellectual property theft makes it difficult for creators to earn a living. This is especially true for small and individual creators who depend on licensing and copyright, but lack the resources to adequately challenge copyright infringement claims in federal court. I’m proud to support the CASE Act because it proposes a common sense solution that will make it easier for creators to protect their intellectual property and continue to share their works and grow our economy.”

    Participation in the CCB will be voluntary, and respondents will have the ability to opt out. The CCB will be housed within the U.S. Copyright Office, and its jurisdiction limited to civil copyright cases with a cap of $ 30,000 in damages. A panel of three Copyright Claims Officers will be designated to adjudicate and settle copyright claims. The simplified proceedings do not require the parties to appear in-person and will permit them to proceed pro se – i.e., without an attorney.

    The bill is supported by the Authors Guild, American Society of Media Photographers, American Photographic Artists, National Press Photographers Association, Professional Photographers of America, North American Nature Photography Association, Songwriters Guild of America, Nashville Songwriters Association International, National Music Publishers Association, Digital Media Licensing Association, Graphic Artists Guild, Creative Future, and the Copyright Alliance.

    Articles: Digital Photography Review (dpreview.com)