Month: October 2017

  • Huge Color-Coded ‘LEGO House’ Designed by BIG Now Open in Denmark

    [ By WebUrbanist in Architecture & Offices & Commercial. ]

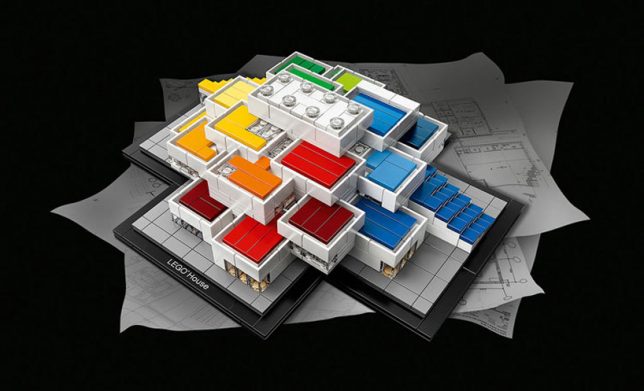
    Designed by architects from BIG, the new LEGO House is itself huge: a 130,000-square-foot ‘experience center’ welcoming people of all ages to play with and appreciate this ubiquitous toy.

    “It has been a dream for me for many years to create a place that will give our visitors the ultimate LEGO experience,” said former president and CEO of LEGO, Kjeld Kirk Kristiansen. A mesmerizing set of drone videos below show the building under construction and upon completion.

    “With LEGO House, we celebrate creativity and the strength of learning through play. When they play, children learn the basic skills that they need, such as creativity, collaboration and problem-solving abilities.”

    Located on the company’s main campus in Billund, Denmark, the building looks like it was made of 21 supersized blocks. Inside, differently colored zones denote different functions — red areas are for creative skills, blue for cognitive skills, green for social skills and yellow for emotional skills.

    The venue includes paid attractions as well as experiences that are free and open to the public. Approximately 250,000 guests are expected annually, with around 2,500 visitors on peak days. Fans of their visit can take home something tangible from the experience as well:

    The LEGO House opened its doors to the public in late September, coinciding with the release of a 744-piece kit of the building itself.

    Share on Facebook


    [ By WebUrbanist in Architecture & Offices & Commercial. ]

    [ WebUrbanist | Archives | Galleries | Privacy | TOS ]


    WebUrbanist

  • Yashica launches Y35 digiFilm camera that uses digital ‘film’ cartriges

    After a number of teasers over the past few weeks, Yashica has finally launched its ‘unprecedented camera’ on Kickstarter: meet the Y35 digiFilm camera. The description page does not offer an awful lot of technical detail, but it looks like the Y35 is relatively simple digital camera in a retro-style body that comes with a unique feature: interchangeable digital ‘film’ cartridges that Yashica calls digiFilm.

    The camera doesn’t actually save any images on the digiFilm (it has an SD-card slot for that) but instead ISO, color and digital filter settings are controlled by inserting a digiFilm cartridges. How’s that for a gimmick?

    To start with, Y35 users will be able to choose from an ISO1600 High Speed digiFilm for grainy images and shooting fast moving subjects, an ISO 400 Black & White digiFilm, an ISO 200 Ultra Fine digiFilm, and a ISO 200 “6 x 6” cartridge that makes the camera capture square images.

    Given most settings are adjusted by inserting a digiFilm cartridge, the camera body itself doesn’t offer a great deal of control. There’s only a “winder” to set the camera up for the next capture, and a shutter speed dial. The rest of the specifications are in line with quite basic digital cameras: images are captured on a 1/3.2-inch 14MP sensor and the lens comes with a 35mm equivalent focal length and F2.8 aperture.

    You can reserve an early bird Yashica Y35 digiFilm special for $ 124 on the Kickstarter page. This will get you the Yashica Y35 camera and the ISO 200 Ultra Fine digiFilm, plus a Yashica digiFilm post card. The package for $ 142 includes an additional digiFilm of your choice. Delivery is planned for April 2018, assuming the camera gets funded.

    Yashica Y35 Specifications:

    • 1/3.2-inch 14MP CMOS sensor
    • Built-in viewfinder
    • F2.8 aperture
    • 35mm equivalent focal length
    • 1m minimum focusing distance
    • 5 selectable steps shutter speeds 1s, 1/30s, 1/60s, 1/250s, 1/500s
    • SD card storage (wifi card compatible)
    • Micro USB connectivity for data transfers
    • Tripod mount
    • Power supply via 2 x AA batteries

    Articles: Digital Photography Review (dpreview.com)

  • How to Make Natural-Looking HDR Images with Aurora HDR 2018

    Aurora HDR 2018 is tremendously easy, fun software by Macphun, designed for processing HDR (High Dynamic Range) images. If you’ve been following popular contemporary photography for a while, you’ll know that dramatic HDR is no longer in style. It fell out of photography fashion as quickly as wine-lovers stopped drinking merlot. Knowing how to create natural-looking HDR images is a very practical tool to have in your wheelhouse though, so let’s take a look at how to do that with Aurora.

    How to Make Natural-Looking HDR Images with Aurora HDR 2018 - ice cave

    Realistic & Detailed Aurora HDR 2018 preset.

    When do you need HDR?

    If you’re shooting a location where there are very bright tones, along with very dark shadows, your camera probably won’t be capable of capturing exactly what your eye sees. If you bracket your images as you shoot, you can capture the entire dynamic range of the scene – every tone from very bright to very dark.

    What is bracketing?

    Bracketing means you shoot multiple images of the same thing, changing the exposure of each individual image. Most photographers choose to shoot between three and five images, though as few as two will work. Sometimes a situation requires seven or more. By bracketing your exposures this way, you generate the raw materials you need to use in Aurora HDR to create a final image that records all of the bright and dark tones your eyes saw.

    How to Make Natural-Looking HDR Images with Aurora HDR 2018

    My three bracketed images inside Lightroom.

    Setting your camera up to bracket

    First, attach your camera to your tripod, compose your scene and fine-tune your focus. Now, configure your bracketing. You can set the auto-bracketing feature (AEB) on your camera to shoot multiple images, approximately one to two stops of light apart, depending on the situation. The first image will be very light, or overexposed. The second image will be correctly exposed – or what your camera interprets as correct. The third image will be very dark or underexposed. Many photographers find three images to be effective, especially when they’re striving for a natural-looking HDR look but you can shoot as many as you think you’ll need.

    How to Make Natural-Looking HDR Images with Aurora HDR 2018 - back of camera AEB on

    Bracketing settings on a Canon camera.

    NOTE: If you don’t have a camera with an auto-bracketing feature, don’t worry, you can bracket manually too. Create multiple exposures for each scene using your exposure compensation dial to increase and then decrease your exposure (make sure to use Aperture Priority and only change the shutter speed as altering the aperture will result in images that do not blend properly). It takes a little more time and patience while you are shooting but it’s worth trying if your camera doesn’t have an auto-bracketing feature.

    How do you process the brackets?

    After your shoot, upload your images to your computer just like you normally would. Aurora HDR runs as stand-alone software but if you’re a Lightroom user, it can be installed as a plug-in too.

    Starting in Aurora HDR 2018

    Double click the Aurora icon to open the software. Click the Open Image button.

    Choose the folder where your images live and select them. Click Open.

    How to Make Natural-Looking HDR Images with Aurora HDR 2018 - select files

    The Aurora dialog box appears with your selected images. Click the Create HDR button.

    Note: Tick off the “Alignment” checkbox if you think there was any movement of the camera between shots. The program will scan the images and attempt to align them. You can also click the little gear icon for additional settings like removing ghosting (subjects that moved from image to image).

    How to Make Natural-Looking HDR Images with Aurora HDR 2018

    Starting in Lightroom

    Go to the folder containing the images you want to process in HDR. Click to select them. Right-click to bring up the menu. Select Export > Aurora HDR 2018 > Open Original Images. The Aurora dialog box appears with your selected images. Click the Create HDR button.

    How to Make Natural-Looking HDR Images with Aurora HDR 2018

    Note: If you made adjustments to your images in Lightroom, such as lens corrections, cropping, straightening, spot removal or noise reduction, instead of selecting Open Original Images, choose Use .TIFF with Lightroom Adjusters.

    Aurora HDR’s Realistic Presets

    Part of why I opened this article with the statement that Aurora HDR 2018 is both easy and fun is because of its presets. Along the lower part of the screen, just above the filmstrip, you’ll see a menu called Categories. Click on it to bring up the preset menu, then click on Realistic HDR.

    How to Make Natural-Looking HDR Images with Aurora HDR 2018

    My four favorite natural-looking Aurora presets live in this folder:

    • Realistic & Detailed
    • Realistic & Balanced
    • Realistic Bright
    • Realistic Neutral

    These presets make my images look and feel the way the ice cave looked and felt when I was there. To me, recreating an image faithful to that memory is what natural-looking realistic HDR is all about.

    How to Make Natural-Looking HDR Images with Aurora HDR 2018

    Choose your favorite

    The best way to choose your favorite Realistic HDR preset is to scroll all the way to the left on the filmstrip and then work your way right, clicking each one. As you select each preset, the larger image above the filmstrip will show you a more detailed preview of how each preset affects the look of your image. Once you find your favorite, it might look so perfect that all you might need to do is save it. Or, you might want to personalize the preset before you save. Here are a few tips on how to do that.

    Modifying the Opacity

    Let’s say that you love the Realistic & Detailed preset but it’s just a touch too much. The first – and easiest – way to modify its effect is to reduce the overall opacity of the preset. To do that, click on that preset in the filmstrip. Slowly shift the slider to the left, reducing the opacity, and lowering the effect (I often find that between 75-80 is the perfect amount). Save the image at this point if you are happy with it.

    How to Make Natural-Looking HDR Images with Aurora HDR 2018

    Another method of reducing opacity is layer-based. Look to the upper right corner of the Aurora HDR develop panel, just below the histogram. See where it says Layers? The Opacity adjustment slider for that layer is just below that. You can increase it or decrease it (each layer) there as well.

    Fine-tuning the preset

    If you’d like to use your chosen preset as a starting point, you can easily modify it. On the right-hand panel of the screen, in the editing panel, just below the Layers section, you’ll see a section called Filters. The first one is called HDR Basic which adds clarity, contrast, vibrance, and a bit of saturation. I’m calling this adjustment out specifically because it does so much to your image.

    Just for kicks, push the HDR Enhance slider all the way to the right, so that it’s at 100. Your image is now the opposite of what most people consider natural-looking HDR. Next, adjust the slider to zero to get a feel for what this slider does to your image.

    How to Make Natural-Looking HDR Images with Aurora HDR 2018

    Realistic & Detailed Aurora preset, with HDR Enhance set to 100. Compare this to the lead image of the same ice cave, with the HDR Enhance set at 50. This image is quite a bit more contrasty, with sharper edges throughout.

    Most of the Realistic presets are set below 50 for HDR Enhance. If you want to stay in a natural-looking range but your image needs a touch more pizazz, slowly move the HDR Enhance slider to the right until you reach the level that feels right to you.

    Additional fine-tuning options

    As you work your way through Aurora’s Filters, you’ll see additional options like Color, HDR Structure and Glow. The preset you’ve chosen dictates the setting of each Filter. But again, you can shift each slider individually to give your image more, or less, pop.

    How to Make Natural-Looking HDR Images with Aurora HDR 2018

    This HDR image was made from three exposures using the Realistic & Bright preset, set at an opacity of 80, with no other changes made.

    To learn the effects of each tool, I suggest moving the sliders all the way to the right, so that the effect is at 100 and then doing the opposite, so the effect is at zero. Nine times out of ten I think the Aurora HDR design gurus have chosen the right level, and I leave the preset at its original amount. If you do choose to make a change just remember that if your goal is natural-looking HDR, a little Structure or Saturation can make a big shift in the appearance of your image.

    Glow

    Glow is an interesting option, giving images an almost Orton-like effect. While it’s a popular style option for many photographers right now, it’s not what I usually call natural-looking. In all four of my favorites, Realistic HDR presets, the Glow setting is set to 0. For ice cave images, 0 is the perfect amount but for some subjects, like this barn, a touch of Glow softened the natural look of this HDR image and made it feel more inviting.

    How to Make Natural-Looking HDR Images with Aurora HDR 2018

    This HDR image was made from three exposures using the Realistic & Bright preset, set at an opacity of 100, with Glow set at 15. Both are very small changes but compare this image to the one above. This one has a little more of a bright, dreamy feel while still looking natural.

    While I probably sound like a broken record at this point, remember to move the slider just a touch to the right if you want your HDR image to have that natural, I-just-stumbled-on-this-gorgeous-vista-and-took-this-amazing-picture sort of look to it.

    Top and Bottom Adjustment

    The Top and Bottom Adjustment Filter is a “selective adjustment” meaning that, unlike global adjustments, it only affects parts of your image. If you have an image where the sky reads overexposed and is much brighter than the foreground, or conversely, where the foreground is dark and underexposed, adjust the image using this tool.

    How to Make Natural-Looking HDR Images with Aurora HDR 2018 - top and bottom adjustments

    This HDR image was made with the same three exposures using the Realistic & Balanced preset, at 80% opacity, plus a Top Adjustment of -5 Exposure, +5 Contrast and +15 Vibrance. I added a Bottom Adjustment of +10 Exposure and +5 Warmth. Of the three final HDR images, this one feels the most natural and faithful to the barn itself.

    For this final version of the barn, after applying the Realistic & Balanced preset, at 80% opacity, I ultimately decided that the sky was a bit too light and the barn was a little too dark. I added a Top Adjustment of -5 Exposure, +5 Contrast, and +15 Vibrance. I also added a Bottom Adjustment of +10 Exposure and +5 Warmth. These adjustments help to enhance the sky and even out the overall exposure of the image.

    Of the three, this version is my favorite. Which is yours?

    Saving your image

    Once you’ve completed all of your adjustments, it’s time to save your image. If you started in Aurora and want to create a JPEG or TIFF, select File > Export and then select the correct folder and rename the file as appropriate for your workflow.

    If you want to create a native Aurora .mpaur2 HDR file, select File > Save and then select the correct folder and rename the file. This format saves the history (and any layers) as well and allows you to continue to go back in and make changes to your image.

    How to Make Natural-Looking HDR Images with Aurora HDR 2018

    Saving your image to your Lightroom Catalog

    If you started in Lightroom, it’s a snap to save your image. After you finish processing your image in Aurora HDR, click the Apply button in the upper right corner of the interface. This saves and also catalogs your image in Lightroom. The new file name will end in AuroraHDR2018-edit.tiff.

    How to Make Natural-Looking HDR Images with Aurora HDR 2018

    Your Turn

    Hopefully, you’ve been following along and processed a few images in Aurora as you were reading this article. Now take a minute to upload your best natural-looking HDR version. Share with the dPS community about how you created it using Aurora as well as any other tips or tricks you’ve discovered.

    Disclaimer: Macphun is a dPS advertising partner.

    The post How to Make Natural-Looking HDR Images with Aurora HDR 2018 by Lara Joy Brynildssen appeared first on Digital Photography School.


    Digital Photography School

  • EyeEm now lets you collect multiple model releases at once over text message

    $ (document).ready(function() { SampleGalleryV2({“containerId”:”embeddedSampleGallery_9500155877″,”galleryId”:”9500155877″,”isEmbeddedWidget”:true,”standalone”:false,”selectedImageIndex”:0,”startInCommentsView”:false,”isMobile”:false}) });

    If you license images of people, you know how much of a pain it can be to gather the appropriate model releases. For every photo, you need a new release, even if you’re uploading 20 photos of the same person from the same photo shoot. Well, no longer. EyeEm just introduced a multi-release feature that lets you handle multiple releases at once; what’s more, you can do it all over text message.

    The feature is very straightforward, as EyeEm shows in this short demo video:

    It’s a 5-step process.

    • Step 1: Log on to EyeEm on the web, open the notifications pane, and go to To Dos.
    • Step 2: Click “Releases for multiple photos”
    • Step 3: Select all photos that show the same person
    • Step 4: Click next and fill out the model’s name
    • Step 5: Click next and share the link with your model through your favorite messaging app—SMS, WhatsApp, FB Messenger, and more are all available.

    That’s it. The model can select only the photos they want to release, and once they’ve signed you will receive a confirmation email.

    This might seem like a small feature, but if you’re a prolific stock photographer, generating multiple releases this easily removes a serious pain point. Plus, these releases can be used on other platforms as well, including Getty, Adobe, Alamy, and others.

    To learn more about the feature or give the EyeEm app a go for yourself, head over to the EyeEm Blog by clicking here.

    Articles: Digital Photography Review (dpreview.com)

  • Review of the Fujinon XF23mm F2 WR Lens

    In this review, I’ll take a look at the Fujinon XF23mm F2 WR Lens. If you shoot Fuji and have considered this one – read on to see why I rate it top marks!

    Review of the Fujinon XF23mm F2 WR Lens

    The Fujinon 23mm f2 lens

    First look

    With the Fuji XF 23mm F2 WR lens now being offered as a kit with the X-Pro2, and the new X-E3, it’s probably a good time to look at this little wonder if you shoot Fuji. This weather-sealed prime lens is 35mm equivalent field of view in full frame terms and makes a perfect street and general photography lens.

    The fast f/2.0 aperture is a stop slower than it’s f/1.4 predecessor, but it’s leaps and bounds faster in the focus department. It also has a much quieter motor, which is important for video and it’s weather resistant.

    Quiet motor great for video

    As the Fuji X-T2 body has 4k video, and with a firmware update to add 4K video to the X-Pro2 due, this is an essential feature for current users looking to do video. Personally, I’m shooting a lot more video of late, both for my YouTube channel and in the creation of shorts in general, so this feature made the lens enticing for me. The original Fuji X camera is, of course, the X100, which has a built-in 23mm f2 lens. The new 23mm lens is a better design though, making it a great option instead of getting an X100F.

    Review of the Fujinon XF23mm F2 WR Lens

    For this article, I’m including some “tourist in my own town” style shots as I’ve not had this lens long enough to travel with it – yet!

    Review of the Fujinon XF23mm F2 WR Lens

    The f/2.0 Trinity

    The 23mm is the widest currently in this range, which includes the XF35mm F2 and the XF50mm F2. In the community, they’ve been nicknamed the Fujicrons, as a kind of homage to the Summicron range of f/2 lenses from Leica. This weather sealed range offers great quality lenses in small, light packages, with quiet motors suited to video work as well as stills.

    They focus faster than the higher range primes in the Fuji range, such as the 23mm f/1.4, 35mm f/1.4, and the 56mm f/1.2. (It’s not fair to directly compare the 50mm and 56mm as they’re not quite the same, though they are close enough for this purpose). The F2 lenses are also really well priced; You can get two of them for the price of one of the faster primes.

    Review of the Fujinon XF23mm F2 WR Lens

    Specs of the XF23mm F2

    The XF23mm F2 WR lens has 10 elements in six groups which includes two aspherical elements. The original f/1.4 lens has only one. These elements increase the sharpness, a big plus for this small lens. The housing is metal, making this a robust lens in keeping with most of the Fuji range.

    The aperture ring runs in 1/3 EV steps and uses nine blades internally which leads to a smoother bokeh. The minimum focusing distance is 22cm (about 9″). The lens comes in at a sprightly 180 grams (0.4 lbs) too. Good news if you’re looking to shoot video on a gimbal or flying on budget airlines with low weight baggage limits! Fi, ally the filter size is 43mm.

    Review of the Fujinon XF23mm F2 WR Lens

    Comparisons

    The first lens people want this lens compared with is the Fuji 23mm f/1.4, because that’s usually the choice they’re trying to make. The XF23mm f/2.0 is a stop slower than then the 23mm f/1.4 but is faster to focus. The additional element makes it sharp, but the original 23mm is quite a sharp lens anyway. Weightwise the f/2.0 is 180g (0.4 lbs) versus the 300g (0.67 lbs) of the f/1.4.

    For close focusing the f/2.0 has a minimum focus distance of 22cm (9″) compared to the 28cm (11″) of the f/1.4. In terms of cost, the f/2.0 is half the price of the f/1.4 at $ 449 versus $ 899. The real question to ask yourself is, does the additional stop of light justify spending twice the money? Only you can decide that.

    Review of the Fujinon XF23mm F2 WR Lens

    The f/2 lens has a slightly wilder field of view than the f/1.4 below.

    Review of the Fujinon XF23mm F2 WR Lens

    For street work, a lot of people choose the XF27mm f/2.8 pancake lens. This makes your Fuji very pocketable. The lens doesn’t protrude much and is really unobtrusive. It’s the smallest lens Fuji makes. Yes, it is cute. The XF23 is much longer (52mm versus 23mm), but isn’t too obtrusive. Again it’s a faster lens and wider. Both are the same price, so it’s a question of speed and depth in this choice. The 23mm is the superior lens, but if you must have a pancake, the 27mm is the only choice really.

    Using the XF23mm F2 Lens

    Review of the Fujinon XF23mm F2 WR Lens

    I’ve found 23mm to be a great focal length to have with you. In fact, it’s probably the most versatile prime lens you could travel with. There’s no issue with general streets scenes, or even general landscapes. It’s great for shots including people in the scene. While it’s not a typical portrait focal length, it looks great for 3/4 length shots in landscape mode (a vertical composition) or portrait mode at a push.

    Review of the Fujinon XF23mm F2 WR Lens

    Even with just f/2, you still have the opportunity to shoot handheld evening shots while traveling.

    Photos from the lens have nice contrast and are generally sharp, even wide open. The lens focuses quickly, even in low light and I can’t say I’ve particularly noticed many misfires. Couple it with the XF56mm f/1.2 or even the XF50mm f/2.0, and you would have a great two-lens kit that covers most shooting situations.

    Review of the Fujinon XF23mm F2 WR Lens

    A typical low light situation where fast primes can help.

    Pros

    • Lightweight
    • Fast Focus
    • Quiet operation
    • One of Fuji’s less expensive lenses

    Cons

    • Not the fastest aperture at this focal length

    Verdict

    If you absolutely need a faster aperture, don’t get the Fujinon XF23mm F2 WR lens. Otherwise it’s utterly fantastic at what it does. I voted with my cash and got this over the 23mm f/1.4 and it hasn’t disappointed.


    The post Review of the Fujinon XF23mm F2 WR Lens by Sean McCormack appeared first on Digital Photography School.


    Digital Photography School

  • Adobe just made it way easier to import Lightroom collections into Adobe Portfolio

    Adobe has announced that Portfolio, its online website publishing service for CC customers, has a new integration with Lightroom that lets users import their collections and add photos to their website with next-to-no effort.

    As of this new update, a users’ Lightroom content will simply show up within Portfolio’s ‘Manage Content’ section under the ‘Integrations’ tab. From there, users are able to choose any of their Lightroom Collections to import to a Page on Portfolio. When added to the website, Adobe says the full Collection appears as a new Page with a photo grid, which you can then customize by removing images and/or rearranging the grid. Other elements, such as text and videos, can also be added to the page.
    Finally, Adobe also says that Portfolio will now automatically import new Behance projects to new Pages within a chosen gallery—assuming the user chooses a default import gallery and has their Adobe ID associated with a Behance account.

    Imported content is tagged with either a Lightroom or Behance badge in the Manage Content section to show where it was imported from.

    To learn more about these new features or give them a try for yourself, head over to the Adobe Creative Cloud blog or download the latest version of Portfolio and give Lightroom import a shot for yourself.

    Articles: Digital Photography Review (dpreview.com)

  • Metabones’ Devil’s Speed Booster turns Pentax Q cameras into ‘monster low-light machines’

    Metabones—the company known for its lens adapters and focal reducing Speed Boosters—has released a new Speed Booster that ought to have Pentax Q users salivating a bit. It’s called the Q666 0.5x ‘Devils Speed Booster’, because it allows Pentax Q owners to mount Nikon F and G lenses and produce a working aperture of f/0.666 when a lens with an f/1.2 aperture is used wide open.

    The booster has a magnification of 0.5x and produces a 2.8x crop factor when used with the Q and Q10, and a 2.3x factor with the Q7 and Q-S1.

    Metabones has used six elements in four groups inside this new Speed Booster, and has incorporated what it calls a ‘long-throw clickless aperture ring’ for G lenses that has eight marked positions. The adapter is compatible with all Nikkor and Nikon-mount lenses except the Nikkor 2.1cm f/4 and the 20mm f/2.8 AI-S.

    The idea for the adapter was launched in August, but this is the first version to emerge. Metabones promises one in a Pentax K mount as well.

    The Metabones Nikon G to Pentax Q Speed Booster Q666 0.50x costs $ 490. For more information, visit the Metabones website.

    Press Release

    Metabones Devil’s Speed Booster Q666 0.50x

    Caldwell Photographic Inc. and Metabones® is pleased to announce the Speed Booster Q666, a.k.a. “The Devil’s Speed Booster”, exclusively for Pentax Q series cameras. With its 0.5x magnification and world-record f/0.666 maximum speed it is crazy wicked fast. So make a deal with the devil today and turn your Pentax Q with its back-illuminated sensor into a monster low-light machine unlike anything ever seen in photography. Attach an f/1.2 lens and stop down a little to see how Stanley Kubrick made do with f/0.7 for filming those famous candle-lit scenes in “Barry Lyndon”. Or open up all the way to f/0.666 and probe the darkness in a way that no photographer has ever been able to do until now.

    With an advanced 6-element optical design, the Q666 packs lots of optical horsepower in a small package. Sharpness is excellent even at f/0.666, and is downright superb if you stop down to f/1.0. Distortion is very low, with a maximum value of, naturally, 0.666%. And thanks to the back-illuminated sensor used in Pentax Q cameras, the full f/0.666 maximum aperture can be utilized with minimal pixel vignetting effects commonly seen in other cameras used with high-speed lenses.

    Figures 2 through 4 below show MTF at 10, 20, and 40 lp/mm as a function of image height for output apertures of f/0.666, f/1.0, and f/2.01. At f/0.666 (i.e., with an f/1.2 master lens) the MTF is high near the axis, and only falls off gradually toward the corners. As the aperture is reduced to f/1.0 and then f/2.0 the MTF becomes very high and more even across the field. Figure 5 shows that there is less than 1 stop of corner illumination falloff even at f/0.666. And guess what – there is no vignetting at all after the output aperture reaches f/1.82. Figure 6 shows that rectilinear distortion added by the Speed Booster Q666 is negligible at less than 0.666%.

    Like all Metabones Speed Boosters, the Speed Booster Q666 is optimized to fully account for the camera’s filter stack located near the sensor surface. This is especially critical at the record-setting f/0.666 aperture now possible with the Q666. As a result, an enormous range of optics, from vintage film lenses to the latest digital designs, will function flawlessly when adapted to any Pentax Q camera. Planned lens mounts for the Speed Booster Q666 include a Pentax-K version and a Nikon F/G version with the most advanced Nikon G aperture adjustment mechanism in the industry.

    The Speed Booster Q666 will be available starting in Aug 2017 from the Metabones website (http://www.metabones.com/products/details/MB_SPNFG-Q-BM1) and its worldwide dealer network for US $ 489.00, plus shipping and applicable taxes and duties.

    Articles: Digital Photography Review (dpreview.com)

  • Samyang unveils 35mm F1.4 autofocus lens for Sony full-frame mirrorless

    Samyang has officially unveiled its fourth autofocus lens for Sony FE mount cameras: the long-rumored Samyang AF 35mm F1.4 FE. The new 35mm joins Samyang’s three other AF lenses—the AF 14mm f/2.8 FE, AF 35mm f/2.8 FE and AF 50mm f/1.4 FE—and offers Sony full-frame mirrorless shooters yet another affordable (and fast) prime to shoot with.

    As with all previous Samyang autofocus FE lenses, the company claims that they offer exceptional image quality across the whole image field.

    This particular lens features 11 lens elements in 9 groups, including 2 aspherical lenses and 2 high-refractive lenses. At its core is a 9 (circular) blade aperture that opens up all the way to F1.4, and a Linear Super Sonic Motor promises “fast, precise and quiet autofocus performance.”

    The lens is scheduled to ship in November at a suggested retail price of £600 and €650, which should put US pricing around $ 750. To learn more about the new lens, head over to the Samyang website.

    Press Release

    Samyang Announces the Fourth Autofocus Lens – AF 35mm F1.4 FE

    October 10th, 2017, Seoul, South Korea – Global optics brand, Samyang Optics (http://www.samyanglensglobal.com) is pleased to announce the release of their fourth autofocus lens: AF 35mm F1.4 FE. The bright F1.4 aperture and absolute resolution turn every moment into artwork. This lens now expands Samyang’s autofocus lens line-up to four which includes three existing autofocus lenses, AF 14mm F2.8 FE, AF 35mm F2.8 FE and AF 50mm F1.4 FE.

    Aim High, Create Artwork

    This new AF 35mm F1.4 FE works in harmony with full frame mirrorless cameras in Sony E mount such as Sony ?7 or ?9 series. It is designed to appeal to enthusiasts and professionals who are ready to take the next step up in photography. It is the excellent companion to create artworks from everyday moments, while the tiny AF 35mm F2.8 FE released in June of this year is the perfect partner for everyday photographers.

    High Performance beyond Expectation

    Absolute resolution across the entire image field is the key feature of Samyang AF 35mm F1.4 FE. The lens includes 11 elements in 9 groups and features 2 aspherical lenses and 2 high-refractive lenses, plus Ultra Multi Coating. The optical design minimises various aberrations and unnecessary light dispersion to deliver outstanding resolution. Fast, precise and quiet autofocus performance meets Samyang’s exceptional optical technology to capture any moments clearly. The bright F1.4 secures fast shutter speed and creates shallow depth of focus images in wide-standard angle of view. The new 35mm F1.4 lens is ideal for professional photography including low-light events, landscapes and portraits with expressive characteristics.

    Available from November 2017

    Samyang AF 35mm F1.4 FE, a lens for photographers aiming high in photography, will be available globally from November and will carry a suggested retail price of EUR 649.

    To celebrate launching, Samyang Optics will hold various consumer events on Facebook (http://www.facebook.com/samyanglensglobal) and Instagram (http://www.instagram.com/samyanglensglobal). For more information on product, visit Samyang Optics official website (http://www.samyanglensglobal.com/).

    Articles: Digital Photography Review (dpreview.com)

  • Sony Cyber-shot RX10 IV sample gallery updated

    Where better to take a 24-600mm equivalent superzoom than on a trip to the mountains? With a zoom range ideal for travel, our Sony RX10 IV review unit headed north to Whistler, BC almost as soon as it arrived. Take a look at our expanded sample gallery.

    See our updated Sony RX10 IV gallery

    $ (document).ready(function() { SampleGalleryStripV2({“galleryId”:”1816870055″}) })

    Sample photoSample photoSample photoSample photoSample photo

    Articles: Digital Photography Review (dpreview.com)

  • Doing Our Dirty Work: Crows Trained to Clean Up Cigarette Butts

    [ By SA Rogers in Gadgets & Geekery & Technology. ]

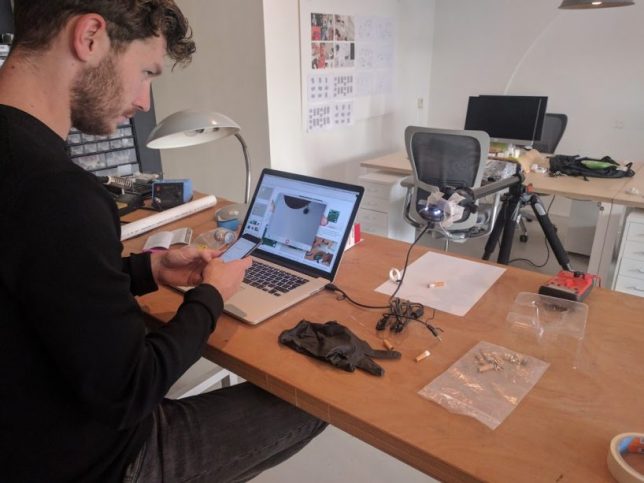
    Should we really be training ultra-smart birds to do our dirty work for us, picking up cigarette butts all over our cities in exchange for treats? One Dutch start-up hopes their clever ‘Crowbar’ will be an easy and mutually beneficial way to deal with the ongoing problem of this specific kind of urban litter, making use of the corvid’s unusual intelligence. Crowded Cities proposes hanging smart machines around the city that train the birds to clean up butts.

    ‘Crowbar’ is based on the ‘Crow Box,’ an open-source project that gives crows peanuts in exchange for coins. The birds learned that they only get rewarded for inserting a particular kind of object. The Crow Box is just one example of humans testing crows’ ability to understand cause and effect and documenting the results.  They explain the process as follows:

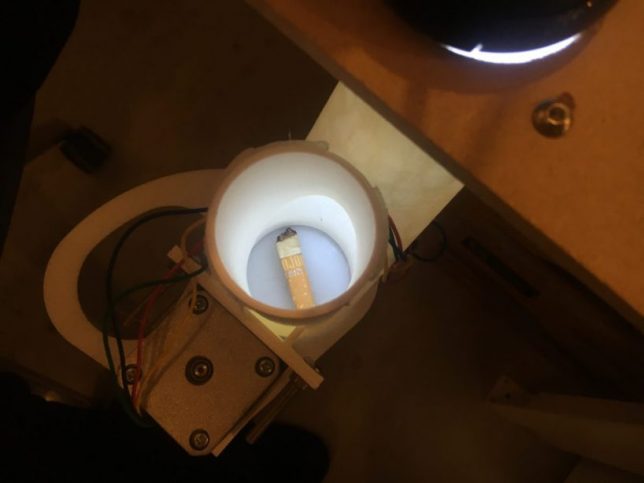
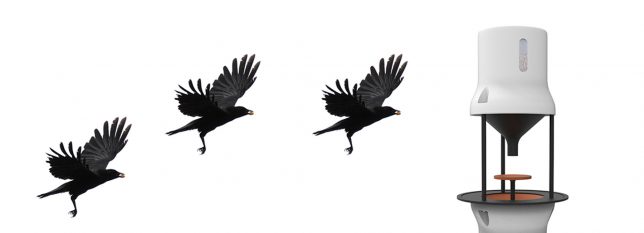
    “The crows bring a cigarette filter to the Crowbar, where they drop it into the bottom funnel to get it checked. After the camera has recognized the cigarette filter as  a filter, it returns a bit of food to the table in front of the crow. The crow goes out telling others, or keeps his secret to himself – we are not sure.”

    Apparently we’ll find out, as the team finishes assembling the CrowBar and puts it out into the world. In the Netherlands, more than 6 billion cigarette filters are tossed onto the street each year, and each one takes 12 years to degrade. It’s not hard to imagine this project seeing some kind of success – have you ever had a crow drop a nut right in front of your car while you’re driving, in the hopes that your tires will act as giant nutcrackers? They’re incredibly smart.

    But it’s a bit disturbing to imagine crows being repeatedly exposed to the carcinogens present in cigarette butts, potentially punishing them in the long term for a stupid human behavior. Plus, it’s only a matter of time before the crows start snatching lit cigarettes right out of people’s hands.

    Share on Facebook


    [ By SA Rogers in Gadgets & Geekery & Technology. ]

    [ WebUrbanist | Archives | Galleries | Privacy | TOS ]


    WebUrbanist