Month: October 2017

  • Google’s unlimited full-res photo storage for Pixel 2 owners ends in 2020

    Google is offering Pixel 2 buyers a special perk that allows them to store an unlimited number of full-resolution photos and videos through Google Photos, but it comes with a catch. Fine print listed at the bottom of Google’s Pixel 2 product page notes that the free unlimited full-res storage is only available until 2020; at that point, the handsets will revert to Google Photos’ typical ‘high-quality’ unlimited storage option.

    ‘High-quality’ is the term Google uses to denote a 1080p video resolution and 16MP image resolution.

    Google Photos allows any user to upload an unlimited number of photos and videos at up to this high-quality threshold; anything that exceeds it is compressed when uploaded and that compressed version is stored. The Pixel 2 will sidestep this restriction, but only for a couple years.

    Non-Pixel phone users can upload full-resolution videos and images for free up to a 15GB threshold. Once that threshold is reached—or, for Pixel 2 owners, once 2020 arrives—additional storage space can be purchased starting at $ 2/month (depending on location).

    Articles: Digital Photography Review (dpreview.com)

  • How to Make Your Photos More Creative Using Camera Angles

    A creative use of camera angles is one of the quickest ways to add interest and variety to your photos.

    Even if you don’t know how to use your camera very well, angles are easy! All you have to do is move your camera higher or lower to dramatically change the angle of your photo. It doesn’t matter what camera or what lens you’re using (even your smartphone), you can always make more creative photos by changing the camera or shooting angle.

    Five Different Camera Angles

    You have five main camera angles to choose from. Each one will add a different perspective, giving your photo the mood or feeling that you want it to have.

    #1 – Bird’s Eye View

    The highest camera angle is “bird’s eye view.” This is when you get up above the scene and look straight down. This angle is great for looking down and seeing all the details of a scene from above.

    A bird’s eye view is an unusual angle because you’re not normally up high looking down on a scene. Any angle that is beyond your usual daily experience will make your photo more interesting to look at.

    Bird Eye View How to Make Your Photos More Creative With Angles

    I chose a bird’s eye view for this photo of our sleeping baby. By choosing this angle, I was able to look down and frame him with blueberry branches.

    Bird Eye View - How to Make Your Photos More Creative With Angles

    A bird’s eye view is great for food photography, allowing you to see everything on the dish.

    #2 – High Angle

    A “high angle” is not quite as extreme as the bird’s eye view. You just need to be a little bit higher than the person or thing that you are photographing.

    Think of a high angle as a very normal view of the world for most adults. This is especially true for parents who are always looking down toward their kids.

    Even though you experience this angle or perspective a lot throughout the day, it can still be perfect for some of your photos. A high angle is useful for making your subject look smaller or more vulnerable and perhaps making the viewer seem more dominant.

    High Angle How to Make Your Photos More Creative With Angles

    This high angle allowed me to look down at my son and also work in some interesting background elements.

    How to Make Your Photos More Creative With Angles

    Since this is a photo of “little sister,” a high angle gives her a smaller more vulnerable appearance.

    #3 – Face-to-Face

    A face-to-face angle is taken at eye level to your subject. This is a very engaging angle and helps to establish a personal connection between the person in your photo and the person viewing it.

    This is a great angle for portraits, though a slightly higher than eye level angle is great for portraits too.

    Face to Face How to Make Your Photos More Creative With Angles

    When she came in from playtime covered in mud, I knew I had to use an engaging face to face angle.

    Face to Face How to Make Your Photos More Creative With Angles

    I love this captivating perspective.

    #4 – Low Angle

    For a low angle, you need to be below eye level. As you get down lower, you make the subject of your photo appear a larger. This may add a larger than life feeling to your photos and is great for emphasizing toughn s, or making things look scary or epic.

    Low Angle How to Make Your Photos More Creative With Angles

    A low angle is absolutely necessary when photographing sharks. It’s the only way to see their most frightening feature; teeth!

    Low Angle 2

    This moment was exploding with energy as the kids ran from the bus stop. Dropping down to a lower angle helps to emphasize the energy of the moment as well as bring the buses in the background in line with the kids.

    #5 – Bug’s Eye View

    Also known as “worm’s eye view,” this angle is just like it sounds. You get down as low as you can and look straight up toward your subject.

    Again, this is a very unusual angle. You rarely experience this point of view, so it will add an interesting or creative perspective to your photo.

    Bug Eye View How to Make Your Photos More Creative With Angles

    I had to lay down on the ground and look up for this photo. It seemed like the perfect angle to capture my son’s first major climb!

    Bug Eye View How to Make Your Photos More Creative With Angles

    It’s easy to get a bug’s eye view at a playground. Just wait for your kids to start climbing and then look straight up at them.

    One Scene – Three Angles

    It’s a great idea to capture more than one angle every time you take photos of a moment. It will push your creativity, help you to explore new perspectives and provide you with more views to tell the story.

    These next photos demonstrate how I captured one scene from three different angles.

    How to Make Your Photos More Creative With Angles

    In this first photo a higher angle was used to look down on the scene and see the puddle.

    Three 2

    A face to face angle is perfect for a muddy faced portrait.

    Three How to Make Your Photos More Creative With Angles

    This lower angle perspective makes the moment feel a little bigger and emphasizes the excitement she felt after having fun in the mud puddle.

    Beyond Everyday Perspectives

    Knowing these five camera angles, and practicing them will help you get unstuck anytime you’re uninspired or find that your photos are turning out boring or predictable. To spice up your photos, simply choose the most unusual angle. Once you’ve done that try at least two more angles and figure out which one has best captured the moment.

    As you experiment with angles you’ll boost your creativity by breaking out of everyday perspectives. Try capturing a few different angles right now. I would love to see your photos in the comment section below.

    The post How to Make Your Photos More Creative Using Camera Angles by Mat Coker appeared first on Digital Photography School.


    Digital Photography School

  • The Control Room app lets you control Lightroom from your smartphone

    Need to spice up your Lightroom editing experience on the desktop? No need to wait for whatever Adobe has waiting for us at AdobeMAX, you can try out the Control Room app instead. Available for both Android and iOS, the app lets you control all of your Lightroom sliders (and more) from your smartphone, allowing you to lean back and edit the photos on your desktop without touching a mouse or keyboard.

    The app was created by software engineer and photographer Aaron Vizzini, who only recently decided to share his creation with the general public.

    Using Control Room, you can both edit and manage (rate, flag, create rapid collections) your photos using your smartphone as the control pane. Any changes you make on your device will update in real time on the computer through a companion plugin. It’s exactly as seamless as it sounds:

    Whether or not this will actually help speed up your Lightroom workflow is entirely dependent on you, but the idea, at least, is pretty neat. To learn more about Control Room or get the $ 4 app for yourself, head over to the iTunes App Store or Google Play, and then visit the Control Room website to download that plugin as well.

    Articles: Digital Photography Review (dpreview.com)

  • Google shares high-resolution Pixel 2 sample photos

    $ (document).ready(function() { SampleGalleryV2({“containerId”:”embeddedSampleGallery_6275889395″,”galleryId”:”6275889395″,”isEmbeddedWidget”:true,”standalone”:false,”selectedImageIndex”:0,”startInCommentsView”:false,”isMobile”:false}) });

    As with the original Pixel handsets, Google is stressing the quality of its Pixel 2 phone’s 12MP camera, calling it the “world’s highest rated smartphone camera” thanks to its DxOMark score of 98. The smartphone doesn’t start shipping to buyers until November 15th, but ahead of that the company has shared a gallery of unedited images and videos taken with the handset.

    The gallery was shared on Saturday by Google employee Issac Reynolds, who explained that the content includes two videos that were edited to demonstrate the camera’s video stabilization through a side-by-side comparison. In addition, Reynolds says that the only equipment used in these shots, the Pixel 2 aside, were hand grips and, in certain instances, handheld reflectors.

    Anyone can view and download the gallery’s content for analysis using third-party software. As recently reported, Google will allow Pixel 2 owners to upload unlimited full-resolution videos and photos to Google Photos for free until 2020. Once that date arrives, and assuming the regular 15GB threshold is reached, Pixel owners will need to pay for additional storage or continue using free backups at a lower quality compressed resolution.

    Articles: Digital Photography Review (dpreview.com)

  • Rail to Trail: 12 U.S. Park Projects Reclaiming Urban Infrastructure

    [ By SA Rogers in Destinations & Sights & Travel. ]

    A whole lot of valuable land in America’s densest urban centers is occupied by the disused and often toxic remnants of neglected infrastructure, industrial complexes and other blight that could be green space instead. Taking inspiration from New York City’s High Line, an elevated linear park along a former New York Central Railroad spur, many cities are transforming urban riverbanks, viaducts, underpasses, freeway structures and even the tops of tunnels into parks, bike paths, pedestrian routes and other public amenities.

    11th Street Bridge Park, Washington DC by OMA and OLIN

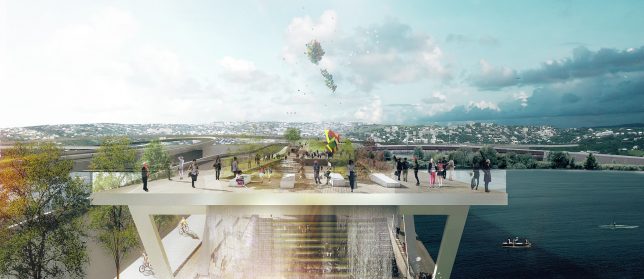
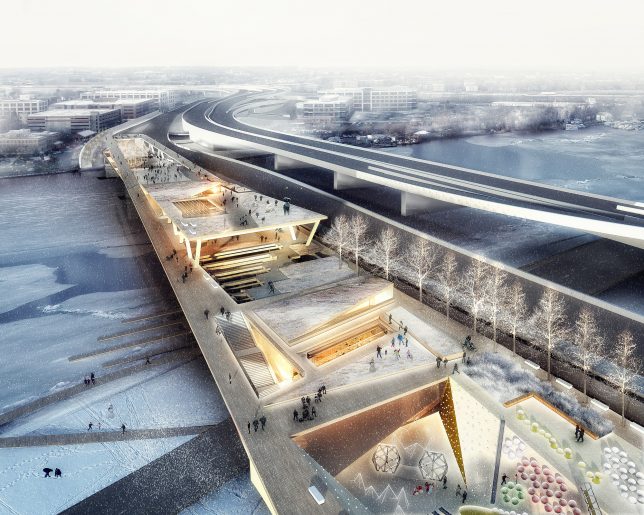
    An aging freeway structure over the Anacostia River in Washington D.C. is set to become the 11th Street Bridge Park, with officials announcing in October 2017 that a design by OMA + OLIN has been chosen. Each ‘lane’ of the bridge is pulled upward toward the middle, crossing each other to form an X shape; the space underneath these overhangs will host a performance area, cafe, plazas and other public functions.

    Lowline, New York City, New York by James Ramsey and Daniel Barasch

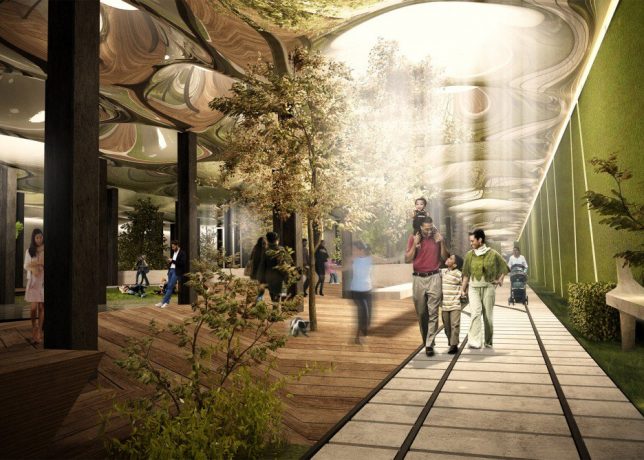
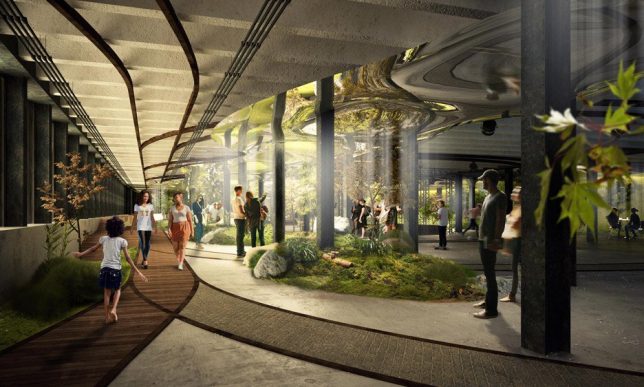
    Complementing New York City’s famous High Line park, a 1.45-mile greenway built on a former New York Central Railroad spur, the subterranean ‘Lowline’ has been given a green light. Set to be the world’s first underground park, it will be tucked into a former trolley terminal in Manhattan’s Lower East Side, with a design by James Ramsey and Daniel Barasch. “The transformation of an old, forgotten trolley terminal into a dynamic cultural space designed for a 21st century city is truly a New York story,” says Barasch. “We know with input from the community and the city, we can make the Lowline a unique, inspiring space that everyone can enjoy.”

    The 606, Chicago, Illinois by Collins Engineering, Michael Van Valkenburgh Associates, Frances Whitehead

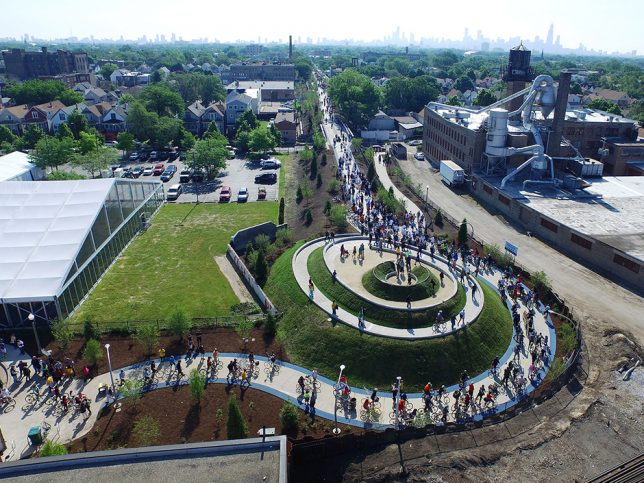
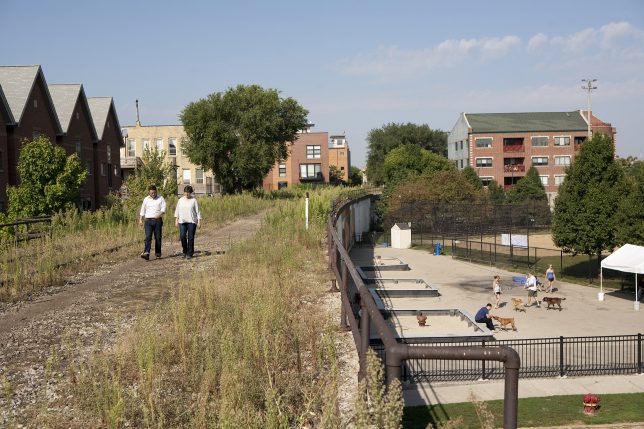
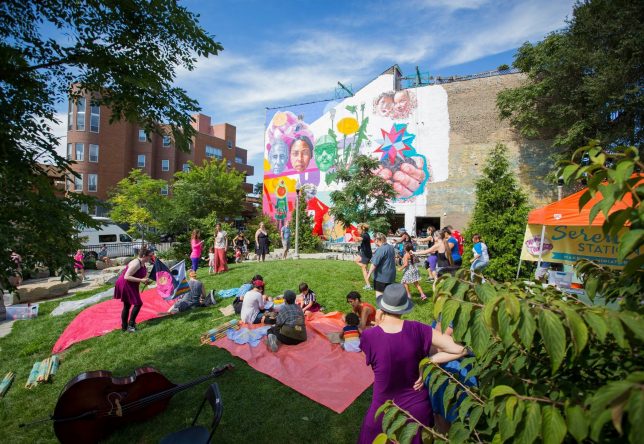
    Chicago converted its abandoned Bloomingdale Rail Line into a 2.7 mile linear park called the 606 (named for the zip code prefix shared by everyone in the city.) The greenway connects four separate neighborhoods and includes a park and trail system with elevated trails for bikers, runners and walkers as well as event spaces and lots of greenery. The project was designed by the firm Frances Whitehead, which approached it as a ‘living work of art,’ demonstrating the vital role that arts play in the fabric of the city.

    The Underline, Miami, Florida by James Corner Field Operations

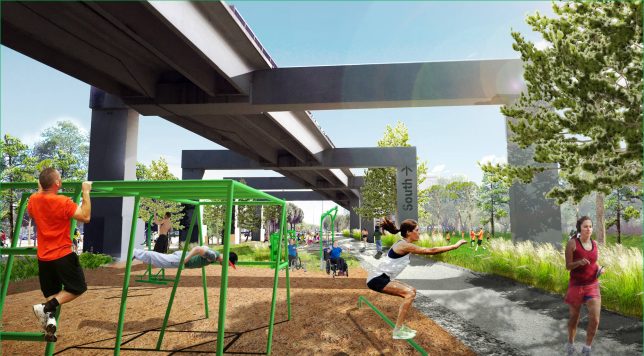
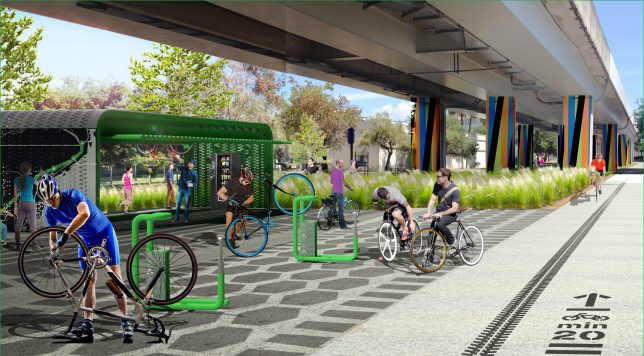
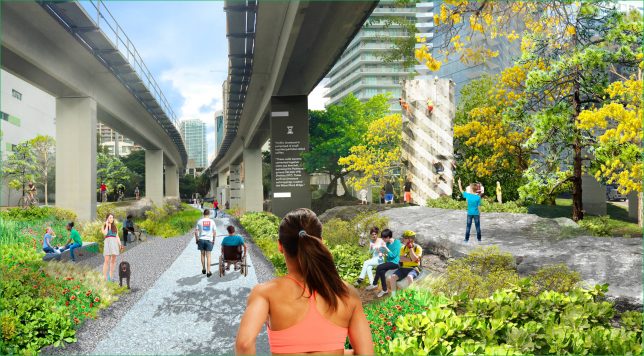
    Down in Miami, a stretch beneath an elevated rail line could become ‘The Underline,’ a new public park by James Corner Field Operations, one of the studios behind the High Line in NYC. The 10-mile-long park and urban trail would sit beneath the city’s MetroRail, following an existing bike path called the M-Path, but widening it and adding a parallel pedestrian path that winds through various ecosystems of native plants and habitats for birds and butterflies. Spaces for arts and recreation would be scattered along the way, like pop-up structures and a bike tune-up station.

    Next Page – Click Below to Read More:
    Rail To Trail 12 U S Park Projects Reclaiming Urban Infrastructure

    Share on Facebook


    [ By SA Rogers in Destinations & Sights & Travel. ]

    [ WebUrbanist | Archives | Galleries | Privacy | TOS ]


    WebUrbanist

  • Video: Why the Profoto A1 is a ‘gamechanger’ for wedding photographers

    Daniel Inskeep and Rachel Gulotta of popular photography YouTube channel Mango Street Lab recently got to test out the Profoto A1—an ultra-high-end $ 1,000 speedlight that Profoto is calling “the world’s smallest studio flash.” The flash has raised a lot of eyebrows with that steep price tag, but as they explain in their short ‘review’ of the A1, Daniel and Rachel believe this is a ‘gamechanger’ for wedding photographers.

    Why is that exactly? Because while it might look like a speedlight, it offers a combination of power, simplicity, and reliability that has the duo tossing their Canon speedlights in the bin.

    Their adulation for these flashes really comes down to three main advantages:

    1. Simplicity and Ease of Use – The menus are easy to navigate and syncing multiple flashes is a cinch.

    2. Built-in Air Remote – No need to purchase a separate air remote, just use the A1 on your camera to control all of your other Profoto lights.

    3. Fast Recycle Time – The duo’s favorite feature by far, this ensures that they don’t miss key shots, even when they’re running on only a partial charge.

    Check out the video to hear their thoughts on this light, and share your own in the comments down below. Are you considering the Profoto A1? Are the advantages worth the price tag? And if they’re not, what would you recommend instead?

    Articles: Digital Photography Review (dpreview.com)

  • Manfrotto unveils Element Carbon entry-level carbon fibre tripod range

    Popular tripod and accessory maker Manfrotto has just revealed a new range of entry-level carbon fibre tripods that it hopes will attract photographers looking for good quality gear at a slightly more affordable price. The two new Element Carbon tripods are aimed at travel photographers and come in two sizes with payload recommendations of 4kg/8.82lb and 8kg/17.64lb.

    The three-position carbon fibre legs feature twist locks, and the larger of the two has a detachable leg that can be fitted to the centre column to form a full-sized monopod. The ball-and-socket heads that come with the legs are made from aluminum and use an Arca-style quick release plate.

    The maximum height of the Manfrotto Element Carbon tripods is 143cm/56.3in for the small version and 164cm/64.57in for the large one, and they weigh 1050g/2.3lb and 1400g/3.08lb, respectively. The new tripods will be priced at £175 and £200—US pricing has yet to be released. For more information, visit the Manfrotto website.

    Press Release

    INTRODUCING THE NEW MANFROTTO ELEMENT CARBON

    Fast Setup. Perfect shot.

    • Smart traveller tripods for photographers who want to learn, experiment and travel free
    • Lightweight on your shoulders, stable on the ground.
    • Essential design ensures instant set up for an enjoyable shooting experience

    Manfrotto, world leader in the photography, imaging equipment and accessories industry, presents Manfrotto Element Carbon. The Manfrotto Element Carbon tripods are the perfect fit for travel photographers who are just starting out and enthusiasts.

    The two new Element Carbon traveller tripods are reliable, lightweight and easy to carry. Both feature a compact and sturdy carbon fibre construction that makes them strong but still very portable. The three leg-angle positions mean they are highly versatile so they are perfect for experimenting with all kinds of creative shots. The twist lock mechanism enables photographers to get into the right position fast, in a few, easy moves, while the aluminum ball head is designed to deliver the fast movement when framing and a firm lock for setting equipment up exactly as you need it. The ball head mounts an Arca-type quick release plate with a 1/4″-20 camera screw on top that ensures equipment is balanced even when using zoom lenses.

    In addition, the Element Traveller Carbon Big Tripod features a detachable leg that, when removed and attached to the centre column, becomes a full size lightweight monopod.

    The Element Carbon Tripods have a payload of 4kg on the small tripod, and 8kg on the big tripod and feature a branded Manfrotto bag, an additional set of spike feet (big tripod only) and an Allen key to fix and tighten your gear.

    The Element Carbon Tripods are available from £174.95.

    For more information, please visit www.manfrotto.co.uk

    Articles: Digital Photography Review (dpreview.com)

  • How to Use Bulb Mode for Long Exposure Photography

    Most DSLR and mirrorless cameras have a feature called Bulb Mode. If you’re like me, you probably saw that in one of the menus or buttons when you first got your camera and have promptly ignored it ever since. Even the name sounds weird, and at first glance, you might think it has more to do gardening than photography. But it’s actually a very useful option that can unlock all sorts of creative possibilities with your camera.

    Learning to use Bulb Mode does take a bit of practice though, and it helps to understand how it got its strange name in the first place. But I think you’ll find that the payoff is worth your time.

    How to Use Bulb Mode for Long Exposure Photography

    Lightning shot using Bulb Mode.

    History Lesson

    Way back in the early days of photography, long before digital image sensors existed, and autofocusing lenses were little more than science fiction, the act of taking a picture still worked in many ways like it does today. Hidden inside the sealed innards of a camera was a piece of light-sensitive film onto which an image would be projected when the camera’s shutter was opened, thus letting light pass through the lens and onto the film.

    It’s the same principle that DSLRs use today. The only major change is how the shutter is constructed and the manner in which the timing is controlled. A hundred years ago there was no such thing as computer-powered cameras or precise mechanical actuators that could open the shutter for a long period of time (typically longer than one second). Instead, the photographer held a small bulb in his or her hand which was attached to the camera’s shutter by a piece of tubing.

    Squeezing the bulb opened the camera shutter and releasing the bulb closed it, which meant the timing of the shutter was entirely up to the individual taking the photo. As long as the bulb was squeezed, the shutter would stay open. This method continued to be used on cameras for years to come, and it’s even possible to find bulb-style shutter releases for cameras today.

    In short, think of Bulb Mode as Time Travel Mode. It basically makes your camera function like a camera from 100 years ago, when you had to squeeze a bulb to open the shutter, and then release the bulb to close it. The only major difference is that unless you literally have a bulb-style shutter release like the one pictured below, you will press the shutter button to open the shutter and release your finger to close it. Pretty neat, isn’t it?

    How to Use Bulb Mode for Long Exposure Photography

    Squeeze the bulb to open the shutter on this Pentax 35mm film camera. Release the bulb to close the shutter. Image courtesy of Wikimedia Commons.

    Bulb Mode Today

    Most modern cameras allow you to set the shutter speed anywhere from 1/4000th of a second and 30 seconds, which gives you an incredible range of creative photographic possibilities. These shutter speeds work in tandem with a camera’s light meter, as well as the ISO and lens aperture, to help you get properly-exposed images with little to no fuss or hassle. With that in mind, the idea of squeezing a bulb to keep the shutter open seems more than a bit anachronistic. Why would anyone want to hold the shutter open manually when you can just dial in a preset value for the shutter speed and not worry about anything else?

    The benefit of Bulb Mode is that it lets you keep the shutter open for as long as you want. The timing is not specified by you, the camera, or anything else which means it’s entirely your decision whether to use a fast, slow or extremely slow shutter speed. Using Bulb Mode, it’s possible to leave your shutter open for one, five, 10 minutes or even longer. The only limitation is your camera’s battery and your own degree of patience, which opens the door for some amazing photographic opportunities.

    How to Use Bulb Mode for Long Exposure Photography

    Finding Bulb Mode

    Shooting Mode Dial

    Canon mode dial, B is Bulb.

    The first step in using Bulb Mode involves figuring out how to access it on your camera, especially if you did not have even known it existed and have never tried to look for it. Because Bulb Mode involves controlling the shutter you might think that you need to first put your camera in Shutter Priority mode, but that’s generally not the case.

    For most cameras, you actually need to use Manual Mode and then set your shutter speed to as low as it can go. You will likely see decreasing speeds of 5 seconds (your display may show that as 5″), 10 seconds, and so on, all the way down to 30 seconds at which point one more click of the dial will put your camera into Bulb Mode. If this doesn’t work for you it’s possible your camera simply doesn’t have Bulb Mode (most DSLRs and mirrorless cameras do have it, on some Canons, it is on the Mode dial as B). If you really aren’t certain just Google the brand and the model of your camera along with the words “bulb mode,” which will likely turn up some useful results.

    How to Use Bulb Mode for Long Exposure Photography

    Instead of showing a shutter speed along with a light meter, my camera’s LCD screen now displays the word “bulb” to indicate that I have entered Bulb Mode.

    Understanding Bulb Mode

    Once your camera is in Bulb Mode a couple of things go a little haywire and you may think your camera is broken. Before you send it in for service, just know that everything is fine…but different. Right away you’ll notice that your camera’s light meter no longer works, and there is no indication of what exposure settings you should be using to get a properly-exposed image.

    This happens because your camera has no idea how long you want to leave your shutter open, and without that information, it doesn’t know whether to indicate if the final image will be overexposed, underexposed, or just right. This can make Bulb Mode positively primitive territory, and if you have ever wanted to know what your photographic forebears had to deal with when taking pictures 100 years ago you now know firsthand.

    The best way to figure out which settings to use is to simply start experimenting. The more you use Bulb Mode you will start to figure out what settings like aperture and ISO might be appropriate given the scene you are photographing. However, there are some general tips that can be applied, which I will cover in the next section.

    Holding the button

    The other weird thing about Bulb Mode, which directly hearkens back to the earliest days of photography, is the manner by which the shutter is controlled. To open the shutter you press the shutter button (a sentence which is most likely eliciting rolled eyes due to how obvious it sounds). However, there’s a catch.

    The shutter stays open only while your finger is pressing the shutter button. It’s just like squeezing a pneumatic bulb in the early days of photography. As you might guess by now, the way to close the shutter is to take your finger off the button. It’s a strange feeling, and if you have a DSLR handy I invite you to give it a try right now. Go get your camera, put it in Manual, spin the control dial until you’re in Bulb Mode, and take a picture. I’ll wait.

    How to Use Bulb Mode for Long Exposure Photography

    Using Bulb Mode

    Did you snap a photo? I bet it felt kind of strange to have the shutter open and close only when you pressed and then released, your finger from the button. This, of course, brings up the next logical question of how do you actually use Bulb Mode to get good pictures? While each person will use it in their own way, there are a couple of guidelines to think about if you want to get good results.

    Low light

    Bulb Mode is most useful when you have little to no ambient light. It is almost worthless in daylight or in a well-lit room (unless of course, you are using really good ND filters to block some of the light) The best time to try it is at night when everything is pitch black except what you are hoping to photograph.

    Setting up to use Bulb Mode

    It’s important to keep your camera steady with a good tripod. You are typically dealing with really long exposures, and even the vibration from your finger pressing the shutter button can affect the resulting image. So the sturdier your tripod is, the better your images will turn out. If you have a cable release or some kind of remote shutter trigger for your camera, now is a great time to use it. Make sure you have one that either locks or counts the exposure for you (if you’re using the small wireless one that camera with your camera, you may need to click it once to open the shutter in Bulb Mode and click it again to close the shutter).

    Note: You cannot use the 2-second self-timer in conjunction with Bulb Mode, it will not work.

    Finally, try using a small aperture of f/8 or f/11 and a low ISO setting like 100 or 200 since the shutter speed is the independent variable in most Bulb Mode photography. This isn’t a requirement, but depending on your subject you might need a wider aperture or higher ISO, particularly if you want to shoot images of stars or capture star trails or other astrophotography phenomena.

    How to Use Bulb Mode for Long Exposure Photography

    I was able to capture a bolt of lightning by holding the shutter open, and the long exposure also shows movement in the clouds too.

    When to use Bulb Mode

    Now it’s time to experiment and really have fun with Bulb Mode. Everyone will use it in a different way, but here are a couple of ideas to get you started.

    • The next time a thunderstorm rolls in, use Bulb Mode to capture lightning strikes. The longer you leave the shutter open, the more lightning bolts you may be able to capture.
    • Try light painting, and experiment with using different kinds of light on familiar subjects you might already have just laying around.
    • Set up your tripod next to a road and shoot light trails as traffic passes by at the night.
    • For a variation on light trails, get a friend have some fun with fire spinning. Note that safety must always come first in these situations, so be sure to keep yourselves, your gear, and the environment around you safe from damage. The best place is a beach with no one around.
    • You don’t need fireworks either, and you can get great results with different sources of light from flashlights to sparklers to twirling glow sticks.
    How to Use Bulb Mode for Long Exposure Photography

    Using a long exposure helped me turn this ordinary jar of pasta into a surreal glowing work of art.

    Conclusion

    These ideas are just scratching the surface of what Bulb Mode can do. The best way to learn is to try it for yourself. If you have any particular tips for using Bulb Mode that you think others would enjoy, or some ideas to try that I didn’t mention here, please leave your thoughts in the comments below!

    The post How to Use Bulb Mode for Long Exposure Photography by Simon Ringsmuth appeared first on Digital Photography School.


    Digital Photography School

  • 7 Tips for Capturing the Decisive Moment in Street Photography

    There is probably no other term as often cited as “The Decisive Moment” in Street Photography. Yet there is no real agreement what a decisive moment defines.

    The street is normally a very chaotic place. People are walking in every direction and there isn’t much “sense” when putting everything together. The decisive moment is different. Suddenly every single detail that is captured in the photograph has a meaning. Subjects that are normally not connected are in a relation to each other, they don’t know it, but the picture clearly shows it.

    Dog Days What is the Decisive Moment

    Creating such images is not an easy task in a candid genre. While some state luck as the most important factor, I believe that you can work towards the Decisive Moment and capture it more regularly. Here are seven tips to help you.

    #1 – Become Quicker

    The street is not a place where you can slack off and take all the time you want to take a shot. There is no second chance to catch candid moments. A decisive moment can last for a few seconds and be gone forever. If you don’t catch it in time, you lose it for eternity.

    Photographing is a 2-step process. First, You have to be familiar with your gear. After spotting a beautiful scene, there is no time for adjusting the camera or learning how your equipment actually works. Take your time to experiment with different settings beforehand so you know what works and what doesn’t. Use the technique of zone-focusing and you will be a lot faster capturing interesting subjects too.

    Decisive moment street photography 01

    The second step is spotting potential scenes in time and developing an instinct even before something interesting happens.

    #2 – Get in The Zone

    To spot interesting scenes instinctively, you need the right mindset for street photography. Just going out with your thoughts somewhere else, won’t land you the money shot very often. Concentration is needed to absorb the chaotic environment and scan it for potential decisive moments.

    There are a lot of distractions in the modern world. Smartphones and your camera are two of the main distractions that can keep your mind away from the street. Before going out on the street, make sure to not have anything important scheduled for the time being and for the best results, turn off your smartphone.

    Decisive moment street photography 02

    Also, don’t get too distracted by your camera. It is just a tool that helps you to display your vision. You don’t need to have a look at every image that you have taken at the very moment. If possible, try out an analog camera and see how pure minimalism can help you to get in the zone.

    #3 – Overcome your Fear

    Spotting a scene is only the first step to capture the decisive moment. Afterwards, you have to translate your vision into the form of a photograph. When you still have fear to get close or take an image, it will limit your creative freedom.

    There is no need to be afraid of the street and strangers. After years of experience, I can assure you that with a minimum of common sense nothing truly bad will happen to you. In reality, the worst that can happen is that someone asks you to delete the picture, but that’s pretty much it.

    Decisive moment street photography 03

    The fear on the street is mostly irrational and your mind is playing tricks on you. Part of it is socialization and I will admit, that every social being feels this way, when starting in street photography. Not invading the “private space” of others has been beneficial for forming social groups, historically speaking. But it doesn’t make much sense in our modern world and is only a hindrance for street photography.

    To overcome your fear, you could try to get rejected purposely by asking for posed portraits pictures. It will show you that most people are actually very relaxed and even if you do get rejected, it isn’t the end of the world.

    #4 – Perfect the Composition

    There are a lot of situations happening on the street that you aren’t able to display to their full potential. This is heavily dependent on the way you frame the image and display it.

    Decisive moment street photography 04

    Lots of images are destroyed because the composition is simply off. I know that street photography is often seen as a genre of freedom. But when it comes to aesthetics, there are natural formulas that are more pleasant than others.

    The rule of thirds is not a myth, but a fact. To embrace this in your photography will make your images visually more profound than ignoring your natural instincts.

    Additionally to the rule of thirds, I would also focus on leading lines, not pointing away from the main subject. For an even more interesting picture try to fill every layer from the foreground to the background with interesting details.

    #5 – Be Inspired

    Decisive moment street photography 05

    The right mood can also influence you in finding a potential scene that can lead to an outstanding image. Inspiration can stem not only from other photographers that you admire but from any creative source.

    Listen to music, watch your favorite movie or read a good book. Anything that helps you to open your mind for creating something outstanding, is suitable to bring you closer to the decisive moment.

    #6 – Dedication

    Decisive moment street photography 06

    Street Photography is not a discipline where you can expect quick results after following a simple guide. It takes years or even decades of dedication to street photography to be able to create the decisive moment, seemingly out of nowhere.

    Developing a photographer’s eye takes a lot of training. Therefore, I would recommend forming a group of other photographers who have the same goals in mind. Walking the street with multiple photographers can also open your eyes to their vision. They are able to point out scenes that wouldn’t even cross your mind on your own.

    #7 – Stay Curious

    Decisive moment street photography 07

    Whatever you do, don’t lose interest in your environment and mankind in general. Curiosity can lead you to interesting scenes that otherwise would seem as if they had no potential. Embrace the tourist in your town.

    Do you remember the last time you were on vacation and took some holiday pictures? Suddenly even the most mundane places can become interesting when you are in a foreign location. The little ice parlor might be totally boring to the residents, but for you, it was worth a picture.

    Follow the same instincts in your own neighborhood. Rather take an image too much, than missing out on the decisive moment. But most importantly, keep the fun. Don’t force yourself too much.

    Conclusion

    The process of doing street photography should always be fulfilling even when the results might not satisfy you. Get out on the street, be mindful, have fun, and over time the results will follow.

    The post 7 Tips for Capturing the Decisive Moment in Street Photography by Sebastian Jacobitz appeared first on Digital Photography School.


    Digital Photography School

  • Review of the new Agua Versa Backpack 90 by Miggo

    Photography is an expensive hobby, and yet still we love doing it whether be it professionally or as a passion. Owning costly camera bodies and lenses is one part of our job, and making sure that they are stored safely in a camera bag is an equally important responsibility. As a street and travel photographer, I am always on the go carrying a camera body, a zoom lens, and a flash. I make sure that I am not carrying all this gear in a heavy backpack.

    The Agua Versa Backpack 90 by Miggo is one of a kind. It’s a versatile storm-proof backpack that can be used as a camera bag as well as a normal day-to-day use bag. When it comes to choosing the right camera bag, I am very particular about its quality, comfort, and weight. Now let’s find out if this classy looking backpack comes out as a clear winner or not.

    Agua Versa Backpack 90 2

    What you can store in the Agua Versa Backpack 90

    • DSLR with attached lens (such as Canon 5D Mark III or IV with 24-70mm f/2.8),
      or medium size DSLRs / large size mirrorless cameras
    • Extra lens (such as 70-200mm f/2.8)
    • Flash unit
    • Up to 14.5” laptop (but I am able to store my 15.6-inch laptop)
    • iPad / tablet
    • Memory cards
    • Cables
    • Extra battery
    • Extra personal belongings

    Appearance

    Cover Photo

    Trust me when I say that this backpack could make you fall in love with it at first sight, and I am saying this from my personal experience. It’s not just me but my fellow photographers have been asking me about this bag as I have been carrying around for weeks now.

    The matte black kind of finish that this bag has is the reason that you may get attracted to it. That is the storm-proof material (tarpaulin) that has been used to create the bag. The combination of black and blue colors makes this bag look elegant as well as stylish at the same time. By looking at the bag you can tell how light and convenient this bag would be to carry on your back.

    Inside the Bag

    The Agua Versa Backpack 90 has three pockets in total. One on the front side which can be used to store accessories such as lens filters, memory card holder, a mobile phone, etc.

    The second pocket is on the right-hand side of the bag which is the main compartment where you can store your laptop (I was easily able to store my 15.6-inch laptop), iPad, pen drive, Gorillapod, etc. You also get a removable padded insert in which I was able to carry my Canon 5D Mark III with the Canon 24-70 f/2.8 lens mounted, a Canon 70-200 f/2.8 lens and the Godox TT685C flash. The best part is that you can carry this padded insert as a standalone camera case during shoots. Once the insert is removed, you can use the backpack as a day-to-day bag as well or store your clothes while you are traveling.

    Agua Versa Backpack 90 5

    Agua Versa Backpack 90 7

    The third pocket which is placed on the left-hand side is a secondary storage space where you can securely store the card reader, important cables, some accessories, and anything that fits inside the pockets.

    Agua Versa Backpack 90 4

    3 Different Carrying Options

    The Agua Versa Backpack 90 allows you to carry the bag in three different ways. The first being the basic backpack position, which is the most comfortable in situations when you are walking a long distance carrying heavy gear. The second way is the X position, in which you can customize the straps in a cross pattern which could be helpful if you are trekking or hiking. The last way is the sling position which basically converts your backpack to a sling bag. By using it as a sling bag, you can easily and quickly draw the camera out of the bag and avoid missing any important moment.


    Agua Versa Backpack 90 1b

    My personal favorite is the sling position as I do not have to constantly take the bag off my shoulders to take out the camera. Simply swing the bag forward, open the side zip and draw the camera swiftly.

    Agua Versa Backpack 90 3

    Comfort

    One of my favorite things about this backpack is the quality of padding that it has on the back as well as on the straps. I have been using this Miggo bag for weeks now, sometimes for hours at a stretch, and not once did I have any kind of shoulder or back pain despite carrying a camera body, two lenses, a flash and other accessories. Be it the backpack or the sling position, the bag sits comfortably on my shoulders and the lower back padding is just perfect.

    Dual-Port Charging Connector

    Agua Versa Backpack 90 6

    How this backpack by Miggo stands out from the rest is the external USB connector that it features on the lower right-hand side. The USB connector unit has two ports which allow you to use a power bank stored in an internal dedicated pouch inside the bag. This means that using one port you can charge your smartphone or any other USB connected device and by using the second port you can charge that power bank too without taking it out of the bag.

    Final Verdict

    At a price of $ 169, the Agua Versa Backpack 90, come sling bag, is a good value for your money if you are a frequent traveler or if you shoot in extreme conditions.

    Cover Photo

    You may be thinking that I am only highlighting the positives of this bag, but there are few negatives as well. This bag lacks a side pocket which can hold a tripod/monopod or a water bottle. The straps are way too long, they roll up and there is a band which holds them up but on some occasions, it comes off.

    You can get your hands on the Agua Versa Backpack 90 and a couple of more bags in the Agua series of Miggo brand on Indiegogo.

    The post Review of the new Agua Versa Backpack 90 by Miggo by Kunal Malhotra appeared first on Digital Photography School.


    Digital Photography School