Month: October 2017

  • Adobe unveils Photoshop Elements 2018: Can open closed eyes, find your best photos and more

    A before and after of Photoshop Elements’ new Open Closed Eyes featured at work.

    While the professional photography market waits with bated breath to see what Adobe has in store for us at AdobeMAX, the company behind Lightroom and Photoshop unveiled something that appeals to a bit broader of an audience today: Photoshop Elements 2018 and Premiere Elements 2018.

    The new, user-friendly versions of Adobe’s photo and video editors come with some really creative and easy-to-use features that the company says are aimed at “memory keepers.” The idea was to create two programs that make finding, enhancing and sharing the precious memories hidden away inside random memory cards, hard drives and (most likely) smartphones almost totally automatic.

    Photoshop Elements 2018

    Photoshop Elements 2018 tackles the same problem that everyone—Google’s Photos App, Apple Photos, etc.—is trying to tackle: how do you help the typical shutterbug find their best images out of the thousands they take every week on their smartphone, and enhance those images so they look ‘professional’ and worth sharing on social media?

    As with everybody else, Adobe is leaning heavily on machine learning and computer vision (different types of ‘AI’) for this trick.

    It starts with an easy-to-use Organizer view and something called Auto Curation, which uses computer vision and some nifty algorithms to guess (because it can’t REALLY know, can it?) which of your images are the best. So if you have a group of 200 images, you can ask Photoshop Elements to cull those down automatically to just 15.

    Once you’ve selected your shots, you can use the program’s new Guided Edits and a new feature called Automatic Selection to do things like drop in a new background, create a double exposure effect using two of your images, or add ‘artistic’ overlays.

    The coolest feature, though, has to be Open Closed Eyes, which allows you to select two frames, and replace the closed eyes in one with the open eyes from another. The results are incredibly lifelike given that whole thing can be done in a matter of seconds.

    Premiere Elements 2018

    Like Photoshop Elements, Premiere Elements 2018 also leans heavily on AI-powered features to make video editing as automatic and pain-free as possible.

    Smart Trim does for videos what Auto Curate does for photos, namely: it asks you what ‘style’ of video you want to create, tries to intelligently find the best clips that match this style, and tosses out the rest to create a coherent clip.

    Another interesting addition is a feature called Candid Moments, which tries to find the best candid ‘photo’ hidden within a video clip and pull it out for you. With new smartphones like the iPhone 8 Plus shooting gorgeous 4K 60p, we could see this feature being a huge hit with those ‘memory keepers’ Adobe is all trying to target.

    Admittedly, neither Photoshop Elements 2018 nor Premiere Elements 2018 are really targetted at more professional photographers out there (read: many of the people who enjoy reading DPReview). But as these beginner-focused programs get more and more powerful, amateur photographers who are allergic to the subscription model and don’t like to do much post-processing anyhow might actually enjoy using Photoshop and Premiere Elements 2018.

    Of course, that’s not to say we won’t be keeping a very close eye on AdobeMAX this year.

    To learn more about Photoshop Elements 2018 and Premiere Elements 2018, head over to the Adobe blog by clicking here, or visit their dedicated landing pages by clicking on the program names above. Both programs are available now for $ 100 new or $ 80 as an upgrade. You can also buy them together for $ 150 new or upgrade both programs at once for $ 120.

    Articles: Digital Photography Review (dpreview.com)

  • Cravar unveils new Rana Series of leather messenger bags for photographers

    Leather goods company Cravar has launched a new range of Rana Series messenger bags, and its attempting to crowdfund the release through Kickstarter. The new series is comprised of four leather messenger bags designed for photographers to use as either a camera bag or an everyday carry. All four bags feature solid brass hardware, a full grain veg-tanned leather exterior, closed-cell foam padding, and an interior made with linen and Sunbrella fabrics.

    The Cravar Rana Series is comprised of the Rana 7, Rana 10, Rana 13, and Rana 15 leather messenger bags—each number approximates the bag’s width.

    The Rana 15 is the largest of the bunch, and is able to accommodate most 15″ laptops as well as a full-frame DSLR and three lenses or more, depending on the size of said lenses. The bag has an aluminum-reinforced top flap, three vertical and two stack dividers, a luggage handle slot, two front pockets, and one rear pocket.

    Similar, but slightly smaller, is the Rana 13 which is also able to fit a full-frame DSLR and three or more lenses, in addition to a smaller 13″ laptop. The Rana 10, meanwhile, can fit a full-frame DSLR, two or more lenses, and a 9.7 – 10.5″ tablet. Finally, Rana 7 can accommodate a full-frame DSLR and one or more lenses, depending on size, plus an iPad mini or other small tablet.

    Cravar is offering the Rana Series bags at the following Kickstarter pledge prices ahead of the higher planned retail costs (assuming the bags are successfully funded and brought to market):

    • Rana 7: $ 165 or more
    • Rana 10: $ 195 or more
    • Rana 13: $ 245 or more
    • Rana 15: $ 275 or more

    To learn more about these bags or order your own, head over to Kickstarter. Shipping to backers is expected to start in February 2018.

    Articles: Digital Photography Review (dpreview.com)

  • On1 Photo RAW 2018 announced: Adds HRD processing, advanced masking and more

    $ (document).ready(function() { SampleGalleryV2({“containerId”:”embeddedSampleGallery_1486583421″,”galleryId”:”1486583421″,”isEmbeddedWidget”:true,”standalone”:false,”selectedImageIndex”:0,”startInCommentsView”:false,”isMobile”:false}) });

    On1 just released the newest version of its stand-alone RAW photo manager and non-destructive editor: On1 Photo RAW 2018. Put another way, there’s now yet another alternative to Lightroom out there, and with this new update the program is more capable than ever, adding features like HDR merge and panorama stitching, advanced masking capabilities, and more.

    You can get a decent overview of the new features in the 2018 version in the video below:

    The main additions to this version of On1 Photo RAW are On1 HDR, panorama stitching, new advanced masking options like Feather and Density that allow you to alter a mask globally, Color range masking, versioning, selective noise reduction, and an updated UI that On1 characterizes as “clean and modern.” There’s also a new “Paint with Color Brush” that allows you to either paint with a solid color or leave the luminosity of the underlying layer intact to change things like eye or hair color.

    You can get a full breakdown of these and other new features on the On1 blog.

    The app is being released as a free Beta on Friday, with an official release slated for the end of October. The full app—which promises ‘much more’ when it arrives after the beta period—will cost $ 120 for new users, while current On1 users will have the option to upgrade for a discounted price of just $ 80 (usually $ 100). Both the full version and upgrade package are already available for pre-order.

    To learn more about the app or pre-order your copy, head over to the On1 blog by clicking here.

    Articles: Digital Photography Review (dpreview.com)

  • How To Trick Someone Into Thinking You’re Really, Really, Ridiculously Photogenic

    In a world of digital keepsakes and endless selfies, there’s a definite pressure to be camera-ready at any moment. Between Youtuber friends and Instagram-addicts, you never know when you’ll next be thrown under the lens, so it never hurts to have a few tricks up your sleeve to help you look as good as you can, and feel happy with Continue Reading

    The post How To Trick Someone Into Thinking You’re Really, Really, Ridiculously Photogenic appeared first on Photodoto.


    Photodoto

  • The Minimalist Landscape Photographer: What do you really need?

    Landscape photography is arguably the first form of photography, literally. At some point around 1826, Joseph Nicéphore Niépce made an exposure on a bitumen covered pewter plate from his upstairs work room. The resulting image would be the first known photograph which displayed his view from the window at his estate in Le Gras, in the Burgundy region of France.

    Since then, the gear and techniques used in landscape photography have grown exponentially. So much in fact, that some photographers possibly feel the only way to make strong landscape photographs is by investing hundreds if not thousands of dollars into specialized camera equipment. But, nothing could be further from the truth!

    The Minimalist Landscape Photographer: What do you really need?

    In reality, landscape photography can be made as complicated or as simple as you would like it to be. Granted, there are a few pieces of gear that will enable you to shoot with more versatility, but at its core, outstanding landscape photography can be accomplished with only a few pieces of basic photography gear. In this article, we’ll share a few suggestions for “minimalist” landscape photography gear. You might be surprised to learn that you probably already have everything you need to get started right now.

    The Landscape Photographer’s Mindset

    I learned a long time ago that capturing a strong landscape photograph has more to do with having a concrete understanding of what you’re trying to accomplish more so than the tools you have at your disposal. In those days, I had only one camera and one lens. Not even a tripod. The lens was a Canon 28-135mm and I only used it because it was the one that came with my camera. Oh, and my camera at the time, it was my first digital camera…ever.

    The Minimalist Landscape Photographer: What do you really need?

    One of my first landscape photos with my new digital camera. Circa 2010.

    Since then, I’ve evolved and so has my gear, my attitude, and my photography. Still, the realization remains that it was never the gear that defined what I was doing even back then. Rather, it was my desire to learn and practice; the idea that I didn’t have the “correct” outfit to shoot landscapes never entered my mind.

    I was just happy to have a camera, the open air, and a place to make photographs. I knew that I needed to photograph the landscapes I saw and from there, everything else was just a matter of making do with what I had at the time. So with that mindset now hopefully at the forefront, here are a few items I consider to be must-have gear for the minimalist landscape photographer. It’s an extremely short list. Consisting of only three things.

    #1 – A Camera

    Yes, it goes without saying that if you’re going to make landscape photos or any other photo for that matter, you need some kind of camera. Today, there are dozens (at least) of digital camera models to choose from ranging from the relatively cheap to the astronomically priced. My advice to you, if you want a serviceable camera body suitable for landscape work, is to dismiss any idea that you need the latest and great camera in order to make solid landscape photos.

    That first digital camera I mentioned earlier was a Canon 7D, which I still use to this day. It’s a great camera, hefty, rugged, and I’ve taken it everywhere. That being said, if I had it to do all over again, I would have gone with a much less expensive camera body. Why? While having blazing fast autofocus capability is nice, it’s not wholly necessary if you’re shooting mainly stationary objects. If you plan on shooting a wide range of subject matter like weddings, sports, etc., other considerations might come into play.

    The Minimalist Landscape Photographer: What do you really need?

    But as a general guideline for landscape shooting, find yourself the highest megapixel camera you can afford (preferably weather sealed) and forget everything else. Save your money for something that I know understand is a much more important piece of the landscape photography pie. And that is…

    #2 – Lens

    The lens is the eye of the camera. Photographs are just physical manifestations of light and that light must travel through your lens before it ever reaches the camera. I’ve shot landscapes with lenses that range from very good to the budget variety. As well as having used lenses that ranged in focal length from 10mm all the way to 600mm (yeah really).

    Some of those were 30-year-old fully manual lenses that cost $ 10 at a pawn shop and others that priced in the $ 3,500 range. What did they all have in common? They let light into my camera to make a photograph.

    The Minimalist Landscape Photographer: What do you really need?

    While it’s true that certain focal lengths render various effects in landscape photography, there is no set rule that you have to use a wide angle or any other focal length lens to shoot landscapes. Virtually any lens you have has the capability to shoot a good landscape photo. Wide angle lenses, say 14mm to 35mm, do capture more of the environment and add a sense of openness to your photos but they are not a requirement.

    The Minimalist Landscape Photographer: What do you really need?

    Shot at 24mm

    If you’re looking for a lens to use for landscape photography without breaking the bank or having to buy multiple lenses, simply search for the fastest (smallest f-number) lens you can find that falls in the medium wide angle range. I say medium wide angle because even though landscapes can be captured using virtually any focal length, it’s the wider lenses that tend to be more versatile in more situations. Something in the 14mm to 50mm range will suffice. There are plenty of options today to find excellent quality fast prime (fixed focal length) lenses for under $ 100.

    #3 – Tripod

    These days, nobody wants to carry around a tripod. And it’s true, there are ways to work around needing a tripod for some types of photography. This isn’t the case when it comes to landscape work. So often the lighting in a scene requires a shutter speed of such length that hand-holding the camera isn’t a possibility.

    While there will always be that person who says, “I can hold the camera still for ten seconds!” the fact of the matter is if you want ultimate sharpness in your landscape photos you will need a tripod. End of story.

    The Minimalist Landscape Photographer: What do you really need?

    That being said, this doesn’t mean you will have to sell your car in order to obtain a usable tripod. My first tripod cost me $ 35 from Wal-Mart. Was it the latest in lightweight carbon fiber with a graphite ball head and a cup holder? Of course not. Did it provide a solid platform for my camera? Absolutely.

    When you’re searching for a tripod, one of the things that you need to look out for is the weight rating. Be sure to get a tripod that can support your camera and lens combo with about another third of that weight added on as a cushion. Just like with the camera, the emphasis on tripod importance is somewhat paradoxical in that it serves an integral function in your work but at the same time being nothing more than something to hold your camera still.

    The Minimalist Landscape Photographer: What do you really need?

    Find a tripod that gives you the height versus the portability you need and can support the weight of your camera rig. Everything else is just icing.

    Final Thoughts on Landscape Photography and Minimalism

    These days, I find myself fortunate to have much more refined and varied equipment than I had 15 or even 10 years ago. Generally, though, 90% of my landscape work is shot using only two lenses which range from 14mm to 24mm. There are times when I venture out to the 50mm range and beyond but not often.

    So really, if I had to, I could do virtually all my work with one camera and one 24mm lens if the need should arise. Being a minimalist landscapist is often brought about by necessity and coupled with the need to make photographs. Remember, you really only need three things:

    1. Camera – Get the highest resolution camera you can afford. Weather sealing is a plus.
    2. Lens – It’s possible to get great results with only one lens. If you can, find a lens that is a medium wide angle with a fast speed (low f-number).The key is to learn to use whatever lens that might be to its fullest potential.
    3. Tripod – Even a minimalist needs a tripod. They can be found extremely cheap if you have realistic expectations. Be sure to use a tripod that can support your heaviest camera and lens combo plus one-third.

    Conclusion

    Yes, that’s truly all you need to make landscape photographs. The gear you use can extend into the realm of high-end GND filters, multi-thousand dollar cameras, space-age tripods, and lenses that would make NASA proud. But when you peel back all the layers, only three things are needed: a camera, a lens, and a tripod.

    Once you have those, everything else is up to you. Becoming a successful landscape shooter has more to do with how you see light, the scene, and how adept you can become to tailoring the image based on the gear you have on hand. Being a minimalist landscapist does not necessarily translate into being a second rate one.

    The post The Minimalist Landscape Photographer: What do you really need? by Adam Welch appeared first on Digital Photography School.


    Digital Photography School

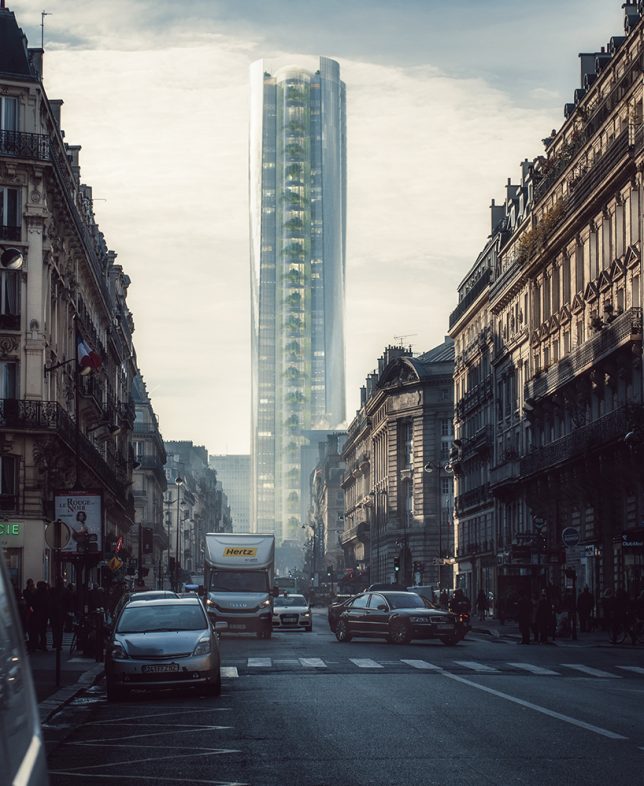
  • MAD Architects Redesign Turns Ugly Paris Tower into Giant City-Scale Mirror

    [ By WebUrbanist in Architecture & Offices & Commercial. ]

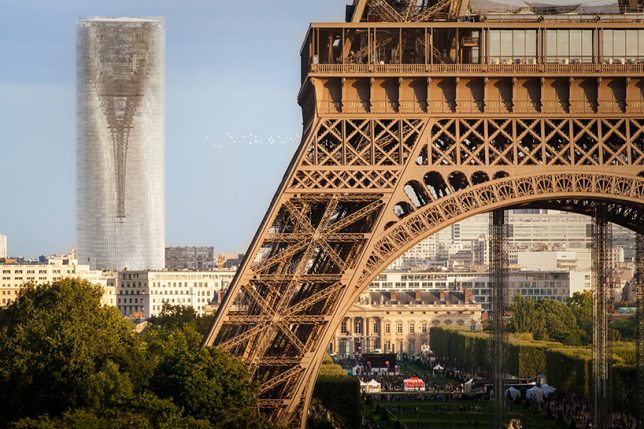
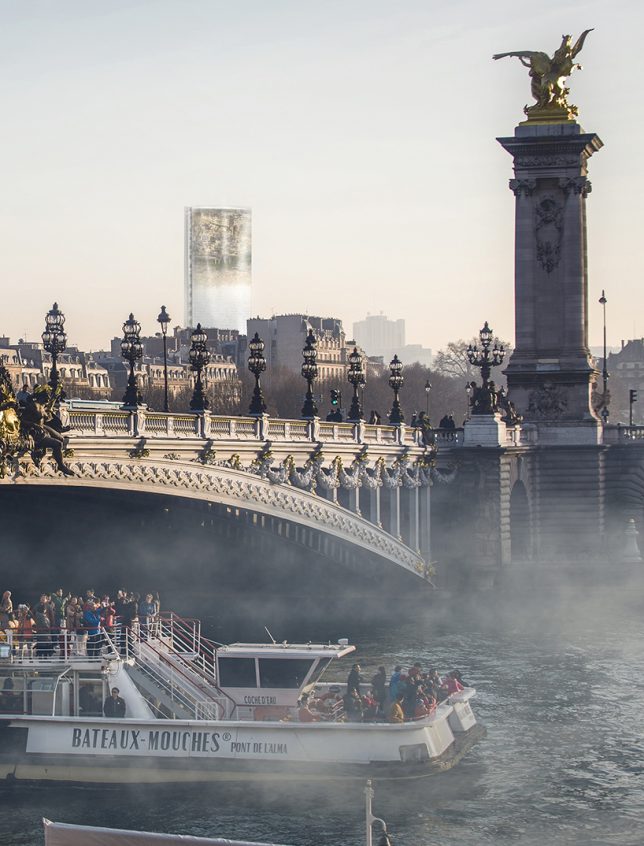
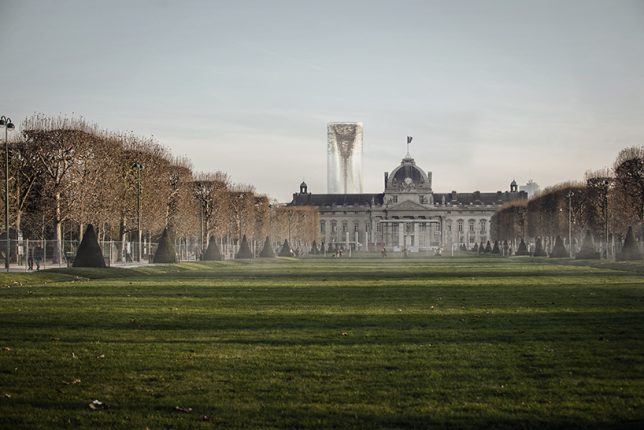
    Tall, dark and brooding, the infamous Maine-Montparnasse Tower is an unexciting skyscraper, especially by Parisian standards, but that could all change if MAD Architects converts it into a city-scale mirror. Their renovation proposal employs clever optical tricks to reflect and invert the surrounding cityscape.

    When it was built, Montparnasse was the tallest building in France and heralded as a technological achievement. But unlike the Eiffel Tower, which was controversial at first but became a symbol of the city, this skyscraper never gained iconic status — in fact, it led urban building heights to be capped at seven stories. Some quip it has the most beautiful views in the city, in part because those views don’t include the building.

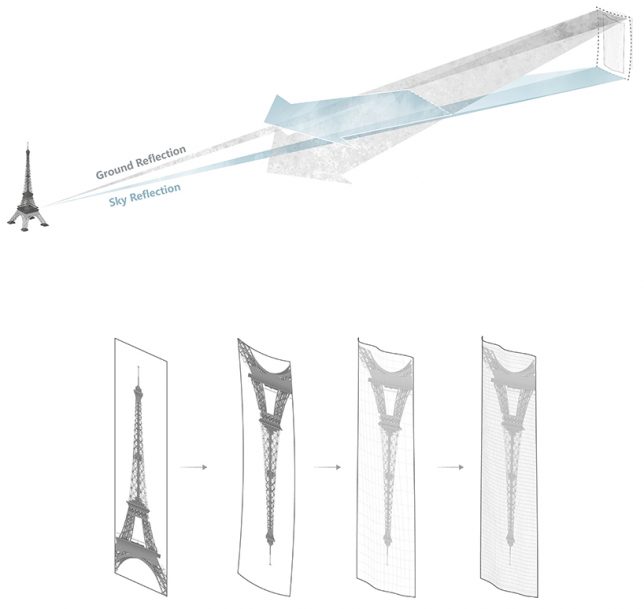
    MAD Architects aims to change perceptions of the tower and its role in the city using concave glass panels tilted at an angle to create reflections of the surrounding built environment.

    Viewers would be able to see surrounding streets, roofs and buildings in its mirrored facade. In a way, the resulting design both blends into the environment while also highlighting the beauty of the French capital and showing it from generally unseen angles.

    “Today, we cannot really demolish this building and the historical regrets it stands for,” explains one of the architects behind the proposal, “but we can establish a new perspective to re-examine and think about how humanity can co-exist and interact with the tower and its environment, to bring meaning to our hearts.”

    Perhaps unfortunately, while the firm was shortlisted in a redesign competition, another team was chosen to renovate the structure before the upcoming Olympic Games. Still, the design idea is out there, and another city might have its own ugly tower in need of transformation.

    Share on Facebook


    [ By WebUrbanist in Architecture & Offices & Commercial. ]

    [ WebUrbanist | Archives | Galleries | Privacy | TOS ]


    WebUrbanist

  • Speed up Your Workflow with the Accent AI Filter in Luminar and Batch Processing

    It’s not uncommon for me to sit down at my computer with a memory card full of images and stare blankly at my ever-growing Lightroom catalog while my mind reels at the thought of editing each and every one of them. Many photographers have experienced this phenomenon and there are certainly some good methods of dealing with it such as using Presets in Lightroom, syncing edits across multiple photos, or even just copying and pasting a series of edits from one image to the next and then tweaking as you go.

    Other programs offer similar tools for processing multiple images at once, but the Achilles Heel of this type of workflow is that the edits are often static in nature. You can choose from a predetermined set of values (e.g. Clarity +10, Saturation +5, Highlights -20, etc.) and then apply that to many images at one time. But what if some of your images require subtle changes to those parameters?

    Lightroom and just about every image editor I have ever used for batch processing won’t tweak your editing parameters if a picture needs a little extra contrast boost or exposure adjustment. That’s where Luminar is different, and its unique Accent AI filter combined with the program’s built-in batch processing offers a great way for you to significantly speed up your workflow while producing outstanding images for yourself, your clients, or your fans on social media.

    How to Speed up Your Workflow Using the Accent AI Filter in Luminar to do Batch Processing

    After batch processing with the Accent AI filter in Luminar.

    Accent AI Filter in Luminar

    The Accent AI filter is new in Luminar Neptune, an update to Luminar that was released this summer. It works by using artificial intelligence to analyze your image and make adjustments depending on where it thinks the picture needs it most. Accent AI isn’t just a predetermined set of adjustments, but a series of tweaks and edits applied dynamically to the image, all controlled by a single slider that lets you control the overall intensity of the filter.

    When I edit my images in Lightroom I often start with a custom preset that includes many alterations such as sharpness, highlights, shadows, tone curve, etc., and then adjust those on a per-image basis according to how I want them to be fine-tuned. It’s the latter part of that process which becomes tedious, and it’s precisely where the usefulness of the Accent AI filter really starts to show.

    If Luminar thinks that an image might benefit from lowering the highlights, increasing shadow detail, altering the exposure, or any number of other editing parameters then it adjusts all of these at once instead of forcing you to edit individual sliders and change numerical values.

    How to Speed up Your Workflow Using the Accent AI Filter in Luminar to do Batch Processing

    Original unprocessed image. All I did to edit this into the image you see above was to use the Accent AI filter in Luminar and nothing else.

    Applying the Accent AI Filter

    Another example of the effectiveness of the Accent AI filter is this image of the Seattle skyline I took from the Sky View Observatory at the top of the Columbia Center Tower. I spent a lot of time using the various sliders in Lightroom to try to get a decent final result. But when opened the same picture in Luminar and used the Accent AI filter, I got a great finished photo in a matter of seconds.

    How to Speed up Your Workflow Using the Accent AI Filter in Luminar to do Batch Processing

    Original photo. Listen closely and you’ll hear a sad trombone playing in the background.

    The first version, processed only using Lightroom. I spent about 10-15 minutes to achieve this in LR.

    The Luminar version is so good I like it even better than the results I got from manually tweaking all sorts of sliders in Lightroom, and it literally took less than 10 seconds with the single Accent AI slider.

    How to Speed up Your Workflow Using the Accent AI Filter in Luminar to do Batch Processing

    Applying the Accent AI filter dramatically improved the image. The only thing I don’t like about this picture are the spots from dust on my lens in the top-left corner. Accent AI is great at many things, but it won’t fix blemishes like that. Luminar does include a powerful Erase tool to fix blemishes if you want to, but of course, it doesn’t work for batch processing.

    Accent AI can also be used in combination with other filters in Luminar to enhance your images even more. You can get just the right combination of editing parameters to make your photos shine. I often use the Accent AI Filter as a starting point, usually adjusting the value to between 60 and 80, and then apply other edits as I need them like Vignette, Dehaze, or Soft Focus.

    But the real power of Accent AI lies in how it can be used for batch processing wherein it can dramatically speed up and enhance the results of your photo editing workflow.

    Creating Presets in Luminar

    How to Speed up Your Workflow Using the Accent AI Filter in Luminar to do Batch Processing

    Click the Add Preset button (shown here with a red circle around it) to create a new Preset that you can use when Batch Processing several images.

    In order to use Accent AI for batch processing you must first create a preset, since you can’t just apply individual filters when going through a batch of images. Your mileage may vary but I’ve found that a good place to start when working with this type of operation is a value of 75. Set that, then click the icon third from the left (circled in red on the screenshot) and give your Preset a name, but make sure it’s descriptive like “Accent AI 75”.

    Presets can contain as many filters as you like. I have create several for different types of images including: landscape, close-up, portraits, etc. All of them include the Accent AI filter and a combination of other filters in order to get the right look. The heavy lifting is done with the Accent AI filter, though. So I have a few different presets created with just that one filter set to different values like 60, 80, and 100 so I can quickly apply a single Accent AI adjustment to multiple images at once.

    The Accent AI filter shines

    Since the Accent AI filter examines each image individually and edits them based on where it thinks they need to be altered, I can generally trust it to give me good results and often don’t even need to use any other adjustments or filters.

    Another way to approach batch processing with Accent AI is to open a single image from a collection of similar photos, apply the filter just as much as you want for that specific image, and then save that value as its own unique Preset. Then enter the Batch Processing mode and apply that Preset to all of your images at once.

    How to Speed up Your Workflow Using the Accent AI Filter in Luminar to do Batch Processing

    The thought of going through and editing each one of these pictures individually really bugs me. I created a preset called Cicada Accent AI 82 for editing these in a batch, which was nothing more than the Accent AI filter set to 82 Percent.

    The major difference between using the Accent AI Filter in Luminar and syncing (or copy/pasting) edits in Lightroom is that Accent AI works dynamically to apply adjustments where they are needed. So each picture is edited individually rather than having all the same edits applied to all of them at once. That makes it ideally suited for batch processing in a way that is a step above what Lightroom and other programs have to offer. I’m not all that comfortable with applying a single preset in Lightroom to many pictures at once without then going through and tweaking all of them. But I’ve learned to trust the Accent AI Filter in Luminar and I’m quite pleased with its results.

    Batch Processing

    Once your preset is created, click the multi-file icon in the top-left of the Luminar interface to enter Batch Processing mode. Here you can set a variety of options such as export location, image format and quality, resizing, renaming, and more.

    How to Speed up Your Workflow Using the Accent AI Filter in Luminar to do Batch Processing

    In the example above I have loaded the Accent AI 75 Percent preset and ran a batch process on 50 photos of a cicada bug. Luminar processed all of them in about the amount of time it would have taken me to edit a single image in Lightroom.

    How to Speed up Your Workflow Using the Accent AI Filter in Luminar to do Batch Processing

    A quick caveat

    As good as the Accent AI filter is for batch processing, it does have some important limitations that you should be aware of. I have found that it works best for nature, landscape, and architecture photography and generally prefer its results in those types of situations over portraits.

    That’s not to say it isn’t useful for portraits, just that I’m a bit overly picky and tend to obsess over small details that even the advanced artificial intelligence in the filter can’t quite match. Also there can be a tendency to apply it a little too much, especially when you first start using it. My advice would be to hold back a bit to a value of 40 or 50, especially when batch processing. Sliding the filter all the way to the right can sometimes result in photos that look a little too over-edited and fake, so it might be best to start small and then find how you like to use it over time.

    How to Speed up Your Workflow Using the Accent AI Filter in Luminar to do Batch Processing

    Conclusion

    Even if you don’t like the idea of trusting a computer to edit your photos for you, I would encourage you to at least give the Accent AI filter inside Luminar a try. Use it in combination with a couple other filters and see how it could save you a great deal of time, especially with batch processing or generating proofs for clients. You might be surprised at how much you like it.

    The post Speed up Your Workflow with the Accent AI Filter in Luminar and Batch Processing by Simon Ringsmuth appeared first on Digital Photography School.


    Digital Photography School

  • Apple acquires AI startup that scores your photos’ framing, composition and more

    Apple has reportedly acquired a small computer vision startup called Regaind, according to TechCrunch, who is citing ‘multiple sources.’ The acquisition falls onto our radar because of what Regaind’s technology is designed to do, namely: score photographs based on their composition, lighting, perspective, and other aesthetic qualities.

    In other words, the company’s computer vision algorithms can tell how ‘good’ your photo is, insofar as such things can be analyzed objectively.

    TechCrunch reports that the acquisition happened ‘earlier this year’, and while Apple hasn’t confirmed the news, the statement it sent to TechCrunch doesn’t deny it either. In fact, it’s about as close to ‘confirmation’ as Apple ever gets in such matters:

    Apple buys smaller technology companies from time to time, and we generally do not discuss our purpose or plans.

    A quick look at Regaind’s website will give you a look at the kind of information the company can ‘see’ in your photographs. This more professional portrait, for example, scores high in the areas of Aesthetics, Sharpness and Exposure, with multiple positive ‘Properties’ highlighted such as ‘Subject Well Framed’ and ‘Pleasant Blur.’

    This birthday snapshot, however, scores much lower and suffers from ‘Dull Colors’ and an ‘Annoying Background.’

    How Apple intends to use this technology (or already is?) may never be explicitly stated, but Regaind’s technology will no doubt make it into Apple’s Photos app on both macOS and iOS, and may even help future iterations of the iPhone camera prompt you to frame your subject better, seek better lighting, or get rid of that ‘Annoying Background’.

    Your guess is as good as ours, but if you want to learn more about this company Apple almost certainly acquired, head over to the Regaind website by clicking here.

    Articles: Digital Photography Review (dpreview.com)

  • 10 macro photography tips for beginners

    1. The Lens

    There are several good lens options out there for macro photography. You could use extension tubes combined with a normal lens, which gives you some magnification; or, even better, you could reverse a normal lens which, when combined with extension tubes, gives even more magnification.

    The most convenient and flexible option though, especially for a beginner within macro photography, is to get a dedicated macro lens.

    The most popular models come in focal lengths between 90-105 mm, and have a 1:1 magnification ratio. There are also shorter focal lengths such as 50 or 60mm, but these have shorter working distances, which means you have to get very close to your subject and risk scaring it away. 1:1 magnification means that, when you focus as closely as possible, your subject is as big on the sensor as it is in real life. So if you have a full frame sensor of 36×24 mm, it means that any insect you want to shoot that is 36mm long just about fits in your picture.

    If you use an APS-C or Micro Four Thirds camera, you will get your subject magnified even more at 1x, as the sensor is smaller. These normal, 1:1 macro lenses are made by most major brands, such as Sigma’s 105mm, Canon’s 100 mm, Nikon’s 105mm, Samyang’s 100mm, Tamron’s legendary 90mm, Sony’s 90mm and Tokina’s 100mm. They cost around $ 400-$ 1,000, and they are all sharp and a great value for the money.

    Many of these lenses have image stabilization, which is a good thing, as it makes composition a lot easier. Have a look at reviews and buy one that you like. You can’t go wrong with a ~100mm 1:1 macro lens—image quality wise, most of them produce comparable results.

    2. Location and weather

    Some of the most interesting subjects to photograph with a macro lens are small bugs and insects. Flowers and various plants are also fun, and can often make interesting abstract images. The locations that offer the most to a macro photographer are, in my experience, places with lots of flowers and plants. Botanical gardens are especially great.

    The best time to go out if you want to shoot bugs and insects is whenever the outside temperature is about 17°C (63°F) or warmer, as insects tend to be more active when it is warm outside. On the other hand, if you are good at finding insects where they rest (I have personally found this very hard), they hold still longer when it is cold. Some macro photographers like to go out on early summer mornings to catch the insects when they’re not quite so active.

    Overcast weather is usually better than sunny weather, as it gives a softer light.

    3. Flash

    If you are shooting very small subjects, such as insects, the focal plane will be extremely narrow—a couple of millimeters or so. Thus, you will have to set your aperture to at least F16 to have a chance of having most of an insect in focus.

    With a small aperture like that, and the need for a high shutter speed due to the shaking of the lens and the subject, a flash is a must. You can use any flash for macro photography, in most cases even the built in pop-up flash of cheaper DSLRs can work well, but my personal favorite is the cheap, compact and lightweight Meike MK-300.

    There are some macro photography situations in which a flash is not strictly needed. One situation is if you are okay with shooting at F2.8 or F4, and there is plenty of sunlight. This could be the case if you are not going all the way to 1:1 magnification, and thus can get a good depth of field with a large aperture (when you move away from your subject, the depth of field will increase).

    The upside with not using a flash is that you get more natural looking photos with natural light. But if you are going to shoot insects up close, and want to have more than a small part of them in focus, you will have to use a flash.

    4. Diffusor

    If you are using a flash for your macro photography, I highly recommend using a diffusor as well. A diffusor is simply any white, translucent material you can find, which you can put between the flash and your subject.

    The larger the light source, the smoother and softer the shadows in your photos become. This is why huge octaboxes are popular in portrait photography. And this is why you should use a diffusor in macro photography: it makes the size of the light from the flash much larger, and thus the light in your photos will look less harsh, and the colors will come out better.

    In the beginning, I used a normal white piece of paper that I cut a hole in and stuck the lens through. It was a bit flimsy though, and would get crumpled during transport. My next diffusor was a filter for a vaacuum cleaner, which I also cut a hole through and put around the lens. This was a great diffusor as well.

    Currently I use a purpose-built soft diffusor, which can conveniently be folded together when not in use.

    5. Shutter speed

    In macro photography, you will find that the small vibrations from your hands when holding the camera will be enough to make the whole picture jump around like crazy. Combine this with trying to photograph an insect sitting on a plant that is swaying in the wind, and you have a real challenge on your hands. See the video at the top of this article to understand what I mean.

    A high shutter speed is therefore to recommend, especially for beginners. Begin with a shutter speed of 1/250 or faster.

    However, the light duration from a speedlight is usually extremely short, and can alone freeze your subject, even combined with a slower shutter speed such as 1/100 s. The reason is that the flash will stand for the majority of the light in the photo, so even if you happen to shake your camera, it will be barely noticeable in the exposure. With a short focal length macro lens, you can take nice looking photos even at 1/40 s shutter speed.

    The benefit of using a slow shutter speed is that you can avoid the black background that you otherwise often get in macro photos taken with a flash. Instead, you can get some color into your background, making the photo look a bit better (at least in my opinion).

    In summary: start out with a fast shutter speed. When you have practiced a bit, try gradually lowering the shutter speed, combined with a flash.

    6. Focusing

    First of all, you can forget about autofocus right away. Most macro lenses’ autofocus is not fast enough to keep up with the jitters and shaking that comes with 1:1 magnification. It is helpful to just give up the thought of autofocus from the very beginning, and learn to focus manually instead.

    Second of all, forget about tripods. Unless you are shooting something completely static, such as a product in a studio, tripods will be very impractical to use in macro photography.

    For shooting insects or flowers outside, you will be disappointed to spend time setting up the tripod, only to discover that the small vibrations of the flower in the wind makes the photo blurry anyway. Not to mention that any insect will have flown away during the first 10 seconds of your 1 minute tripod setup.

    Over time I have developed the following method of focusing, which I think gives the best results: Hold the camera with both hands, and preferably anchor your elbows against your sides or legs to give even more stability. Next, turn your focusing ring to approximately the magnification you want to get. Then focus, not by touching the focusing ring, but by slowly rocking towards the subject, while trying to snap the photo exactly at the right moment. See the video for a visualization of this technique.

    If you can get one out of 5 photos focused and sharp in the right place, consider that a good ratio. Expect to throw away a lot of photos when doing macro photography, especially at the beginning.

    7. Focal plane

    As I already mentioned, a close focusing distance will mean an extremely narrow focal plane. And since we’re not talking about advanced techniques like focus stacking, you will find that the best macro photos come when you utilize the narrow focal plane in clever ways.

    Try to find subjects that are flat, and put them in the focal plane. Examples are small, flat flowers, or butterflies photographed from the side, or beetles with fairly flat backs.

    Another example of utilizing the narrow focal plane in a creative way is to make an insect’s head “stick out” of the blurry bokeh. This makes for an interesting and aesthetically pleasing effect.

    8. Angles

    A common newbie mistake is to conveniently snap the photo from where you stand, at a 45 degree angle towards the insect or flower. This will make your photo look like every other newbie macro photo out there—in other words: it will be boring.

    Try to find uncommon angles, such as shooting the insect from the side, from the front, or from below. Make use of your flip out screen if you don’t want to crawl on the ground. If the insect sits on a plant or a leaf, try pulling up that plant to hold it against the sky—it gives you an interesting angle and a more beautiful background.

    9. Magnification

    Something I did a lot as a beginner in macro photography was to always go for maximum magnification. I thought, “the bigger the insect in the frame, the cooler the photo.” But the truth is that you can often find a more beautiful or interesting photo if you back off a little, and let the insect look just as small as it actually is, depicted in its surroundings.

    10. Sharp objects

    And lastly, never put sharp objects such as knives or drills against your expensive macro lens. Despite what some YouTubers seem to suggest in their thumbnails, also avoid cigarette lighters and toothpaste. Putting stuff like this against your lens is only useful for clickbait thumbnails on Youtube!


    Micael Widell is a photography enthusiast based in Stockholm, Sweden. He loves photography, and runs a YouTube channel with tutorials, lens reviews and photography inspiration. You can also find him as @mwroll on Instagram and 500px.

    This article was originally published on Micael’s blog, and is being republished in full on DPReview with express permission.

    Articles: Digital Photography Review (dpreview.com)

  • New product overview videos: Sony a9 and FE lenses

    We’re always expanding our collection of product overview content, and we’ve just added videos for the Sony a9, as well as a brace of recent FE lenses – the 12-24mm F4 and 16-35mm F2.8 GM wideangles, and the 100-400mmF4.5-5.6 GM telezoom.

    Take a look at some of the key features these products offer – demonstrated in the shooting scenarios they were built to handle. For more overviews and gear tests, be sure to subscribe to our YouTube channel.

    Product overview: Sony FE 12-24mm F4 G

    Product overview: Sony FE 16-35mm F2.8 GM

    Product overview: Sony FE 100-400mm F4.5-5.6 GM


    This is sponsored content, created with the support of Amazon and Sony. What does this mean?

    Articles: Digital Photography Review (dpreview.com)