Month: October 2017

  • Houses to Human Hearts: 13 Recent Breakthroughs in 3D-Printed Designs

    [ By SA Rogers in Conceptual & Futuristic & Technology. ]

    When 3D printers are widely accessible and affordable, will we see another industrial revolution, enabling us to manufacture just about everything we need on demand? Progress made in 3D printing thus far looks promising. Designers, engineers, architects and even novices are printing everything from fully functional human hearts and custom biodegradable shoes to full-scale architecture and bicycle bridges. One designer even printed himself a large-format camera based on three models he couldn’t afford.

    Beating Artificial Heart

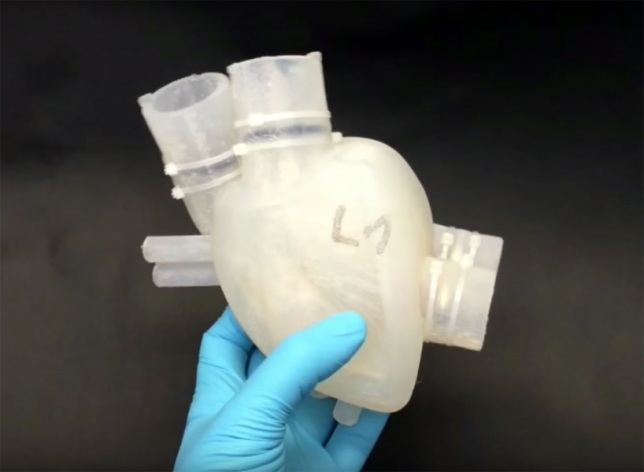
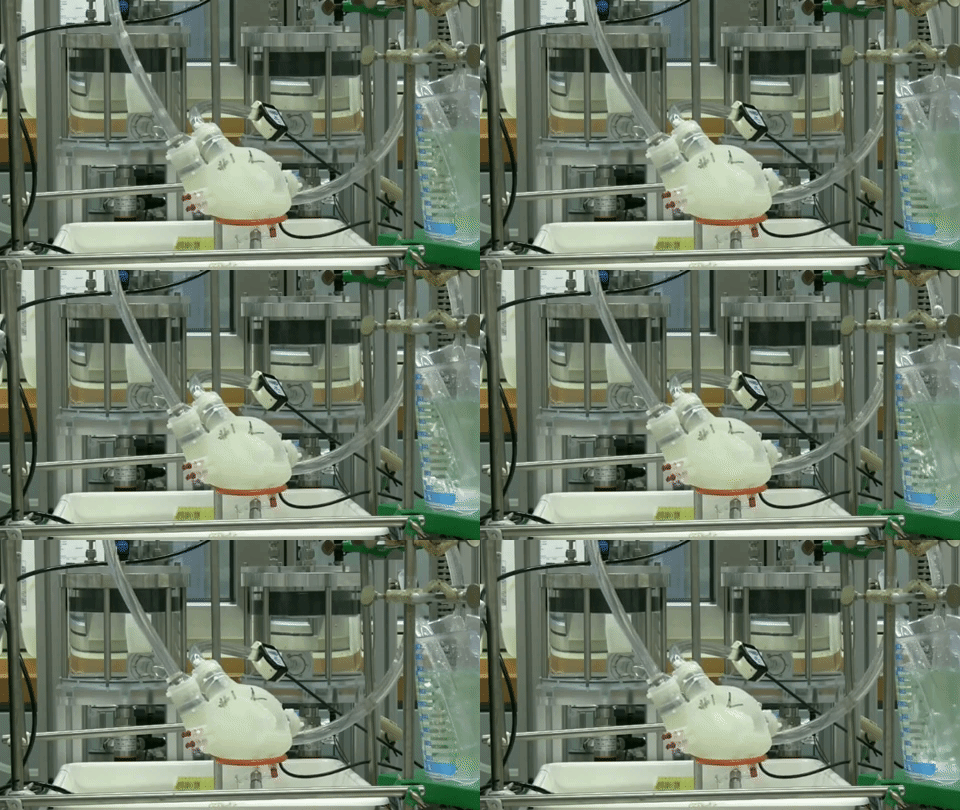
    Created by researchers at ETH Zürich, this 3D-printed silicone heart beats almost like a real one, and though it’s not yet considered a viable long-term replacement, it can help keep a patient’s blood flowing while they’re waiting for a donor organ. Right now, the material can only withstand about 45 minutes of usage, but the team sees it as a proof of concept showing a way forward for artificial hearts in the future.

    Ceramic Constellation Pavilion

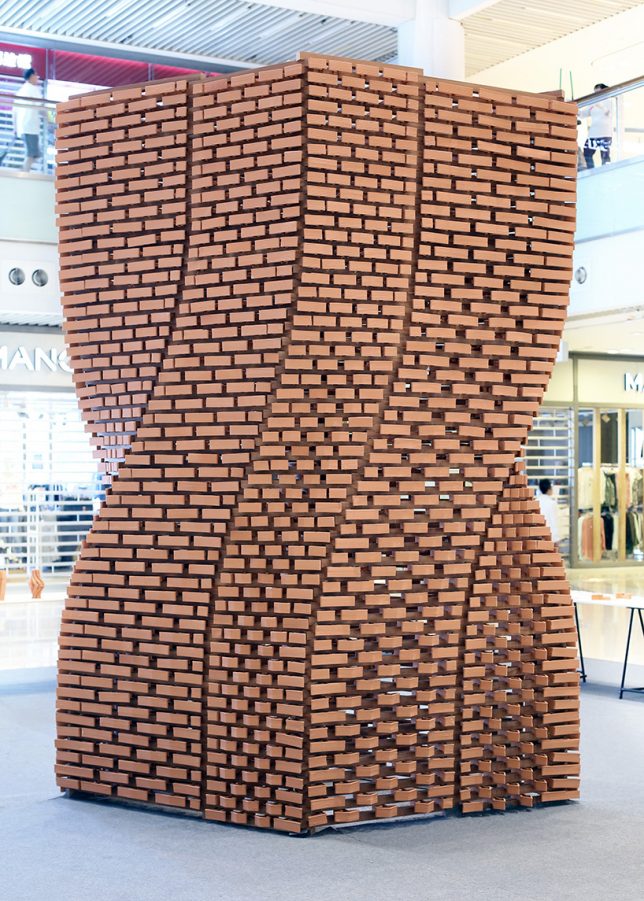
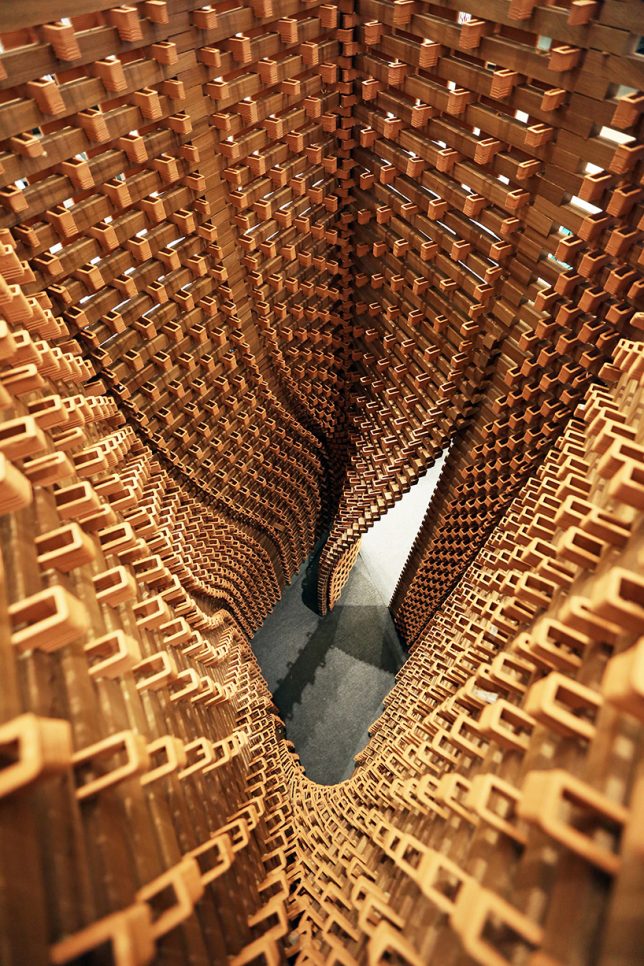
    Made entirely of 3D-printed terra-cotta bricks with a unique shape that allows them to slot together without conventional brick bonding techniques, ‘Ceramic Constellation Pavilion’ gives us a glimpse at what we might be able to achieve with 3D-printed architecture in the decades to come. The structure was created by the University of Hong Kong’s Department of Architecture along with Sino Group. “In a context that has largely been shaped by standardization and mass production, the project seeks to overcome the constraints of today’s architectural production through the introduction of a structure made entirely of non-standard components.”

    Robotic Sign Language Arm

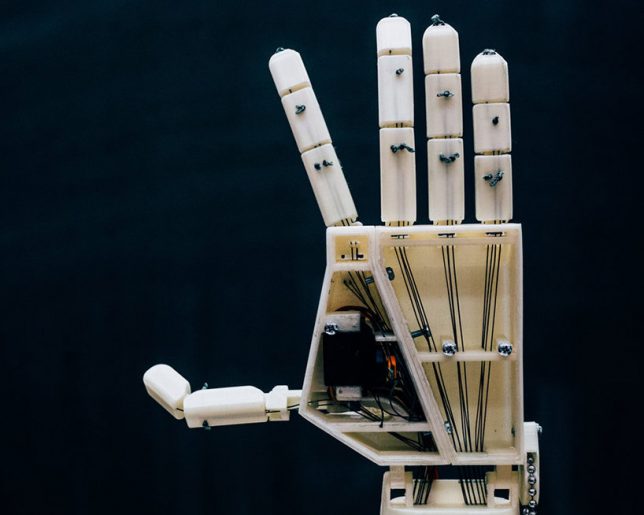
    Shortages of sign language interpreters internationally (and the difficulty of finding one on the spot) led the students behind Project Aslan to seek better ways to bridge the communication gap between the hearing and deaf communities. This robotic sign language hand is one result, using 3D printing to make it more affordable and easy to build. The robot receives information from a local network to activate its joints, allowing it to interpret written language into sign language. It’s not meant to replace human interpreters, but rather step in when they aren’t available, and can be used to teach sign language, too.

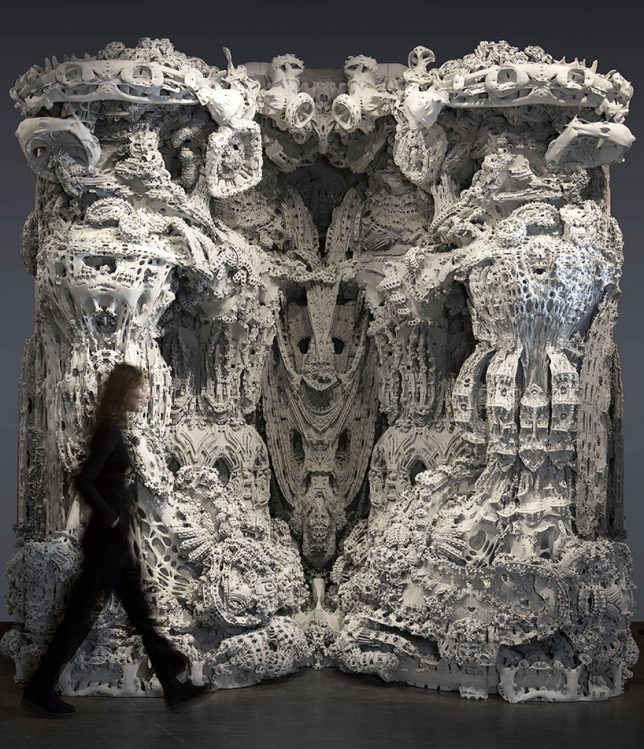
    Digital Grotesque II 3D-Printed Grotto

    Designed entirely by algorithms, ‘Digital Grotesque II’ is a 3D-printed pavilion made of 7 tons of printed sandstone, with an incredible 1.35 billion surfaces. It’s another look at how we could achieve unprecedented complexities, porosities and spatial depth in future architecture using 3D printing and other new methods of fabrication as robotics become more accessible.

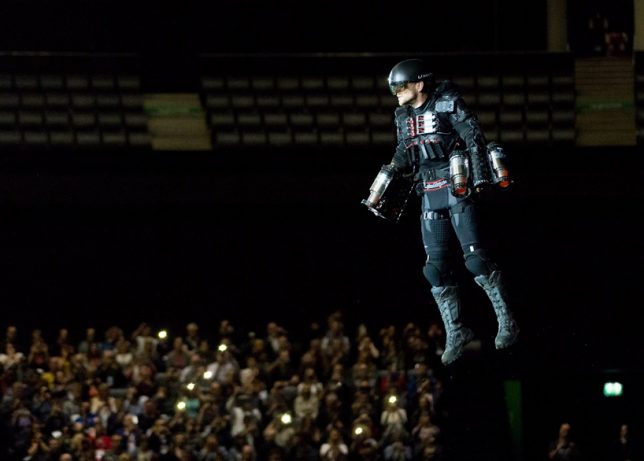
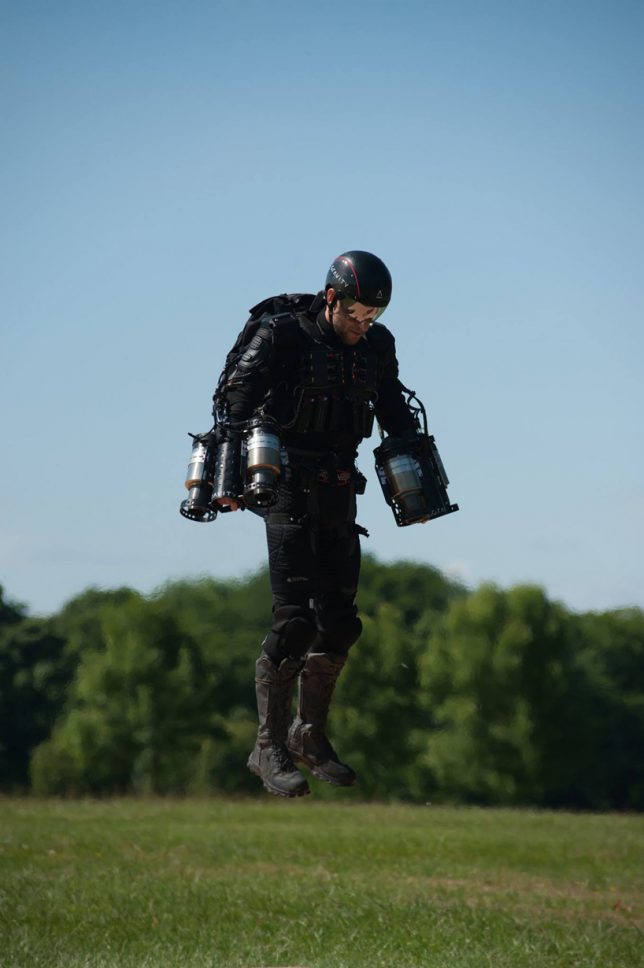
    Flying Iron Man Suit

    Considering the optimism and rapid rate of progress in the 20th century, many of us expected to have cooler toys by now. Are we finally about to get a suit that lets us fly? Kind of. The Iron Man suit by Gravity Industries is set to be 3D printed in metal, with six miniature jet engines mounted to the arms and back for vertical takeoff and flight. However, it’ll literally take an Iron Man to wear the thing, as it takes enormous strength to control the jets. The suit itself weights up to 90 pounds.

    Next Page – Click Below to Read More:
    Houses To Human Hearts 13 Recent Breakthroughs In 3d Printed Designs

    Share on Facebook


    [ By SA Rogers in Conceptual & Futuristic & Technology. ]

    [ WebUrbanist | Archives | Galleries | Privacy | TOS ]


    WebUrbanist

  • Video comparison: GoPro Hero6 ‘is what the Hero5 should have been’

    GoPro announced the all-new Hero6 last week, and while it might look identical to the Hero5 on the outside, the camera’s capabilities have been vastly improved thanks largely to a new custom-designed image processor called the GP1. But does this fancy new processor deliver on its promises for better stabilization, improved dynamic range, and improved low light performance?

    The folks at Vistek wanted to find out, so they pitted the Hero6 against its predecessor in a range of head-to-head tests that demonstrate one thing very clearly: The GoPro Hero6 definitely delivers on its promises.

    From stabilization—which is now available all the way up to 4K/24p—to dynamic range and beyond, the Hero6 soundly beat the Hero5 in every test Vistek threw its way. Of course, you’d expect this from a new model of the same action camera, but for the most part, the improvements are not simply incremental… they’re obvious.

    As with any small action camera there is still plenty of room for improvement; a small sensor is still a small sensor and there are plenty of things a tiny little action camera just doesn’t do particularly well no matter what. But as Vistek points out, GoPro seems to have listened to its consumers (and competition from companies like Yi) and built that action camera that ‘is what the Hero5 should have been.’

    The question now becomes: is it too little too late? But you’re the only one who can answer that.

    Articles: Digital Photography Review (dpreview.com)

  • How to Find More Creativity Through Using Less Gear

    In this article,

    A few weeks ago, I was packing for an 8-day photo workshop I was leading in the Alaska Range. It was autumn, which meant we’d be concentrating on the landscape, but there would likely be ample opportunities to photograph wildlife and create macros. That diversity meant that I would need to pack for every opportunity.

    How to Find More Creativity Through Using Less Gear

    A year ago, or heck, three months ago, that would have meant my bag would have included: two DSLRs, a 500mm f/4 with a 1.4x teleconverter, a 70-200mm f/2.8, a 24-105mm f/4, a 17-40mm, a fixed 14mm, a polarizer, a variable neutral density filter, a big Gitzo tripod to hold that heavy kit, and a monster camera bag to hold it all. The total weight of all my camera gear would probably come in around 50 pounds, maybe more.

    So there I was, packing my camera gear for more than a week of shooting the grand landscapes and wildlife of Alaska. I loaded my small daypack, topped it off with a rain jacket and a sweater, threw it over my shoulder and walked out the door. Total camera gear weight was under 8lbs.

    How to Find More Creativity Through Using Less Gear

    What happened?

    I realized that all my gear, lenses, filters, and the enormous DSLR bodies; none of them were actually improving my photography. Plus, I was being hindered by all that stuff. I’d be out shooting and find I was more concerned about selecting the right lens or filter than I was about the actual composition.

    And that, right there, is where creative photography goes to die.

    How to Find More Creativity Through Using Less Gear

    Cutting back and using less gear

    So I cut back. I adopted the Lumix mirrorless system and acquired three lenses for the trip: a 12-32mm, a 45-150mm, and a 300mm f/4 (the only sizeable piece of glass in the kit). Since the Lumix system is micro four-thirds, all those lengths are doubled when compared to a full-frame camera. I can cover almost anything from 24-600mm in a kit that weighs a small fraction of my DSLRs. I could, quite literally, fit it all in my pockets.

    When in the field, I can switch from one lens to another quickly and without fuss. I learned to keep the most likely lens set on the camera. If wildlife was a possibility, then the 300mm lived on the camera. When we were hiking and I was looking for wide landscapes, then the 12-32mm was the go-to lens. On gray days with patchy sun, the mid-range 45-150mm zoom was always ready.

    How to Find More Creativity Through Using Less Gear

    Time to be more creative

    When I saw a composition,  I would raise my camera and shoot, re-compose, shoot again, and so on for several minutes, while other photographers were still working out the best lens, camera body, or filter for the situation.

    I also found I had more time and energy to simply sit on the tundra, look, and wait. I wasn’t fiddling with my gear so I had long moments to experience the places where I was photographing.

    Come to think of it, that may actually be why I feel my photography improved so much. I had the time to be creative.

    How to Find More Creativity Through Using Less Gear

    As any photographer worth their salt knows, making images is not formulaic, it is creative. In order to be creative, we have to be open to the situation, not distracted. And we have to be ready when the light or action is happening. My gear, or lack of it, gave me that time and flexibility.

    How to Find More Creativity Through Using Less Gear

    Did I ever miss all my equipment?

    I’d like to say no, but there were times, that yes, I did miss my old kit. Cutting back my camera gear meant some sacrifices. Occasionally those sacrifices involved a particular focal length or filter that I hadn’t brought along. Once or twice I wished for the clean bokeh of my 500mm f/4 to separate a bird from a tangled background and on one occasion, the 24mm equivalent wasn’t wide enough to capture the expanse of the sky I was after.

    How to Find More Creativity Through Using Less Gear

    Comparison rears its ugly head

    But the sacrifice I remember most clearly (and I feel like an idiot for even mentioning this one) was my vanity. At one point, I was among a good size group of serious photographers not related to the workshop I was leading. There were more 500mm and 600mm f/4s hanging off sturdy carbon tripods than you could shake a stick at. Meanwhile, I stood there, an actual bonafide professional photographer, with a tiny point-and-shoot sized mirrorless camera and a couple of itty-bitty lenses in the pocket of my jacket.

    I wanted to justify my compact gear, defend my decision by bragging about how good my kit actually was, even compared to their monstrous cameras – but I didn’t. Instead, I kept my silence, listened to their discussions of lenses, f-stops, and autofocus speeds, and thought instead about my next composition.

    How to Find More Creativity Through Using Less Gear

    I bring up this somewhat uncomfortable subject because I think that this sense of inadequacy, in the lives of photographers, is very, very real. We want to be taken seriously. And when we are in the field, (when no one can see the images we are actually creating) we are usually judged by the gear we are carrying and using. There is a hierarchy in which those with the biggest, most expensive glass and bodies rise to the top, as though their investment is somehow reflective of their skills or knowledge as photographers.

    How to Find More Creativity Through Using Less Gear

    Gear doesn’t make you a good photographer

    There is a lot of pressure to BE one of those people with the huge camera bag and big lenses. But the reality is that your gear has nothing to do with how good you are as a photographer. Gear helps, it’s even necessary to a certain extent, but its presence or price tag is not reflective of you, the photographer. It’s the images that matter.

    In the future, I’m going to try to let my photographs, not my gear, be the source of my pride (or inadequacy).

    How to Find More Creativity Through Using Less Gear

    Though not the Alaska Range, I continue to embrace the minimal gear mentality. I made this image the night before I wrote this article, on the beach in Homer, Alaska.

    The post How to Find More Creativity Through Using Less Gear by David Shaw appeared first on Digital Photography School.


    Digital Photography School

  • Panasonic firmware debugs GH4, improves stabilization on 42.5mm and 30mm lenses

    Panasonic has released new firmware for the Lumix DMC-GH4 camera, its 42.5mm f/1.2 portrait lens and the 30mm f/2.8 macro. The firmware was introduced the same day as the V2.0 for the Lumix DC-GH5, but was rather over-shadowed by the bigger news (for obvious reasons). That doesn’t mean it’s not worth mentioning though.

    On the camera side, the update for the GH4 fixes an issue that prevented image stabilization from functioning with some third party lenses when working in the variable frame rate video mode.

    For the lenses, the update brings Dual IS 2 to both the (H-HS030) Lumix G Macro 30mm f/2.8 ASPH Mega OIS and (H-NS043) Leica DG Nocticron 42.5mm f/1.2 ASPH Power IOS lenses, with individual updates for each of the models.

    The version 2 of the stabilization system that combines in-camera sensor movement with in-lens anti-shake units is said to provide better performance for stills shooters as well as stabilization in movie mode and 4K/6K Photo modes via a new gyro system in Dual IS 2 compatible bodies. At the moment only the DC-GH5 and G80/G85 support the system, which differs from the Dual IS modes used in the GX8 and GX80/85.

    For more information visit the Panasonic website, or follow the direct links to the firmware pages for the Lumix DMC-GH4, Lumix G Macro 30mm f/2.8 ASPH Mega OIS and Leica DG Nocticron 42.5mm f/1.2 ASPH Power IOS. Panasonic also publishes a chart that shows the version of Dual IS each lens/body combination will deliver.

    Articles: Digital Photography Review (dpreview.com)

  • RevolCam adds three accessory lenses and an adjustable light to any smartphone camera

    When we reviewed the Shiftcam for the iPhone 7 Plus earlier this year we found it to be one of the most user friendly and versatile lens attachments for the iPhone. The team behind Shiftcam has now returned to Kickstarter to launch a new multi-lens smartphone attachment: the RevolCam.
    Like the Shiftcam the RevolCam adds wide angle, fisheye and macro lenses to your smartphone camera but lacks a tele option. On the plus side it adds a built-in mirror for selfies and a detachable and adjustable LED light, providing additional illumination in dim conditions. Instead of the Shiftcam’s slider mechanism it uses a revolving design to allow for lens swapping on the fly.
    In contrast to the Shiftcam, which is device-specific, the RevolCam comes with a universal design and its makers promise easy and secure attachment to any smartphone via a clamp mechanism. This should also work on the main camera of dual-camera equipped devices.

    If you can live without a tele-attachment the RevolCam looks like an interesting accessory for mobile photographers who like to expand the camera feature set using attachment lenses. You can currently secure one by pledging $ 29 plus shipping on the RevolCam Kickstarter page which also makes it an affordable option. Delivery is planned for November 2017.

    Articles: Digital Photography Review (dpreview.com)

  • Review of the Latest Version of PaintShop Pro 2018

    In this article, I will review the latest version of PaintShop Pro 2018. I have a unique perspective, having used it over 17 years ago for the first time. Let’s see how it fairs now.

    Please note: this is a Windows-only program.

    Start of PaintShop Pro (PSP)

    Approximately 17 years ago I was working in retail selling computer hardware and software. A lot of people came in asking for Photoshop and were understandably shocked when they were informed the price was $ 1500. So being able to offer them an alternative for around $ 200 meant I made a lot of sales of what was then PaintShop Pro Version 7.

    Review of the Latest Version of PaintShop Pro 2018

    Since then, Corel bought the program and invested in further development. PSP (as it was known in the day) could do quite a bit of what Photoshop did, it had layers and masking, support for graphics tablets, and for the majority of people who just wanted to be creative, was a very cost-effective option. It was laid out in a similar way to Photoshop, functioned very similarly and to a certain extent was just as difficult to learn for a newbie.

    Things have changed a lot since then. Now, I have spent the last three years learning to use Photoshop to creatively edit my images beyond straight photography. With a new set of skills under my belt, it’s time to see what PaintShop Pro 2018 can offer once again.

    Price and Options of PaintShop Pro 2018

    PaintShop Pro 2018 is available in both Standard ($ 64.99 USD) and Ultimate ($ 79.99 USD) options, where Ultimate includes some other potentially useful Corel programs. For our purposes here, this review will only cover the Standard version.

    Purchase Full version for a new installation, or upgrade if you are a current user.

    Please note that PaintShop Pro 2018 is only compatible with Windows operating systems, however, it must also be noted that this is a perpetual license, not a subscription. You only need to pay once and it’s yours forever, which may appeal to some customers.

    Ease of Use

    On starting up PaintShop Pro you are greeted with a Welcome screen and the choice of Essentials or Complete.  Each screen is a different color to minimize confusion. At the bottom of each screen is a choice of links encompassing tutorials, free stuff and access to technical support.

    Review of the Latest Version of PaintShop Pro 2018

    There is also access directly within the program to purchase extra textures, software (including an upgrade to the Ultimate version) and lots of different plugins and special effect options.

    Creating a new file offers choices from a custom design and several different image or document presets.

    Review of the Latest Version of PaintShop Pro 2018

    The Essentials Workspace

    The Essentials workspace layout is very simple and clean with the usual central space dedicated to the image, a menu bar at the top, tool bar options to the left and right, and an image browsing interface (similar to Adobe Bridge) at the bottom.

    The left tool bar can be moved, docked, floated or stretched out to a single column of buttons. Adding or removing functions is easily done by clicking on the plus (+) at the bottom and selecting from the choices available. It is a pretty extensive list and would likely cover the requirements for most average users.

    The right tool bar by default handles the colour palette options and can also be docked by right-clicking and selecting that option.

    Review of the Latest Version of PaintShop Pro 2018

    The Complete Workspace

    The Complete workspace layout is a bit more involved with an additional Learning Center docked on the right-hand side. Good news is that if you switch between Essentials and Complete, the program remembers your preferences for laying out the menus so it stays consistent. Layers also dock much tidier in Complete workspace than they do in Essentials – so if you want to use Layers, I suggest using the Complete workspace. There is a fair amount of customization of the visual layout, sizing, and color options as well under User Interface.

    Keyboard shortcuts appear to be pretty similar to those used in Photoshop. I tested Ctl+Z (undo), B, and X with expected results.

    Review of the Latest Version of PaintShop Pro 2018

    Performance

    The system used for testing was an HP Z230 Workstation with an i7-4770 3.4Ghz processor, 12GB memory, and an SSD drive. The performance was quick and responsive. However noticeable lag was experienced when bringing in a large PSD file with around 50 layers. It took about a minute for the program to process and open the file.

    Linking to a Network Drive to view RAW files also showed some hesitation while the program did some background processing.

    Image Management and Editing

    Enhance Photo options are available within both the Essential and Complete workspaces. My preference is for the Smart Photo fix, as you get a large preview window to view the effect of adjustments, plus you have more options and control over the settings. One Step Photo Fix is a “click the button and what you get is what you get”. Smart Photo Fix gives you basic options but with a bit more control.

    Review of the Latest Version of PaintShop Pro 2018

    Smart Photo Fix option offers some basic editing options as well as a Before and After preview which is really useful.

    There are also some Lens Correction options under the Adjust Menu to help counter various distortion problems.

    The usual Adjustment layers are available; Brightness/Contrast, Curves, Hue/Saturation, and Levels being the most likely candidates, plus a few unique to PaintShop Pro. One feature I did particularly like was that it offers a preview of the effect from within the editing palette.

    Review of the Latest Version of PaintShop Pro 2018

    A preview window is offered on all the Adjustment Layers that I tested.

    Working with RAW images

    RAW images can be edited via a Camera Raw option. It appears to work similar to Lightroom, where you point the navigation at the desired folder and it pulls up the images in a grid view. I have everything saved on an NAS (Network Attached Storage), and the Computer navigation option couldn’t view it, but I was able to add a link to the NAS under the Collections>Browse more Folders option. It took a while for the program to make the network linkage, and bring up the images.

    Once you find the RAW file you want to edit, select it and click the EDIT Tab and it will open up a fairly basic panel with similar options to Adobe Camera Raw. It would be on a par with Lightroom version 3 or 4, so quite limited compared to current Adobe options. However, if you do not need the more advanced features, it is quite functional.

    Review of the Latest Version of PaintShop Pro 2018

    Raw file editing is fairly basic compared to today’s standards (Adobe ACR) but it covers the bases for most home users without being too complicated.

    Creative Options

    Masks are still a bit clunky. When you want to add one, you are asked to choose from three options – if you want it to behave the same way you expect in Photoshop, choose Source Opacity. The default is Source Luminance.

    Review of the Latest Version of PaintShop Pro 2018

    No wonder I found masks so difficult to learn back when first using PaintShop Pro.

    The Scratch Remover worked alright but when I tested it on a textured background, there was an obvious blur visible where it had applied. Object Remover was a bit clunky to use, in that you had to select the object you wanted to remove with one tool, and the background you wanted to replace it with via a separate tool. Once applied it did a pretty good job. Some feathering of the edges, and it would blend in nicely.

    Here you can see a line of blur where I have used the Scratch Remover (red circle). I have also used the Content-Aware option but that is less obvious (purple circle).

    Text can be applied, and there are lots of options for texture, paint, brushes (though there is a very limited default range of brushes, you do have the option to purchase more or create your own).

    Review of the Latest Version of PaintShop Pro 2018

    Brushes and text and using layers.

    Conclusion

    PaintShop Pro 2018 is a program that is clearly aimed at the consumer market. With two levels of control, it caters to the most basic requirements, and still allows enough scope for people who want to stretch their editing capabilities.

    For those needing professional or advanced level editing Lightroom and Photoshop, both offer much more advanced functionality, but PaintShop Pro will cater to the vast majority of user requirements. The price is attractive, as is the lack of any ongoing subscription costs. A lot of work has gone into improving and modernizing the interface and there is a lot of flexibility offered as to how you can interact with the program.

    It offers a good range of tools and options at a reasonable price and should not be overlooked. It would compare favorably against Adobe Elements.

    Rating

    There are a few historical quirks (like management of layers) that should be improved to make it easier to use. But PaintShop Pro is ideal for a home user who wants a range of features that are not too complicated.

    The post Review of the Latest Version of PaintShop Pro 2018 by Stacey Hill appeared first on Digital Photography School.


    Digital Photography School

  • 31 Day Giveaway Spooktacular

    Warning: preg_replace(): The /e modifier is no longer supported, use preg_replace_callback instead in /home/forge/content.photojojo.com/content.photojojo.com/wordpress/wp-content/plugins/ozh-better-feed/inc/feed.php on line 134


    Photojojo

  • Hot Rod Flame for Flame – How the Shot was Made

    In this article, see how the shot below was conceptualized, shot and put together and finished in post-processing.

    Flame for flame Hot Rod Flame for Flame - How the Shot was Made

    The idea

    It all begun with the first picture I did of the customer’s hot rod. He wanted a print on his wall (about 2×3 meters). So, I used my large format camera, a Linhof Master Techika, with sheet film. We did a large scan of the negative and the huge print of that scan.

    Hot Rod Flame for Flame - How the Shot was Made

    This huge print from a 4×5 negative looks great even from up close.

    Then the customer painted two other cars in the same style as the hot rod.

    Hot Rod Flame for Flame - How the Shot was Made

    Cool cars with pin striped flames.

    He called and asked me to do a group shot and if I had any ideas how to do it. I thought about it a while and came up with the idea of light painting fire in the background, but I wanted to light the cars perfectly. I also had a reflection of the fire and the cars in my mind.

    Safety first

    We found a huge asphalt place, where we were far away from anything flammable and we could use water on the ground for the reflection. But before I go into detail, I want to tell you about the safety part. Safety was the most important part of this shoot and it took a lot of time to plan everything.

    Safety Hot Rod Flame for Flame - How the Shot was Made

    Always be careful with fire.

    Here is a safety checklist for you:

    • You must get a permission to shoot at the selected location.
    • Everybody should wear cotton shirts and jeans – these materials can be extinguished easily in case of fire.
    • Get a fireproof suit for your assistant (ask your fire department).
    • Talk with your fire department before the shoot, they have lots of knowledge about fire safety. Also find out if you need a fire permit.
    • Have enough people on the set (one who carries the fire wick and one who kills the fire).
    • Have a fire extinguisher onsite and know how to use it (also get a fire blanket).
    • Gas tanks of old cars are mostly leaky, and at warmer temperatures they vaporize gas. So be sure to have enough distance between the cars and the fire – talk to car mechanic before the shoot about the risks.
    • Wet sheets and lots of extra water.
    • If it is too windy cancel the shoot – it’s difficult to control fire in windy conditions.

    How the shot was done

    Setup - Hot Rod Flame for Flame - How the Shot was Made

    This is how the setup looked.

    I arranged the cars hours before sunset and set my camera on a tripod. In order to get a better idea of the outcome, I shot tethered to my laptop. After everything was in place, I started shooting the cars while the strobe was moved all around the cars. With all these different shots, I could get a reflection free exposure of all cars in post-production.

    Color

    Here you can see all the single exposures.

    After this was done we poured about 200 litres of water on the ground to make the reflection. Again I took multiple exposures of the reflection with the strobe.

    Reflection

    Same procedure again.

    The fire

    After I did a separate shot of the lights, I was waiting for blue hour to do the fire light painting. For that we used a 3-meter-long wick (a Kevlar wick is the one you want to buy) mounted on a long metal stick. We soaked the wick with lamp oil, in a metal pot (use one that you can cover with a lid if it catches fire) far away from the place where we fired it up.

    Then I started with a long exposure (using a cable release on my camera) while one assistant walked behind the cars with the huge fire wick. At the end, the second one killed the fire with the wet sheets. As you can imagine, this is a very time critical task to get everything done during blue hour.

    Fire

    This is how the fire painting looked.

    Gear used:

    • Canon EOS 5D MK III
    • Canon EF 35mm 1.4 L USM
    • Canon Timer Release TC-80N3
    • Linhof tripod and ballhead
    • Hensel Expert D 1000 Strobe
    • Hensel Grand 90 Softbox
    • Hensel Power Max L mobile power generator
    • Hensel aluminum tripod

    Post-processing

    I’m a long-time Photoshop user, but changed to Affinity Photo since my CS6 license was only valid on Windows and not on my new Mac. First it was a try, but now I do everything in Affinity Photo. I just love it – even the iPad app, that could also open my 1.2 gig hot rod file.

    Step by step:

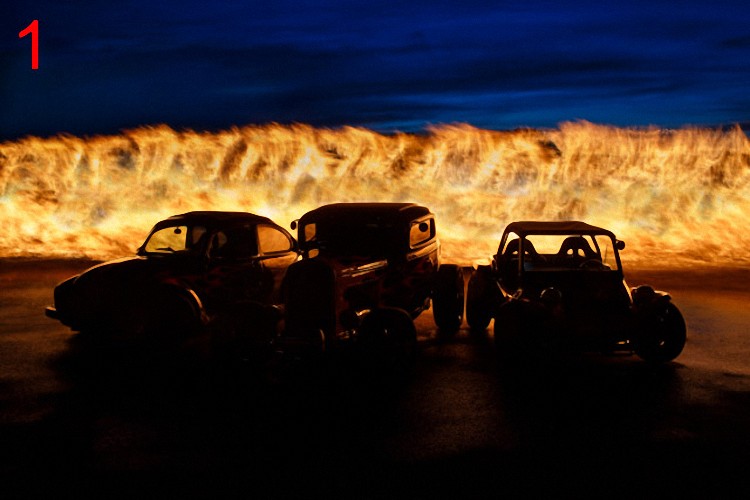
    I used the fire painting image as the background (1 below). Then I put all the other layers above using layer masks and painted everything in one by one.

    1

    First the headlights (2) then the cars starting with the Dune Buggy (3,4,5) to the Hot Rod (6-7) and at the end VW Beetle (8,9).

    2

    3

    4

    5

    6

    7

    8

    9

    Now I put a layer mask above all the cars, deleted some of the parts that were too shiny and painted flame reflections from the background back in (10). At the end, I painted the reflections into the picture to make everything complete (11).

    10

    11

    As you can imagine there were lots of layers to work with and in total I worked 11 hours (including preparation and shooting) on this one photograph.

    Affinity2

    Every layer with its own layer mask.

    Final image

    Not everyone will have the resources, skills or ability to do a shot like this. Please remember, do not attempt this without advise from safety professionals.

    But I hope you agree that all the time and effort that went into this shot is worth it.

    Flame for flame hotrodm


    The post Hot Rod Flame for Flame – How the Shot was Made by Markus Hofstaetter appeared first on Digital Photography School.


    Digital Photography School
  • OnePlus 5 camera review

    $ (document).ready(function() { SampleGalleryV2({“containerId”:”embeddedSampleGallery_5457242714″,”galleryId”:”5457242714″,”isEmbeddedWidget”:true,”standalone”:false,”selectedImageIndex”:0,”startInCommentsView”:false,”isMobile”:false}) });

    The OnePlus 5 is the Chinese manufacturer’s flagship smartphone, replacing last year’s OnePlus 3T. The new model is the first OnePlus to feature a dual-camera setup and offers some enticing imaging specifications: a main camera with a 1/2.8″ 16MP Sony IMX 398 sensor and fast F1.7 aperture is supported by a 2x tele-module featuring a 20MP 1/2.8″ Sony IMX 350 sensor and F2.6 aperture.

    The dual-camera design allows for an iPhone 8 Plus-like background-blurring portrait mode and the Smart Capture feature combines optical zoom with multi-
    frame technology for improved zoom quality. The OnePlus 5 camera also comes with 4K video, a 720p/120 fps slow-motion mode and a dual-LED flash. The camera app’s new Pro mode provides manual control over the most important shooting parameters and DNG Raw capture.

    The OnePlus 5 uses Qualcomm’s latest Snapdragon 835 flagship chipset. Offering 8GB RAM/128GB or 6GB RAM/64GB memory options and a 3300mAh battery that supports the OnePlus Dash Charge quick charging system, the rest of the device’s specifications are firmly top-shelf as well.

    Key Photographic / Video Specifications

    • Dual-camera
    • 16MP 1/2.8″ Sony IMX 398 sensor and F1.7 lens
    • 20MP 1/2.8″ Sony IMX 350 sensor and F2.6 lens
    • Dual-LED flash
    • 4K video
    • 720p/120fps slow-motion
    • Portrait Mode
    • Manual controls
    • DNG-Raw support
    • 16MP / F2.0 front camera

    Other Specifications

    • 5.5″ AMOLED 1080p display
    • Qualcomm Snapdragon 835 chipset
    • 6GB RAM/64GB storage or 8GB RAM/128GB storage
    • USB Type-C
    • Fingerprint reader
    • 3.5mm audio jack
    • 3300 mAh battery with Dash Charge

    DPReview smartphone reviews are written with the needs of photographers in mind. We focus on camera features, performance, and image quality.

    Articles: Digital Photography Review (dpreview.com)

  • Star Crossed: 10 More Abandoned Observatories

    [ By Steve in Abandoned Places & Architecture. ]

    These closed and abandoned astronomical observatories once gazed skyward into a star-spangled universe, revealing hidden wonders of time and space. Once.

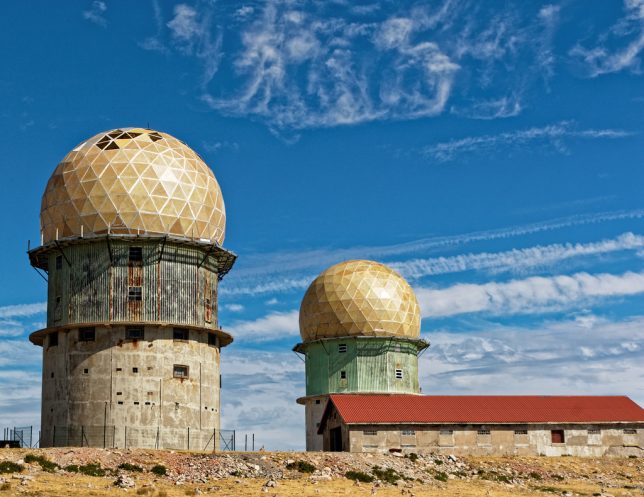
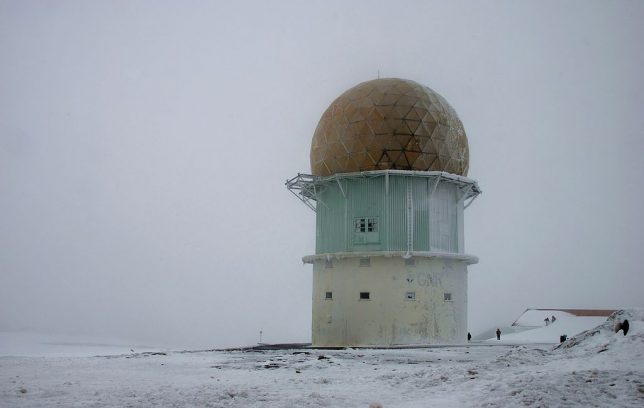
    You’ll typically find observatories atop the highest mountains, mainly because there’s less air to see through up there. Smaller countries with smaller mountains do the best they can, as is the case with this abandoned observatory (or old radar station, depending on the source) slowly deteriorating high up on Portugal’s aptly named Serra da Estrela (“Star Mountain Range”).

    Case Western University Observatory, Ohio

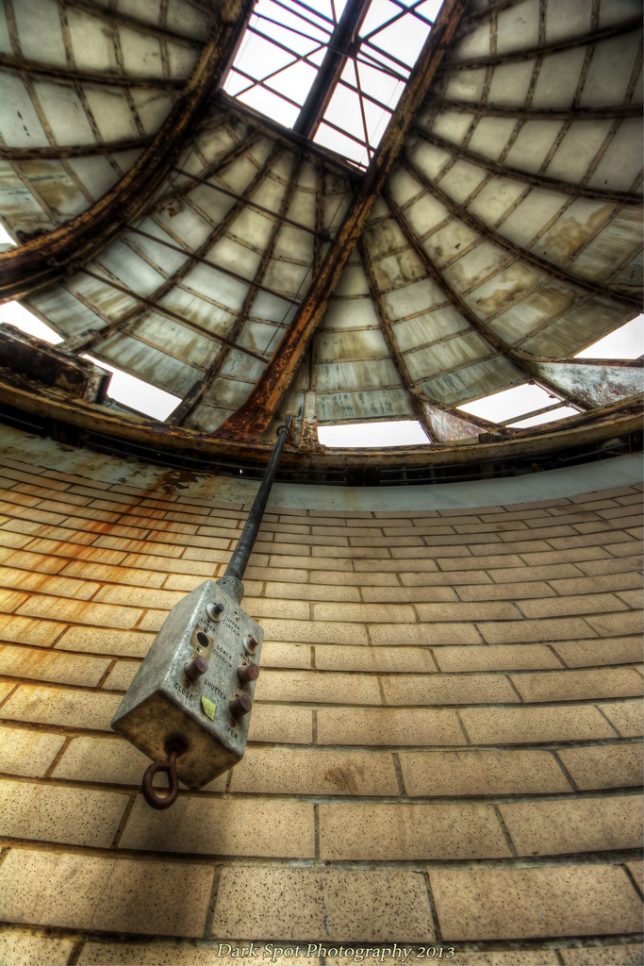
    Flickr member David Barnas (Dark Spot Photography) perfectly captures the lonely majesty of abandoned observatories in the above image. This breathtaking photo dates from May of 2013 and offers a unique view of the dome of one of Case Western University’s now-disused observatories.

    Lick Observatory, California

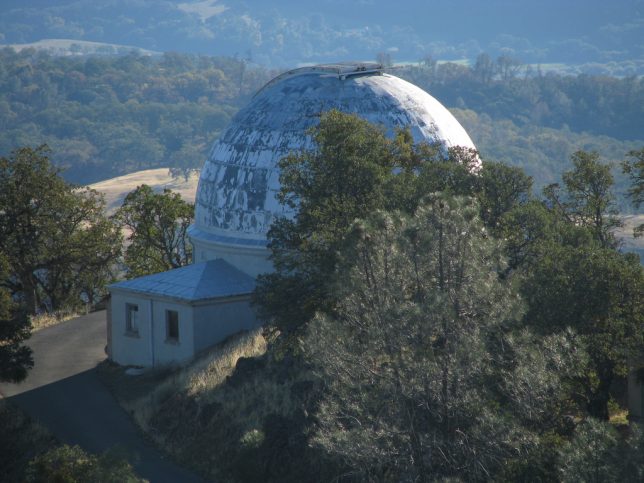
    Lick Observatory encompasses a number of telescopes and other related observing tools protected by structural domes of various ages and sizes. With construction atop Mount Hamilton near San Jose, California beginning in 1876, Lick Observatory boasts individual observatories in current use, temporarily closed and outright abandoned pending demolition. Flickr members Kelly The Deluded (kjoyner666) and Panoramio user Nick Sower captured what appears to be the 20-Inch Carnegie Double Astrograph in need of a new paint job – at the very least.

    City Observatory, Edinburgh, Scotland

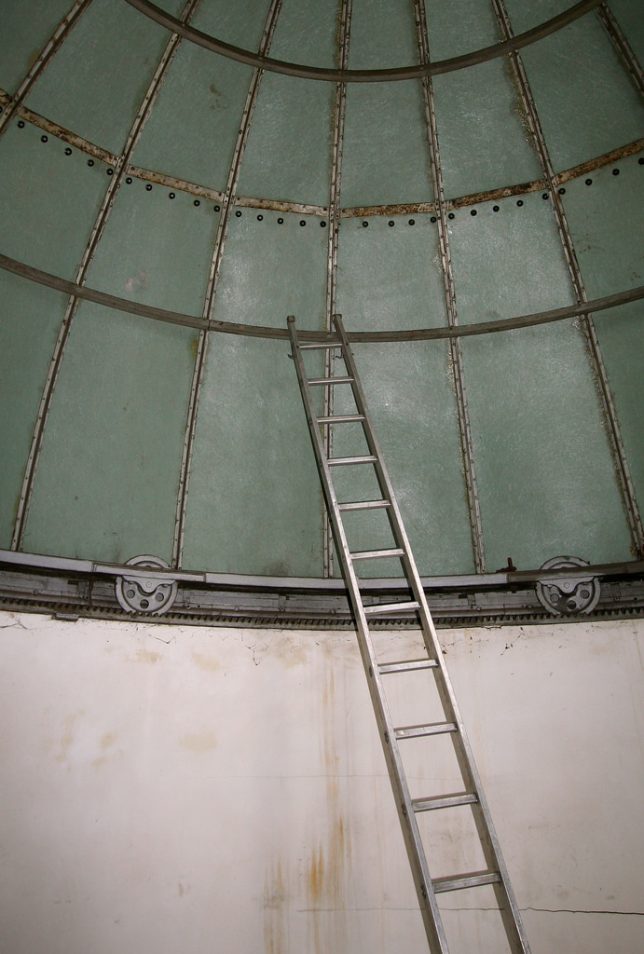
    The venerable City Observatory on Calton Hill in Edinburgh, Scotland dates back to 1818 and provided stalwart scientific service for nearly two centuries – the Astronomical Society of Edinburgh moved out of the observatory in 2009. Since then, the buildings have been managed by the City of Edinburgh Council, who restored the interior decor but then rented out the rooms as holiday accommodations. Flickr member Jenni Douglas (photojenni) snapped the interior of one of the observatory’s domes in May of 2007.

    Crimea, Ukraine

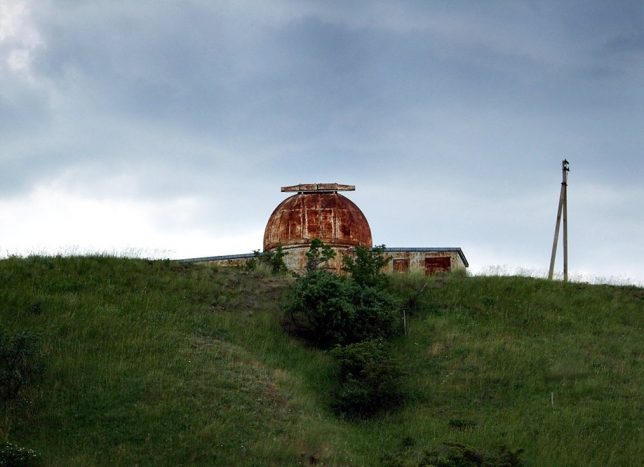
    Russia’s hotly-contested annexation of Crimea from the Ukraine was still six years away when Flickr member Max Bashyrov (movaxdx) snapped the above image of “some kind of abandoned observatory.” With all that visible rust, we’ll have to assume it was formerly engaged in observing Mars, the Red Planet.

    Next Page – Click Below to Read More:
    Star Crossed 10 More Abandoned Observatories

    Share on Facebook


    [ By Steve in Abandoned Places & Architecture. ]

    [ WebUrbanist | Archives | Galleries | Privacy | TOS ]


    WebUrbanist