Some of the wildlife photos you’ve seen may not have been taken ‘in the wild,’ thanks to game farms with captive animals.
Articles: Digital Photography Review (dpreview.com)
Some of the wildlife photos you’ve seen may not have been taken ‘in the wild,’ thanks to game farms with captive animals.
Articles: Digital Photography Review (dpreview.com)
 |
It might not be much, but the latest industry figures from trade body CIPA suggest the camera market may have finally bottomed-out.
Shipments of digital cameras with built-in lenses were flat, compared with the same period in 2016. This may not sound positive, but it comes after 21 consecutive quarters of year-on-year sales declines. On top of this, the value of these shipments was up by 7%, compared with the the same period last year.
Meanwhile, shipments of interchangeable lens cameras are up, compared to Q1 2016, with 6% more cameras shipping and the value of those shipments increasing by 14%. Mirrorless cameras make up a historic high proportion of these sales, and now account for 36% of all the ILCs shipped, though they make up only 25.6% of the value of those shipments, suggesting the average selling price of a mirrorless camera is lower than that of a DSLR.
Although there is a chance that some of this (comparatively) positive news stems from camera makers finally being able to satisfy the pent-up demand that had built up following 2016’s earthquake, the increased average selling price of fixed lens cameras can only be good news.
However, to put it into context, although ILC sales are 34% down, compared to the same period five years ago (though only 15% down in terms of value), cameras with built-in lenses are down 84% by volume. And, while every manufacturer says it’s focusing on the higher margin end of the compact market, it’s going to be difficult for all the current camera makers to get their fill of a pie that’s so much smaller than it was.
Source: CIPA 1, CIPA 2
Articles: Digital Photography Review (dpreview.com)
Some of the wildlife photos you’ve seen may not have been taken ‘in the wild,’ thanks to game farms with captive animals.
Articles: Digital Photography Review (dpreview.com)
[ By WebUrbanist in Architecture & Cities & Urbanism. ]
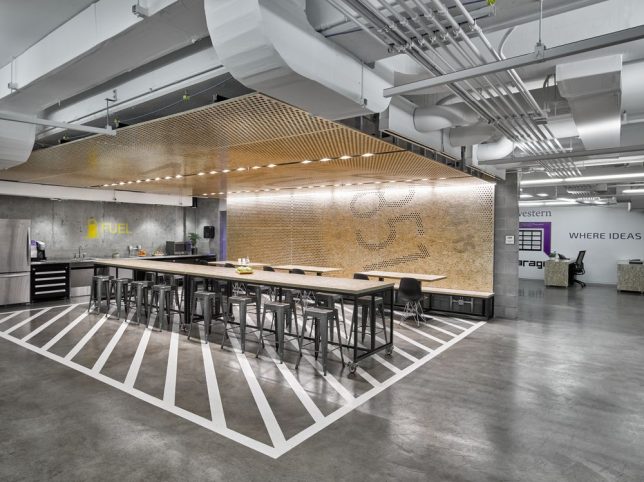
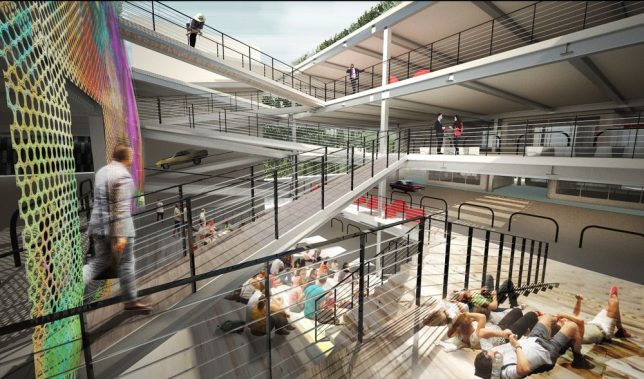
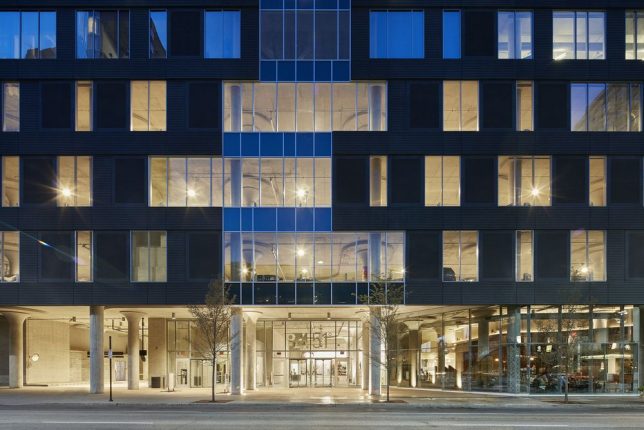
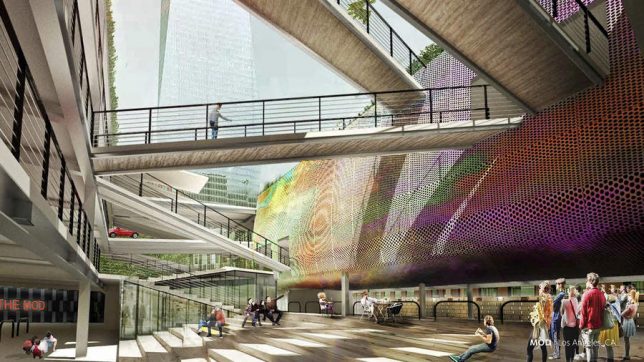
As driverless vehicles hit the streets and shared car usage grows, forward-thinking architects, developers and urban planners are working on adaptable designs to future-proof parking garage structures and give them second lives.
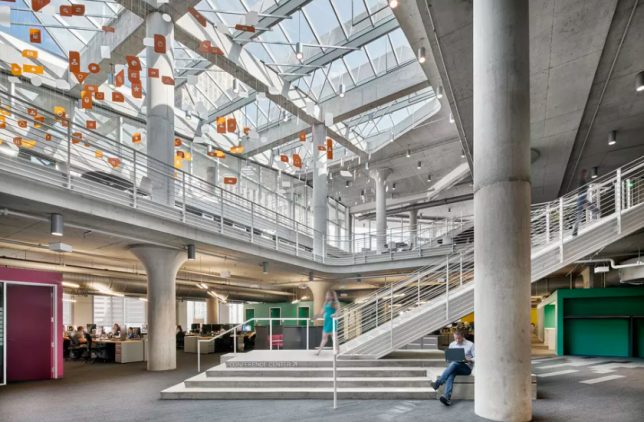
Big firms like Gensler see the writing on the wall, predicting car usage will peak by the end of the decade and ride-sharing may dominate by 2025. The effect of this on cities and real estate will be massive, freeing up home garages, street parking and dedicated parking structures — nation-wide there are over 500,000 parking spots and spaces inside buildings and outdoors covering an estimated 3,500+ square miles.
![]()
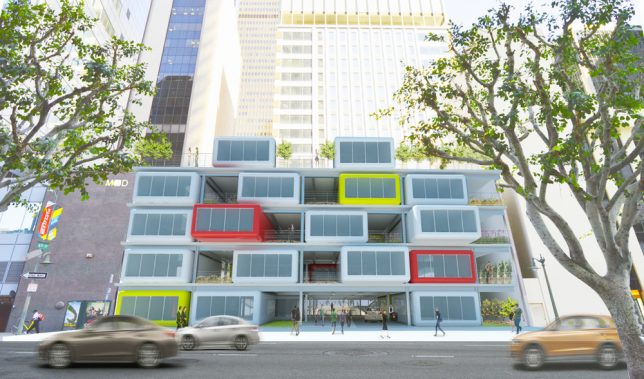
Gensler’s The Mod concept plays to new possibilities in light of their predictions, featuring garage floor heights that will work for new uses. Its modular sections can be easily moved or removed to let in light and facilitate circulation. Built-in utility hookups also help make conversion easier. The firm has also designed a building in Ohio with three parking levels made to be changed into offices over time with easily-added facades and details similar to ones found on other floors (below).
Another such project — a 1,000-car garage for building residents in the Arts District of Los Angeles by Avalon Bay — is to be completed in four years, a long time in this age of fast-evolving technology. Accordingly, their plans include tricks to make converting this area back to other residential uses easy and efficient. This includes flat floors (rather than inclined ones found in many garages) so they can be turned effectively into usable spaces, like shops or community areas.
Converting garages will be a huge project of the coming decades, but so will rethinking the way new architecture is designed in the age of autonomous vehicles. Without people at the wheel, cars can park themselves in smaller spaces. Loading/unloading zones will be reduced and the way people enter buildings (from the street rather than a garage) could change dramatically as well.
Then, of course, there are streets — with less street-side parking, space is opened up for things like parklets, walking and biking paths (not to mention all of the changes to how roads will work). Accordingly, many designers, developers and planners are wisely anticipating these changes — still, their ultimate effect on the built environment remains to be seen as the future continues to take shape.
![]()


[ By WebUrbanist in Architecture & Cities & Urbanism. ]
[ WebUrbanist | Archives | Galleries | Privacy | TOS ]
$ (document).ready(function() { SampleGalleryV2({“containerId”:”embeddedSampleGallery_5301473564″,”galleryId”:”5301473564″,”isEmbeddedWidget”:true,”standalone”:false,”selectedImageIndex”:0,”startInCommentsView”:false,”isMobile”:false}) });
Chinese optical manufacturer Anhui ChangGeng Optical Technology Company Limited, or Venus Optics, has released more details of a forth-coming lens it claims will be the widest rectilinear F2 for the Micro Four Thirds system. The Laowa 7.5mm F2 MFT was first seen at Photokina last year, and will offer the 110° angle of view we’d expect from a 15mm lens on a full-frame camera and will be available in two versions – a standard model that will weigh 200g / 7oz and a lightweight model that will tip the scales at 150g / 5.3oz.
Both versions of the lens will feature 13 elements in 9 groups and will use a pair of aspheric elements and three in extra-low dispersion glass. The company has stopped short of using the ‘Zero-D’ designation it applies to the Laowa 12mm F2.8 and its previously announced 15mm F2, but does claim to have minimized distortion, as well as chromatic aberrations.
The 7.5mm lens will have a 46mm filter thread, a closest focusing distance of 12cm / 4.7in, a 7-bladed iris and will be 55mm long. The lightweight version has been designed with drones in mind, will use lighter metals than the standard version and will cost $ 519 plus tax instead of $ 499. Black or silver options are available. The standard model will be shipping this month with the lightweight model following in July. For more full specification and pre-order information visit the Venus Optics website.
$ (document).ready(function() { SampleGalleryV2({“containerId”:”embeddedSampleGallery_9744816138″,”galleryId”:”9744816138″,”isEmbeddedWidget”:true,”standalone”:false,”selectedImageIndex”:0,”startInCommentsView”:false,”isMobile”:false}) });
Press release
Featuring a 110° Angle of View, Ultra-fast f/2 aperture, 46mm filter thread& less than 200g in weight
Venus Optics, the camera lenses manufacturer who had previously launched a number of unique Laowa camera lenses, is proud to announce the world’s widest rectilinear f/2 lens for Micro Four Thirds cameras, Laowa 7.5mm f/2 MFT.
The Laowa 7.5mm f/2 MFT is currently the widest f/2 rectilinear lens ever designed for Micro Four Thirds Cameras. It is an ultra-wide & ultra-fast prime lens with a 35mm equivalent focal length of 15mm. Despite the extreme specifications, Venus Optics has successfully minimized the weight of the lens to less than 200g (0.44 pounds) and 55mm long. This compact and light lens comprises of 13 elements in 9 groups with 2 pcs of aspherical elements and 3 pcs of Extra-low dispersion elements. This optical design successfully minimizes the distortion and chromatic aberrations to its lowest but at the same time, delivers a superb optical performance from corners to corners.
The extreme 110° angle of view and ultra-fast f/2 aperture allows photographers to create impressive astro-photography shots with ease. It also gives photographers a fast and wide-angle option for landscape photography and low-light shooting. The lens is designed with a 46mm filter thread which can gives additional portability for screw-in filters.
Venus Optics also introduce a lightweight version for this lens and controlled the weight to merely 150g. The feather-light weight opens up a new opportunity for photographers and pilots to shoot wider footage with gimbals and drones.
Availability
The Laowa 7.5mm f/2 MFT is currently available to pre-order in the official website of Venus Optics (http://www.venuslens.net/) and their authorized resellers. It comes with 2 colors, Black and Silver. Recommended Retail Price in US (without tax) is USD 499/pc for standard version and USD 519/pc for Lightweight version. Pricing may vary in different countries.
Articles: Digital Photography Review (dpreview.com)
With spring comes new life, growth, rebirth. It’s also time for the bugs to show up!
Those creepy crawly, flying, buzzing, annoying insects. But yet some of them are oddly beautiful as well. Let’s see some images of these creatures.

By Allxan.

By Mike Keeling

By Grozzle J

By Dinesh Valke

By Tibor Nagy

By Santanu Sen

By Markus Trienke

By uditha wickramanayaka

By Giuseppe Calsamiglia

By Robert Whyte

By Robert Whyte

By Ziva & Amir

By the_tahoe_guy

By Mike Keeling

By Mike Keeling

By coniferconifer

By Steve Bremer

By Mike Keeling

By John Flannery
The post What Bugs You? 19 Images of Creepy Crawly Critters by Darlene Hildebrandt appeared first on Digital Photography School.
On the latest episode of the TWiT Network’s weekend show, The New Screen Savers, DPReview editor Dale Baskin joins tech guru Leo Laporte, and co-host Iain Thomson, to talk about hot products and trends from NAB 2017. Tune in to the entire episode to also learn about the dangers of ‘space weather,’ an update on the Cassini spacecraft crossing through Saturn’s rings, and a head-to-head comparison of the Samsung Gear VR and Google Daydream.
You can watch The New Screen Savers live every Saturday at 3pm Pacific Time (23:00 UTC), on demand through our articles, the TWiT website, or YouTube, as well as through most podcasting apps.
Articles: Digital Photography Review (dpreview.com)
Sony has certainly rippled some tides with the announcement of its a9, which we got a first look at hands-on in NYC. We’ve been thoroughly analyzing its capability, which you can follow in our updated First Impression Review, and if you’re an a7R II owner, check out our ‘what’s better?’ slideshow here.
But perhaps as, or more, important as all its technical capability is that the a9 comes with some serious ergonomic improvements that change everything for fast-paced shooters. Features we’ve been asking for a long time now. And Sony listens. Not just to us but to the requests of many of its direct users. And we can all agree direct access to certain camera features is a huge plus, as opposed to menu-diving.
So that’s exactly what Sony has given us. Instant camera overrides at the press of a button. With one simple button press you can switch the camera from Aperture Priority with 1/125s minimum shutter speed in Auto ISO to Shutter Priority with 1/2000s shutter speed to freeze the action. This can allow you to instantly switch from panning shots to ‘freezing the motion’ shots – with one button press.
Sports/action shooters should take note, but we’re particularly excited because the ability to assign different autofocus area modes plus autofocus activation (among other options) to different custom buttons, just like you can on a Nikon D5 (and to a limited degree on a Canon 1D X II), has changed the way I personally shoot. I can instantly adapt to changing scenarios, much like with the Nikon D5 here, with a simple button press – potentially rescuing shots I’d have otherwise missed diving into settings to change AF modes. Watch our video below to see the implementation on the a9:
On the a9, what allows one to quickly activate any AF mode is not just Sony’s dedicated function to do so (called ‘Registered AF func.’ – which only recalls one AF area mode) but, instead, ‘Recall Custom hold’. This function instantly overrides a number of camera settings, including: Shoot Mode, Aperture, Shutter Speed, Drive Mode, Exposure Comp., ISO, Metering Mode, Focus Mode, Focus Area, and AF On (whether or not to engage AF). This is very similar to Canon’s ‘Register/recall shooting func’, but with the added benefit that there are 3 such banks, while Canon only offers 1. That means that on Canon DSLRs, you can only ever recall one set of overrides (even if you assign this function to multiple buttons, they all do the same thing). Nikon only allows certain settings to be overridden – like AF area and metering mode – but at least allows any number of buttons to be assigned arbitrarily to any AF/metering mode.
So what Sony allows via ‘Recall Custom hold’ is a sort of best-of-both-worlds: marrying Canon’s flexibility to override multiple settings with Nikon’s ability to assign any button to a number of AF/metering options, not just one particular bank. Canon’s custom controls are so complex and inflexible that you can only assign a button to change and activate an AF mode via ‘Metering and AF start’ or ‘Recall shooting func’, which are themselves only available to two buttons: AF-ON and AEL. That’s it. Read more about it in our 5D IV review covering all this in detail.
The Sony a9, on the other hand, simply affords you 3 banks to allow to quickly switch between 3 different commonly accessed operating modes with utmost ease. Kudos, Sony: you’ve one-upped Canon and Nikon – in an ergonomic regard no less.
Settings you do with override to change you check with a checkmark in the checkbox; if you don’t want that particular mode to change (like Shoot mode or exposure settings if you’re simply trying to change AF mode): just uncheck it.
This is a powerful feature that allows me, for example, to instantaneously switch between subject tracking AF, complete auto AF when the former fails, Eye AF for portraits, or good old center-focus-and-recompose when everything intelligent fails. All with one button press. That can be the difference between nailing the shot, and missing it.
But that’s not all that’s different about the a9. Memory Recall functions have been extended to be far more like the Custom modes Canon, Panasonic and Olympus allow – instantly changing most/all camera settings with one switch of the mode dial.
 |
| Memory Recall modes on Sony cameras are like ‘Custom’ Modes on Canon, Panasonic, and Olympus cameras – they recall many cameras functions simply by switching to that mode. Sadly, in the past, Sony’s M modes have not been very comprehensive (they don’t remember custom button assignments, e.g.), but the a9 remembers more settings. And while it doesn’t remember button assignments – a shame since the features I wish to access in video are different than the features I wish to access in stills – it’s a step in the right direction. Still, Sony really needs to introduce proper C modes that remember all camera settings – including button assignments. |
Memory Recall now remembers far more features than in previous Sony cameras. Ideally, it’d remember all of them – including button customizations – so as to recall the state of a camera precisely, immediately. Sadly, this not yet the case, but the extended set of settings Memory Recall now remembers is welcome and significant. We’ll outline the additional features remembered vs. the a7R II below, shortly, so stay tuned.
That means keep hitting that ‘Refresh’ button. 🙂*
* It’s late, and I promise to update this article with a full set of Memory Recall functions/differentiators in the morning, after I get (I hope) at least 4 hours of sleep. Thank you for your patience!
Articles: Digital Photography Review (dpreview.com)
In this article you will get some solid tips for planning and executing a sunset portrait session. Learn how to take the images that you and your subjects will love.

Many photographers feel overwhelmed when they start photographing portraits, professionally or for fun.
Where should I shoot? How should I pose people? What lens should I use? What settings should I be using? When should I move them to/from a great spot? What should I say to get great emotion?
A plan will give you confidence and help alleviate some of the immediate pressure of decision making. It’s not restrictive because often the best shots are unplanned, but rather something to give you confidence and a direction to fall back on when you aren’t feeling inspired.
Here is our rough plan for all of our sunset shoots, whether it be an engagement, part of a wedding, family portrait, maternity, or outdoor newborn session. Our sunset portrait sessions are always planned approximately one hour before sunset.
This plan’s purpose is twofold – it not only helps you have more confidence and direction, but will also help you make the most of your location and sunset lighting.

Plan to arrive at least 20-30 minutes early to scout a new location. You never know what amazing little lane or spot may be just around the corner, so it’s worth taking some extra time to explore. It’s also nice to arrive before your client so that you can make them feel welcome upon their arrival.
Start to assess the location by asking the following questions:
Where are some nice shady spots to begin? Shady spots are perfect to start off with while the sun is still bright and harsh.
What is the highest point at the location? If you are at a hilly location, this is where you will be able to capture the final moments of sunset and make the most of the golden light.
Where is the most impressive spot for sunset? This is where you want to end up – so it should be last on your route.
With these questions answered, you can very roughly map out a planned route. This means you’ll always have a direction to head and will be able to lead the clients confidently around the location.

To make the absolute best of the sunset lighting, you can follow the same sort of pattern every shoot (in this order):
Let’s put your plan into practice, assuming sunset is 6 pm:
4:40 pm – Arrive, scout the area and assess the location.
5:00 pm – Your client arrives and is briefed about the fun time they are going to have!
Get straight into shooting in the nice shady spot you already found. We love to knock out some more formal shots like these here, as usually these are photos clients love, but don’t want big on the walls. Save the more impressive lighting for landscape shots.


You can then move on to any shots where you want the sun in the photo, but you can filter the light through the trees. (Read our past article on four different ways to filter sun flare in this article: How to Control Sun Flare in Your Photos). Photos such as these:


Roughly 10-20 minutes before sunset is usually the best time to try a silhouette. As silhouettes require you to shoot at a very low angle, you won’t be able to match up the height of the sun with the clients’ feet if you wait any longer. You can read our article on capturing silhouettes here.


At this point, the light will be golden – so you want to be at your final spot. Do all you can to make this most of the beautiful soft light – you can even position your clients out in the open if you know how to control sunflare. We try to take a variety of photos at this time – a landscape, waist-up, and close-ups. That way, we can create wall art sets that all have the same sunset colouring.


The sun has set, but you still have a glorious window of 15 minutes where you can capture the gorgeous colours of dusk. Because the sun is no longer emitting harsh light, you can now use the whole other side of the location! Areas that were previously too lit by the sun can now be shot in the soft light of dusk.


This plan is designed to give you some structure if you are lacking confidence and direction for your sunset portrait photo sessions. It will help you get the most from the sunlight, and effectively manage your time during the shoot. Of course, being photographers, we’re all for creativity, so breaking the rules is great once you have more confidence.
Please share your sunset portrait images in the comments below.

The post How to Plan a Successful Sunset Portrait Session by Alana Orth appeared first on Digital Photography School.
You probably know the story by now: Sal Cincotta, owner of the site Behind the Shutter and its associated ShutterFest conference, entered and won his own photography competition. Not surprisingly, many people are upset about this, and have said so on the internet. Cincotta wrote a lengthy post on Facebook defending his actions, stressing that the judging was fair. Still: he entered and won his own photo competition. It just doesn’t look great any way you spin it, does it?
Much has been said about the whole debacle, but nobody rants like our friend Jared Polin aka Fro, so we think it’s worth 8 minutes of your time. And for the record, we think it’s a bad idea to enter your own photography competition.
Articles: Digital Photography Review (dpreview.com)
You must be logged in to post a comment.